Valentine Heart Mittens

I was inspired to make these mitten patterns by brightly coloured offerings from 1975. By the time I had tried out a number of versions - and had many more examples of right-hand gloves than I want or need - my final designs differ substantially from the original. But they are cute aren't they?
They are a close fit on my hands, but though my hands are small, I tend to have short fingers only; the measurement around my hand is just over 7 inches.
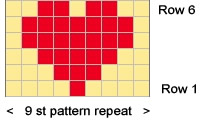
Instructions:Begin working the RIGHT GLOVE: Using contrast colour, cast on 48 stitches; purl one row, and join into a round. Change to main colour and knit one row. Thumb gusset 1st round: K24, p1, k2, p1, k20. Now set aside the thumb stitches and continue with the main glove as
follows: Work 2 rounds straight. Cut 6 lengths of contrast wool, about 28 inches in length, and 6 of main
shade; do not use bobbins, just the lengths of wool.
Row 1: K4 from the ball of main shade, k1 using first strand of contrast yarn, k8 using first strand of main shade, k1 contrast using second strand of contrast, k8 using second strand of main shade, and so on the the last 4 sts; k3 in last strand of main shade, slip the last st. Still using the last working needle, pick up the st below the first st of the round and knit into it, then pass the slipped st over this st. Turn the work.
[Editor's note: Use the pop-up from the above picture for more detailed photos of this technique.] Row 2: P3 in main shade, p3 in contrast,
p6 in main shade, and so on; use the intarsia method
and twist the two yarns together when you change colour. Continue in this
way until you get to the last stitch in the row, and slip this stitch.
Still using the first working needle, pick up the st below the last st
of the round and purl into it, then pass the slipped st over this st.
Turn the work. Now go back to working in the round, and continue in main shade only,
using the main ball of wool. Divide for fingers Next round (forefinger):
Knit the first 20 sts of the round and place on a stitch holder; place
the last 20sts of the round on a second stitch holder; Knit 16; cast on
2 sts. [18 sts] Next round (middle finger):
Slip the last 7sts on the first stitch holder (the ones nearest to the
forefinger) onto a needle and knit them; pick up and knit 2 from the cast
on sts at the base of the forefinger; slip the first 7sts on the second
stitch holder (the ones nearest to the forefinger) onto a needle and knit
them; cast on 2 sts. [18 sts]. Next round (third finger): Work and complete as for middle finger. Next round (little finger):
Pick up 2 sts at the base third finger; slip the remaining 6 sts on the
second stitch holder onto a needle and knit them; slip the remaining 6
sts on the first stitch holder onto a needle and knit them. [14sts] Thumb: LEFT GLOVE: 1st round: K20, p1, k2, p1, k24. Continue in this way as for right glove, but following the stitch layout as set until you reach row 25. 25th and 26th rounds: K23, p1, k18, p1, k27. [70 sts] Now set aside the thumb stitches and continue with the main glove as
follows: Once you have set the position of the thumb, you can work the rest of the left glove exactly as for the right glove. Making up: |
MaterialsExample shown is knitted in 1 x 50g ball 4 ply in main shade, and small amount of contast colour. One set of 4 No. 12 (2½ mm) needles. TensionApprox. 32sts and 44 rows to 4 inches on No 12 needles. Size mattersWidth all round above thumb, 7 ins. To alter the size use larger or smaller needles as required. A word on the woolThe wool I used was from my store room. IntarsiaHere is a nice little video clip about intarsia knitting. Don't be put off by her continental knitting method. Disclaimer
|

|
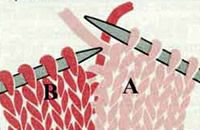
Intarsia.Text and Pictures taken from Ethknits "How to knit" page. Hold the working yarn in your right hand and the yarn to be woven in your left. |
|
 |
 |
|
Changing on a knit row: Knit with yarn A until you want to change. Pull yarn A over to the left and wrap yarn B across the back of A as you knit the next stitch. |
Changing on a purl row: Purl with yarn A until you want to change. Pull yarn A over to left and wrap yarn B under A as you bring it across to purl the next stitch. |
|
You can see from the purl row picture that the edge resembles a sideways knitted row as on each row you cross the yarns over. This way you should get no holes. Don't worry if you see holes where the yarn is loose in some places. When you finish your work you will have lots of ends to sew in and you can pull these tight and sew up any holes that still appear. |
|

