The Boyfriend Cardigan
No - really - the boyfriend....
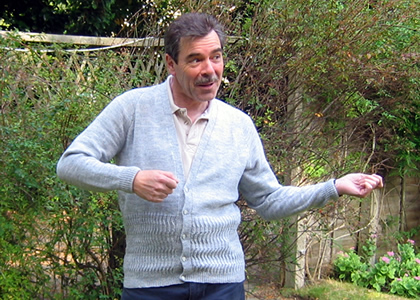
I say this as, had you seen the modelled photo from the 1970s, it may have led you to wonder. The orginal cerise colour in combination with the lacy pattern seems to be a bit feminine - but - hey! - we were looking at the beginnings of the "New Man" in the 1970s, right? (but it looks just perfect on my "old" man).
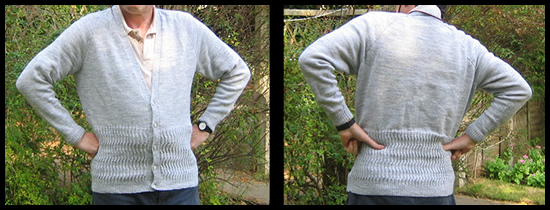
Sad to say, I think I possess the actual original yarn in the suggested (pink) colour for this pattern, but I chose to style it in an elegant pearl grey, using a practical superwash wool blend.
Obviously it could be made to suit a man or a woman.
Instructions.This is a raglan cardigan, designed for a man and given in 3 sizes. Main size is given for a 40 inch chest and other 2 sizes are given in brackets. Pattern:The twisted rib pattern is worked over 24 rows as follows: 1st Row: S1, k1, *
p2, k2; repeat from * to end. Back:Using No 12 needles, cast on 153 {161 : 169} sts. 1st Row: S1, k1, *
p1, k1; repeat from * to last stitch;
k1. Repeat the first and second rows 7 times more, then the first row once. 18th Row: S1, *
inc once in the next stitch purlwise; (k1, p1) 3 times; k1 *
; Change to No 10 needles. Next Row: S1, * k2tog, k7 *; repeat from * to * 8 times; k2tog, k2{6 : 10}; k2tog; k2{6 : 10}; repeat from * to * 8 times; k2tog, k6, k2tog, k2. [153 {161 : 169} sts] Next Row: S1, purl to the last st, k1. Continue in st-st until work measures 17 {17 : 18} inches, ending with a purl row. Shape Armholes: Right Front.Using No 12 needles cast on 83 {87 : 91} sts. 1st Row: S1, k1, *
p1, k1; repeat from * to last stitch;
k1. Repeat the first and second rows 7 times more, then the first row once Slip the last 12 sts of the row on to a stitch holder or safety pin to continue the front border later. Turn and continue knitting the right front on 78 {82 : 86} sts. Change to No 10 needles, and work the 24 rows of the pattern three times, then the first 6 rows again, as you did for the back. Next Row: S1, (k2tog, k10) twice;
k2tog, k11{13 : 15};
k2tog, k11{13 : 15};
k2tog, k10, k2tog, k9, k2tog, k2. Next Row: S1, purl to the last st,
k1. †† Continue in stocking stitch until work measures the same as the Back Shape Armhole: Work 82 {82 : 78}
rows decreasing once at the front edge on the next and every following
10th row - and at same time decrease once at the armhole edge on
the next and every alternate row. For the largest 44 inch size, work 4 more rows, decreasing once at the front edge on the 3rd row and at the same time decrease once at the armhole edge on every row. [19 sts] For the small (40 inch) and medium (42 inch) sizes, work 12 {4}
rows decreasing once at the armhole edge only on the next and every alternate
row. [7 {15}sts]. Then work a further 4 {12 : 16} rows decreasing once at the armhole edge only on every row. [ 3 {3 : 3} sts] Next Row: S1, k2tog. Left Front:Using No 12 needles cast on 83 {87 : 91} sts. 1st Row: S1, k1, *
p1, k1; repeat from * to last stitch;
k1. Repeat the first and second rows 4 times more. 17th Row: S1, k1, * p1, k1; repeat from * to last 12 sts. Slip the last 12 sts of the row on to a stitch holder or safety pin to continue the front border later. Turn and continue knitting the left front on 71 {75 : 79} sts. 18th Row: S1, *
inc once in the next stitch purlwise; (k1, p1) 5 times, *;
Change to No 10 needles, and work exactly as given for the Right Front until †† is reached. Continue in stocking stitch until work measures the same as the Back Shape Armhole: Complete as given for the right front, reversing all shapings.
Sleeves:Using No 12 needles cast on 63 {63 : 67} sts. 1st Row: S1, k1, *
p1, k1; repeat from * to last stitch;
k1. Change to No 10 needles, and proceed in stocking stitch, increasing one stitch at each end of the 5th and every following 6th row until there are 109 {109 : 113} sts on the needle. Continue without further shaping until the work measures 19 inches, ending with right side facing for the next row. Shape Top: Work 44 {44 : 36} rows, decreasing 1 st at each end of the next and every folowing 4th row. [ 71 {71 : 79} sts] Then work 56 {56 : 64} rows, decreasing 1 st at each end of the next and every alternate row. [ 15 {15 : 15} sts] Cast off. Making up:Press pieces gently under a damp cloth according to the instructions
on the yarn ball-band. Right front border:Place the 12 sts from the welt of the right front (kept on a safety pin) back on No 12 needles. With wrong side facing, rejoin the yarn and commence the rib as follows: Next Row: Inc in the next stitch purlwise, k1; (p1, k1) 5 times. Next Row: S1, k1, *
p1, k1; repeat from * to last stitch;
k1. Repeat the last two rows over the 13sts until border is of sufficient Left front border:Place the 12 sts from the welt of the left front (kept on a safety pin)
back on No 12 needles. With right side facing, rejoin the yarn and commence
the rib as follows: Next Row: S1, *
p1, k1; repeat from * to end. Repeat the last two rows over the 13sts placing buttonholes at desired
intervals as follows: Next Row (wrong side of work): S1,
(p1, k1) twice, p1; cast off 2 sts; (p1, k1) twice. Continue in rib until border is of sufficient length to go up front, across sleeve top and halfway across back of neck. Cast off in rib. Completion:Sew ends of borders together. Sew borders to front edges. Sew on buttons to correspond with button holes. |
Materials4 ply: 9 : 10 : 11 50g balls [Editor's note: I used ony 7 balls of Luxe - see "Word on the Wool" below] 1 pair of No 10 (3¼mm) and 1 pair of No 12 (2¾mm) knitting needles. 5 buttons. Tension30 stitches to 4 inches over stocking stitch. Size mattersTo fit 40:42:44
inch chest; actual size 41:43:45
inches. Abbreviationsinc: increase in the next stitch by knitting (or purling) twice into it. yrn/yon/yfwd: yarn round needle / yarn over needle / yarn forward. Makes an extra stitch which forms a small pattern hole when knitted on the next row. k1tbl: knit through back loop of the stitch. This has the effect of twisting the yrn or yon stitch that you made, making it tighter. s1: slip one stitch. psso: pass the slipped stitch over. Effectively you are "knitting
2 together through back loops" A Word
|
Here, George tries to emulate the original model's pose. Sadly, he is inhibited by the lack of a Hendrix hairstyle and droopy moustache.