Life of Ease
Well if you don't actually have the life of ease, this might help you attain it - firstly with the relaxation of knitting it, and then in the casual dress code it will encourage once completed.
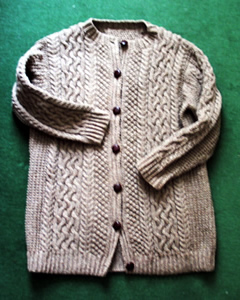
This pattern is straight from the 1970s, but does seem to have that timeless quality* about it.
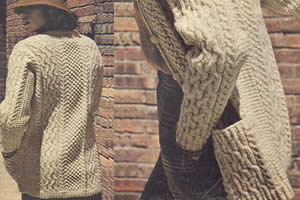
The Magpie Aran yarn is exactly the nutty brown tweed colour I always imagined for the cardigan, (yellow/cream Arans are not a good colour for me). However Magpie, though a very robust wool, soft it is not, and I think this design would be great in a lovely soft airy yarn; luckily there is plenty of choice these days in this kind of wool weight.
* I do admit that I hate that word "timeless"- it seems to be an unwritten rule that once said it will ensure the item to which it applies becomes dated and laughable even more quickly than other items of the same vintage. However, in this case I think it really does apply, and (if it's any comfort) I don't think it was high fashion even in the 1970s, which is probably why it took so long for me to be inspired to finally make it up.
Instructions.Figures in brackets refer to larger sizes; where only one figure is given,
this refers to all sizes. The BackWith No 9 needles cast on 98 (104 : 110: 116 : 122) sts. Repeat the last 2 rows 3 times more, then 1st row once, increasing 1st at both ends of last row on lst, 3rd and 5th sizes. Increase row: K8 (10 : 14: 16: 20), kfb *p7, (k2, pfb) 6 times, k2, p7 *; (k1, p1, then k1, p1 in next st) 4 times, k2; repeat from * to *, kfb, knit to end. [118 (122 : 130 : 134: 142) sts] Change to No 7 needles and pattern as follows: 1st row: (kb1, p1) 5 (6 : 8 : 9 :
11) times; * k7, (p2, k2) 6 times, p2. k7
*; p18; repeat from *
to *, (p1, kb1) to end. These 12 rows form the pattern. Continue in straight until work measures 20 ins, ending with right side facing for next row. Shape Armhole: Continue straight until armhole measures 7½ (7½ : 8: 8: 9) ins, ending after a wrong-side row.
Continue on the last set of stitches. Next row: Cast off 8, pattern to
end. Repeat the last 2 rows once more. Join yarn to neck edge of remaining sts and work to match lst side, reversing shapings. Pocket linings (make 2)[Editor's note: You may note from the photograph that I omitted pockets on my cardigan - actually I think it looks best with pockets, and I plan to add them in later, but if you don't want them, simply leave out these sections.] With No 9 needles cast on 38sts. 1st row: K2, (p2, k2) to end. Repeat the last 2 rows for 5 inches, ending after 1st row. Next row: P3, increase in the next stitch, rib to the last 4 sts, increase in the next stitch, p3. Leave the stitches on a spare needle or stitch holder. The Right FrontWith No 9 needles cast on 58 (61 : 64 : 67 : 70) sts. 1st row: K1, (kb1, p2) to end. Repeat the last 2 rows once more. Next row (buttonhole): Rib3, cast
off 3, rib to end. Work 3 more rows in rib, increasing 1st at the end of the last row on the 1st, 3rd and 5th sizes. [59 (61 : 65 : 67 : 71) sts] Increase row: K8 (10 : 14: 16: 20), kfb; repeat from * to * as increase row on back; (k1, p1, then k1, p1 in next st) twice, k2; turn, leaving the remaining 8 sts on a safety-pin to work the buttonhole band later. Change to No 7 needles and continue to work on 60 (62 : 66 : 68 : 72) sts as follows: 1st row: P10; repeat from *
to * as 1st row of back, then (p1, kb1) to
end. Keeping bramble stitch and cable pattern correct, decrease 1 stitch at
the end of the following 21st row, then the following 12th row. Next row (place pocket): P10, slip
the next 40 stitches on to a stitch holder or spare needle; Continue in pattern, decreasing 1 stitch at side edge on the following
10th row. Then continue straight on the remaining 57 (59 : 63 : 65 : 69)
stitches until work measures 13 inches. Shape Armhole: Shape Neck: Shape Shoulder: The Left FrontWith No 9 needles cast on 58 (61 : 64 : 67 : 70) stitches. Repeat the last 2 rows 3 times more, then 1st row once, increasing 1st at the beginning of the last row on the lst, 3rd, and 5th sizes. Increase row: Rib 8 stitches, and
leave these 8 stitches on a safety-pin to work the left front band later. Change to No 7 needles and pattern thus: 1st row: (Kb1, p1) 5 (6 : 8 : 9 :
11) times; repeat from * to *
as 1st row of back, then p10. Continue in pattern as now set, and complete to match right front, reversing
shapings and the position of the pocket. The SleevesWith No 9 needles cast on 44 (44 : 50 : 50 : 50) sts. Increase row: **
(k2, kfb) once (once : twice : twice : twice), Change to No 7 needles and pattern as follows: 1st row: (Kb1, p1) 3 (3 : 5 : 5 :
5) times; repeat from * to *
as for the 1st row of the back; (p1, kb1) to end. Continue in pattern as now set, increasing 1 stitch at both ends of following 5th row and every following 5th (5th : 6th : 6th : 5th) row until you have 80 (80 : 86 : 86 : 92) stitches, working the increased stitches into the pattern as end panels. Continue straight until work measures 17 (17 : 18 : 18 : 18) inches. For 1st, 2nd, and 3rd sizes, end with wrong side facing, and for 4th and 5th sizes end with right side facing to begin the next row. Mark the ends of the last row (with a piece of coloured thread or a stitch marker). Shape Top: The Pocket TopsWith right side facing, slip the 40 stitches on the stitch holder for the left front pocket on to No 9 needles. 1st row: K1, (k2tog tbl, p2) twice; (kb1, p2) 8 times; k2tog tbl, p2, k2tog tbl, k1. [36 sts] 2nd row: K1, pb1, (k2, pb1) to last
stitch, k1. Repeat the process for the stitches on the stitch holder for the right front pocket. The Front BandsWith wrong side facing, slip the 8 stitches of left front on the safety-pin back on to on to No 9 needles. Work in rib as set, increasing 1 stitch at the end of the 1st row. [9 sts]. Continue in rib until band will fit front edge. [Editor's note: I have found it difficult to judge the fit of front bands knitted in this way. My method now is that when I have knitted about the right length, I test the length against the main body by laying the work flat and totally relaxed with the front band laid in position up the front. When the front band is about ½ to 1 inch shorter than the main body it fits nicely into position very slightly stretched.] Leave the stitches on a spare needle. The Neck BandJoin shoulder seams. With No 9 needles and right side facing, rib across the 9sts of the right band, pick up and knit 29 sts up right front neck, 37 sts round back neck, 29 sts down left front neck, and finally rib across 9sts of left front band. Work 6 rows in rib matching in with the bands, making the last (top)
buttonhole on the 4th and 5th rows. To Make UpJoin side seams. |
Materials
|
|
|
