Elegance for winter cocktails
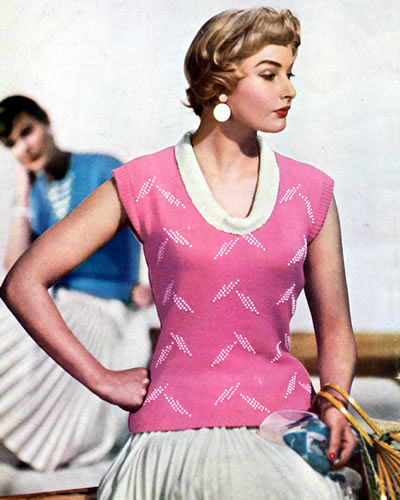
I admit this is clearly styled for summer but I always thought to make it in black with gold beads and perhaps a gold metallic yarn for the collar.
Either way it's a lovely flattering top in fine yarn.
This pattern offers you the option of beads - which are threaded on in advance and then knitted in - or "trimmmed with embroidery". I found a good alternative to pre-threading beads which is hooking them, where you can work them in as you go. I wrote about this technique in an earlier entry, and repeat the instructions here at the end of these pattern instructions.
I think beads would be lovely for a winter version and perhaps embroidery for summer.
Instructions. Instructions for larger size is given in brackets. Where one set of
figures is given this applies to both sizes. Instructions in square brackets
also apply to both sizes.  To thread beads on to the wool, make a needle with a 4-inch length of fuse wire by folding up 1½ inches of wire into a loop, slip the end of the wool through the loop, then twist the wire very tightly to form a smooth needle with the wool fixed firmly at the end. [Editor's note: I wrote about threading beads in a previous article - go to this link to see some pictures.] Back** For bead version: break wool and thread 126 beads. 1st - 6th rows: Work in stocking
stitch, starting with a knit row. For bead version, break wool and thread 126 beads. 45th - 70th rows: As 7th to 32nd
rows but reverse, motif by reading pattern rows (odd rows) backwards,for
example 45th (7th) row will read: 71st - 76th rows: As 1st to 6th rows. These 76 rows form pattern. Continue in pattern, shaping sides by increasing 1 stitch at each end
of next and every following 6th row until there are 125 (131)
stitches, taking increased stitches into stocking stitch a few rows straight
until back measures 15 inches down centre. With right side facing, shape armholes by casting off 7 stitches at the beginning of the next 2 rows, then k2tog at each end of the next and every alternate row until 97 (99) stitches remain. Continue straight in pattern until 5 lines of motifs have been done,
then continue in stocking-stitch until back measures 22½ inches down
centre. With right side facing, shape shoulders by casting off
10 (10) stitches at the beginning of the
next 6 rows. FrontWork as for back from ** to **.
Continue in pattern shaping armholes by casting off 7 stitches at the
beginning of the next 2 rows, then k2tog at each end of the next and following
alternate row. [107 (113) sts] Now shape neck: Next row: k2tog, pattern 45 (48),
turn and leave remaining stitches on a spare needle or needle holder.
Continue in pattern, decreasing 1 stitch at the armhole edge, on the following 3 (5) alternate rows, then keep this edge straight, and at the same time decrease 1 stitch at the neck edge on every following 4th row until 30 stitches remain. Work straight in stocking-stitch until front matches back. With right side facing, continue in stocking stitch, shaping shoulder
by casting off 10 (10) stitches at the
beginning of the next and following 2 alternate rows (the armhole edge).
Finish to correspond with first shoulder. CollarJoin shoulder seams. With No 11 needles and white (contrast) wool, cast
on 31 (33) stitches. Repeat the last 2 rows until strip fits comfortably all round neck. Cast
off in rib; join short sides. Making UpPress work lightly on wrong side under a damp cloth. With No. 11 needles,
right side facing and pink wool, pick up and knit 110 (110)
stitches all round each armhole.  Join side seams. |
Materials
|
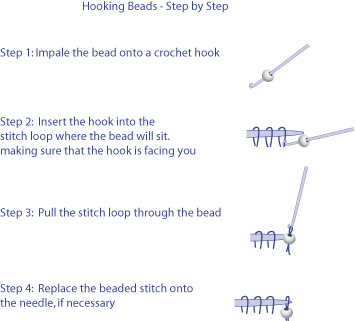
Hooking Beads.
This method means you don't have to pre-string the beads on your yarn - I think it is good for placing a few beads amid a lot of knitting, when you don't want to carry just a few beads across miles of yarn before you use them, and you also don't want to break your thread.
This information appeared in Knitty.com. (Spring 2006 edition) in an article by Sivia Harding.