French Connection
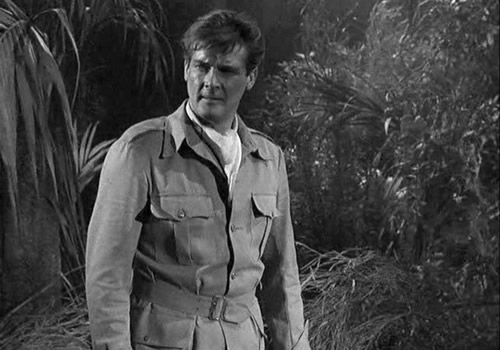
An expression of the era of safari suits and cravats* heralding a new "casual look" - where you could be smart without a lounge suit - like Brett Sinclair. [Having said that I can only find pictures of Brett with his safari jacket open necked or worn over a polo-neck, and his cravats worn conventionally with his suits; perhaps this was an expression of the character he was playing rather than fashion.]
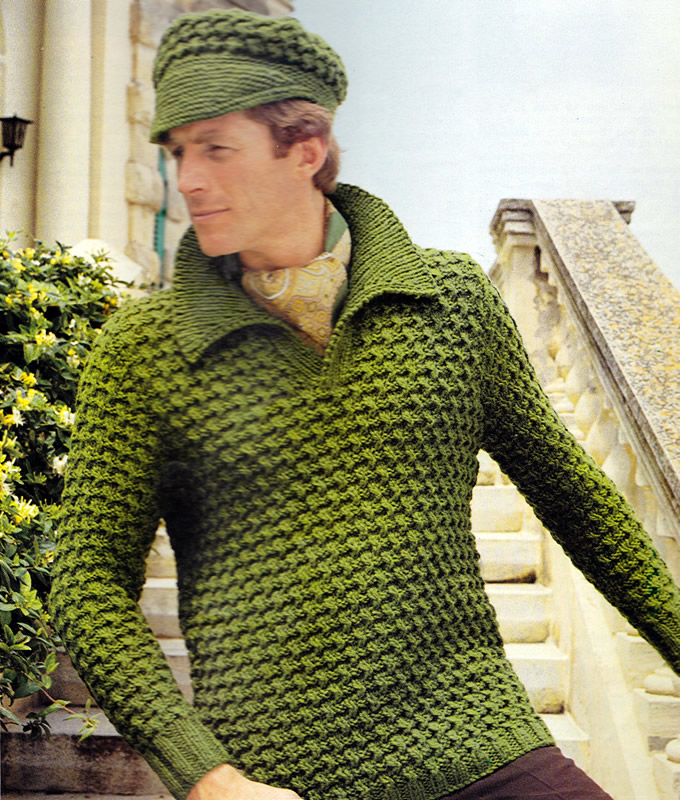
If you overlook the styling - and maybe the colour - this is quite a nice sweater - and maybe cap if not all worn as an outfit. A shorter button-through neck would improve it for me.
* See gratuitous picture of Roger at the end of the instructions.
Sweater Instructions.Back** 1st row: p1, k2, *
p2, k2; repeat from * to last stitch,
p1. Change to No 4 needles and pattern as follows: 1st row (right side facing): *
Tw2R, k1 ; repeat from * to end. Shape sides by increasing 1 stitch at each end of the next and every following 24th row until there are 78/82/86/90 stitches, taking increased stitches into pattern. Work straight until back measures 17 inches, ending with right side facing. Keeping continuity of pattern, shape armholes by casting off 4
stitches at the beginning of the next 2 rows, then decrease 1 stitch at
each end of every row until 58/60/62/64
stitches remain. Work straight until back measures 26/26½/27/27½ inches, ending with right side facing. Shape shoulders by casting off 5/6/6/6 stitches at the beginning of the next 4 rows, then 6/5/5/6 stitches at the beginning of the following 2 rows. Leave the remaining 26/26/28/28 stitches on a spare needle. Front Work as for back from ** to **. Divide for front opening as follows: Next row: pattern 26/27/28/29.
Turn. Work straight in pattern on these 26/27/28/29 stitches for first side until front measures 23/23/23½/23½ inches, ending with right side facing. Shape neck by decreasing 1 stitch at the neck edge on the next 7 rows, then on every alternate row until 16/17/17/18 stitches remain. Work a few rows straight until front matches back at armhole edge, ending
with right side facing. With right side facing, leave centre 6 stitches on a safety-pin; rejoin yarn to remaining stitches and pattern to end. Finish to correspond with first side, reversing shapings. SleevesWith No 7 needles, cast on 32/32/36/36 stitches and work 3 inches in rib as on lower edge of back increasing 4 stitches evenly across last row: 36/36/40/40 stitches. Change to No 4 needles and pattern as on back, shaping sides by increasing
1 stitch at each end of the 9th and every following 6th row until there
are 48/44/52/50
stitches. Work straight until sleeve seam measures 18/18/18½/18½ inches, ending with right side facing. Keeping continuity of pattern, shape top by casting off 4 stitches at the beginning of the next 2 rows, then decrease 1 stitch at each end of the next and every alternate row until 38/38/42/42 38/38/42/42 stitches remain. Now decrease 1 stitch at each end of every row until 16 stitches remain.
Left Front BorderWith right side facing and No 7 needles, work across 6 centre stitches on front as follows: 1st row: k2, p1, m1, p1, k2 {7 sts} Repeat the last 2 rows until border, when slightly stretched, fits up
left side of front to start of neck shaping, ending with right side facing. Right Front BorderWith No 7 needles, cast on 7 stitches and work in rib as for left front until border fits up right side of front to start of neck shaping, ending with right side facing. Do not break yarn. Leave stitches on a safety pin. To Make UpOmitting ribbing, press lightly under a damp cloth or following the instructions
on the ball band. CollarWith right side facing and No 7 needles, rib 7 stitches from right front
border, pick up and knit 16/18/20/22
up right side of neck, knit 26/26/28/28
from back, increase 1 stitch at centre, pick and knit 16/18/20/22
down left side, then rib 7 border stitches. Shape collar as follows: 1st row: k1, *
p1, k1, repeat from * to end. Now repeat rows 2 - 5 until collar measures 4 inches at centre back,
ending with 2nd or 4th row. Use a tapestry needle and 12 inch lengths of yarn for making up, noting that yarn must be twisted from time to time during make up so that it does not break. Join side and sleeve seams; insert sleeves. |
Materials17/18/19/20 x 50g balls chunky wool. Pair each of No 4 (6mm) No 7 (4½mm) needles. Tension15st and 20 rows to four inches on No 4 needles over stocking stitch.
Size mattersTo fit chest: 17/18/19/20
inches; AbbreviationsTw2R: k2tog, but do not slip stitches off needle; then knit first
stitch again, A word on the wool.Original yarn was Patons Husky Chunky, which as I recall was a pure wool
chunky, and a fairly dense tough yarn as the name implies. Disclaimer
|
Cap Instructions CrownWith No, 4 needles, cast on 14 stitches and purl 1 row. Shape as follows: Keeping continuity of pattern, increase 1 stitch as before at each end
of next and following 2 alternate rows: {34 sts} Now decrease 1 stitch at each end of every row until 14 stitches remain.
Work 1 row straight. BrimWith No 7 needles, cast on 84 stitches. 1st row: (p2, increase in next stitch) 3 times, * p1, increase in next stitch, p2, increase in next stitch; repeat from * to last 5 stitches, p2, increase in next stitch p2. {116 sts} Change to No 4 needles and work rows 1 - 8 of pattern as on back of sweater, then repeat rows 1 - 3 again. Cast off knitwise. PeakWith right side facing and No 7 needles, pick up and knit 76 stitches
along cast-on edge on the brim. Shape as follows: Continue working short rows in this manner, working 2 stitches fewer on every 2 rows until the rows "knit to last 33 stitches. Turn" have been worked. Next 2 rows: knit to last 36 stitches.
Turn. Making UpBlock crown to a 9 inch circle by pinning out round edges, and press
lightly under a damp cloth. Using a flat seam, join ends of brim. |
Materials3x 50g balls chunky wool. Pair each of No 4 (6mm) No 7 (4½mm) needles. Tension24st and 32 rows to four inches on No 9 needles. Size matters"Average hat size". A word on the wool.Original yarn was Patons Husky Chunky, which as I recall was a pure wool
chunky, and a fairly dense tough yarn as the name implies. Disclaimer
|