Spring Cushions
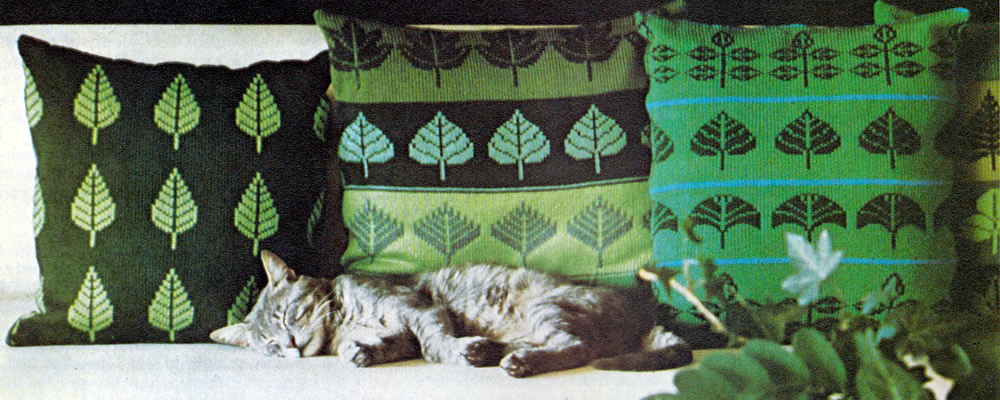
Simple yet effective cushions using stylised leaf motifs.
Cushions can be an opportunity to really give full rein to your creative side with little investment risk - in either time or materials. If (like me) you feel you lack a natural artistic streak of your own, you can find inspiration almost anywhere. Any small motifs from embroidery sources can be used for knitting - but make sure you check the tension you need to aim at as it will dictate the resulting size of the cushion.
Instructions.These cushions are created using a limited colour palette and an intarsia technique. Only two colours are used where the motifs are worked, which is a good idea to start with - both stylistically and technically. Assuming you are familiar with the idea of working from charts, as usual, the charts show the right, or knitted, side of the work, reading knit rows from right to left; every alternate row worked in purl and read from left to right. The yarn not in use is carried loosely across the back of the fabric all the time, so it will be taken behind the stitches on a knitted row and in front of them on a purled row. Ideally you need to keep within a maximum of about five or six stitches
in each colour so that you don't have to carry the yarn not in use across
too many stitches at the back of the work. It is feasible to carry the
yarn across a greater number of stitches as long as you don't pull the
yarn so tightly that it puckers your work. The completed size of a motif, (and the entire design), will depend on the tension at which you are working. For example: with a tension of 20 stitches and 28 rows to 4 inches (10 cm), a motif worked over 15 stitches and 21 rows will form a square measuring 3 inches (7.5cm) by 3 inches (7.5cm). So you can do some simple working out to adapt any motifs to a design measuring the size you want. If you are not so familiar with working from charts, this might be a good project to start out with. For consistency, the charts show each motif on a 23 stitch grid; the actual pattern repeat across the cushion is 24 stitches: each set of stitches on the chart is separated by one background stitch. The overall spacing or layout of the motifs is given by a written set-up row for each cushion, which is the first row on the charts.
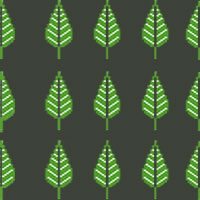 Cushion 1Worked in two colours with the same motif repeated evenly all over the cushion. Using No 9 (3¾mm) needles and main shade (A), cast on 99 stitches, and work in stocking stitch throughout. Work 4 rows in main shade (A). Next row: k1 stitch in A, k1 stitch in B, (k23 stitches in A, k1 stitch in B) 4 times finishing the row with k1 stitch in A. 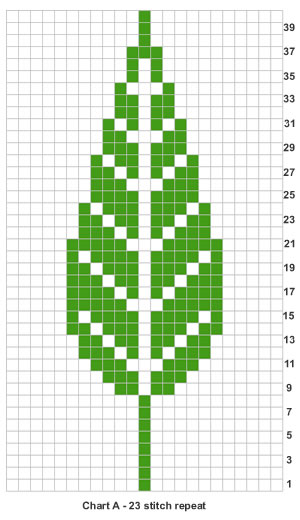 There is half a leaf at each end of the row, plus an extra stitch at each end of the work which will be used for seaming. So now continue in pattern from the chart, starting with the seam stitch followed by the centre stitch of the leaf. The overall pattern repeat is 24 stitches, 13 stitches for the leaf and 11 stitches between the leaves at the widest point. Work the 40 pattern rows, followed by 8 rows in A only, twice, then work
the 40 row pattern again followed by 4 rows in A.
 Cushion 2Worked in 8 colours with stripes of colour and repeated motifs in 8 colours (A-H). Using No 9 (3¾mm) needles and main shade (A), cast on 121 stitches, and work in stocking stitch throughout. Work 2 rows using A, 1 row using B and 4 rows using A. Motif stripe 1: Next row: p12 stitches in A, (p1 stitch in B, p23 stitches in A) 4 times finishing the row with p1 stitch in B, p12 stiches in A. 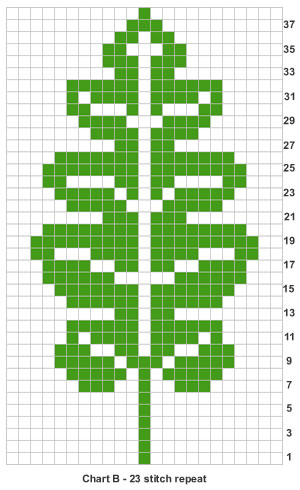 Continue working from the Chart B until 38 rows have been completed. Work plain stripes of 4 rows in A, 1 row in C, 1 row in D, and 4 rows in C. Motif stripe 2: Next row: p12 stitches in C, (p1 stitch in D, p23 stitches in C) 4 times finishing the row with p1 stitch in D, p12 stiches in C. 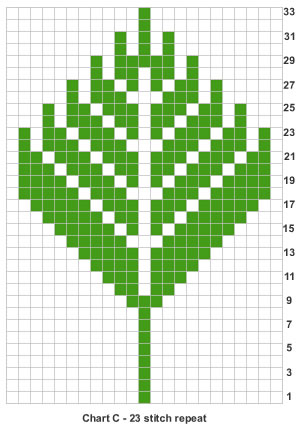 Continue working from Chart C until 33 rows have been completed. Work plain stripes of 4 rows in C, 1 row in E, 1 row in F, and 4 rows in E. Motif stripe 3: Next row: k12 stitches in E, (k1 stitch in F, k23 stitches in E) 4 times finishing the row with k1 stitch in F, k12 stiches in E. 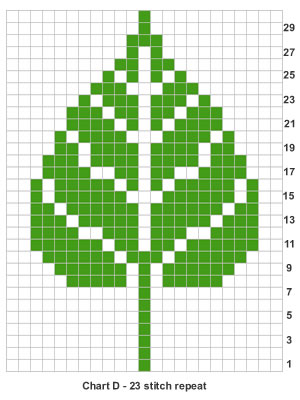 Continue working from Chart D until 30 rows have been completed. Work plain stripes of 4 rows in E, 1 row in H, 1 row in E, and 4 rows in G. Motif stripe 4: Next row: k12 stitches in G, (k1 stitch in H, k23 stitches in G) 4 times finishing the row with k1 stitch in H, k12 stiches in G. 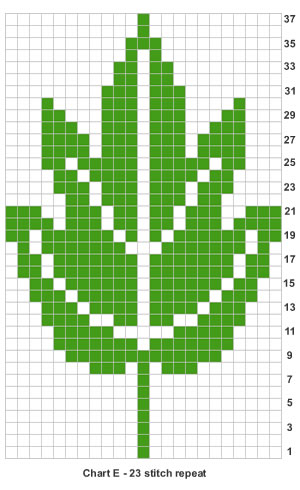 Continue working from Chart E until 37 rows have been completed. Finally, work plain stripes of 4 rows in G, 1 row in H, 2 rows G.
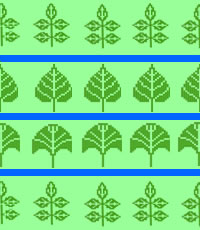 Cushion 3Worked in three colours (A-C) with different motifs repeated in bands across the cushion; the background and motif colours are constant, and the motif bands are separated by thin stripes of the third colour. Using No 9 (3¾mm) needles and contrast colour C, cast on 99 stitches, and work in stocking stitch throughout. Work 2 rows in contrast C, 4 rows in main shade A. Motif stripe 1: Next row: k2 stitches in B, (k23 stitches in A, k1 stitch in B) 4 times finishing the row with k1 stitch in B. 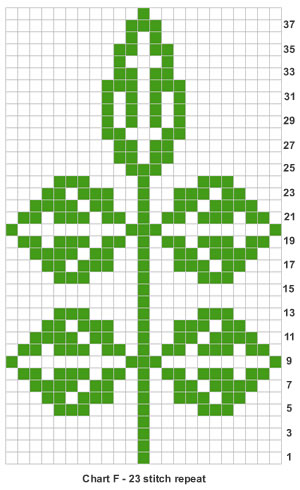 Here again there is half a leaf at each end of the cushion, so the pattern has been set to start with the centre stitch of a leaf, plus the seaming stitch at each end of the row. Continue working from the Chart F until 38 rows have been completed. Work plain stripes of 4 rows in A, 2 rows in C, and 4 rows in A. Motif stripe 2: Next row: k2 stitches in B, (k23 stitches in A, k1 stitch in B) 4 times finishing the row with k1 stitch in B. 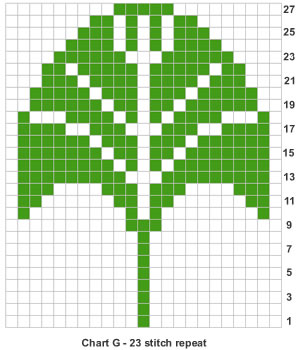 Again there is half a leaf at each end of the cushion, so the pattern has been set to start with the centre stitch of a leaf, plus the seaming stitch at each end of the row. Continue working from the Chart G until the 27 rows of the pattern have been completed. Work plain stripes of 4 rows in A, 2 rows in C, and 4 rows in A. Motif stripe 3: Next row: p2 stitches in B, (p23 stitches in A, p1 stitch in B) 4 times finishing the row with p1 stitch in B. Continue working from the Chart D until the 30 rows of the pattern have been completed. Work plain stripes of 4 rows in A, 2 rows in C, and 4 rows in A. Motif stripe 4: Next row: p2 stitches in B, (p23 stitches in A, p1 stitch in B) 4 times finishing the row with p1 stitch in B. Just as before, there is half a leaf at each end of the cushion, so the pattern has been set to start with the centre stitch of a leaf, plus the seaming stitch at each end of the row. Continue working from the Chart F until 38 rows have been completed. Work plain stripes of 4 rows in A, and 2 rows in C. Making upAll the cushions are made up of two identical pieces. |
Materials
|
