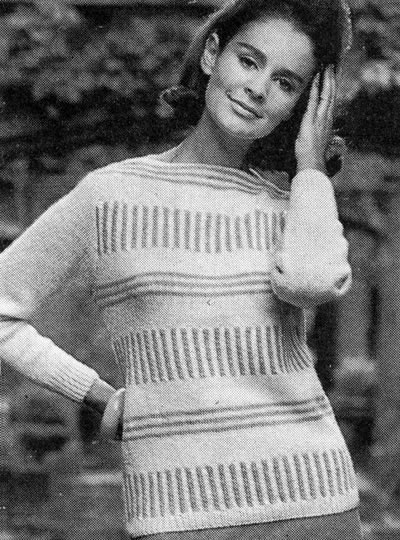
Home

Weblog

Pattern of
the Month

On the Needles
(...and Off the Needles)

Knitalong

Stitchcraft

Vintage Patterns

About the
Idle Hands


Archive entry for 2019

« 2018 | Main | 2020 »

December 2019

Skating Set

SkatingSet.jpg

Charming offering from the mid-fifties - the era of the "set".
I'm not sure how much of a commonplace activity skating was or is. I guess the climate in the south of the UK and the constant dangers warned of in skating on lakes and ponds meant that in my youth at least it was not a general pursuit outside of ice rinks. I was very keen on roller skating - another 1950s and 60s popular sport - I even owned my own roller skates etc; however the only times I ever tried skating on ice, was at a rink with hired skates.
In the celluloid world, however, any wintry film would not have been complete without its skating scene, and this would have made the perfect accessory. Luckily you could also consider using it without the skating - though it does rather draw to mind US costume dramas.

Instructions

Note: Muff and all white borders are worked using yarn doubled.

Muff

Pocket lining:
Using two strands of white yarn, cast on 31 stitches and work 5 inches straight in stocking stitch.
Cast off.

Main Part:
Using two strands of red wool, cast on 49 stitches and work in pattern as follows:

1st row (right side facing): k1, * k1tbl, p1; repeat from * to last 2 stitches, k1tbl, k1.
2nd row: * k1, p1tbl; repeat from * to last stitch, k1.
3rd and 4th rows: As 1st and 2nd.
5th row: k1, * p1, k1tbl; repeat from * to last 2 stitches, p1, k1.
6th row: k1, * k1, p1tbl; repeat from * to last 2 stitches, k2.
7th and 8th rows: As 5th and 6th.

These 8 rows form the pattern.
Continue straight in pattern until work measures 3 inches.
Make pocket opening as follows:

Next row: Pattern 9, cast off 31, pattern to end.
Next row: Pattern 9, cast on 31, pattern to end.

Continue straight in pattern until work measures 14 inches from start.
Cast off.

Borders:
Using two strands of white wool, cast on 11 stitches and
work as follows:
1st row: k2, (p1, k1) 4 times k1.
2nd row: (k1, p1) 5 times, k1.
Repeat these 2 rows until work measures 13 inches.
Cast off in rib.
Make another piece the same.

Making up

Press work lightly on wrong side under a damp cloth.
Cut a piece of lining material to correspond with main part.

Join short sides of muff; insert pocket, joining top to 31 cast-off stitches, then catch down pocket neatly all round.
Sew zip into opening.
Join end of borders and sew in position (stretching slightly) at each end on top of main part.

Turn muff inside out. Wrap 2 layers of wadding round muff and join ends. Join short sides of lining material. Slip lining over wadding and hem neatly to main work just inside ends of muff.
Turn right side out; brush up white borders to look like fur using a wire brush.
[Editor's note: Given the choice of yarns available today, you might consider using a textured or furry yarn for the white borders - either a DK equivalent that you use double or a thicker yarn that knits to the right tension.

I seem to remember from my youth that muffs generally had a string attached to hang them round your neck so that you could have both hands free if necessary. I'm not sure if this was just because I was a child and was the equivalent to having your gloves on a string (threaded through your coat sleeves!), but it certainly would make it more practical if you planned to use it for more than skating expeditions.]

Cap

Using single strand of red wool, cast on 108 stitches and work 4½ inches in k1/p1 rib. Change to twisted rib and shape crown as follows:

1st row: * p1, k1 through back of loop; repeat from * to end.
2nd row: * p1tbl, k1; repeat from * to end.
3rd row: (rib 16 as before, k2togtbl) 6 times.
4th row:
Work in twisted rib as above.
5th row:
(rib 15 as before, k2togtbl) 6 times.
6th row:
Work in twisted rib as above.
7th row: (rib 14 as before, k2togtbl) 6 times.

Continue in twisted rib decreasing 6 stitches in the same way on every
alternate row until 36 stitches remain.

Next row: purl.
Next row: k2tog all across. [18 sts]
Next row:
Purl.
Next row: k2tog all across. [9 sts]
Next row:
Purl.

Break wool, draw through remaining stitches and fasten off.

Border:
Using two strands of white wool, make a border worked exactly as given for muff 17½ inches in length when slightly stretched.

Making up

Press lightly on wrong side under a damp cloth.
Join seam.
Fold under 2¼ inches of ribbing all round brim to wrong side and slip-hem in place.
Sew border all round hat on top of hem and brush up with a wire
brush as for muff.
Using white wool make a pom-pom and sew to top of hat.

Materials

Double knitting yarn: 8 oz in Scarlet and 4 oz in white.

One pair of No 7 (4½mm) needles.

6-inch zip fastener.

White fabric to line muff, and 2 pieces of wadding for padding.

Tension

Cap: 24 sts to 4 inches (10cm) over twisted rib pattern using single strand of yarn.
Muff: 20 sts to 4 inches (10cm) over basket rib pattern using two strands of yarn.

Size matters

Cap to fit "an average head".
Muff measures 9½ inches in width.

Abbreviations

k2tog or p2tog: work 2 sts together to decrease.

k1tbl/p1tbl: knit/purl 1 stitch through back loop.

k2togtbl/p2togtbl: knit/purl 2 stitches together through back loops.

stocking stitch: one row knit and one row purl, ("stockinette").

Disclaimer
(well...almost)

In transposing any pattern it is always a risk that errors will be introduced, in spite of dedicated proof reading.
If you have any problems with this pattern, please and I will try and assist.

November 2019

Smock Pinafores

SmockTops75.jpg

Pretty and easy to make knitted pinafores, providing a practical alternative to full knitted dresses which may be too warm for most centrally heated homes in this era.

Instructions.

This is the plain bodice, striped skirt, design in two colours.

Back

**
With No 10 needles and contrast (D), cast on 84/88/96/100 stitches, and work 4 rows garter stitch (every row knit).

Next row (increase row): knit 7/9/8/10 stitches; (m1, k14/14/16/16) 5 times; m1, knit 7/9/8/10.
[90 / 94 / 102 / 106 sts]

Change to No 8 needles and join in main shade (L); work in pattern as follows:

1st row (right side facing): Knit in L
2nd row: Purl in L
3rd row: Using D: k2, * sl2, k2; repeat from * to end.
4th row: Using D: p2, * sl2, p2; repeat from * to end.
5th row: Knit in L
6th row: Purl in L
7th row: Knit in D
8th row: Purl in D
9th row: Using L: sl2, * k2, sl2; repeat from * to end.
10th row: Using L: sl2, * p2, sl2; repeat from * to end.
11th row: Knit in D
12th row: Purl in D

These 12 rows form the pattern.
Continue in pattern until back measures approximately 6½/8/9/10½ inches ending on the 11th pattern row.

Next row: Using D: purl 13/2/0/5 stitches; (p2tog, p0/1/1/1) 31/29/33/31 times; p2tog, purl 13/3/1/6
[58 / 64 / 68 / 74 sts]

Starting with a knit row, continue straight in stocking-stitch (one row knit, one row purl) until back measures 8//11/12½ inches, ending with a purl row.

Shape armholes by casting off 3 stitches at the beginning of the next 2 rows, then decrease 1 stitch at each end of every row until 42/48/52/58 stitches remain.
Work 1 row straight.

Now decrease 1 stitch at each end of the next and every alternate row until 36/40/44/48 stitches remain.
**

Work straight until back measures 12½/14½/16½/18½ inches ending with a purl row.
Shape shoulders by casting off 4/4/5/5 stitches at the beginning of the next 2 rows, then 3/4/4/5 stitches at the beginning of the following 2 rows.
Leave the remaining 22/24/26/28 stitches on a spare needle or stitch holder.

Front

Work as for back from ** to ** .
Work 1 row straight.

Divide for neck as follows:

Next row: knit 10/11/12/13; k2tog, turn, and leave the remaining stitches on a spare needle.
Continue on these 11/12/13/14 stitches for the first side, decreasing 1 stitch at the neck edge on every row until 7/8/9/10 stitches remain.
Work straight until front matches back at armhole edge, ending with a purl row.
Shape shoulder: by casting off 4/4/5/5 stitches at the beginning of the next row. Work 1 row straight.
Cast off remaining 3/4/4/5 stitches.

With right side facing, leave the centre 12/14/16/18 stitches on a spare needle, and rejoin yarn to the remaining stitches k2tog, knit to end.

Finish to correspond with the first side, reversing shapings.

To Make Up

Press parts lightly under a damp cloth on wrong side, omitting garter
stitch borders.
Join right shoulder seam.

Neckband: With right side facing, using No 10 needles and colour D, starting at the left front shoulder, work as follows:
Pick up and knit 18/19/20/21 stitches down the left side of the neck, knit 12/14/16/18 stitches from the front, pick up and knit 18/19/20/21 up the right side; then knit 22/24/26/28 stitches from the back. [70 / 76 / 82 / 88 sts]
Work 3 rows in garter stitch (every row knit).
Cast off.

Join left shoulder seam and neckband.
Armhole Borders: With right side facing, using No 10 needles and colour D, pick up and knot 50/56/62/68 stitches all round each armhole.
Work 3 rows in garter stitch.
Cast off.

Join side seams.
Press seams.

Materials

Double Knitting yarn:
2/2/2/3 x 50g balls in main shade;
2/2/2/2 balls in the contrast colour

Pair each of No 8 (4mm) and No 10 (3¼mm) needles.

Spare needles or stitch holders.

Tension

22sts and 30 rows to four inches on 4mm needles over stocking stitch.

Size matters

To fit chest:
20/22/24/26 inches;
length from top of shoulders: 12½/14½/16½/18½ inches.

Abbreviations

L: main shade (light)
D: contrast (dark)

k: knit
p: purl
k2tog or p2tog: knit or purl 2 sts together (decrease one stitch)

m1: make a stitch by picking up the horizontal loop lying before next stitch and working into the back of it.

sl1: slip one stitch by passing it between the needles without knitting it.

A word on the wool.

Original yarn was Patons Totem double crepe.

Disclaimer
(well...almost)

In transposing any patterns it is always a risk that errors will be introduced, in spite of dedicated proof reading.
If you have any problems with this pattern, please and I will try and assist.


Instructions.

This is the pinafore with the patterned bodice design in three colours.

Note: When working colour pattern from the chart, strand yarns loosely across the back of the work over not more than 3 stitches at a time, to keep the fabric elastic.
When changing twist yarns on the wrong side to avoid a hole.
Read odd rows knit from right to left and even rows purl from left
to right.

Back

**
With No 10 needles and contrast (D), cast on 84/88/96/100 stitches, and work 4 rows garter stitch (every row knit).

Next row (increase row): knit 7/9/8/10 stitches; (m1, k14/14/16/16) 5 times; m1, knit 7/9/8/10.
[90 / 94 / 102 / 106 sts]

Break off colour D

Change to No 8 needles and join in main shade (M), and starting with a knit row, work straight in stocking stitch until back measures 7///11 inches ending with a knit row.

Next row: purl 4/10/10/7 stitches; (p2tog, p2/2/2/3) 20/18/20/18 times; p2tog, purl 4/10/10/7
[69 / 75 / 81 / 87 sts]

Joining in and breaking off colours as required, work in pattern from chart until back measures 8//11/12½ inches, ending with a purl row.

Note: Repeat the 6 pattern stitches 11/12/13/14 times across and last 3 stitches on knit rows and first 3 stitches on purl rows as indicated.

Keeping continuity of pattern, shape armholes by casting off 4 stitches at the beginning of the next 2 rows, then decrease 1 stitch at each end of every row until 47/53/59/65 stitches remain.
Work 1 row straight.

Now decrease 1 stitch at each end of the next and every alternate row until 43/47/51/55 stitches remain.
**

Work straight in pattern until back measures 12½/14½/16½/18½ inches ending with a purl row.

Shape shoulders by casting off 4/4/5/5 stitches at the beginning of the next 2 rows, then 4/5/5/6 stitches at the beginning of the following 2 rows.
Leave the remaining 27/29/31/33 stitches on a spare needle or stitch holder.

Front

Work as for back from ** to ** .
Work 1 row straight.

Divide for neck as follows:

Next row: pattern 12/13/14/15; k2tog, turn, and leave the remaining stitches on a spare needle.
Continue on these 13/14/15/16 stitches for the first side, decreasing 1 stitch at the neck edge on every row until 8/9/10/11 stitches remain.
Work straight in pattern until front matches back at armhole edge, ending with a purl row.
Shape shoulder: by casting off 4/4/5/5 stitches at the beginning of the next row. Work 1 row straight.
Cast off remaining 4/4/5/5 stitches.

With right side facing, leave the centre 15/17/19/21 stitches on a spare needle, and rejoin appropriate colour yarn to the remaining stitches k2tog, pattern to end.

Finish to correspond with the first side, reversing shapings.

To Make Up

Press parts lightly under a damp cloth on wrong side, omitting garter
stitch borders.
Join right shoulder seam.

Neckband: With right side facing, using No 10 needles and colour D, starting at the left front shoulder, work as follows:
Pick up and knit 17/18/19/20 stitches down the left side of the neck, knit 15/17/19/21 stitches from the front decreasing 2 stitches evenly across, pick up and knit 17/18/19/20 up the right side; then knit 27/29/31/33 stitches from the back. [70 / 76 / 82 / 88 sts]
Work 3 rows in garter stitch (every row knit).
Cast off.

Join left shoulder seams and neckband.
Armhole Borders: With right side facing, using No 10 needles and colour D, pick up and knot 50/56/62/68 stitches all round each armhole.
Work 3 rows in garter stitch.
Cast off.

Join side seams.
Press seams.

Materials

Double Knitting yarn:
2/2/2/3 x 50g balls in main shade;
1 balls in of the two the contrast colours.
Editor's note: Colour names to conjure with:
Aqua Gem, Gay Turquoise, Blue Slate and Wild Rose....

Pair each of No 8 (4mm) and No 10 (3¼mm) needles.

Spare needles or stitch holders.

Tension

22sts and 30 rows to four inches on 4mm needles over stocking stitch.

Size matters

To fit chest:
20/22/24/26 inches;
length from top of shoulders: 12½/14½/16½/18½ inches.

Abbreviations

M: main (aqua)
L: light (pink)
D: dark (blue)

k: knit
p: purl
k2tog or p2tog: knit or purl 2 sts together (decrease one stitch)

m1: make a stitch by picking up the horizontal loop lying before next stitch and working into the back of it.

sl1: slip one stitch by passing it between the needles without knitting it.

A word on the wool.

Original yarn was Patons Totem double crepe.

Disclaimer
(well...almost)

In transposing any patterns it is always a risk that errors will be introduced, in spite of dedicated proof reading.
If you have any problems with this pattern, please and I will try and assist.


October 2019

Dr Watson's Lopi Sweater

Lopi2019.jpg

I have always loved Lopi sweaters (whatever the era) and I thought the one worn by Martin Freeman in Sherlock (2011 - was it that long ago?!) was especially good. I love the navy base and the Christmassy air about it. For all I know, in the context of the show, it may have been meant as a joke Christmas jumper - but I love it despite many Sherlock fans labelling as ugly (ugly?!).
As you can see this pattern I have provided here, as made popular in the 70s and 80s, goes with the muted natural tones of the era, so you would need to change the colours to your own choice - mine being navy white and red, of course. You can, however, see in the picture what a difference the colour scheme makes; both his and hers sweaters are knitted to the same pattern, and yet with a change to the main shade and order of contrasts it looks like quite a different pattern.

Instructions.

Note: When working colour pattern from chart, strand yarn not in use loosely across wrong side of work over not more than 3 stitches at a time to keep fabric elastic.
Read all rounds knit from right to left.

Back and Front (alike)

With 5mm needles and main shade A, cast on 75 [79, 83, 87, 91, 95] stitches, and work in K1/P1 rib for 4 inches (10cm), right-side rows having K1 at each end, and ending with wrong side facing for next row.
Next row: Rib 8 [8, 8, 10, 10, 10], m1, (rib 15 [16, 17, 17, 18, 19, m1) 4 times, rib to end.
{80 [84, 88, 92, 96, 100] sts}.

Change to 6mm needles and starting with a knit row, work in stocking stitch until work measures 15½ (15½, 15, 14½, 15, 14½] inches, (39 [39, 38, 37, 38, 37] cm), ending with a purl row.

Shape armholes by casting off 5 stitches at the beginning of the next 2 rows.
Decrease 1 stitch at each end of the next and every alternate row until
64 [66, 68, 72, 74, 76] stitches remain.
Work 1 row.
Leave these stitches on a spare needle or stitch holder.

Sleeves (two alike)

With 5mm needles and main shade A, cast on 33 [35, 37, 39, 39, 41] stitches, and work in rib as on Back for 4 inches (10cm), and ending with wrong side facing for next row.
Next row: Rib 2 [3, 4, 2, 2, 3], m1, (rib 5 [5, 5, 6, 6, 6, m1) 6 times, rib to end.
{40 [42, 44, 46, 46, 48] sts}.

Change to 6mm needles and starting with a knit row, work in stocking stitch, shaping sides by increasing 1 stitch at each end of the 3rd [3rd, 5th, 3rd, 7th, 7th) row.

Continue in stocking stitch in main colour only on 6mm needles and increase 1 stitch at each end of every following 8th [8th, 9th, 9th, 9th, 8th] row until there are 58 [60, 60, 64, 64, 68] stitches.
Work straight until sleeve seam measures 17½ (17½, 17½, 19, 19½, 19½] inches, (44 [44, 44, 48, 49, 49] cm), ending with a P row.

Shape armholes by casting off 5 stitches at the beginning of the next 2 rows.
Decrease 1 stitch at each end of the next row.
Work 3 rows.
Repeat the last 4 rows 0 [1, 1, 1, 2, 2] times.

1st, 3rd, 4th and 6th sizes only: Decrease 1 stitch at each end of the next row. Work 1 row.

All sizes: Leave remaining 44 [46, 44, 48, 48, 50] stitches on a spare needle or stitch holder.

Yoke and Neck Border

With right side facing, slip the first 32 [33, 34, 36, 37, 38] stitches from the back on a spare needle with points at both ends.
With right side facing, using six 6½mm needles (or a 6½mm circular needle) and main shade, knit across the remaining 32 [33, 34, 36, 37, 38] stitches from the back, increasing 2 stitches evenly across these stitches for the 5th and 6th sizes, then knit 44 [46, 44, 48, 48, 50] stitches from left sleeve, 64 [66, 68, 72, 74, 76] stitches from the front, 44 [46, 44, 48, 48, 50] stitches from the right sleeve, and finally 32 [33, 34, 36, 37, 38] stitches from the back, increasing 2 stitches evenly across these stitches for the 5th and 6th sizes as before; so you now have all the pieces joined in a circle with the beginning of the round at the centre back.
{216 [224, 224, 240, 248, 256] sts}.

If you are using 6 double pointed needles, then divide the stitches evenly on 5 needles. Mark the first stitch of the round with a coloured thread, then joining in and breaking off colours as required, work the 32 [32, 32, 36, 36, 36] rounds from Chart A [A, A, B, B, B], repeating the 8 pattern stitches 27 [28, 28, 30, 31 , 32] times across and decreasing where indicated.
{81 [84, 84, 90, 93, 96] sts}.

Chart A

Chart B

Break 1st and 2nd contrasts and continue in main shade only.

Shape Back as follows:
1st row: Knit 7 [8, 8, 9, 10 , 11], turn.
2nd row: Purl 14 [16, 16, 18, 20 , 22] turn.
3rd row: Knit 21 [24, 24, 27, 30 , 33], turn.
4th row: Purl 28 [32, 32, 36, 40 , 44], turn.
5th row: Knit 14 [16, 16, 18, 20 , 22].

Change to set of four (or circular) 5mm needles and decrease 1 stitch on the first round on 1st and 5th sizes only (to make them an even number of stitches).
Work in K1/P1 rib for 3 [3, 3, 4, 4 , 4] inches, (8 [8, 8, 10, 10 , 10] cm). Then, using a 6mm needle, cast off loosely in rib.

To Make Up

With wrong side of work facing, block each piece by pinning out round edges, and omitting ribbing press lightly following any instructions on the ball band.

When making up a chunky garment it is easier to use an oddment of finer yarn in a toning shade for the sewing. If you prefer to make up with the original yarn, use 76cm lengths and a large needle, making sure the yarn keeps its original twist by turning the needle clockwise between fingers and thumb after every few stitches.

Join armhole, side and sleeve seams. Press seams.
Fold the neck border in half to wrong side and slip-hem loosely in position.

Materials

Chunky knitting yarn:
13 [14, 15, 16, 17, 18] 50g balls in main shade.

2 balls in each of 2 contrast colours for all sizes.

Pair each 5mm, 6mm, and 6½mm needles.
Set of four 5mm and 6½mm needles, plus
two spare 6½mm needles with points at both ends.
Editor's note: Or use 6½mm circular needles, although you may need to transfer to a set dpns if circulars become too difficult to manage as the yoke decreases in size.

Tension

15sts and 20 rows to four inches on 6mm needles over stocking stitch.

Size matters

To fit chest:
40 [42, 44, 46, 48, 50] inches; (102 [107, 112, 117.122, 127] cm).
Actual size: 42 [44, 46, 48, 50, 52] ins;
(107 [112, 117, 122, 127, 132] cm).
Length from top of shoulders:
25½ [26, 26, 26½, 27, 27] ins;
(65 [66, 66, 67, 69, 69] cm).
Sleeve seam:
17½ (17½, 17½, 19, 19½, 19½] ins;
(44 [44, 44, 48, 49, 49] cm).

Abbreviations

k: knit
p: purl
m1: make a stitch by picking up the horizontal loop lying before next stitch and working into the back of it.

A word on the wool.

Original yarn was Patons Husky Chunky.

Disclaimer
(well...almost)

In transposing any patterns it is always a risk that errors will be introduced, in spite of dedicated proof reading.
If you have any problems with this pattern, please and I will try and assist.


DrWatson.jpg

Note that Dr Watson has patterning just above the welts on the body and the sleeve.
If you want to knit the actual original, it is Alafoss 52 - again looking quite different in the natural tones associated with Icelandic sweaters.

Alafoss52.jpg

September 2019

Country Wear Pullover

CountrySlipover.jpg

Fair-Isle pullover or vest in bright colours, with the added interest in that it is knitted sideways.

Instructions:

The pullover is worked sideways using the Fair-Isle technique. Strand the wools not in use loosely across the back of the work.

Back

Begin at the left side edge. Using No 9 (3¾mm) needles and main shade natural yarn cast on 84 stitches.
Purl one row.

Continue in stocking stitch, working the pattern from the chart, reading knit rows from right to left and purl rows from left to right. Work the 12 pattern stitches 7 times across.

When the 10th row of the chart has been completed, continue in pattern, working armhole increasings as shown on the chart, and keeping the extra stitches in pattern as indicated.
At the beginning of the 24th row, cast on 50 stitches to complete the armhole. [147 sts]

Continue in pattern, increasing 1 stitch at the shoulder edge at the end of the 29th, 37th, 45th, and 53rd rows as indicated. [151 sts]
Work straight until the 78th row of the chart has been completed.
This brings you to the centre back.

For the second half of the back, work down from top of chart, that is: 77th, 76th, 75th, 74th rows, etc, still reading from right to left on knit rows and left to right on purl rows.
Remember on this half of the back to decrease 1 stitch at the shoulder edge on the 53rd, 45th, 37th and 29th rows, and to cast off 50 stitches at the beginning of the 24th row for the armhole, then to decrease 1 stitch at the armhole edge on every row until 84 stitches remain.

Work straight to the end of the chart, then purl 1 row in natural.
Cast off.

Front

Begin at the right side and work exactly as for the first half of the back until the 57th row has been completed. [151 sts].

Divide for neck opening:
58th row: Cast off 15, pattern to end.

Continue in pattern, casting off 5 stitches at the beginning of the next 9 purl rows as indicated on the chart. [91 sts]
Work 2 rows straight to the end of the 78th row of the chart.

For the second half of the front, work down from the top of the chart as before, casting on stitches at the neck edge to correspond with those cast off on the first half, and decreasing at the shoulder and armhole edges as indicated.

When the chart is complete, purl 1 row in natural.
Cast off.

Ribbed welt

With the right side of the work facing, using No 12 needles and main shade natural, pick up and knit 140 stitches along the lower edge of the back.
Work 3½ inches in k1/p1 rib: cast off in rib.

Work the front welt in the same way.

Neckband

Join shoulder seams.

With the right side of the work facing, using No 12 needles and main shade natural, beginning at the centre back, pick up and knit 88 stitches to centre front.

Work 10 rows k1/p1 rib, decreasing 1 stitch at the centre front on alternate rows; cast off in rib.

Work the other half to correspond.

Armhole bands

With the right side of the work facing, using No 12 needles and main shade natural, pick up and knit 160 stitches round each armhole.

Work 10 rows k1/p1 rib; cast off in rib.

To Make Up

Press parts well under a damp cloth.
Join side seams.
Join neck ribbing at centre back and front.
Press all seams.

Materials

4 x 1oz balls of 4 ply fingering in main shade (natural), plus 1 oz each in 6 contrast colours: brown, yellow, blue, rust, emerald, white.

A pair each No 9 (3¾mm) and No 12 (2¾mm) needles.

Tension

30sts to 4 inches

Size matters

Chest to fit one size: 39-41 inches.
Length: 23 inches.

Abbreviations

k2tog/p2tog: decrease by knitting/purling 2 sts together.

stocking stitch: one row knit and one row purl, ("stockinette").

A word on the wool

Original called for Patons Fair Isle Fingering about which there is some information available on Ravelry. This pattern is in ounces but it seems the yarn stuck around for a while as some vintage stocks can be seen in 25g balls.
Measured by a user to be about 150m or 160 yards to a 1 oz ball, and the ball band states "4ply".

Jamiesons are Kings (or Queens) of Fair Isle and Shetland knitting - their Spindrift yarn sounds a good substitute: equivalent to a traditional 4ply; ideal for Fair Isle knitting; extensive colour pallet of over 220 colours; supplied in 25g Balls (105m); tension: 30sts x 32 rows on 3¼mm needles.

Disclaimer
(well...almost)

In transposing any patterns it is always a risk that errors will be introduced, in spite of dedicated proof reading.
If you have any problems with this pattern, please and I will try and assist.

For a pdf version of the chart you can right click >>here<< and choose "save link as" or "save target as" (browser dependent options) to download and save a pdf file.

August 2019

Colour-wise fashion

MustardYellowSweater.jpg

I love the styling of this photo - the poise of the model, the "clashing" colour combination, the bracelet, and the lovely use of the location which makes the very best of the look of fresh summer rain.

This is a fairly simple pattern where the vertical contrast stripes are made by stranding the unused colour across the back (as opposed to intarsia) and this makes for a slightly more interesting 3D effect, even though they compensate by changing needles and stitch count over the different sections.
Not everyone likes mustard (or yellow...) but I think this sweater looks quite sophisticated as the colours are close on the colour wheel but not really matching. I have a sweater in pink with orange trim which gives a similar effect (less violent than it might sound!). Bear in mind also that mustard can be a difficult shade to pin down - so it could be gold or beige - just make sure it tones perfectly with your pencil skirt....

Instructions.

Instructions for larger size is given in brackets. Where one set of figures is given, this applies to both sizes.
Y = Sunglint Yellow and M = French Mustard

Back and Front alike

With No 10 (3¼mm) needles, cast on 100 (106) stitches and work in k1/p1 rib for 1¼ inches, increasing 14 (16) stitches on the last row by working twice into every 7th (6th) stitch 14 (16) times: [114 (122) sts]

‡‡
Change to No 7 needles and work 36 rows vertical stripes, stranding wool loosely the slipped stitches, thus:

1st row: Using Mustard yarn (M), * k2, keeping wool at back of work, slip 2 purlways; rep from * to last 2 stitches, k2.
2nd row: Using M, * p2, slip 2 purlways; rep from * to last 2 stitches, p2.
3rd row: Using Yellow yarn (Y), * keeping wool at back slip 2 purlways, k2; rep from * to last 2 stitches, slip 2 purlways.
4th row: Using Y, * slip 2 purlways, p2; rep from * to last 2 stitches, slip 2 purlways.

Repeat the last 4 rows 8 times more.
Break M.

Change to No 8 needles and continue in stocking stitch in yarn Y, thus:

Next row: * k 7 (8), k2tog; repeat from * to last 6 (2) stitches; k6 (2): [102 (110) sts]

Work 13 rows straight in stocking stitch.

Join in yarn M, and work horizontal stripes of 2 rows M, 2 rows Y, 2 rows M, 2 rows Y, 2 rows M.
Break M.
‡‡

Work 13 rows in yarn Y.

Next row: * p7 (8), purl twice into next stitch; repeat from * to last 6 (2) stitches, p6 (2): [114 (122) sts]

Repeat from ‡‡ to ‡‡

Continue in yarn Y and shape armholes by casting off 5 (6) stitches at the beginning of the next 2 rows, then decrease 1 stitch at each end of the next 6 knit rows: [80 (86) sts]

Next row: * p 6 (9), purl twice in the next stitch; repeat from * to last 10 (6) stitches, p 10 (6): [90 (94) sts]

Change to No 7 needles, join in M and work the 36 rows of vertical stripes.
Break M.

Change to No 8 needles.

Next row: * k6 (9), k2tog; repeat from * to last 10 (6) stitches, k10 (6): [80 (86) sts]
Work 13 rows stocking-stitch in yarn Y.

Join in M and work horizontal stripes of 2 rows M, 2 rows Y, 2 rows M, 2 rows Y, 2 rows M.
Break M.

Shape shoulders: by casting off 6 (7) stitches at the beginning of the next 6 rows.
Work a further 6 rows on the remaining stitches, increasing 1 stitch at each end of every row.
Cast off loosely.

Back and Front alike

Make a second piece for the front exactly as instructions above.

Sleeves

With No 10 needles and yarn Y, cast on 48 (50) stitches, and work 2½ inches in k1/p1 rib.

With right side facing, change to No 8 needles and stocking-stitch, starting with a knit row, and shape sides by increasing 1 stitch at each end of the 7th and every following 6th row until there are 70 (72) stitches.

Work straight until sleeve seam measures 16½ (16½) inches.
With right side facing, shape top, by casting off 4 (5) stitches at the beginning of the next 2 rows, then k2tog at each end of the next and every alternate row until 32 (32) stitches remain.
Purl back, then decrease 1 stitch at each end of every row until 14 (14) stitches remain.
Cast off.

To Make Up

Press parts lightly on wrong side under a damp cloth, avoiding ribbing.
Join shoulder, side, and sleeve seams; insert sleeves.
Join shaped ends of neck facing.
Turn under 6 rows stocking-stitch across the back of the neck and 6 rows across the front, but graduating hem to a depth of 12
rows at centre front; catch down lightly on wrong side.
Press all seams and neck facing lightly.

Materials

Double Knitting yarn: 13 (14) oz in Sunglint yellow, and 4 (4)oz French Mustard

Pair each No 7 (2¾mm), No 8 (4mm) and No 10 (3¼mm) needles.

Tension

22 sts x 28 rows to 4 ins in stocking stitch on No 8 (4mm) needles.

Size matters

To fit chest 34-35 (36-37) inches;
length from top of
shoulders: 23 (23) inches;
sleeve seam: 23 (23) inches.

Abbreviations

k2tog or p2tog: knit or purl 2 stitches together (decrease one stitch).
stocking stitch: one row knit and one row purl, ("stockinette").

A word on the wool

The original design was in Patons Totem Double Crepe which was a pure wool standard double knitting yarn.

Disclaimer
(well...almost)

In transposing any pattern it is always a risk that errors will be introduced, in spite of dedicated proof reading.
If you have any problems with this pattern, please and I will try and assist.

MustardYellowSweater2.jpg

July 2019

Sun Set

SunSet1.jpg

The era of the "set" — a sweet and quirky twin set for you to enjoy while soaking up the sun.
[I would, but I have a serious case of teeny tiny waist envy].

Instructions

This is a two-piece: a bolero with pointed edge, and a sleeveless top with back and front V-neck.

Bolero Back

Begin at the back of the neck.
With two No 12 (2¾mm) needles, cast on 36 stitches fairly loosely, and work 1 row in k2, p2 rib.

With right side facing, continue in rib, casting on 18 stitches at the beginning of the next 2 rows, then 6 stitches at the beginning of the
following 10 rows for shoulders. [132 sts].
Work straight in rib for 7½ inches from the end of the shoulder shaping.

With right side facing, shape for armholes by increasing 1 stitch at the beginning of the next 8 rows, then cast on 8 stitches at the beginning of the following 2 rows, taking the extra stitches into the
rib as they are made. [156 sts].
Work 10 rows straight.

** Here divide for points:

Next row (right side facing): rib 78, turn, and leave remaining stitches on a spare needle, or stitch holder.

Continue to work backwards and forwards on these 78 stitches using
three needles thus: rib 39 stitches on to 1st needle; with 2nd needle sl1, k1, psso, rib to end; * with spare needle, rib to last stitch of next needle, purl this stitch; with spare needle sl1, k1, psso, rib to end.
Repeat from * until all stitches are gone. Fasten off.

With right side facing, rejoin wool to last 78 stitches and
work to correspond with first half. **

Bolero Fronts

Left bolero front: Begin at the shoulder.
With two No 12 (2¾mm) needles, cast on 18 stitches and work row in k2, p2 rib.

With wrong side facing, continue in rib, casting on 6 stitches at the
beginning of the next and following 4 alternate rows. [48 sts].
This completes shoulder shaping.

With right side facing, continue in rib and shape front edge by increasing 1 stitch at the beginning of the next row (front edge) then on every following 4th row, 18 times in all, taking the extra stitches into rib as they are made; afterwards keep the front edge straight. When the armhole (straight edge) measures 7½ inches from the end of the shoulder shaping, with wrong side facing, increase 1 stitch at the beginning of the next and following 3 alternate rows, then cast on 8 stitches at the beginning of the following alternate row. [78 sts].
Work 10 rows straight.

With right side facing, shape as for back by working from to .

Right bolero front: Work as for left, reversing all shapings.

Sleeves (two alike)

With two No 12 (2¾mm) needles, cast on 116 stitches and work
3½ inches in k2, p2 rib.

Continue in rib, shaping the top by casting off 4 stitches at the beginning of the next 2 rows, then decrease 1 stitch at the beginning of every row until 66 stitches remain, then at each end of every row until 32 stitches remain.
Cast off.

Sun Top (back and front alike)

With two No 13 (2¼mm) needles, cast on 126 stitches and work
4 inches in k2, p2 rib.
Change to two No 12 (2¾mm) needles and continue in rib, shaping sides by increasing 1 stitch at each end of the 7th and every following 4th row until there are 156 stitches. Work straight until piece measures 11¾ inches from the start.

Here divide for points exactly as given for back of by working from ** to ** .

Making up

Press parts only very lightly on the wrong side under a damp cloth.

Join shoulder and sleeve seams of bolero and side seams of sun top.
With crochet hook and white wool, work edging all round points of sun top; all round points, up fronts and round back of neck on bolero
thus:-
Join wool to edge of knitting, 6 chain, * miss 2 stitches of knitting, 1 treble in next stitch, 3 chain; repeat from * ending 1 treble in last stitch of knitting; fasten off.

Cords: Take 6 strands of Viridian each 60 inches long and twist tightly together; then fold in half allowing two halves to twine round each other to form a cord; thread through holes in crochet edging on inside edges of points of sun-top; make a similar cord for back inside edges, then two more in red for outer edges of points.
Knot ends together on shoulders. In the same way make a red cord to go round front points and all round back of neck of
bolero, then make one in viridian to go round points of
back.
Secure ends on wrong side at underarms.
Join crochet edgings together from underarm for inches to form side seams of bolero. Insert sleeves. Turn back cuffs and press lightly in position.
Press all seams.

Materials

3ply fingering:-
Bolero: 5oz in white and small amounts in Viridian (blue-green) and Lipstick Red.
Sun Top: 4oz in white and small amounts in Viridian and Lipstick Red.

A set of 4 No 12 (2¾mm) needles.
One pair of No 13 (2¼mm) needles.
One No 13 crochet hook.

Tension

Equivalent to a basic tension of
34sts x 42 rows to 4 inches over stocking stitch on 2¾mm needles.

Size matters

One size only to fit 34-35 inch chest;
length from top of shoulders to point on bolero: 17 ins;
from top of point to lower edge on sun top: 18½ ins;
sleeve seam: 2 ins (cuff turned back).

Abbreviations

k2tog or p2tog: work 2 sts together to decrease.

sl1: slip one stitch by passing it between the needles without knitting it.

psso: pass the slipped stitch over.

sl1, k1, psso: slip 1, knit 1, pass the slipped stitch over; also known as "ssk" (slip, slip, knit).

Disclaimer
(well...almost)

In transposing any pattern it is always a risk that errors will be introduced, in spite of dedicated proof reading.
If you have any problems with this pattern, please and I will try and assist.

SunSet2.jpg

June 2019

Three-ounce top I

3ozHighNeck.jpg

Very pretty lacy tops with the emphasis on wool economy.
The style of this pattern in conjunction with the price (3d), the emphasis on economy, and its pattern sequence number is giving me mixed messages as to the date; however general opinion seems to be that these patterns are from the late 1940s.

Instructions.

Instructions for the larger size is given in brackets. Where one set of figures is given this applies to both sizes.
Note that the two different sizes are achieved by using different needles sizes as well as different numbers of stitches.

Front

With No 13 (12) needles, cast on 123 stitches.

1st row: p3, * k3, p3; repeat from * to end.
2nd row: k3, * p3, k3; repeat from * to end.
Repeat these 2 rows 18 times, then repeat the 1st row again.
40th row: p2tog, purl to end.

Change to No 11 (10) needles and pattern as follows:

1st row: k1, * k1, wo, k4, sl1, k2tog, psso, k4, wo; repeat from * to last stitch, k1.
2nd and each alternate row: purl.
3rd row: k3, * wo, k3, sl1, k2tog. psso, k3, wo, k3; repeat from * ending last repeat k2, instead of k3.
5th row: k1, k2tog, * wo, k1, wo, k2, sl1, k2tog, psso, k2, wo, k1, wo, sl1, k2tog, psso; repeat from * to the last 11 stitches; wo, k1, wo, k2, sl1, k2tog, psso, k2, wo, k3.
7th row: k1, * wo, sl1, k1, psso, k2, wo, k1, sl1, k2tog, psso, k1, wo, k3; repeat from * to last stitch, k1.
9th row: k2, * wo, sl1, k2tog , psso, wo, k1; repeat from * to end.
10th row: Purl.
These 10 rows form the pattern and are repeated throughout.

Repeat the 10 pattern rows 7 times more. (80 rows).

Shape Armhole:
Note: Great care must be taken to keep the pattern correct when decreasing for shaping. An increase must always be made to balance a decrease in the pattern even if it comes immediately after the cast off stitches.

Cast off 5 stitches at the beginning of the next 2 rows; then 4 stitches at the beginning of the next 2 rows, and 3 stitches at the beginning of the next 2 rows. [98 sts]

7th row: As 7th pattern row.
Work the next 3 rows as 8th. 9th and 10th pattern rows to complete one pattern.
Work 4 more complete patterns of 10 rows each.

Shape Neck:
51st row: Work 38 stitches as 1st pattern row, ending k4, wo, k1.

Cast off 22 stitches, (1 stitch on the right-hand needle), pattern 37 stitches.
Work on this 2nd set of 38 stitches for right shoulder.

52nd row: purl 38 stitches.
53rd row: cast off 3 stitches, work in pattern to end.
54th row: purl 35 stitches.
55th row: cast off 2 stitches, work in pattern to end.
56th row: purl 33 stitches.
57th row: cast off 2 stitches, work in pattern to end.
58th row: purl 31 stitches.
59th row: k2tog, work in pattern to end.
Keeping the pattern correct, work 10 rows on 30 stitches.

70th row: cast off 10 stitches; purl to end.
71st row: Work in pattern of 9th pattern row.
72nd row: cast off 10 stitches, purl to end.
73rd row: As 71st row.
Cast off.

Left shoulder:
Join wool to neck edge of the remaining 38 stitches, and work to match the right shoulder.

Back

Work to match the front until 5 complete patterns have been worked from the beginning of the armhole shaping.

Divide for Back Opening:

51st row: work 49 stitches in pattern. Turn.
52nd row: increase into 1st stitch; purl to end.
Continue in pattern on these 50 stitches until 2 patterns are completed.

Shape Shoulder:
71st row: cast off 10 stitches, then work in pattern of 9th pattern row.
72nd row: purl.
Repeat the last 2 rows twice more.
Cast off remaining 20 stitches.

Left Shoulder:
Cast on 3 stitches and join to centre back.
Work to match right shoulder, keeping the 3 extra stitches for underflap in garter stitch, and casting off 22 stitches for neck.

Sleeves:

With No. 13, (12) needles. cast on 87 stitches.
1st row: p3, * k3, p3; repeat from * to end.
Work in this rib for 8 more rows.

10th row: p3, * increase into next stitch, p8; repeat from to last 4 stitches, increase into next stitch, p3. [98 sts]

Change to No 11 (10) needles and pattern.
Work 3, (2) complete patterns.
If sleeve is wanted longer for larger size, then work a further complete pattern.

Shape Top:
Cast off 5 stitches twice, and then 4 stitches twice at the beginning of the next 4 rows, [80 sts]
Decrease 1 stitch at each end of the next and every alternate row until 44 stitches remain.
Purl one row (40 rows from the beginning of the shaping).
Now cast off 2 stitches at the beginning of the next 6 rows. (32 stitches remain).
Cast off 3 stitches at the beginning of the next 4 rows.
Cast off 20 stitches.

Neck Band

Back-stitch shoulder seams very neatly.
With No 13 (12) needles and right side of work facing, pick up and
knit 120 stitches evenly round neck.
Work in rib of k3, p3, for 9 rows.
Cast off in rib, using a No 11 (10) needle.

Making Up

Seam-stitch side and sleeve seams.
Set in sleeves and back-stitch.
Catch down underflap.
Work a row of chain stitch down right side of back opening. turn and
make 4 buttonholes in chain stitch.

Make 4 buttons follows:
Make 8 chain and join in a circle. Work 6 dc into this circle. Work a second round of 6 dc then a round of 4 dc. Break off thread and pull through loop to secure. Stuff with a very small quantity of cotton wool and draw up tight.
Sew on buttons to match.

Lay on a blanket or well padded board and press lightly on wrong side with a hot iron and damp cloth, omitting all ribbing.
Be careful not to over press or the raised pattern will be flattened and the lacy appearance lost.

Materials

3 (4) ozs 2 ply.

Pairs of No 13 or (2¼mm), and No 11 (3mm) needles for smaller size.

Pairs of No 12 (2¾mm) and No 10 (3¼mm) needles for larger size.

A medium crochet hook.

Tension

7½ (7) sts x 10½ (10) rows to 1 inch on No 11 (10) needles, measured over the pattern.

Size matters

To fit 34 (36) inch chest; length from top of shoulders 18½ (19) inches; side seam 12 (13) inches; sleeve seam 3½ (4) inches.

Abbreviations

k2tog or p2tog: knit or purl 2 sts together (decrease one stitch)

sl1: slip one stitch.

psso: pass the slipped stitch over.

sl1, k1, psso: slip 1, knit 1, pass the slipped stitch over; also known as "ssk" (slip, slip, knit).

wo: wool over - bring the yarn over the needle so that when you knit the following stitch, you will have created an extra stitch, in a way that makes a decorative eyelet hole.

dc: double crochet (that is English double crochet or US single crochet).

A word on the wool.

"2 ply" yarn is a very fine yarn equivalent to some kind of laceweight today - hence the very good yardage, needing only 3 ounces (84g).

John Arbon has some wonderful laceweight that might be suitable but the actual required yardage in any substitute can only be estimated.

The original yarn was "Golden Eagle Polynit" 2ply. In 2012 Susan Crawford found some vintage Polynit (3ply not 2ply) at Woolfest on Eliza's stand (I also love her stand) and although the name implies otherwise it is actually pure wool. Susan was pleased with the colour matching of her Excelana brand with these original wools - as I would have been in her shoes.

Disclaimer
(well...almost)

In transposing any pattern it is always a risk that errors will be introduced, in spite of dedicated proof reading.
If you have any problems with this pattern, please and I will try and assist.

Three-ounce top II

3ozLowNeck.jpg

Very pretty lacy tops with the emphasis on wool economy.
The style of this pattern in conjunction with the price (3d), the emphasis on economy, and its pattern sequence number is giving me mixed messages as to the date; however general opinion seems to be that these patterns are from the late 1940s.

Instructions.

This jumper with the low neck is given only in one size.

Front

With No. 10 needles, cast on 123 stitches.

1st row: p3, * k3, p3, repeat from * to end.
2nd row: k3, * p3, k3, repeat from * to end.
3rd row: As the 1st row.
4th row: k2tog, rib in pattern to end.

Change to pattern as follows:
[Editor's note: This pattern is the same as for thejumper with the high neck.]

1st row: k1, * k1, wo, k4, sl1, k2tog, psso, k4, wo; repeat from * to last stitch, k1.
2nd and each alternate row: purl.
3rd row: k3, * wo, k3, sl1, k2tog. psso, k3, wo, k3; repeat from * ending last repeat k2, instead of k3.
5th row: k1, k2tog, * wo, k1, wo, k2, sl1, k2tog, psso, k2, wo, k1, wo, sl1, k2tog, psso; repeat from * to the last 11 stitches; wo, k1, wo, k2, sl1, k2tog, psso, k2, wo, k3.
7th row: k1, * wo, sl1, k1, psso, k2, wo, k1, sl1, k2tog, psso, k1, wo, k3; repeat from * to last stitch, k1.
9th row: k2, * wo, sl1, k2tog , psso, wo, k1; repeat from * to end.
10th row: Purl.
These 10 rows form the pattern and are repeated throughout.

Repeat the 10 pattern rows twice more. (3 complete patterns of 10 rows each).

Change to No 12 needles and work 20 rows.
[Editor's note: This is to make the shaping for the waist.]

Change back to No 10 needles and work 70 rows.

Shape Armhole:
Note: Great care must be taken to keep the pattern correct when decreasing for shaping. An increase must always be made to balance a decrease in the pattern even if it comes immediately after the cast off stitches.

Cast off 12 stitches. With 1 stitch on the right-hand needle, work as 1st pattern row to the last 12 stitches.
Cast off 12 stitches. Fasten off and break wool.

Cast on 24 stitches. Join to work. Purl 98 stitches, and cast on 24 stitches at the end of the row.
3rd row: k24 stitches and work as 3rd row of pattern to last 24 stitches, knit to end.
4th row: Purl 146 stitches.
5th row: As 5th pattern row.
Work 5 rows to complete the pattern, then work 30 rows.
(4 complete patterns from the beginning of the armhole shaping).

Neck Shaping:
1st row: Work 62 stitches as 1st pattern row.
Cast off 22 stitches.
Work on this last set of 62 stitches for right side of neck as follows:
With 1 stitch already on the right-hand needle, work as from * of 1st pattern row to end.
2nd and each alternate row: purl.
3rd row: Keeping pattern correct, cast off 6 stitches at the beginning of this and the 2 following alternate rows.
9th row: Keeping pattern correct, cast off 3 stitches at the beginning of this and the following alternate row.
12th row: Purl 38 stitches.
Work 8 rows to complete 6 complete patterns from the beginning of the armhole shaping, then work the first 5 rows to start the 7th pattern repeat.

Shape Shoulder:
(6th pattern row). Cast off 12 stitches; purl to end.
Next row: Work 26 stitches in pattern as for 7th pattern row.
Next row: Cast off 12 stitches; purl to end.
Next row: Work 14 stitches in pattern as for 9th pattern row.
Cast off 14 stitches.

Left Side of Neck:
Join wool to neck edge of remaining 62 stitches.

Cast off 6 stitches at the beginning of this and the 2 following alternate rows, then cast off 3 stitches at the beginning of the 2 following alternate rows.
Work one complete pattern of 10 rows On these 38 stitches, then work 6 rows of 7th pattern from the beginning of the of armhole shaping.

Shape Shoulder as for right side of neck, beginning with a 7th pattern row.

Neck

With No 10 needles and right side of work facing, pick up and knit 98 stitches all round neck.

Purl 1 row.
Next row: As 9th pattern row.
Repeat these 2 rows 3 times more.

Change to No 12 needles.
Next row: P2tog, purl to the last 2 stitches, p2tog. [96 sts]
Next row: k3, p3; repeat to end.
Work 4 rows in this k3/p3 rib.
Cast off loosely in rib, using the wool doubled.
[Editor's note: This make the edge stronger.]

Back

Work to match the front exactly.

Making Up

Run a thread along each of the cast on 24 stitches and gather to fit the 12 cast off stitches. Sew together very neatly on the wrong side.
Seam-stitch side seams, matching pattern exactly, and seam-stitch the neck on each shoulder.

Lay on a blanket or well padded board and press lightly on wrong side with a hot iron and damp cloth, omitting all ribbing.
Be careful not to over press or the raised pattern will be flattened and the lacy appearance lost.

Materials

3 ozs 2 ply.

Pairs of No 10 or (3¼mm), and No 12 (2¾mm) needles for smaller size.

Tension

7 sts x 10 rows to 1 inch on No 10 needles, measured over the pattern.

Size matters

To fit 34-36 inch chest; length from top of shoulders 21 inches.

Abbreviations

k2tog or p2tog: knit or purl 2 sts together (decrease one stitch)

sl1: slip one stitch.

psso: pass the slipped stitch over.

sl1, k1, psso: slip 1, knit 1, pass the slipped stitch over; also known as "ssk" (slip, slip, knit).

wo: wool over - bring the yarn over the needle so that when you knit the following stitch, you will have created an extra stitch, in a way that makes a decorative eyelet hole.

A word on the wool.

"2 ply" yarn is a very fine yarn equivalent to some kind of laceweight today - hence the very good yardage, needing only 3 ounces (84g).

John Arbon has some wonderful laceweight that might be suitable but the actual required yardage in any substitute can only be estimated.

The original yarn was "Golden Eagle Polynit" 2ply. In 2012 Susan Crawford found some vintage Polynit (3ply not 2ply) at Woolfest on Eliza's stand (I also love her stand) and although the name implies otherwise it is actually pure wool. Susan was pleased with the colour matching of her Excelana brand with these original wools - as I would have been in her shoes.

Disclaimer
(well...almost)

In transposing any pattern it is always a risk that errors will be introduced, in spite of dedicated proof reading.
If you have any problems with this pattern, please and I will try and assist.

May 2019

Cricket (or Tennis) Pullover

CricketPullover.jpg

Anyone for cricket?

I made this as a slipover for a long, lean, and lanky chap; it is based on the pattern given but I adapted it to use some Guernsey yarn instead of DK (by knitting a bigger size and making it much longer to fit the chap - seemed like the body was never-ending!).
The instructions are for a full sweater pattern as well as the slipover.

Instructions.

The sweater is worked in a good range of sizes, intended to cover kids and men, but could also fit women, making suitable length adjustments in body and sleeve. Instructions for the larger sizes are shown in brackets.
Because of the layout for the different sizes, I recommend printing out the instructions and underlining the size you have chosen to work in every section that applies to that size (and maybe crossing through the other inapplicable sections).
There are options for versions with and without sleeves (and with and without team colours, of course).

Sweater Back

With No 10 (3¼mm) needles and main shade, cast on 77, 83, 89, 95, 99, 105, 111, 117, 121, 127 stitches.

**
1st row (right side facing)
: k1 * p1, k1; repeat from * to end.
2nd row: p1 * k1, p1; repeat from * to last stitch, p1.

If not including contrast colours, Repeat 1st and 2nd rows 10 times then the 1st row again, and continue below with 24th (increase) row.

If including contrast colours, repeat 1st and 2nd rows once.
Join in second colour and repeat 1st and 2nd rows once.
Break off contrast, and continuing in main shade, repeat 1st and 2nd rows 5 times.
Join in contrast once again and repeat 1st and 2nd rows once.
Break off contrast, and continuing in main shade, repeat 1st and 2nd rows twice, then the 1st row once.
**
Continue with main shade for the remainder of the Back.
24th (increase) row: p3 (4, 7, 8, 6, 5, 6, 9, 7, 8); * increase once in the next stitch purlwise, p1; repeat from * to the last 2 (3, 6, 7, 5, 4, 5, 8, 6, 7) stitches: p2 (3, 6, 7, 5, 4, 5, 8, 6, 7).
[113 (121, 127, 135, 143, 153, 161, 167, 175, 183) sts].

Change to No 8 (4mm) needles and proceed as follows:-

For three smallest sizes only (28, 30 and 32 inch chest):

***
1st row: k0 (4, 7); p2, * slip the next 4 stitches on to a cable needle and hold at the back of the work, k5 stitches, then k4 stitches from cable needle (this will now termed C9B); p2, k7, p2; slip the next 5 stitches on to a cable needle and hold at the front of the work, k4 stitches, then k5 stitches from cable needle (this will now termed C9F); p2, k7, p2; repeat from * to last 31 (35, 38) stitches, C9B, p2, k7, p2, C9F, p2, k0 (4, 7).
2nd row: p0 (4, 7); k2, p9, k2, p7, k2, p9; * k2, p7, k2, p9; repeat from * to last 2 (6, 9) stitches, k2, p0 (4, 7).
3rd row: k0 (4, 7); p2, * k9, p2, k7, p2; repeat from * to last 31 (35, 38) stitches, k9, p2, k7, p2, k9, p2, k0 (4, 7).
4th row: p0 (4, 7); k2, p9, k2, p7, k2, p9, * k2, p7, k2, p9, repeat from * to last 2 (6, 9) stitches, k2, p0 (4, 7).
Repeat 3rd and 4th rows 4 times.
***

For the medium-small sizes only (34, and 36 inch chest):

***
1st row: k- (-, -, 2, 6); * p2, k7, p2, slip the next 4 stitches on to a cable needle and hold at the back of the work, k5 stitches, then k4 stitches from cable needle (this will now termed C9B); p2, k7, p2; slip the next 5 stitches on to a cable needle and hold at the front of the work, k4 stitches, then k5 stitches from cable needle (this will now termed C9F); repeat from * to last - (-, -, 13, 17) stitches, C9B, p2, k7, p2, p2, k- (-, -, 2, 6).
2nd row: p- (-, -, 2, 6); k2, p7, k2; * p9, k2, p7, k2; repeat from * to last - (-, -, 2, 6) stitches, p- (-, -, 2, 6).
3rd row: k- (-, -, 2, 6); * p2, k7, p2, k9; repeat from * to last - (-, -, 13, 17) stitches, p2, k7, p2, k- (-, -, 2, 6).
4th row: p- (-, -, 2, 6); k2, p7, k2; *p9, k2, p7, k2; repeat from * to last - (-, -, 2, 6) stitches, p- (-, -, 2, 6).
Repeat 3rd and 4th rows 4 times.
***

For the three medium-large sizes only (38, 40 and 42 inch chest):

***
1st row: k- (-, -, -, -, 0, 4, 7), p2; * slip the next 5 stitches on to a cable needle and hold at the front of the work, k4 stitches, then k5 stitches from cable needle (this will now termed C9F); p2, k7, p2; slip the next 4 stitches on to a cable needle and hold at the back of the work, k5 stitches, then k4 stitches from cable needle (this will now termed C9B); p2, k7, p2; repeat from * to last - (-, -, -, -, 31, 35, 38) stitches, C9F, p2, k7, p2, C9B, p2, k- (-, -, -, -, 0, 4, 7).
2nd row: p- (-, -, -, -, 0, 4, 7); k2, p9, k2, p7, k2, p9, * k2, p7, k2, p9; repeat from * to last - (-, -, -, -, 2, 6, 9) stitches, k2, p- (-, -, -, -, 0, 4, 7).
3rd row: k- (-, -, -, -, 0, 4, 7); p2, * k9, p2, k7, p2; repeat from * to last - (-, -, -, -, 31, 35, 38) stitches, k9, p2, k7, p2, k9, p2, k- (-, -, -, -, 0, 4, 7).
4th row: p- (-, -, -, -, 0, 4, 7); k2, p9, k2, p7, k2, p9, * k2, p7, k2, p9, repeat from * to last - (-, -, -, -, 2, 6, 9) stitches, k2, p- (-, -, -, -, 0, 4, 7).
Repeat 3rd and 4th rows 4 times.
***

For two largest sizes only (44 and 46 inch chest):

***
1st row: k- (-, -, -, -, -, -, -, 2, 6); * p2, k7, p2, slip the next 5 stitches on to a cable needle and hold at the front of the work, k4 stitches, then k5 stitches from cable needle (this will now termed C9F); p2, k7, p2; slip the next 4 stitches on to a cable needle and hold at the back of the work, k5 stitches, then k4 stitches from cable needle (this will now termed C9B); repeat from * to last - (-, -, -, -, -, -, -, 13, 17) stitches, p2, k7, p2, k- (-, -, -, -, -, -, -, 2, 6).
2nd row: p- (-, -, -, -, -, -, -, 2, 6), k2, p7, k2; * p9, k2, p7, k2; repeat from * to last - (-, -, -, -, -, -, -, 2, 6) stitches, p- (-, -, -, -, -, -, -, 2, 6).
3rd row: k- (-, -, -, -, -, -, -, 2, 6); * p2, k7,p2, k9; repeat from * to last - (-, -, -, -, -, -, -, 13, 17) stitches, p2, k7, p2, k- (-, -, -, -, -, -, -, 2, 6).
4th row: p- (-, -, -, -, -, -, -, 2, 6); k2, p7, k2; * p9, k2, p7, k2; repeat from * to last - (-, -, -, -, -, -, -, 2, 6) stitches, p- (-, -, -, -, -, -, -, 2, 6).
Repeat 3rd and 4th rows 4 times.
***

FOR ALL 10 sizes

Under each separate section for the size you are working, the instructions embedded between *** to *** forms the pattern.

Keeping continuity of pattern (throughout) continue until work measures 11½ (13, 14, 13½, 15½, 15½, 15½, 15½, 15, 16) inches from the beginning, ending on a wrong side row.

Shape armholes:
Cast off 7 stitches in pattern at the beginning of the next 2 rows.
[99 (107, 113, 121, 129, 139, 147, 153, 161, 169) sts].

****
Work 9 (11, 13, 15, 10, 13, 17, 18, 22, 24) rows, decreasing 1 stitch at each end of every row.
[81 (85, 87, 91, 109, 113, 113, 117, 117, 121) sts].

Continue without shaping until armhole measures 7½ (8, 8, , 10½, 10½, 10½, 10½, 11, 11) inches, ending on the wrong side.

Shape shoulders:
Cast off 12 (12, 12, 13, 18, 17, 17, 18, 18, 18) stitches in pattern at the beginning of the next 2 rows.
Cast off 12 (12, 13, 14, 18, 18, 18, 19, 19, 19) stitches in pattern at the beginning of the next 2 rows.

Cast off remaining 33 (37, 37, 37, 37, 43, 43, 43, 43, 47) stitches in pattern.
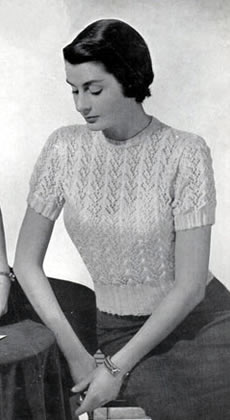
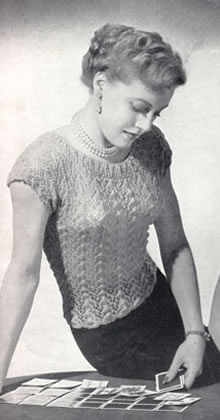
Sweater Front

Work exactly as given for back until **** is reached in the armhole shaping section.

Divide for neck:
Next row: k2tog, pattern 45 (49, 52, 56, 60, 65, 69, 72, 76, 80) stitches, k2tog; turn.

Working on these 47 (51, 54, 58, 62, 67, 71, 74, 78, 82) stitches only, proceed as follows:

Next row: pattern to last 2 stitches, p2tog.
[46 (50, 53, 57, 61, 66, 70, 73, 77, 81) sts]

Work 7 (9, 11, 13, 5, 11, 15, 16, 13, 21) rows, decreasing once at the armhole edge on every row, and at the same time decreasing at the neck edge on the next and every alternate row.
[35 (36, 36, 37, 53, 49, 47, 49, 57, 49) sts]

For one medium and the two largest sizes only (36, 44 and 46 inch chest):

Work - (-, -, -, 3, -, -, -, 7, 1) rows, decreasing once at the armhole edge in every row, at the same time decreasing once at the neck edge on the - (-, -, -, 0, -, -, -, 4th, 0) row.
[- (-, -, -, 50, -, -, -, 49, 48) sts]

For the smallest and other large sizes only (28, 30, 32, 34, 38, 40, 42 inch chest):

Work 12 (14, 12, 6, -, 6, 2, 1, -, -) rows, decreasing once at the neck edge only on every following 2nd (2nd, 2nd, 2nd, -, 2nd, 2nd, 1st, -, -) row.
[29 (29, 30, 34, -, 46, 46, 48, -, -) sts]

FOR ALL 10 sizes

Work 20 (20, 20, 28, 53, 44, 44, 44, 45, 43) rows, decreasing once at the neck edge only on the 4th (4th, 4th, 4th, 1st, 4th, 4th, 4th, 1st, 3rd), and every following 4th row.
[24 (24, 25, 27, 36, 35, 35, 37, 37, 37) sts]

Continue without shaping until armhole measures same as Back to "Shape Shoulders" section, ending on wrong side row.

Shape shoulders:
Next row: cast off 12 (12, 12, 13, 18, 17, 17, 18, 18, 18) stitches in pattern and then pattern to end of row.
Next row: pattern to end of row.
Cast off remaining 12 (12, 13, 14, 18, 18, 18, 19, 19, 19) stitches in pattern.

Work the other half of the front to match the first as follows:

With right side facing, slip the first stitch of the the remaining stitches on to a safety pin (this is the centre stitch).
Rejoin the yarn to the remaining 49 (53, 56, 60, 64, 69, 73, 76, 80, 84) stitches and proceed as follows:-

Next row: k2tog, pattern to last 2 stitches, k2tog.
[47 (51, 54, 58, 62, 67, 71, 74, 78, 82) sts]
Next row: p2tog, pattern to end
[46 (50, 53, 57, 61, 66, 70, 73, 77, 81) sts]

Work 7 (9, 11, 13, 5, 11, 15, 16, 13, 21) rows, decreasing once at the neck edge on the next and every alternate row, and at the same time decreasing once at the armhole edge on every row.
[35 (36, 36, 37, 53, 49, 47, 49, 57, 49) sts]

For one medium and the two largest sizes only (36, 44 and 46 inch chest):

Work - (-, -, -, 3, -, -, -, 7, 1) rows, decreasing once at the neck edge on the - (-, -, -, 0, -, -, -, 4th, 0) row, at the same time decreasing once at the armhole edge on every row.
[- (-, -, -, 50, -, -, -, 49, 48) sts]

For the smallest and other large sizes only (28, 30, 32, 34, 38, 40, 42 inch chest):

Work 12 (14, 12, 6, -, 6, 2, 1, -, -) rows, decreasing once at the neck edge only on every following 2nd (2nd, 2nd, 2nd, -, 2nd, 2nd, 1st, -, -) row.
[29 (29, 30, 34, -, 46, 46, 48, -, -) sts]

FOR ALL 10 sizes

Work 20 (20, 20, 28, 53, 44, 44, 44, 45, 43) rows, decreasing once at the neck edge only on the 4th (4th, 4th, 4th, 1st, 4th, 4th, 4th, 1st, 3rd), and every following 4th row.
[24 (24, 25, 27, 36, 35, 35, 37, 37, 37) sts]

Continue without shaping until armhole measures same as Back to "Shape Shoulders" section ending on right side.

Shape shoulders:
Next row: cast off 12 (12, 12, 13, 18, 17, 17, 18, 18, 18) stitches in pattern and then pattern to end of row.
Next row: pattern to end of row.
Cast off remaining 12 (12, 13, 14, 18, 18, 18, 19, 19, 19) stitches in pattern.

Sweater Sleeves (both alike)

With No 10 needles and main shade, cast on 43 (43, 45, 45, 55, 55, 59, 59, 59, 61) stitches.

Work from ** to ** as given for Back.

24th (increase) row: p6 (6, 8, 8, 11, 11, 11, 11, 11, 13); * increase once in the next stitch purlwise; repeat from * to the last 7 (7, 9, 9, 12, 12, 12, 12, 12, 14) stitches: p7 (7, 9, 9, 12, 12, 12, 12, 12, 14).
[73 (73, 73, 73, 87, 87, 95, 95, 95, 95) sts].

Change to No 8 (4mm) needles and using main shade throughout proceed in pattern as give for 1st (1st, 1st, 1st, 3rd, 3rd, 9th, 9th, 9th, 9th) size of Back and at the same time, increasing once at each end of the 1st (1st, 1st, 1st, 3rd, 3rd, 9th, 9th, 9th, 9th) and every following 1st (1st, 1st, 1st, 3rd, 3rd, 9th, 9th, 9th, 9th) row until there are 87 (81, 89, 81, 117, 117, 107, 107, 125, 125) stitches, working the increased stitches into the pattern.

For all sizes EXCEPT the smallest only (30, 32, 34, 36, 38, 40, 42, 44, 46 inch chest):

Increase once at each end of the following - (6th, 6th, 6th, 4th, 4th, 6th, 6th, 4th, 4th) row, until there are 87 (95, 95, 101, 129, 129, 129, 129, 137, 137) stitches, working the increased stitches into the pattern.

FOR ALL 10 sizes

Continue without shaping until sleeve measures 14½ (15½, 16½, 17, 20, 20, 20, 20, 20, 20) inches, ending on the wrong side.

Shape Sleeve Top
Work 18 (26, 26, 24, 26, 26, 28, 28, 28, 28) rows, casting off 1 stitch at the beginning of every row.
[69 (69, 69, 77, 103, 103, 101, 101, 109, 109) sts].

Work 20 (20, 20, 24, 36, 36, 32, 32, 36, 36) rows, casting off 2 stitches at the beginning of every row.
[29 (29, 29, 29, 31, 31, 37, 37, 37, 37) sts].

Cast off loosely in pattern.

Sweater Neckband

Join right shoulder seams.
With right side facing, using No 10 (3¼mm) needles and main shade, and commencing at the top of the left front neck, pick up and knit 45 (49, 49, 51, 63, 63, 63, 63, 65, 65) stitches evenly down the left side of the the front neck, knit the centre stitch you left on a safety pin, pick up and knit 45 (49, 49, 51, 63, 63, 63, 63, 65, 65) stitches evenly up the right side of the the front neck, and 32 (36, 36, 36, 36, 42, 42, 42, 42, 46) stitches evenly across the cast-off stitches of the back neck.
[123 (135, 135, 139, 163, 169, 169, 169, 173, 177) sts].

If you are including a contrast then proceed as follows, otherwise follow the same instructions using only the main shade.

1st row: Using main shade * p1, k1, repeat from * to last stitch pl.
2nd row: Join in and use contrast, k1, [p1, k1] 21 (23, 23, 24, 30, 30, 30, 30, 31, 31) times; k2togtbl, k1,k2tog; k1, [p1, k1] 37 (41, 41, 42, 48, 51, 51, 51, 52, 54) times.
3rd row: Using contrast, [p1, k1] 37 (41, 41, 42, 48, 51, 51, 51, 52, 54) times; p2tog, p1, p2togtbl; [k1, p1] 21 (23, 23, 24, 30, 30, 30, 30, 31, 31) times. Break off contrast.
4th row: Using main shade, k1, [p1, k1] 20 (22, 22, 23, 29, 29, 29, 29, 30, 30) times, k2togtbl, k1, k2tog, k1, [p1, k1] 36 (40, 40, 41, 47, 50, 50, 50, 51, 53) times.
5th row: Using main shade, [p1, k1] 36 (40, 40, 41, 47, 50, 50, 50, 51, 53) times; p2tog, p1, p2togtbl; [k1, p1] 20 (22, 22, 23, 29, 29, 29, 29, 30, 30) times.
6th row: Using main shade, k1, [p1, k1] 19 (21, 21, 22, 28, 28, 28, 28, 29, 29) times, k2togtbl, k1, k2tog, k1, [p1, k1] 35 (39, 39, 40, 46, 49, 49, 49, 50, 52) times.
7th row: Using main shade, [p1, k1] 35 (39, 39, 40, 46, 49, 49, 49, 50, 52) times; p2tog, p1, p2togtbl; [k1, p1] 19 (21, 21, 22, 28, 28, 28, 28, 29, 29) times.
8th row: Using main shade, k1, [p1, k1] 18 (20, 20, 21, 27, 27, 27, 27, 28, 28) times, k2togtbl, k1, k2tog, k1, [p1, k1] 34 (38, 38, 39, 45, 48, 48, 48, 49, 51) times.
9th row: Using main shade, [p1, k1] 34 (38, 38, 39, 45, 48, 48, 48, 49, 51) times; p2tog, p1, p2togtbl; [k1, p1] 18 (20, 20, 21, 27, 27, 27, 27, 28, 28) times.
10th row: Join in and use contrast, k1, [p1, k1] 17 (19, 19, 20, 26, 26, 26, 26, 27, 27) times; k2togtbl, k1, k2tog; k1, [p1, k1] 33 (37, 37, 38, 44, 47, 47, 47, 48, 50) times.
11th row
: Using contrast, [p1, k1] 33 (37, 37, 38, 44, 47, 47, 47, 48, 50) times; p2tog, p1, p2togtbl; [k1, p1] 17 (19, 19, 20, 26, 26, 26, 26, 27, 27) times. Break off contrast.
12th row: Using main shade, k1, [p1, k1] 16 (18, 18, 19, 25, 25, 25, 25, 26, 26) times, k2togtbl, k1, k2tog, k1, [p1, k1] 32 (36, 36, 37, 43, 46, 46, 46, 47, 49) times.
13th row: Using main shade, [p1, k1] 32 (36, 36, 37, 43, 46, 46, 46, 47, 49) times; p2tog, p1, p2togtbl; [k1, p1] 16 (18, 18, 19, 25, 25, 25, 25, 26, 26) times.
[99 (111, 111, 115, 139, 145, 145, 145, 149, 153) sts].

Cast off in rib.

To Make Up the Sweater

Review the yarn ball band for any special washing or pressing instructions.
Join left shoulder and neckband seams.
Set in sleeves, placing centre of head of sleeve to shoulder
seam.
Join side and sleeve seams.

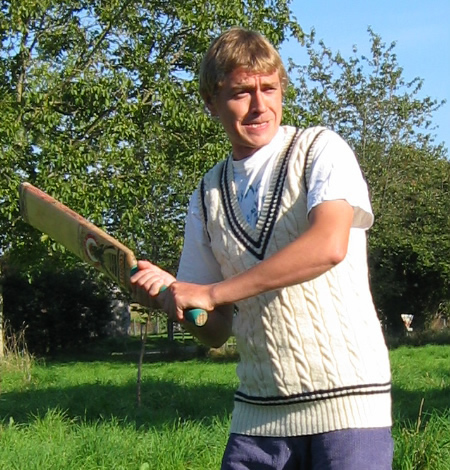
Slipover Back, Front, and Neckband

Work exactly as given for sweater.

Slipover Armbands (alike)

Join left shoulder and neckband seams.

With right side facing, using No 10 (3¼mm) needles and main shade pick up and knit 101 (107, 107, 113, 135, 135, 135, 135, 141, 141) stitches evenly around the armhole edge.

If you are including a contrast then proceed as follows, otherwise follow the same instructions using only the main shade.

1st row: Join in and use contrast, * p1, k1, repeat from * to last stitch, p1.
2nd row: Using contrast, k1, * p1, k1, repeat from * to end.

Using main shade, repeat 1st and 2nd rows twice.
Using contrast, repeat 1st and 2nd rows once. Break off contrast.
Using main shade, repeat 1st row once.
Cast off in rib.

To Make Up the Slipover

Review the yarn ball band for any special washing or pressing instructions.
Join side and armband seams.

Materials

Double Knitting yarn in white or ivory.
Oddments of colours for contrast if required.
Sweater:
4 (4, 5, 5, 6, 6, 6, 7, 7, 9) x 100g balls
Slipover:
2 (3, 3, 3, 3, 4, 4, 4, 4, 4) x 100g balls

Pair each of No 8 (4mm) and No 10 (3¼mm) needles.

Tension

29sts and 30 rows to four inches on 4mm needles over pattern.
Editor's note: When substituting yarns, making a swatch is a good idea; I think you are fairly safe to assume that this is designed for a standard DK - 22sts x 30rows in stocking stitch on 4mm needles.

Size matters

To fit chest:
28 (30, 32, 34, 36, 38, 40, 42, 44, 46) inches (actual measurement is larger giving ease from 3 inches on smallest size up to 4 inches on largest size).
Length: 19 (21, 22, 22, 26, 26, 26, 26, 26, 27) inches.
Sleeve seam:
14½ (15½, 16½, 17, 20, 20, 20, 20, 20, 20) inches.

Abbreviations

k: knit
p: purl
tbl: through back loop
C9B: slip the next 4 stitches on to a cable needle and hold at the back of the work, k5 stitches, then k4 stitches from cable needle
C9F: slip the next 5 stitches on to a cable needle and hold at the front of the work, k4 stitches, then k5 stitches from cable needle
k2tog or p2tog: knit or purl 2 stitches together (decrease one stitch).
k2togtbl or p2togtbl: knit or purl 2 stitches together through back loops.

A word on the wool.

Original yarn was a good quality double knitting woollen blend.

Disclaimer
(well...almost)

In transposing any patterns it is always a risk that errors will be introduced, in spite of dedicated proof reading.
If you have any problems with this pattern, please and I will try and assist.


April 2019

Colourful Bolero

ColourfulBolero.jpg

Printed towards the end of WW2, in an era of extreme shortages **, this is knitwear designed with a view to using left overs or even maybe "pulled back" wool.
Despite that I think it looks really attractive - and is a very interesting design being knitted sideways.

Instructions.

Instructions for one size.
The pattern stitches are given below.
Try out a piece of the pattern for practice by casting on 24 stitches.

Pattern:

1st row (wrong side facing): Purl.
2nd row
: * k2, p4, k1, p4; repeat from * ending row k2.
3rd row
: p2, * k4, p1, k4, p2; repeat from * to end.
4th row: k1, * twist A, p3, k1, p3, twist B; repeat from *, ending k1.
5th row: p3, * k3, p1, k3, p4; repeat from * all along, ending p3.
6th row: * k2, twist A, p2, k1, p2, twist B; repeat from * ending k2.
7th row: p4, * k2, p1, k2, ending p6; repeat from *, ending row p4.
8th row: k3, * twist A, p1, k1, p1, twist B, k. 4; repeat from *, ending k3.
9th row: p5, * k1, p1, k1, p8; repeat from *, ending p5.
10th row: k4, * twist A, k1, twist B, k6, repeat from *, ending k4.
Change to white yarn.
11th row: purl.
12th row: knit.

Repeat these 12 rows throughout.

Back

The bolero is knitted sideways.

With No 10 (3¼mm) needles, cast on 90 stitches and work 5 rows of the pattern.

Now increase at the beginning of the next and end of every following row at this side until there are 108 stitches, and 23 rows are done.
On to the end of this row cast on 37 stitches to complete the armhole shaping.

Work straight until 2 more complete patterns are done, and then work 1 row of the next pattern, which brings you back to the top of the shoulder.
Cast off 16 stitches for the back neck insert (to be knitted later).
Finish this pattern and work 5 more patterns, and then 9 rows of 6th.

At the beginning of the 10th row cast on 16 stitches, and then finish the shoulder to correspond with first side, casting off 37 for the armhole and decreasing on every row thereafter until 90 stitches remain.

Finish off with 5 rows straight.

There are 15 patterns in total across the back, omitting the last 2-row white stripe.

Left front

Work as for back, but cast off 26 instead of 16 stitches on the shoulder.
Then work straight, finishing this pattern and 3 more, but omit the last white stripe.
Cast off.

Right front

Work to correspond with left front.

[Editor's note: They are assuming rather a lot here and expect you will work this out for yourself. You could continue to work the in the same sideways direction: as you have just cast off at the centre front, so you could cast on for the right front at the centre front which would mean casting on 119 stitches - then casting on 26 at the shoulder, and completing the shaping as you did for the back.
Or,
You could work exactly as you did for the left front but reversing all the shapings - so you would be doing the armhole increasing at the end of the rows and you would cast on the 37 stitches at the same edge and casting off the 26 stitches at this same edge.]

Neck Ribbing

Join back and front shoulder seams.

With No 10 (3¼mm) needles, and front of work facing, pick up and knit 80 stitches across the back of the neck. Work in k1/p1 rib, decreasing at each end of every alternate row 5 times.

Change to No 12 (2¾mm) needles and continue in rib, decreasing as before until 48 stitches remain. Cast off fairly tightly in rib.

For each front section pick up and knit 44 stitches in the same way, and decrease 5 times on alternate rows at the side edge before changing to No 12 needles. Then decrease as before until 22 stitches remain.
Cast off in rib.

For each shoulder piece pick up and knit 42 stitches across each shoulder and then shape as for back, casting off the remaining 10 stitches.

[Editor's note: It may or may not be obvious here but you are knitting on the sides of a rectangle here and decreasing towards the middle; when you sew these together you will have mitred corners - you can just see this in the photograph.]

Front Borders

With No 12 (2¾mm) needles, cast on 13 stitches and work a length of k1/p1 rib long enough to go up the left front.
Work a piece the same for the right front, but make 3 buttonholes: one in the 3rd row from the top, and the remaining 2 at one inch intervals.

To make a buttonhole: rib 5, cast off 3, rib 5; on the next row cast on 3 over those cast off in the previous row.

Continue strip for the length required, then cast off in rib.

Sleeves

Worked sideways in pattern.

With No 10 (3¼mm) needles cast on 13.

1st row: Pattern to end.
2nd row: Increase in 1st stitch, pattern to end.
3rd row: Cast on 4, pattern to end.

Repeat 2nd and 3rd rows 3 times more.

10th row: As 2nd.
11th row: Cast on 17, pattern to end.
12th row: Increase in 1st stitch, pattern to end.
13th row: Pattern to last stitch, work twice into this.

Repeat 12th and 13th rows 15 times more, then the 12th row again.
There are now 84 stitches on the needle and 44 rows have been done.
Work the next 42 rows straight in pattern.

87th row: Pattern to the last 2 stitches, k2tog.
88th row: k2tog, pattern to end.

Repeat 87th and 88th rows 15 times more, then 87th row again.
119 rows have now been done, and there are 51 stitches on the needle.

120th row: k2tog, pattern to end.
121st row: Cast off 17, pattern to end.
122nd row: k2tog , pattern to end.
123rd row: Cast off 4, pattern to end.

Repeat 122nd and 123rd rows 3 times more, leaving 13 stitches on the needle.
Work 1 row in pattern; cast off.

This finishes the 11th coloured stripe.

Making Up

Press work lightly on wrong side under a damp cloth.
Sew together side and sleeve seams; insert sleeves.
Sew on buttons.
Join ribbing at corners neatly before stitching front strips to edge.

Materials

3 ply yarn: 1 oz in main shade (M) plus 1oz each in 5 different shades of the same wool, or odd balls of different colours to make up this amount.

[Editor's note: Looking at the photo and instructions, presumably one of these colours needs to be white.]

Pair each No 10 (3¼mm) and No 12 (2¾mm) needles.

Tension

32 stitches to 4 ins on No 10 (3¼mm) needles.

Size matters

To fit chest 33-35 inches;
length from top of shoulders: 18½ inches;
sleeve seam: 5½ inches.

Abbreviations

Twist A: Knit into back of 2nd stitch on left-hand needle, then knit into front of 1st stitch, drop both stitches off needle together.

Twist B: Knit into front of 2nd stitch on left needle, then knit into front of 1st stitch on left needle, slip both off together.

k2tog or p2tog: work 2 sts together to decrease.

A word on the wool

Susan Crawford, who specialises in vintage knits, offers lovely Fenella wool which "knits up to that elusive vintage ‘3 ply’ tension".

Jamiesons have an excellent range of colours in "2ply laceweight" which states: This yarn can be used in vintage patterns which call for "3ply yarns".

John Arbon has some wonderful laceweight that looks suitable.

Disclaimer
(well...almost)

In transposing any pattern it is always a risk that errors will be introduced, in spite of dedicated proof reading.
If you have any problems with this pattern, please and I will try and assist.

** The 'Make Do and Mend' campaign - which is currently quite a well known slogan from WW2 - was launched to encourage people to make their existing clothing last longer. Clothes care was a key part of the Make Do and Mend message. Shortages of basic materials and consequential clothing rationing necessitated imaginative use of materials; this included recycling and renovating old clothes, and the innovative use of home-made accessories, which could alter or smarten up an outfit. You see a lot of these ideas in magazines of that era appearing as little knitted collars and cuffs or just inexpensive embellishment ideas. This type of pattern continues from its humble beginnings well into the 1950s - and not surprising since although the war ended in 1945, clothes rationing did not end until 1949.

Rationing worked by allocating each item or category of clothing a 'points' value which varied according to how much material and labour went into its manufacture. Each person was allocated a fixed number of coupons to "spend" when they purchased clothing. In 1941, at the inception, adults receive 66 but this allocation shrank as the war progressed: to 48 in 1942, 36 in 1943 and 24 by 1945. As for knitwear specifically - a jumper, for example, used up 5 coupons and socks 1-3. Making your own knitwear did not help much since knitting wool was also rationed (almost pro rata) with two ounces of knitting yarn requiring one coupon; however, with essentials such as boots and overcoats requiring 7 coupons you can see why people were reluctant to spend any coupons at all on knitwear when they could reuse old "pulled back" yarn.

One interesting result of this evolved from the fact that "mending cards" of yarn were not rationed at all - presumably to encourage the make-do-and-mend mentality. They were traditionally dull buff or grey colours being intended to darn mens socks. [I have inherited many of these cards which sit at the bottom of my work basket - commercial socks are much tougher these days]. However during this period the commercial yarn companies started to produce "mending cards" in all kinds of wild colours which fitted perfectly with multicoloured designs such as this bolero, or the ubiquitous Fair Isle sweater patterns of the period. The influence of rationing some items and not others could be seen much wider than just in knitting yarn in that people would find ways of using many different or less usual materials for clothing if they happened to be "off the ration".

The popularity of multicoloured sweaters, and specifically Fair Isle, was very much to do with being able to use smaller amounts of yarn from different sources and make a garment that looked fresh and new, rather than the collection of oddments which it really was. Sewing patterns were also offered with this in mind - I have a lovely blouse pattern from the period with terrific square shoulders and nipped in waist that is designed to be made in 2 fabrics out of "2 of your husbands old shirts" with the pattern pieces shown laid out accordingly on the shirts, (noting that men's shirts of the period were positively voluminous).

March 2019

Spring Thickie

SpringThickie1.jpg

Another highly wearable jumper with a flattering neckline from the 1950's.
The sleeves look to be a pleasing (to me) three-quarter length but with a set in style that is almost a dolman, yet with a flattering line fitted to the neck shaping.
Although cited as a "thickie" in 1950s terms it's made in a standard double knitting weight yarn - so "Spring Thickie" or "Square Neck Casual" - I leave the name up to you.

Instructions.

Instructions for the larger size is given in brackets. Where one set of figures is given this applies to both sizes.

The sweater is worked in an all-over pattern involving loops and slipped stitches. It is advisable to practise this stitch to get used to it before starting the main work. Take particular care not to drop any stitches as it is difficult to pick them up again without spoiling the pattern.
Where numbers of stitches are given these apply to the basic number only, ie each double stitch is counted as one stitch.
[Editor's note: This is easier to understand once you have practised the stitch.]

Pattern stitch

With No 9 needles, cast on 13 stitches, and work 2 inches to practise the pattern.
1st row: k1 * insert needle into next stitch and knit, winding wool twice round needle; repeat from * to end.
2nd row: Drop 1st loop of 1st stitch off needle, keeping index finger of left hand on 2nd loop to prevent it slipping off, * now knit this 2nd loop together with 1st loop of next stitch, winding wool twice round needle as before and leaving the 2nd loop still on left needle; repeat from * to last loop and stitch, knit these together, winding wool round needle twice as before. [12 sts]
3rd row: Drop 1st loop of 1st stitch off needle, keeping finger of left hand on 2nd loop to prevent it slipping off, * now knit this 2nd loop together with 1st loop of next stitch, winding wool twice round needle as before and leaving the 2nd loop still on left needle; repeat from * to
last loop on left needle, knit into back of this loop, winding wool twice round needle.

The 3rd row forms the pattern and this row is now repeated throughout.

[Editor's note: Just to encourage you - this pattern is easier to do in practice than to explain.]

Back

Using yarn in main shade and No 9 needles, cast on 101 (109) stitches and work straight in pattern starting with 1st and 2nd rows [once 2nd row is done there are 100 (108) stitches]; continue until 31 (31) ridges have been done from start.

Continue in pattern and shape for armholes:
Next row (right side facing): Cast off 20 (24) [to cast off — knit the
1st loop instead of dropping it, * knit together the next 2 loops forming the double stitch but putting wool round needle once only, then slip the 1st stitch over the 2nd stitch in the usual way; repeat from * until 20 (24) stitches have been cast off], then pattern 60 (60), cast off the last 20 (24) stitches in the same way.
Break off yarn.

With wrong side facing, rejoin wool and continue straight in pattern until 51 (51) ridges have been done from start.
Break off main shade yarn, and join in white yarn.

**Continue thus:
1st row (right side facing): k1, in the usual way, * k2 loops together winding wool round needle once - thus making an ordinary stitch; repeat from * to end. [61 (61) sts]
2nd row: In white yarn, k2tog, [p1, k1] 28 times, p1, k2tog.
3rd row: In white yarn, [p1, k1] 29 times, p1.
4th row: In white yarn, p2tog, [k1, p1] 27 times, k1, p2tog.
5th row: In white yarn, [p1, k1] 28 times, p1.
Change to No 11 needles and continue in rib with 2 rows main shade, 4 rows white, 2 rows main shade, and 4 rows white, and decreasing at each end of every alternate row.
Cast off in rib. **

Pocket linings (make 2 the same)

Begin by making pocket linings.
With main shade and No 9 needles, cast on 26 (26) stitches and work about 4 inches in stocking stitch, ending with a purl row.
Break off yarn and leave stitches on a spare needle or stitch holder.
Make another the same.

Front

Using yarn in main shade and No 9 needles, cast on 101 (109) stitches and work in pattern exactly as given for back, starting with 1st and 2nd
rows, until 11 (11) ridges have been done from start.
Here introduce pockets.

Next row (right side facing): pattern 9 (11), leave main shade yarn hanging, and join in white, [knit the next 2 loops together, winding wool once round needle] 26 times, slip these 26 white stitches on a spare needle or stitch holder for the time being; pick up the main shade yarn again and work across the 26 (26) stitches of one pocket lining thus [k1 winding wool twice round needle] 26 times, pattern across the next 30 (34) stitches of main work, again leave main shade yarn hanging, join in 2nd ball of white and work across the next 26 (26) stitches as before and leave on a spare needle or stitch holder; pick up main shade and work across 26 (26) stitches of 2nd pocket lining as before, pattern 9 (11).
Continue in pattern until 31 (31) ridges have been done from start, then with right side facing, shape armholes exactly as given for back, then work straight in pattern on the centre 60 (60) stitches until 41 (41) ridges have been done from start.
Break off main shade and and join in white.

With right side facing, work striped rib border for neck exactly
as given for back from ** to **.

Left sleeve

**
Using white yarn and No 11 needles, cast on 60 (60) Sts, and work 4 rows k1/p1 rib.
Join in main shade and rib 2 rows, then rib 4 rows white , increasing 1 stitch at each end of the last row; rib 2 rows main shade.

Change to No 9 needles and rib 3 rows in white.
Next row (wrong side facing): rib 3, [rib 7, increase in next st.] 7 times, rib 3. [69 (69) sts]
Break off white yarn.

Join in main shade and work first 3 rows of pattern as given for back.
Next row: Knit and purl in 1st loop of 1st stitch instead of dropping it, keeping 2nd loop on left needle as before, pattern to end as given for 3rd pattern row.
Next row: Knit and purl in 1st loop of 1st stitch instead of dropping it,
keeping 2nd loop on left needle as before, pattern to last stitch as given for 3rd pattern row, insert left needle into loop of last stitch of previous row, then knit these 2 stitches together, winding wool twice round needle [this gives an increase without leaving a hole].

Continue repeating the last row until there are 123 (123) stitches
Work straight until 36 (38) ridges have been done from start.
**

With right side facing shape top.
* Next row: Cast off 12 (12) as described before, pattern to last 12 (12) stitches , cast off the last 12 (12) stitches in the same way.
Break off yarn.
With wrong side facing rejoin yarn, and pattern back.
Repeat from * once more.
Next row: Cast off 25 (25) stitches, pattern to last 5 (5) stitches, cast
off the last 5 (5) stitches.
Break off yarn.
With wrong side facing, rejoin wool and pattern back. [45 (45) stitches remain.].
Break off main shade.
Join in white and work striped ribbing, shaping as before.

Right sleeve

Work as for left sleeve from ** to ** [123 (123) sts].
Repeat from to once.
Next row: Cast off 5 (5) stitches, pattern to last 25 (25) stitches, cast off the last 25 (25) stitches.
Break off yarn.
With wrong side facing, rejoin yarn and pattern back.
Break off main shade.
Join in white and finish as before.

To Make Up

Do not press.
Using tailored seams, join side seams.
Pin sleeves very carefully into armholes, making sure you have the right sleeve in the right armhole, match the neck ribbing neatly at corners and pin straight edge of sleeve [side edge] to the 20 cast-off stitches at the back and front. Sew in position, then join the rest of the sleeve seam.

With No 11 needles and white wool, work a further 3 rows rib across each pocket top, then 2 rows main shade, 3 rows white; cast off in rib in white Catch down sides of pocket tops and pocket linings.

Press seams lightly.

Materials

19 (20) ozs Double Knitting, in main shade (Glamour Red - or Black);
2 oz in White.

A pair each of Nos
9 (3¾mm) and 11 (3mm) needles.

Tension

This pattern stitch is difficult to measure but it is equivalent to a basic tension of 23sts x 31 rows to 4 ins in stocking stitch on 3¾mm needles.

Size matters

The pattern is given in two sizes to fit bust: 34-35 (36-37) inches; length from top of shoulders, 23 (23) ins.; sleeve seam, 14½ (15) ins.

Abbreviations

k2tog or p2tog: knit or purl 2 sts together (decrease one stitch)

stocking stitch: one row knit and one row purl, ("stockinette")

Disclaimer
(well...almost)

In transposing any pattern it is always a risk that errors will be introduced, in spite of dedicated proof reading.
If you have any problems with this pattern, please and I will try and assist.

SpringThickie2.jpg

February 2019

Weekend Jacket

LoopJacket.jpg

I like hooded jackets and textured fabrics. The benefit of this texturing is that it's all in the stitch, and you don't have to worry about sourcing a replacement for a unique vintage yarn. I can't say how effective the pattern is other than from the photo - so may be best to try a sample swatch first (always a Good Idea - no?!). I'm sure the jacket would work just as well plain.

...attractive loop-stitch texture gives extra warmth to this eyecatching week-end jacket - and a hood can be added for a colder-day version...

Instructions

Instructions are for 4 sizes.

Back

Using No 8 (4mm) needles, cast on 79/83/87/91 stitches and work 7 rows in garter stitch, (ie every row knit).

Change to No 5 (5½mm) needles and pattern as follows:

1st row (right side facing): knit.
2nd row: purl.
3rd row: knit.
4th row: p1, * L1, p3; repeat from * to last 2 stitches, L1, p1.
5th-7th rows: as 1st - 3rd rows.
8th row: p3, * L1, p3; repeat from * to end.

These 8 rows form the pattern for the back.

Work a further 8 rows straight in pattern.

Continue in pattern, shaping sides by decreasing 1 stitch at each end of the next and every following 6th row until 71/75/79/83 stitches remain, then on every following 4th row until 67/71/75/79 stitches remain.

Work straight until back measures 18½ inches (47 cm) at centre, ending with right side facing.

Shape raglans as follows:
1st row: k2, k2togtbl, knit to the last 4 stitches, k2tog, k2.
2nd row: p3, pattern to last 3 stitches, p3.
3rd row: knit.
4th row: as 2nd. [65/69/73/77 sts]

Now repeat 1st and 2nd rows until 23/23/25/25 stitches remain, ending with right side facing.
Leave these stitches on a spare needle.

Pocket linings (make 2)

Using No 5 needles, cast on 21 stitches and work 23 rows stocking stitch, starting with a purl row.
Leave stitches on a spare needle and make another one the same.

Left Front

**Using No 8 needles, cast on 35/37/39/41 stitches and work 7 rows garter-stitch. **

Change to No 5 needles and pattern as follows:

1st and 3rd sizes:
Work 16 rows straight in pattern as for back.

2nd and 4th sizes:
Work pattern thus:
1st row: knit.
2nd row: purl.
3rd row: knit.
4th row: p1, * L1, p3; repeat from * to end
5th-7th rows: as 1st - 3rd rows.
8th row: p3, * L1, p3; repeat from * to last 2 stitches, L1, p1.
These 8 rows form pattern for left front.
Work a further 8 rows straight.

All sizes: Continue in pattern, shaping side edge by decreasing 1 stitch at the beginning of the next and following 6th row. [33/35/37/39 sts].
Work 1 row straight.

Place pocket lining as follows:
1st row: knit 6/7/8/9, slip next 21 stitches on to a stitch holder and in place of these, knit across the stitches of one pocket lining, knit 6/7/8/9.
Work 3 rows straight in pattern, then decrease 1 stitch at the beginning of the next and following 6th row, then on every following 4th row until
29/31/33/35 stitches remain.

Keeping continuity of pattern, work straight until front matches back at the side edge, ending with right side facing.

Shape raglan as follows:
1st row: k2, k2togtbl, knit to end.
2nd row: pattern to last 3 stitches, p3.
3rd row: knit.
4th row: as 2nd.

Now repeat 1st and 2nd rows until 13/13/14/14 stitches remain, ending with right side facing.

Continue decreasing at raglan edge as before on the next and every alternate row, and at the same time decrease 1 stitch at the neck edge on every row until 8/8/6/6 stitches remain, then on every following alternate row until 4 stitches remain, all sizes.

Now keep the neck edge straight and work 1 more raglan decrease as before. [3 sts]..
1st row: purl.
1st row: k1, k2togtbl.
1st row: p2, turn; k2tog and fasten off.

Right Front

Work as for left front from ** to **.
Change to No 5 needles and pattern as follows:

1st and 3rd sizes:
Work 16 rows straight in pattern as for back.

2nd and 4th sizes:
Work pattern thus:
1st row: knit.
2nd row: purl.
3rd row: knit.
4th row: p3, * L1, p3; repeat from * to last 2 stitches, L1, p1.
5th-7th rows: as 1st - 3rd rows.
8th row: p1, * L1, p3; repeat from * to end.
These 8 rows form pattern for right front.
Work a further 8 rows straight.

All sizes: Finish to correspond with left front, reversing shapings and working 'k2tog' when shaping raglan instead of 'k2togtbl'.

Sleeves

Using No 8 needles, cast on 35/35/39/39 stitches and work 7 rows garter stitch.

Change to No 5 needles and pattern as for back, shaping sides as follows:
Increase 1 stitch at each end of 7th/5th/3rd/3rd and every following 10th/8th/8th/ 6th row until there are 49/53/47/47 stitches, taking increased stitches into pattern.

3rd and 4th sizes: Now increase 1 stitch at each end of every following 10th/8th row until there are 55/59 stitches.

All sizes: Work a few rows straight until sleeve seam measures 16 inches (41 cm), ending with the right side facing.

Shape raglans as for back until 7 stitches remain all sizes.
1st row: in pattern.
1st row: k1, k2togtbl, k. 1, k2tog , k1. [5 sts]
1st row: in pattern.
Leave stitches on a safety pin.

Front Borders

Left: With No 8 needles, cast on 11 stitches and work a strip in garter stitch to fit up left front to start of neck shaping, when slightly stretched, ending with right side facing.
Sew in position as you go along.
For hooded version: Cast off.
Version without hood: Leave stitches on a safety-pin.

Right: With No 8 needles, cast on 11 stitches and work 6 rows garter stitch. Work in loop pattern as follows:
1st row: k1, * L1, k1; repeat from * to end.
1st row: knit.
1st row: k2, * L1, k1; repeat from * to last stitch, k1.
1st row: knit.
These 4 rows form pattern. Finish to correspond with left border, but casting off in pattern for hooded version.

Neck Border for version without hood

Join raglan seams.
With right side facing and No 8 needles, knit 11 from right border, pick up and knit 10 stitches up right side of neck, k5 from right sleeve, 23/23/25/25 from back decreasing 2 stitches evenly, k5 from left sleeve, pick up and knit 10 down left side of neck, knit 11 from left border. [73/73/75/75 sts]

1st row: k11, keeping continuity of loop pattern as for right border work to end.
Keeping 11 stitches of left border in garter stitch, work a further 15 rows straight in loop pattern.
Cast Off in loop pattern and garter stitch.

Hood

Join raglan seams.

With right side facing and No 8 needles, start at the centre of the right border and pick up and knit 5 stitches, pick up and knit 9 stitches up right side of neck, k5 from right sleeve, knit 23/23/25/25 from back, k5 from left sleeve, pick up and knit 9 down left side of neck, then k5 from left border to centre. [61/61/63/63 sts]

Work 5 rows k1/p1 rib, rows on right side having a k1 at each end.

1st row: rib 4/4/1/1, m1, * rib 4, m1; repeat from * last 5/5/2/2 stitches, rib 5/5/2/2. [75/75/79/79 sts]

Change to No 5 needles.
1st row: p12, starting with 4th row, work in loop pattern as for back to last 12 stitches, p12.

Keeping 12 stitches at each end in stocking stitch, continue in loop pattern until work measures 11 inches (28 cm) from start of ribbing, ending with right side facing.

Cast off 24 stitches at the beginning of the next 2 rows.
Continue straight in pattern for a further 3 in. (7 cm) on the remaining 27/27/31/31 stitches, then work a further 3 inches (7 cm) in stocking stitch.
Cast off.

Hood Border

With No. 8 needles, cast on 103/103/107/107 stitches, and knit 2 rows, then work 16 rows in loop pattern as for right border, starting with 1st row.
Cast Off in loop pattern.

To Make Up

Using a warm iron and damp cloth, press parts lightly on wrong side, omitting loop and garter stitch borders and taking care not to spoil the pattern. Join side and sleeve seams.

Pocket Tops: With right side facing and No 8 needles, knit across each set of 21 pocket stitches decreasing 1 stitch in centre. [20 sts].
Work 4 rows garter stitch.
Cast off knitwise.
Catch down sides of pocket tops neatly to main work, then sew linings lightly in position on wrong side.

Cut petersham the same length as right border plus 1 inch (2 cm) for turnings.
Mark position for 8 buttonholes on petersham, first to come 1½ in. (4 cm) up from lower edge, 8th 1 inch (2 cm) below top of neck border or below top of ribbing on hooded version, and remainder spaced evenly.
Cut buttonholes in petersham and buttonhole round them.
Pin petersham on wrong side of right border and sew along inner edge and along top and bottom edges, then catch firmly in centre between each buttonhole along outer edge.

Hooded Version: Join sides to top of hood.
Pin loop border on top of hood, cast-on edge to come level with outside edge.
Sew in position all round, sewing short edges level with short edges on front borders.
Both versions: Press seams.
Sew on buttons and press studs at neck.

Materials

25/26/27/28 x 50g balls of chunky yarn.
Without hood:
20/21/22/23 x 50g balls.

Pair each No 5 (5½mm) and No 8 (4mm) needles.

2 stitch-holders.

2 press studs.

2½ inch wide petersham for buttonhole border.

Tension

17 sts and 21 rows to 4 inches measured over stocking stitch on No 5 (5½mm) needles.

Size matters

The pattern is given in 4 sizes to fit bust:
32/34/36/38 inches, (81/86/91/96 cm);
length from top of shoulders, 27/27½/28/28½ inches, 69/70/71/72 cm);
sleeve seam, 16 inches, (41cm) all sizes.

Abbreviations:

k2tog or p2tog: knit or purl 2 stitches together (decrease one stitch).

stocking stitch: one row knit and one row purl, ("stockinette").

tbl: through back loops. [k2tog tbl also known as "ssk" or slip, slip, knit]

m1: make 1 stitch by picking up horizontal loop lying before next stitch and working into the back of it.

L1: knit next stitch, winding yarn over needle and first finger of left hand once, then over needle again, then place the 2 loops back on the left needle and knit them together with the stitch through back of loops.

A Word on the Wool:

Original knitted in Patons Doublet.
This is a chunky - stated to be "double double knitting" - so 2 times thicker than DK. Ravelry lists it as 60 yards to 50g which sounds reasonable but I am unable to confirm.

Disclaimer
(well...almost)

In transposing any pattern it is always a risk that errors will be introduced, in spite of dedicated proof reading.
If you have any problems with this pattern, please and I will try and assist.

January 2019

Jelly Bag Hat

JellyBagHat.jpg

This knitting pattern is not at all challenging (except maybe the 4 needles).
No - it's really all about the delightful picture - such a charming fresh-faced model with those decorous come-hither eyes - all combined with lovely bright colours designed to be cheering for the home makers during WW2.

This kind of quirky Wee Willy Winkie hat did become popular for a while, a few years ago but I haven't seen many around lately. Big pom poms are still the thing though....!

Materials

4 ozs mixed shades fingering, 2-ply.
Any odd balls of bright colours will do.

[Editor's note: the "2ply" is probably literally two plies but in yarn weight perhaps more like a 3 ply going by the stated tension,]

A set of four No 11 (3mm ) needles.

Instructions.

Cast on 120 stitches, 40 on each of 3 needles.
Work in rounds of stocking-stitch, changing colour, every 1½ inches.

When 6 inches are done start to decrease very gradually.
To do this knit 2 together at the end of each needle. (3 stitches decreased).
On the next decrease row knit 2 together into the backs of stitches This prevents the cap twisting always in one direction. Make these decreases about every 4 inches until there are 102 stitches left.

When cap is desired length k2tog all round, then draw wool through remaining stitches and fasten off.
For a shorter cap make decreases every 2 inches.

Finish off the end with a multicoloured wool pom-pom, but don't make
it too thick.

You may need to run thread elastic round cast-on edge to keep cap firm on the head.

Tension

8 stitches to an inch.

Size matters

Original cap is 30 inches long but you could make one 18 inches long that is perhaps more suitable for every day wear.

Disclaimer
(well...almost)

In transposing any pattern it is always a risk that errors will be introduced, in spite of dedicated proof reading.
If you have any problems with this pattern, please and 1 will try and assist.

© Christina Coutts 2007

Helpful Stuff

Pattern Archive

Categories

Yarn Links

Fabric etc

Stuff to do

  • Little rabbits
  • V&A 1940s Patterns
  • Monkey Socks
  • Necktie Bag
  • Posh Gloves
  • Criss-cross coasters