Weekend Jacket
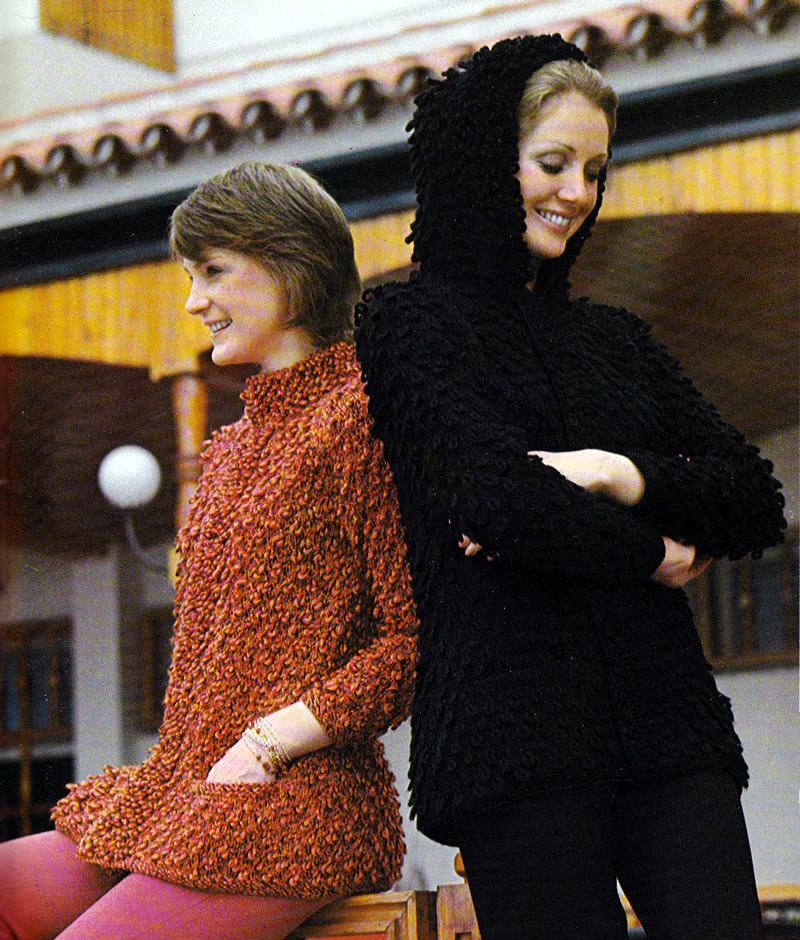
I like hooded jackets and textured fabrics. The benefit of this texturing is that it's all in the stitch, and you don't have to worry about sourcing a replacement for a unique vintage yarn. I can't say how effective the pattern is other than from the photo - so may be best to try a sample swatch first (always a Good Idea - no?!). I'm sure the jacket would work just as well plain.
...attractive loop-stitch texture gives extra warmth to this eyecatching week-end jacket - and a hood can be added for a colder-day version...
InstructionsInstructions are for 4 sizes. BackUsing No 8 (4mm) needles, cast on 79/83/87/91 stitches and work 7 rows in garter stitch, (ie every row knit). Change to No 5 (5½mm) needles and pattern as follows: 1st row (right side facing): knit. These 8 rows form the pattern for the back. Work a further 8 rows straight in pattern. Continue in pattern, shaping sides by decreasing 1 stitch at each end of the next and every following 6th row until 71/75/79/83 stitches remain, then on every following 4th row until 67/71/75/79 stitches remain. Work straight until back measures 18½ inches (47 cm) at centre, ending with right side facing. Shape raglans as follows: Now repeat 1st and 2nd rows until 23/23/25/25
stitches remain, ending with right side facing. Pocket linings (make 2)Using No 5 needles, cast on 21 stitches and work 23 rows stocking stitch,
starting with a purl row. Left Front**Using No 8 needles, cast on 35/37/39/41 stitches and work 7 rows garter-stitch. ** Change to No 5 needles and pattern as follows: 1st and 3rd sizes: 2nd and 4th sizes: All sizes: Continue in pattern, shaping side edge by decreasing
1 stitch at the beginning of the next and following 6th row. [33/35/37/39
sts]. Place pocket lining as follows: Keeping continuity of pattern, work straight until front matches back at the side edge, ending with right side facing. Shape raglan as follows: Now repeat 1st and 2nd rows until 13/13/14/14 stitches remain, ending with right side facing. Continue decreasing at raglan edge as before on the next and every alternate row, and at the same time decrease 1 stitch at the neck edge on every row until 8/8/6/6 stitches remain, then on every following alternate row until 4 stitches remain, all sizes. Now keep the neck edge straight and work 1 more raglan decrease as before.
[3 sts].. Right FrontWork as for left front from ** to
**. 1st and 3rd sizes: 2nd and 4th sizes: All sizes: Finish to correspond with left front, reversing shapings and working 'k2tog' when shaping raglan instead of 'k2togtbl'. SleevesUsing No 8 needles, cast on 35/35/39/39 stitches and work 7 rows garter stitch. Change to No 5 needles and pattern as for back, shaping sides as follows: 3rd and 4th sizes: Now increase 1 stitch at each end of every following 10th/8th row until there are 55/59 stitches. All sizes: Work a few rows straight until sleeve seam measures 16 inches (41 cm), ending with the right side facing. Shape raglans as for back until 7 stitches remain all sizes. Front BordersLeft: With No 8 needles, cast on 11 stitches and work a strip
in garter stitch to fit up left front to start of neck shaping, when slightly
stretched, ending with right side facing. Right: With No 8 needles, cast on 11 stitches and work 6 rows
garter stitch. Work in loop pattern as follows: Neck Border for version without hood Join raglan seams. 1st row: k11, keeping continuity
of loop pattern as for right border work to end. HoodJoin raglan seams. With right side facing and No 8 needles, start at the centre of the right border and pick up and knit 5 stitches, pick up and knit 9 stitches up right side of neck, k5 from right sleeve, knit 23/23/25/25 from back, k5 from left sleeve, pick up and knit 9 down left side of neck, then k5 from left border to centre. [61/61/63/63 sts] Work 5 rows k1/p1 rib, rows on right side having a k1 at each end. 1st row: rib 4/4/1/1, m1, * rib 4, m1; repeat from * last 5/5/2/2 stitches, rib 5/5/2/2. [75/75/79/79 sts] Change to No 5 needles. Keeping 12 stitches at each end in stocking stitch, continue in loop pattern until work measures 11 inches (28 cm) from start of ribbing, ending with right side facing. Cast off 24 stitches at the beginning of the next 2 rows. Hood BorderWith No. 8 needles, cast on 103/103/107/107
stitches, and knit 2 rows, then work 16 rows in loop pattern as for right
border, starting with 1st row. To Make UpUsing a warm iron and damp cloth, press parts lightly on wrong side, omitting loop and garter stitch borders and taking care not to spoil the pattern. Join side and sleeve seams. Pocket Tops: With right side facing and No 8 needles, knit across
each set of 21 pocket stitches decreasing 1 stitch in centre. [20 sts]. Cut petersham the same length as right border plus 1 inch (2 cm) for
turnings. Hooded Version: Join sides to top of hood. |
Materials
25/26/27/28
x 50g balls of chunky yarn. Pair each No 5 (5½mm) and No 8 (4mm) needles. 2 stitch-holders. 2½ inch wide petersham for buttonhole border. Tension17 sts and 21 rows to 4 inches measured over stocking stitch on No 5 (5½mm) needles. Size mattersThe pattern is given in 4 sizes to fit bust: Abbreviations:k2tog or p2tog: knit or purl 2 stitches together (decrease one stitch). stocking stitch: one row knit and one row purl, ("stockinette"). tbl: through back loops. [k2tog tbl also known as "ssk" or slip, slip, knit] m1: make 1 stitch by picking up horizontal loop lying before next stitch and working into the back of it. L1: knit next stitch, winding yarn over needle and first finger
of left hand once, then over
needle again, then place the 2 loops back on the left needle and knit
them together with the stitch through back of loops. A Word on the Wool:Original knitted in Patons Doublet. Disclaimer
|
