Home

Weblog

Pattern of
the Month

On the Needles
(...and Off the Needles)

Knitalong

Stitchcraft

Vintage Patterns

About the
Idle Hands


Archive entry for 2020

« 2019 | Main | 2021 »

December 2020

Doll Clothes

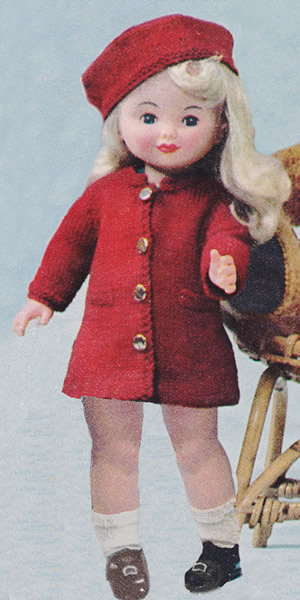
DollHatCoat.jpg

A sweet little old-fashioned set for a dolly.

Instructions.

Outfit includes coat and beret in double knitting wool; dress in 3 ply; and vest, pants and socks in 3 ply.

Coat - back

Cast on 48 stitches work 4 rows in stocking stitch.

Next Row: purl (this marks the hem- line).

Continue in stocking stitch beginning with a purl row, and decreasing 1 stitch at each end of every 6th row until 38 stitches remain.

Continue straight until work measures 5½ inches from hemline.

Raglan Shaping: Cast off 2 stitches at the beginning of the next 2 rows, then decrease 1 stitch at each end of every alternate row until 16 stitches remain.
Cast off.

Coat - right front

Cast on 28 stitches. Work 4 rows in stocking stitch.

Next Row: purl (this marks the hem- line).
Next Row: p26, k2.
Next Row: Knit.
Repeat the last 2 rows throughout, decreasing 1 stitch at the end of the 4th row and every following 6th row until 23 stitches remain, at the same time, when work measures 2 inches from hemline, ending with a purl row at the bordered edge, work buttonhole as follows:

Next Row: k2, cast off 2, knit to end.
Next Row: purl to the last 2 stitches, cast on 2, k2.

Make 2 more buttonholes at the front edge, 1½ inches apart.
Work until front measures 5½ inches from hemline, ending with a knit row.

Raglan Shaping: Making 4th buttonhole 1½ inches from 3rd, cast off 2 stitches at beginning of the next row. Decrease 1 stitch at the beginning with of every alternate row until 16 stitches remain, ending with a purl row.

Neck Shaping:
Next Row: Cast off 6 stitches, knit to end.
Continue raglan shaping and decrease 1 stitch at neck edge on the next 4 rows. Continue raglan shaping only until 1 stitch remains. Fasten off.

Coat - left front

As right front, reversing shaping and omitting buttonholes.

Coat - sleeves

Cast on 26 stitches and knit 4 rows.
Continue in stocking stitch, increasing 1 stitch at each end of the first row, until work measures 3 inches.
Shape top as you did for the back raglan until 6 stitches remain.
Cast off.

Coat - collar

Join raglan seams.
Pick up and knit 42 stitches around neck edge, omitting borders.
Knit 4 rows.
Cast off.

Coat - mock pockets

Cast on 10 stitches and knit 2 rows.
Cast Off.

Coat - making up

Press work.
Join side and sleeve seams.
Turn up hem and catch-stitch on wrong side.
Sew on pockets, 4 ins. from lower edge.
Sew on 4 buttons.

Beret

Cast on 68 stitches and knit 4 rows.

Next Row: (k3, increase in next stitch), repeat to end.
Work 3 rows stocking stitch, beginning with a purl row.
Next Row: (k4, increase in next stitch), repeat to end.
Work 6 rows stocking stitch.
Next Row: (p33, increase in next stitch), repeat to end.
Next Row: (k13, k2tog), repeat to end.
Next Row and every alternate row: purl.
Next Row: (k12, k2tog) repeat to end.
Continue to decrease in this way on every alternate row until 28 stitches remain.
Next Row: (k2tog), repeat to end.

Beret - making up

Thread wool through remaining stitches and secure.
Press work.
Join back seam.
Sew button to centre top.

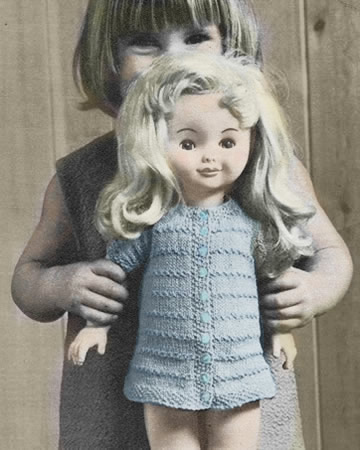
DollDress3.jpg

Dress - back

Cast on 49 stitches and work 6 rows in moss stitch.
Work 6 rows stocking stitch, 2 rows moss stitch
These 8 rows form the pattern.
Repeat the pattern, decreasing 1 stitch at each end of the next and every 6th row until 39 stitches remain.

Continue straight until work measures 5½ ins.

Sleeve Shaping. Cast on 9 stitches at the beginning of the next 2 rows. Then continue until work measures 8 ins.
Cast off.

Dress - right front

Cast on 27 stitches.
Work 4 rows moss stitch.
Next Row: Pattern 2, wfd, k2tog, pattern to end.
Next Row: Moss stitch.
Continue in pattern as for back, but working 5 stitches at front edge in moss stitch for front border, and working a buttonhole as before on the 1st row of each moss stitch stripe.
At the same time, when 8 rows of pattern have been worked, decrease 1 stitch at the side edge on the next and every following 6th row until 22 stitches remain.
Continue straight until work measures 5½ inches, ending at side edge.

Sleeve Shaping.
Cast on 9 stitches at the beginning of the next row.
Continue until work measures 7 inches, ending at front edge.

Neck Shaping.
Next Row: Moss stitch 5, and slip these 5 stitches on to a safety pin, cast off 4 stitches, pattern to end.
Decrease 1 stitch at the neck edge on the next 8 rows.
Pattern 2 rows.
Cast off.

Dress - left front

As right front, reversing shaping and omitting buttonholes.

Dress - neckband

Join shoulder seams.
Slip border stitches from safety pin on to a needle, pick up and knit 39 stitches around neck, pattern 5 border stitches from other safety pin.
Work 4 rows moss stitch, making 10th buttonhole on the 2nd row.
Cast off.

Dress - sleeve border

Pick up and k. 33 stitches along sleeve edge.
Work 3 rows moss stitch.
Cast off.

Dress - making up

Press work.
Join side and sleeve seams.
Sew on buttons.

Vest - back and front alike

With No 10 needles cast on 36 stitches.
Work 4 inches in k2, p2 rib.

Armhole Shaping.
Cast off 2 stitches at the beginning of the next 4 rows.
Decrease 1 stitch at each end of the next row.
Pattern 3 rows

Neck Shaping.
Next Row: Rib 6, cast off 14 stitches, pattern to end.
Work 12 rows.
Cast off.
Complete Other side to match.

Vest - making up

Join side and shoulder seams.
With crochet hook join wool to neck edge:
(3 chain, miss ¼ inch, 1dc in edge) all around neck.
Fasten off.

Pants - back and front alike

With No 10 needles cast on 34 stitches and knit 2 rows.
Next Row: (k2, wfd, k2tog); repeat to last 2 stitches, k2.
Knit 2 rows.
Continue in stocking stitch until work measures 3 inches.

Leg Shaping.
Cast off 7 stitches at the beginning of the next 4 rows.
Work 3 rows straight.
Cast Off.

Pants - making up

Press work.
Join crotch and side seams.
Thread elastic through holes at waist and secure.
With crochet hook work border as for neck of vest around leg openings.

Socks

With No 11 needles, cast on 28 stitches

1st row: increase in first stitch, k12, (increase in next stitch) twice, k12, increase in last stitch.
2nd and alternate rows: purl.
3rd row: increase, k14, (increase in next stitch) twice, k14, increase.
5th row: increase, k16, (increase in next stitch) twice, k16, increase.
7th row: increase, k18, (increase in next stitch) twice, k18, increase.
8th row: purl.
Next row: k26, k2tog, turn.
Next row: p9, p2tog, turn.
Next row: k9, k2tog , turn.
Continue decrease 1 stitch each side of centre stitches until 36 stitches remain altogether.
Work 2 inches in stocking stitch over all stitches.
Work 6 rows k2, p2, rib.
Cast off ribwise.

Socks - making up

Press work.
Join back and foot seam.

Materials

Coat and Beret: 3ozs Double Knitting
5 buttons
No 9 (3¾mm) knitting needles

Dress: 1oz 3 ply
10 buttons
No 10 (3¼mm) knitting needles

Vest, Pants and Socks: 2ozs 3 ply
12 inches of elastic
No 10 (3¼mm) and No 11 (3mm) knitting needles
No 11 (3mm) crochet hook

Tension

24 sts to 4 inches on No 9 needles.
[This would be the DK yarn tension]

Size matters

Designed to fit a 20-inch doll.

Abbreviations

ch: chain
dc:
double crochet remembering that this is UK notation, and in the US this stitch is referred to as single crochet.

k2tog: knit 2 sts together
p2tog:
purl 2 sts together
moss stitch:
repeat k1, p1 on an odd number of stitches so that a previous row's knit stitch is purled and vice versa. (Also known as seed stitch).
wfd: wool forward to making an extra stitch by passing the yarn over the needle when you knit the following stitch. [This also creates an eyelet hole which can be for for decoration or a small buttonhole]

A Word on the Wool.

The pattern is sized for a 20 inch doll which may suit "Our Generation", "American Girl" or vintage Pedigree dolls.

3 ply yarn can be easily found as baby wool in white which would be fine for the vest/pants/socks but for the dress you may be challenged to find more interesting colours.

1 ounce (oz) is approximately 28g.

Disclaimer (well...almost)

In transposing any pattern it is always a risk that errors will be introduced, in spite of dedicated proof reading. If you have any problems with this pattern, please and I will try and assist.

November 2020

Nordic Slipover

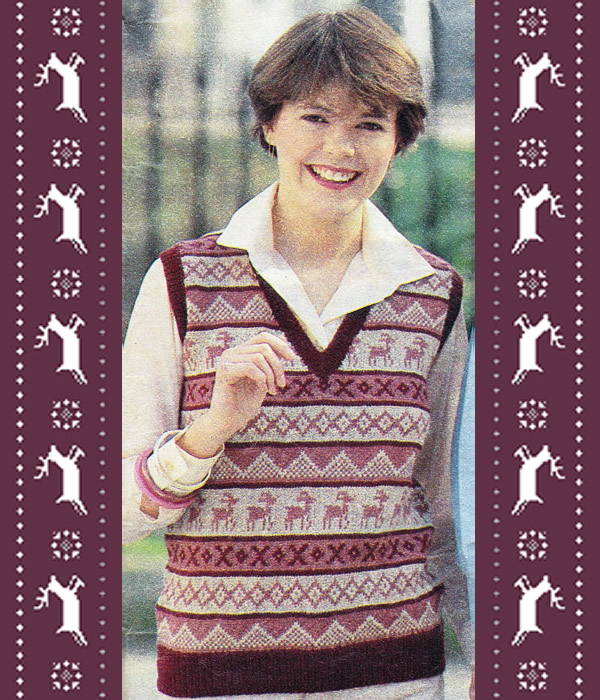
NordicSlipover3.jpg

A cute seasonal sleeveless sweater.
Co-incidentally I see that Wardrobe Icons have featured "knitted vests" as an "unexpected hero" this week, having "fallen in love with how versatile it is as a layering piece". They illustrate it with 3 shapes including fair-isle patterns with a closer fit and plain with a relaxed fit.
You could replace the Nordic style pattern given here with any fair-isle pattern of your choosing, just repeating it across the width of the sweater, making sure to centre the pattern - for example the Shetland Folklore pattern which is worked over a 10 stitch repeat.
I have a "relaxed fit" example in polka dots, which could easily be knitted plain.

Instructions

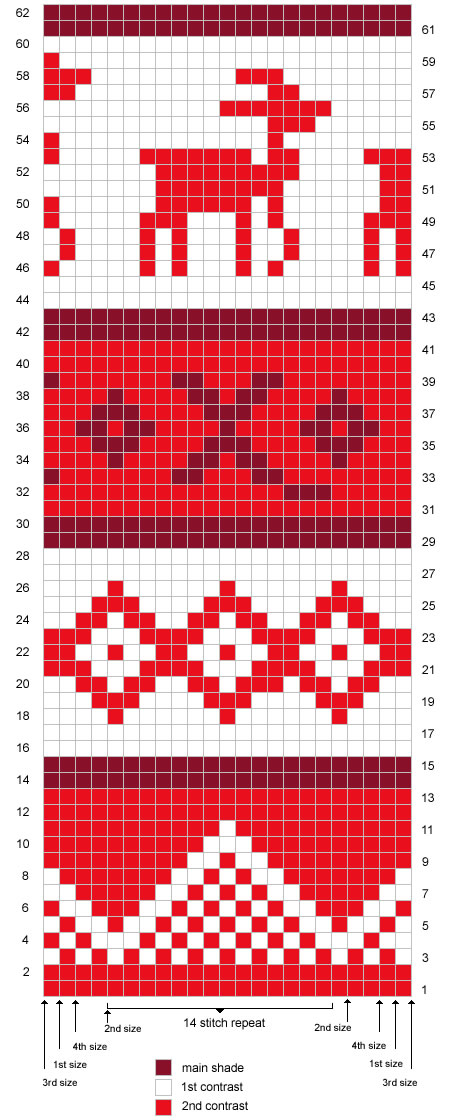
Note: When working the colour pattern from the chart, strand the yarns loosely across the back of the work over not more than 3 stitches at a time, to keep the fabric elastic.
Work from the chart, reading odd rows knit from right to left and even rows purl from left to right.

Back

With No 12 (2¾mm) needles and main shade (MS), cast on 106 [114, 120, 128] stitches and work in K1/P1 for 2½ inches, ending with a right side row.

Next row: Rib 1 [5, 4, 4] * m1, rib 4; repeat from * to last 1 [5, 4, 4] stitches, m1, rib 1 [5, 4, 4].
(133 [141, 149, 159] sts).

Change to No 10 (3¼mm) needles and work in pattern from the chart, joining in and breaking off colours as required, working the first 4 [1, 5, 3] and last 3 [0, 4, 2] stitches on knit rows, and the first 3 [0, 4, 2], and the last 4 [1, 5, 3] stitches on purl row as indicated, and working the 14 stitch repeat pattern 9 [10, 19, 11] times across in between.

Continue until back measures 14½ inches, ending with a wrong side row.

**

Shape Armholes:
Keeping pattern correct, cast off 6 stitches at the beginning of the next 2 rows. Decrease 1 stitch at each end of the next 9 [11, 11, 15] rows, then at each end of every alternate row until 95 [99, 105, 109] stitches remain.

Work without further shaping until back measures 22½ [23, 23, 23½] inches, ending with a wrong side row.

Shape Shoulders:
Cast off 8 [9, 9, 10] stitches at the beginning of the next 4 rows, then 9 [8, 10, 9] stitches at the beginning of the following 2 rows.
(45 [47, 49, 51] sts).

Leave stitches on a spare needle or stitch holder.

Front

Work as for Back up to **.

Shape Armholes and Neck:

Next row: keeping pattern correct, cast off 6 stitches, and pattern until 60 [64, 68, 73] stitches are on the right hand needle; turn and leave remaining stitches on a spare needle or stitch holder.

Continue on first set of stitches only.
Work one row.

Decrease 1 stitch at the armhole edge on the next 9 [11, 11, 15] rows, and then on every alternate row, at the same time, decrease 1 stitches at the neck edge on the next row, and every alternate row until 38 [39, 41, 42] stitches remain.

Then continue to decrease 1 stitch at the neck edge only on every alternate row until 32 [34, 37, 39] stitches remain. Then decrease 1 stitch at the neck edge only on every following 3rd row until 25 [26, 28, 29] stitches remain.

Work without further shaping until front matches back to start of shoulder shaping, ending with a wrong side row.

Shape Shoulder:
Cast off 8 [9, 9, 10] stitches at the beginning of the next and following alternate row.
(9 [8, 10, 9] sts).

Work one row, and then cast off.

With right side facing, slip centre stitch on to a safety pin, and rejoin yarn to the remaining 66 [70, 74, 79], and pattern to end.

Work to match the first side, reversing the shaping.

Making Up

Press lightly using a cool iron and dry cloth - or as instructed on the ball band - omitting the ribbing.

Join right shoulder seam.

Neckband: With right side facing, No 12 needles and MS, pick up and knit 72 [76, 78, 82], stitches down left neck, knit stitch from safety pin (mark this stitch with a coloured thread), pick up and knit 72 [76, 78, 82], stitches up right neck, then knit 45 [47, 49, 51] stitches from Back, decreasing 3 stitches evenly.
(187 [197, 203, 213] sts).

1st row wrong side facing): * p1, k1; repeat from * to last 2 stitches before the marked stitch, p2tog, p1, p2togtbl; ** k1, p1; repeat from ** to end.

2nd row: k1, * k1, p1; repeat from * to last 2 stitches before the marked stitch, p2tog, p1, p2togtbl, k1; ** p1, k1; repeat from ** to end.

Repeat the last 2 rows 3 times more, then the 1st row again.
Cast off evenly in rib, decreasing at marked stitch as before.
Join left shoulder and neckband.

Armhole Borders: With right side facing, No 12 needles and MS, pick up and knit 118 [124, 132, 138], stitches round each armhole.

Work in k1/p1 rib for 9 rows.
Cast off evenly in rib.

Join side seams and armhole borders.
Press seams.

Materials

2 x 50g balls 4 ply in each of the three colours (all sizes).

Pair each No 12 (2¾mm), and No 10 (3¼mm) needles.

Tension

32 stitches x 32 rows to 4 ins (10cm) measured over pattern using 2¾mm needles.

Size matters

To fit chest 32 [34, 36, 38] inches;
length: 22½ [23, 23, 23½] inches.

Abbreviations

k2tog or p2tog: knit or purl 2 stitches together (decrease one stitch).

m1: make 1 stitch by picking up horizontal
loop lying before next stitch and working into the back of it.

p2togtbl: purl 2 stitches together through back loops.

A word on the wool

The original design was in Patons Clansman 4ply.

Disclaimer
(well...almost)

In transposing any pattern it is always a risk that errors will be introduced, in spite of dedicated proof reading.
If you have any problems with this pattern, please and I will try and assist.

October 2020

Footnote - Argyll Socks

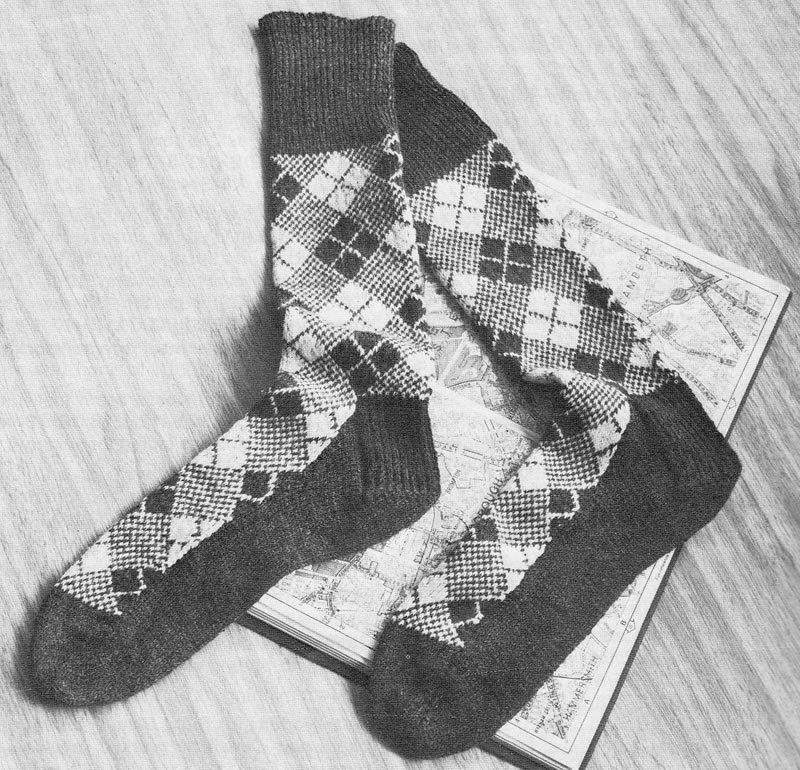
ArgyllSocks.jpg

Socks created in two colours with the fair isle technique. Less common these days, now that we can create such exciting coloured socks with self-patterning yarns. Nonetheless quite satisfying since space dyed skeins cannot produce this lovely traditional Argyll pattern.

Instructions.

Each sock is worked in three (attached) sections - leg, upper foot, and lower foot - and mostly using only 2 needles, but these needles need to be double points (that is, pointed at both ends).
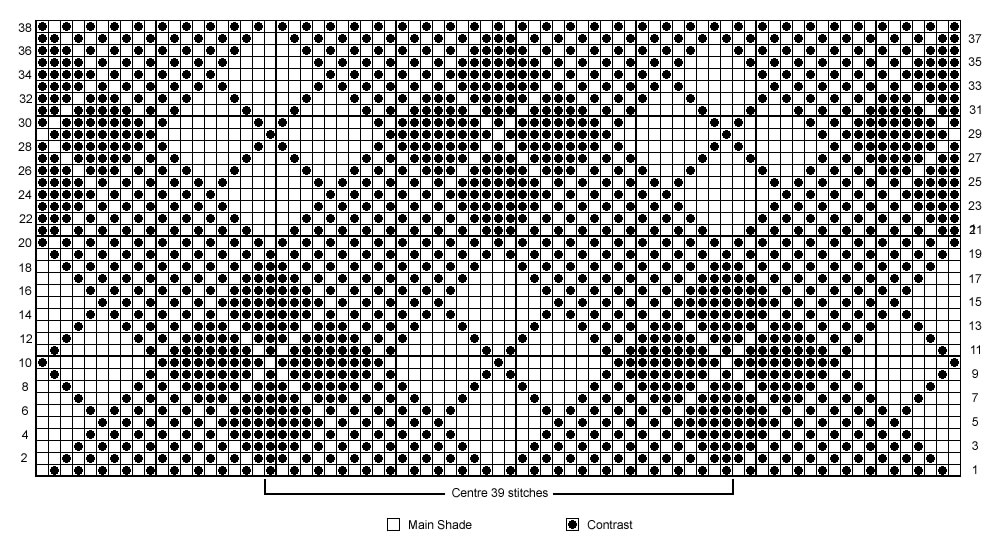
Note: When working from chart, carry the yarn not in use loosely across the wrong side of the work over not more than 3 stitches at a time to keep the fabric elastic.

Leg and instep

Starting at the top leg, using 2 needles and Main Shade (MS), cast on 78 stitches and work in k1/p1 rib for 4 inches, decreasing 1 stitch at the end of the last row : 77 stitches.

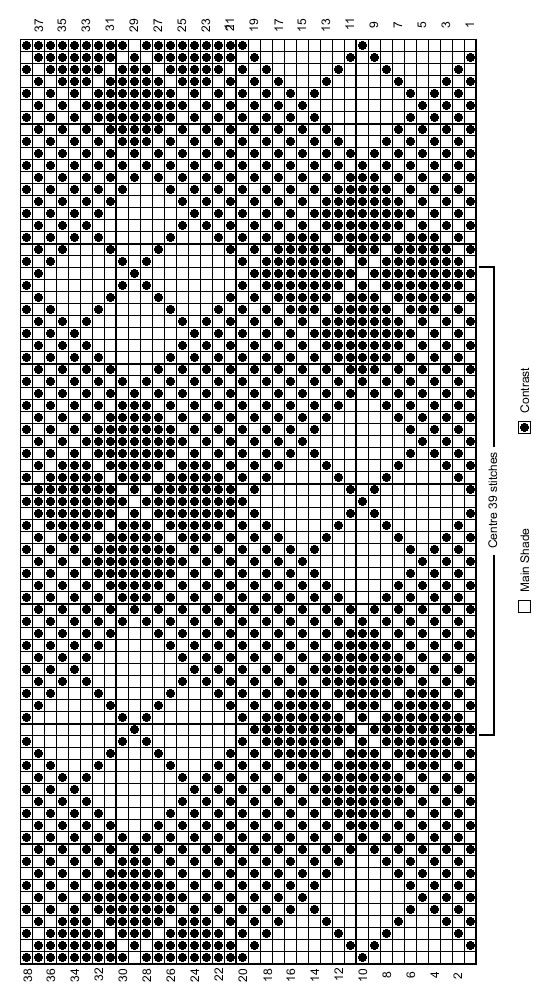
Start with a knit row, working in stocking stitch in pattern from chart, joining in Contrast (C), reading odd rows knit from right to left and even rows purl from left to right, until 75 rows have been worked.

Next row: pattern 18, increase in the next stitch, pattern to last 19 stitches, increase in the next stitch, pattern to end : 79 stitches.
Break yarns.

Slip first and last 20 stitches on spare needles for heel.
Rejoin yarns where required and continue on the centre 39 stitches for the instep, working in pattern from the chart, reading odd rows knit from right to left and even rows purl from left to right, until 76 rows have been worked.
Break C.

Continue in MS and stocking stitch (1 row knit one row purl), starting with a knit row, until foot is required length, allowing 2½ inches for toe shaping and ending with a purl row. Leave stitches on a spare needle.

Heel and sole:

Slip the 2 groups of 20 stitches on to one needle....
[Editor's note: Here you are joining the sock into its circular shape by folding in the edges to work the heel and sole - thus the stitches are arranged with the edges of the work meeting in the middle of your needle. You are continuing to work on two needles.]
...and with right side facing and MS, work as follows:

1st row: k19, k2tog, k19.
2nd row: purl.
3rd row: k1, * sl1 purlwise, k1; repeat from * to end.
4th row: purl.
Rep 3rd and 4th rows for 2½ inches, ending with a 3rd row.

Turn heel as follows:
1st row: k1, p19, p2tog, p1, turn.
2nd row: k3, sl1 knitwise, k1, psso, k1, turn.
3rd row: p4, p2tog, p1, turn.
4th row:
k5, sl1 knitwise, k1, psso, k1, turn.
5th row: p6, p2tog, p1, turn.
6th row: k7, sl1 knitwise, k1, psso, k1, turn.

Continue in this way until all the stitches have been worked : 21 stitches.

Next row: p21 stitches, then pick up and purl 18 stitches down side of heel piece, turn.
Next row: k39 stitches, then pick up and knit 18 stitches down other side of heel: 57 stitches.
Next row: purl.
Next row: k1, sl1 knitwise, k1, psso, knit to last 3 stitches, k2tog, k1.
Repeat the last 2 rows until 35 stitches remain.

Continue straight until work matches the patterned instep piece, ending with a purl row.

Toe:

Next row: k18 and now (finally) arrange the stitches on 3 needles for working the toe in the round as follows:
1st needle: k17 under foot stitches;
2nd needle: k39 instep stitches
3rd needle: knit remaining 18 underfoot stitches.
Slip the 1st from each end of the 2nd needle on to the end of the 1st and the beginning of the 3rd needle: 18/37/19 stitches.

Work in rounds shape toe as follows:
1st round:
1st needle:
knit to last 3 stitches, k2tog, k1;
2nd needle:
k1, sl1 knitwise, k1, psso, knit to last 3 stitches, k2tog, k1;
3rd needle:
k1, sl1 knitwise, k1, psso, knit to end.
2nd round: knit.
Repeat the last 2 rounds until 22 stitches remain.
Knit the stitches from the 1st needle on to the 3rd needle and graft or cast off stitches from two needles together.

Making up

Omitting ribbing, press parts lightly on wrong side following instructions on the ball band.

Sew seams down back of leg, and on each side of the sole, using a flat seam technique (not mattress stitch for example).

Sew in all ends.

Make a second sock to match.

Materials

3 x 25g balls of 3 ply yarn in main shade and 1 in lighter contrast.

Set of four No 13 (2¼mm) needles, pointed at both ends.
[Editor's note: The instructions assume you will work 78 sts on 2 of your DPNs so you need to ensure they are long enough, or use 2 extra DPNs that are.]

Tension

36 sts x 44 rows to 4 inches

Size matters

Length from top to base of heel: 13½ inches (34 cm);
length of foot: 10½ inches (27cm).

Abbreviations

MS is main shade (Lovat Heather).
C
is contrast (white).

sl1: slip the next stitch

k2tog or p2tog: work 2 sts together to decrease.

psso: pass the slipped stitch over, ("sl1, k1, psso" also known as "ssk")

A Word on the Wool.

Original yarn was Patons Nylox 3ply in colours Lovat Heather (2002) and Snow White (504).

Disclaimer (well...almost)

In transposing any pattern it is always a risk that errors will be introduced, in spite of dedicated proof reading. If you have any problems with this pattern, please and I will try and assist.

September 2020

Robin Hood and Maid Marion

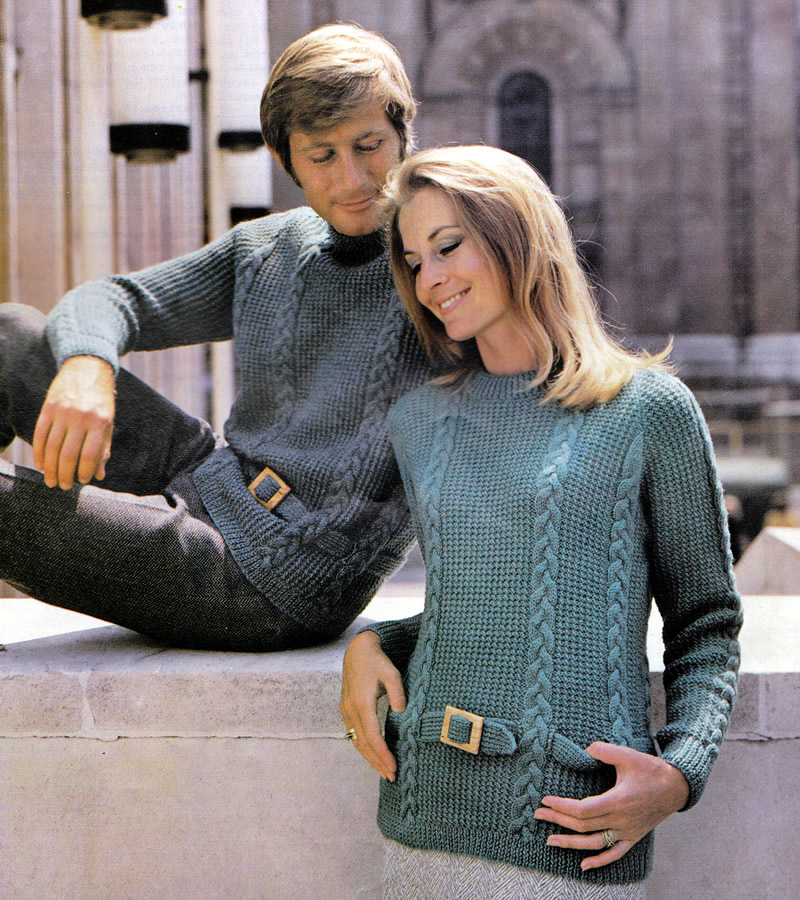
BeltedSweaters.jpg

Long-line sweaters with belts at hip level. Very up-to-the-minute sixties styling - but somehow I feel they should have been shown in Lincoln Green - no?

Instructions

The main body of the sweater is knitted in "rice stitch" which is knitting a kind of sparse moss or seed stitch with some of the knit stitches on the right side worked into the back of the stitch.

Back:


Using size 10 needles, cast on 115 (119, 123, 131, 139, 143, 147) stitches.
1st row
: * k1, p1, repeat from * to last stitch, k1.
2nd row: * p1, k1, repeat from * to last stitch, p1.
Repeat these 2 rows 5 times more.

Change to size 8 needles and pattern:
1st row (Right side facing): [p1, k1tbl] 3 (3, 4, 6, 8, 8, 9) times; * p2, k9, p2, [k1tbl, p1] 6 times, k1tbl, p2, k9, p2 * ; [k1tbl, p1] 12 (14, 14, 14, 14, 16, 16) times, k1tbl; repeat from * to * once; [k1tbl, p1] 3 (3, 4, 6, 8, 8, 9) times.

2nd row: k8 (8, 10, 14, 18, 18, 20), p9, k17, p9, k29 (33, 33, 33, 33, 37, 37); p9, k17, p9; k8 (8, 10, 14, 18, 18, 20).

3rd row: [p1, k1tbl] 3 (3, 4, 6, 8, 8, 9) times, * p2, sl3F, k3, k3 from cable needle, k3, p2, [k1tbl, p1] 6 times, k1tbl, p2, sl3F, k3, k3 from cable needle, k3, p2, * [k1tbl, p1] 12 (14, 14, 14, 14, 16, 16) times, k1tbl, repeat from *to * once, [k1tbl, p 1] 3 (3, 4, 6, 8, 8, 9) times.

4th row: As 2nd row.
5th row
: As 1st row.
6th row
: As 2nd row.

7th row: [p1, k1tbl] 3 (3, 4, 6, 8, 8, 9) times, * p2, k3, sl3B, k3, k3 from cable needle, p2, [k1tbl, p1] 6 times, k1tbl, p2, k3, sl3B, k3, k3 from cable needle, p2, * [k1tbl, p1] 12 (14, 14, 14, 14, 16, 16) times, k1tbl, repeat from * to * once, [k1tbl, p1] 3 (3, 4, 6, 8, 8, 9) times.

8th row: As 2nd row.

These 8 rows form the pattern.
Continue in pattern until work measures approximately 5 inches from the beginning, ending with the 8th pattern row.

Make Slots for Belt:

Next row: Pattern 6 (6, 8, 12, 16, 16, 18) stitches and turn, leaving remaining stitches on a spare needle.
Work 8 rows on these stitches. Break off yarn.

Join in yarn to remaining stitches, pattern 13 stitches and turn, leaving remaining stitches on a spare needle.
Work 8 rows on these stitches. Break off yarn.

Join in yarn to remaining stitches, pattern 13 stitches and turn, leaving remaining stitches on a spare needle.
Work 8 rows on these stitches. Break off yarn.

Join in yarn to remaining stitches, pattern 13 stitches and turn, leaving remaining stitches on a spare needle. Work 8 rows on these stitches. Break off yarn.

Join in yarn to remaining stitches, pattern 25 (29, 29, 29, 29, 33, 33) stitches and turn, leaving remaining stitches on a spare needle.
Work 8 rows on these stitches. Break off yarn.

Join in yarn to remaining stitches, pattern 13 stitches and turn, leaving remaining stitches on a spare needle.
Work 8 rows on these stitches. Break off yarn.

Join in yarn to remaining stitches, pattern 13 stitches and turn, leaving remaining stitches on a spare needle.
Work 8 rows on these stitches. Break off yarn.

Join in yarn to remaining stitches, pattern 13 stitches and turn, leaving remaining stitches on a spare needle. Work 8 rows on these stitches. Break off yarn.

Join in yarn to remaining 6 (6, 8, 12, 16, 16, 18) stitches, work to end.
Work 8 rows on these stitches.

Next row: Work in pattern across all stitches.

Continue in pattern until work measures approximately 15 (15½, 15½, 16, 16, 16½, 16½) inches from the beginning, ending with a wrong side row. Mark each end of the last row with a coloured thread to facilitate easier working when joining raglan seams.

Shape Raglan Armholes:
Keeping continuity of pattern, work as follows:

1st, 2nd, 3rd, 4th, and 7th sizes only.

Decrease 1 stitch at each end of the next and 3 (3, 3, 3, -, -, 1) following 4th rows. 107 (111, 115, 125, -, -, 143) remaining.

All sizes .

Decrease 1 stitch at each end of the next and every following alternate row

until 55 (57, 57, 59, 59, 61, 63) stitches remain, ending with a wrong side row. Mark each end of the last row with a coloured thread.

Shape Shoulder Sections:
Cast off 12 stitches at the beginning of the next 2 rows.
Leave the remaining 31 (33, 33, 35, 35, 37, 39) stitches on a spare needle.

Front:

Follow instructions as for the Back from to , until 79 (81, 81, 85, 87, 89, 91 ) stitches remain, ending with a wrong side row.

Shape one side of the Neck:
Next row: Work 2 together, pattern 29 (29, 29, 30, 31, 32, 32) stitches and turn, leaving remaining stitches on a spare needle.
Next row: Decrease 1 stitch at each end of the next and every following alternate row until 16 (16, 16, 17, 18, 17, 17) stitches remain.
Keeping neck edge straight, continue to decrease at armhole edge as before until 12 stitches remain, ending with a wrong side row. Mark end of last row with a coloured thread.
Shape Shoulder by casting off the remaining 12 stitches.

Shape other side of the Neck:
Slip the centre 17 (19, 19, 21, 21, 21, 23) stitches onto a spare needle.
Join in yarn at neck edge to remaining stitches, pattern to last 2 stitches, work 2 together.
Complete to match first side of neck.

Sleeves:

Using size 10 needles, cast on 53 (53, 57, 57, 61, 61, 61) stitches.

Using size 10 needles, cast on 115 (119, 123, 131, 139, 143, 147) stitches.
1st row
: * k1, p1, repeat from * to last stitch, k1.
2nd row: * p1, k1, repeat from * to last stitch, p1.
Repeat these 2 rows 8 times more.

Change to size 8 needles and pattern:
1st row (Right side facing): [p1, k1tbl] 10 (10, 11, 11, 12, 12, 12) times; * p2, k9, p2, [k1tbl, p1] 10 (10, 11, 11, 12, 12, 12) times.

2nd row: k22 (22, 24, 24, 26, 26, 26), p9, k17, p9, k29 (33, 33, 33, 33, 37, 37); p9, k22 (22, 24, 24, 26, 26, 26).

3rd row: [p1, k1tbl] 10 (10, 11, 11, 12, 12, 12) times, p2, sl3F, k3, k3 from cable needle, k3, p2, [k1tbl, p1] 10 (10, 11, 11, 12, 12, 12) times.

4th row: As 2nd row.
5th row
: As 1st row.
6th row
: As 2nd row.

7th row: [p1, k1tbl] 10 (10, 11, 11, 12, 12, 12) times, p2, k3, sl3B, k3, k3 from cable needle, p2, [k1tbl, p1] 10 (10, 11, 11, 12, 12, 12) times.

8th row: As 2nd row.

These 8 rows form the pattern.

Increase and work into pattern, 1 stitch at each end of the next and every following 10th (9th, 9th, 8th, 8th, 7th, 6th) row until there are 73 (77, 81, 85, 89, 93, 97) stitches on the needle.
Continue without further shaping until! work measures 16 (16½, 16½, 17, 17, 17½, 17½) inches for her and 17 (17½, 17½, 18, 18, 18½, 18½) inches for him from the beginning, ending with a wrong side row.
Mark each end of last row with a coloured thread.

Shape Raglan Top:
Decrease 1 stitch at each end of the next and 3 (2, 2, 2, 2, 1, 1) following 4th rows. 65 (71, 75, 79, 83, 89, 93) stitches remaining.

Work 1 row.

Now decrease 1 stitch at each end of the next and every following alternate row until 13 stitches remain, ending with a wrong side row.
Mark each end of last row with a coloured thread.
Work a further 2 inches, ending with a wrong side row. Leave these stitches on a spare needle.

Neckband

With right side of work facing and using size 8 needles, knit across the 13 stitches on top of Left Sleeve, pick up and k20 (20, 22, 22, 24, 24, 24) stitches down left side of neck, knit across the 17 (19, 19, 21, 21, 21, 23) stitches at centre, pick up and k20 (20, 22, 22, 24, 24, 24) stitches up right side of neck, knit across the 13 stitches on top of Right Sleeve and the 31 (33, 33, 35, 35, 37, 39) stitches on back neck: 114 (118, 122, 126, 130, 132, 136) stitches.
Work in k1, p1 rib for 1 inch.
Change to size 10 needles and work ½ inch.
Change to size 8 needles and work 1 inch.
Cast off loosely in rib.

Belt

Using size 10 needles, cast on 13 stitches.

1st row (Right side facing): * k1, p1, repeat from * to last stitch, k1.
2nd row: * p1, k1 , repeat from * to last stitch, p1.
Repeat these 2 rows for 36 (36, 38, 38, 40, 40, 42) inches, ending with a wrong side row.

Decrease 1 stitch at each end of the next and every following alternate row until 3 stitches remain. Knit 3 together and fasten off.

To Make Up

Using a back stitch, join raglan seams, shoulder sections and neckband, matching coloured threads on raglan to coloured threads on sleeve top.
Join side and sleeve seams.
Fold neckband in half onto wrong side and slip stitch down.
Sew buckle to straight edge of Belt.
Thread Belt through Slots.

Press seams lightly under a damp cloth.

Materials

23 (24, 26, 27, 29, 30, 31) x 25g balls double knitting wool.

Pair each No 8 (4mm) and
No 10 (3¼mm) needles.
Cable needle.

Buckle for belt.

Tension

24sts x 34 rows to 4 ins measured over rice stitch.

Size matters

Actual chest measurement: 34 (36, 38, 40, 42, 44 46) inches Length to centre back neck: 23 (23¾, 24¼, 25¼, 25¾, 26½, 27) ins Her sleeve seam: 16 (16½, 16½, 17, 17, 17½, 17½) inches
His sleeve seam: 17 (17½, 17½, 18, 18, 18½, 18½) inches

Abbreviations

k1tbl: knit through the back of the stitch.
sl3f: slip next 3 sts on to cable needle and leave at front of work
sl3b:
slip next 3 sts on to cable needle and leave at back of work

A word on the wool.

Original yarn was a pure wool superwash yarn.

Disclaimer (well...almost)

In transposing any pattern it is always a risk that errors will be introduced, in spite of dedicated proof reading.
If you have any problems with this pattern, please and I will try and assist.

August 2020

Edgewise! (more filet crochet)

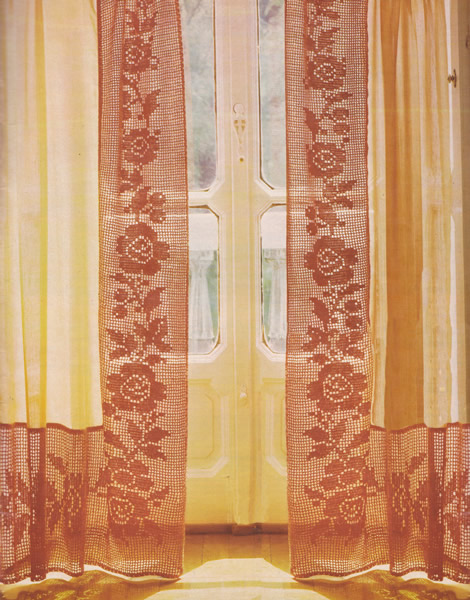
FiletEdging.jpg

"A lovely idea for enhancing plain curtains is to make this floral pattern filet crochet border."
— again very true, but still quite a commitment if you are to make them looking as splendid as in the photo; as noted in the other posts this month, filet crochet is not technically difficult, but quite laborious.
This border is worked in No 20 cotton on a 2mm hook - still fairly fine but not quite so taxing as lace. Note that it could be adapted for an edging for a table cloth or table runner.

If you want to crochet a little something, and the mere thought of this gives you a headache, then try the little bonus pattern for a flower spray.

Filet Crochet

The crochet stitches used in filet crochet are very simple, consisting of "tall" stitches which in this patter are trebles, and chain stitches combined together to create a mesh of "spaces"; some of these spaces are filled in with "blocks" of the tall stitches, hence the pattern can be represented with a chart, that shows you how the spaces and blocks are arranged. You will see how this works as I explain below.

In these examples the "tall" stitches are shown as trebles.

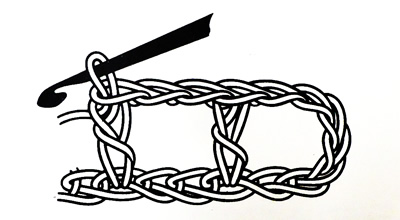
Spaces (sp)

Spaces are made by making 2 chain, missing 2 (or the same as the number of chain) stitches, then "tall" stitch into the next stitch.
The picture shows making 2 chain, missing 2 stitches and making the tall stitches trebles. You are left with a square hole which is the "space".

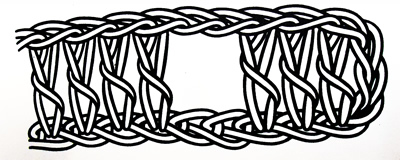
Blocks (blk)

To make a block you fill in the space with tall stitches.
In our example you put 2 stitches into what would have been the space; this replaces the chains and missed stitches and creates a "block" of 4 tall stitches: two that would have been part of the mesh of spaces and 2 that fill in the space.

The picture shows making 1 treble into each of the next 4 stitches (starting 3 chain counts as 1 treble), 2 chain, miss 2 stitches, 1 treble into the next stitch, 1 treble into the next 3 stitches (makes a block of 4).

As you continue in a pattern, you should ensure that your basic mesh is preserved, so that the trebles that make the framework of the spaces all sit evenly above one another, not offset like brickwork (unless of course that is part of the pattern!). In general the pattern is created by the blocks, rather like giant pixels making an overall picture.
This method of working is in fact very simple; you just need patience.

Instructions

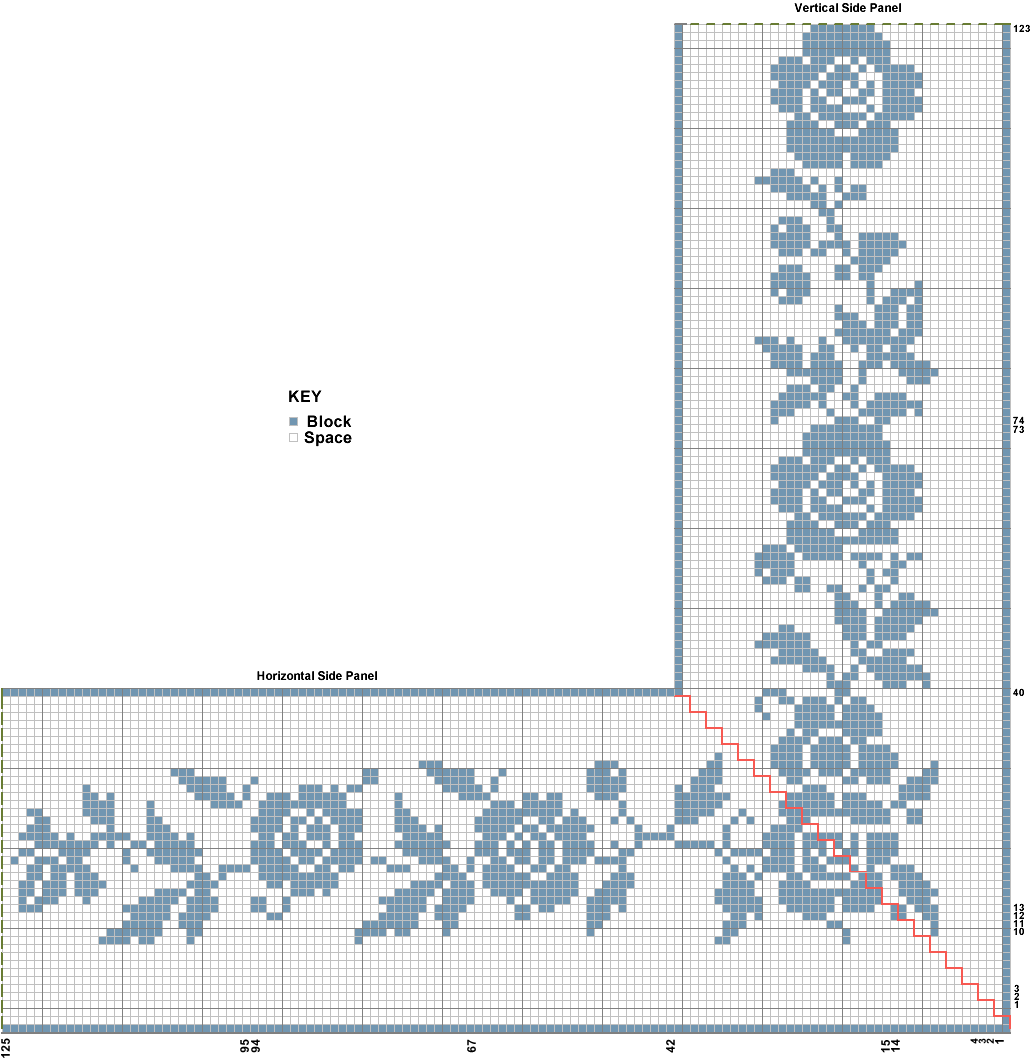
The vertical (side) edging is worked first, from the bottom, starting with shaping the mitred corner as shown in the chart; then work on upwards to the required length, after which you fasten off. Next, you pick up at the mitred corner at the bottom of the side panel and work short rows across the mitre until al the stitches are incorporated, and you are working the horizontal (bottom) panel at 90 degrees to the side edging - also as shown in the chart. Work to the require width of your curtain, then fasten off.

Vertical Side Panel

Begin at lower outer corner, make 11 chain, work 1 tr in 8th chain from hook, 1 tr in 3 chain, turn.

1st row (right side): 3 chain, miss 1 tr, 1 tr in 3 tr, 2 chain, 1 tr in 3rd chain, turn.

2nd row: 10 chain, 1 tr in 8th chain from hook; (2 chain, 1 tr in next tr) twice, 1 tr in 2 tr, 1 tr in top of 3 chain.

3rd row: 3 chain, miss 1 tr, 1 tr in 3 tr; (2 chain, 1 tr in next tr), twice, 2 chain, 1 tr in 3rd chain.

Working bracketed instructions twice more on every repeat, repeat 2nd and 3rd rows 3 times more.

Begin filet pattern thus:

10th row: 10 chain, 1 tr in 8th chain from hook, 2 chain, 1 tr in next tr, 2 tr in chain space, 1 tr in next tr, (2 chain, 1 tr in next tr) 8 times, 1 tr in 2 tr, 1 tr in top of 3 chain.

11th row:—3 chain, miss 1 tr, 1 tr in 3 tr, (2 chain, 1 tr in next tr) 8 times, 1 tr in next 2 tr, (l tr in next tr, 2 chain) twice, 1 tr in 3rd chain.

12th row: 8 chain, 1 tr in 4th chain from hook, 1 tr in next 2 chain, (2 chain, 1 tr in next tr) twice, 2 tr in chain space, 1 tr in next 4 tr, (2 chain, 1 tr in next tr) 8 times, 1 tr in 2 tr, 1 tr in 3rd chain.

Beginning with 13th row, continue working from chart (each square marked in blue worked by 2 tr in 2-chain space or previous trs as given on 10th, 11th and 12th rows) until 40th row is worked, and the mitre shaping is complete.
Continue working from chart until 73rd row is completed.
* Working chart rows in reverse by reading even rows from left to right and odd rows from right to left, work from 74th to 123rd row. Repeat from * until shorter edge of border is length required to fit your curtain.
Fasten off.

Horizontal Lower Panel

With wrong side of vertical panel facing, join cotton to outer corner.
Make 8 chain, 1 tr in 4th chain from hook, 1 tr in 4 chain, slip stitch in base of 4th tr of foundation of vertical panel; slip stitch along 2 chain of foundation, turn.
[Editor's note: You are creating the mitred corner shaping, and joining to the side panel at the same time.]

1st row (right side): 2 chain, miss 2 tr, 1 tr in 3 tr, 1 tr in top of 3 chain, turn.
2nd row: 3 chain, miss 1 tr, 1 tr in 3 tr, * 2 chain, 1 tr in top of slip stitch, 2 chain, 1 tr in same chain as 1 tr of vertical panel, 2 chain, slip stitch in base of tr, slip stitch along 2 chain, turn *.
3rd row: (2 chain, 1 tr in next tr) 3 times, 1 tr in 2 tr, 1 tr in top of 3 chain, turn.
4th row: chain, miss 1 tr, 1 tr in 3 tr, (2 chain, 1 tr in next tr), twice, repeat from * to * of 2nd row.

Working bracketed instructions twice more on every repeat, repeat 3rd and 4th rows 4 times, then repeat 3rd row again.

14th row: 3 chain, miss 1 tr, 1 tr in 3 tr, (2 chain, 1 tr in next tr) 12 times, 2 chain, 1 tr in top of slip stitch, 2 tr in chain space, 1 tr in same chain as tr, 2 tr around bar of tr, slip stitch in base of tr, turn.

Turn chart sideways and continue working from chart, beginning with 15th row, still shaping corner as set until 41st row is completed.

42nd row: Pattern to 1 tr in top of slip stitch, 3 tr in end tr of 40th row of side panel, turn.

Continue working from chart until 94th row is completed.
Repeat 67th to 94th rows until shorter inner edge is length required less 19 cm or 7½, inches.
Then work from 95th to 125th to finish off.
Fasten off.

Making Up:

Pin out work a section at a time and block.
Sew around your curtain or fabric.

Materials

One ball of Twilleys Twenty will make approximately 26½cm or 10½ inches of border.
[Editor's note:This is a No 20 cotton which came in 20g balls approximately 100m in length.]

2mm crochet hook.

Ready-made curtains, or a length of voile or appropriate fabric to make your own.

Tension

8 holes (spaces) to 2 inches or 5cm.

Size matters

Length as required.
Width: 10½ inches.
[Editor's note:Make sure you check this out if you decide to change the thread and hook sizes.]

Crochet abbreviations:

ch: chain
ss: slip stitch
sp: space - work 2 ch, miss 2 sts, work 1 tr into next st.
tr: treble.

Remember these are English crochet instructions where dc is equivalent to US single crochet; htr is equivalent to US double crochet - see "Terminology" in the side bar.

Disclaimer (well...almost)

In transposing any pattern it is always a risk that errors will be introduced, in spite of dedicated proof reading. If you have any problems with this pattern, please and I will try and assist.

EdgewiseChart.png

You can access a larger version of the chart - right click on the icon below and choose "save link as" or "save target as" (browser dependent options) to download and save a pdf file.

Curtains in Filet Crochet

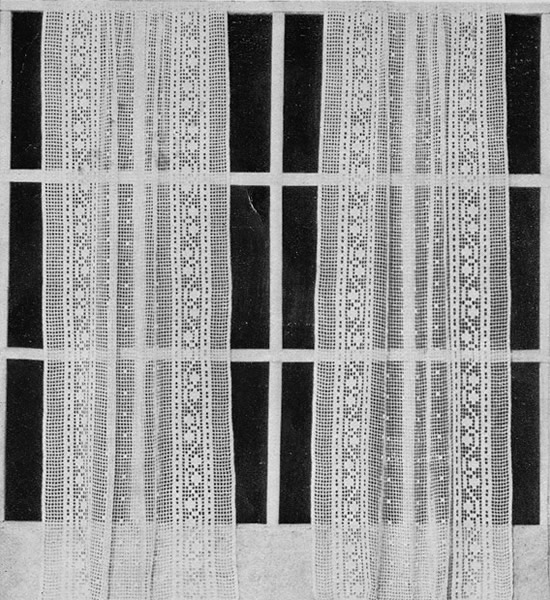
FiletCurtains.jpg

"These delightful curtains will give your home a brighter look."
— which is very true I'm sure, provided you have the skill and patience to make them.
If you are up to speed with crochet — and I'm guessing you won't attempt this unless you are — then it would be quite feasible to adapt to a slightly thicker crochet cotton and fewer repeats, in both width and length, using the chart as a guide.

If you want to crochet a little something, and the mere thought of this gives you a headache, then try the little bonus pattern for a flower spray.

Filet Crochet

This pattern as originally written does not appear to provide any explanation of the abbreviations, so unless you are competent in the method of filet crochet, it could be hard to understand. So I am providing some expanded notes on the method here.

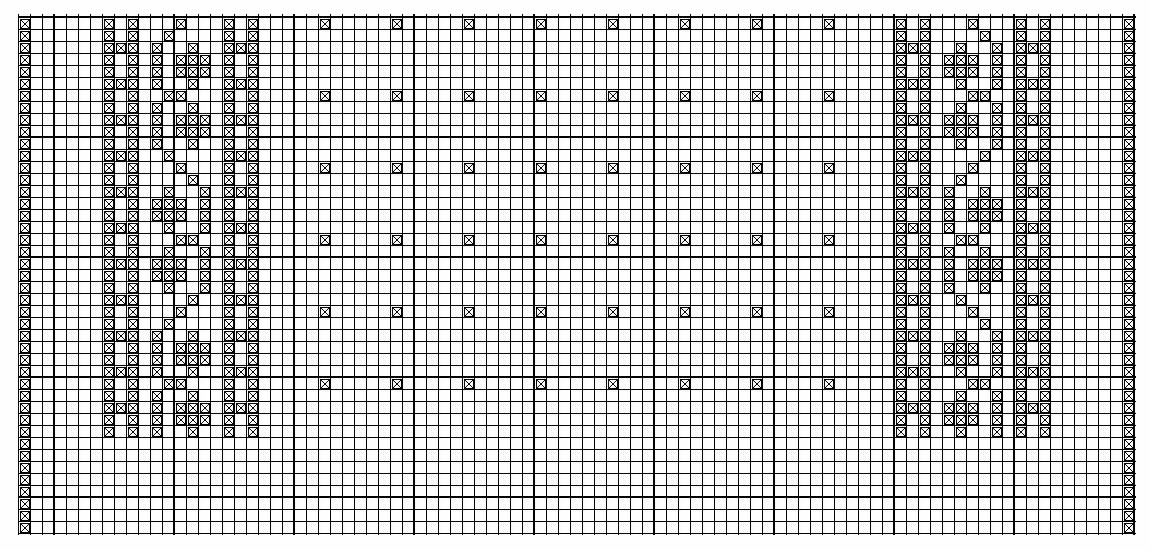
The crochet stitches used in filet crochet are very simple, consisting of "tall" stitches that could be trebles, (or double trebles or triple trebles), and chain stitches combined together to create a mesh of "spaces"; some of these spaces are filled in with "blocks" of the tall stitches, hence the pattern can be represented with a chart, that shows you how the spaces and blocks are arranged. You will see how this works as I explain below.

In these examples the tall stitches are shown as trebles.

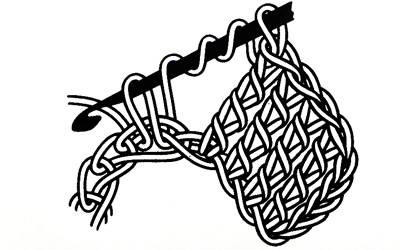
Spaces (sp)

Spaces are made by making 2 (or more) chain, missing 2 (or the same as the number of chain) stitches, then "tall" stitch into the next stitch.
The picture shows making 2 chain, missing 2 stitches and making the tall stitches trebles. You are left with a square hole which is the "space".

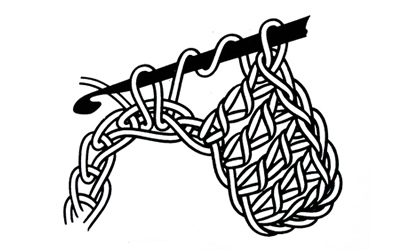
Blocks (blk)

To make a block you fill in the space with tall stitches.
In our example you put 2 stitches into what would have been the space; this replaces the chains and missed stitches and creates a "block" of 4 tall stitches: two that would have been part of the mesh of spaces and 2 that fill in the space.

The picture shows making 1 treble into each of the next 4 stitches (starting 3 chain counts as 1 treble), 2 chain, miss 2 stitches, 1 treble into the next stitch, 1 treble into the next 3 stitches (makes a block of 4).

As you continue in a pattern, you should ensure that your basic mesh is preserved, so that the trebles that make the framework of the spaces all sit evenly above one another, not offset like brickwork (unless of course that is part of the pattern!). In general the pattern is created by the blocks, rather like giant pixels making an overall picture.
This method of working is in fact very simple, although, I have to be frank, quite laborious.

Notes for this vintage pattern:

There are several considerations here: firstly the finess of the thread they specify; secondly the size of the hook needed, thirdly the tall stitch they used; and finally the spaces and blocks.

No 60 thread is very fine - like sewing cotton - I can only point out that a curtain is a movable feast, and provided you check the tension, you could adapt it. For your sanity you might want to try out with the rather more usual No 20 cotton (the lower the number the thicker the thread).

The No 5½ crochet hook is not a specification in mm. You can read about imperial hook sizes using the link in the side bar. This is going to be the type of tiny steel hook used in lace making equivalent to about ¾mm.
If you use No 20 cotton then an imperial No 3, 1¼mm (1.25mm) crochet hook might be appropriate.

The "tall" stitch here is abbreviated to "ltr" which is "long treble" I believe, and I'm given to understand that this is a triple treble.
This is made by passing the hook under the thread of the left hand 3 times, before inserting the hook into the next stitch and pulling through the loop as usual; there are 5 loops on the hook as in the picture. Pass the thread over the hook and pull through 2 loops on the hook, and repeat this manoeuvre 3 times until there is one loop left on the hook and you are ready to start the next stitch.

However although the spaces in this pattern are worked with 3 chain rather than 2, the mesh in the picture looks square, and it implies to me that the "ltr" might be a double treble rather than triple. Again, I would try a sample swatch to see how it looks. And just to encourage you - swatching in crochet is much quicker than knitting.

Here is picture of double trebles; made the same way as triple trebles, but start by passing the hook under the thread of the left hand twice instead of 3 times.

The spaces and blocks for this pattern are worked over 4 stitch repeats rather that 3 as in the examples. A space is made by working 3 chain and missing 3 stitches before the next ltr.
So for a block you put 3 stitches into what would have been the space; this replaces the chains and missed stitches and creates a "block" of 5 tall stitches: two that are part of the framework mesh of spaces and 3 that fill in the space.

Instructions

[Editor's note:These are the instructions as given in the original - however they make a lot of assumptions about one's knowledge of the method, hence I have provided more in the way of explanation above.]

The curtain is commenced at the top.
Start with 377 chain.
Foundation row: 1 ltr into 6th chain from hook, 4 more ltr for the first block, 91 spaces, 1 blk, 4 chain, turn.

[Editor's note:I feel I have to explain this row:
1 ltr into 6th chain from hook and then 4 ltr makes an effective block of 5 where the 5 chain count as your first ltr; this uses 9 of the 377 chains;
next you make your first space with 3 chain, miss 3 stitches and make a ltr into the next stitch; this uses 4 more of the foundation chains;
then you repeat the space a further 90 times which uses 360 more of the foundation chains.
So you have used 9+4+360=373 chains, and this leaves you with the final 4 chain for your last 4 ltr.
Note that you finish a space with an ltr and then make 4 ltr which means you finish with a block of 5. You then make 4 chain to count as an ltr for the start of the next row.
]

Repeat this row 7 times more.

Start pattern:

9th row (1st row of pattern): 1 blk, 6 sp, 1 blk, 1 sp, 1 blk, 1 sp, 1 blk, 2 sp, 1 blk, 2 sp, 1 blk, 1 sp, 1 blk, 53 sp, 1 blk, 1 sp, 1 blk, 2 sp, 1 blk, 2 sp, 1 blk, 1 sp, 1 blk, 1 sp, 1 blk, 6 sp, 1 blk.

Now proceed from the 10th row of the chart, that is, the 2nd pattern row.

Materials

Coats Chain Mercer Crochet No 60:
4½ balls are required for a curtain approximately 40 inches long,
and 5½ balls for a 47 inch length.

Milwards steel crochet hook No 5½.

Tension

5 spaces to 1 inch

Size matters

Length as required.
Width: 18½ inches.
[Editor's note:Make sure you check this out if you decide to change the thread and hook sizes.

Crochet abbreviations:

ch: chain
ss: slip stitch
sp: space - work 3 ch, miss 3 sts, work 1 ltr into next st.
blk: block - work 4 ltr into the next 4 sts.
ltr: "long treble" - a double or triple treble.

Remember these are English crochet instructions where dc is equivalent to US single crochet; htr is equivalent to US double crochet - see "Terminology" in the side bar.

Disclaimer
(well...almost)

In transposing any pattern it is always a risk that errors will be introduced, in spite of dedicated proof reading.
If you have any problems with this pattern, please and I will try and assist.

You can access a larger version of the chart - right click on the icon below and choose "save link as" or "save target as" (browser dependent options) to download and save a pdf file.

Repeat the pattern for the required length, making allowance for the hem and finishing with a row of ltr.

To Make Up

Turn over the hem at the 6th row of the plain mesh and stitch to the
bottom of the 4th row of pattern; then stitch along the 2nd row from the top of hem to form a heading.

Press the curtains using a warm iron over a damp cloth.

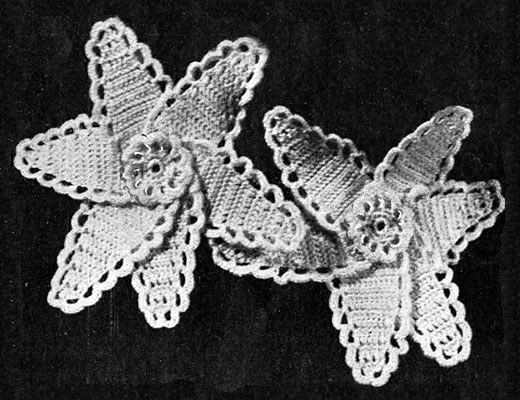
Floral Spray

FlowerSpray.jpg

This is a little addendum to the next two crochet curtain patterns providing the theme for this month. If you want to see the other patterns then search for "curtains" using the box in the side bar.
But — if you want to crochet a little something, and the mere thought of making a pair of curtains gives you a headache, then try this little bonus pattern for a flower spray. Again it asks for really tiny hook and lace cottons - but being a flower, you can freely adapt the materials and hook and make it come out any size you like.

Double Double Crochet

Dbl dc is not a stitch I had come across before, but here it is. I think it makes a rather pretty stitch.

To work a dbl dc insert the hook into the stitch and pull thread through. Then thread over hook, and pull through one loop on hook; then thread over hook, and pull through remaining 2 loops.


Petal

Commence with 13 chain.

1st row: dbl dc into 3rd ch from hook; 1 dbl dc into each of the remaining ch, 2 ch; turn.
(2 ch stands for first dbl dc of next row.
2nd row: 1 dbl dc into each dbl dc; 2 ch; turn.

Repeat the 2nd row 6 times more.

9th row: Decrease 1 stitch at the beginning and end of the row; 2 ch, turn.
(To decrease: insert hook into st, thread over hook and pull through, insert hook into next stitch and pull thread through, thread over and pull through 2 loops, thread over and pull through remaining 2 loops).
10th row: 1 dbl dc into each dbl dc; 2 ch; turn.
Repeat 9th and 10th rows 3 times more.

Fasten off.


Edging

1st row: Join thread into the dbl dc of 1st row-end, * 5 ch, miss 1 row-end, 1 dc into next row-end. Repeat from * 6 times more;
5 ch; 1 dc into 3rd dbl dc of last row of petal.
Work down other side to correspond; turn.

2nd row: 6 dc into each loop of 5 ch.
Fasten off.

Make 5 more petals.


Centre.

Commence with 6 ch, join with a slip stitch.

1st row: Into ring work 11 dc, join with a ss.
2nd row: 2 dc into each dc, 1 ss. into first dc.
3rd row: * 5 ch, miss 1 dc; 1 dc into next dc; repeat from * ending with 5 ch, miss 1 dc, 1 ss into same place as last ss.
4th row: Into each 5 ch loop work 5 dc.

Fasten off.


To Make Up.

Sew petals together at base.
Sew centre into position.

Make another flower the same, and sew on to a piece of fine wire.

Materials

Coats Chain Mercer Crochet No 60

Milwards steel crochet hook No 5.
[Editor's note: This is going to be a teeny tiny steel hook of the type used in lace making — equivalent to about ½mm. You can read about imperial hook sizes using the link in the side bar.]

Piece of fine wire.

Tension

12 rows to 1 inch
[Editor's note: Obviously depends on your choice of thread and hook.]

Size matters

The flower is about 3¼ inches from tip to tip.
The petal is 1½ inches.
[Editor's note: Or whatever size you make it using your choice of thread and hook.]

Crochet abbreviations:

ch: chain
ss: slip stitch
sp: space — work 3 ch, miss 3 sts, work 1 ltr into next stitch.
dc: double crochet.
dbl dc: "double double crochet" — explanation in the instructions.

Remember these are English crochet instructions where dc is equivalent to US single crochet; htr is equivalent to US double crochet - see "Terminology" in the side bar.

Disclaimer
(well...almost)

In transposing any pattern it is always a risk that errors will be introduced, in spite of dedicated proof reading.
If you have any problems with this pattern, please and I will try and assist.

July 2020

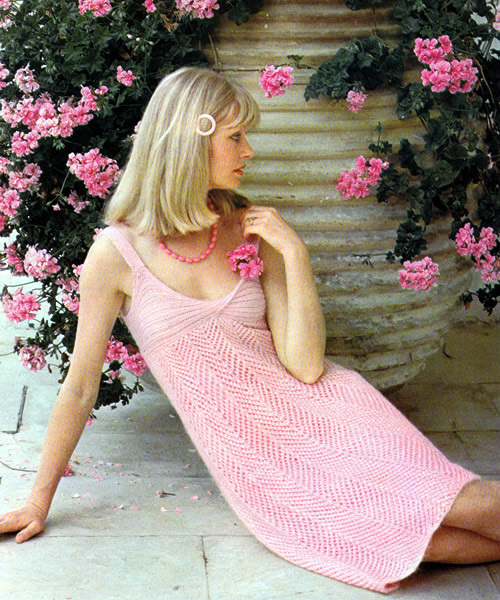
Camisole party frock

PartyDress.jpg

A very pretty strappy knitted dress which is styled for the summer, but, as usual, would work well for the winter, perhaps with a sparkly yarn, and worn with a bolero, tippet, or stole - if we are ever allowed to go out in public any time soon....

Instructions

The pattern panel for the dress is worked over 5 stitches as follows:

1st row: yfwd, k2togtbl, k1, k2tog, yfwd.
2nd row: purl.
3rd row: k1, yfwd, sl1, k2tog, psso, yfwd, k1.
4th row: purl.

Back

**
Using No 7 (4½mm) needles, cast on 135 stitches and knit one row.

Work in Pattern A as follows:

1st row (right side facing): k1, (k2tog, yfwd) 5 times, k3, * (yfwd, k2togtbl) 4 times, yfwd, sl1, k2tog, psso, yfwd, (k2tog, yfwd) 4 times, k3; repeat from * to last 11 stitches; (yfwd, k2togtbl) 5 times, k1.

2nd row: k1, purl to last stitch, k1

3rd row: k2, * (k2tog, yfwd) 5 times, k1, (yfwd, k2togtbl) 5 times, k1; repeat from * to last stitch, k1.

4th row: as 2nd.

These 4 rows form Pattern A.

Repeat them until back measures 15 inches, ending with 4th pattern row.

Shape as follows:

Next row: k1, (k2tog) twice, (yfwd, k2tog) 3 times, yfwd, sl1, k2tog, psso, * (yfwd, k2togtbl) 4 times, sl1, k2tog, psso, (k2tog, yfwd) 4 times, sl1, k2tog, psso repeat from * to last 11 stitches, (yfwd, k2togtbl) 4 times, k2togtbl, k1. [111 sts]

Continue in Pattern B as follows:

1st row (wrong side facing): k1, purl to the last stitch, k1.

2nd row: k1, (k2tog, yfwd) 4 times, k3, *(yfwd. k2togtbl) 3 times, yfwd, sl1, k2tog, psso, yfwd, (k2tog, yfwd) 3 times, k3; repeat from * to last 9 stitches, (yfwd, k2togtbl) 4 times, k1.

3rd row: as 1st row.

4th row: k2, * (k2tog. yfwd) 4 times. k1, (yfwd, k2togtbl) 4 times, k1; repeat from * to last stitch, k1.

These 4 rows form Pattern B.

Repeat them until back measures 20 inches, ending with 1st pattern row.

Shape as follows:

Next row: k1, (k2tog) twice, (yfwd, k2tog) twice, yfwd, sl1, k2tog, psso, * (yfwd, k2togtbl) 3 times, sl1, k2tog, psso, (k2tog, yfwd) 3 times, sl1, k2tog, psso; repeat from * to last 9 stitches , (yfwd, k2togtbl) 3 times, k2togtbl, k1. [87 sts]

Continue in Pattern C as follows:

1st row (wrong side facing): k1, purl to last stitch, k1.

2nd row: k1, (k2tog , yfwd) 3 times, k3, * (yfwd, k2togtbl) twice, yfwd, sl1, k2tog, psso, yfwd, (k2tog, yfwd) twice, k3; repeat from * to last 7 stitches; (yfwd, k2togtbl) 3 times, k1

3rd row: as 1st row.

4th row: k2, * (k2tog, yfwd) 3 times, k1, (yfwd, k2togtbl) 3 times, k1; repeat from * to last stitch, k1.

These 4 rows form Pattern C.

Repeat them until back measures 22 inches.

Place a marker at each end of last row.

Change to No 10 (3¼mm) needles and continue in Pattern C until back measures 4 inches from markers, ending with right side facing.

Next row: cast off 21, k8 (this includes the stitch on the needle from casting off), slip these 8 stitches on a safety-pin, cast off 29, k8, slip these 8 stitches on a safety-pin, cast off remaining 21 stitches.

Work shoulder strap as follows:
With wrong side facing and No 10 needles, rejoin yarn to 8 stitches on safety-pin and work in stocking-stitch, starting with a p. row, until strap measures 16 inches. Cast off.
Work 2nd strap in the same way.

Front

Work as for back from ** to **.

Next row: cast off 44, place a marker in the last of these stitches, cast off remaining stitches.

Join side seams of skirt.

Bodice

With No. 10 needles, cast on 34 stitches and work in rib as follows:

Next row: k1, * p2, k2; repeat from * to last stitch, k1.

This row forms rib pattern. Repeat it until strip, when slightly stretched, fits along upper edge of skirt from outer side of shoulder straps to marker at centre front.
Place a marker in "k3." edge of strip.
Rib 4 more rows.
Place a 2nd marker in opposite end.

Now continue in rib until length from 2nd marker matches length from cast-on edge to 1 st marker.
Cast off loosely in rib.

To Make Up

Starting at outer side of shoulder strap, sew first half of bodice strip in position, first marker matching centre marker of front.
Now fold under upper edge of strip, bringing 2nd marker also to centre marker of front, thus twisting the strip, then sew 2nd half of strip in position, ending at outer edge of other strap (thus leaving back edge between straps free).
Sew side edges Of bodice strips to approximately 4 inches of shoulder straps, then sew straps to front. Face straps with ribbon on wrong side
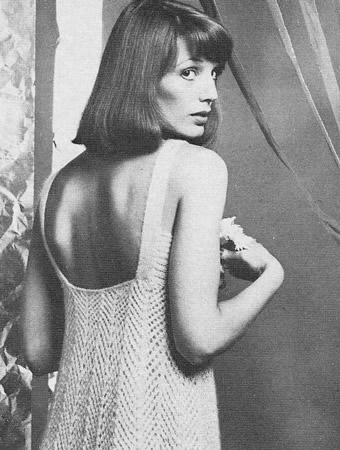
[Editor's Note: The bodice only goes around the front of the dress; it might be easier to see how you are intended to sew it to the straps if you look at the picture of the back of the dress below.]

Cut lining the full width of skirt but 2 inches longer than skirt when lying flat. Allow ½ inches for seams and 1 inch for hem.
Join side seams, then catch top of lining in position all round top of skirt.

Pin hem in position, then try dress on before stitching, to be certain lining is the correct length.

Materials

Dress: 6 x 50g balls of a light weight double knitting. (See"a word on the wool").

Pair each No 10 (3¼mm) and No 7 (4½mm) needles.

1¼ yards (about 1.2m) of 1 inch (2.5cm) wide facing ribbon.

1¾ yards (about 1.6m) of 36 inch (90cm) wide lining material in a matching shade.

Tension

25 sts and 32 rows to 4 inches measured over pattern on No 7 needles.

Size matters

The pattern is given in one size to fit bust 34 - 36 inches. Length (excluding shoulder strap) measured flat is 30 inches. (The dress drops to 32 inches when worn)

Abbreviations:

k2tog or p2tog: knit or purl 2 stitches together (decrease one stitch).
stocking stitch: one row knit and one row purl, ("stockinette").
tbl: through back loops. [k2tog tbl also known as "ssk" or slip, slip, knit]
yfwd: yarn forward
sl1: slip one stitch
psso: pass the slipped stitch over

A Word on the Wool:

Original knitted in Patons Kismet which which was 80% acrylic and 20% mohair; it was a fairly light weight yarn, and it was the fluffiness that caused it to knit to something like a DK equivalent (on the right needles).

This pattern emphasises the light weight nature of the yarn with an open-work pattern knitted on large needles.

The other thing to note is that it had an exceptional yardage - about 225m to 50g which is about double that of a normal DK, so you need to take all that into account when considering substituting.

Disclaimer (well...almost)

In transposing any pattern it is always a risk that errors will be introduced, in spite of dedicated proof reading. If you have any problems with this pattern, please and I will try and assist.

Altering the size

Unusually for this era, we have only the one size - perhaps they think those more well-endowed would not suit this style - and maybe they are right - certainly I don't think I could make it work for me.
However, if you did want to make it larger, I really think the only option is to work out the repeats in the pattern and add some extra width in the skirt - then knit the bodice section (it's knitted sideways) longer, and workout where to reposition the straps.
On top of that, if were knitting this, I would try using a delicate lace-weight yarn (there are some lovely ones around), swatching the pattern, and experimenting with different needles to get the right tension.
But then I never did like an easy life.

PartyDress-back.jpg

I'm putting this photo in to show you the back of the dress, but I can't let it pass without commenting that to me it's very vaguely sleazy - I think "come to bed eyes" would be the description. It's almost as if the photographer were more used to using his skills for a different kind of audience altogether...

June 2020

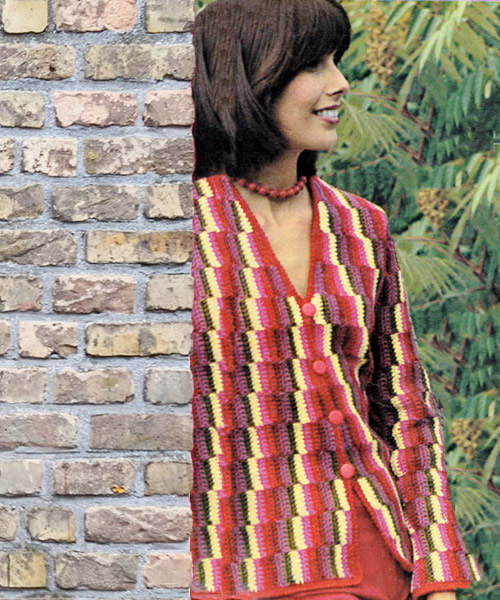
Crochet a Cardi

CrochetCardi.jpg

This looks like a very wearable crochet cardigan (for those who prefer crochet to knitting). Bands of two-row stripes in double crochet are arranged to form a flattering chevron down the centre back, giving the illusion of shaping. You could make it in a single shade, or go totally wild as shown in the photo - or you could choose more muted contrasts in naturals, perhaps greys and taupes with ecru. If you choose brights you could be guided more by Kaffe Fassett's favourite combinations, introducing turquoises with fuschia and poppy.

So .... "Make it plain and simple or bright and stunning"

Instructions.

Instructions for larger sizes are given in brackets.
[Editor's Note: The cardigan is made up of a series of narrow crochet strips which are then sewn together lengthways; the colours in the strips are offset from one another to make the chevron pattern, and they are made shorter to make the armholes and sleeve shaping.]

Main Part

1st Band: With 4mm hook and main shade (A) make 8 chain.
Foundation row: —Miss 1 ch, 1 dc in each ch to end. {7 dc}
1st Row: l ch, 1 dc in each dc.
Repeat 1st row for pattern.
Continue in pattern working 2 row stripes of the 5 contrasts (B, C, D, E, F) and main shade (A) until 40 [42 : 44 : 46] stripes are completed, ending with D [F : B : D] stripe; mark this stripe with contrast thread for centre back.
Beginning with C [E : A : C] stripe work sequence in reverse from F to A for 39 [41 : 43 : 45] more stripes, ending with A stripe.
Fasten off.

2nd Band: Make as the 1st band , but beginning and ending with contrast colour B and with centre back stripe of E [A : C : E].
Join to 1st band.

3rd Band: As 1st, but beginning and ending with contrast colour C and with centre back stripe of F [B : D : F].
Join to 2nd band.

Continue in this way, beginning and ending with next stripe of colour sequence, until the 9th band is complete.

Right Front

Next Band: Begin with contrast colour E and work 16 [17 : 18 : 19] stripes. Omit the first stripe of the previous band; join.

Next Band: Begin with A and work 14 [15 : 16 : 17] stripes. Omit one stripe at each end of the previous band; join.

Next Band: Begin with contrast colour C and work 12 [13 : 14 : 15] stripes. Join as previous band.

Next Band: Begin with contrast colour E and work 11 [12 : 13 : 14] stripes. Omit the first stripe of the previous band; join.

Shape shoulders:

Next Band: With A make 7 [8 : 10 : 11] chain. Work the foundation row and the 1st row as you did in the first band. {6 [7 : 9 : 10] dc}.
Work 2 stripes.
* Next Row: l ch, (insert hook in next dc) twice, yrh and draw through 3 loops - decrease worked - 1 dc in each dc to end.

Continue in stripes, decreasing 1 stitch at eh beginning of every 4th row until 2 dc remain. Work 1 row. Fasten off.
Omit the first stripe of the previous band; join.

Back

Reversing stripes at centre as given for main part continue thus:

Next Band: Beginning and ending B [C : D : E] work 35 [37 : 39 : 41] stripes. Omit 5 stripes of 9th band of main part for armhole; join.

Next Band: Beginning and ending D [E : F : A] work 33 [35 : 37 : 39] stripes. Omit 1 stripe at each end of previous band ; join.

Next Band: Beginning and ending F [A : B : C] work 31 [33 : 35 : 37] stripes. Join on as last band.

Next Band: As last but beginning and ending A [B : C : D]; join.

Shape shoulders:

With B [C : D : E] ** make 3 [3 : 5 : 5] chain. Work the foundation row and the 1st row as you did in the first band. {2 [2 : 4 : 4] dc}.

Next Row: l ch, 2 dc in next dc - increase worked - 1 dc in each dc to end.
Continue in stripe pattern, increasing 1 stitch at the beginning of every 4th row until there are 6 [7 : 9 : 10] dc,
Work 1 row. **
Work 16 [14 : 16 : 14] stripes, reversing stripes after 8th [7th : 8th : 7th] of these stripes. Complete as right front shoulder from *.
Sew on.

Left Front

As right front to shoulder shaping, reversing stripes and shapings, and missing 5 stripes of last band of main part for armhole.

Shape shoulders:

Beginning D [E : F : A], work as shoulder shaping of back from ** to ** . Work 2 [1 : 2 : 1] stripes. Fasten off. Sew on.

Sleeves

1st Band: beginning with A, work as for 1st band of main part, repeating 6 stripes of A, B, C, D, E and F until there are 22 [22 : 24 : 24] stripes.

2nd Band: beginning with B, work as 1st band.
Sew on.

3rd Band: beginning with B, work 24 [24 : 26 : 26] stripes. Omitting 1 stripe each end sew on to 2nd band.

4th Band: beginning with C, work as for 3rd band. Sew on.

5th Band: beginning with C, work 26 [26 : 28 : 28] stripes. Omitting 1 stripe each end, sew on.

6th Band: beginning with D, work as for 5th band. Sew on.

7th Band: beginning with D, work 28 [28 : 30 : 30] stripes. Omitting 1 stripe each end, sew on.

8th Band: beginning with E, work as 7th band. Sew on.

9th Band: beginning with E, work 30 [30 : 32 : 32] stripes. Omitting 1 stripe at each end, sew on.

10th Band: beginning with F, work as 9th band.

Now shape top:
11th Band: beginning with D, work 24 [24 : 26 : 26] stripes. Omitting 3 stripes at each end of previous band and sew on.

12th Band: beginning with F, work 22 [22 : 24 : 24] stripes. Omitting 1 stripe each end of previous band and sew on.

13th Band: beginning with B, work 20 [20 : 22 : 22] stripes. Sew on as last band.

Making Up

Press work lightly.
Join shoulder and sleeve seams.
Set in Sleeves.

Edging:
Using the 3½mm hook join A to centre back at lower edge.

1st Round: l ch, 1 dc in end of each row or dc around entire outer edge, working 3 dc in the corners; slip stitch to 1st ch at the beginning of the round.
2nd Round (make buttonholes): 1 ch, 1 dc in each dc to corner; 3 dc in corner dc, 1 dc in 23 dc, (3 ch, miss 2 dc, 1 dc in 10 dc) 4 times, 1 dc in each dc to end, working 3 dc in centre dc of left corner; slip stitch to 1st ch at the beginning of the round.
3rd Round: 1 ch, now working in reverse from left to right work 1 dc in each dc and ch; slip stitch to 1st ch at the beginning of the round.
Fasten off.

With main shade A work around sleeve edges to match.
Sew on buttons. Press seams.

Materials

5 [6 : 7 : 8] (25 gram) balls double knitting yarn in the main colour, plus,
4 [5 : 6 : 7] balls in each of 5 contrast colours.
[Editor's Note: Crochet works up quickly but does rather eat up the yarn; this cardigan needs a total of up to 24 x 50g balls of DK. The yarn used in the original was an acrylic with a yardage of approximately 150m or 164yards per 50g.]

4mm and 3½mm crochet hooks.

Tension

Pattern strip is 1¾ inches wide and 18 rows to 4 inches.

Size matters

To fit chest 32 [34 : 36 : 38] inches;
length: 23 [23 : 23½ : 23½] inches;
sleeve: 18 inches all sizes.

Crochet abbreviations:

ch: chain
ss: slip stitch
dc: double crochet
yrh: yarn round hook

Remember these are English crochet instructions where dc is equivalent to US single crochet - see "Terminology" in the side bar.

Disclaimer
(well...almost)

In transposing any pattern it is always a risk that errors will be introduced, in spite of dedicated proof reading.
If you have any problems with this pattern, please and I will try and assist.

May 2020

Chic Criss-Cross Blouse

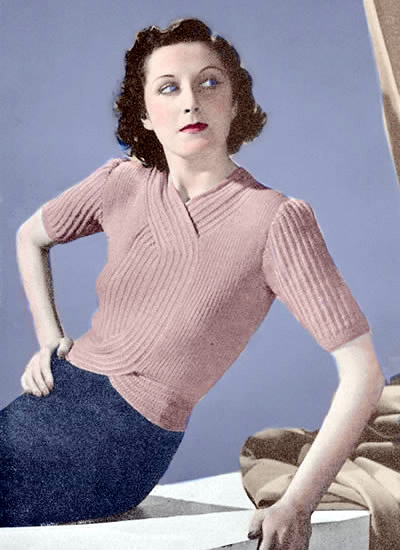
Criss-Cross.jpg

The criss-cross front on this knitted blouse is a new*, exciting idea. It fits close and snug around the waist, and does up With eight buttons - four at the back of the neck, and four at the waist. The main part is in plain k1/p1 rib, while the bands are in a fancy rib stitch.
* New in the autumn of 1938.
... and being from the 1930s, there is only one set of instructions to fit a modest 34-36 inch chest - however, they do suggest using different needle sizes to make a minor adjustment within that size range.

Instructions.

Instructions for one size only; you can slightly alter the size by using different needles as indicated in the pattern materials.

Front

Start with the belt as follows:
Cast on 27 stitches.

1st row: Slip 1,* slip 1 knitwise, p3; repeat from * to last 2 stitches, slip 1 knitwise, k1.
2nd row: Slip 1, *p1 into back of slip stitch, k3; repeat from * to last 2 stitches, p1 into back of slip stitch, k1.

Repeat these 2 rows (which form the pattern) until work measures 13½ inches, then, with right side facing: * work to last 3 stitches, turn, and work back. Work straight across tow rows then repeat from * twice.

Now shape as follows:
1st row: Work 3 stitches, turn, and work back.
3rd row: Work 5 stitches, turn, and work back.
5th row: Work 7 stitches, turn, and work back.
Continue thus, taking 2 more stitches into every alternate row until you work across all stitches.
Work 3 rows straight, then put stitches on a holder.

With right side facing, pick up and knit 46 stitches, commencing 3½ inches in from the holder, and ending 6 inches from beginning of work along upper edge (inside of curve) for right front. [The 6 inch straight piece left should reach to the centre back.]
[Editor's Note: The point I notice most here is that if 6 inches is allowed for on each side reaching round to the centre back, then the implication is that the total waist size is only 24 inches (4 x 6). This is a pretty neat little waist - even for the stated size - so it might be worth checking that the belt reaches round your waist, sitting just above the hips as shown in the picture.]

Work 19 rows in k1/p1 rib over these 46 stitches.
Leave on a spare needle.

Work a second piece to correspond to the first to make the left front, working all shapings at the opposite ends of the needle. (ie: commence picking up stitches with right side facing, 6 inches from commencement, and start the rib with p1).

The two front pieces are now joined together as follows:
Work across the 46 stitches of the left front in k1/p1 rib, then placing the 27 stitches from the first holder (right belt) in front of the work, work across them in fancy rib, and then work across 27 stitches from 2nd holder (left belt) in fancy rib, and then finally, work the remaining 46 stitches from spare needle (right front) in k1/p1 rib.
When joining fancy pieces, work together the last stitch of first piece with first stitch of second piece, and make sure that the right welt lies on top of left. [145 sts].

Now continue over all stitches:
1st row (wrong side facing): (k1, p1) 23 times, work in fancy rib pattern on next 26 stitches, k1, work in pattern on next 26 stitches (p1, k1) 23 times.
2nd row: (p1, k1) 23 times, work in pattern on next 26 stitches, p1, work in pattern on next 26 stitches, (k1, p1) 23 times.
Continue repeating these 2 rows, at the same time increasing 1 stitch at each end of every following 6th row until there are 165 stitches on the needle (keep increased stitches in k1/p1 rib).

Now work straight until front measures 11 inches, or length required; it is advisable to measure yourself here and make sure that the belt fits snugly round the natural waistline.

With right side facing, shape armholes by casting off 6 stitches at the beginning of the next 2 rows, 5 stitches at the beginning of the next 2 rows, 4 stitches at the beginning of the next 2 rows, and 3 stitches at the beginning of the next 2 rows.
Work ½ inch straight on these 129 stitches, increasing once in the centre stitch of the last row, and then shape left shoulder.

1st row (right side facing): Rib 38 stitches, turn, leaving remaining stitches on a spare needle.
2nd row: Increase in first stitch, rib to end.
3rd row: Rib.
Repeat 2nd and 3rd rows until you have 46 stitches; now decrease at the neck edge on every row until 37 stitches remain, then on every alternate row until 23 stitches remain.
Work should now measure 6¾ inches from commencement of armhole shapings.
Shape shoulder by casting off 7 stitches at the beginning of the following 3 alternate rows at the armhole edge, and at the same time decreasing 1 stitch on the 2 alternate rows at the neck edge.

Return to the main work, and complete the right shoulder to correspond.
Then work on the centre panel as follows (right side facing):
Work 27 stitches in pattern, turn, leaving other 27 stitches on a spare needle, and work back.

1st row:Work 3 stitches, turn, and work back.
3rd row: Work 5 stitches, turn, and work back.
5th row: Work 7 stitches, turn, and work back.
Continue thus, taking 2 more stitches into every row until you again work over all stitches.
Work back and then ** work 4 rows straight.
Next row: Work 17 stitches, turn, and work back.
Repeat from ** 3 times.
Now work straight for 10½ inches and cast off.
Work remaining 27 stitches to correspond, reversing all shapings.

Back

Cast on 114 stitches and work 28 rows in k1/p1 rib.
Now increase at each end of the next and every following 6th row until there are 134 stitches on the needle. Work straight until side seam equals that of front to underarm, then shape armhole by casting off 6 stitches at the beginning of the next 2 rows, 5 at the beginning of the next 2 rows, 4 at the beginning of the next 2 rows, and 3 at the beginning of the next 2 rows.
Continue straight until work measures 4¼ inches from commencement of armhole shapings.
Next row: Rib 42, cast off 14, rib 42, and continue on these last 42 stitches only, leaving remainder on a spare needle.

Shape neck by casting off 2 stitches at the neck edge on the following 5 alternate rows, and then k2tog at this edge on the following 9 alternate rows [23 sts].
Now shape shoulder by casting off 7 stitches at the armhole edge at the beginning of the following 3 alternate rows, and at the same time decreasing 1 stitch on the 2 alternate rows at the neck edge.
Work the remaining 42 stitches to correspond.

Sleeves

Cast on 91 stitches and work 1 inch in k1/p1 rib.
Change to fancy rib as for belt, and increase at each end of the 4th and every following 3rd row until there are 125 stitches on the needle.
With right side facing, shape top by casting off 6 stitches at the beginning of the next 2 rows, then k2tog at each end of every row until 29 stitches remain.
Cast off.

Making Up

Press very lightly only with a warm iron under a damp cloth.
Join side, shoulder and sleeve seams; insert sleeves, gathering all fullness to the top of the shoulder.
Take the loose end of the fancy band from the right front, underneath that of the left front, and stitch to the left front edge of the neck round to centre back.
Take the left front band over that of the right front, and stitch to the right front edge of the neck round to centre back.
Stitch bands into position at bottom of front, and also across back, meeting at the centre.
Work a row of double crochet all round neck and bottom edges and both back openings, making 4 button loops for neck fastening and 4 for waist fastening. Sew on buttons to match.

Materials

8 ozs 3 ply.

According to size: Two pairs of No 10 (3¼mm) needles for 34-36 inch chest.
or
Use two pairs of No 11 (3mm) for 33 inch chest.
Or
Use No 9 (3¾mm) for 37 inch chest.

Eight small buttons

One No 12 (2¾mm or 2½mm) crochet hook.

Tension

34 sts to 4 inches on No 10 (3¼mm) needles for 34-36 inch chest.
Or
36 sts to 4 inches on No 11 (3mm) for 33 inch chest.
Or
32 sts to 4 inches on No 9 (3¾mm) for 37 inch chest.

Size matters

One size to fit 34-36 inch chest; length from top of shoulders 18 inches. Options to slightly decrease or increase the size by using different needles to achieve different tensions.

Abbreviations

k2tog or p2tog: knit or purl 2 sts together (decrease one stitch)

stocking stitch: one row knit and one row purl, ("stockinette")

A word on the wool.

Original yarn was Patons Super Crêpe.

Susan Crawford, who specialises in vintage knits, offers lovely Fenella wool which "knits up to that elusive vintage ‘3 ply’ tension".

Jamiesons have an excellent range of colours in "2ply laceweight" which states: This yarn can be used in vintage patterns which call for "3ply yarns".

Disclaimer
(well...almost)

In transposing any pattern it is always a risk that errors will be introduced, in spite of dedicated proof reading.
If you have any problems with this pattern, please and I will try and assist.

Criss-CrossFancyRib.jpg

April 2020

Bunny Slipovers

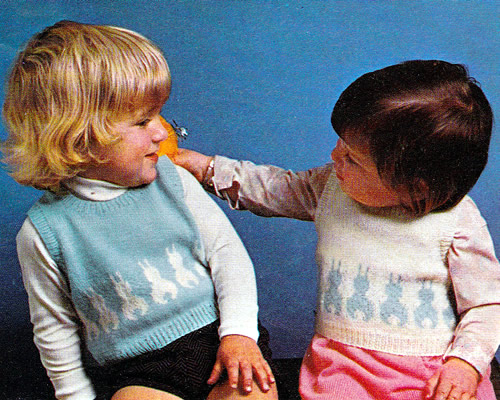
BunnySlipovers.jpg

Sweet little sleeveless jumpers for toddlers with Easter bunny motifs.

Instructions.

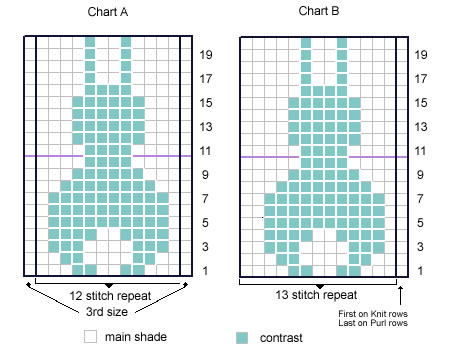
When working the colour pattern from the chart, strand yarn not in use loosely across the wrong side of the work over not more than 3 stitches at a time in order to keep the fabric elastic.
Twist the yarns on wrong side of the work when changing colour to avoid a hole.
Read odd rows knit from right to left, and even rows purl from left to right.

If you want to view chart image full size in the browser then right click on the image below and choose "view image".

Back

**
With No 13 (2¼mm) needles and main shade (M), cast on 76 [84, 90] stitches and work 1 inch in k1/p1 rib.

Next row: rib 3 [7, 10] (m1, rib 10) 7 times, m1, rib 3 [7, 10]:
84 [92, 98] sts.

Change to No 11 needles and starting with a knit row, work straight in stocking-stitch until back measures 1½ [2, 2] inches, ending with right side facing.

Change to No 10 needles and joining in contrast colour (C) as required, work rows 1-20 inclusive from chart A [B, A]

.

Work the first 0 [1, 1] stitch on knit rows and last 0 [1, 1] stitch on purl rows as indicated, repeating the 12 [13, 12] pattern stitches 7 [7, 8] times across - and the last 0 [0, 1] stitch on knit rows, and first 0 [0, 1] stitch on purl rows as indicated.
Break C.
[Editor's note: The charts are fairly easy to read but these instructions may make them seem more complicated than they are.
If this helps at all - rather than making it worse:
On the first size using chart A you just repeat the 12 stitch pattern across the work with no extra stitches at either end (12 x 7 = 84).
On the third size chart A also, you repeat the 12 stitch pattern across the work but you have one extra stitch at either end to make up the 98 stitches (12 x 8 = 96 plus 2).
On the second size chart B, you repeat the 13 stitch pattern across the work but you have one extra stitch at one end to make up the 92 stiches (13 x 7 = 91 plus 1).]

Change to No 11 needles and continue in M and stocking stitch until back measures 4½ [5, ]inches, ending with right side facing.

Shape armholes by casting off 6 stitches at the beginning of the next 2 rows, then decrease 1 stitch at each end of every row until 54 [58, 64] stitches remain. Work 1 row straight.

Now decrease 1 stitch at each end of the next and every alternate row until 48 [52, 56] stitches remain. **

Continue straight until back measures 9 [10, 11] inches, ending with right side facing.

Shape shoulders by casting off 5 stitches at the beginning of the next 2 rows, then 4 [5, 6] stitches at the beginning of the following 2 rows.

Leave the remaining 30 [32, 34] stitches on a spare needle.

Front

Work as for Back from ** to ** .
Work 3 rows straight.

Shape neck as follows:

Knit 18 [19, 20], turn, and leave remaining stitches on a spare needle.
Continue on these stitches for first side, decreasing 1 stitch at the neck edge on every row until 9 [10, 11] stitches remain.

Work straight until front matches back at armhole edge, ending with right side facing.

Shape shoulder by casting off 5 stitches at the beginning of the next row.
Work 1 row straight.
Cast off remaining stitches.

With right side facing, leave centre 12 [14, 16] stitches on a spare needle, rejoin yarn to the remaining stitches and knit to end.

Finish to correspond with first side, reversing shapings.

Making Up

Using a cool iron and a damp cloth for Baby Wool, press parts lightly on the wrong side, omitting ribbing.
Join right shoulder seam.

Neckband: With right side facing, No 13 needles and M, start at the top of the left shoulder and work as follows:
Pick up and knit 27 [29, 31] stitches down left side of neck, k12 [14, 16] from centre, pick up and knit 27 [29, 31] stitches up right side, then knit 30 [32, 34] from back :
96 [104, 112] sts.

Work 6 rows k1/p1 rib.
Cast off in rib.

Join left shoulder seam, then join neckband with a flat seam

Armhole Borders: With right side facing, No 13 needles and M, pick up and knit 86 [94, 102] stitches round each armhole and work 6 rows k1/p1 rib.

Cast off evenly in rib.
Join side seams and armhole borders.
Press seams.

Materials

Baby 3 ply 25g balls: 2 in main colour and 1 contrast colour (all sizes).

Pair each No 13 (2¼mm), No 11 (3mm), and No 10 (3¼mm) needles.

Tension

32 stitches x 40 rows to 4 ins (10cm) in stocking stitch on No 11 (3mm) needles.

Size matters

To fit chest 20 [22, 24] inches;
length from top of
shoulders: 9 [10, 11] inches.

Abbreviations

k2tog or p2tog: knit or purl 2 stitches together (decrease one stitch).

m1: make 1 stitch by picking up horizontal
loop lying before next stitch and working into the back of it.

sl1: slip one stitch by passing it between the needles without knitting it.

A word on the wool

The original design was in Patons Baby 3ply - a version of which is still available today.

Disclaimer
(well...almost)

In transposing any pattern it is always a risk that errors will be introduced, in spite of dedicated proof reading.
If you have any problems with this pattern, please and I will try and assist.

March 2020

Comfortable week-end jacket

MansLumberJacket11.jpg

Perfect for our current wintery spring.
Every man loves a comfortable lumber jacket for casual week-end wear.
[And I'm sure many a woman loves a comfortable man just like this one - if not the dog as well.
Notice that Roger has been wisely supplied with a lovely thick pair of leather gloves for this photo shoot...]

Instructions.

Instructions are given for one medium man's size only.

Back

With No 10 needles, cast on 109 stitches and work 3 inches in k1/p1 rib, rows on the right side having a k1 at each end.

Change to No 8 needles and pattern as follows:

1st row [Right side facing]: * k1, p1; repeat from * to last stitch, k1.
2nd row: Purl.

These 2 rows form the pattern.
Work straight in pattern until back measures 16 inches.

With right side facing, shape armholes by casting off 7 stitches at the beginning of the next 2 rows, then k2tog at each end of following 2 rows: [91 sts]

Work straight until back measures 24 inches.

With right side facing, shape shoulders by casting off 10 stitches at the beginning of the next 6 rows; cast off remainder fairly tightly.

Left Front:

With No 10 needles, cast on 55 stitches and work 34 inches in k1/p1 rib as before.

Change to No 8 needles and, in pattern, work straight until front measures 16 inches.

With right side facing, shape armhole by casting off 7 stitches at the beginning of the next row, then k2tog at this edge on the following 2 rows [46 sts]
Purl back.

Work 41 rows straight in pattern, then with wrong side facing, shape neck by casting off 6 stitches at the beginning of the next row, then k2tog at this edge on every row until 30 stitches remain.

Work a few rows straight until front matches back to the start of the shoulder shaping.

With right side facing, shape shoulder by casting off 10 stitches at the beginning of the next and following 2 alternate rows, (armhole edge).

Right Front:

Work to correspond with the left front, reversing shapings.

Sleeves:

With No 10 needles, cast on 57 stitches, and work 2½ inches in k1/p1 rib as before.

Change to No 8 needles and pattern, increasing 1 stitch at each end of the 7th and every following 6th row until there are 83 stitches.

Work straight until sleeve measures 18½ inches or required length.

With right side facing, shape top by casting off 5 stitches at the beginning of the next 2 rows, then k2tog at each end of the next and every alternate row until 41 stitches remain; then, at each end of every row until 25 stitches remain.
Cast off.

To Make Up

Press work on wrong side under a damp cloth.

Neckband:
Join shoulder seams.
With right side facing and No 10 needles, pick up and knit 85 stitches all round neck.
Work l¼ inches in k1/p1 rib.
Cast off in rib.

Join side and sleeve seams; insert sleeves.
Insert zip-fastener at front opening.

Materials

Double Knitting yarn 19 ozs - shown in colour Wine.
[Editor's note: 1 oz is approximately 28g However the quantity you require depends on the length of the yarn rather than the weight so this can be only a guide.]

A pair each No 8 (4mm) and No 10 (3¼mm) needles.

A zip fastener (double-ended - suitable for a jacket).
[Editor's note: no length is suggested for the zip, and probably better to measure, or monitor the length as you make the jacket.]

Tension

22 sts x 30 rows to 4 inches.

Size matters

To fit 39-41 inch bust; length from top of shoulders: 25 inches; sleeve seam: 18½ inches.

Abbreviations

k2tog: decrease by knitting 2 stitches together.

inc: increase by working into front and back of stitch

dec: decrease by working 2 stitches together.

Disclaimer
(well...almost)

In transposing any pattern it is always a risk that errors will be introduced, in spite of dedicated proof reading.
If you have any problems with this pattern, please and I will try and assist.

MansLumberJacket12.jpg

February 2020

Against the Cold

AgainstTheCold.jpg

This 1930s sweater has good news and bad news. The good is that it's made in a yarn weight that is more popular today than then - that is a heavy DK or worsted. And as a consequence, the bad news is that the instructions are only given for one size, and with limited opportunity to alter the size by using thicker yarn.
I have referenced some reading material at the end of the instructions, that might help you with adaptations if you are feeling that adventurous.

" An unusual broken trellis pattern makes this warm country jumper. The casual polo collar does up at the back with three buttons, and the button-up idea is carried out again on the front of the welt. ".

Instructions.

Instructions are given for only one small/medium size.

Back

With No 8 needles, cast on 70 stitches and work 3½ inches in k2, p2 rib. In the last row increase to 80 stitches by working twice into each of the first and last 5 stitches of the row. Change to No. 7 needles and pattern as follows:
1st row: * (p2, k2) twice, p10, k2, repeat from * to end.
2nd row: * p2, k10, (p2, k2) twice, repeat from * to end.
3rd row: * p1, k2, p2, (k2, p4) twice, k2, p1, repeat from * to end.
4th row: * k1 (p2, k4) twice, p2, k2, p2, k1, repeat from * to end.
5th and 6th rows: * (k2, p2) 5 times, repeat from * to end.
7th row: * k1, p2, k2, p4, k2, p2, k2, p4, k1, repeat from * to end.
8th row: * p1, k4, p2, k2, p2, k4, p2, k2, p1, repeat from * to end.
9th row: * p10, (k2, p2) twice, k2, repeat from * to end.
10th row: * p2, (k2, p2) twice, k10, repeat from * to end.
11th row: * k, 1, p10, (k2, p2) twice, k1, repeat from * to end.
12th row: * p1, (k2, p2) twice, k10, p1, repeat from * to end.
13th row: * k2, p10, (k2, p2) twice, repeat from * to end.
14th row: * (k2, p2) twice, k10, p2, repeat from * to end.
15th row: * p1, (k2, p4) twice, k2, p2, k2, p1, repeat from * to end.
16th row: * k1, p2, k2, (p2, k4) twice, p2, k1, repeat from * to end.
17th and 18th rows: * (p2, k2) 5 times, repeat from * to end.
19th row: * k1, p4, k2, p2, k2, p4, k2, p2, k1, repeat from * to end.
20th row: * p1, k2, p2, k4, p2, k2, p2, k4, p1, repeat from * to end.
21st row: * (k2, p2) twice, k2, p10, repeat from * to end.
22nd row: * k10, (p2, k2) twice, p2, repeat from * to end.
23rd row: * k1, (p2, k2) twice, p10, k1, repeat from * to end.
24th row: * p1, k10, (p2, k2) twice, p1, repeat from * to end.

These 24 rows form the pattern, which is repeated throughout.
When work measures 12 inches from commencement shape for armholes by casting off 5 stitches at the beginning of the next 2 rows, and then k2tog at each end of the next 2 rows.
Work for 1 more inch and then change to k2, p2 rib (beginning and ending rows on the right side with k2).
Continue straight until rib section measures 3 inches, and then divide for neck opening:

Next row: Rib across the first 30 stitches, k6, turn, leaving remaining stitches on a spare needle.

Work on these 36 stitches, keeping the 6 stitches at the inside edge in stocking-stitch, and after ½ an inch make a buttonhole as in the front welt (see instructions below).

To make a buttonhole:
With the right side facing, k2, cast off 2, work to end.
In the next row cast on 2 stitches to replace those cast off in the previous row.

When work measures 19 inches from commencement cast off 9 stitches at the beginning of the following 2 alternate rows at the armhole edge, and in the same row as the first casting-off make another buttonhole as before.
Leave these stitches on a spare needle.

Return to the remaining 30 stitches, cast on 6 stitches and, keeping these in stocking-stitch, work to correspond with the first side, but omitting the buttonholes.

Front:

Begin with the right welt.
With No 8 needles cast on 40 stitches.

1st row: k6, * p2, k2, repeat from * to last 2 stitches, p2.
2nd row: k2, * p2, k2, repeat from * to last 6 stitches, p6.

Repeat these 2 rows once and then make a buttonhole as follows:
5th row: k2, cast off 2, work to end.
In the next row cast on 2 stitches to replace those cast off in the previous row.

Continue in pattern for 1 inch, and then make another buttonhole in the same way, then work for 1 more inch and make another buttonhole.
When work measures 3½ inches, ending with a purl row, leave on a spare needle and make another piece for the left welt to correspond, but omitting the buttonholes.
When this second piece measures 3½ inches, increase by working twice into first 3 stitches (side edge), work across next 31 stitches, then, holding the spare needle with the right welt stitches in front of the remaining 6 stitches of the left welt, knit through one stitch from each needle and take off together; work to the last three stitches and work twice into each of these (80 stitches).
Work 1 more row right across in rib.

Now change to No 7 needles and pattern as for back, and continue until 3½ inches of the yoke ribbing have been done.

Next row (right side facing): Rib 27, leave 12 stitches on a spare needle, rib 27.
Continue to work on the last 27 stitches, casting off 3 at the beginning of every row at the neck edge until 18 stitches remain.
Work straight until front measures 19 inches from commencement.

Cast off 9 stitches at the beginning of the following 2 alternate rows, at the armhole edge.
Work remaining 27 stitches to correspond.

Sleeves:

With No 8 needles, cast on 32 stitches and work in k2, p2 rib for 3 inches.
In the last row increase to 42 stitches by working twice into each of the first and last 5 stitches of the row.

Now change to No 7 needles and pattern, but after 2 inches have been done, increase in the next and every following 4th row until there are 62 stitches on the needle, taking the increased stitches into the pattern.

Work straight until sleeve measures 18½ inches from commencement, then, cast off 4 stitches at the beginning of the next 2 rows, then k2tog at each end of every row until 20 stitches remain.
Cast off.

Collar

Join shoulder seams.

With the set of No 8 needles and front of work facing, take the 18 stitches from the spare needle at the left back, pick up and knit 19 over the left shoulder, take 12 from the spare needle at the front, pick up and knit 19 over the right shoulder, and take the 18 from the spare needle at the right back.
Work 4 inches in k2, p2 rib. Cast off loosely.

To Make Up

Sew up side and sleeve seams, and insert sleeves.
Stitch the cast-on stitches of the under-lap down.
Sew on buttons to match buttonholes and fasten collar with press studs.
Press seams lightly.

Materials

Double Knitting or Worsted weight: 14 ozs.

A pair each No 8 (4mm) and No 7 (4½mm) needles.
A set of 4 No 8 (4mm) needles or a circular needle.

Five large buttons.

Tension

20 stitches to 4 inches using No 7 (4½mm) needles.

Size matters

To fit 34-36 inch bust; length from top of shoulders: 19½ inches; sleeve seam: 18½ inches.

Abbreviations

k2tog: decrease by knitting 2 stitches together.

inc: increase by working into front and back of stitch

dec: decrease by working 2 stitches together.

Disclaimer
(well...almost)

In transposing any pattern it is always a risk that errors will be introduced, in spite of dedicated proof reading.
If you have any problems with this pattern, please and I will try and assist.

A word on the wool...

This 1930s pattern is given in only one size - which to be fair is a "medium" although I suspect the average size for women is rather larger than medium these days. The original yarn was Patons Totem - which was a double knit weight but came in a number of guises over the years I believe - and the tension and needles indicate it's more like a worsted weight. So it's not so easy to simply increase the size by using a thicker yarn - it might work if you check your tension, but the resulting sweater might be unappealingly chunky for the intended style.

Geraldine Warner has produced a helpful book about how to approach adapting vintage patterns - however, don't be confused as it is published under two different titles - but it's the same book. Also note that this is a book of techniques and "how to" - it's does not contain any knitting patterns:
Knit Back in Time or also known as Vintage Design Workshop

Whatever you choose to do, when adapting - always knit a swatch!

Pattern detail:

January 2020

Traditional Arans

TraditionalArans.jpg

A set of conventional Aran sweaters in a good range of sizes.
Patterns include, twisted cables, lobster claw, diamonds, blackberry or trinity stitch, and double moss stitch.

Instructions

Back:


Using size 10 needles, cast on 70 (74, 80, 84, 88, 94, 102, 106, 112) stitches and work in k1/p1 rib for 2 inches, ending with a right side row.
Next row: Rib 3 (5, 5, 8, 10, 10, 14, 3, 2) * work twice into next stitch, rib 2 (2, 2, 2, 2, 2, 2, 3, 4); repeat from * to last 4 (6, 6, 7, 9, 9, 13, 3, 2)stitches, work twice into next stitch, rib 3 (5, 5, 6, 8, 8, 12, 2, 1).
[ 92 (96, 104, 108, 112, 120, 128, 132, 140) sts]

Change to size 7 needles and pattern.
1st row: [k1, p1] 1 (2, 4, 5, 6, 8, 10, 11, 13) times, * [k4, p1] twice, k2, p1, sl2f, p1, k2 from cable needle, p6, sl1b, k2, purl stitch from cable needle, p1, k2, [p1, k4] twice, * p12; repeat from * to * once, [p1, k1] 1 (2, 4, 5, 6, 8, 10, 11, 13) times.

2nd row: [p1, k1] 1 (2, 4, 5, 6, 8, 10, 11, 13) times, * [p4, k1] twice, p2, k2, p2, k6, p2, k2, p2, [k1, p4] twice, * [k1, p1, k1 all into next stitch, p3tog] 3 times; repeat from * to * once, [k1, p1] 1 (2, 4, 5, 6, 8, 10, 11, 13) times.

3rd row: [p1, k1] 1 (2, 4, 5, 6, 8, 10, 11, 13) times, * C4B, p1, C4F, p1, k2, p2, sl2f , p1, k2 from cable needle, p4, sl1b, k2, purl stitch from cable needle, p2, k2, p1, C4B, p1, C4F, *p12; repeat from * to * once, [k1, p1] 1 (2, 4, 5, 6, 8, 10, 11, 13) times.

4th row: [k1, p1] 1 (2, 4, 5, 6, 8, 10, 11, 13) times, * [p4, k1] twice, p2, k3, p2, k4, p2, k3, p2, [k1, p4] twice, * [p3tog, k1, p1, k1 all into next stitch] 3 times; repeat from * to * once, [p1, k1] 1 (2, 4, 5, 6, 8, 10, 11, 13) times.

5th row: [k1, p1] 1 (2, 4, 5, 6, 8, 10, 11, 13) times, * [k4, p1] twice, k2, p3, sl2f , p1, k2 from cable needle, p2, sl1b, k2, purl stitch from cable needle, p3, k2, [p1, k4] twice, * p12; repeat from * to * once, [p1, k1] 1 (2, 4, 5, 6, 8, 10, 11, 13) times.

6th row: [p1, k1] 1 (2, 4, 5, 6, 8, 10, 11, 13) times, * [p4, k1] twice, p2, k4, p2, k2, p2, k4, p2, [k1, p4] twice, * [k1, p1, k1 all into next stitch, p3tog] 3 times; repeat from * to * once, [k1, p1] 1 (2, 4, 5, 6, 8, 10, 11, 13) times.

7th row: [p1, k1] 1 (2, 4, 5, 6, 8, 10, 11, 13) times, * C4B, p1, C4F, p1, k2, p4, sl2f , p1, k2 from cable needle, sl1b, k2, purl stitch from cable needle, p4, k2, p1, C4B, p1, C4F, * p12; repeat from * to * once, [k1, p1] 1 (2, 4, 5, 6, 8, 10, 11, 13) times.

8th row: [k1, p1] 1 (2, 4, 5, 6, 8, 10, 11, 13) times, * [p4, k1] twice, p2, k5, sl2b, p2, p2 from cable needle, k5, p2, [k1, p4] twice, * [p3tog, k1, p1, k1 all into next stitch] 3 times; repeat from * to * once, [p1, k1] 1 (2, 4, 5, 6, 8, 10, 11, 13) times.

9th row: [k1, p1] 1 (2, 4, 5, 6, 8, 10, 11, 13) times, * [k4, p1] twice, k2, p4, sl1b, k2, purl stitch from cable needle, sl2f , p1, k2 from cable needle, p4, k2, [p1, k4] twice, * p12; repeat from * to * once, [p1, k1] 1 (2, 4, 5, 6, 8, 10, 11, 13) times.

10th row: [p1, k1] 1 (2, 4, 5, 6, 8, 10, 11, 13) times, * [p4, k1] twice, p2, k4, p2, k2, p2, k4, p2, [k1, p4] twice, * [k1, p1, k1 all into next stitch, p3tog] 3 times; repeat from * to * once, [k1, p1] 1 (2, 4, 5, 6, 8, 10, 11, 13) times.

11th row: [p1, k1] 1 (2, 4, 5, 6, 8, 10, 11, 13) times, * C4B, p1, C4F, p1, k2, p3, sl1b, k2, purl stitch from cable needle, p2, sl2f, p1, k2 from cable needle, p3, k2, p1, C4B, p1, C4F, * p12; repeat from * to * once, [k1, p1] 1 (2, 4, 5, 6, 8, 10, 11, 13) times.

12th row: [k1, p1] 1 (2, 4, 5, 6, 8, 10, 11, 13) times, * [p4, k1] twice, p2, k3, p2, k4, p2, k3, p2, [k1, p4] twice, * [p3tog, k1, p1, k1 all into next stitch] 3 times; repeat from * to * once, [p1, k1] 1 (2, 4, 5, 6, 8, 10, 11, 13) times.

13th row: [k1, p1] 1 (2, 4, 5, 6, 8, 10, 11, 13) times, * [k4, p1] twice, k2, p2, sl1b, k2, purl stitch from cable needle, p4, sl2f, p1, k2 from cable needle, p2, k2, [p1, k4] twice, * p12; repeat from * to * once, [p1, k1] 1 (2, 4, 5, 6, 8, 10, 11, 13) times.

14th row: [p1, k1] 1 (2, 4, 5, 6, 8, 10, 11, 13) times, * [p4, k1] twice, p2, k2, p2, k6, p2, k2, p2, [k1, p4] twice, * [k1, p1, k1 all into next stitch, p3tog] 3 times; repeat from * to * once, [k1, p1] 1 (2, 4, 5, 6, 8, 10, 11, 13) times.

15th row: [p1, k1] 1 (2, 4, 5, 6, 8, 10, 11, 13) times, * C4B, p1, C4F, p1, k2, p1, sl1b, k2, purl stitch from cable needle, p6, sl2f, p1, k2 from cable needle, p1, k2, p1, C4B, p1, C4F, * p12; repeat from * to * once, [k1, p1] 1 (2, 4, 5, 6, 8, 10, 11, 13) times.

16th row: [k1, p1] 1 (2, 4, 5, 6, 8, 10, 11, 13) times, * [p4, k1] twice, p2, k1, p2, k8, p2, k1, p2, [k1, p4] twice, * [p3tog, k1, p1, k1 all into next stitch] 3 times; repeat from * to * once, [p1, k1] 1 (2, 4, 5, 6, 8, 10, 11, 13) times.

These 16 rows form the pattern.
Continue in pattern until work measures 12 (13, 14, 14½, 15, 15, 15½, 15½, 16) inches from the beginning, ending with a wrong side row.

Shape Armholes:
Keeping continuity of pattern, cast off 4 (4, 5, 5, 5, 7, 8, 8, 9) stitches at the beginning of the next 2 rows. Decrease 1 stitch at each end of the next and every following alternate row until 80 (84, 86, 90, 92, 94, 96, 100, 104) stitches remain.

Continue without further shaping until work measures 7½ (, 8, , , , 9, , ) inches from commencement of armhole shaping, ending with a wrong side row.

Shape Shoulders:
Cast off 6 (7, 7, 7, 7, 7, 7, 8, 8) stitches at the beginning of the next 6 rows; then 6 (5, 5, 6, 7, 7, 8, 6, 7) stitches at the beginning of the following 2 rows. Leave the remaining 32 (32, 34, 36, 36, 38, 38, 40, 42) stitches on a spare needle.

Front:

Follow instructions as for the Back, from to .

Continue without further shaping until work measures 5 (, , , 6, , 6½, , 7) inches from commencement of armhole shaping, ending with a wrong side row.

Shape Shoulders:
Cast off 6 (7, 7, 7, 7, 7, 7, 8, 8) stitches at the beginning of the next 6 rows; then 6 (5, 5, 6, 7, 7, 8, 6, 7) stitches at the beginning of the following 2 rows. Leave the remaining 32 (32, 34, 36, 36, 38, 38, 40, 42) stitches on a spare needle.

Shape Neck:
Next row: Pattern 32 (34, 34, 36, 37, 37, 38, 39, 41) stitches and turn, leaving remaining stitches on a spare needle.

Decrease 1 stitch at the neck edge on the next 8 (8, 8, 9, 9, 9, 9, 9, 10) rows.
Continue without further shaping until work measures the same as Back to shoulder, ending at the armhole edge.

Shape Shoulders:
Cast off 6 (7, 7, 7, 7, 7, 7, 8, 8) stitches at the beginning of the next 2 following alternate rows.
Work 1 row.
Cast off the remaining 6 (5, 5, 6, 7, 7, 8, 6, 7) stitches.

Slip the centre 16 (16, 18, 18, 18, 20, 20, 22, 22) stitches on to a spare needle.
Join in yarn at neck edge to remaining stitches, and pattern to end. Complete to match first side of neck.

Sleeves:

Using size 10 needles, cast on 42 (44, 46, 48, 50, 52, 54, 56, 58) stitches and work in k1/p1 rib for 2½ inches, ending with a right side row.
Next row: Rib 2 (5, 8, 5, 3, 7, 5, 2, 7) * work twice into next stitch, rib 1 (1, 1, 2, 3, 2, 3, 3, 3); repeat from * to last 2 (5, 8, 4, 3, 6, 5, 2, 7) stitches, work twice into next stitch, rib 1 (4, 7, 3, 2, 5, 4, 1, 6).
[ 62 (62, 62, 62, 62, 66, 66, 70, 70) sts]

Change to size 7 needles and pattern.

1st row: [k1, p1] 1 (1, 1, 1, 1, 2, 2, 3, 3) times, k2, p8, [k4, p1] twice, k2, p1, sl2f, p1, k2 from cable needle, p6, sl1b, k2, purl stitch from cable needle, p1, k2, [p1, k4] twice, p8, k2, [p1, k1] 1 (1, 1, 1, 1, 2, 2, 3, 3) times.

2nd row: [p1, k1] 1 (1, 1, 1, 1, 2, 2, 3, 3) times, p2, [k1, p1, k1 all into next stitch, p3tog] twice, [p4, k1] twice, p2, k2, p2, k6, p2, k2, p2, [k1, p4] twice, [k1, p1, k1 all into next stitch, p3tog] twice, p2, [k1, p1] 1 (1, 1, 1, 1, 2, 2, 3, 3) times.

3rd row: [p1, k1] 1 (1, 1, 1, 1, 2, 2, 3, 3) times, k2, p8, C4B, p1, C4F, p1, k2, p2, sl2f , p1, k2 from cable needle, p4, sl1b, k2, purl stitch from cable needle, p2, k2, p1, C4B, p1, C4F, p8, k2, [k1, p1] 1 (1, 1, 1, 1, 2, 2, 3, 3) times.

4th row: [k1, p1] 1 (1, 1, 1, 1, 2, 2, 3, 3) times, p2, [p3tog, k1, p1, k1 all into next stitch] twice, [p4, k1] twice, p2, k3, p2, k4, p2, k3, p2, [k1, p4] twice, [p3tog, k1, p1, k1 all into next stitch] twice, p2, [p1, k1] 1 (1, 1, 1, 1, 2, 2, 3, 3) times.

5th row: [k1, p1] 1 (1, 1, 1, 1, 2, 2, 3, 3) times, k2, p8, [k4, p1] twice, k2, p3, sl2f , p1, k2 from cable needle, p2, sl1b, k2, purl stitch from cable needle, p3, k2, [p1, k4] twice, p8, k2, [p1, k1] 1 (1, 1, 1, 1, 2, 2, 3, 3) times.

6th row: [p1, k1] 1 (1, 1, 1, 1, 2, 2, 3, 3) times, p2, [k1, p1, k1 all into next stitch, p3tog] twice, [p4, k1] twice, p2, k4, p2, k2, p2, k4, p2, [k1, p4] twice, [k1, p1, k1 all into next stitch, p3tog] twice, p2, [k1, p1] 1 (1, 1, 1, 1, 2, 2, 3, 3) times.

7th row: [p1, k1] 1 (1, 1, 1, 1, 2, 2, 3, 3) times, k2, p8, C4B, p1, C4F, p1, k2, p4, sl2f , p1, k2 from cable needle, sl1b, k2, purl stitch from cable needle, p4, k2, p1, C4B, p1, C4F, p8, k2, [k1, p1] 1 (1, 1, 1, 1, 2, 2, 3, 3) times.

8th row: [k1, p1] 1 (1, 1, 1, 1, 2, 2, 3, 3) times, p2, [p3tog, k1, p1, k1 all into next stitch] twice, [p4, k1] twice, p2, k5, sl2b, p2, p2 from cable needle, k5, p2, [k1, p4] twice, [p3tog, k1, p1, k1 all into next stitch] twice, p2, [p1, k1] 1 (1, 1, 1, 1, 2, 2, 3, 3) times.

9th row: [k1, p1] 1 (1, 1, 1, 1, 2, 2, 3, 3) times, k2, p8, [k4, p1] twice, k2, p4, sl1b, k2, purl stitch from cable needle, sl2f, p1, k2 from cable needle, p4, k2, [p1, k4] twice, p8, k2, [p1, k1] 1 (1, 1, 1, 1, 2, 2, 3, 3) times.

10th row: [p1, k1] 1 (1, 1, 1, 1, 2, 2, 3, 3) times, p2, [k1, p1, k1 all into next stitch, p3tog] twice, [p4, k1] twice, p2, k4, p2, k2, p2, k4, p2, [k1, p4] twice, [k1, p1, k1 all into next stitch, p3tog] twice, p2, [k1, p1] 1 (1, 1, 1, 1, 2, 2, 3, 3) times.

11th row: [p1, k1] 1 (1, 1, 1, 1, 2, 2, 3, 3) times, k2, p8, C4B, p1, C4F, p1, k2, p3, sl1b, k2, purl stitch from cable needle, p2, sl2f, p1, k2 from cable needle, p3, k2, p1, C4B, p1, C4F, p8, k2, [k1, p1] 1 (1, 1, 1, 1, 2, 2, 3, 3) times.

12th row: [k1, p1] 1 (1, 1, 1, 1, 2, 2, 3, 3) times, p2, [p3tog, k1, p1, k1 all into next stitch] twice, [p4, k1] twice, p2, k3, p2, k4, p2, k3, p2, [k1, p4] twice, [p3tog, k1, p1, k1 all into next stitch] twice, p2, [p1, k1] 1 (1, 1, 1, 1, 2, 2, 3, 3) times.

13th row: [k1, p1] 1 (1, 1, 1, 1, 2, 2, 3, 3) times, k2, p8, [k4, p1] twice, k2, p2, sl1b, k2, purl stitch from cable needle, p4, sl2f, p1, k2 from cable needle, p2, k2, [p1, k4] twice, p8, k2, [p1, k1] 1 (1, 1, 1, 1, 2, 2, 3, 3) times.

14th row: [p1, k1] 1 (1, 1, 1, 1, 2, 2, 3, 3) times, p2, [k1, p1, k1 all into next stitch, p3tog] twice, [p4, k1] twice, p2, k2, p2, k6, p2, k2, p2, [k1, p4] twice, [k1, p1, k1 all into next stitch, p3tog] twice, [k1, p1] 1 (1, 1, 1, 1, 2, 2, 3, 3) times.

15th row: [p1, k1] 1 (1, 1, 1, 1, 2, 2, 3, 3) times, k2, p8, C4B, p1, C4F, p1, k2, p1, sl1b, k2, purl stitch from cable needle, p6, sl2f, p1, k2 from cable needle, p1, k2, p1, C4B, p1, C4F, p8, k2, [k1, p1] 1 (1, 1, 1, 1, 2, 2, 3, 3) times.

16th row: [k1, p1] 1 (1, 1, 1, 1, 2, 2, 3, 3) times, p2, [p3tog, k1, p1, k1 all into next stitch] twice, [p4, k1] twice, p2, k1, p2, k8, p2, k1, p2, [k1, p4] twice, [p3tog, k1, p1, k1 all into next stitch] twice, p2, [p1, k1] 1 (1, 1, 1, 1, 2, 2, 3, 3) times.

These 16 rows form the pattern.

Increase, and work into the double moss, 1 stitch at each end of the next and every following 10th (9th, 7th, 6th, 6th, 6th, 5th, 6th, 5th) row until there are 72 (74, 78, 80, 84, 88, 92, 94, 98) stitches on the needle.

Continue without further shaping until work measures 15 (16, 16½, 17, 17½, 18, 18, 18½, 18½) inches from the beginning, ending with a wrong side row.

Shape Top:
Cast off 4 (4, 5, 5, 5, 7, 8, 8, 9) stitches at the beginning of the next 2 rows. Decrease 1 stitch at each end of the next and every following alternate row until 48 (50, 52, 54, 56, 52, 50, 50, 52) stitches remain, then 1 stitch at each end of every row until 20 (22, 22, 24, 26, 26, 28, 28, 30) stitches remain.
Cast off.

Neckband

Using a back stitch, join right shoulder seam.

With right side of work facing and using size 10 needles, pick up and knit 21 (21, 21, 22, 22, 22, 22, 22, 23) stitches down side of neck, knit across the 16 (16, 18, 18, 18, 20, 20, 22, 22) stitches at centre, pick up and knit 21 (21, 21, 22, 22, 22, 22, 22, 23) stitches up right side of neck, knit across the 32 (32, 34, 36, 36, 38, 38, 40, 42) stitches on back neck.
[90 (90, 94, 98, 98, 102, 102, 106, 110) sts]

Work in k1, p1, rib for 2½ inches.
Cast off loosely in rib.

To Make Up

Pin out to correct measurements and press lightly with a warm iron over a damp cloth, omitting ribbing.

[Editor's Note: Avoid over-pressing the pattern stitches as this will flatten out cables or other textured stitches - in fact spraying the work with water, pinning out to shape (ie blocking), and leaving to dry naturally can work better than pressing.]

Using a back stitch, join side and sleeve seams.
Join left shoulder seam and neckband.
Set in Sleeves.
Fold neckband in half on to wrong side and slip stitch down.
Press seams lightly.

Materials

12 (13, 14, 15, 16, 17, 18, 19, 20) x 50g balls.

Pair each No 7 (4½mm) and
No 10 (3¼mm) needles.
Cable needle.

Tension

19sts to 4 ins in over stocking stitch.

Size matters

Actual chest measurement: 28½ (30½, 33½, 35, 37, 40½, 43½, 45½, 48½) ins
Length: 20¾ (22, 2, 24, 24¾, 25, 25¾, 26, 26¾) ins
Sleeve seam, 15 (16, 16½, 17, 17½, 18, 18, 18½, 1) inches

Abbreviations

m1: make one st by picking up loop between sts and knit into back of it.
sl2f: slip next 2 sts on to cable needle and leave at front of work.
sl1b: slip next stitch on to cable needle and leave at back of work.
sl2b: slip next 2 sts on to cable needle and leave at back of work.
C4B: slip next 2 sts on to cable needle and leave at back
of work, k2, then k2 from cable needle.
C4F: slip next 2 sts on to cable needle and leave at front of work, k2, then k2 from cable needle.

A word on the wool.

Original yarn was a branded Aran Bainin (which from Gaelic indicates an undyed white yarn). So substitute any Aran weight yarn.

The tension here indicates a lighter weight Aran - almost veering towards the American worsted weight. So as always - check your tension, and, as usual, you'll have to guess the quantity allowing for the fact that it's a pure wool.

Disclaimer
(well...almost)

In transposing any pattern it is always a risk that errors will be introduced, in spite of dedicated proof reading.
If you have any problems with this pattern, please and I will try and assist.

© Christina Coutts 2007

Helpful Stuff

Pattern Archive

Categories

Yarn Links

Fabric etc

Stuff to do

  • Little rabbits
  • V&A 1940s Patterns
  • Monkey Socks
  • Necktie Bag
  • Posh Gloves
  • Criss-cross coasters