Home

Weblog

Pattern of
the Month

On the Needles
(...and Off the Needles)

Knitalong

Stitchcraft

Vintage Patterns

About the
Idle Hands


Archive entry for February 2020

« January 2020 | Main | March 2020 »

February 2020

Against the Cold

AgainstTheCold.jpg

This 1930s sweater has good news and bad news. The good is that it's made in a yarn weight that is more popular today than then - that is a heavy DK or worsted. And as a consequence, the bad news is that the instructions are only given for one size, and with limited opportunity to alter the size by using thicker yarn.
I have referenced some reading material at the end of the instructions, that might help you with adaptations if you are feeling that adventurous.

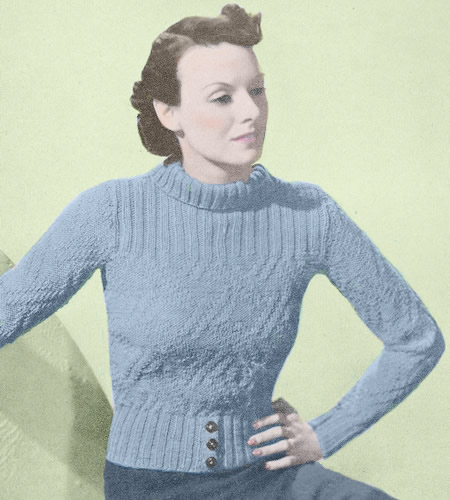
" An unusual broken trellis pattern makes this warm country jumper. The casual polo collar does up at the back with three buttons, and the button-up idea is carried out again on the front of the welt. ".

Instructions.

Instructions are given for only one small/medium size.

Back

With No 8 needles, cast on 70 stitches and work 3½ inches in k2, p2 rib. In the last row increase to 80 stitches by working twice into each of the first and last 5 stitches of the row. Change to No. 7 needles and pattern as follows:
1st row: * (p2, k2) twice, p10, k2, repeat from * to end.
2nd row: * p2, k10, (p2, k2) twice, repeat from * to end.
3rd row: * p1, k2, p2, (k2, p4) twice, k2, p1, repeat from * to end.
4th row: * k1 (p2, k4) twice, p2, k2, p2, k1, repeat from * to end.
5th and 6th rows: * (k2, p2) 5 times, repeat from * to end.
7th row: * k1, p2, k2, p4, k2, p2, k2, p4, k1, repeat from * to end.
8th row: * p1, k4, p2, k2, p2, k4, p2, k2, p1, repeat from * to end.
9th row: * p10, (k2, p2) twice, k2, repeat from * to end.
10th row: * p2, (k2, p2) twice, k10, repeat from * to end.
11th row: * k, 1, p10, (k2, p2) twice, k1, repeat from * to end.
12th row: * p1, (k2, p2) twice, k10, p1, repeat from * to end.
13th row: * k2, p10, (k2, p2) twice, repeat from * to end.
14th row: * (k2, p2) twice, k10, p2, repeat from * to end.
15th row: * p1, (k2, p4) twice, k2, p2, k2, p1, repeat from * to end.
16th row: * k1, p2, k2, (p2, k4) twice, p2, k1, repeat from * to end.
17th and 18th rows: * (p2, k2) 5 times, repeat from * to end.
19th row: * k1, p4, k2, p2, k2, p4, k2, p2, k1, repeat from * to end.
20th row: * p1, k2, p2, k4, p2, k2, p2, k4, p1, repeat from * to end.
21st row: * (k2, p2) twice, k2, p10, repeat from * to end.
22nd row: * k10, (p2, k2) twice, p2, repeat from * to end.
23rd row: * k1, (p2, k2) twice, p10, k1, repeat from * to end.
24th row: * p1, k10, (p2, k2) twice, p1, repeat from * to end.

These 24 rows form the pattern, which is repeated throughout.
When work measures 12 inches from commencement shape for armholes by casting off 5 stitches at the beginning of the next 2 rows, and then k2tog at each end of the next 2 rows.
Work for 1 more inch and then change to k2, p2 rib (beginning and ending rows on the right side with k2).
Continue straight until rib section measures 3 inches, and then divide for neck opening:

Next row: Rib across the first 30 stitches, k6, turn, leaving remaining stitches on a spare needle.

Work on these 36 stitches, keeping the 6 stitches at the inside edge in stocking-stitch, and after ½ an inch make a buttonhole as in the front welt (see instructions below).

To make a buttonhole:
With the right side facing, k2, cast off 2, work to end.
In the next row cast on 2 stitches to replace those cast off in the previous row.

When work measures 19 inches from commencement cast off 9 stitches at the beginning of the following 2 alternate rows at the armhole edge, and in the same row as the first casting-off make another buttonhole as before.
Leave these stitches on a spare needle.

Return to the remaining 30 stitches, cast on 6 stitches and, keeping these in stocking-stitch, work to correspond with the first side, but omitting the buttonholes.

Front:

Begin with the right welt.
With No 8 needles cast on 40 stitches.

1st row: k6, * p2, k2, repeat from * to last 2 stitches, p2.
2nd row: k2, * p2, k2, repeat from * to last 6 stitches, p6.

Repeat these 2 rows once and then make a buttonhole as follows:
5th row: k2, cast off 2, work to end.
In the next row cast on 2 stitches to replace those cast off in the previous row.

Continue in pattern for 1 inch, and then make another buttonhole in the same way, then work for 1 more inch and make another buttonhole.
When work measures 3½ inches, ending with a purl row, leave on a spare needle and make another piece for the left welt to correspond, but omitting the buttonholes.
When this second piece measures 3½ inches, increase by working twice into first 3 stitches (side edge), work across next 31 stitches, then, holding the spare needle with the right welt stitches in front of the remaining 6 stitches of the left welt, knit through one stitch from each needle and take off together; work to the last three stitches and work twice into each of these (80 stitches).
Work 1 more row right across in rib.

Now change to No 7 needles and pattern as for back, and continue until 3½ inches of the yoke ribbing have been done.

Next row (right side facing): Rib 27, leave 12 stitches on a spare needle, rib 27.
Continue to work on the last 27 stitches, casting off 3 at the beginning of every row at the neck edge until 18 stitches remain.
Work straight until front measures 19 inches from commencement.

Cast off 9 stitches at the beginning of the following 2 alternate rows, at the armhole edge.
Work remaining 27 stitches to correspond.

Sleeves:

With No 8 needles, cast on 32 stitches and work in k2, p2 rib for 3 inches.
In the last row increase to 42 stitches by working twice into each of the first and last 5 stitches of the row.

Now change to No 7 needles and pattern, but after 2 inches have been done, increase in the next and every following 4th row until there are 62 stitches on the needle, taking the increased stitches into the pattern.

Work straight until sleeve measures 18½ inches from commencement, then, cast off 4 stitches at the beginning of the next 2 rows, then k2tog at each end of every row until 20 stitches remain.
Cast off.

Collar

Join shoulder seams.

With the set of No 8 needles and front of work facing, take the 18 stitches from the spare needle at the left back, pick up and knit 19 over the left shoulder, take 12 from the spare needle at the front, pick up and knit 19 over the right shoulder, and take the 18 from the spare needle at the right back.
Work 4 inches in k2, p2 rib. Cast off loosely.

To Make Up

Sew up side and sleeve seams, and insert sleeves.
Stitch the cast-on stitches of the under-lap down.
Sew on buttons to match buttonholes and fasten collar with press studs.
Press seams lightly.

Materials

Double Knitting or Worsted weight: 14 ozs.

A pair each No 8 (4mm) and No 7 (4½mm) needles.
A set of 4 No 8 (4mm) needles or a circular needle.

Five large buttons.

Tension

20 stitches to 4 inches using No 7 (4½mm) needles.

Size matters

To fit 34-36 inch bust; length from top of shoulders: 19½ inches; sleeve seam: 18½ inches.

Abbreviations

k2tog: decrease by knitting 2 stitches together.

inc: increase by working into front and back of stitch

dec: decrease by working 2 stitches together.

Disclaimer
(well...almost)

In transposing any pattern it is always a risk that errors will be introduced, in spite of dedicated proof reading.
If you have any problems with this pattern, please and I will try and assist.

A word on the wool...

This 1930s pattern is given in only one size - which to be fair is a "medium" although I suspect the average size for women is rather larger than medium these days. The original yarn was Patons Totem - which was a double knit weight but came in a number of guises over the years I believe - and the tension and needles indicate it's more like a worsted weight. So it's not so easy to simply increase the size by using a thicker yarn - it might work if you check your tension, but the resulting sweater might be unappealingly chunky for the intended style.

Geraldine Warner has produced a helpful book about how to approach adapting vintage patterns - however, don't be confused as it is published under two different titles - but it's the same book. Also note that this is a book of techniques and "how to" - it's does not contain any knitting patterns:
Knit Back in Time or also known as Vintage Design Workshop

Whatever you choose to do, when adapting - always knit a swatch!

Pattern detail:
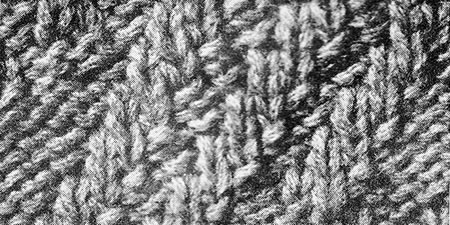
© Christina Coutts 2007

Helpful Stuff

Pattern Archive

Categories

Yarn Links

Fabric etc

Stuff to do

  • Little rabbits
  • V&A 1940s Patterns
  • Monkey Socks
  • Necktie Bag
  • Posh Gloves
  • Criss-cross coasters