Bunny Slipovers
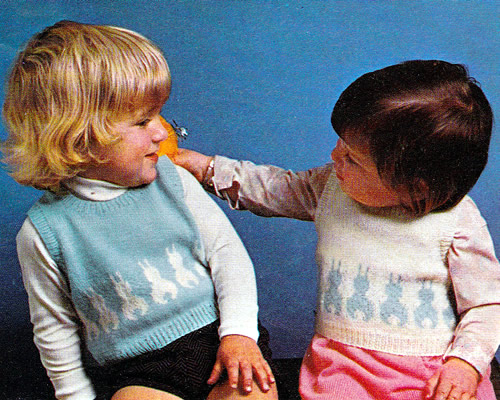
Sweet little sleeveless jumpers for toddlers with Easter bunny motifs.
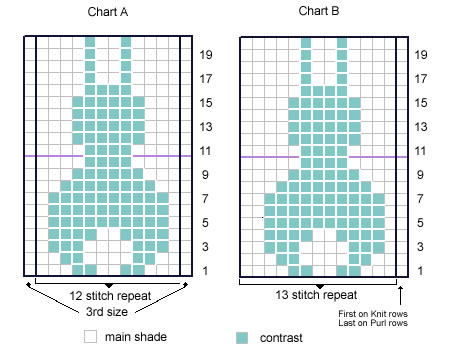
Instructions.When working the colour pattern from the chart, strand yarn not in use
loosely across the wrong side of the work over not more than 3 stitches
at a time in order to keep the fabric elastic. If you want to view chart image full size in the browser then right click on the image below and choose "view image". Back** Next row: rib 3 [7,
10] (m1, rib 10) 7 times, m1, rib 3 [7,
10]: Change to No 11 needles and starting with a knit row, work straight in stocking-stitch until back measures 1½ [2, 2] inches, ending with right side facing. Change to No 10 needles and joining in contrast colour (C) as required, work rows 1-20 inclusive from chart A [B, A]
Work the first 0 [1, 1]
stitch on knit rows and last 0 [1,
1] stitch on purl rows as indicated, repeating
the 12 [13, 12]
pattern stitches 7 [7, 8]
times across - and the last 0 [0,
1] stitch on knit rows, and first 0 [0,
1] stitch on purl rows as indicated. Change to No 11 needles and continue in M and stocking stitch until back measures 4½ [5, 5½]inches, ending with right side facing. Shape armholes by casting off 6 stitches at the beginning of the next 2 rows, then decrease 1 stitch at each end of every row until 54 [58, 64] stitches remain. Work 1 row straight. Now decrease 1 stitch at each end of the next and every alternate row until 48 [52, 56] stitches remain. ** Continue straight until back measures 9 [10, 11] inches, ending with right side facing. Shape shoulders by casting off 5 stitches at the beginning of the next 2 rows, then 4 [5, 6] stitches at the beginning of the following 2 rows. Leave the remaining 30 [32, 34] stitches on a spare needle. FrontWork as for Back from ** to **
. Shape neck as follows: Knit 18 [19, 20],
turn, and leave remaining stitches on a spare needle. Work straight until front matches back at armhole edge, ending with right side facing. Shape shoulder by casting off 5 stitches at the beginning of the
next row. With right side facing, leave centre 12 [14, 16] stitches on a spare needle, rejoin yarn to the remaining stitches and knit to end. Finish to correspond with first side, reversing shapings. Making UpUsing a cool iron and a damp cloth for Baby Wool, press parts lightly
on the wrong side, omitting ribbing. Neckband: With right side facing, No 13 needles and M, start at
the top of the left shoulder and work as follows: Work 6 rows k1/p1 rib. Join left shoulder seam, then join neckband with a flat seam Armhole Borders: With right side facing, No 13 needles and M, pick up and knit 86 [94, 102] stitches round each armhole and work 6 rows k1/p1 rib. Cast off evenly in rib. |
MaterialsBaby 3 ply 25g balls: 2 in main colour and 1 contrast colour (all sizes). Pair each No 13 (2¼mm), No 11 (3mm), and No 10 (3¼mm) needles.
Tension32 stitches x 40 rows to 4 ins (10cm) in stocking stitch on No 11 (3mm) needles. Size mattersTo fit chest 20 [22, 24]
inches; Abbreviationsk2tog or p2tog: knit or purl 2 stitches together (decrease one stitch). m1: make 1 stitch by picking up horizontal sl1: slip one stitch by passing it between the needles without knitting it. A word on the woolThe original design was in Patons Baby 3ply - a version of which is still available today. Disclaimer
|
 .
.
