Instructions.
Instructions for one size only; you can slightly alter the size by using
different needles as indicated in the pattern materials.
Front
Start with the belt as follows:
Cast on 27 stitches.
1st row: Slip 1,*
slip 1 knitwise, p3; repeat from *
to last 2 stitches, slip 1 knitwise, k1.
2nd row: Slip 1, *p1
into back of slip stitch, k3; repeat from *
to last 2 stitches, p1 into back of slip stitch, k1.
Repeat these 2 rows (which form the pattern) until work measures 13½
inches, then, with right side facing: *
work to last 3 stitches, turn, and work back. Work straight across tow
rows then repeat from * twice.
Now shape as follows:
1st row: Work 3 stitches, turn, and
work back.
3rd row: Work 5 stitches, turn, and
work back.
5th row: Work 7 stitches, turn, and
work back.
Continue thus, taking 2 more stitches into every alternate row until you
work across all stitches.
Work 3 rows straight, then put stitches on a holder.
With right side facing, pick up and knit 46 stitches, commencing 3½
inches in from the holder, and ending 6 inches from beginning of work
along upper edge (inside of curve) for right front. [The 6 inch straight
piece left should reach to the centre back.]
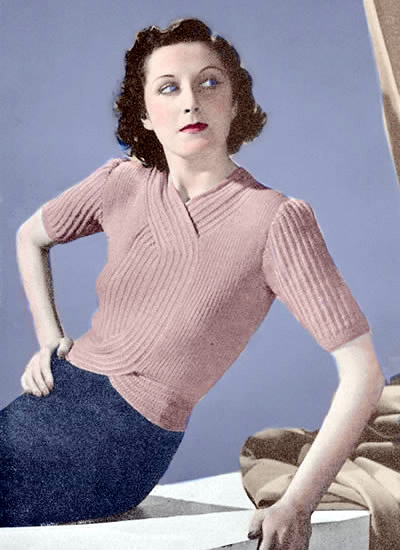
[Editor's Note: The point I notice most here is that if 6 inches is allowed
for on each side reaching round to the centre back, then the implication
is that the total waist size is only 24 inches (4 x 6). This is a pretty
neat little waist - even for the stated size - so it might be worth checking
that the belt reaches round your waist, sitting just above the hips as
shown in the picture.]
Work 19 rows in k1/p1 rib over these 46 stitches.
Leave on a spare needle.
Work a second piece to correspond to the first to make the left front,
working all shapings at the opposite ends of the needle. (ie: commence
picking up stitches with right side facing, 6 inches from commencement,
and start the rib with p1).
The two front pieces are now joined together as follows:
Work across the 46 stitches of the left front in k1/p1 rib, then placing
the 27 stitches from the first holder (right belt) in front of the work,
work across them in fancy rib, and then work across 27 stitches from 2nd
holder (left belt) in fancy rib, and then finally, work the remaining
46 stitches from spare needle (right front) in k1/p1 rib.
When joining fancy pieces, work together the last stitch of first piece
with first stitch of second piece, and make sure that the right welt lies
on top of left. [145 sts].
Now continue over all stitches:
1st row (wrong side facing): (k1,
p1) 23 times, work in fancy rib pattern on next 26 stitches, k1, work
in pattern on next 26 stitches (p1, k1) 23 times.
2nd row: (p1, k1) 23 times, work in
pattern on next 26 stitches, p1, work in pattern on next 26 stitches,
(k1, p1) 23 times.
Continue repeating these 2 rows, at the same time increasing 1 stitch
at each end of every following 6th row until there are 165 stitches on
the needle (keep increased stitches in k1/p1 rib).
Now work straight until front measures 11 inches, or length required;
it is advisable to measure yourself here and make sure that the belt fits
snugly round the natural waistline.
With right side facing, shape armholes by casting off 6 stitches at the
beginning of the next 2 rows, 5 stitches at the beginning of the next
2 rows, 4 stitches at the beginning of the next 2 rows, and 3 stitches
at the beginning of the next 2 rows.
Work ½ inch straight on these 129 stitches, increasing once in the
centre stitch of the last row, and then shape left shoulder.
1st row (right side facing): Rib
38 stitches, turn, leaving remaining stitches on a spare needle.
2nd row: Increase in first stitch,
rib to end.
3rd row: Rib.
Repeat 2nd and 3rd rows until you have 46 stitches; now decrease at the
neck edge on every row until 37 stitches remain, then on every alternate
row until 23 stitches remain.
Work should now measure 6¾ inches from commencement of armhole
shapings.
Shape shoulder by casting off 7 stitches at the beginning of the
following 3 alternate rows at the armhole edge, and at the same
time
decreasing 1 stitch on the 2 alternate rows at the neck edge.
Return to the main work, and complete the right shoulder to correspond.
Then work on the centre panel as follows (right side facing):
Work 27 stitches in pattern, turn, leaving other 27 stitches on a spare
needle, and work back.
1st row:Work 3 stitches, turn, and
work back.
3rd row: Work 5 stitches, turn, and
work back.
5th row: Work 7 stitches, turn, and
work back.
Continue thus, taking 2 more stitches into every row until you again work
over all stitches.
Work back and then ** work 4 rows
straight.
Next row: Work 17 stitches, turn,
and work back.
Repeat from ** 3 times.
Now work straight for 10½ inches and cast off.
Work remaining 27 stitches to correspond, reversing all shapings.
Back
Cast on 114 stitches and work 28 rows in k1/p1 rib.
Now increase at each end of the next and every following 6th row until
there are 134 stitches on the needle. Work straight until side seam
equals that of front to underarm, then shape armhole by casting off 6
stitches at the beginning of the next 2 rows, 5 at the beginning of the
next 2 rows, 4 at the beginning of the next 2 rows, and 3 at the beginning
of the next 2 rows.
Continue straight until work measures 4¼ inches from commencement
of armhole shapings.
Next row: Rib 42, cast off 14, rib
42, and continue on these last 42 stitches only, leaving remainder on
a spare needle.
Shape neck by casting off 2 stitches at the neck edge on the following
5 alternate rows, and then k2tog at this edge on the following 9 alternate
rows [23 sts].
Now shape shoulder by casting off 7 stitches at the armhole
edge at the beginning of the following 3 alternate rows, and at
the same time decreasing 1 stitch on the 2 alternate rows at the
neck edge.
Work the remaining 42 stitches to correspond.
Sleeves
Cast on 91 stitches and work 1 inch in k1/p1 rib.
Change to fancy rib as for belt, and increase at each end of the 4th and
every following 3rd row until there are 125 stitches on the needle.
With right side facing, shape top by casting off 6 stitches at the beginning
of the next 2 rows, then k2tog at each end of every row until 29 stitches
remain.
Cast off.
Making Up
Press very lightly only with a warm iron under a damp cloth.
Join side, shoulder and sleeve seams; insert sleeves, gathering all
fullness to the top of the shoulder.
Take the loose end of the fancy band from the right front, underneath
that of the left front, and stitch to the left front edge of the neck
round to centre back.
Take the left front band over that of the right front, and stitch to the
right front edge of the neck round to centre back.
Stitch bands into position at bottom of front, and also across back, meeting
at the centre.
Work a row of double crochet all round neck and bottom edges and both
back openings, making 4 button loops for neck fastening and 4 for waist
fastening. Sew on buttons to match.
|
Materials
8 ozs 3 ply.
According to size: Two pairs of No 10 (3¼mm) needles for 34-36 inch
chest.
or
Use two pairs of No 11 (3mm) for 33 inch chest.
Or
Use No 9 (3¾mm) for 37 inch chest.
Eight small buttons
One No 12 (2¾mm or 2½mm) crochet hook.
Tension
34 sts to 4 inches on No 10 (3¼mm) needles for 34-36 inch chest.
Or
36 sts to 4 inches on No 11 (3mm) for 33 inch chest.
Or
32 sts to 4 inches on No 9 (3¾mm) for 37 inch chest.
Size matters
One size to fit 34-36 inch chest; length from top of shoulders 18 inches.
Options to slightly decrease or increase the size by using different needles
to achieve different tensions.
Abbreviations
k2tog or p2tog: knit or purl 2 sts together (decrease one stitch)
stocking stitch: one row knit and one row purl, ("stockinette")
A word on the wool.
Original yarn was Patons Super Crêpe.
Susan Crawford, who specialises in vintage knits, offers lovely Fenella
wool which "knits up to that elusive vintage ‘3 ply’
tension".
Jamiesons have an excellent range of colours in "2ply
laceweight" which states: This yarn can be used in vintage
patterns which call for "3ply yarns".
Disclaimer
(well...almost)
In transposing any pattern it is always a risk that errors will be introduced,
in spite of dedicated proof reading.
If you have any problems with this pattern, please
and I will try and assist.
|