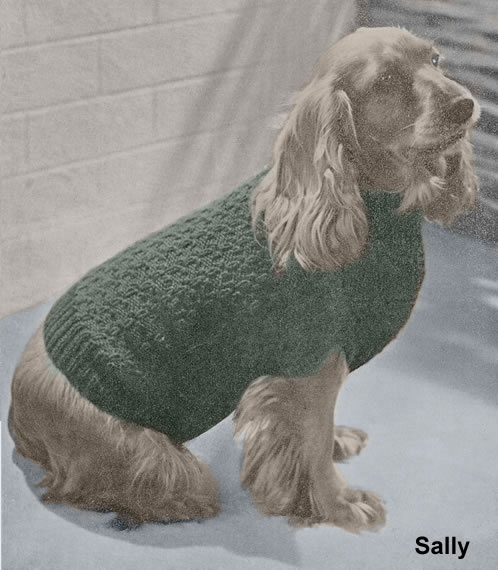
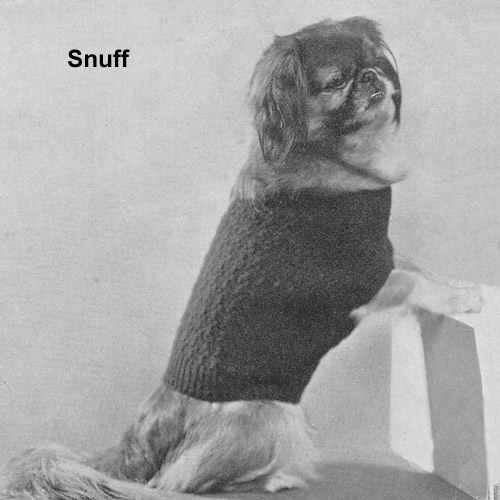
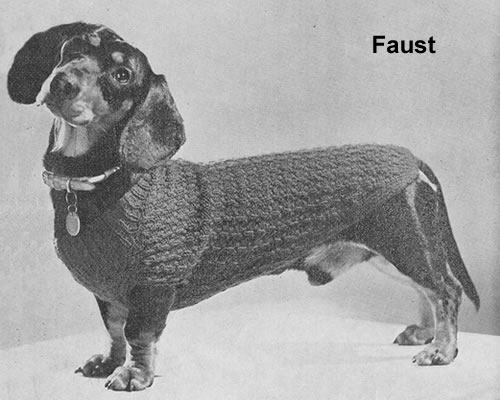
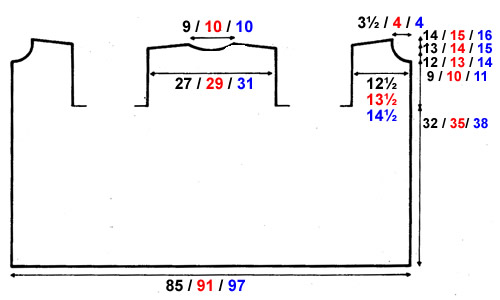
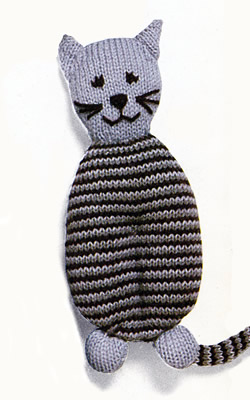
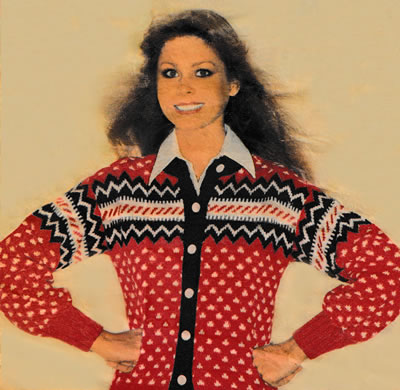
Instructions.
Instructions are given for 3 sizes - the larger sizes are shown in brackets.
When working the pattern weave the yarns not in use loosely across the
wrong side of the work; do not strand the threads over more than 3 stitches
at a time in order to keep the fabric elastic, joining in and breaking
off colours as required.
Back and Fronts (worked in one piece up to the armholes)
With No 10 (3¼mm) needles and main shade (R), cast on 194 [206,
218] stitches and work as follows:
1st row: k2, *
p2, k2; repeat from * to end.
2nd row: p2, *
k2, p2; repeat from * to end.
These two rows form the rib. Work a further 31 rows.
Next (increase) row: p9 [12,
4], m1, *
p8 [7, 7],
m1; repeat from * until p9 [12,
4] stitches remain; purl to end. {217 [233,
249] sts}
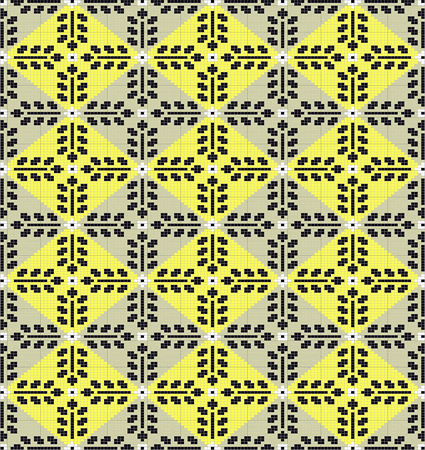
Change to No 8 (4 mm) needles and join in white (W). Weaving in the yarns
not in use, work the 2-colour pattern entirely in stocking stitch, beginning,
on the right side of the work, with a knit row. Note: only the colours
are specified below.
1st row (knit): 3R, *
3W, 5R; repeat from * ending the last
repeat with 3R instead of 5R.
2nd row (purl): 4R, *
1W, 7R; repeat from * ending the last
repeat with 4R.
3rd row: knit across all stitches
in red (R).
4th row: purl across all stitches
in red (R).
5th row (knit): 2W, *
5R, 3W; repeat from * ending the last
repeat with 2W.
6th row (purl): 1W, *
7R, 1W; repeat from * to end.
7th row: knit across all stitches
in red (R).
8th row: purl across all stitches
in red (R).
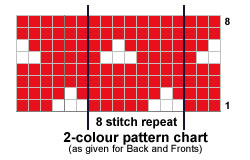
These 8 rows form the 2-colour pattern. Work a further 59 rows, up to
the armholes, ending with a 3rd pattern row.
Divide to separate back and fronts: With red, (R) p51 [55,
59] stitches; increase in the next stitch
and leave these 53 [57, 61]
stitches on a spare needle or stitch holder to be worked later for the
left front;
p113 [121, 129]
stitches, turn, and leave the remaining 52 [56,
60] stitches on a spare needle or stitch
holder to be worked later for the right front.
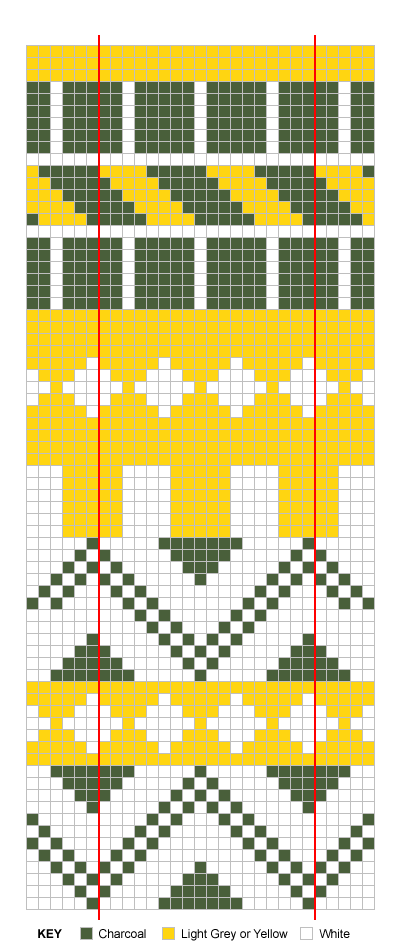
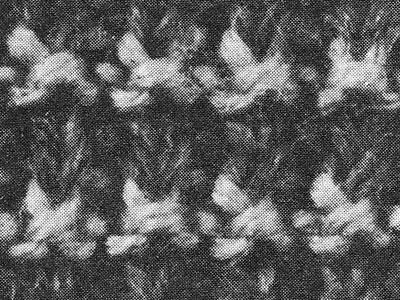
Back
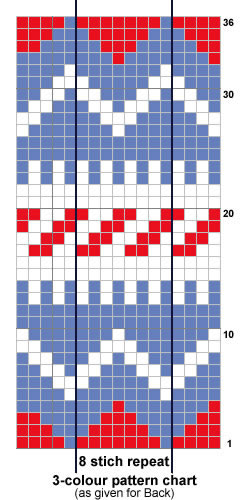
On these 113 [121, 129]
stitches work the 36 row 3-colour pattern, weaving in the yarns not in
use at the back of the work. Once again, the pattern is worked entirely
in stocking stitch beginning with a knit row so only the colour details
are shown. Join in blue (B).
1st row (knit): 4R, *
1B, 7R; repeat from * until 5 stitches
remain; 1B, 4R.
2nd row (purl): 3R, *
3B, 5R; repeat from * until 6 stitches
remain; 3B, 3R.
3rd row (knit):
2R, * 5B, 3R; repeat from *
until 7 stitches remain; 5B, 2R.
4th row (purl):
1R, * 7B, 1R; repeat from *
to end.
5th row (knit): 4B, *
1W, 7B; repeat from * until 5 stitches
remain; 1W, 4B.
6th row (purl): 3B, *
3W, 5B; repeat from * until 6 stitches
remain; 3W, 3B.
7th row (knit):
2B, * 2W, 1B, 2W, 3B; repeat from
* until 7 stitches remain; 2W, 1B,
2W, 2B.
8th row
(purl): 1B, * 2W, 3B, 2W,
1B; repeat from * to end.
9th row (knit):
2W, * 5B, 3W; repeat from *
ending the last repeat with 2W instead of 3W.
10th row (purl):
1W, * 7B, 1W; repeat from *
to end.
11th row: knit across all stitches
in blue (B).
12th row: purl across all stitches
in blue (B).
13th row (knit): 1B, *
1W, 1B; repeat from * to end.
14th row (purl): 1B, *
1W, 1B; repeat from * to end.
15th row: knit across all stitches
in white (W).
16th row: purl across all stitches
in white (W).
17th row(knit): *
2W, 2R; repeat from * until 1 stitch
remains; 1W.
18th row(purl): *
2W, 2R; repeat from * until 1 stitch
remains; 1W.
19th row(knit): *
2R, 2W; repeat from * until 1 stitch
remains; 1R.
20th row(purl): *
2R, 2W; repeat from * until 1 stitch
remains; 1R.
[Editor's note: Rows
21-36 are a repeat of rows 1-16 worked in exact mirror image so Row 21
is the same as row 16, row 22 is the same as row 15, and so on back to
the first row the same as row 36..]
21st row: knit across all stitches
in white (W).
22nd row: purl across all stitches
in white (W).
23rd row (knit): 1B, *
1W, 1B; repeat from * to end.
24th row (purl): 1B, *
1W, 1B; repeat from * to end.
25th row: knit across all stitches
in blue (B).
26th row: purl across all stitches
in blue (B).
27th row (knit): 1W, *
7B, 1W; repeat from * to end.
28th row (purl):
2W, * 5B, 3W; repeat from *
ending the last repeat with 2W instead of 3W.
29th row
(knit): 1B, * 2W, 3B, 2W,
1B; repeat from * to end.
30th row (purl):
2B, * 2W, 1B, 2W, 3B; repeat from
* until 7 stitches remain; 2W, 1B,
2W, 2B.
31st row (knit): 3B, *
3W, 5B; repeat from * until 6 stitches
remain; 3W, 3B.
32nd row (purl): 4B, *
1W, 7B; repeat from * until 5 stitches
remain; 1W, 4B.
33rd row (knit):
1R, * 7B, 1R; repeat from *
to end.
34th row (purl):
2R, * 5B, 3R; repeat from *
until 7 stitches remain; 5B, 2R.
35th row (knit): 3R, *
3B, 5R; repeat from * until 6 stitches
remain; 3B, 3R.
36th row (purl): 4R, *
1B, 7R; repeat from * until 5 stitches
remain; 1B, 4R.
Break off blue and continue in the 2-colour pattern, beginning with the
3rd row. Work 10 [10, 14]
rows.
Slope shoulders: Cast off 7 [6,
8] stitches at the beginning of the next
2 rows, 7 [7, 8]
stitches at the beginning of the following 2 rows, then cast off 6 [7,
7] stitches at the beginning of the next
8 rows.
Leave the remaining stitches on a spare needle or stitch holder.
Left Front
With right side facing, rejoin the yarns to the the inner (armhole) end
of the 53 [57, 61]
stitches, and work in the 3 colour pattern as follows.
1st row (knit): 4R, *
1B, 7R; repeat from * until 1 [5,
1] stitches remain; 1B [(1B,
4R), (1B)] .
2nd row (purl): 2B [(3R,
3B), (2B)] , *
5R, 3B; repeat from * until 3 stitches
remain; 3R.
3rd row (knit):
2R, * 5B, 3R; repeat from *
until 3 [7, 3]
stitches remain; 3B [(5B,2R), (3B)]
4th row (purl):
(4B, 1R) [(1R), (4B,
1R)] , * 7B, 1R; repeat from
* to end.
These 4 rows set the position of the 3-colour pattern. Work a further
32 rows in pattern to match the back.
Break off blue (B).
With red (R) knit 1 row.
To shape the neck:
1st row (purl, wrong side facing):
with red (R), cast off 9 [10, 11]
stitches, purl to end.
2nd row (knit): 2W, *
5R, 3W; repeat from * until 2 [5,
8] stitches remain; k0 [(3R),
(6R)]; k2tog in R.
** Keeping continuity of the 2-colour
pattern to match the main part, decrease 1 stitch at the neck edge on
the next 5 rows — when working the right front read 6 rows
here instead — {38 [41, 44]
sts}.
Pattern 2 [2, 6]
rows.
Slope shoulder: Cast off 7 [6,
8] stitches at the beginning of the next
row, then 7 [7, 8]
stitches at the beginning of the following alternate row.
Work one row, then cast off 6 [7,
7] stitches at the beginning of the next
row, and 2 following alternate rows. Work one row.
Cast off remaining 6 [7, 7]
stitches.
Right Front
With wrong side facing, rejoin red (R) at the the inner (armhole) end,
increase in the first stitch, and purl to end. {53 [57,
61] sts}
Work in the 3 colour pattern as follows:
1st row (knit): 1B [(4R,
1B), (1B)], *
7R 1B; repeat from * until 4 stitches
remain; 4R.
2nd row (purl): 3R, *
3B, 5R; repeat from * until 2 [6,
2] stitches remain; 2B [(3B,
3R), (2B)]
3rd row (knit):
3B [(2R,5B), (3B)]
, * 3R, 5B; repeat from *
until 2 stitches remain; 2R.
4th row (purl):
* 1R, 7B; repeat from *
until 5 [1, 5]
stitches remain; (1R, 4B) [(1R), (1R,4B)].
These 4 rows set the position of the 3-colour pattern.
Work a further 32 rows in pattern to match the back.
Break off blue (B).
With red (R) work 2 rows.
To shape the neck:
1st row (knit, right side facing):
with red (R), cast off 9 [10, 11]
stitches; knit k1R [(4R), (2W,
5R)]; * 3W, 5R; repeat from
* until 2 stitches remain; 2W.
Work as given for left front from **
to end, noting the variation.
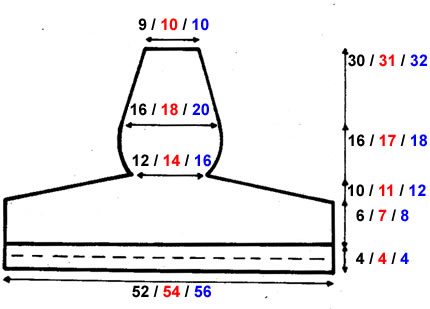
Sleeves (both alike)
With No 10 (3¼mm) needles and main shade R, cast on 48 [48,
52] stitches and work 32 rows in double rib
as for main piece.
Next (increase) row: k4, m1, *
k1, m1; repeat from * until 4 stitches
remain;k4. {89 [89, 97]
sts}
Purl one row in red (R).
Change to No 8 (4 mm) needles and work 72 rows in the 2-colour pattern
as given on main piece (back and fronts).
Work the 36 rows of the 3-colour pattern as given on back.
Break off blue (B) and white (W).
With red (R) knit one row, then cast off.
Button Band
With No 10 (3¼mm) needles and blue (B) cast on 13 stitches, and
work 158 [158, 162]
rows in k1/p1 single rib, beginning odd numbered rows with k1, and even
numbered rows with p1.
Leave these stitches on a safety pin.
Buttonhole Band
With No 10 (3¼mm) needles and blue (B) cast on 13 stitches, and
work 6 [6, 10]
rows in k1/p1 single rib, as given for button band.
1st (buttonhole) row: Rib 5, cast
off 3 stitches, rib to end.
2nd (buttonhole) row: Rib to end,
casting on 3 stitches over those cast off, on previous row.
Rib 24 rows.
Repeat the last 26 rows 4 times more, then the 2 buttonhole rows again.
Rib 19 more rows, leaving the stitches on the needle.
Neckband
Join shoulder seams.
Using the No 10 (3¼mm) needles holding the 13 stitches of the buttonhole
band, and continuing the last row, pick up and knit 23 [24,
27] stitches from right neck shaping, knit
across 37 [39, 41]
stitches from the back, increasing 3 stitches evenly across, pick up and
knit 23 [24, 27]
stitches from left neck shaping, and finally rib across the 13 stitches
(from the safety pin) of the button band. {112 [116,
124] sts}
1st rib row: k1, *
p1, k1; repeat from * 5 times, k2;
** p2, k2; repeat from **
until 13 sts remain; p1, * k1, p1;
repeat from this last * to end.
2nd rib row: p1, *
k1, p1; repeat from * 5 times, p2;
** k2, p2; repeat from **
until 13 sts remain; k1, * p1, k1;
repeat from this last * to end.
These two rows set the rib. Work 3 rows.
1st (buttonhole) row: Rib 5, cast
off 3 stitches, rib as set to end.
2nd (buttonhole) row: Rib to end,
casting on 3 stitches over those cast off, on 1st row.
Work 12 rows in rib as set, then work the 2 buttonhole rows again.
Rib 4 rows, cast off in rib.
Making Up
Press parts lightly on wrong side with a warm iron over a dry cloth,
or following any instructions on the ball band.
Set sleeves into armholes, and join the sleeve seams.
Sew front bands to respective fronts.
Turn neckband in half to the wrong side, and catch in place. Oversew the
buttonhole in the neckband.
Sew on buttons.
|
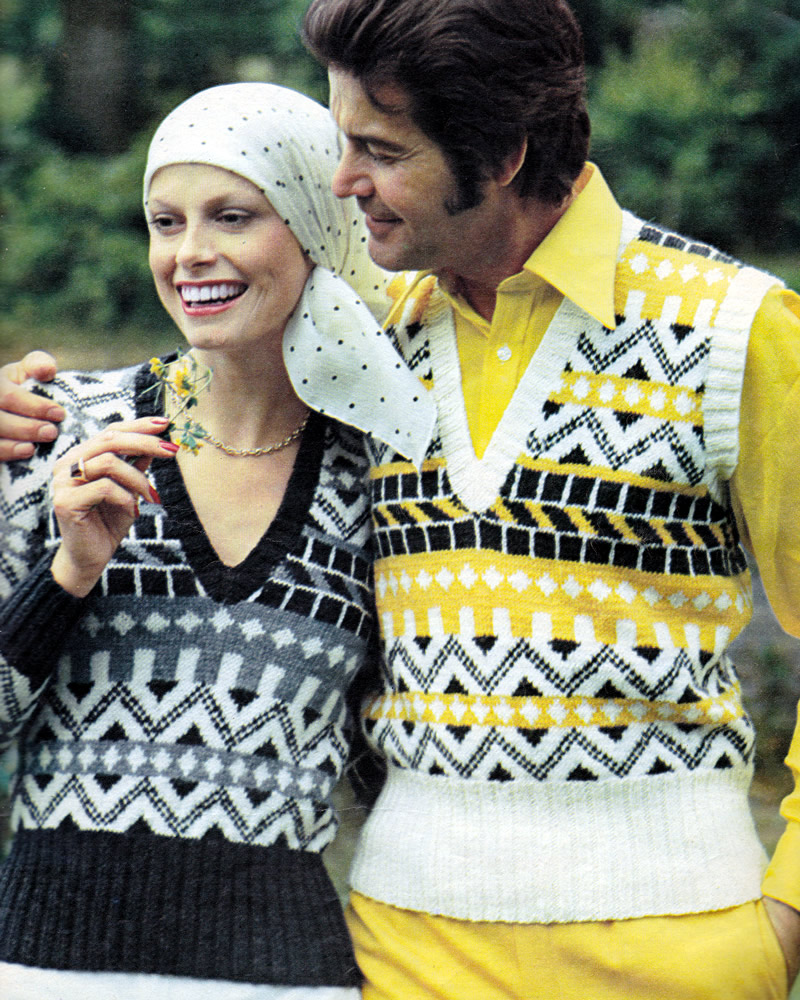
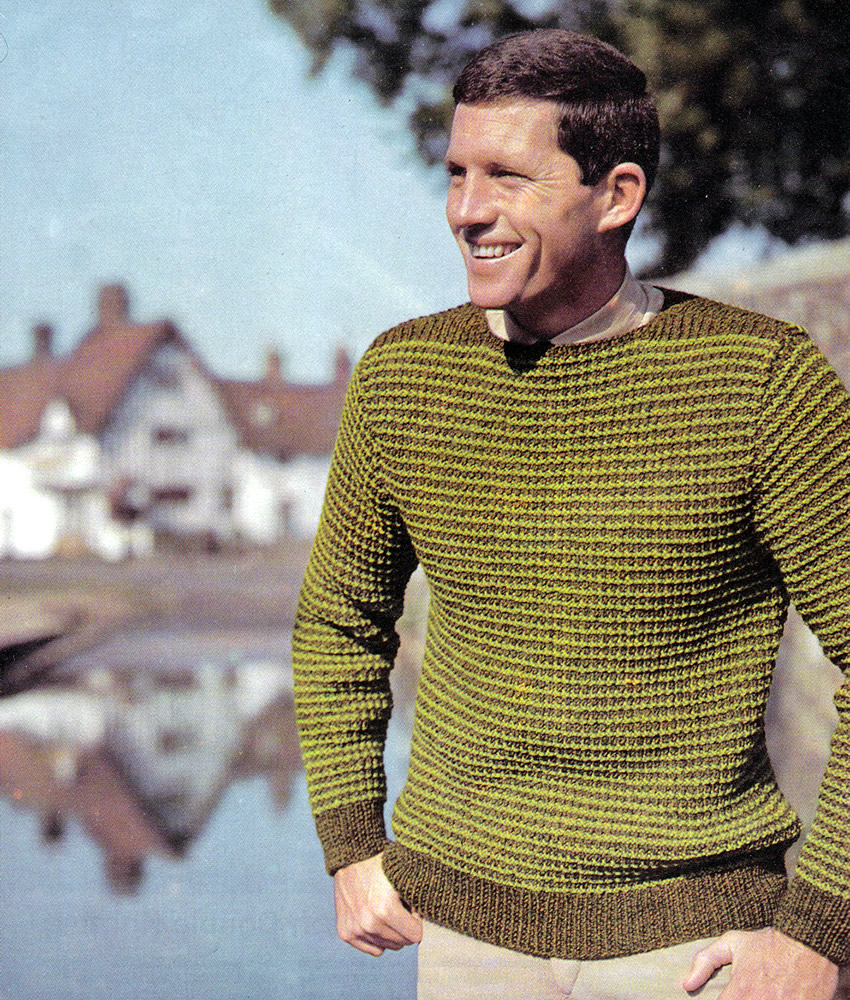
Materials
5 [5, 6]
50g balls DK in main shade (R) red, plus
2 [2, 3]
balls (B) blue, and
2 [2, 3]
balls (W) white.
Pair each No 8 (4mm) and No 10 (3¼mm) needles.
7 buttons.
Tension
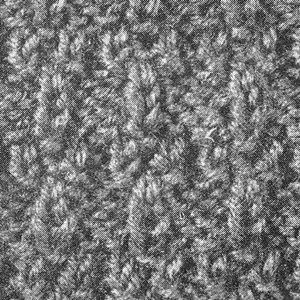
26 stitches x 27 rows to 4 ins (10cm) over the pattern on No 8 (4mm)
needles.
Size matters
To fit chest 34 [36, 38]
inches, (86 [91, 97]
cm);
length: 22 [22,
22½] inches, (56 [56,
57½] cm);
sleeve seam: 19¾ [19¾, 19¾]
inches, (50 [50, 50]
cm).
Abbreviations
k2tog or p2tog: knit or purl 2 stitches together (decrease one
stitch).
stocking stitch: one row knit and one row purl, ("stockinette").
dec: decrease by working 2 stitches together.
inc: increase by working twice into the same stitch.
m1: make 1 stitch by picking up horizontal
loop lying before next stitch and working into the back of it.
A word on the wool
The original design was in Patons Fiona - a yarn I was very fond of,
both in quality and rich colour range. It was a standard DK; some information
given on the web implies it was slightly thicker and others slightly thinner.
In the 1970s it was sold in 50g balls: 175 yds/160m meters); 51% wool,
49% acrylic.
In my opinion a similar substitute would be Rowan Felted Tweed DK.
"Always check your tension" [Good Advice].
Disclaimer
(well...almost)
In transposing any pattern it is always a risk that errors will be introduced,
in spite of dedicated proof reading.
If you have any problems with this pattern, please
and I will try and assist.
|