Home

Weblog

Pattern of
the Month

On the Needles
(...and Off the Needles)

Knitalong

Stitchcraft

Vintage Patterns

About the
Idle Hands


Archive entry for November 2021

« October 2021 | Main | December 2021 »

November 2021

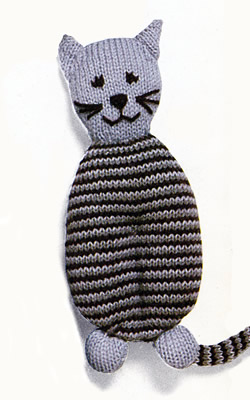
Snug Gown for Bedtime

SnugToddlerGown.jpg

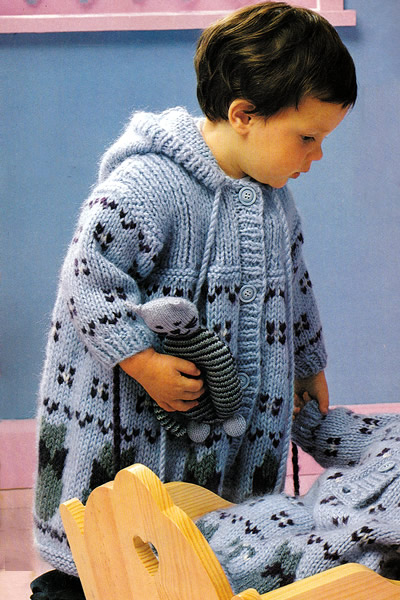
The cutest hooded gown made in a soft chunky yarn - perfect for bedtime, (or other occasions, as it is described as a "coat"). The lower section has a design of kittens - and there is a cute toy cat to match.

Instructions

The pattern is given in 3 sizes: 12 (18 : 24) months. Where only one set 
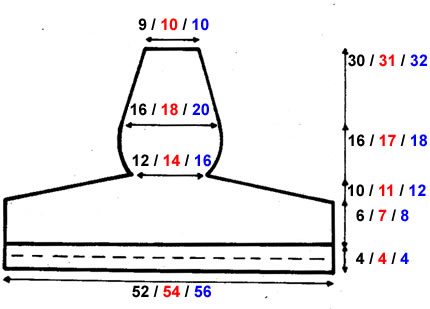
of instructions is given it applies to all sizes.
The body of the gown is worked as one piece up to the armholes.

Sleeves

With 5mm needles and main colour (M), cast on 22 (24 : 26) stitches and work 3 (3 : 4) cm in k1/p1 rib, ending with wrong side facing for next row.
Work 1 row in purl increasing 7 stitches evenly across the row.
[29 (31 : 33) sts].

Now change to 6mm needles and stocking stitch following the Fair Isle colour pattern in the chart for the sleeve:

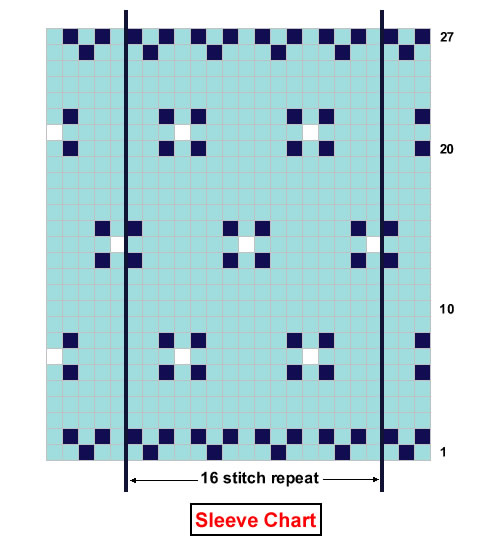
For the first size, begin with 1 stitch in black (B) then 1 in main shade (M); for the second size, begin with 1M, 1B, 1M; for the third size, begin with 4M,
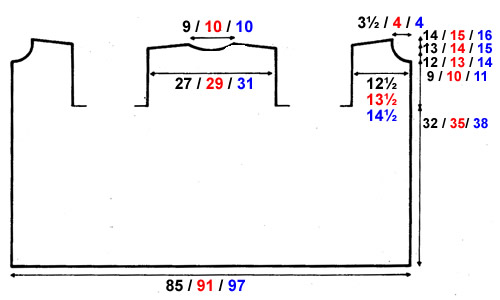
 1B, 1M, 1B, 1M.
Then follow the 16 stitch repeat shown in the chart.
At the same time, increase 1 stitch at each end of every 7th (8th : 10th) row 3 times, taking the stitches into the pattern.
[35 (37 : 39) sts].
Then work 3 (4 : 6) more rows, and then place a stitch marker or piece of coloured thread at each end of the row.

Continue in stocking stitch: for the smallest size, work the last 3 rows of the chart, then purl one row in main shade; for the second and third sizes work 2 rows in stocking stitch.

Then for all sizes, change to 5mm needles and finish by working 4 rows in garter stitch.

Leave the stitches on a stitch holder or spare needle and work a second sleeve in the same way.

Body (knitted as a single piece)

Using size 5mm needles and main colour (M), cast on 113 (121 : 129) stitches and work 6 rows in garter stitch.

Change to 6mm needles and work 2 (2 : 6) rows in stocking stitch.

Continue stocking stitch and follow the Fair-Isle pattern working from the charts.

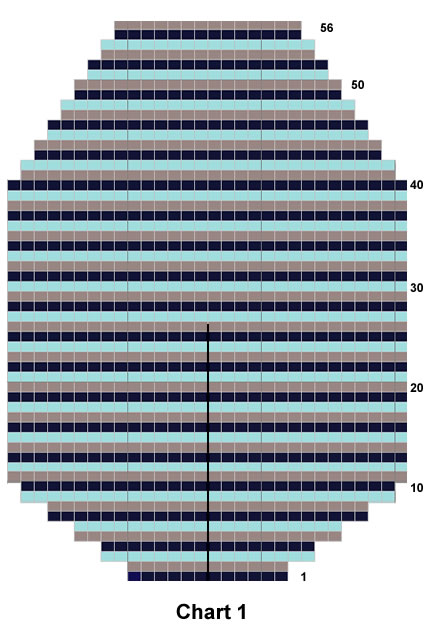
Work 2 rows as in Chart 1, commencing with 1M, 1B, then repeating the 8 stitch pattern across the row ending 1M, 1B, as indicated.

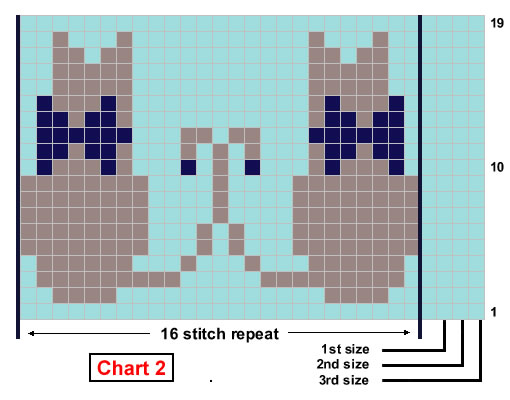
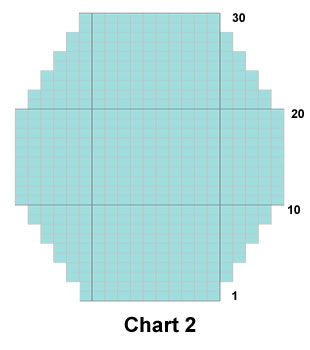
Now work the 19 rows of the cat pattern from Chart 2, 4 times across the row, placing 3 (5 : 7) stitches between each group, and working 2 (3 : 4) stitches in main shade before the first and after the last group.

Work 2 rows as in Chart 3, commencing with 2M, then repeating the 8 stitch pattern across the row ending 1B, 1M, as indicated.

Work 4 rows in stocking stitch.
Next, work 10 (17 : 17) rows of Chart 4, commencing 1M, 1B, 5M, then repeating the 16 stitch pattern across the row ending 1M, 1B, 5M, 1B, as indicated.

Work 4 rows in stocking stitch.

Repeat the 2 rows as in Chart 3, as before, (commencing with 2M, then repeating the 8 stitch pattern across the row ending 1B, 1M, as indicated).

Work 3 (2 : 2) rows in stocking stitch, and (wrong side facing) work 4 rows in garter stitch.

At this point you have completed 58 (64 : 68) rows and your work should measure 32 (35 : 38) cm.

Now you must divide the work and continue knitting the back and fronts separately.

Change to 5mm needles and work in k1/p1 rib as follows, casting off some stitches for the armholes, as well as decreasing across the row.

Next (right side facing, decrease) row: k2, (p1, k1) 3 (3 : 3) times, p1, k2tog, (p1, k1) 2 (3 : 4) times, p1, k2tog, (p1, k1) 3 (3 : 3) times, k1; place these 23 (25, 27 ) stitches on a spare needle or stitch holder...
[Editor's note: this section of 23 (25, 27) stitches will form the right front.]

...and continue the row by casting off the next 6 stitches, then, continue the decreasing, after the stitch already on the needle from the casting off:
k1, (p1, k1) 3 (4 : 5) times, p1, k2tog, (p1, k1) 4 (4 : 4) times, p1, k2tog, (p1, k1) 4 (4 : 4) times, p1, k2tog, (p1, k1) 4 (4 : 4) times, p1, k2tog, (p1, k1) 3 (4 : 5) times, k1; place these 47 (51, 55 ) stitches on a spare needle or stitch holder...
[Editor's note: this section of 47 (51, 55) stitches will form the back.]

And continue the row by casting off the next 6 stitches, then, continue the decreasing, after the stitch already on the needle from the casting off:
k1, (p1, k1) 3 (3 : 3) times, p1, k2tog, (p1, k1) 2 (3 : 4) times, p1, k2tog, (p1, k1) 3 (3 : 3) times, k1.
[Editor's note: You are now going to continue to work on this last section of 23 (25, 27) stitches to complete the left front
.]

Upper Left Front

Next row (wrong side facing): p2, * k1, p1, repeat from * to last stitch, p1. [23 (25 : 27) sts]

With right side facing, continue in k1/p1 rib for a further 19 (21 : 23) rows, then shape the neck as follows: cast off 3 (4 : 4) stitches on the next row, then 2 (2 : 2) on the following alternate row.
[18 (19 : 21) sts]

Continue to decrease at the neck edge, and shape shoulders as follows:
Next row (right side facing): cast off 5 (5 : 6) stitches, rib end.
Next row: k2tog, rib end.
Next row: cast off 5 (6 : 6) stitches, rib end.
Next row: k2tog, rib end.
Next row: Cast off remaining 6 (6 : 7) stitches and fasten off.

Upper Right Front

Rejoin yarn to the right front section at the front edge.

Next row (right side facing): k2, * p1, k1, repeat from * to last stitch, p1. [23 (25 : 27) sts]

With wrong side facing, continue in k1/p1 rib for a further 19 (21 : 23) rows, then shape the neck as follows: cast off 3 (4 : 4) stitches on the next row, then 2 (2 : 2) on the following alternate row.
[18 (19 : 21) sts]

Continue to decrease at the neck edge, and shape shoulders as follows:
Next row (wrong side facing): cast off 5 (5 : 6) stitches, rib end.
Next row: k2tog, rib end.
Next row: cast off 5 (6 : 6) stitches, rib end.
Next row: k2tog, rib end.
Next row: Cast off remaining 6 (6 : 7) stitches and fasten off.

Upper Back section

With wrong side facing, rejoin the yarn to the remaining stitches in the centre.
Next row (wrong side facing)
: p2, * k1, p1, repeat from * to last stitch, p1. [47 (51 : 55) sts]

Work a further 26 (28 : 30) rows in k1/p1 rib.

Now shape shoulders and back neck by casting off 5 (5 : 6) stitches at the beginning of the next row.

Next row (wrong side facing): cast off 5 (5 : 6) stitches, rib 15 (17 : 19) (including the stitch already on the needle), cast off 7 stitches, and rib to end.
Next row (right side facing): cast off 5 (6 : 6) stitches, rib 10 (11 : 12) (including the stitch already on the needle). Turn, and work each side of the next separately.
Next row: cast off 4 (5 : 5) stitches, rib 6 (6 : 7) (including the stitch already on the needle). Turn.
Cast off remaining 6 (6 : 7) stitches, and fasten off.

This completes the right side of the Back neck.

Rejoin the yarn to the remaining stitches at the neck edge and, right side facing, rib one row.

Next row (wrong side facing): cast off 5 (6 : 6) stitches, rib 10 (11 : 12) (including the stitch already on the needle).
Next row: cast off 4 (5 : 5) stitches, rib 6 (6 : 7) (including the stitch already on the needle).
Cast off remaining 6 (6 : 7) stitches, and fasten off.

This completes the left side of the Back neck.

Button Band

Using 5mm needles, cast on 65 (71 : 77) stitches in main shade (B), and work in k1/p1 rib for 5 rows, keeping the 2 stitches at each end of the row in stocking stitch - like this:

Next row: k2, * p1, k1, repeat from * to last stitch, k1.
Next row: p2, * k1, p1, repeat from * to last stitch, p1.

And so on for 5 rows in all.

Purl one row, then knit 3 rows in stocking stitch using waste yarn of a different colour. Leave these stitches on a spare needle or holder.

Make a second (right hand) band in the same way, adding 3 button holes on the 4th row:

4th row: k2, p1, k1, cast off 2, rib 10 (12 : 13), cast off 2, rib 10 (12
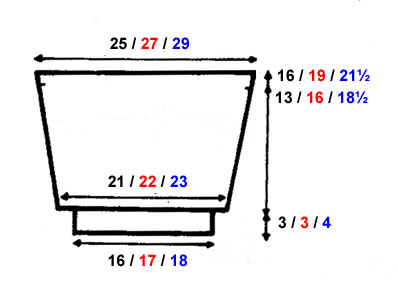
 : 13), cast off 2, rib to end.
5th row: p2, then continue in rib as set, casting on 2 stitches over the 3 buttonholes where you cast off on previous row.
6th row: purl.

Complete with 3 rows of waste yarn as before.

Hood

Using 5mm needles, cast on 69 (73 : 75) stitches in main shade (B), and work in k1/p1 rib for 8 rows.

Change to 6mm needles and work 11 (13 : 15) rows in stocking stitch.
With wrong side facing, cast off 6 (7 : 7) stitches at the beginning of the next 2 rows; then 7 (7 : 7) stitches at the beginning of the next 6 rows.
[15 (17 : 19) sts]

Wrong side facing, continue in stocking stitch, increasing 1 stitch at each end of every 4th row 3 times. [21 (23 : 25) sts]
Work 3 rows straight.

Right side facing, continue in stocking stitch, decreasing 1 stitch at each end of every 6th (6th : 5th) row 3 (3 : 4) times. [15 (17 : 17) sts]
Work 9 (9 : 7) rows straight.
Cast off.

To Make Up

Sew shoulder and sleeve seams up to the coloured markers.
Fit the sleeves to the armholes, grafting the live stitches to the armhole edge, and sewing the sections of the sleeve seam left free to the stitches cast off at the armholes of the body.
[Editor's note: If grafting the stitches makes no sense to you, you can just cast these stitches off in the normal way and then sew the top of the sleeve to the armhole edge - and then sew the marked section of sleeve seam to the cast-off stitches of the body as instructed.
]

Sew the button band, stitch by stitch, to the right side of the work using back stitch, (undo the rows of waste yarn).

Sew up the sides of the hood. Fold the front edge in half inwards and sew round like a hem to make a channel to thread the cord through.
Sew the hood to the neck, making sure you leave the hem open at the ends.
Make a 150cm twisted cord and 2 pompoms. Slide the cord through the hem of the hood. Attach the pompoms at each end.
Lightly iron the seams.

Finish the buttonholes with embroidery if desired, and sew on buttons.

Materials

Chunky or Bulky weight yarn in 50g approx 45m balls (see notes below):
7 (8 : 9) balls main pale blue shade (M) "Forget-Me-Not".
2 balls in dark blue/black (B) "Sloe".
2 balls in grey (G) "Mouse".
1 ball in Ecru. (E)

Pair each No 6 (5mm) and No 4 (6mm) needles.

3 buttons..

Tension

13 sts and 18 rows to 4 inches measured over stocking stitch on 6mm needles.

Size matters

Chest size:
20 (22 : 24) inches,
52 (56 : 60) cm;

length from top of shoulders:
18 (19½ : 21) ins,
46 (50 : 54) cm;

sleeve seam:
7½ ( : 10) ins,
19 (21 : 25½) cm.

Abbreviations:

k2tog or p2tog: knit or purl 2 stitches together (decrease one stitch).
stocking stitch: one row knit and one row purl, ("stockinette").
garter stitch: knit every row.
sl1: slip one stitch.
psso: pass the slipped stitch over

A Word on the Wool:

Original was knitted in a soft brushed chunky wool blend. Available information suggests it was sold in 50g balls with a yardage of about 45 metres per ball.

Be very careful in your choice of yarn and quantities when substituting though, as "big wool" can lead to big miscalculations - and needless to say - knit a swatch.

Disclaimer
(well...almost)

In transposing any pattern it is always a risk that errors will be introduced, in spite of dedicated proof reading.
If you have any problems with this pattern, please and I will try and assist.


Mittens

This is a pattern for a very simple little pair of mittens in matching colours. The mittens are attached to a cord which is threaded through the armholes of a coat so that they can hang free at the ends of the sleeves if removed (and thus don't get lost).

With 5mm needles and dark contrast colour (B), cast on 18 (18 : 20) stitches and work 3 cm in k1/p1 rib.
Change to 6mm needles and work 12 (12 : 14) rows in stocking stitch. Then work as follows:

Next row: k1, sl1, k1, psso, k4 (4 : 5), k2tog, sl1, k1, psso, k4 (4 : 5), k2tog, k1.
[14 (14 : 16) sts]
Cut the yarn leaving a tail for sewing, and thread it through the stitch and pull up.


To make up the mittens: sew up the sides.
In colour B, make a 130cm twisted cord and in main shade (M), make 2 pompoms. Slide the cord through the sleeves of the coat - if you are making them to go with the pattern above, you can attach the cord to the neck - so it stays permanently in place. Attach the mittens at each end and attach a pompom to each mitten,

CatSleeveDiagram.jpg

CatBodyDiagram.jpg

CatHoodDiagram.jpg

Cuddly Cat Toy

CatToy1.jpg

A simple cuddly toy to go with the gown for bedtime.

Instructions

This is a very simple toy made up of fairly flat ovals, which should not be over-stuffed.

Body (2 pieces)

Using dark colour (B), cast on 12 stitches and work in striped stocking stitch following Chart 1 with stripes as follows:
Work 1 row in B, 1 row in G, 1 row in M, throughout.

(The chart shows casting on 2 stitches at the end of every row, until there are 28 stitches, then increase 1 stitch at each end of the next row [30 sts]; then working 29 rows straight, before starting to decrease 1 stitch at at each end of the next and every alternate row until 14 stitches remain).

Cast off using B.

Work a second side in the same way.

Head (2 pieces)

Using light colour (M), cast on 11 stitches and work in stocking stitch following Chart 2, (which shows increasing 1 stitch at each end of the third and every following alternate row until there are 21 stitches; then working 9 rows straight, before starting to decrease 1 stitch at at each end of the next and every alternate row until 11 stitches remain).

Work a second side in the same way.

Ears (2 pieces)

Using light colour (M), cast on 8 stitches, and work 10 rows straight.
Cast off.

Work a second ear in the same way.

Paws (4 pieces)

Using light colour (M), cast on 10 stitches and work in stocking stitch following Chart 3, (which shows working 6 rows straight, then decreasing 1 stitch at at each end of the next and every alternate row until 4 stitches remain).

Cast off.

Work a further 3 pieces in the same way.

Tail (1 piece)

Using dark colour (B), cast on 12 stitches and work 62 rows in striped stocking stitch as follows:
1 row in B, 1 row in G, 1 row in M, throughout.
Cast off.

To Make Up

Assemble the two faces of the body, the head and the paws. Sew, (right sides together) leaving an opening. Turn right side out, stuff, and sew closed.
Fold the rectangles of the ears in two to form a triangle, and sew on each side of the head.
Sew the head and paws to the body, as shown in the picture.
Sew an 8cm seam in backstitch, as indicated on Chart 1, starting from the bottom and the middle of the body, to indicate trousers.
Fold the tail in two lengthwise (wrong side out), sew the seam, turn right side out, stuff and close; fix it on the top of the back seam of the pants.
Embroider eyes, nose, mouth, and whiskers, in color B as shown in the photo.

Materials

Quick-knit or 5 ply:
1 ball in each of pale blue shade (M) "Forget-Me-Not", dark blue/black (B) "Sloe", and grey (G) "Mouse".

Pair of No 12 (2¾mm or 2½mm) needles which should be pointed at both ends, or circular.

Stuffing.

Tension

25 sts and 34 rows to 4 inches measured over stocking stitch. However, as this is a toy the tension is less important - you just need to be consistent.

Size matters

Makes about a 10 inch toy.

Abbreviations:

k2tog or p2tog: knit or purl 2 stitches together (decrease one stitch).
stocking stitch: one row knit and one row purl, ("stockinette").

A Word on the Wool:

The original yarn was a quick-knit - that is between a DK and a 4ply, either of which could be substituted - the toy would just end up a little larger or smaller.

The original yarn came in 50g balls of 160 metres.

Disclaimer
(well...almost)

In transposing any pattern it is always a risk that errors will be introduced, in spite of dedicated proof reading.
If you have any problems with this pattern, please and I will try and assist.

© Christina Coutts 2007

Helpful Stuff

Pattern Archive

Categories

Yarn Links

Fabric etc

Stuff to do

  • Little rabbits
  • V&A 1940s Patterns
  • Monkey Socks
  • Necktie Bag
  • Posh Gloves
  • Criss-cross coasters