Home

Weblog

Pattern of
the Month

On the Needles
(...and Off the Needles)

Knitalong

Stitchcraft

Vintage Patterns

About the
Idle Hands


Archive entry for 2022

« 2021 | Main | 2023 »

December 2022

Snow Baby

SnowBaby.jpg

Adorable winter coatigan and bonnet set for a child.

Instructions.

Instructions for 2 sizes, larger size in brackets.

COAT

The body of the coat is made in one piece beginning at the bottom edge.

With larger size needles and white colour, cast on 186 (204) stitches, and, using the blue colour, work in stocking stitch until the work measures 9 (13 ) inches.
Now divide the piece to work the Back and Fronts separately from the armholes by placing 46 (50) stitches at each side on holders.

Coat Back

Continue on the centre 94 (104)stitches for the Back only.

Shape armholes by decreasing: for size 1: decrease 1 stitch at the beginning of the next 8 rows, (for size 2: decrease 1 stitch at each end of the next row once, then the following 4th row once, then the following alternate row once, and finally the following 4th row once).
Place the remaining 86 (96) stitches on a holder.

Coat - Right Front:

With right side facing, pick up 46 (50) stitches for the on the right and shape the armhole.
Beginning at the armhole edge, for size 1: decrease 1 stitch on the next and every alternate row, 4 times, (for size 2: decrease 1 stitch on the next row once, 1 stitch at the beginning of the following 4th row once, 1 stitch at the beginning of the following alternate row once, 1 stitch at the beginning of the following 4th row once).
At the same time shape the neck edge beginning at 1st (5th) - knit - row, by leaving the last 22 (26) stitches unworked, turning and purling back, and then in the same way, leaving the last 5 stitches unworked on every alternate row 4 times.

Leave all 42 (46) stitches remaining on a holder.

Coat - Left Front:

Work the left front the same as the right front, reversing all shapings.

Sleeves (make 2):

With smaller size needles and blue colour, cast on 38 stitches and work 1¼ inches in k1/p1 rib.
Change to larger size needles, and work in stocking stitch, increasing 8 (10) stitches evenly spaced across the first row. [46 (48) sts]
Increase 1 stitch at each end of every 4th row 8 times. [62 (64) sts]

Continue without shaping until work measures 6¾ () inches.
Shape top by decreasing for size 1: 1 stitch at the beginning of the next 8 rows, (for size 2: decrease 1 stitch at the beginning of the next 2 rows, 1 stitch at each end of the following 4th row, 1 stitch at each end of the following alternate row, 1 stitch at each end of the following 4th row).
Leave the remaining 54 (56) stitches on a stitch holder.

Yoke:

With larger size needles in blue colour, pick up the 278 (300) stitches from the holders: 42 (46) stitches from the right front, 54 (56) stitches from the right sleeve, 86 (96) stitches from the back, 54 (56) stitches from the left sleeve, and finally, 42 (46) stitches from the left front.

With right side facing, work 2 rows in stocking stitch decreasing 8 stitches at the armholes on the first row as follows:
Next row (decrease): k40 (44), k2tog, k2tog, k50 (52), k2tog, k2tog, k82 (92), k2tog, k2tog, k50 (52), k2tog, k2tog, k40 (44).
[270 (292) sts]
Next row: purl.

The next row decreases a number of stitches evenly across each section of the yoke - work the two sizes as follows:

SIZE 1 only

Next row (decrease): (k1, k2tog, k2tog, k1, k2tog) 5 times, k1;
k1, (k3, k2tog) 10 times, k1;
k1, k2tog, (k1, k2tog, k2tog, k1, k2tog) 10 times, k1;
k1, (k2tog, k3) 10 times, k1;
k1, (k2tog, k1, k2tog, k2tog, k1) 5 times. [189 sts]

Next row: purl.

SIZE 2 only

Next row (decrease): (k1, k2tog) 15 times;
k2, (k4, k2tog, k4) 5 times, k2;
k2tog, k2tog, (k1, k2tog) 29 times, k3tog;
k2, (k4, k2tog, k4) 5 times, k2;
(k2tog, k1) 15 times.
[219 sts]

Next row: purl.

Now work the pattern sections in stocking stitch from the charts, with decreasing on plain rows in between as follows; note carefully that decrease rows are written separately for each of the two sizes:

Both sizes: work row 1-4 rows from chart 1 starting with a knit row.

SIZE 1 only:

Next row 5 (decrease): Using blue yarn: k6, * k2tog, k5, repeat from * 26 times, k1. [163 sts]
Next row 6: Change to white and purl across the row.
Next row 7 (decrease): Change to blue yarn: k7, * k2tog, k5, repeat from * 22 times. [141 sts]

SIZE 2 only:

Next row 5 (decrease): Using blue yarn: k8, * k2tog, k6, repeat from * 26 times, k3. [193 sts]
Next row 6 : Change to white and purl across the row.
Next row 7 (decrease): Change to blue yarn: k1, * k2tog, k8, repeat from * 19 times, k2tog. [173 sts]

Both sizes: work 7 rows from chart 2 starting with a purl row.

SIZE 1 only:

Next row 15 (decrease): Using blue yarn: k10, * k2tog, k3, repeat from * 25 times, k6. [116 sts]

SIZE 2 only:

Next row 15 (decrease): Using blue yarn: k7, * k2tog, k4, repeat from * 27 times, k4. [146 sts]

Both sizes: work 2 rows from chart 3 starting with a purl row.

SIZE 1 only:

Next row 18 (decrease): Using blue yarn: p2, * p2tog, p3, repeat from * 22 times, p2tog, p2. [93 sts]
Next row 19: Change to white and knit across the row.
Next row 20 (decrease): Change to blue yarn: p10, * p2tog, p2, repeat from * 19 times, p7. [74 sts]

SIZE 2 only:

Next row 18 (decrease): Using blue yarn: p6, * p2tog, p4, repeat from * 23 times, p2. [123 sts]
Next row 19: Change to white and knit across the row.
Next row 20 (decrease): Change to blue yarn: p1, * p2tog, p4, repeat from * 20 times, p2tog. [102 sts]

Both sizes: work 6 rows from chart 4 starting with a knit row.

SIZE 1 only:

Next row 27 (decrease): Using blue yarn: * k2tog, k4, repeat from * 12 times, k2tog. [61 sts]

SIZE 2 only:

Next row 27 (decrease): Using blue yarn: k2, * k2tog, k2, repeat from * 25 times. [77 sts]

Both sizes: work 4 rows from chart 5 starting with a purl row.

Both sizes: purl 1 row in blue, decreasing one stitch at the centre of the work. [60 (76) sts]

Place the remaining stitches on a stitch holder.

Coat border:

Remove the strand of white at the bottom of the work, picking up the stitches as you go.
With the circular needle and blue colour, pick up and knit 436 (506) stitches around the edge of the coat, as follows:
60 (76) stitches around neck,
91 (109) stitches from each front,
186 (204) stitches from bottom edge.
Commence working in the round, increasing 2 stitches at the corners between each section.

Work 4 rounds of stocking stitch (every round knitted) and on the 2nd round on right front edge, make 3 buttonholes 2 stitches wide: cast off 2 stitches, then on the third round, cast on 2 stitches over the spaces.
Place the first buttonhole in line with the last row of Chart 1, of the yoke; space the others 8 stitches apart.

On the 5th round, work 1 round of eyelets:
5th round: k1, * yarn over, k2tog, repeat from * to end.
[This is the fold line to make the picot edge].

Work a further round, then make 3 buttonholes at same places as first 3 buttonholes. Work a further 2 rounds then cast off all stitches.

Finishing the coat:

Sew armhole and sleeve seams.
Fold border in half all around the coat and sew in place.
Sew around buttonholes.
Sew on buttons.

Materials

Double Knitting yarn:

Coat: 3 (4) x 50g balls in blue colour plus 1 ball in white.

Bonnet: 1 ball in each colour.

One pair each of 3mm and 3½mm (or 3¾mm) needles.

3½mm (or 3¾mm) circular needle.

Tension

23sts x 30 rows to 4 inches

Size matters

1 / 2 years
[25 / 26 inch chest]

Abbreviations:

k2tog: decrease by knitting 2 stitches together
p2tog: decrease by purling 2 stitches together
yo: yarn over needle to make an extra stitch (creates a decorative hole)

A Word on the Wool.

Original yarn was a double knitting with 50/50 wool/acrylic mix and approximately 125m to 50g.

Disclaimer
(well...almost)

In transposing any pattern it is always a risk that errors will be introduced, in spite of dedicated proof reading.
If you have any problems with this pattern, please and I will try and assist.


BONNET

With larger size needles and blue colour, cast on 89 stitches.
Work 4 rows in stocking stitch until the work measures 9 (13 ) inches.

On the 5th row, work eyelets:
5th row: k1, * yarn over, k2tog, repeat from * to last 2 stitches; k2. [90 sts]
[This is the fold line to make the picot edge].

Continue in stocking stitch, and when work measures 1¼ inches, begin the fair-isle pattern following the 35 rows on the chart given at the end.

Then shape the back of the hat by casting off 30 stitches at each edge of next row. You now have 29 stitches.
[Editor's note: If I were knitting this I would cast off 30 stitches at the beginning of the next two rows and then continue on the centre 29 stitches only; this avoids having to break and rejoin the blue colour.]

Continue on the centre 29 stitches in blue colour, decreasing 1 stitch at each end of every 4th row 6 times.
Cast off the remaining 17 stitches.

Finishing the bonnet:

Fold the border along the row of eyelets to form the picot edge, and sew a hem.
Fold the T shaped knitting into a bonnet shape and sew the two back seams, so that the plain centre section forms the back of the head, and the picot edge frames the face.
With smaller size needles and blue colour, pick up and knit 64 stitches all around the bottom edge of the bonnet.

To make the chin strap, cast on 25 stitches (left side of work, right side of bonnet), and work 4 rows in k1/p1 rib. On the 2nd make 1 buttonhole 2 stitches wide, as on the coat, placing it 4 stitches from the end of the strap.
On the 5th row, cast off all stitches.
Sew a button on the other (left) side of the bonnet to attach the chin strap.

Bonnet Chart

November 2022

Long Tall Sally (with her beau)

LeggyDolls.jpg

Lovable leggy dolls in their fashionable trouser suits - knitted with sewn-on felt features.

Instructions.

The basic dolls are identical, differing only in hair and clothing.

Girl Doll - head (2 pieces alike):

With No 11 needles and flesh colour, cast on 12 stitches.
Working in stocking stitch, increase 1 stitch at each end of the next 9 rows, then increase stitch each end of the following 5 alternate rows. Then, increase 1 stitch each end of every 3rd row until there are 46 stitches.
Work 15 rows straight.

Now decrease 1 stitch at each end of the next and every 3rd row
until 40 stitches remain.
Decrease 1 stitch at each end of the following 5 alternate rows, then decrease 1 stitch at each end of every row until 12 stitches remain. Cast off.

Make a second piece the same and join together, leaving cast-on edges open.
Stuff firmly.


Girl Doll - body (2 pieces alike):

With No 11 needles and flesh colour, cast on 24 stitches.
Work 22 rows stocking stitch.
Then, decrease 1 stitch at each end of the next row.
Work 5 rows straight.
Increase 1 stitch at each end of the next and every 5th row until there are 32 stitches.
Work 5 rows straight.
Cast off 7 stitches at the beginning of the next 2 rows.
Decrease 1 stitch at each end of the following 3 alternate rows.
Work 3 rows straight.
Decrease 1 stitch at each end of the next row.
Work 17 rows straight.
Cast off.

Make a second piece the same and join together, leaving cast-off edges open.
Stuff firmly and sew to head opening.

Girl Doll - legs (make 2):

With No 11 needles and flesh colour, cast on 38 stitches.
Work 10 rows stocking stitch.

Next Row: k14, k2tog, k6, k2togtbl, k14.
Next Row: p13, p2togtbl, p6, p2tog, p13.
Continue decreasing as set on every row, working 1 stitch less at the beginning and end of the rows until 26 stitches remain.

Continue straight until work measures 12 inches.
Cast off.

Join back and foot seams.
Stuff; close opening and sew to body.

Girl Doll - arms (make 2):

With No 11 needles and flesh colour, cast on 25 stitches.
Work in stocking stitch until work measures 7 inches, ending after a purl row.

Next Row: k1, (m1, k11, m1, k1) twice.
Purl one row.
Next Row: k1, (m1, k13, m1, k1) twice.
Purl one row.
Next Row: k1, (m1, k15, m1, k1) twice.

Work 11 rows straight.
Next Row: k1, (k2togtbl, k13, k2tog, k1) twice.
Next Row: p1, (p2tog, p11, p2togtbl, p1) twice.

Continue to decrease as set on the next 4 rows.
Cast off.

Join side and hand seams.
Stuff; close opening and sew to body.

Girl Doll - hair:

Cut brown yarn in 36 inch lengths. With centre of strands of yarn at centre of head, arrange evenly over head from front hairline to nape of neck, backstitching securely over centre for parting.
Smooth down to ear level, catch down, then plait ends, tie and trim.

Girl Doll - features:

Cut oval sections, as given in the diagram, for eyes, (white felt); centres (black), mouth (red); sew on as shown in picture.

Girl Doll - jumper:

BACK: With No 9 needles and Red yarn, cast on 48 stitches.
Work 4 rows in k1/p1 rib. Break off red yarn, and join in Navy yarn.
*

** Continue in stocking-stitch until work measures 3¼ inches, ending with a purl row.

Next Row (make back opening): k26; turn.
Next Row: k4, purl to end.
Next Row: knit.
Repeat the last 2 rows until work measures 5¼ inches, ending with a purl row.

Shape the armhole by casting off 3 stitches at the armhole edge on the next 3 rows.
Continue until work measures 8 inches.
Cast off.

Rejoin yarn to the inner edge of the remaining stitches, cast on 4 stitches, and complete to match the other side.

FRONT: Work exactly as for BACK as far as *.
Continue in stocking stitch until work measures 5¼ inches, ending with a purl row.

Shape armholes by casting off 3 stitches at the beginning of the next 2 rows, then k2tog at each end of the next 3 rows.
**

Neck shaping:
Next Row: k12; turn.
Decrease 1 stitch at the neck edge on the next 3 rows.
Cast off.

Slip the centre 12 stitches on to a stitch holder and work the other side of the neck to match.

SLEEVES: With No 9 needles and Red yarn, cast on 40 stitches, and work as for the BACK up to *.

Continue in stocking stitch, until work measures 2 inches, ending with a purl row.
To shape the top, cast off 3 stitches at the beginning of the next 2 rows, then k2tog at the beginning of every row until 22 stitches remain.
Cast off.

NECKBAND: Join the shoulder seams.
With No 9 needles and Red yarn, starting and the centre back, pick up and knit 48 stitches around the neck, including the stitches on the holder.
Rib 3 rows, and cast off loosely in rib.

Set in the sleeves.
Join side and sleeve seams.
Sew on 3 press studs down the back opening.

CHERRIES: Cut two circles in red felt - about the size of a 1p piece. Sew on and embroider stems with white yarn as shown in the photo.

Girl Doll - trousers:

LEGS (2 pieces alike): With No 9 needles and Red yarn, cast on 42 stitches. Work in stocking stitch, until work measures 8 inches, ending with a purl row.

Increase 1 stitch at each end of the next and following 4th row.
Work 3 rows.
Cast off 2 stitches at the beginning of the next 2 rows.
Decrease 1 stitch at each end of the next 3 rows.
Continue in stocking stitch, until work measures 12½ inches.
Cast off.

Make a second leg the same.

Join front and back seams.
Join leg seams.
Turn up ½ inch hems to right side on legs and catch stitch in place.
Turn in ½ inch hem at waist, enclosing a ring of elastic, and catch stitch in place.

Girl Doll - socks:

With No 9 needles and Green yarn, cast on 46 stitches.
Work 10 rows in stocking stitch.

Next Row: k17, k2tog, k8, k2togtbl, k17.
Next Row: p16, p2togtbl, p8, p2tog, p16.

Working in stripes of 2 rows Red, and and 2 rows Green, continue decreasing as set until 32 stitches remain.
Pattern 13 rows.
Still working in stripes, knit 1 row, then rib 3 rows, and cast off in rib.
Join leg and foot seam.

Girl Doll - shoes:

Cut out 4 upper sections and 2 soles from red felt, using the pattern given in the diagram.
Join heel and toe seams.
Sew the lower edge of the upper around the sole.


Boy Doll - head, body, legs, and arms:

Work exactly as for GIRL doll.

Boy Doll - hair:

Using a darning needle and 2 strands of dark brown yarn, work around hair line, then then fill centre thus:
Wind the yarn three times around 2 fingers of your left hand and back stitch these loops to the head. Stitch the next 3 loops close to the previous loops, and continue in this way, covering the head densely.

Boy Doll - features:

Exactly as the GIRL doll.

Boy Doll - jumper:

BACK: With No 9 needles and Blue yarn, cast on 48 stitches.
Work 8 rows in stocking-stitch.
Join in Light Blue yarn, and work 2 rows, then break off Light Blue.
Continue in Blue. ***

Complete the back as for the GIRL doll's jumper, starting from **.

FRONT: Work exactly as for BACK (above) as far as ***.
Then continue to work as for the GIRL's jumper as far as **.

Shape armholes by casting off 3 stitches at the beginning of the next 2 rows, then k2tog at each end of the next 3 rows.
**

Neck shaping:
Next Row (wrong side facing): p16; turn.
Next Row: k2, k2tog, knit to end.
Repeat the last 2 rows until 10 stitches remain.
Work 1 row.
Cast off.

Rejoin the yarn to the inner edge of the remaining stitches, and work the other side to match, working k2togtbl, instead of k2tog.

SLEEVES: With No 9 needles and Blue yarn, cast on 40 stitches, and work as for the (Boy's) BACK up to ***.

Continue in stocking stitch, until work measures 2½ inches, ending with a purl row.
To shape the top, cast off 3 stitches at the beginning of the next 2 rows, then k2tog at the beginning of every row until 22 stitches remain.
Cast off.

NECK INSET:
With No 9 needles and Blue yarn, cast on 3 stitches.
Work 2 rows in stocking stitch.
Working in stripes of 2 rows Light Blue and 2 rows Blue, increase 1 stitch at each end of the next and every following alternate row until there are 15 stitches.
Cast off knitwise.

COLLAR:
With No 9 needles and Blue yarn, cast on 36 stitches.
Working 1 stitch knit at each end of ever purl row, work as for the (Boy's) BACK up to ***.
Work 13 rows straight.
Next Row: k1, p11, cast off knitwise the next 12 stitches, purl to the last stitch, k1.

Continue on these stitches only.
Still working the garter stitch edge as set, decrease 1 stitch at each end of the 3rd and every following 4th row until 2 stitches remain.
Knit 3 rows.
K2tog and fasten off.

With right side facing, rejoin yarn to inner edge of remaining stitches, and work other side to match.

Join shoulders.
Sew in inset.
Sew press studs to collar to points to fasten at centre front.
Sew on 3 press studs down the back opening.
Set in sleeves.
Join side and sleeve seams.
Turn under ½ inch hems at lower edge, collar and sleeves and catch stitch in place.

Boy Doll - trousers:

Work as for the GIRL doll's trousers but using Blue yarn, and turning all the hems to the wrong side.

Boy Doll - boots:

Cut out 4 upper sections and 2 soles from white felt, using the pattern given in the diagram.
Cut 4 circles in red felt about the size of a 10p piece, and sew on each side of the heel for decoration, as shown.
Join heel and toe seams of uppers, and sew around sole.
With white thread, work stitching line as shown by broken line.
Pierce eyelet holes and lace with Blue yarn.

Materials

Double knitting yarn in 20g balls:

Girl Doll:
• 6 balls in flesh colour;
• 4 balls in red;
• 4 balls in brown;
• 3 balls navy, and
• 1 ball in lime green.
• One 6-inch square of red felt and scraps of white and black felt for shoes, cherries and features.
• 3 press studs and a waist length of elastic.

Boy Doll:.
• 6 balls in dark blue;
• 4 balls dark brown;
• 1 ball in light blue.
• One 6-inch square of white felt and scraps of red and black felt for boots and features.
• 5 press studs and a waist length of elastic.

• A pair each of Nos 11 (3mm) and 9 (3¾mm) knitting needles
• Stuffing for each doll.

Tension

28sts x 36 rows to 4 inches on No 11 needles.
24sts x 32 rows to 4 inches on No 9 needles.

Size matters

Height 24 inches.

Abbreviations

m1: make 1 stitch by picking up the strand of yarn before the next stitch and knit into the back of it
k2tog: knit 2 stitches together
k2togtbl: knit 2 stitches together through back loops (also known as ssk - "slip, slip, knit")
p2tog: purl 2 sts together
p2togtbl: purl 2 sts together through back loops


A Word
on the Wool.

The original yarn was a courtelle bri-nylon standard double knitting.

Disclaimer
(well...almost)

In transposing any pattern it is always a risk that errors will be introduced, in spite of dedicated proof reading.
If you have any problems with this pattern, please and I will try and assist.


Pattern Diagram

This is the pattern for the felt pieces used for the features, shoes, and boots.
It is mapped on to a grid of 1 inch squares, (subdivided into eighths), originally designed for you to draw it out yourself on to a grid of 1 inch squares. You can download pdf files of printable graph paper from the web - you need 8 lines to the inch.

October 2022

Knitted trouser suit

SixtiesTrouserSuit.jpg

Having spent years making tongue-in-cheek comments about knitted trousers, I find they seemed to become a kind of pandemic fashion item - safely out of site during Zoom meetings. I'm not sure the fashion was really for anything like hand-knitted trousers; however, sitting (unobserved!) in my poorly-insulated chilly office at the top of the house, cosy woollen trousers are taking on some kind of appeal.
Even if the trousers don't appeal, there is a rather nice matching low-belted long-line cable sweater - very much of the period.

Instructions.

3 sizes - larger sizes are given between brackets -
eg Small (Medium, Large).

Jumper Back

Using No 10 (3¼mm) needles, cast on 94 (106, 116) stitches and work 11 rows in k1/p1 rib.
Next row: Rib 7 (5, 10), * work twice into the next stitch, rib 7; repeat from * to last 7 (5, 10) stitches; work twice into the next stitch, rib 6 (4, 9).
[105 (119, 129) sts]

Change to No 8 (4mm) needles and pattern:

1st row (right side facing): k5 (4, 1); [p4, k4] one (two, three) times; * p2, k9, p2, [k4, p4] twice, k4; repeat from * once, p2, k9, p2, [k4, p4] one (two, three) times, k5 (4, 1).
2nd row: p30 (37, 42); * k4, p4, k4, p21; repeat from * once, p9 (16, 21).
3rd row: k5 (4, 1); [p4, k4] one (two, three) times; * p2, sl3F, k3, k3 from cable needle, k3, p2, [k4, p4] twice, k4, repeat from * once, p2, sl3F, k3, k3 from cable needle, k3, p2, [k4, p4] one (two, three) times; k5 (4, 1).
4th row: work as for 2nd row.
5th row: work as for 1st row.
6th row: work as for 2nd row.
7th row: k5 (4, 1); [p4, k4] one (two, three) times; * p2, k3, sl3B, k3, k3 from cable needle, p2, [k4, p4] twice, k4, repeat from * once, p2, k3, sl3B, k3, k3 from cable needle, p2, [k4, p4] one (two, three) times; k5 (4, 1).
8th row: work as for 2nd row.

These 8 rows form the pattern. Continue in pattern until work measures 16 inches from the beginning, ending with a wrong side row.

Shape Armholes:
Keeping the continuity of the pattern, cast off 7 stitches at the beginning of the next 2 rows. Decrease 1 stitch at each end of the next and every following alternate row until 81 (89, 99) stitches remain.

* Continue without further shaping until work measures 7 (, 8) inches from start of armhole shaping, ending with a right side row.

Shape Shoulders:
Next row (wrong side facing): cast off 5 (6, 7) stitches, pattern 20 (22, 25), including the stitch used in casting off. Turn, leaving the remaining stitches on a spare needle or stitch holder.
Next row: w2tog, pattern to end.
Next row: cast off 5 (6, 7) stitches, pattern to last 2 stitches, w2tog. Repeat the last 2 rows once.
Work 1 row.
Cast off the remaining 6 (6, 7) stitches.

With wrong side of work facing, join in yarn at the neck edge and work to end.
Next row (wrong side facing): pattern 23 (26, 30) stitches, w2tog.
Turn, leaving the centre 31 (33, 35) stitches on a spare needle or stitch holder.
W2tog at the neck edge on the next 3 rows.
Next row: Cast off 5 (6, 7) stitches, pattern to end.
Work 1 row.
Repeat the last 2 rows twice more.
Cast off the remaining 6 (6, 7) stitches.
(The armhole is ½ inch shorter on the left side to allow for the ribbing to make the shoulder opening).

Jumper Front

Follow instructions for Back from * to *.
Continue without further shaping until work measures 4½ (5, ) inches from start of armhole shaping, ending with a wrong side row.

Shape Neck:
Next row: Pattern 30 (33, 37) stitches and turn, leaving remaining stitches on a spare needle.
Decrease 1 stitch at the neck edge on the next 9 rows.
Continue without further shaping until work measures 7 (, 8) inches from start of armhole shaping, ending at armhole edge.
(The armhole is ½ inch shorter on the left side to allow for the ribbing to make the shoulder opening).

Shape Shoulder:
Cast off 5 (6, 7) stitches at the beginning of the next and 2 following alternate rows.
Work 1 row.
Cast off the remaining 6 (6, 7) stitches.
Slip the centre 21 (23, 25) stitches on to a spare needle.
Join in yarn at the neck edge to the remaining stitches, pattern to end.
Decrease 1 stitch at the neck edge on the next 9 rows.
Continue without further shaping until work measures 7½ (8, ) from the start of the armhole shaping, ending at the armhole edge.

Shape Shoulder:
Cast off 5 (6, 7) stitches at the beginning of the next and 2 following alternate rows.
Work 1 row.
Cast off the remaining 6 (6, 7) stitches.

Jumper Sleeves

Using No 10 (3¼mm) needles, cast on 52 (54, 56) stitches and work 15 rows in k1/p1 rib.
Next row: Rib 5 (4, 7), * work twice into next stitch, rib 5 (8, 13); repeat from * to last 5 (5, 7) stitches; work twice into next stitch, rib 4 (4, 6). [60 stitches].

Change to No 8 (4mm) needles and rib pattern.
1st row (right side facing): p4, * k4, p4; repeat from * to end.
2nd row: k4, * p4, k4, repeat from * to end.

These 2 rows form the pattern.
Increase and work into rib pattern, 1 stitch at each end of the 11th and every following 12th (9th, 7th) row until there are 76 (82, 88) stitches on the needle.
Continue without further shaping until work measures 16½ (17, 17½) inches from the beginning, ending with a wrong side row.

Shape Top:
Cast off 7 stitches at the beginning of the next 2 rows.
Decrease 1 stitch at each end of the next and every following 4th row until 54 (58, 64) stitches remain; then decrease 1 stitch at each end of every alternate row until 36 (42, 46) stitches remain.
Now decrease 1 stitch at each end of every row until 22 (24, 24) stitches remain.
Cast off.

Jumper Shoulder Edging

Using size 10 needles, cast on 11 stitches.
1st row (right side facing): k1, * p1, k1, repeat from * to end.
2nd row: p1, * k1, p1, repeat from * to end.
Repeat these 2 rows for ¾ inch.

1st Buttonhole row: Rib 4, cast off 3, rib to end.
2nd Buttonhole row: Rib to end, casting on 3 stitches over cast off stitches in previous row.
Work 1¾ (2, ) inches in rib, measured from base of buttonhole.
Work another buttonhole.
Work ¾ (1, 1¼) inches in rib, measured from base of previous buttonhole and ending with a wrong side row.
Leave these stitches on a safety pin.
Work a second piece to match, omitting buttonholes.

Jumper Neckband

Using a back stitch, join right shoulder seam.
With right side of work facing and using No 10 needles, rib across the 11 stitches of the Shoulder Edging with buttonholes; pick up and k13
stitches down left side of front neck; knit across the 21 (23, 25) stitches at centre front; pick up and knit 15 stitches up right side of front neck; 7 stitches down right side of back neck; knit across the 31
(33, 35) stitches at the centre back, pick up and knit 4 stitches up left side of back neck, then rib across the 11 stitches of the Shoulder Edging without buttonholes. [113 (117, 121) sts]

Next row (wrong side facing): p1, * k1, p1, repeat from * to end.
Next row: k1, * p 1, k1 , repeat from * end.

Continue in rib, making a third buttonhole 1¾ (2, ) inches from base of previous buttonhole.
Change to No 11 needles and work a further ½ inch in rib.
Cast off in rib.

Jumper Belt

Using No 10 needles, cast on 13 stitches.
1st row (right side facing): k1, * p1, k1, repeat from * to end.
2nd row: p1, * k1, p1, repeat from * to end.
Repeat these 2 rows for 36 (38, 40) inches, ending with a wrong side row. Decrease 1 stitch at each end of the next and every following
alternate row until 3 stitches remain.
Knit 3 together, and fasten off.

Belt Tabs (Make 4):

Using No 10 needles, cast on 7 stitches.
1st row (right side facing): k1, * p1, k1, repeat from * to end.
2nd row: p 1, * k 1, p 1, repeat from to end.
Repeat these 2 rows for 2 ½ inches, ending with a wrong side row. Cast off in rib.

Making Up Jumper

Using a back stitch, join side and sleeve seams.
Stitch Shoulder Edgings to left shoulder with a flat stitch.
Sew in sleeves, overlapping Shoulder Edging.
Sew on buttons.
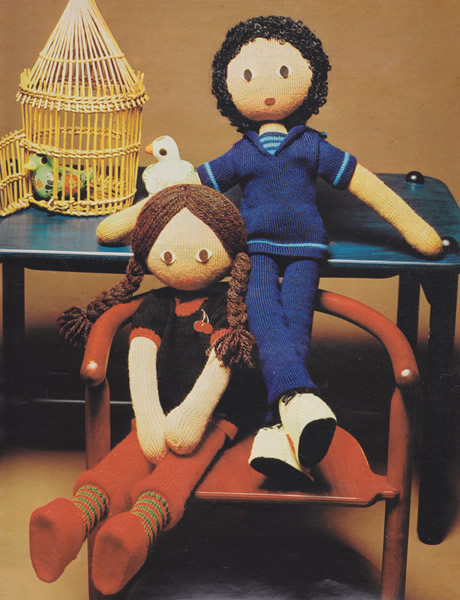
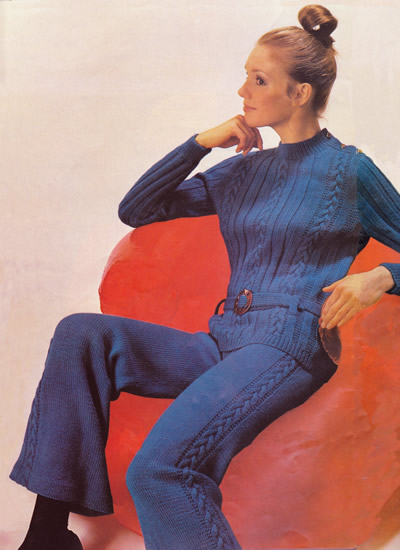
Stitch belt tabs into position as shown in photograph.
Sew buckle to straight edge of belt.
Slot belt through tabs.

Materials

Double Knitting yarn, 25g balls.

Jumper:
22 (24, 26)

One pair each of Nos 8 (4mm), 10 (3¼mm), and 11 (3mm) needles.
1 cable needle.

3 buttons.
1 buckle.

Trousers:
23 (25, 28)

One pair each of Nos 8 (4mm), and 10 (3¼mm) needles.
1 cable needle.

6 inch zip.
Elastic to fit waist.
1 trouser clip.

Tension

22 sts x 32 rows to 4 inches measured over stocking stitch

Size matters

Jumper: to fit chest 30-31, (34-35, 37-38)
actual measurement
32 (36, 39) inches; length: 32 (36, 39) inches; sleeve seam: 16½ (17, 17½) inches.

Trousers: to fit hips 32-33 (35-36, 38-39) inches;
inside leg seam:
28 (28, 28) inches.

Abbreviations:

k/p: knit/purl
w2tog: knit or purl 2 stitches together.
k2tog: knit 2 stitches together.
sl3F: slip the next 3 stitches on to a cable needle and leave at front of work.
sl3B: slip the next 3 stitches on to a cable needle and leave at back of work.
m1: make 1 stitch by picking up the strand of yarn before the next stitch and knitting into the back of it.
sl1K: slip the next knitwise.
sl1P: slip the next purlwise.

A Word on the Wool

The original yarn was a standard double knitting, 100% superwash wool.

Disclaimer
(well...almost))

In transposing any pattern it is always a risk that errors will be introduced, in spite of dedicated proof reading.
If you have any problems with this pattern, please and I will try and assist.


Trousers Right Leg

Using No 8 (4mm) needles, cast on 121 (129, 137) stitches and work 9 rows stocking stitch, (1 row knit, 1 row purl).
Next row (wrong side facing): Knit to mark hemline.

Commence pattern:

1st row (right side facing): k53 (57, 61); p2, k9, p2; k55 (59, 63).
2nd row: purl.
3rd row: k53 (57, 61); p2, sl3F, k3, k3 from cable needle, k3, p2; k55 (59, 63).
4th row: purl.
5th row: as 1st row.
6th row: purl.
7th row: k53 (57, 61); p2, k3, sl3B, k3, k3 from cable needle, p2; k55 (59, 63).
8th row: purl.

These 8 rows form the pattern.
Continue until 44 pattern rows in all have been worked.

Keep continuity of cable panel:
Next row: k2tog, work to last 2 stitches, k2tog. [119 (127, 135) sts]
Work 19 rows straight.
Next row: k2tog, work to end. [118 (126, 134) sts]
Work 19 rows straight.
Repeat the last 40 rows once more. [115 (123, 131) sts]

Next row: k2tog, work to last 2 stitches, k2tog. [113 (121, 129) sts]
Work 19 rows straight.
Repeat the last 20 rows once more. [111 (119, 127) sts]

Next row: k2tog, work to end. [110 (118, 126) sts]
Work 7 rows straight.
Next row: Work 60 (64, 68), m1, work to last stitch, increase into last stitch. [112 (120, 128) sts]
Work 5 rows straight.
Next row: Work to last stitch, increase into last stitch. [113 (121, 129) sts]
Work 1 row straight.
Next row: Work 60 (64, 68), m1, work to end. [114 (122, 130) sts]
Work 3 rows straight.
Next row: Work to last stitch, increase into last stitch. [115 (123, 131) sts]
Work 3 rows straight.
Next row: Work 60 (64, 68), m1, work to end. [116 (124, 132) sts]
Work 1 row straight.
Next row: Work to last stitch, increase into last stitch. [117 (125, 133) sts]
Work 5 rows straight.
Next row: Increase into first stitch, work 44 (48, 52), m1, work 15, m1, work to last stitch, increase into last stitch. [121 (129, 137) sts]
Work 2 rows straight.
Next row: Work to last stitch, increase into last stitch. [122 (130, 138) sts]
Work 2 rows straight.
Next row: Increase into first stitch, work to last stitch, increase into last stitch. [124 (132, 140) sts]
Work 1 row straight.
Next row: Work 64 (68, 72), m1, work to last stitch, increase into last stitch. [126 (134, 142) sts]
Next row: Work to last stitch, increase into last stitch. [127 (135, 143) sts]
Work 2 rows straight.
Next row: Increase into first stitch, work to last stitch, increase into last stitch. [129 (137, 145) sts]
Work 1 row straight.
Next row: Cast off 3 stitches, work to end. [126 (134, 142) sts]
Next row: Cast off 16 stitches, work to end. [110 (118, 126) sts]
Next row: k2tog, work 61 (65, 69), m1, work to last 2 stitches, k2tog. [109 (117, 125) sts]
Work 1 row straight.
Next row: k2tog, work 45 (49, 53), m1, work to last 2 stitches, k2tog. [108 (116, 124) sts]
Work 1 row straight.
Next row: Work to last 2 stitches, k2tog. [107 (115, 123) sts]
Work 7 rows straight.
Next row: Work to last 2 stitches, k2tog. [106 (114, 122) sts]
Work 5 rows straight.
Next row: Work 45 (49, 53), k2tog, work to end. [105 (113, 121) sts]
Work 9 rows straight.
Next row: Work 61 (65, 69), m1, work to last 2 stitches, k2tog. [105 (113, 121) sts]
Work 7 rows straight.
Next row: Increase into first stitch, work 43 (47, 51), k2tog, work to end. [105 (113, 121) sts]
Work 5 rows straight.
Next row: Work 22 (24, 26), [k2tog] twice, work 35 (37, 39), m1, work to last 2 stitches, k2tog. [103 (111, 119) sts]
Work 5 rows straight.
Next row: Work 77 (85, 93), [k2tog] twice, work to last 2 stitches, k2tog. [100 (108, 116) sts]
Work 1 row straight.
Next row: k2tog, work 19 (21, 23), [k2tog] twice, work 17 (19, 21), k2tog, work to end. [96 (104, 112) sts]
Work 3 rows straight.
Next row: Work to last 2 stitches, k2tog. [95 (103, 111) sts]
Work 3 rows straight.
Next row: k2tog, work 17 (19, 21), [k2tog] twice, work 15 (17, 19), k2tog, work 32 (34, 36), [k2tog] twice, work to end. [89 (97, 105) sts]
Work 1 row straight.
Next row: Work to last 2 stitches, k2tog. [88 (96, 104) sts]
Work 7 rows straight.
Next row: Work 67 (71, 75), [k2tog] twice, work to last 2 stitches, k2tog. [85 (93, 101) sts]
Next row (wrong side facing): Work 75 (82, 89) stitches, turn, sl1K, work to end.
Next row: Work 65 (71, 77) stitches, turn, sl1K, work to end.
Next row: Work 55 (60, 65) stitches, turn, sl1K, work to end.
Next row: Work 44 (48, 52) stitches, turn, sl1K, work to end.
Next row: Work 33 (36, 39) stitches, turn, sl1K, work to end.
Next row: Work 22 (24, 26) stitches, turn, sl1K, work to end.
Next row: Work 11 (12, 13) stitches, turn, sl1K, work to end.
Next row: Work across all stitches.
Cast off.

Trousers Left Leg

Using No 8 (4mm) needles, cast on 121 (129, 137) stitches and work 9 rows stocking stitch, (1 row knit, 1 row purl).
Next row (wrong side facing): Knit to mark hemline.

Commence pattern:

1st row (right side facing): k55 (59, 63); p2, k9, p2; k53 (57, 61).
2nd row: purl.
3rd row: k55 (59, 63); p2, sl3F, k3, k3 from cable needle, k3, p2; k53 (57, 61).
4th row: purl.
5th row: as 1st row.
6th row: purl.
7th row: k55 (59, 63); p2, k3, sl3B, k3, k3 from cable needle, p2; k53 (57, 61).
8th row: purl.

These 8 rows form the pattern.
Continue until 44 pattern rows in all have been worked.

Keep continuity of cable panel:
Next row: k2tog, work to last 2 stitches, k2tog. [119 (127, 135) sts]
Work 19 rows straight.
Next row: work to last 2 stitches, k2tog. [118 (126, 134) sts]
Work 19 rows straight.
Repeat the last 40 rows once more. [115 (123, 131) sts]

Next row: k2tog, work to last 2 stitches, k2tog. [113 (121, 129) sts]
Work 19 rows straight.
Repeat the last 20 rows once more. [111 (119, 127) sts]

Next row: Work to last 2 stitches, k2tog. [110 (118, 126) sts]
Work 7 rows straight.
Next row: Increase into first stitch, work 49 (53, 57), m1, work to end. [112 (120, 128) sts]
Work 5 rows straight.
Next row: Increase into first stitch, work to end. [113 (121, 129) sts]
Work 1 row straight.
Next row: Work 53 (57, 61), m1, work to end. [114 (122, 130) sts]
Work 3 rows straight.
Next row: Increase into first stitch, work to end. [115 (123, 131) sts]
Work 3 rows straight.
Next row: Work 55 (59, 63), m1, work to end. [116 (124, 132) sts]
Work 1 row straight.
Next row: Increase into first stitch, work to end. [117 (125, 133) sts]
Work 5 rows straight.
Next row: Increase into first stitch, work 56 (60, 64), m1, work 15, m1, work to last stitch, increase into last stitch. [121 (129, 137) sts]
Work 2 rows straight.
Next row: Increase into first stitch, work to end. [122 (130, 138) sts]
Work 2 rows straight.
Next row: Increase into first stitch, work to last stitch, increase into last stitch. [124 (132, 140) sts]
Work 1 row straight.
Next row: Increase into first stitch, work 59 (63, 67), m1, work to end. [126 (134, 142) sts]
Next row: Increase into first stitch, work to end. [127 (135, 143) sts]
Work 2 rows straight.
Next row: Increase into first stitch, work to last stitch, increase into last stitch. [129 (137, 145) sts]
Next row: Cast off 3 stitches, work to end. [126 (134, 142) sts]
Next row: Cast off 16 stitches, work to end. [110 (118, 126) sts]
Work 1 row straight.
Next row: k2tog, work 45 (49, 53), m1, work to last 2 stitches, k2tog. [109 (117, 125) sts]
Work 1 row straight.
Next row: k2tog, work 45 (49, 53), m1, work to last 2 stitches, k2tog. [108 (116, 124) sts]
Work 1 row straight.
Next row: k2tog, work to end. [107 (115, 123) sts]
Work 7 rows straight.
Next row: k2tog, work to end. [106 (114, 122) sts]
Work 5 rows straight.
Next row: Work 59 (63, 67), k2tog, work to end. [105 (113, 121) sts]
Work 9 rows straight.
Next row: k2tog, work 42 (46, 50), m1, work to end. [105 (113, 121) sts]
Work 7 rows straight.
Next row: Work 59 (63, 67), k2tog, work to last stitch, increase into last stitch. [105 (113, 121) sts]
Work 5 rows straight.
Next row: k2tog, work 42 (46, 50), m1, work 35 (37, 39), [k2tog] twice, work to end. [103 (111, 119) sts]
Work 5 rows straight.
Next row: k2tog, work 20 (20, 20), [k2tog] twice, work to end. [100 (108, 116) sts]
Work 1 row straight.
Next row: Work 56 (60, 64), k2tog, work 17 (19, 21), [k2tog] twice, work to last 2 stitches, k2tog. [96 (104, 112) sts]
Work 3 rows straight.
Next row: k2tog, work to end. [95 (103, 111) sts]
Work 3 rows straight.
Next row: Work 19 (21, 23), [k2tog] twice, work 32 (34, 36), k2tog, work 15 (17, 19), [k2tog] twice, work to last 2 stitches, k2tog. [89 (97, 105) sts]
Work 1 row straight.
Next row: k2tog, work to end. [88 (96, 104) sts]
Work 7 rows straight.
Next row: k2tog, work 15 (19, 23), [k2tog] twice, work to end. [85 (93, 101) sts]
Work 1 row straight.
Next row (right side facing): Work 75 (82, 89) stitches, turn, sl1P, work to end.
Next row: Work 65 (71, 77) stitches, turn, sl1P, work to end.
Next row: Work 55 (60, 65) stitches, turn, sl1P, work to end.
Next row: Work 44 (48, 52) stitches, turn, sl1P, work to end.
Next row: Work 33 (36, 39) stitches, turn, sl1P, work to end.
Next row: Work 22 (24, 26) stitches, turn, sl1P, work to end.
Next row: Work 11 (12, 13) stitches, turn, sl1P, work to end.
Next row: Work across all stitches.
Cast off.

Trousers Waistband

Using backstitch, join front and inside leg seams.
With right side of work facing, and using No 10 (3¼mm) needles pick up and knit 160 (176, 192) stitches evenly around waistband from centre back seam to centre back seam.
Commencing with a purl row, work 8 rows in stocking stitch.
Next row: Knit (this row marks the fold line).
Commencing with a knit row, work a further 8 rows in stocking stitch.
Cast off fairly loosely.

Making Up Trousers

Sew in zip to centre back seam, placing top of zip in line with base of waistband, then join
remainder of seam.
Turn waist and ankle hems onto wrong side and slip stitch down.
Thread elastic through waistband and secure at each end.
Sew trouser clip to waistband.

September 2022

Pop Socks

PopSocks.jpg

These socks are made using 2 needles, with one main colour and 4 contrasts. Of course, you can have as many contrasts as you like, and it would be good for using up lots of bright leftovers yarns; however it's always good to have a consistent main colour to tie it all together.
Alternatively you could easily substitute a suitably cheerful self-striping yarn either for the contrast stripes, or used plain throughout, allowing it to do its thing.
whatever you choose, complete the look with clogs*.
Just the thing to jazz up your jeans. Make them with or without toes — and the brighter the better!

* note: if you knit separate toes, it might be a bit overcrowded in clogs...

Instructions.

The socks are worked on two needles.

Right Leg

**

Using No 11 needles and colour A, cast on 80 stitches.
1st row (right side facing): p1, * k2, p2, repeat from * to last 3 stitches, k2, p1.
2nd row: k1, * p2, k2, repeat from * to last 3 stitches, p2, k1.
Repeat the last 2 rows until work measures 2 inches (5cm) from the start, ending with a wrong side row.

Join in colour B. Beginning with a knit row, continue in stocking stitch, (1 row knit, 1 row purl), working in striped sequence of 4 rows B, 2 rows A, 4 rows C, 2 rows A, 4 rows D, 2 rows A, 4 rows E and 2 rows A throughout.
Continue in pattern until work measures 5 inches (12½cm) from the start, ending with a purl row.

Shape leg:

Next row: k1, sl1, k1, psso; knit to the last 3 stitches k2tog, k1.

Keeping striped sequence correct. Continue in this way, decreasing 1 stitch at each end of every following 6th row until 60 stitches remain.
Continue without shaping until work measures 13½ inches (34½ cm)
from the start, or required length, ending with a wrong side row.

Divide for heel and instep

With right side of work facing, slip the first 15 stitches on to a stitch holder for the heel.
Keeping the striped sequence correct, knit the next 30 stitches for the instep; turn; slip the last 15 stitches on to a stitch holder for the other side of the heel.

Instep

Work 6½ inches (16½cm) in the striped sequence for the instep, ending with 2 rows in colour A (wrong side row).

Editor's note: Now you need to decide if you want "normal" socks, or socks with separate toes - useful for bar-toe sandals! - and if you are knitting toes then you leave the stitches on a stitch holder at this point while you continue to knit the heel.

Shape instep top without toes ("normal" sock)

Next row: Using colour A throughout, k1,sl1, psso; knit to the last 3 stitches, k2tog, k1.
Next row: purl to end.
Repeat the last 2 rows until 10 stitches remain.
Cast off.

Version including toes

Break off yarn and leave the stitches on a holder while you continue with the instructions to shape the heel.

Shape heel

Editor's note: heel shaping instructions for both versions of sock, with or without toes.

Slip the 30 stitches you previously left on holders on to the needle, placing the outside edges together in the middle.
Editor's note: you have curled the edges of the sock round to form a tube shape - but you continue to knit the heel just on these 30 stitches, back and forth using 2 needles.

Using colour A and with right side of work facing, shape the heel, working short rows as follows:

1st row (right side facing): sl1 knitwise, k28. Turn.
2nd row: sl1 purlwise, p27. Turn.
3rd row: sl1 knitwise, k26. Turn.
4th row: sl1 purlwise, p25. Turn.

Continue in this way, working one stitch less on every row until you have worked the row: "sl1 purlwise, p13. Turn." has been completed, leaving 8 stitches unworked at each side.

Next row: sl1 knitwise, k13. Pick up the loop lying between
the needles and knit it together with the next stitch. Turn.
Next row: sl1 purlwise, p14. Pick up the loop lying between
the needles and purl it together with the next stitch. Turn.

Continue working one more stitch on every row until you have picked up all the stitches and there are 30 stitches.
Matching the striped sequence with that on the instep, knit the sole by continuing in stocking stitch without shaping until the sole measures the same as the instep.

Shape sole top without toes ("normal" sock)

Shape the top by working exactly the same as for the instep shaping.

**

Version including toes

Having completed the heel, return to the instep stitches that you left on a holder.

Big toe:

Next row: Using colour A, knit across instep stitches, then knit 10 stitches from the sole. Turn, and cast on 2 stitches.
Next row: purl 22 stitches. Turn, and cast on 2 stitches. [24 sts]

Using A throughout, and working on these 24 stitches, work 16 rows in stocking stitch.

Shape top:
1st row: k2tog all across the row.
2nd row: purl to end.
3rd row: work as for 1st row.
Break off yarn and thread it through the remaining stitches; draw up and fasten off.
Join seam to base of toe.

Second toe

With right side of work facing, using the right hand needle and colour B, pick up 3 stitches at the base of the big toe. K5 stitches. Turn, and cast on 2 stitches.
Next row: p15. Turn, and cast on 2 stitches. [17 sts]

Using B throughout, and working on these 17 stitches, work 14 rows in stocking stitch.

Shape top:
1st row: k2tog all across the row to last stitch; k1.
2nd row: purl to end.
3rd row: work as for 1st row.
Break off yarn and thread it through the remaining stitches; draw up and fasten off.
Join seam to base of toe.

Third toe

With right side of work facing, using the right hand needle and colour C, pick up 3 stitches at the base of the second toe.
K5 stitches, turn, and cast on 2 stitches.
Next row: p15. Turn, and cast on 2 stitches. [17 sts]

Using C throughout, and working on these 17 stitches, work 12 rows in stocking stitch.
Complete the third toe shaping as given for second toe.

Fourth toe

With right side of work facing, using the right hand needle and colour D, pick up 3 stitches at the base of the third toe. K4 stitches. Turn, and cast on 2 stitches.
Next row: p13, turn, and cast on 2 stitches. [15 sts]

Using D throughout, and working on these 15 stitches, work 12 rows in stocking stitch.

Shape top:
1st row: k2tog all across the row to last stitch; k1.
2nd row: purl to end.
3rd row: k2tog all across the row.
Break off yarn and thread it through the remaining stitches; draw up and fasten off.
Join seam to base of toe.

Little toe

With right side of work facing, using the right hand needle and colour E, pick up 3 stitches at the base of the fourth toe. Knit to end. Turn.
Next row: purl to end. [15 sts]

Using E throughout, and working on these 15 stitches, work 10 rows in stocking stitch.
Complete the little toe shaping as given for the fourth toe.


Left Leg

Work as for right leg from ** to **.
This completes the version without separate toes.

Version including toes

Set the position of the toes for the left foot as follows:

Big toe:

Next row: Using colour A, knit across the sole stitches, then knit 10 stitches from the instep. Turn, and cast on 2 stitches.
Next row: purl 22 stitches. Turn, and cast on 2 stitches. [24 sts]

Complete the big, second, third, fourth, and little toes, as given for the right leg.

Making up

Omitting ribbing, press parts lightly under a damp cloth with
a warm iron.
Sew seams down back of leg, and on each side of the sole, using a flat seam technique (not mattress stitch for example).
Sew in all ends.
Press seams lightly.

Materials

3 x 25g balls of 4 ply yarn in main shade (A) and 1 ball in each of 4 contrast colours (B, C, D, and E).

One pair of No 11 (3mm) needles.
Stitch holders.

Tension

30 sts x 40 rows to 4 inches over stocking stitch on No 11 (3mm) needles.

Size matters

To fit and "average" adult foot: 9/9½ inches (23/24cm). Length from top of heel: 13½ inches (34½ cm).

Abbreviations

sl1: slip the next stitch
psso: pass the slipped stitch over, ("sl1, k1, psso" also known as "ssk")

k2tog or p2tog: work 2 sts together to decrease.

A Word on the Wool.

Original yarn was a superwash 4ply. These days there is a huge choice of wool for socks, but I would recommend some nylon content.

Disclaimer (well...almost)

In transposing any pattern it is always a risk that errors will be introduced, in spite of dedicated proof reading. If you have any problems with this pattern, please and I will try and assist.

August 2022

Roll up for a string shopper

StringBag.jpg

Fun to make, this was a common type of reusable shopping bag before the days of the ubiquitous little nylon fold-up bags. It easily rolls up to keep in a handbag or purse, and is more useful than ever now in eliminating single-use plastics.

Instructions.

The bag can be made in either of 2 sizes. Both designs are worked from the same instructions and the figures in brackets [ ] refer to the smaller bag where applicable.
[Editor's note: So the size difference is just the difference in tension from reducing the thread thickness and size of hook.]

Base - first section:

Using 1¾mm [1¼mm] hook make 5 chain and join with a ss to the first ch to form ring.
1st round: 3ch, (counts as first treble), 13tr into circle. Join with a slip stitch into 3rd of first 3ch. {14tr}
2nd round: ss into space before next tr, 3ch, (counts as first treble), 1tr into same place as ss, * 2tr into next stitch, repeat from * to end.
Join with a ss to 3rd of first 3ch.
3rd round: ss into sp before next tr, 3ch, 1tr into same place as ss (called increase 1) * 1tr into each of the next 3 sps, 2tr into next sp (called increase 1), repeat from * omitting the increase at the end of the last repeat.
Join with a ss into 3rd of 3ch.
4th - 6th rounds: ss into sp before next tr, 3ch, 1tr into same place as last ss, * 1tr into each sp to within next increase, 2tr into next increase, repeat from * to end, omitting the increase at the end of the last repeat.
Join with a ss to 3rd of first 3ch.
7th round: ss into sp before next tr, 3ch, 1tr into same place as last ss, * 1tr into each of next 3 sps, increase in next sp, rep from * to end, omitting the increase at the end of the last repeat.
Join with a ss into 3rd of first 3ch.
8th - 9th rounds: As 4th.
10th round: ss into sp before next tr, 3ch, 1tr into same place as last ss, * 1tr into each of next 13 sps, increase over next increase, repeat from * to end, omitting the increase at the end of the last repeat.
Join with a ss to 3rd of 3ch. Fasten off.

Base - second section:

Using 1¾mm [1¼mm] hook, rejoin yarn through elastic band, 3ch to form first tr, work 48 tr over band.
Join with a ss to 3rd of first 3ch.
2nd round: ss into sp before next tr, 3ch, 1tr into same place as last ss, * 1 tr into each of next 6 sps, increase in next sp, repeat from * to end, omitting the increase at the end of the last repeat.
Join with a ss into 3rd of 3ch.
3rd - 6th rounds: As 7th - 10th rounds of the first section.
Do not fasten off.

Main section

1st round: Place both sections together and join by working through both sections at the same time, 1dc into sp before next tr, * 1dc into each of next 2 sps, 9ch, 1dc into each of next 4 sps, 9ch, 1dc into next sp; repeat from * to end, omitting 9ch and 1dc at the end of the last repeat, 3ch, 1trtr into first dc.
2nd round: 3ch, 2tr into the loop just made, * 7ch, 3tr into next loop, repeat from * to end, ending with 3ch, 1dtr into 3rd of first 3ch.
Repeat the last round 28 times more.

Top band

1st round: 4dc into loop just made, * 4ch, 4dc into next loop, repeat from * ending with 4ch, ss into first dc.
2nd round: 3ch, 1tr into each of the next 3dc, * 4tr into next sp, 1tr into each of next 4dc, repeat from * to end, omitting 4tr at the end of the last repeat.
Join with a ss to 3rd of first 3ch.
3rd round: 3ch, 1tr into each tr.
Join with a ss to 3rd of first 3ch.
4th round: As 3rd.
5th round: 1dc into same place as ss, 1dc into each tr.
Join with a ss to first dc.
Fasten off.

Handle (make 2)

Using 1¾mm [1¼mm] hook, make 9ch.
1st row: Into 2nd ch from hook work 1dc, 1dc into each ch to end.
Turn.
2nd row: 3ch (counts as first tr), miss first dc, 1tr into each dc to end.
Turn.
3rd row: 1ch, 1dc into each tr to end.
Turn.
Repeat the last 2 rows 33 times more.
Do not turn at end of last row.
Work 1 row dc all round handle.
Join with a ss to first dc.

To make up

Damp and pin out to size.
Leave to dry.
Sew handles to top band on WS.

Materials

Large bag: 4 x 20g balls No 10 crochet cotton.
A 1¾ mm crochet hook.

Small bag: 2 x 25g balls No 20 crochet cotton.
A 1¼ mm crochet hook.

Elastic band or shirring elastic in a circle.

Tension

Large bag: 8sts and 4 rows to 1 inch over trebles worked on 1¾ mm crochet hook.

Small bag: 11sts and 5 rows to 1 inch over trebles worked on 1¼ mm crochet hook.

Size matters

Large bag: will carry 15lb (7 kilo)

Small bag: will carry 6½lb (3 kilo)

Abbreviations:

ch: chain
dc: double crochet
tr: treble
dtr: double treble
trtr: triple treble
ss: slip stitch
sp: space

Remember these are English crochet instructions where dc is equivalent to US single crochet - see "Terminology" in the side bar.

A Word on the Wool

Nos 10 and 20 crochet cotton are fairly standard and easy to obtain.

Disclaimer
(well...almost)

In transposing any pattern it is always a risk that errors will be introduced, in spite of dedicated proof reading.
If you have any problems with this pattern, please and I will try and assist.

July 2022

Trendy Crochet Dress

CrochetDress.jpg

A sixties dress in crochet - which is apparently one of the trends for the season. The simple lacy-look design is worked in light weight yarn over a four-row pattern.
Personally I have a slight prejudice that it can be a bit thick and heavy for summer wear - however the catwalks featured "jumbo" crochet items - so - time to sacrifice all for fashion!
On the plus side, crochet is a speedy technique, meaning that items are highly suitable for you to make for yourself in a reasonable time frame.

Instructions.

The dress is given for 3 sizes - larger sizes in brackets - which once again only go up as far as a 38 inch chest. The yarn required is a 4 ply fingering weight, but you could experiment with the tension using a DK soft cotton and a larger hook, which would tend more towards the "jumbo" nature of the designer version.

Back and Front (make 2 alike)

Using No 11 (3mm) hook make 141 (150 : 159) chain.

1st row: 1 dtr in 6th chain from hook, * miss 2 chain, 1 dtr in each of the next 4 chain, miss 2 chain, (1 dtr, 2 chain, 1 dtr) - referred to as 1 group - in next chain; repeat from * to end.
2nd row: 1 dc in first dtr, (5 chain, 1 dc in space before 4 dtr, 5 chain, 1 dc in space after 4 dtr) to end, working last dc in the turning chain.
[Editors note:the "5 chain" here creates what is subsequently referred to as a "loop".]

3rd row: 4 chain, 3 dtr in loop, (1 group in centre chain of next loop, 4 dtr in next loop) to end.
4th row: 1 dc in dtr, (5 chain, 1 dc before next group, 5 chain, 1 dc after group) to end, working last dc in the turning chain
5th row: 4 chain, (1 group in centre chain of loop, 4 dtr in next loop) up to 1 loop from end, then 1 group in loop, 1 dtr in end dc.
Repeat 2nd to 5th rows inclusive for pattern.

Continue in pattern until work measures 7 (8 : 9) inches.
Adjust length here, if required.
Change to No 12 (2¾mm) hook and work 11 inches.
Change to No 13 (2¼mm) hook and continue until work measures 26 (26½ : 27) inches, ending with a 3rd pattern row.

Armhole Shaping:
Next row: slip stitch over 1 pattern; then pattern until 1 pattern remains, turn.
Next row: slip stitch over 3 chain; then pattern to within 3 chain from the end, turn.

Continue in pattern until work measures 32½ (33½ : 34½) inches, ending with a 3rd pattern row.

Neck and Shoulder shaping:
Next row: pattern over 3 complete patterns, turn.
Next row: pattern to end.
Next row: slip stitch over 1 pattern; then pattern to within 3 stitches from the end.
Fasten off.

Miss 6 (7 : 8) complete patterns and 1 group; join in yarn and complete to match the other side.

To Make Up

Press work with a warm iron over a damp cloth.
Join shoulder and side seams.

Edging: Work in rounds around neck, armholes and lower edge.
1st round: dc (working 3 dc over chain loop or dtr). Do not turn.
2nd round: dc in reverse, inserting hook in next dc to right.
[Editors note: dc in reverse can also be called crab stitch - it's a little awkward to perform, but gives a twisted cord effect edge There are various tutorials to be found on-line.]

Fasten off.
Sew in any loose ends.


For an excellent round-up of SS22 trends on the catwalks review the items at Wardrobe Icons.

Crochet dress, seen here in Tod's sixties-inspired jumbo crochet shift.

TodsJumboCrochet.jpg

Materials

4ply fingering yarn:
13 (14 : 15) oz of crepe 4ply.

Nos 11 (3mm), 12 (2¾mm), and 13 (2¼mm) crochet hooks.

Tension

2 patterns to 3 inches on 3mm hook.

Size matters

To fit chest:
34 / 36 / 38 inches;
length:
33 / 34 / 35 inches.

Abbreviations

ch: chain
dc: double crochet
dtr: double treble
ss: slip stitch
sp: space

A word on the wool.

Original yarn was pure wool crepe 4 ply - crepe being good for crochet as the yarn tends to resist splitting.
1 oz is about 28 grams; yardage unknown.

Disclaimer
(well...almost)

In transposing any patterns it is always a risk that errors will be introduced, in spite of dedicated proof reading.
If you have any problems with this pattern, please and I will try and assist.

June 2022

Cool Customer

CoolCustomer.jpg

An easy ribbed slipover for breezier summer days.

Instructions.

The main pattern stitch is named as "beaded rib" worked as follows:

1st row and all odd rows (right side facing): knit
2nd row and all even rows: * k1; k1b (see abbreviations). Repeat from * to end of round.
Editor's note: I would call this stitch "mock fisherman's rib" - "mock" because the alternate rows are knitted plain.

Back

With smaller sized needles, cast on 134/140/146/152/158 stitches, and work 2¾ inches in k1/p1 rib.

Change to larger needles and work in the "beaded rib" stitch until work measures 14/14/14½/15/15½ inches.

Shape armholes, by casting off 3 stitches at the beginning of the next 4 rows; then cast off 2 stitches at the beginning of the next 4/4/4/6/6 rows; then decrease 1 stitch at each end of the next, and following 4/5/6/5/6 alternate rows.
[104/108/112/116/120 sts]

Continue in pattern as set until work measures 22/22½/23½/24½/2 inches.

Shape shoulders and back neck as follows:

Cast off 10/9/10/11/11 stitches at the beginning of the next 2 rows.

Next row: cast off 9/10/10/10/11, k18/9/10/11/11, cast off centre 28/30/32/34/34, knit to end.
Next row: cast off 9/10/10/10/11, p18/19/19/19/20 and then turn, leaving the 19/20/20/20/21 right back shoulder stitches unworked on the needles, while you finish the left shoulder separately.

Next row: cast off 10 at the neck edge, knit to end.
Next row: cast off the remaining 9/10/10/10/11 and fasten off.

With wrong side facing, rejoin the yarn to the right back at the neck edge and cast off 10 at the neck edge, purl to end. Turn and cast off the remaining 9/10/10/10/11 and fasten off, thus completing the right shoulder.

Front

Work as for back up to the start of the armhole shaping when work measures 14/14/14½/15/15½ inches.

Start the armhole shaping, by casting off 3 stitches at the beginning of the next 4 rows; then cast off 2 stitches at the beginning of the next 4/4/4/6/6 rows.
[114/120/126/128/134 sts]

Divide for neck by continuing on the first half of the stitches only and placing the remaining half of the stitches [57/60/63/64/67 sts] on a spare needle.

Keeping the pattern correct, decrease 1 stitch at the armhole edge on the next and following 4/5/6/5/6 alternate rows, and, at the same time, decrease 1 stitch at the neck edge on every 5th row 24/25/26/27/27 times. [28/29/30/31/33 sts]

Continue straight until work measures 22/22½/23½/24½/2 inches, then shape shoulders by casting off at the armhole edge on every alternate row, 10/9/10/11/11 stitches once, and 9/10/10/10/11 stitches twice.

Rejoin the yarn to the stitches on the spare needle and work the other side of the neck to match, reversing the shapings.

To Make Up

Join the shoulder seams.

Neck Border:
With double pointed needles or circular, beginning at the lowest point of the V-neck, pick up and knit 64/68/72/76/80 stitches up the right neck edge, then 46/50/52/54/54 stitches around the back neck, then
64/68/72/76/80 stitches down the left neck edge.
Work ¾ inch in k1/p1 rib, but work
back and forth (rather than in the round), decreasing 1 stitch at each end on every row.
Bind off loosely in rib and sew the neck border bias seam.

Armhole borders:
With smaller size needles, pick up and knit 184/190/196/202/206 stitches evenly around the armholes.
Work ¾ inch in k1/p1 rib.
Bind off loosely in rib.

Sew side seams including the armhole border seams.

Block and press as required.

Materials

4 ply yarn:
6/7/7/8/8 x 50g balls

Pair each of No 12 (2¾mm) and No 10 (3¼mm) needles.

No 12 (2¾mm) double pointed needles or circular.

Tension

28sts and 60 rows to 4 inches on 3¼mm needles over "beaded rib" stitch.

Size matters

Finished chest measurement:
38/40/41/43/44 inches.

Abbreviations

k: knit
p: purl
k1b: knit 1 below: insert needle through the centre of the stitch below the next stitch to be knitted, and knit off both stitches at the same time.
Editor's note: This stitch is fairly well known now due to the popularity of brioche knitting; however it's easier to demonstrate than describe, so if you don't understand then look for video demonstrations on YouTube or similar.

A word on the wool.

Original yarn was an acrylic yarn with a yardage of about 170m per 50g ball.

You can use a 4 or 5 ply yarn for this loose fitting design, but check your tension and alter the needle size if necessary.

Disclaimer
(well...almost)

In transposing any patterns it is always a risk that errors will be introduced, in spite of dedicated proof reading.
If you have any problems with this pattern, please and I will try and assist.


May 2022

Long Lacy Sweater

LongLacySweater.jpg

This sweater from the end of the 1970s is a presage of the style that became so ubiquitous in the 1980s - the oversized unisex sweater with drop shoulders and no shaping. It is very simply constructed with wide squared off sleeves and no armhole shaping on the body. The neck opening is formed from a vertical slit, rather like a poncho - all very simple.

This is one of my favourite types of sweater - really long and slouchy with a deep welt - suitable to wear with narrow trousers or leggings. [Clearly I belong in the 1980s.] In addition, the stitch used is an openwork lacy pattern which I find very satisfying to knit. In fact, this particular sweater looks so very long, I might be tempted to knit it shorter for myself (I am not very tall) to keep the style of a tunic rather than a dress.
...the length is mini-skirt, the style blouson. Surprisingly easy to knit, this feminine open lace stitch sweater worked on large size needles adds new dimensions to a sporty Aran...

Instructions.

The pattern is written for one size only, and at 34 to 38 inches this might be a bit of a limitation. It is designed to be oversized, so the actual measurement should come out at about 41 inches if you achieve the stated tension.

[Editor's note: I can see why they would have had difficulty providing a sensible larger size, as the lace pattern is repeated over 34 stitches - so if you added another repeat it would increase the size by at least 12 inches. Having said that, many oversize sweaters, both in the eighties and now, are designed to be in excess of 50 inches as a supposed "one size", and it would be a moderately feasible task to redraft the pattern, due to the lack of shaping - if you had the appetite for it.]

Front

** With 4mm needles, cast on 88 stitches.

1st row: p1, k2, * p2, k2; repeat from * to last stitch, p1.
2nd row: k1, p2, * k2, p2; repeat from * to last stitch, k1.
Repeat 1st and 2nd rows until work measures 8½ inches (21 cm), ending with a 1st row.

Next row: p6, increase in the next stitch, * p4, increase in the next stitch; repeat from * to the last 6 stitches, p6. [104 sts].

Change to No 5½ mm needles and work in pattern as follows:
1st row: k1, * k3, k2tog, k4, yrn, p2, (k2, yfwd, sl1k, k1, psso) 3 times, p2, yon, k4, sl1k, k1, psso, k3; repeat from * to
last stitch, k1.
2nd row: k1, * p2, p2togtbl, p4, yrn, p1, k2, (p2, yrn, p2tog) 3 times, k2, p1, yrn, p4, p2tog, p2; repeat from * to last stitch, k1. 3rd row: k1, * k1, k2tog, k4, yfwd, k2, p2, (k2, yfwd, sl1k, k1, psso) 3 times, p2, k2, yfwd, k4, sl1k, k1, psso, k1; repeat from * to last stitch, k1.
4th row: k1, * p2togtbl, p4, yrn. p3, k2, (p2, yrn, p2tog) 3 times, k2, p3, yrn, p4, p2tog; repeat from * to last stitch, k1.

5th - 12th rows: Repeat 1st to 4th rows twice.

13th row: k1, * yfwd, sl1k, k1, psso, k2, yfwd, sl1k, k1, psso, p2, yon, k4, sl1k, k1, psso, k6, k2tog, k4, yrn, p2, k2, yfwd, sl1k, k1, psso, k2; repeat from * to last stitch, k1.
14th row: k1, * yrn, p2tog, p2, yrn, p2tog, k2, p1, yrn, p4, p2tog, p4, p2togtbl, p4, yrn, p1, k2, p2, yrn, p2tog, p2; repeat from * to last stitch, k1.
15th row: k1, * yfwd, sl1k, k1, psso, k2, yfwd, sl1k, k1, psso, p2, k2, yfwd, k4, sl1k, k1, psso, k2, k2tog, k4, yfwd, k2, p2, k2, yfwd, sl1k, k1, psso, k2; repeat from * to last stitch, k1.
16th row: k1, * yrn, p2tog, p2, yrn, p2tog, k2, p3, yrn, p4, p2tog, p2togtbl, p4, yrn, p3, k2, p2, yrn, p2tog, p2; repeat from * to last stitch, k1.

17th - 24th rows: Repeat 13th to 16th rows twice.

These 24 rows form the pattern. **
Continue in pattern until Front measures 30 inches (76 cm), ending with right side facing for next row (measured with work hanging from needle to allow for drop).
[Editor's note: Calculating from the tension this should be about 108 rows in the pattern or 4½ pattern repeats.]

Next row: Pattern 52 stitches, M2, pattern to end.

Divide for neck as follows:
Next row (wrong side facing): Pattern 53 stitches, turn, and leave remaining stitches on a length of yarn or a stitch holder.
[Editor's note: Make a note of the pattern row number you are working on when you knit this turning row..]
Continue on these stitches only for the first side, and work in pattern until Front measures 38 inches (97cm), ending with right side facing.
Cast off.

With wrong side facing, rejoin yarn to remaining stitches at the centre neck edge, and finish to correspond with first side.
[Editor's note: I think they rather gloss over this instruction - you need to have made a note of the row number on which you divided for the neck so you can make sure you resume the pattern here on the correct row.]

Back

Work as for Front from ** to **.
Continue in pattern until Back measures 34 inches (86 cm), ending with right side facing for next row.
Next row: Pattern 52 stitches, M2, pattern to end.

Divide for neck as follows:
Next row (wrong side facing): Pattern 53 stitches, turn, and leave remaining stitches on a length of yarn or a stitch holder.
[Editor's note: As you did for the Front, make a note of the pattern row number you are working on when you knit this turning row.]
Continue on these stitches only for the first side, and work in pattern until Back matches Front at side edge, ending with right side facing.
Cast off.

With wrong side facing, rejoin yarn to remaining stitches at the centre neck edge, and finish to correspond with first side.
[Editor's note: Having seen how you did it with the Front, you can resume the pattern here on the correct row, using the note you made when you divided the Back neck.]

Sleeves

With 4mm needles, cast on 36 stitches and work in rib as for Front for 4 inches (10cm), ending with a 1st row.
Next row: p1, * increase in the next stitch; repeat from * to the last stitch, p1. [70 sts]
Change to 5½mm needles, and work in pattern as for Front until Sleeve measures 18 inches (46cm) down centre, ending with right side
facing.
Cast off.

To Make Up

Omitting ribbing, press lightly on wrong side following instructions on the ball band.
Join shoulder seams.
Placing centre of cast-off stitches of sleeves to shoulder seams, sew sleeves in position.
Join side and sleeve seams.
Press seams.

Materials

18 x 50g balls of Aran weight yarn yarn.

A pair each of Nos
8 (4mm), 5 (5½mm).

Tension

This design uses big needles so the tension is
20 stitches x 20 rows to 4 ins on No 5½mm needles over the pattern - different from the usual Aran tension.

The original yarn knitted to a tension of 18 stitches x 24 rows to 4 inches on 5mm needles over stocking stitch.

Size matters

To fit chest: 34-38 inches; length: 38 inches;
and sleeve seam: 18 inches.

Abbreviations

M2: make 2 stitches by picking up the horizontal loop lying before the next stitch and working into back and front of it.
inc: increase by knitting into front and back of the next stitch.
yrn/yfwd/yon: "yarn round needle" / "yarn forward" / "yarn over needle"; make a stitch by passing the yarn over the needle.
sl1k: slip one stitch knitwise.
psso: pass the slipped stitch(es) over.
k2tog: (decrease) knit 2 stitches together.
p2tog: (decrease) purl 2 stitches together.
tbl: through back loop(s).
sl: slip.

A word on the wool.

The original sweater was knitted in a Patons Capstan - a pure wool classic Aran weight yarn.

Disclaimer
(well...almost)

In transposing any pattern it is always a risk that errors will be introduced, in spite of dedicated proof reading.
If you have any problems with this pattern, please and I will try and assist.

April 2022

Colour Pop Cushions

PopCushions.jpg

These crochet cushion covers are really easy (and quick) to make in double knitting yarn, and would be good for a beginner if you fancy them. They are so simple that an experienced crocheter could no doubt make them without a pattern. However, although simple, they are a good example of creating an effect purely through the use of colour - if you want them to really pop, use opposites on the colour wheel (turquoise/tangerine, purple/yellow] - or you can dial it right down and use natural sheep colours. As the size and therefore tension for cushion covers is pretty adaptable, it could provide a useful project for handspun, - or you could use up any bright knitting oddments for a colourful designer effect, (as controversially favoured by our current colourful prime minister).

Instructions.

Basic instructions for 4 cushions as illustrated.
[Editor's note: The patchwork square will give you the most practice with the various stitches, and the plain square is the simplest (but less interesting!).]

Chevron cushion

Using B, make 68 chain.

Foundation row: using B, 1 tr in 4th ch from hook, 1 tr in each of next 6 ch, (decrease 2, 1 tr in each of next 6 ch, 3 tr in next ch, 1 tr in each of next 6 ch) 3 times, decrease 2, 1 tr in each of next 6 ch, 2 tr in last ch. [65 sts - 3 ch at start of row counts as 1 stitch]

Joining in colours as required, work in pattern as follows:

1st row: using B, 3 ch, 1 tr in first stitch, 1 tr in each of the next 6 stitches, (decrease 2, 1 tr in each of the next 6 stitches, 3 tr in the next stitch, 1 tr in each of next 6 stitches) 3 times, decrease 2, 1 tr in each of the next 6 stitches, 2 tr in top of 3 ch
2nd and 3rd rows: in G as 1st row.
4th and 5th rows: in Y as 1st row.
6th row: in B as 1st row.

These 6 rows form the pattern.
Repeat them 8 times more, then the 1st - 5th rows again.
Fasten off.

Making up the chevron cushion

Join starting and finishing edges using a flat seam.
Join 1 side edge. Slip in pad, and join remaining side.


Patchwork cushion

Make 2 of each of the following squares:

First Square (wide stripes):

Using B, make 33 chain.
Foundation row: 1 tr in 4th ch from hook, 1 tr in each remaining chain. [31 sts]
Next row: 3 ch, miss first stitch, 1 tr in each remaining stitch.

Continue repeating last row, working 1 row more in B, then 3 rows G, 3 rows Y, 3 rows B, 3 rows G, 3 rows Y: 18 rows in all.
Fasten off.

Second Square (mitred corner):

Work 18 rows as for first square, but working 1 row B, 1 row G, 1 row Y.

Third Square (wide stripes):

Using Y, make 4 chain.
Foundation row: Using Y, (1 tr, 1 ch, 2 tr), all 4th ch from hook.

1st row: Using Y, 3 ch, (3 tr, 1 ch 3 tr) all chain space, 1 tr in top of 3 starting chain. [3 ch counts as 1 stitch, 3 tr forms a group]

2nd row: Using G, 3 ch, 1 tr in space between first stitch and next group, (1 group, 1 ch, 1 group) in chain space, 2 tr in space between last group and 3 ch.
[2 groups with ch space at centre and half a group at each end.]

3rd row: Using G, 3 ch, 1 group in space between half group and next group, (1 group, 1 ch, 1 group) in chain space, 1 group in space between group and half group, 1 tr in top of 3 chain.
[4 groups with 3 ch and tr at each end.]

4th row: Using B, 3 ch, 1 tr in space between first stitch and group, 1 group in next space between 2 groups, (1 group, 1 ch, 1 group) in chain space, 1 group in next space between 2 groups, 2 tr in space between last group and 3 ch.
[4 groups half a group at each end.]

5th row: Using B, 3 ch, 1 group in space between half group and group, 1 group in next space between 2 groups, (1 group, 1 ch, 1 group) in chain space, 1 group in next space between 2 groups, 1 group in space between group and half group, 1 tr in top of 3 chain.
[6 groups.]

6th row: Using Y, 3 ch, 1 tr in space between first stitch and group, 1 group in each space between 2 groups, (1 group, 1 ch, 1 group) in chain space, 1 group in each space between 2 groups, 2 tr in space between last group and 3 ch.

7th row: Using Y, 3 ch, 1 group in space between half group and group, 1 group in each space between 2 groups, (1 group, 1 ch, 1 group) in chain space, 1 group in each space between 2 groups, 1 group in space between last group and half group, 1 tr in top of 3 chain.

8th and 9th rows: Using G, as 6th and 7th rows.
10th and 11th rows: Using B, as 6th and 7th rows.
12th - 17th rows: as 6th - 11th rows. [18 groups]

Fasten off.

Fourth Square (squared circle):

** worked in rounds as follows:
Foundation: Using Y, make 4 chain and join into a ring with a slip stitch.

1st round: Using Y, 4 ch, (3 tr, 1 ch) 3 times into the ring, join with a slip stitch in the 3rd of the 4 starting chain.

2nd round: Using G, slip stitch into first ch space (formed by top of starting chain of previous round), then 4 ch, 3 tr into that same ch space, (3 tr, 1 ch, 3 tr in next ch space) 3 times, 2 tr in first chain space again, join with a slip stitch in the 3rd of the 4 starting chain.
[3 tr form a group]

3rd round: Using B, slip stitch into first ch space, then 4 ch, 1 group into that same ch space, (1 group in next space between 2 groups, 1 group, 1 ch , 1 group in next ch space) 3 times, 1 group in next space between 2 groups, 2 tr in first ch space, join with a slip stitch in the 3rd of the 4 starting chain.

4th round: Using Y, slip stitch into first ch space, then 4 ch, 1 group into that same ch space, * 1 group in each space between 2 groups,1 group, 1 ch, 1 group in ch space; repeat from * but ending with 2 tr in first ch space, join with a slip stitch in the 3rd of the 4 starting chain, as on previous rounds.

5th round: Using G, work as 4th round.
6th round: Using B, work as 4th round.
**
7th - 9th rounds: work as 4th - 6th rounds.

Making up the patchwork cushion

Using a flat seam piece together the squares, to make two large squares each made up of 4 smaller squares, for the front and back of the cushion (see photograph).

Join 3 sides, slip in pad, and join remaining side.


Block cushion

The fourth square of the patchwork cushion is a squared-off circle - a form of the traditional "granny" square. The block cushion is a giant version of this square.
Work as for the fourth square of the patchwork cushion above from ** to **. Then repeat the 4th - 6th rounds 4 times more, then the 4th and 5th rounds once again.
Fasten off.

Make a second piece in the same way.

Making up the block cushion

Join 3 sides, slip in pad, and join remaining side.


Plain cushion

Using a single colour throughout, make 62 chain.

Foundation row: 1 tr in 4th chain from hook, 1 tr in each remaining chain. [60 sts - 3 ch at start of row counts as 1 st]

Next row: 3 ch, miss first stitch, 1 tr in each remaining stitch.

Repeat the last row until cushion measures 16 inches (or to make the size you require).
Fasten off.

Make a second piece in the same way.

Making up the plain cushion

Join 3 sides, slip in pad, and join remaining side.

Materials

Standard double knitting yarn in colours of your choice. As in photo, they are labeled B (blue), Y (yellow), and G (green).

A 5mm (UK 6) crochet hook.

Chevron cushion:
2 (50g) balls in each of 3 colours.

Patchwork cushion:
2 (50g) balls in each of 3 colours.

Block cushion:
2 (50g) balls in each of 2 colours.

Plain cushion:
4(50g) balls.

Tension

14sts x 8½ rows to 4 inches (10cm).

Size Matters

Approximate size: 16 x 16 inches
(41 x 41cm)

Crochet abbreviations:

ch: chain
tr: treble crochet
sp: space
sl: slip stitch
gr: group
decrease 2: (yarn round hook, draw loop through next stitch, draw loop through 2 loops on hook) repeat 3 times, draw loop through all 4 loops on hook
dc: double crochet
dc: double crochet
dc: double crochet

Remember these are English crochet instructions where dc is equivalent to US single crochet - see "Terminology" in the side bar.

Disclaimer
(well...almost)

In transposing any pattern it is always a risk that errors will be introduced, in spite of dedicated proof reading.
If you have any problems with this pattern, please and I will try and assist.

March 2022

Choose Tweed

TweedDress.jpg

This wasn't my original choice for this month, but recently I have noticed a trend for monochrome wool dresses in some fashion articles. Not too hard to knit as the two-colour effect is formed by slipping stitches - so only one colour in any one row.

Instructions.

A tweed dress in 3 sizes (small/medium/large).

Back

**
Using No 8 (4mm) needles lighter tweed colour (L), cast on 129/135/141 stitches, and begin working in the two-colour pattern as follows:

1st row (right side facing): Purl in L - do not break yarn L.
2nd row: Join in darker contrast D, p1, * with wool at front, sl1, p1; repeat from * to end.
3rd row: Using D, p1, * wool back, sl1, wool forward, p1; repeat from * to end - do not break yarn D.
4th row: Purl in L.
5th row: Purl in L - do not break yarn L.
6th row: Using D, p2, * with wool at front, sl1, p1; repeat from * to last stitch, p1.
7th row: Using D, p2, * wool back, sl1, wool forward, p1; repeat from * to last stitch, p1 - do not break yarn D.
8th row: Purl in L.

These 8 rows form the pattern.

Work straight until back measures 3 inches, ending with a 4th or 8th pattern row.
With right side facing, shape skirt as follows:
1st decrease row: p42/44/46, p3tog, p39/41/43, p3tog, p42/44/
46. [125/131/137 sts]

Work straight until back measures 6 inches, ending with a 4th or 8th pattern row.
2nd decrease row: p41/43/45, p3tog, p37/39/41, p3tog, p41/43/45. [121/127/133 sts]

Work straight until back measures 9 inches, ending with a 4th or 8th pattern row.
3rd decrease row: p40/42/44, p3tog, p35/37/39, p3tog, p40/42/44. [117/123/129 sts]

Work straight until back measures 12 inches, ending with a 4th or 8th pattern row.

Continue in this way, decreasing 4 stitches on every 1st or 5th pattern row at 3 inch intervals, until 97/103/109 stitches remain.

Work straight until back measures 29½ inches down centre, ending with 2nd or 6th pattern row.
With right side facing, shape armholes, by casting off 5 stitches at the beginning of the next 2 rows, then decrease 1 stitch at each end of the next and every alternate row until 75/79/83 stitches remain.
**

Work a few rows straight until back measures 31/31½/32 inches, ending with right side facing.

Here divide for back opening:
Next row: pattern 37/39/41, turn, and leave remaining 38/40/42 stitches on a spare needle.

Continue straight on these 37/38/41 stitches for first side, until back measures 36½/37/37½ inches.
With right side facing, shape shoulder by casting off 6/7/8 stitches at the beginning of the next row, then 7/7/7 stitches at the beginning of the following 2 alternate rows.
Cast off remaining 17/18/19 stitches.

With right side facing, rejoin wool to remaining stitches, cast off the centre stitch, then finish to correspond with first side, reversing shapings.

Front

Work as for back from ** to ** .
[75/79/83 sts]

Work straight until front measures 34/34½/35 inches, ending with right side facing.

Here divide for neck:

Next row: pattern 28/29/30, turn, and leave remaining 47/50/53 stitches on a spare needle.
Next row: work straight in pattern.

Continue on these stitches for first side, decreasing 1 stitch at the neck edge on the next and every alternate row until 20/21/22 stitches remain.

Work a few rows straight until front matches back at armhole edge, ending with right side facing.

Shape shoulder as given for back.

With right side facing, rejoin wool to the remaining stitches, cast off the centre 19/21/23 stitches, and pattern to end.
Finish to correspond with the first side.

To Make Up

Press parts or block lightly on the wrong side under a damp cloth.
Join the shoulder seams.

Neck Facing:
With right side facing, using No 10 needles and D colour, work as follows:
Pick up and knit 20/21/22 stitches across left side of back, 17 down left side of front, 19/21/23 from the centre front, 17 up right side of front, and 20/21/22 across right side of back.
[93/97/101 sts]
Work backwards and forwards in stocking stitch for 5 rows, starting with a purl row. Cast off loosely using a bigger needle.

Armhole Facing:
With right side facing,
Using No 10 needles and D colour, pick up and knit 88/94/100 stitches all round each armhole.
Work 5 rows stocking-stitch, starting with a purl row.
Cast off loosely using a bigger needle.

Join side seams.
Join armhole facing.
Fold neck and armhole facings to wrong side and slip-hem lightly in position all round, so that the stitches do not show through on the right side.
Insert zip into back opening, allowing edges to meet to conceal it.
Press all seams lightly on wrong side.

Materials

Double knitting:
15/17/19 x 1oz balls in lighter coloured tweed ;
8/9/10 balls in darker solid colour.

Pair each of
No 8 (4mm), and
No 10 (3¼mm) needles.

6 inch zip.

Tension

22sts to 4 inches on 4mm needles over pattern.

Size matters

To fit chest:
34-35 / 36-37 / 38-39 inches;
length from top of shoulders:
36½ / 37 / 37½ inches.

Abbreviations

k: knit
p: purl
p3tog: purl 3 stitches together
stocking stitch: knit one row, purl one row
L: lighter tweed
D: darker contrast

A word on the wool.

Original yarn was pure wool in a standard DK weight.
Yardage is not given but I would not expect it to be longer than average for a pure wool.
Given the requirement for tweed I might use Rowan felted tweed for both colours as it is a favourite of mine, and not too heavy a weight, which I might be concerned about with a dress made in a textured stitch.

Disclaimer
(well...almost)

In transposing any patterns it is always a risk that errors will be introduced, in spite of dedicated proof reading.
If you have any problems with this pattern, please and I will try and assist.


February 2022

Gentlemen prefer...

GentlemenPreferGrey.jpg

well... they prefer... grey if my experience is anything to go by (whether it's 50 shades or maybe just 2); even the muted coloured stripe is a risk. However, colour choices are easily adapted to the taste of the wearer, and in my case: I love stripes (both wearing and knitting them), whatever the colours.
Otherwise - the greys have it.

Instructions.

A man's plain loose sweater in 3 sizes (small medium and large).

Back

Using No 11 (3mm) needles and red contrast colour (R), cast on 118/122/126 stitches, and work 3 rows k2/p2 rib. Break yarn.
Change to main colour (M) and continue in rib until work measures
3½ inches from the beginning. Break yarn.

Change to No 9 (3¾mm or 3½mm) needles and join in dark grey contrast (G) to start working the striped stocking stitch pattern, increasing 2 / 3 / 4 stitches, evenly across the first row.
[120/125/130 sts].
Work in alternate stripes of 14 rows G, 14 rows M.

After the first 12 rows of the seventh stripe (which is in in colour G), shape the armholes by casting off 9/10/11 stitches at the beginning of the next 2 rows. [102/105/108 sts].

Change to colour R and work 14 rows for the 8th stripe.

Change to colour G and continue in striped stocking stitch alternating between colours G and M.
When work measures 26¼ / 26¾ / 27¼ inches, shape shoulders and back neck as follows:

Cast off 9 stitches at the beginning of the next 2 rows.
Next row: Cast off 9/9/9, k7/8/9, cast off centre 50/51/52, knit to end.
Next row: Cast off 9/9/9, p7/8/9 and then turn, leaving the 8/9/10 right back shoulder stitches unworked on the needles, while you finish the left shoulder separately.
Next row: k8/9/10, turn, cast off the remaining 8/9/10 and fasten off.

With wrong side facing, rejoin the yarn to the right back at the neck edge and purl 8/9/10. Turn and cast off the remaining 8/9/10 and fasten off, thus completing the right shoulder

Front

Work as for back until work measures 23¼ / 23½ / 24 inches.

Keeping continuity of the striped pattern shape neck as follows:
Next row: k43/44/45, cast off the centre 16/17/18 stitches, knit to end.
Next row: p43/44/45 and leave the remaining 43/44/45 stitches on a spare needle or stitch holder while you complete the left front separately.

At the beginning of the next row cast off 4 stitches. Then at the neck edge on every following alternate row, cast off: 3 stitches once, 2 stitches 3 times, and 1 stitch 4 times. [26/27/28 sts].

Continue straight on these stitches until front matches back to the shoulder. With wrong side facing, at the armhole edge, shape shoulder by casting off 9/9/9 stitches on the next and following alternate row. Knit 1 row and then cast off the remaining 8/9/10 stitches.
This completes the left front.

With wrong side facing, return to the stitches for the right side of the front, rejoin the yarn to the neck edge, and cast off 4 stitches, purl to end. Then at the neck edge on every following alternate row cast off: 3 stitches once, 2 stitches 3 times, and 1 stitch 4 times. [26/27/28 sts].

Continue straight on these stitches until front matches back to the shoulder. With right side facing, at the armhole edge, shape shoulder by casting off 9/9/9 stitches on the next and following alternate row. Purl 1 row and then cast off the remaining 8/9/10 stitches.
This completes the right front.

Sleeves

Using No 11 (3mm) needles and red contrast colour (R), cast on 66/70/74 stitches, and work 3 rows k2/p2 rib. Break yarn.
Change to main colour (M) and continue in rib until work measures
3½/4/ inches from the beginning. Break yarn.
[Editor's note: You may be puzzled by the largest size having a smaller sleeve welt. This is to keep the sleeve length correct overall, while trying to keep to an exact sequence of the stripes.]

With right side facing, change to No 9 (3¾mm or 3½mm) needles and join in contrast to start working the striped stocking stitch pattern, increasing 18/19/20 stitches, evenly across the first row.
[84/89/94 sts].
Working in alternate stripes of 14 rows G, 14 rows M, as before; however, for the largest size 3, begin the stocking stitch with a stripe of main colour M, followed by G. This will ensure you end at the top of the sleeve with a stripe in the dark contrast G, as shown in the photo.

Increase 1 stitch at each end of every following 10th row, 11 times.
[106/111/116 sts].

Continue until work measures 20 / 20¾ / 21½ inches from the beginning, [Editor's note: This should be 126/128/140 rows in stocking stitch.], which should be an exact number of stripes, ending with the darker grey colour G - for the second (medium) size you should work 16 rows in colour G on this last stripe.
Cast off.

To Make Up

Press parts or block lightly under a damp cloth, avoiding ribbing.
Join the shoulder seams.

Neck Border:
Using the set of 4 No 11 (3mm) needles and red contrast colour (R), pick up and knit 128/132/132 stitches evenly around the neck.
Work 3 rounds in K2/P2 rib, the 6 rounds in main shade (M), then 3 rounds in colour R. Cast off in rob using R.

Sew in sleeves. [Editor's note: The instructions are not explicit on this point but as the top of the sleeve is a straight edge, I would be inclined to sew it to the straight edge of the armhole, and sew the top half inch of the side of the sleeve to the cast off stitches of the armhole.]
Stitch side and sleeve seams.

Diagram showing dimensions for smallest size:

Materials

Double knitting yarn:
6/6/7 x 50g balls in light grey (M);
5/6/6 balls in darker grey (G);
1/2/2 ball dark red (R)

Pair each of
No 11 (3mm), and
No 9 (3¾mm or 3½mm) needles.
One set of 4 No 11 (3mm) needles.

Tension

22sts x 30 rows to four inches on 3½mm needles over stocking stitch.

Size matters

To fit chest:
40 / 42 / 44 inches,
[actual sizes approximately 2 inches larger];
length from top of shoulders:
26¼ / 26¾ /27¼ inches;
sleeve seam:
19½ / 20 / 21 inches.

Abbreviations

k: knit
p: purl
stocking stitch: knit one row, purl one row
M: main light grey
G: mid grey
R: wine red

A word on the wool.

Original yarn was mixed fibre double knitting equivalent.
Yardage was approximately 140 meters (153 yards) per 50g ball; this is the key point to note when substituting.

Disclaimer
(well...almost)

In transposing any patterns it is always a risk that errors will be introduced, in spite of dedicated proof reading.
If you have any problems with this pattern, please and I will try and assist.


January 2022

Set Up for the Cold

SetUpForTheCold.jpg

A "long, long" scarf worked in bands of stripes and jacquard pattern, with a matching pull-on hat and gloves to complete the set. These are all knitted in a lighter weight yarn, but the scarf is double thickness so will be very snug; it's also pretty long, so check that's what you want, as obviously you can make it to whatever length you like.

Instructions

The scarf is worked on 4 needles in the round to make a tube, which is then flattened; the result is a flat scarf with two layers of knitted fabric, and means you don't have to worry about seeing the "wrong side" of the knitting. This is a standard way to make - especially commercial - scarves. Although often seen made in the round, both the hat and the gloves are worked flat on two needles, with a seam making them into the required round shape. It would be simple enough to adapt this pattern and make the hat in the round, especially as you have the method given for the scarf. If this is your first attempt at gloves, however, making them flat may be a good way to start.

Scarf

Using the set of 4 No 10 (3¼mm) needles - or the circular needle - cast on 112 sts in Main Shade (A).
Work in rounds of stocking stitch (every round knit).

Pattern as follows:

**
1st and 2nd rounds: using B knit.
3rd and 4th rounds: using A knit.
5th and 6th rounds: using C knit.
7th and 8th rounds: using D knit.
9th and 10th rounds: using E knit.
11th - 23rd rounds: follow the 13 row pattern given in scarf chart 1.
24th - 33rd rounds: repeat rows 1-10.
**
34th - 46th rounds: follow the 13 row pattern given in scarf chart 2.

These 46 rounds form the pattern.
Repeat these rounds 10 times more, then the 1st to the 33rd rounds again.

Cast off using A.

To make up the Scarf

Darn in all ends on the wrong side.
Press gently under a damp cloth using a warm iron.
Turn the scarf right side out.
Cut yarn A into 20½ cm (8 inch) lengths. Taking 3 strands together, knot fringe through both thicknesses of both short ends at 1½ cm (½ inch) intervals.
[Editor's note: The scarf is a knitted tube, and you are now flattening it (to make the scarf double thickness); you then attach the fringe to each straight end, through both edges - which also serves to close the ends of the tube instead of sewing them together (but you might want to sew them anyway).]
Trim the fringe.


Hat

Using No 12 (2¾mm) needles, and main shade A, cast on loosely 144 stitches. Work 20 rows K1/P1 rib, increasing 1 stitch at the end of the last row. [145 sts]
Change to No 11 (3mm) needles. Continue in stocking stitch with the same pattern as given for the scarf but knitting back and forth in rows, not in the round. Work from ** to **, with every alternate row being purl. Then continue, repeating rows 1 - 10 only throughout.

Continue in pattern until work measures 18cm (7 inches) from the beginning, ending with a purl row.

Shape the crown

Decrease for the crown, keeping the continuity of the striped pattern:
1st decrease row: k5, (sl1, k2tog, psso, k9) 11 times; sl1, k2tog, psso, k5. [121 sts]
Work 3 rows in stocking stitch without shaping.
2nd decrease row: k4, (sl1, k2tog, psso, k7) 11 times; sl1, k2tog, psso, k4. [97 sts]
Work 3 rows in stocking stitch without shaping.
3rd decrease row: k3, (sl1, k2tog, psso, k5) 11 times; sl1, k2tog, psso, k3. [73 sts]
Work 3 rows in stocking stitch without shaping.
4th decrease row: k2, (sl1, k2tog, psso, k3) 11 times; sl1, k2tog, psso, k2. [49 sts]
Work 3 rows in stocking stitch without shaping.
5th decrease row: (k2tog, sl1, k2tog, psso, k2tog) 7 times. [21 sts]
Purl one row.
Next row: (sl1, k2tog, psso) 7 times.
Break off yarn, and thread through remaining stitches; draw up and fasten off.

To make up the Hat

Press as given for the scarf.
Join the centre back seam, taking care to reverse the seam on brim (which folds back).
Fold the brim in half to the right side.


Gloves

Note: When working the gloves, use separate balls of yarn for the palm and thumb, twisting the yarns at the back of the work when changing colours.

Right hand glove

Using No 12 (2¾mm) needles and main shade A, cast on 56 stitches.
Work 26 rows k1/p1 rib.
Change to No 11 (3 mm) needles, and beginning with a knit row work 4 rows in stocking stitch.

Start thumb shaping:

1st row: using first ball of B, k28; using A, increase one stitch in each of the next 2 stitches, k1; using a 2nd ball of B, k25.
2nd row: using B, p25; using A, p5; using B, p28.
3rd row: using A, knit to end.
4th row: using A, purl to end.
5th row: using C, k28; using A, increase in the next stitch, k2, increase in the next stitch, k1; using C, K25.
6th row: using C, p25; using A, p7; using C, p28.
7th row: using D, k28; using A, k7; using D, k25.
8th row: using D, p25; using A, p7; using D, p28.
9th row: using E, k28; using A, increase in the next stitch, k4, increase in the next stitch, k1; using E, k25.
10th row: using E, p25; using A, p9; using E; p27, increase in the last stitch. [63 sts including 9 thumb sts]

Continue in pattern as given for chart, increasing the thumb stitches as before on the 3rd and then every foil 4th row until the 24th row has been completed, decreasing one stitch at the end of the last row.

Thumb:

Next row: using B, k28; using A, k16 stitches; turn and cast on 2 stitches.
Next row: using A, p18 stitches; turn and cast on 2 stitches. [20 sts]
***
Beginning with a knit row, work 18 rows in stocking stitch.

[Editor's note: For this method you keep all the stitches on the needles as you work the thumb and each finger separately. At this point for the thumb, you keep 28 stitches unworked on the right hand needle, and 25 stitches unworked on the left hand needle, while you work on the centre 16 stitches (which you have increased to 20 by casting on 2 extra stitches on each side. You knit the thumb flat, back and forth up to the tip, then you fasten off and sew it up into the thumb shape.]

Shape top:
Next row: (k2tog, k2) 5 times.
Next row: purl to end.
Next row: (k2tog) 7 times, k1.
Break off yarn, thread through remaining stitches, draw up and fasten off.
Join seam.

With right side of work facing and using B, knit up 4 stitches from the base of the thumb, knit to end. [57 sts]
[Editor's note: With right side facing, you have 28 stitches already on the right hand needle; you rejoin the yarn at the centre where the thumb is, and start by picking up the 4 stitches that you cast on, which are now wrapped round to meet at the base of the thumb. You then knit the 25 stitches on the left hand needle. Don't worry if you end up with small holes showing at the base of the thumb, (or, later, the fingers) as you can pull them in later when you sew in the ends from the join.]
Beginning with a purl row work one row in B, 2 rows A, 2 rows C, 2 rows D, 2 rows E and 4 rows A, ending with a purl row.
Continue in A only.

Divide for fingers:

1st finger
Next row: k36, turn and cast on one stitch.
Next row: p17, turn and cast on one stitch. [18 sts]
Beginning with a knit row, work 24 rows in stocking stitch on these 18 stitches.

Shape top:
**
Next row: (k2, k2tog) 4 times, k2. [14 sts]
Next row: purl to end.
Next row: (k2 tog) 7 times.
Break off yarn, thread through remaining stitches, draw up and fasten off.
**
Join seam.

2nd finger
With right side of work facing, knit up 2 stitches from the base of the 1st finger, k7, turn, and cast on one stitch.
Next row: p17, turn, and cast on one stitch. [18 sts]
Beginning with a knit row, work 28 rows in stocking stitch.
Complete to match first finger, working from ** to **.
Join seam.

3rd finger
With right side of work facing, knit up 2 stitches from the base of the 2nd finger, k7, turn, and cast on one stitch.
Next row: p17, turn, and cast on one stitch. [18 sts]
Complete to match 2nd finger.
Join seam.

4th finger
With right side of work facing, knit up 2 stitches from the base of the 3rd finger, k6.
Beginning with a purl row, continue in stocking stitch across all remaining stitches for 19 rows.

Shape top
Next row: (k2, k2tog) 3 times, k2.
Next row: p to end.
Next row: (k2tog) 5 times, k1.
Break off yarn, thread through remaining stitches, draw up and fasten off.
***

Left hand glove

Work as given for right hand glove, reversing the pattern and the position of thumb as follows:

1st row: using 1st ball of B, k25; using A, increase one stitch in each of
the next 2 stitches, k1; using 2nd ball of B, k28.

Continue as given for right hand glove until 24th row of pattern has been completed.

Thumb

Next row: using B, k24; using A, k16, turn and cast on 2 stitches.
Next row: using A, p18, turn and cast on 2 stitches.

Complete as given for right hand glove working from *** to ***.

To make up

Press as given for scarf.
Join side seam and 4th finger seam.

Materials

25g balls of 4 ply (fingering) yarn:

Scarf: 4 balls in main shade A
5 balls in contrast B
4 balls in contrast C
2 balls in contrast D
2 balls in contrast E

One set of 4 3¼mm (UK 10) double pointed needles (dpn), or a circular needle.

Hat and gloves:
3 balls in main shade A
1 ball in each of the contrast colours B, C, D, and E.

One pair of 3mm (UK 11), and one pair of 2¾mm (UK 12) needles

Tension

28sts x 36 rows to 4 ins over stocking stitch on 3¼ mm needles.

Size matters

Scarf: 20½ cm (8 inches) wide, by 183cm (72 inches) long, excluding the fringe
Hat: to fit an average adult head.
Gloves: to fit an average adult hand.

Abbreviations

k2tog: knit 2 sts together.

increase: by knitting into the front and back of the next stitch

A word on the wool.

The original yarn was standard 4 ply superwash wool; about 92 yards (84 m) per 25g ball.

Disclaimer
(well...almost)

In transposing any pattern it is always a risk that errors will be introduced, in spite of dedicated proof reading.
If you have any problems with this pattern, please and I will try and assist.

© Christina Coutts 2007

Helpful Stuff

Pattern Archive

Categories

Yarn Links

Fabric etc

Stuff to do

  • Little rabbits
  • V&A 1940s Patterns
  • Monkey Socks
  • Necktie Bag
  • Posh Gloves
  • Criss-cross coasters