Instructions
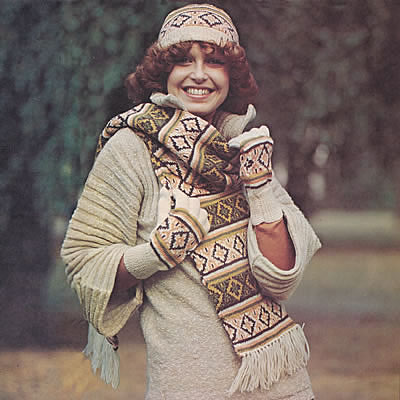
The scarf is worked on 4 needles in the round to make a tube, which is then flattened; the result is a flat scarf with two layers of knitted fabric, and means you don't have to worry about seeing the "wrong side" of the knitting. This is a standard way to make - especially commercial - scarves.
Although often seen made in the round, both the hat and the gloves are worked flat on two needles, with a seam making them into the required round shape. It would be simple enough to adapt this pattern and make the hat in the round, especially as you have the method given for the scarf. If this is your first attempt at gloves, however, making them flat may be a good way to start.
Scarf
Using the set of 4 No 10 (3¼mm) needles - or the circular needle
- cast on 112 sts in Main Shade (A).
Work in rounds of stocking stitch (every round knit).
Pattern as follows:
**
1st and 2nd rounds: using B knit.
3rd and 4th rounds: using A
knit.
5th and 6th rounds: using
C knit.
7th and 8th rounds: using
D knit.
9th and 10th rounds: using
E knit.
11th - 23rd rounds: follow the 13
row pattern given in scarf chart 1.
24th - 33rd rounds: repeat rows 1-10.
**
34th - 46th rounds: follow the 13
row pattern given in scarf chart 2.
These 46 rounds form the pattern.
Repeat these rounds 10 times more, then the 1st to the 33rd rounds again.
Cast off using A.
To make up the Scarf
Darn in all ends on the wrong side.
Press gently under a damp cloth using a warm iron.
Turn the scarf right side out.
Cut yarn A into 20½ cm (8 inch) lengths. Taking 3 strands together,
knot fringe through both thicknesses of both short ends at 1½ cm
(½ inch) intervals.
[Editor's note: The scarf is a knitted tube, and you are now flattening
it (to make the scarf double thickness); you then attach the fringe to each
straight end, through both edges - which also serves to close the ends
of the tube instead of sewing them together (but you might want to sew
them anyway).]
Trim the fringe.
Hat
Using No 12 (2¾mm) needles, and main shade A, cast on loosely 144
stitches. Work 20 rows K1/P1 rib, increasing 1 stitch at the end of the
last row. [145 sts]
Change to No 11 (3mm) needles. Continue in stocking stitch with the same
pattern as given for the scarf but knitting back and forth in rows, not
in the round. Work from ** to **,
with every alternate row being purl. Then continue, repeating rows 1 -
10 only throughout.
Continue in pattern until work measures 18cm (7 inches) from the beginning,
ending with a purl row.
Shape the crown
Decrease for the crown, keeping the continuity of the striped pattern:
1st decrease row: k5, (sl1, k2tog,
psso, k9) 11 times; sl1, k2tog, psso, k5. [121 sts]
Work 3 rows in stocking stitch without shaping.
2nd decrease row: k4, (sl1, k2tog,
psso, k7) 11 times; sl1, k2tog, psso, k4. [97 sts]
Work 3 rows in stocking stitch without shaping.
3rd decrease row: k3, (sl1, k2tog,
psso, k5) 11 times; sl1, k2tog, psso, k3. [73 sts]
Work 3 rows in stocking stitch without shaping.
4th decrease row: k2, (sl1, k2tog,
psso, k3) 11 times; sl1, k2tog, psso, k2. [49 sts]
Work 3 rows in stocking stitch without shaping.
5th decrease row: (k2tog, sl1, k2tog,
psso, k2tog) 7 times. [21 sts]
Purl one row.
Next row: (sl1, k2tog, psso) 7 times.
Break off yarn, and thread through remaining stitches; draw up and fasten
off.
To make up the Hat
Press as given for the scarf.
Join the centre back seam, taking care to reverse the seam on brim (which
folds back).
Fold the brim in half to the right side.
Gloves
Note: When working the gloves, use separate balls of yarn for
the palm and thumb, twisting the yarns at the back of the work when changing
colours.
Right hand glove
Using No 12 (2¾mm) needles and main shade A, cast on 56 stitches.
Work 26 rows k1/p1 rib.
Change to No 11 (3 mm) needles, and beginning with a knit row work 4 rows
in stocking stitch.
Start thumb shaping:
1st row: using first ball of B, k28;
using A, increase one stitch in each
of the next 2 stitches, k1; using a 2nd ball of B, k25.
2nd row: using B, p25; using A, p5;
using B, p28.
3rd row: using A, knit to end.
4th row: using A, purl to end.
5th row: using C, k28; using A, increase
in the next stitch, k2, increase in the next stitch, k1; using C, K25.
6th row: using C, p25; using A, p7;
using C, p28.
7th row: using D, k28; using A, k7;
using D, k25.
8th row: using D, p25; using A, p7;
using D, p28.
9th row: using E, k28; using A, increase
in the next stitch, k4, increase in the next stitch, k1; using E, k25.
10th row: using E, p25; using A, p9;
using E; p27, increase in the last stitch. [63 sts including 9 thumb sts]
Continue in pattern as given for chart, increasing the thumb stitches
as before on the 3rd and then every foil 4th row until the 24th row has
been completed, decreasing one stitch at the end of the last row.
Thumb:
Next row: using B, k28; using A,
k16 stitches; turn and cast on 2
stitches.
Next row: using A, p18 stitches; turn
and cast on 2 stitches. [20 sts]
***
Beginning with a knit row, work 18 rows in stocking stitch.
[Editor's note: For
this method you keep all the stitches on the needles as you work the thumb
and each finger separately. At this point for the thumb, you keep 28 stitches
unworked on the right hand needle, and 25 stitches unworked on the left
hand needle, while you work on the centre 16 stitches (which you have
increased to 20 by casting on 2 extra stitches on each side. You knit
the thumb flat, back and forth up to the tip, then you fasten off and
sew it up into the thumb shape.]
Shape top:
Next row: (k2tog, k2) 5 times.
Next row: purl to end.
Next row: (k2tog) 7 times, k1.
Break off yarn, thread through remaining stitches, draw up and fasten
off.
Join seam.
With right side of work facing and using B, knit up 4 stitches from the
base of the thumb, knit to end. [57 sts]
[Editor's note: With right side facing, you have 28 stitches already on the right
hand needle; you rejoin the yarn at the centre where the thumb is, and start by
picking up the 4 stitches that you cast on, which are now wrapped round to meet at the base of the thumb. You then knit the 25 stitches on the left hand needle.
Don't worry if you end up with small holes showing at the base of the thumb, (or, later, the fingers) as you can pull them in later when you sew in the ends from the join.]
Beginning with a purl row work one row in B, 2 rows A, 2 rows C, 2 rows
D, 2 rows E and 4 rows A, ending with a purl row.
Continue in A only.
Divide for fingers:
1st finger
Next row: k36, turn and cast on one
stitch.
Next row: p17, turn and cast on one
stitch. [18 sts]
Beginning with a knit row, work 24 rows in stocking stitch on these 18
stitches.
Shape top:
**
Next row: (k2, k2tog) 4 times, k2.
[14 sts]
Next row: purl to end.
Next row: (k2 tog) 7 times.
Break off yarn, thread through remaining stitches, draw up and fasten
off.
**
Join seam.
2nd finger
With right side of work facing, knit up 2 stitches from the base of the
1st finger, k7, turn, and cast on one stitch.
Next row: p17, turn, and cast on one
stitch. [18 sts]
Beginning with a knit row, work 28 rows in stocking stitch.
Complete to match first finger, working from **
to **.
Join seam.
3rd finger
With right side of work facing, knit up 2 stitches from the base of the
2nd finger, k7, turn, and cast on one stitch.
Next row: p17, turn, and cast on one
stitch. [18 sts]
Complete to match 2nd finger.
Join seam.
4th finger
With right side of work facing, knit up 2 stitches from the base of the
3rd finger, k6.
Beginning with a purl row, continue in stocking stitch across all remaining
stitches for 19 rows.
Shape top
Next row: (k2, k2tog) 3 times, k2.
Next row: p to end.
Next row: (k2tog) 5 times, k1.
Break off yarn, thread through remaining stitches, draw up and fasten
off.
***
Left hand glove
Work as given for right hand glove, reversing the pattern and the position
of thumb as follows:
1st row: using 1st ball of B, k25;
using A, increase one stitch in each of
the next 2 stitches, k1; using 2nd ball of B, k28.
Continue as given for right hand glove until 24th row of pattern has
been completed.
Thumb
Next row: using B, k24; using A,
k16, turn and cast on 2 stitches.
Next row: using A, p18, turn and cast
on 2 stitches.
Complete as given for right hand glove working from ***
to ***.
To make up
Press as given for scarf.
Join side seam and 4th finger seam.
|
Materials
25g balls of 4 ply (fingering) yarn:
Scarf: 4 balls in main shade A
5 balls in contrast B
4 balls in contrast C
2 balls in contrast D
2 balls in contrast E
One set of 4 3¼mm (UK 10) double pointed needles (dpn), or a circular
needle.
Hat and gloves:
3 balls in main shade A
1 ball in each of the contrast colours B, C, D, and E.
One pair of 3mm (UK 11), and one pair of 2¾mm (UK 12) needles
Tension
28sts x 36 rows to 4 ins over stocking stitch on 3¼ mm needles.
Size matters
Scarf: 20½ cm (8 inches) wide, by 183cm (72 inches) long,
excluding the fringe
Hat: to fit an average adult head.
Gloves: to fit an average adult hand.
Abbreviations
k2tog: knit 2 sts together.
increase: by knitting into the front and back of the next stitch
A word on the wool.
The original yarn was standard 4 ply superwash wool; about 92 yards (84
m) per 25g ball.
Disclaimer
(well...almost)
In transposing any pattern it is always a risk that errors will be introduced,
in spite of dedicated proof reading.
If you have any problems with this pattern, please
and I will try and assist.
|