Home

Weblog

Pattern of
the Month

On the Needles
(...and Off the Needles)

Knitalong

Stitchcraft

Vintage Patterns

About the
Idle Hands


Archive entry for 2023

« 2022 | Main | 2024 »

December 2023

Well wrapped up

WellWrapped.jpg

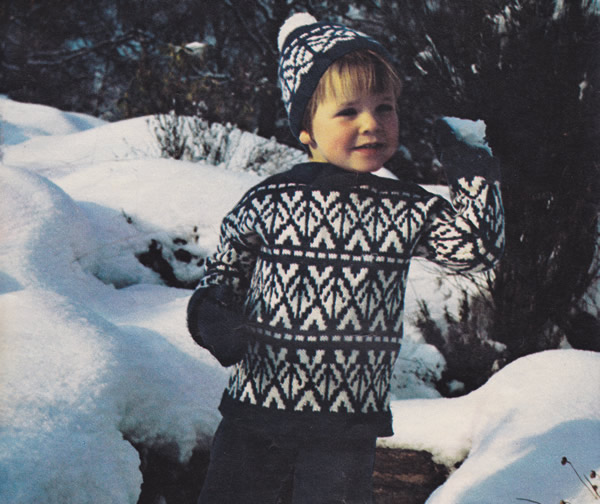
This is a pleasing and relatively simple set for a child, with a sweater and hat worked in a two-colour fair-isle pattern. To match, we have a plain coloured pair of mittens, and a simple pair of trousers - all in double knitting weight yarn.

Instructions

Sweater Back and Front alike:

With No 10 (3¼mm) needles and MC, cast on 85 stitches.
Work 11 rows stocking stitch.
Knit 1 row (hemline).

Work 10 rows stocking stitch, beginning with a knit row. *
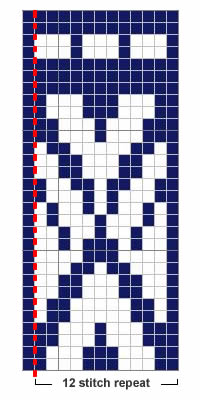
Change to No 9 needles, join in C, and work the pattern from the chart. Work the odd rows as knit, reading the chart from right to left, and repeating the 12 stitches before the dotted line to the last stitch, then k1 stitch beyond the dotted line. Work the even rows as purl, reading the chart from left to right, purling the first stitch (before dotted line), and then repeating the 12 stitches beyond dotted line to end.

WellWrappedChart.jpg

Continue until 3 complete patterns have been worked (or until work measures 16 inches from hemline), ending with a purl row.
Break off C.
Work 4 rows stocking stitch with MC.

Shoulder Shaping: Cast off 8 stitches at the beginning of the next 6 rows. Purl 1 row (hemline). Work 6 rows in stocking stitch, beginning with a purl row, increasing 1 stitch at the beginning of every row. Cast off.

Sleeves:

With No 10 needles and MC cast on 49 stitches.
Work as back to *.
Change to No 9 needles and pattern as for the back, increase 1 stitch at each end of the 5th and every following 6th row until there
are 61 stitches
Continue until the 26th row of the 2nd pattern has been worked (or until the sleeve measures 10 inches from the hemline).
Cast off 6 stitches at the beginning of the next 4 rows.
Cast off.

Trousers Right Leg:

Beginning at the ankle, with No 10 needles, and MC cast on 76 stitches. Work 7 rows in stocking stitch knit 1 row (hemline).
Change to No 9 needles and continue in stocking stitch until leg
measures 15 inches from hemline, ending with a purl row.
Continue straight, increasing 1 stitch at each end of next and every alternate row until there are 88 stitches.
Purl 1 row.
Mark each end of last row for the top of the leg.

Decrease 1 stitch at each end of the 5th and every following 6th row until 68 stitches remain. Continue until work measures 24½ inches from hemline *, ending with a knit row. **

Shape back by working short rows thus:
Purl 12; turn, knit to end.
Purl 24; turn, knit to end.
Purl 36; turn, knit to end.
Purl 48; turn, knit to end.
Next row: Purl across all stitches.

Change to No 10 needles and work 1 inch in k1/p1 rib.
Cast off in rib.

Trousers Left Leg:

Work as right leg to *, ending with a purl row.
Complete as right leg from ** but working knit instead of purl, and purl
instead of knit.

Hat:

With No 10 needles and MC cast on 97 stitches.
Work 1 inch in k1/p1 rib, beginning the 2nd row p1.
Change to No 9 needles and pattern as for back of sweater until one complete pattern from the chart has been worked (or until work measures 5½ inches), ending with a purl row.
Break off C and continue with MC only.

Work 6 rows in stocking stitch, decreasing 1 stitch at the end of 1st row. [96 sts].

Shape top thus:
Next row: (k2tog, k6); repeat to end.
Purl 1 row.
Next row: (k2tog, k5); repeat to end.
Purl 1 row.
Next row: (k2tog, k4); repeat to end.
Purl 1 row.

Continue decreasing in this way on every alternate row until 24 stitches remain. Purl 1 row.
Next row: (k2tog); repeat to end. [12 sts]
Break off yarn, thread through remaining stitches, draw up and fasten off securely.

Mitts (make 2 alike):

With No 10 needles and MC cast on 39 stitches.
Work 2 inches rib as beginning of hat.
Change to No 9 needles and work 2 rows stocking stitch.
Shape Thumb thus:
Next row: k19, pick up loop that lies before next stitch and knit it through back loop (referred to as make 1), k1, m1, k19.
Purl 1 row.
Next row: k19, m1, k3, m1, k19.
Purl 1 row.
Continue to increase in this way, working 2 stitches more between the increases on every alternate row until there are 51 stitches
Purl 1 row.
Next row: k32; turn and cast on 1 stitch.
Next row: p14; turn and cast on 1 stitch.
Work 10 rows stocking stitch on these 15 stitches
Next row: (k2tog, k 1) 5 times.
Next row: (p2tog) 5 times.
Break off wool, thread through remaining stitches, draw up and
fasten off securely.
Join thumb seam.

With right side facing and 32 stitches on right hand needle, rejoin yarn at the base of the thumb; pick up and knit 2 stitches at the base of thumb, knit the 6 stitches to the end of the row end. [40 sts].
Work 2½ inches stocking stitch on these stitches, ending with a purl row.
Next row: (k1, k2tog, k14, k2togtbl, k1) twice.
Purl 1 row.
Next row: (k1, k2tog, k12, k2togtbl, k1) twice.
Purl 1 row.
Next row: ( k2tog) across row to end.
Cast off.

To Make Up

Press or block work.

Sweater: Join shoulder and neck facing seams.
Sew top of sleeves to sides, beginning and ending 5 inches from shoulder seam.
Join side and sleeve seams.
Turn in hems and catch-stitch in place.

Trousers: Join front and back seams.
Join leg seams.
Turn up hems and catch-stitch in place.
Join elastic in ring and attach to wrong side of waist with herringbone casing.

Hat: Join seam.
Make pompon and sew on top.

Mitts: Join seam.

Materials

Worked in a standard double knitting yarn (swatch as per tension given).

Sweater:
6 oz main colour, and 4 oz contrast.

Hat:
2 oz main colour, and 1 oz contrast.

Trousers:
9 oz main colour.

Mitts:
2 oz main colour.

Pair each of No 9 (3¾mm), and
No 10 (3¼mm) needles.

Waist length of elastic.

Tension

26sts to 4 inches over fair-isle, 24sts over stocking stitch on 3¾mm needles.

Size matters

Sweater:
To fit 24 inch chest; length 16½ inches; sleeve: 10 inches.

Trousers:
Width around widest part 26 inches;
leg length 16½ inches.

Abbreviations

k: knit
p: purl
k2tog: knit two stitches together to decrease one stitch
k2togtbl: knit two stitches together through back loops to decrease one stitch
p2tog: purl two stitches together to decrease one stitch
stocking stitch: alternate rows of knit and purl. (US= "stockinette")

MC = main colour
C = contrast

Disclaimer
(well...almost)

In transposing any patterns it is always a risk that errors will be introduced, in spite of dedicated proof reading.
If you have any problems with this pattern, please and I will try and assist.

November 2023

Sparkling Party Frills for Fun

PartyFrills.jpg

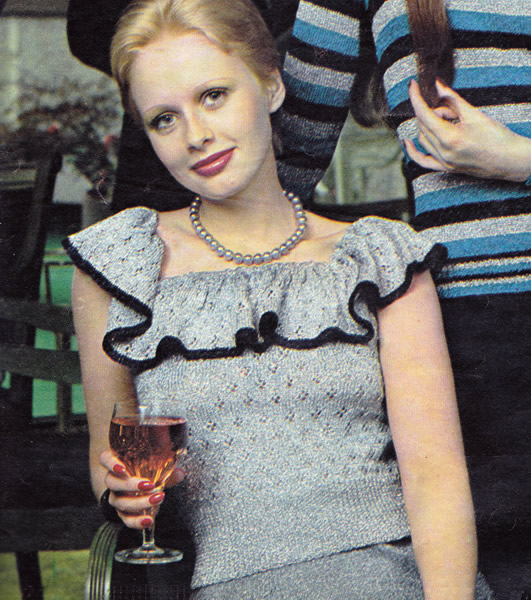
A fun top intended for a metallic yarn, and perfect for the party season. I find metallics a bit scratchy, but there are now quite a lot of sparkly fingering weight yarns for you to choose from. [Always check your tension... I know you do...]

Beautifully shaped sleeveless silver jumper with frill gathered on to deep round neckline.

Instructions

Note: instructions are given for 3 sizes.

Back and Front alike:

With No 13 (2¼mm) needles cast on 112 / 120 / 128 stitches, and work 3 inches in k1/p1 rib.

Change to No 12 (2¾mm) needles and pattern:

1st row: knit.
2nd and every alternate row: purl.
3rd row: k3, (yfwd, k2togtbl, k6) repeat to end, finishing last repeat k3.
5th row: k1, (k2tog, yfwd, k1, yfwd, k2togtbl, k3) repeat to end, ending last repeat k2.
7th row: as 3rd row.
9th row: knit
11th row: k7, (yfwd, k2togtbl, k6) repeat to last stitch, k1.
13th row: k5, (k2tog, yfwd, k1, yfwd, k2togtbl, k3) repeat to last 3 stitches, k3.
15th row: as 11th row.
16th row: purl.

These 16 rows form the pattern.
Continue in pattern and increase 1 stitch at each end of the next and every following 8th row until there are 128 / 136 / 144 stitches.
Then continue straight until work measures 12 inches, ending with a purl row.

Armhole Shaping: Cast off 4 / 5 / 6 stitches at the beginning of the next 4 rows.
Armhole Shaping:
Next row: k2tog, pattern 40, turn.
Continue on these stitches only, casting off 8 stitches at the beginning of the next and following 3 alternate rows; at the same time decreasing 1 stitch at the armhole edge on the next 7 rows.
Knit the last 2 stitches together and fasten off.

With right side facing, cast off the centre 28/ 32 / 36 stitches.
Complete to match the first side.

Frill (two pieces alike)

With No 12 needles and contrast edge colour, cast 168/ 184 / 200 stitches.
Work 3 rows stocking stitch.
Knit 1 row (hemline).
Work 4 rows stocking stitch.
Break off contrast edge colour, join on main colour, and repeat the
16 pattern rows of the main part twice, then repeat 1st to 8th rows once more.
Next row: k 0 / 1 / 2, * k2tog, k1; repeat from * to end.
Change to No 13 needles. Beginning with a purl row, work 4 rows stocking stitch, then knit 1 row (hemline).
Work 4 rows stocking stitch for the casing.
Cast off.

Making Up

Press lightly.
Join side seams.

Armhole Edgings: With right side facing, using No 13 needles, pick up and k32 / 36 / 40 stitches around the armhole edge.
Knit 1 row. Cast off

Join side edges of frill. Fold cast-on edge to wrong side at hemline and sew down, leaving an opening to insert elastic.
Stitch centre of each "side" of the frill to the entire neck shaping of back and front, leaving remainder free at each side to complete armholes.
Thread elastic through casing; adjust to fit and join ends. Close opening.

Materials

Fingering 3 ply weight metallic yarn:
8 / 8 / 9 x 25g balls in main colour, and 1 ball for the edging detail.

Pair each of No 12 (2¾mm), and No 13 (2¼mm) needles.

Tension

32sts to four inches

Size matters

To fit chest:
32 / 34 / 36 inches;
length: 18 / 18½ / 19 inches.

Abbreviations

k: knit
p: purl
k2tog: knit two stitches together to decrease one stitch
k2togtbl: knit two stitches together through back loops to decrease one stitch [also known as "ssk" or slip, slip, knit]
yfwd: yarn forward. Makes an extra stitch which forms a small pattern eyelet hole when knitted on the next row.
stocking stitch: alternate rows of knit and purl. (US= "stockinette")

Disclaimer
(well...almost)

In transposing any patterns it is always a risk that errors will be introduced, in spite of dedicated proof reading.
If you have any problems with this pattern, please and I will try and assist.


A Word on the Wool.

The original yarn was Twilleys Goldfingering - available in 25g balls with a yardage of 100m (109yds), 80% Viscose 20% Metallised Polyester.
Although the Twilleys company wound up in 2007, Goldfingering is currently still fairly widely available - and in some rather inspiring colours. At time of writing, for example, the colour 05 silver is on special offer here, (the picture shows the colour "pewter" with edging in "ebony").

October 2023

Diamonds to Suit

DiamondSuit.jpg

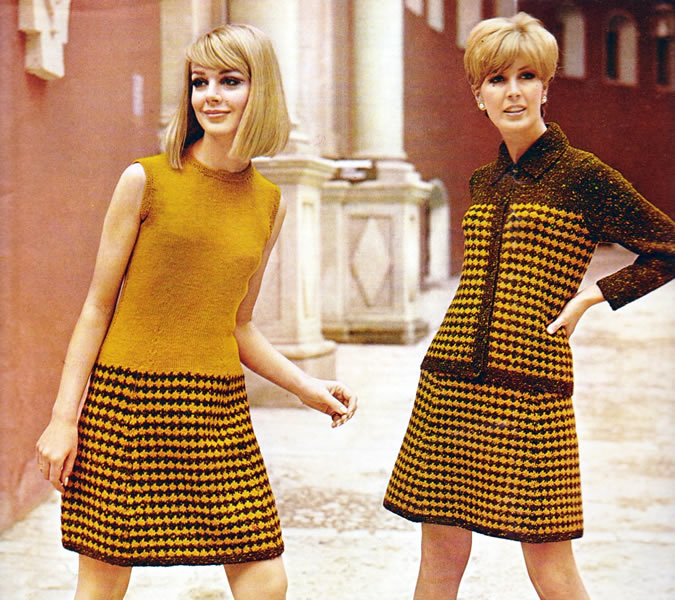
Striking (or startling) sixties "costume" of a jacket with a matching dress or skirt. The colours are very much of the time, so it might be slightly more appealing to current taste if executed in, say, black or navy with a neutral white or cream (but if you like it, I expect you'd already thought of that!).

Instructions for Jacket and Skirt Suit

Jacket Back

Using No 10 (3¼mm) needles and B, cast on 80 / 84 / 88 / 92 stitches and work 10 rows in garter stitch.
Next row: knit 10 / 12 / 4 / 6, knit twice in next stitch, * knit 4, knit twice in next stitch; repeat from * to last 9 / 11 / 3 / 5 stitches, knit 9 / 11 / 3 / 5.
[93 / 97 / 105 / 109 stitches]

With right side facing, change to No 7 (4½mm) needles, join in D and work in pattern as follows:—
1st row: using D, * k1, with wool at back, slip 3 purlwise repeat from * to last stitch, k1.
2nd row: using D, * p2, with wool at front, slip 1 purlwise, p1; repeat from * to last stitch, p1.
3rd row
: knit in D.
4th row: purl in D.
5th row: using B, * slip 2, k1, slip 1; repeat from * to last stitch, slip 1. 6th row: using B, * slip 1, purl 3; repeat from * to last stitch, slip 1.
7th row: knit in B.
8th row: purl in B.
These 8 rows form the pattern.

Work straight in pattern until back measures approximately 14 inches, ending with 8th pattern row.
With right side facing, shape armholes by casting off 5 / 5 / 6 / 6 stitches at the beginning of the next 2 rows.

Now decrease 1 stitch at each end of next and every alternate row until 69 / 73 / 79 / 83 stitches remain. Break D.

Next row: in B, purl 3 / 6 / 2 / 5, p2tog, * p4, p2tog; repeat from * to last 4 / 5 / 3 / 4 stitches, purl 4 / 5 / 3 / 4.
[58 / 62 / 66 / 70 sts]

Work straight in stocking stitch in B, starting with a knit row, until back measures 21 / 22 / 22 / 22½ inches down centre.
With right side facing, shape shoulders by casting off 5 / 6 / 7 / 6 stitches at the beginning of the next 2 rows, then 6 / 6 / 6 / 7 stitches at the beginning of the next 4 rows.
Cast off remaining 24 / 26 / 28 / 30 stitches.

Jacket Left Front

Using No 10 needles and B, cast on 38 / 40 / 42 / 44 stitches and work 10 rows in garter stitch.
Next row: knit 3 / 3 / 5 / 3, knit twice in the next stitch, * knit 4 / 3 / 2 / 2, knit twice in next stitch; repeat from * to last 4 / 4 / 6 / 4 stitches, knit 4 / 4 / 6 / 4.
[45 / 49 / 53 / 57 sts]

With right side facing, change to No 7 needles and diamond pattern, starting with 1st pattern row, and work straight until front matches back at side edge, ending with 8th pattern row.

With right side facing, shape armholes by casting off 5 / 5 / 6 / 6 stitches at the beginning of the next row.
Pattern back.
Now decrease 1 stitch at this edge on the next and every alternate row until 33 / 37 / 40 / 44 stitches remain. Break D.

Next row: in B, purl 3 / 4 / 3 / 1, p2tog, * purl 3 / 2 / 2 / 2, p2tog; repeat from * to last 3 / 3 / 3 / 1 stitches, purl 3 / 3 / 3 / 1.
[27 / 29 / 31 / 33 sts]

Work straight in stocking stitch in B, starting with a knit row, until front measures 19½ / 20 / 20 / 20½ inches down centre.
With wrong side facing, shape neck by casting off 4 / 5 / 6 / 7 stitches at the beginning of the next row.
Now decrease 1 stitch at this edge on every row until 17 / 18 / 19 / 20 stitches remain.
Work a few rows straight until front matches back at armhole edge.
With right side facing, shape shoulder by casting off 5 / 6 / 7 / 6 stitches at the beginning of the next row, then 6 / 6 / 6 / 7 stitches at the beginning of the following 2 alternate rows.

Jacket Right Front

Work to correspond with left front, reversing shapings.

Sleeves

Using No 10 needles and B, cast on 40 / 42 / 42 / 44 stitches and work 11 rows garter stitch.
With right side facing, change to No 7 needles and stocking stitch, starting with a knit row, and shape sides by increasing 1 stitch at each end of the 9th/7th/7th/5th and every following 8th row, until there are 56 / 60 / 60 / 64 stitches.

Work straight until sleeve seam measures 15 / 15½ / 15½ / 16 inches.
With right side facing, shape top by casting off 4 / 4 / 5 / 5 stitches at the beginning of the next 2 rows.
Now decrease 1 stitch at each end of the next and every alternate row until 22 / 24 / 20 / 22 stitches remain. Purl back.
Now decrease 1 stitch at each end of every row until 18 / 18 / 18 / 18 stitches remain.
Cast off.

Collar

Using No 10 needles and B, cast on 60 / 62 / 64 / 66 stitches and work in garter stitch, shaping collar by increasing 1 stitch at each end of the next and every alternate row until there are 70 / 72 / 74 / 76 stitches
Work 2 rows straight.
Next row
: knit 7 / 4 / 5 / 6, knit twice in the next stitch, knit 7 / 8 / 8 / 8, knit twice in the next stitch; repeat from * to last 6 / 4 / 5 / 6 stitches; knit 6 / 4 / 5 / 6.
[78 / 80 / 82 / 84 sts]

Work 7 rows straight.
Next row
: knit 7 / 4 / 5 / 6, knit twice in next stitch, knit 8 / 9 / 9 / 9, knit twice in next stitch; repeat from * to last 7 / 5 / 6 / 7 stitches; knit 7 / 5 / 6 / 7.
[86 / 88 / 90 / 92 sts]

Work 7 rows straight.
Next row
: knit 8 / 5 / 6 / 7 stitches, knit twice in the next stitch, knit 9 / 10 / 10 / 10, knit twice in the next stitch; repeat from * to last 7 / 5 / 6 / 7 stitches, knit 7 / 5 / 6 / 7.
[ 94 / 96 / 98 / 100 sts]

Work 7 rows straight,
Next row
: * knit 8 / 5 / 6 / 7, knit twice in the next stitch, * knit 10 / 11 / 11 / 11, knit twice in the next stitch; repeat from * to last 8 / 6 / 7 / 8 stitches, knit 8 / 6 / 7 / 8.
[102 / 104 / 106 / 108 sts]

Work 7 rows straight. Cast off.

Front Bands

Right: With No 10 needles and B, pick up and knit 107 / 109 / 109 / 111 stitches up right front to start of neck shaping.
Work 4 rows garter stitch.
Make 7 buttonholes in next 2 rows as follows:—
Next row: knit 4/ 5 / 5 / 5, (cast off 3, knit 13) 6 times, cast off 3, knit 4/ 5 / 5 / 5.
Next row: knit, casting on 3 over those cast off.
Work a further 4 rows garter stitch.
Cast off.

Left: Work to correspond with right front band, omitting buttonholes.

To Make Up

Press parts lightly on wrong side under a damp cloth, avoiding garter stitch borders.
Join shoulder, side and sleeve seams; insert sleeves.
Pin cast-on and increasing edge of collar all round neck, starting and ending in centre of front bands.
Sew neatly in position.
Press seams.
Sew on buttons and press stud under collar.

Skirt

First panel:
With No 10 needles and B, cast on 55 / 59 / 63 / 67 stitches and work 6 rows garter stitch, (every row, knit).
Next row: knit, increasing 10 stitches evenly across.
[65 / 69 / 73 / 77 sts]

With right side facing, change to No 7 needles, join in D and work in pattern as follows:—
1st row: in D, * k1, with wool at back, slip 3 purlwise repeat from * to last stitch, knit 1.
2nd row: in D, * p2, slip 1 purlwise, p1, repeat from * to last stitch, purl 1.
3rd row
: knit in D.
4th row: purl in D.
5th row: in B, * slip 2, k1, slip 1; repeat from * to last stitch, slip 1.
6th row: * slip 1, p3; repeat from * to last stitch, slip 1.
7th row: knit in B.
8th row: purl in B.
These 8 rows form the pattern.

Work a further 4 / 8 / 10 / 16 rows straight in pattern.
Continue in pattern, shaping sides by decreasing 1 stitch at each end of next and every following 16th / 14th / 14th / 12th row until 51 / 53 / 57 / 59 stitches remain. **

Work 3 / 3 / 1 / 1 rows straight, then, decrease 1 stitch at each end of next and every following 6th row until 31 / 33 / 35 / 37 stitches remain.

Work a few rows straight until panel measures 20 / 20½ / 21 / 21½ inches down centre, ending with 8th pattern row.
Break D.

Change to No 10 needles, and work 1 inch k1/p1 rib in B.
Cast off loosely in rib.
Make 3 more panels the same, one for each side, and one more for back or front.

To Make Up

Press parts lightly on wrong side under a damp cloth, avoiding garter stitch borders.
Join seams.
Press seams.
Cut elastic to fit waist and join into a ring; sew inside top of skirt using herringbone stitch over elastic to form a casing.

Materials

Jacket:
15 / 16 / 17 / 18 x 1oz balls balls in tweed double knitting ("Peat Moss")
4 / 4 / 5 / 5 x 1oz balls in plain double knitting ("Amberglow")

Skirt:
8 / 9 / 9 / 10 x 1oz balls balls in tweed double knitting ("Peat Moss")
6 / 4 / 6 / 6 x 1oz balls in plain double knitting ("Amberglow")

Pair each of No 7 (4½mm), and
No 10 (3¼mm) needles.

7 buttons.
½ inch wide elastic to fit waist.
1 press stud.

Tension

16sts and 27 rows over 3 inches on 4½mm needles over diamond pattern.

18sts and 25 rows to 4 inches in tweed yarn on 4½mm needles over stocking stitch.

Size matters

Jacket:
To fit chest:
32-33 / 34-35 / 36-37 / 38-40 inches;
length from top of shoulders: 21½ / 22 / 22 / 22½ inches;
sleeve seam: 15 / 15½ / 15½ / 16

Skirt:
To fit hips: 34-35 / 36-37 / 38-39 / 40-42 inches;
length: 21/ 21½ / 22 / 22½ inches;

Abbreviations

k: knit
p: purl
k2tog: knit two stitches together to decrease one stitch
k2togtbl: knit two stitches together through back loops to decrease one stitch
p2tog: purl two stitches together to decrease one stitch
stocking stitch: alternate rows of knit and purl. (US= "stockinette")
garter stitch: every row knit.

D = plain double knitting colour
B = tweed double knitting colour

A word on the wool.

The original yarn was Patons Bracken combined with a plain DK.
Bracken originally came - as per this pattern - in 100% pure wool balls of 1oz (28g) balls. There's no indication of yardage for either this or the later version of the yarn (50g balls of 60% wool).
Tension is standard 22 sts to 4 inches on 4mm needles.

I would substitute with Rowan Felted Tweed DK (because I love it and there is a wonderful range of colours); however it's a finer yarn, and much loftier and light weight yarn than Bracken, which knitted up quite firmly, and the tension here aligns Bracken more towards being an Aran yarn rather than a DK.

Disclaimer
(well...almost)

In transposing any patterns it is always a risk that errors will be introduced, in spite of dedicated proof reading.
If you have any problems with this pattern, please and I will try and assist.


Instructions for Dress

Skirt sections

Work panel as given for skirt above from ** to **.
[51 / 53 / 57 / 59 sts]

Work 9 / 9 / 7 / 13 rows straight, then decrease 1 stitch at each end of the next and following 10th row.
[47 / 49 / 53 / 55 sts]

Work a few rows straight until panel measures 16½ / 17 / 17½ / 18 inches down centre, ending with 4th pattern row, and increasing 1 stitch in the centre of this row for the 2nd and 4th sizes only.
[47 / 50 / 53 / 56 sts]

Break off B yarn, and leave the stitches on a spare needle or stitch holder.

Make another 3 panel sections the same, and number each panel 1, 2, 3 and 4.

Bodice back:

To make the bodice, arrange the stitches from the skirt panels as follows:—
Slip the first 23 / 25 / 27 / 28 stitches of panel No 1 and the last 24 / 25 / 26 / 28 stitches of panel No 3 on stitch holders.
With No 8 (4mm) needles, and right side facing, using D yarn knit the remaining 24 / 25 / 26 / 28 stitches of panel No 1, knit across 47 / 50 / 53 / 56 stitches of panel No 2, then knit remaining 23 / 25 / 27 / 28 stitches of panel No 3.
[94 / 100 / 106 / 112 sts]

*** Continue working back and forth in stocking stitch on these 94 / 100 / 106 / 112 stitches for the back, starting with a purl row and work 3 rows straight.
Next row: knit 26 / 28 / 30 / 32, k2tog, k1, k2togtbl, knit 32 / 34 / 36 / 38, k2tog, k1, k2togtbl, knit 26 / 28 / 30 / 32.
[90 / 96 / 102 / 108 sts]
Work 5 rows straight.
Next row: knit 25 / 27 / 29 / 31, k2tog, k1, k2togtbl, knit 30 / 32 / 34 / 36, k2tog, k1, k2togtbl, knit 25 / 27 / 29 // 31.
[86 / 92 / 98 / 104 sts]
Work 5 rows straight.
Next row: knit 24 / 26 / 28 / 30, k2tog, k1, k2togtbl, knit 28 / 30 / 32 / 34, k2tog, k1 , k2togtbl, knit 24 / 26 / 28 / 30.
[82 / 88 / 94 / 100 sts]
Work 5 rows straight.
Next row: knit 23 / 25 / 27 / 29, k2tog, k1, k2togtbl, knit 26 / 28 / 30 / 32, k2tog, k1, k2togtbl, knit 23 / 25 / 27 / 29.
[78 / 84 / 90 / 96 sts]
Work 15 rows straight.
Next row: knit 24 / 26 / 28 / 30, increase 1 stitch by picking up horizontal loop lying before next stitches and knitting into back of it, k1, increase 1 as before, knit 28 / 30 / 32 / 34, increase 1, k1, increase 1, knit 24 / 26 / 28 / 30.
[82 / 88 / 94 / 100 sts]
Work 7 rows straight.
Next row: knit 25 / 27 / 29 / 31, increase 1, k1, increase 1, knit 30 / 32 / 34 / 36, increase 1, k1, increase 1, knit 25 / 27 / 29 / 31.
[86 / 92 / 98 / 104 sts]
Work 7 rows straight.
Next row: knit 26 / 28 / 30 / 32, increase 1, k1, increase 1, knit 32 / 34 / 36 / 38, increase 1, k1, increase 1, knit 26 / 28 / 30 / 32.
[90 / 96 / 102 / 108 sts]
Work 7 rows straight.
Next row: knit 27 / 29 / 31 / 33, increase 1, k1, increase 1, knit 34 / 36 / 38 / 40, increase 1, k1, increase 1, knit 27 / 29 / 31 / 33.
[94 / 100 / 106 / 112 sts]

Work straight until bodice measures 12½ / 12½ / 12 / 12 inches from start.
With right side facing, shape armholes by casting off 5 stitches at the beginning of the next 2 rows.
Now decrease 1 stitch at each end of the next and every alternate row until 66 / 70 / 74 / 78 stitches remain. ***

Work a few rows straight until bodice measures 15½ inches down centre, ending with right side facing.
Here divide for back opening: -
Next row: knit 33 / 35 / 37 / 39.
Turn and leave remaining stitches on a spare needle or stitch holder.
Continue straight on these 33 / 35 / 37 / 39 stitches for first side until bodice measures 19½ inches down centre.
With right side facing, shape shoulder by casting off 6 / 7 / 6 / 7 stitches at the beginning of the next row, then 6 / 7 / 6 / 7 stitches at the beginning of the following 2 alternate rows.
Purl back.
Leave the remaining 15 / 16 / 17 / 18 stitches on a spare needle or stitch holder.

With right side facing, rejoin the yarn to the remaining stitches and finish to correspond with first side of back.

Bodice front:

With No 8 needles and right side facing, using D yarn, work as follows:—
knit 24 / 25 / 26 / 28 stitches of panel No 3 from the stitch holder, knit across 47 / 50 / 53 / 56 stitches of panel No 4, then knit 23 / 25 / 27 / 28 stitches of panel No 1 from the stitch holder.
[94 / 100 / 106 / 112 sts]

Work as for Bodice back from *** to ***.
66 / 70 / 74 / 78 stitches remain.
Continue straight on these stitches until bodice front measures 17½ inches down centre, ending with right side facing.

Here divide for neck:-
Next row
: knit 26 / 27 / 28 / 29.
Turn and leave remaining stitches on a spare needle or stitch holder.
Continue on these 26 / 27 / 28 / 29 stitches for the first side, decreasing 1 stitch at the neck edge on the next 8 rows.
[18 / 19 / 20 / 21 sts]
Work a few rows straight until front matches back at armhole edge.

With right side facing, shape shoulder as given for back.

With right side facing, slip centre 14 / 16 / 18 / 20 stitches on a spare needle or stitch holder, rejoin wool to remaining stitches, and knit to end.
Finish to correspond with first side.

To Make Up

Press parts carefully on wrong side under a damp cloth, avoiding garter stitch borders.
Join shoulder seams.

Neckband: With right side facing, and using the set of No 10 needles, or circular needle, work in D yarn as follows:—
Knit 15 / 16 / 17 / 18 stitches from left side of back, increasing 2 stitches evenly; pick up and knit 16 stitches down left side of front, knit 14 / 16 / 18 / 20 stitches from centre front increasing 4 stitches evenly across, pick up and knit 16 stitches up right side of front, knit 15 / 16 / 17 / 18 stitches from right side of back increasing 2 stitches evenly across.
[84 / 88 / 92 / 96 sts]

Arranging the stitches evenly on 3 needles, or using circular needle, work backwards and forwards in garter stitch (every row knitted) for 3 rows.
Next row: knit 5 / 7 / 6 / 8, k2tog, * knit 10 / 10 / 11 / 11, k2tog; repeat from to last 5 / 7 / 6 / 8 stitches, knit 5 / 7 / 6 / 8.
[77 / 81 / 85 / 89 sts]

Work a further 3 rows garter stitch. Cast off.

Armbands: With right side facing, and using No 10 needles, work in D yarn as follows:—
Pick up and knit 76 / 76 / 84 / 84 stitches round each armhole.
Work 6 rows garter stitch. Cast off.

Join side seams and armbands with a flat seam.
Insert zip into back opening allowing edges to meet to conceal it.
Press all seams.

Materials

12 / 13 / 14 / 15 x 1oz balls in plain double knitting ("Amberglow")
6 / 7 / 7 / 8 x 1oz balls in tweed double knitting ("Peat Moss")

Pair each of No 7 (4½mm), No 8 (4mm), and No 10 (3¼mm) needles.
Set of 4 No 10 (3¼mm) needles or a circular needle.

A 5 inch zip fastener for back of dress.
[Editor's note: probably better to check the measurement once the bodice is completed.]

Tension

16sts and 27 rows over 3 inches on 4½mm needles over diamond pattern.

Size matters

To fit chest:
32-33 / 34-35 / 36-37 / 38-40 inches;
hips: 34-35 / 36-37 / 38-39 / 40-42 inches;
length from top of shoulders: 36 / 36½ / 37 / 37½ inches.

Abbreviations

k: knit
p: purl
k2tog: knit two stitches together to decrease one stitch
k2togtbl: knit two stitches together through back loops to decrease one stitch
stocking stitch: alternate rows of knit and purl. (US= "stockinette")
garter stitch: every row knit.

D = plain double knitting colour
B = tweed double knitting colour

A word on the wool.

The original yarn was Patons Bracken combined with a plain DK.
Bracken originally came - as per this pattern - in 100% pure wool balls of 1oz (28g) balls. There's no indication of yardage for either this or the later version of the yarn (50g balls of 60% wool).
Tension is standard 22 sts to 4 inches on 4mm needles.

I would substitute with Rowan Felted Tweed (because I love it and there is a wonderful range of colours); however it's a much loftier and light weight yarn than Bracken, which knitted up quite firmly.

Disclaimer
(well...almost)

In transposing any patterns it is always a risk that errors will be introduced, in spite of dedicated proof reading.
If you have any problems with this pattern, please and I will try and assist.

September 2023

Out in the Open Air

OutInTheOpenHer.jpg

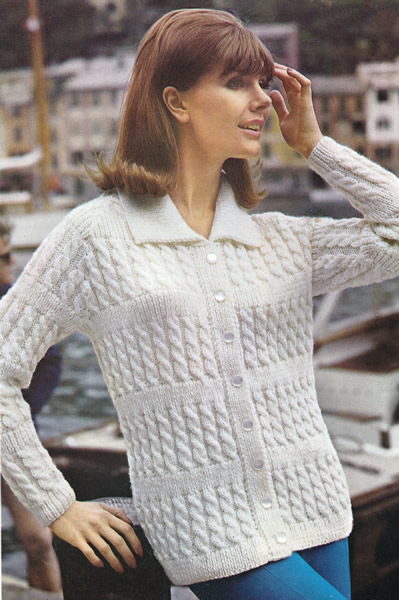
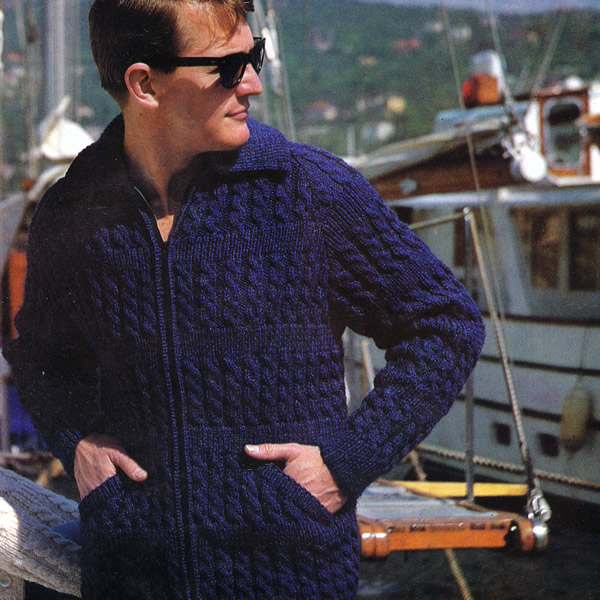
Still beside the sea, as the weather turns cooler. An altogether pleasing design for jackets with broken cable pattern - for him: a zip closure with angled pockets, and for her: a smooth line with buttons.

Instructions for woman's jacket

Note: instructions are given for 3 sizes.
Use No 6 (5mm) needles for cables and No 7 (4½mm) needles for the ribbing after the welt.

Back

With No 8 (4mm) needles cast on 122 / 128 / 136 stitches, and work 11 rows in k1/p1 rib, increasing 1 stitch at the end of the last row on the middle size only. [122 / 129 / 136 sts]

12th row: k1, purl to the last stitch, k1.

Change to No 6 (5mm) needles and pattern:

1st row: k1, p2, * k4, p3; repeat from * to last 7 sts; k4, p2, k1.
2nd row: k3, * p4, k3; repeat from * to end.

**
3rd row: k1, p2, * cable4, p3; repeat from * to last 7 sts; cable4, p2, k1.
4th row: k3, * p4, k3; repeat from * to end.
5th row: as 1st row.
6th row: as 2nd row.
7th row: as 1st row.
8th row: as 2nd row.
**

Repeat from ** to ** twice more, then repeat the 3rd, 2nd, and 1st rows once more, in that order.

Change to No 7 (4½mm) needles.

24th row: k1, purl to the last stitch, k1.
Work 9 rows in k1/p1 rib.
34th row: k1, purl to the last stitch, k1.

These 34 rows form the pattern.

Change to No 6 needles and repeat from 1st to 34th rows inclusive once, then 1st to 24th rows inclusive once.
Work 4 rows in k1/p1 rib. ***

Keeping pattern correct and changing needles as before, shape armholes by casting off 7 / 8 / 9 stitches at the beginning of the next 2 rows.
Work a further 6 rows, decreasing 1 stitch at each end of the 1st, 3rd, 5th, and 6th rows.

Repeat the last 6 rows until 32 / 37 / 42 stitches remain, ending with right side facing.

For the 2nd size: work 4 more rows, decreasing 1 stitch at each end of the 1st and 3rd rows.

For the 3rd size: work 8 more rows, decreasing 1 stitch at each end of the 1st and then alternate rows.

For all sizes: cast off the remaining 32 / 33 / 34 stitches, firmly.

Left Front

With No 8 needles cast on 66 / 72 / 80 stitches, and work exactly as for back to ***.

Keeping pattern correct and changing needles as before, shape armhole:

Next row: cast off 7 / 8 / 9 stitches, work in rib to end.
Next row: k1, purl to the last stitch, k1.

Continuing on No 6 needles:
** Work a further 6 rows decreasing 1 stitch at the armhole edge on the 1st, 3rd, 5th and 6th rows.
Repeat the last 6 rows until 46 / 51 / 57 stitches remain, ending at the armhole edge.

SHAPE NECK:
For the 1st size continue decreasing at the armhole edge as before and at the same time, decrease 1 stitch at the neck edge on the next and every alternate row until 2 stitches remain. Cast off.

For the 2nd and 3rd sizes: continue decreasing as before but at each end of the needle until 31 / 21 stitches remain.
Now continue decreasing at the armhole edge as before and at the same time, decrease 1 stitch at the neck edge on the next and every alternate row until 10 / 14 stitches remain.
Then decrease 1 stitch at each end of the next and every alternate row until 2 stitches remain. Cast off. **

Right Front

Work exactly as for left front to the start of the armhole shaping, then work one more row in rib to end with the wrong side facing.

Now shape the armhole:

Next row: cast off 7 / 8 / 9 stitches, purl to the last stitch, k1.

Continuing on No 6 needles:
Work as for the left front from ** to **.

Sleeves

With No 8 needles cast on 40 / 40 / 42 stitches, and work 11 rows in k1/p1 rib, increasing 5 / 5 / 10 stitches evenly across on the last row. [45 / 45 / 52 sts]

Next row: k1, purl to the last stitch, k1.

Change to No 6 needles and cable pattern, as for the back, and work
2 / 2 / 2 rows.

Continue working in cable and rib pattern, increasing 1 stitch at each end of the next and every following 4th row until there are 89 / 91 / 98 stitches. Then continue straight until the 28th row of the 3rd pattern has been completed - that is, finishing on on the same row as the back before the start of the armhole shaping.

Shape armhole exactly as for back until 43 / 43 / 48 stitches remain.
Now decrease 1 stitch at each end of the next and every following alternate row until 9 / 5 / 6 stitches remain. Cast off.

Front Borders

Left: With No 7 needles, cast on 11 stitches.

1st row: k2, * p1, k1; repeat from * to last stitch, k1.
2nd row: k1, * p1, k1; repeat from * to end.

Repeat these 2 rows until border fits up edge of left front to the start of the neck shaping when slightly stretched.
Cast off evenly in rib. Sew in position.

Right: Work a similar strip for the right front, with the addition of 8 buttonholes; the first to come in the 5th and 6th rows up from the lower edge, and the 8th just below the start of the neck shaping, and the remaining 6 spaced evenly in between.
First mark the position of the buttons with pins on the left border to ensure even spacing and work the buttonholes to correspond.

To make a buttonhole: with right side facing, rib 4, cat off 3, rib 4; rib back, casting on 3 over those cast off.

When border is finished, cast off evenly in rib, and sew in position.

Collar

With No 7 needles, cast on 139 / 141 / 145 stitches, and work in k1/p1 rib as given for left front border, until collar measures 4 inches. Cast off 24 / 25 / 27 stitches at he beginning of the next 4 rows.
Cast off remaining stitches.

To Make Up

Pin out the pieces to sizes required and block or press according to the instructions for the wool you are using (usually given on the ball band).
Join raglan, side and sleeve seams, matching patterns carefully.
Sew collar in position, placing ends to centre of front borders.
Press seams as above.
Sew on buttons.

Materials

Aran or worsted weight yarn:
14 / 14 / 15 x 2oz balls in snow white.

Pair each of No 6 (5mm), No 7 (4½mm), and No 8 (4mm) needles.
Cable needle.

8 buttons.

Tension

19sts and 24 rows to four inches on 5mm needles over stocking stitch.

Size matters

To fit chest:
35-36 / 37-38 / 39-40 inches;
length from top of shoulders: 25 / 25½ / 26 inches;
sleeve seam: 17 inches (all sizes).

Abbreviations

k: knit
p: purl
k2tog: knit two stitches together to decrease one stitch
cable4: slip next 2 stitches on to a cable needle to front of work, k2, then k2 from cable needle.

A word on the wool.

The original yarn was Patons Ariel designed for outer wear with a slightly rough texture. It was one of those "tripleknit" yarns which never really caught on in the UK. More or less Aran or American worsted weight. It came in 2oz (57g) balls at 89m/97yards, 80% wool, 20% man-made fibres.
Really do try a swatch for this one as Arans and worsteds cover a wide range of tensions on a variety of needles.

Disclaimer
(well...almost)

In transposing any patterns it is always a risk that errors will be introduced, in spite of dedicated proof reading.
If you have any problems with this pattern, please and I will try and assist.


Out in the Open Air

OutInTheOpenHim.jpg

"The sporty out-door look is perfectly typified in this popular, but first-class looking, zipped jacket. Companion to the woman's jacket, in the same attractive crunchy broken rib pattern. Lovely waterside colour of deep, shimmering blue, lightweight, but windproof by the sea, in the special triple-knit texture."

Instructions for man's zipped jacket

Note: instructions are given for 2 sizes.
Use No 6 (5mm) needles for cables and No 7 (4½mm) needles for the ribbing after the welt.

Back

With No 8 (4mm) needles cast on 136 / 142 stitches, and work 11 rows in k1/p1 rib, increasing 7 stitches evenly across on the last row. [143 / 150 sts]

12th row: k1, purl to the last stitch, k1.

Change to No 6 (5mm) needles and pattern:

1st row: k1, p2, * k4, p3; repeat from * to last 7 sts; k4, p2, k1.
2nd row: k3, * p4, k3; repeat from * to end.

**
3rd row: k1, p2, * cable4, p3; repeat from * to last 7 sts; cable4, p2, k1.
4th row: k3, * p4, k3; repeat from * to end.
5th row: as 1st row.
6th row: as 2nd row.
7th row: as 1st row.
8th row: as 2nd row.
**

Repeat from ** to ** twice more, then repeat the 3rd, 2nd, and 1st rows once more, in that order.

Change to No 7 (4½mm) needles.

24th row: k1, purl to the last stitch, k1.
Work 9 rows in k1/p1 rib.
34th row: k1, purl to the last stitch, k1.

These 34 rows form the pattern.

Change back to No 6 needles and continue in pattern until 3 complete patterns have been completed from the start.

Keeping pattern correct and changing needles as before, with right side facing, shape armholes by casting off 4 stitches at the beginning of the next 2 rows, then decrease 1 stitch at each end of every row until 103 / 98 stitches remain. Now decrease 1 stitch at each end of the next and every alternate row until 41 / 42 stitches remain, ending with right side facing.

Leave these stitches on a spare needle or stitch holder.

Right Front

With No 8 needles cast on 66 / 72 stitches, and work 11 rows in k1/p1 rib, increasing 7 / 8 stitches evenly across on the last row. [73 / 80 sts]

12th row: k1, purl to the last stitch, k1.

Change to No 6 needles and pattern as given for the back.
Work 29 rows, thus ending with wrong side facing,

Here divide for pocket.

Next row: rib 21 / 28 and slip these stitches onto a spare needle or stitch holder, cast off 3, pattern to end.
Next row: work in pattern.

Keeping pattern correct and changing needles as before, shape as follows:
Next row: cast off 2, pattern to end.
Next row: work in pattern.

Repeat the last 2 rows 10 times more. [27 / 27 sts]
Break yarn and leave these stitches onto a spare needle or stitch holder.

With right side facing, rejoin yarn to the last 21 / 28 stitches; cast on 3, and rib to end.
Next row: work in pattern.

Continue in pattern, casting on 2 stitches at the beginning of the next and every alternate row until there are 46 / 53 stitches, taking the cast on stitches into the pattern as they are made, and ending at the side edge.

Now continue in pattern over all stitches, until front matches back at side edge, ending with wrong side facing.

Keeping pattern correct and changing needles as before, shape raglan armhole:

Next row: cast off 4, pattern to end.

Now decrease 1 stitch at the armhole edge on the next 10 / 22 rows. [59 / 54 sts]
Continue in pattern, decreasing 1 stitch at the armhole edge at the beginning of every alternate row until 36 / 37 stitches remain, thus ending with right side facing.

Shape neck:

Next row: cast off 12 / 13, pattern to end.
Now decrease 1 stitch at each end of the next and every alternate row until 2 stitches remain. P2. Cast off.

Left Front

With No 8 needles cast on 66 / 72 stitches, and work 11 rows in k1/p1 rib, increasing 7 / 8 stitches evenly across on the last row. [73 / 80 sts]

12th row: k1, purl to the last stitch, k1.

Change to No 6 needles and pattern as given for the back.
Work 29 rows, thus ending with wrong side facing,

Here divide for pocket.

Next row: pattern 52 / 52 and slip the remaining 21 / 28 stitches onto a spare needle or stitch holder.
Next row: cast off 3, pattern to end.
Next row: work in pattern.

Next row: cast off 2, pattern to end.
Next row: work in pattern.
Repeat the last 2 rows until 27 stitches remain, ending at the front edge.

Break yarn and leave these 27 stitches onto a spare needle or stitch holder.

With wrong side facing, rejoin yarn to last 21 / 28 stitches.
Next row: cast on 3, pattern to end.
Next row: work in pattern.
Next row: cast on 2, pattern to end.
Next row: work in pattern.
Repeat the last 2 rows 10 times more. [46 / 53 sts]. Break wool.

With wrong side facing, rejoin yarn at front edge, and continue in pattern over all stitches, and finish to correspond with right front, reversing all shapings.

Sleeves

With No 8 needles cast on 48 / 52 stitches, and work 2½ inches in k1/p1 rib, increasing 11 / 14 stitches evenly across on the last row. [59 / 66 sts]

Change to No 6 needles and cable pattern, as for the back, and work
2 / 6 rows.

Continue working in cable and rib pattern, increasing 1 stitch at each end of the next and every following 4th row until there are 109 / 110 stitches, taking the increased stitches into the pattern as they are made.

Then continue straight until the 34th row of the 3rd pattern has been completed - that is, finishing on on the same row as the back before the start of the armhole shaping.

Shape top by casting off 4 stitches at the beginning of the next 2 rows, then decrease 1 stitch at each end of the next 18 rows. [65 / 66 sts]

Now decrease 1 stitch at each end of the next and every following alternate row until 5 / 6 stitches remain, ending with right side facing. Leave these stitches on a spare needle or stitch holder.

Collar

Join raglan seams, matching patterns.
With No 7 needles and right side facing, pick up and knit 28 stitches round right side of neck, knit the 5 / 6 sleeve stitches, knit 41 /42 from
back increasing 8/5 stitches evenly across as you go, knit 5/6 sleeve stitches, pick up and knit 28 stitches round left side of neck.
[115 / 115 sts.]

Next row: k1, * p1, k1; repeat from * to end.
Next row: p1, * k1, p1; repeat from * to end.
Repeat the last 2 rows once more

Next row (increases): rib 4, pick up horizontal loop lying before next stitch and knit into the back of it; rib to last 4 stitches, pick up horizontal loop lying before next stitch and knit into the back of it, rib 4.
Work 3 rows in rib.
Repeat the last 4 rows until the collar is 5 inches deep at the centre back, taking the increased stitches into the rib pattern.
Cast off evenly in rib.

Pocket Linings an Borders

Linings: With No 6 needles and right side facing, pick up and knit 32 stitches along top slope of each pocket and work 4 inches in stocking-stitch, starting with a knit row. Cast off.
Borders: With No 7 needles, pick up and knit 34 stitches along lower slope of each pocket and work 5 rows in k1/p1 rib,
Cast off evenly in rib.

To Make Up

Pin out the pieces to sizes required and block or press according to the instructions for the wool you are using (usually given on the ball band).
Join side and sleeve seams matching patterns.
Catch down pocket linings and borders to main work.
Work a row of double crochet (US = single crochet) along the edge of each front.
Insert zip fastener into front opening, allowing crochet edging to
meet over zip to conceal it.
Press all seams as before.

Materials

Aran yarn:
18 / 19 x 2oz balls in in gendarme blue

Pair each of No 6 (5mm), No 7 (4½mm), and No 8 (4mm) needles.
Cable needle.
No 10 (3¼mm) crochet hook.

A zip fastener (double-ended - suitable for a jacket).
[Editor's note: no length is suggested for the zip, and probably better to measure, or monitor the length as you make the jacket.]

Tension

19sts and 24 rows to four inches on 5mm needles over stocking stitch.

Size matters

To fit chest:
39-40 / 41-42 inches;
length from top of shoulders: 27½ / 27½ inches;
sleeve seam: 18½ / 18½ inches (all sizes).

Abbreviations

k: knit
p: purl
k2tog: knit two stitches together to decrease one stitch
cable4: slip next 2 stitches on to a cable needle to front of work, k2, then k2 from cable needle.

A word on the wool.

The original yarn was Patons Ariel designed for outer wear with a slightly rough texture. It was one of those "tripleknit" yarns which never really caught on in the UK. More or less Aran or American worsted weight. It came in 2oz (57g) balls at 89m/97yards, 80% wool, 20% man-made fibres.
Really do try a swatch for this one as Arans and worsteds cover a wide range of tensions on a variety of needles.

Disclaimer
(well...almost)

In transposing any patterns it is always a risk that errors will be introduced, in spite of dedicated proof reading.
If you have any problems with this pattern, please and I will try and assist.

August 2023

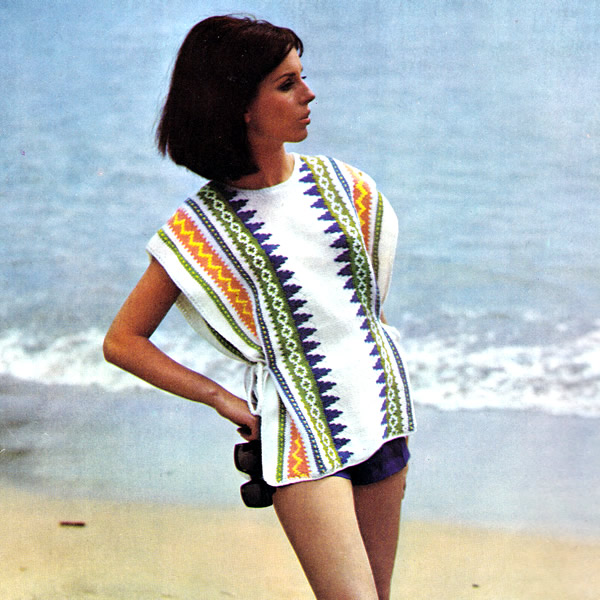
Beach Tunic or Poncho

BeachTunic.jpg

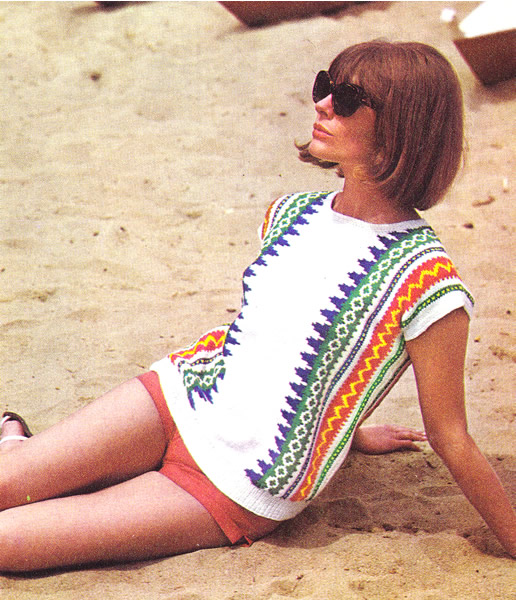
Beach cover-up, which can be made as a sleeveless tunic top (above), or a poncho/tabard (below) -- great for a sandy beach, after a refreshing dip on an English summer's day!

"Poncho wrap to slip on after a bathe, ties loosely at the sides -- warm but light weight, it's the perfect cover-up for after-swim. Tunic uses the same vivid design, to give you a play sweater for the beach to wear over tiny shorts."

Instructions for Tunic

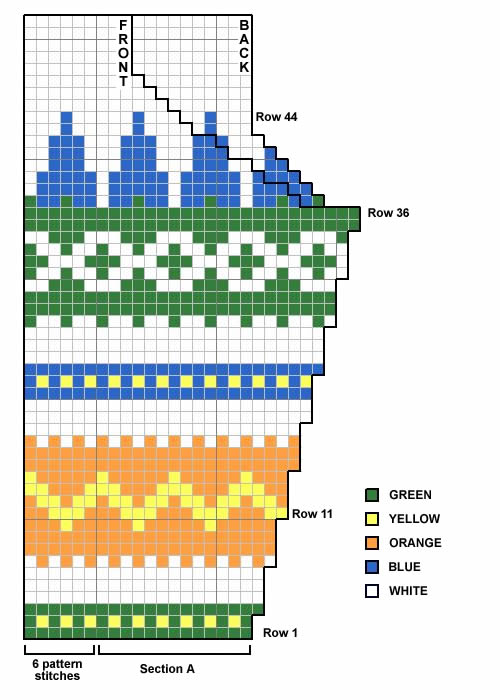
Instructions are given for 3 sizes, and the tunic is knitted sideways, following the chart.
Carry unused wool loosely behind work to keep even tension and elasticity.

Back

With No 9 (3¾mm) needles and main shade (W), cast on 121 / 121 / 127 stitches, and work 1 / 3 / 5 rows in stocking stitch, starting with a purl row.
Break off W.

Change to No 8 (4mm) needles and with right side facing, work the Fair Isle pattern from the chart, reading odd rows knit from right to left, and even rows purl from left to right.

On knit rows, first work section A, then repeat the 6 pattern stitches 18 / 18 / 19 times. On purl rows, repeat the 6 pattern stitches 18 / 18 / 19 times, then work section A, as indicated.

Thus your first 2 rows will read :
1st row (right side facing): knit in green (G).
2nd row: purl, * 1G, 1Y; repeat from * to last stitch, 1G.

Continue working from chart until 36th pattern row has been completed, increasing 1 stitch at the beginning of the next and every
following 4th row for shoulder as indicated : [130 / 130 / 136 sts].

Shape back of neck by casting off 3 stitches at the beginning of the next row, then decrease 1 stitch at this edge on the following 6 rows as indicated: [121 / 121 / 127 sts].
Work 1 row straight to complete the Fair Isle panel.
Break off B.

Change back to No 9 needles and work 42 / 46 / 50 rows straight in stocking stitch in main shade W, starting with a knit row.
Change to No 8 needles, join in B, and work the Fair Isle panel for the left side.
To reverse the pattern, read the chart as before, but work down the chart, starting with the 44th row.
When you are working backwards, even rows are knit, and odd rows, purl.
So the first 2 rows will read:
44th row (right side facing): knit 3W, 1B, 5W, 1B, 3W, * 2W, 1B, 3W; repeat from * to end.
43rd row: purl, * 3W, 1B, 2W; repeat from * to last 13 stitches; 3W, 1B, 5W, 1B, 3W.

Finish to correspond with chart, increasing for neck and decreasing for shoulder as indicated.
When the 44 rows of chart are done, break G.

Change to No 9 needles and work 1 / 3 / 5 rows in stocking stitch, in W, starting with a knit row.
Cast off.

Front

Work as for back, shaping neck by casting off 5 stitches at the beginning of the 37th row, then decreasing as indicated, and changing to No 9 needles when the 44 rows of the Fair Isle panel have been completed: [111 / 111 / 117 sts].

When the neck shapings are complete, work 34 / 38 / 42 rows straight in stocking stitch using W, starting with a knit row.
Now, reading chart in reverse as before, work 4 more rows in W, shaping the neck as indicated.
Change to No 8 needles, and Fair Isle pattern, and finish as for the back, shaping neck and shoulder as before.

Ribbed Border

Front: with right side facing, using W wool and No 9 needles, pick up and knit 114 / 120 / 126 stitches evenly along the lower edge.
Work 10 / 14 / 10 rows in k1/p1 rib; cast off in rib.
Work the back ribbed border in the same way.

To Make Up

Press work lightly on the wrong side, under a damp cloth, avoiding the ribbing.

Join right shoulder seam.
With right side facing, using W and crochet hook, start at the left side of the neck on the front, and work a row of double crochet (English = double crochet, American= single crochet) evenly round neck edge.

Turn with 1 chain, and work a further 3 rows dc, turning with 1 chain
at the end of every row.
Fasten off.

Join the left shoulder and neckband seam.

Armholes: Measure 6¼ / / inches from the top of the shoulder down the side edge on the back and front, and mark with pins.
With right side facing, W wool and crochet hook, work a row of dc between the pins. Work a further 3 rows dc, decreasing 1 stitch at each end of every row. Fasten off.
Work the other armhole in the same way.

Join side and border seams; press seams.

Materials

Double Knitting yarn:
8 / 8 / 9 x 1oz balls in main shade (W), snow white;
2 / 2 / 2 oz in each of green (G) and red (R);
1 / 2 / 2 oz in blue (B);
1 / 1 / 1 oz in yellow (Y).

Pair each of No 8 (4mm) and No 9 (3¾mm) needles.
No 10 (3¼mm) crochet hook.

Tension

23sts and 31 rows to four inches on 3¾mm needles over stocking stitch.

Size matters

To fit chest:
33-34 / 35-36 / 37-38 inches;
length from top of shoulders: 21½ / 22 / 22½ inches.

Abbreviations

k: knit
p: purl
k2tog: knit two stitches together to decrease one stitch
W: main white
G: green
R: red
B: blue
Y: yellow

A word on the wool.

Original yarn was a double knitting

Disclaimer
(well...almost)

In transposing any patterns it is always a risk that errors will be introduced, in spite of dedicated proof reading.
If you have any problems with this pattern, please and I will try and assist.


TunicPonchoChart.jpg


BeachPoncho.jpg

Instructions for Poncho

Instructions are given for 3 sizes, and the tunic is knitted sideways, following the chart.
Carry unused wool loosely behind work to keep even tension and elasticity.

Back

With No 7 (4½mm) needles and main shade (W), cast on 127 stitches, and work 6 rows in stocking stitch, starting with a knit row.

Change to No 6 (5mm) needles and with right side facing, work the Fair Isle pattern from the chart, reading odd rows knit from right to left, and even rows purl from left to right.

On knit rows, first work section A, then repeat the 6 pattern stitches 19 times. On purl rows, repeat the 6 pattern stitches 19 times, then work section A, as indicated.

Thus your first 2 rows will read :
1st row (right side facing): knit in green (G).
2nd row: purl, * 1G, 1Y; repeat from * to last stitch, 1G.

Continue working from chart until 36th pattern row has been completed, increasing 1 stitch at the beginning of the next and every
following 4th row for shoulder as indicated : [136 sts].

Shape back of neck by casting off 3 stitches at the beginning of the next row, then decrease 1 stitch at this edge on the following 6 rows as indicated: [127 sts].
Work 1 row straight to complete the Fair Isle panel.
Break off B.

Change back to No 7 needles and work 26 rows straight in stocking stitch using main shade W, starting with a knit row.
Change to No 6 needles, join in B, and work the Fair Isle panel for the left side.
To reverse the pattern, read the chart as before, but work down the chart, starting with the 44th row.
When you are working backwards, even rows are knit, and odd rows, purl.
So the first 2 rows will read:
44th row (right side facing): knit 3W, 1B, 5W, 1B, 3W, * 2W, 1B, 3W; repeat from * to end.
43rd row: purl, * 3W, 1B, 2W; repeat from * to last 13 stitches; 3W, 1B, 5W, 1B, 3W.

Finish to correspond with chart, increasing for neck and decreasing for shoulder as indicated.
When the 44 rows of chart are done, break G.

Change to No 7 needles and work 6 rows in stocking stitch, using W, starting with a knit row.
Cast off.

Front

Work as for back, shaping neck by casting off 5 stitches at the beginning of the 37th row, then decreasing as indicated, and changing to No 7 needles when the 44 rows of the Fair Isle panel have been completed: [117 sts].
Break off B.

When the neck shapings are complete, work 18 rows straight in stocking stitch using W.
Now, reading chart in reverse as before, work 4 more rows in W, shaping the neck as indicated.
Change to No 6 needles, and Fair Isle pattern, and finish as for the back, shaping neck and shoulder as before.

To Make Up

Press work lightly on the wrong side, under a damp cloth.

Neck edging front: with right side facing, using W and crochet hook, start at the left side of the neck on the front, and work a row of double crochet (English = double crochet, American= single crochet) evenly round neck edge.
Turn with 1 chain.
Work a 2nd row of dc.
Fasten off.
Neck edging back: work as for front.

In the same way, neaten the side edgings by working a row of dc down the right side of the front, along the lower edge, and up the other side; turn with one chain, and work a 2nd row.
Fasten off.

Work a crochet edging on the back in the same way.

Join shoulder seams.
Press seams and edgings.

Make ties: with 3 strands of W, or contrast yarn, make 4 lengths of crochet chain, about 20 inches long. Sew one length to each side of front and back, about 3½ inches in from the side and 10 inches up from the lower edge.
Tie as shown in the photo.

Materials

Aran or worsted weight yarn:
10 x 1oz balls in main shade (W), snow white;
3 oz in green (G);
2 oz in tangerine (R);
2 oz in blue (B);
1 oz in yellow (Y).

Pair each of No 6 (5mm) and No 7 (4½mm) needles.
No 10 (3¼mm) crochet hook.

Tension

20sts and 25 rows to four inches on 4½mm needles over stocking stitch.

Size matters

Width across front measured flat:
22 inches;
length from top of shoulders: 25 inches.

Abbreviations

k: knit
p: purl
k2tog: knit two stitches together to decrease one stitch
W: main white
G: lime green
R: tangerine
B: royal blue
Y: sun yellow

A word on the wool.

Original yarn was a blend of wool and acrylic, making it so-called "light weight", though it's an Aran or worsted weight yarn.
A cotton blend might be pleasanter for the beach.

Disclaimer
(well...almost)

In transposing any patterns it is always a risk that errors will be introduced, in spite of dedicated proof reading.
If you have any problems with this pattern, please and I will try and assist.


July 2023

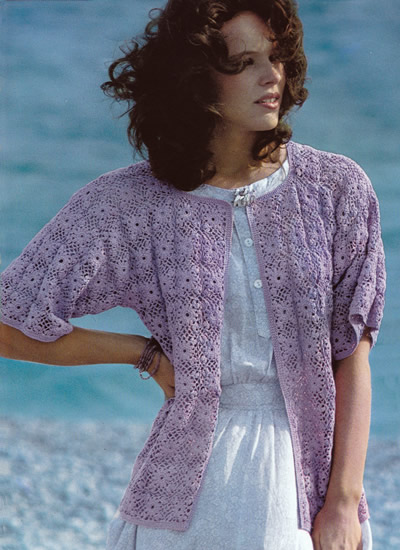
Kimono Cardigan

KimonoCardigan.jpg

A very feminine coatlet to crochet in cotton for the summer. Its boxy shape gives it a little more edge for styling successfully with jeans and a tee, as well as more conventionally with a breezy summer frock.
The design is constructed from motifs made using in a fairly fine cotton on a 1.5 mm hook, so it might be more of an heirloom project - the month of June always brings weddings to mind.

Instructions.

Instructions for 2 sizes, larger size in brackets
The top is made up by joining a number of crocheted square motifs.

Special instructions: make cluster

This is a 3 dtr cluster made by working 3 dtr together as follows:

* yoh twice, insert hook into stitch or ch space, yoh, pull 1 loop through, yoh, pull yarn through 2 loops, yoh, pull yarn through 2 loops, repeat from * twice more, still working into the same stitch.
Yoh, pull yarn through all 4 loops on hook.

When working a cluster at the beginning of the round, work as follows:

3ch (counts as first dtr), * yoh twice, insert hook into same stitch or ch space, yoh, pull 1 loop through, yoh, pull yarn through 2 loops, yoh, pull yarn through 2 loops, repeat from * once more, still working into the same stitch.
Yoh, pull yarn through all 3 loops on hook.

Basic Motif

Make 6 ch, close circle with 1 slip stitch.
Work in rounds.
1st round: work 12 dc into the centre of the circle, joining to first dc with a slip stitch.
2nd round: make a cluster as for the beginning of a round, 3 ch; (make cluster, 3ch) 11 more times. Join to top of cluster at the start of the round with a slip stitch.
3rd round: slip stitch into the next chain space, make a cluster as for the beginning of a round, 3 ch, make cluster into the same ch space, * (5 ch, 1 dc in next ch space) twice, 5 ch; (make cluster, 3 ch, make cluster) all in next chain space; repeat from * twice more.
End with (5 ch, 1 dc in next ch space) twice, 5 ch, and join to top of cluster at the start of the round with a slip stitch.

Make 298 (332) identical motifs. These are then joined in strips of various lengths in order the build up the cardigan shape.

Joining motifs

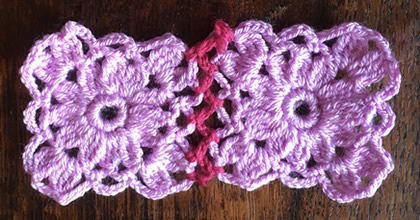
Make sure the motifs are all the same side up when you start to join them. Work as follows: join to the corner of the second completed motif, then make 2 ch, then 1dc into the loop on the corner of previous motif. Continue thus, with 2 ch, 1 dc into each of the following loops, alternating between each of the two motifs.

Below is an example of the motifs with the joining stitches shown in a different colour.

Lower edge of cardigan (back and fronts)

Make 7 strips of 18 (20) motifs and then join the strips in same way as for joining motifs. (You have a rectangle 18 (20) by 7 motifs which is the back and fronts worked together up to the armholes).

Back (top and sleeves)

Make 5 strips of 18 (20) motifs and then join the strips in same way as for joining motifs. (You have a rectangle 18 (20) by 5 motifs which is the back and sleeves worked together from the armholes up to the shoulders).

Right front (top and sleeves)

Make 3 strips of 9 (10) motifs and then join them.
Make 2 strips of 7 (8) motifs and then join them to the previous piece,
staggering them 2 motifs to the left for the front neck.

Left front (top and sleeves)

Work in the same way,the opposite way round.

Putting it all together

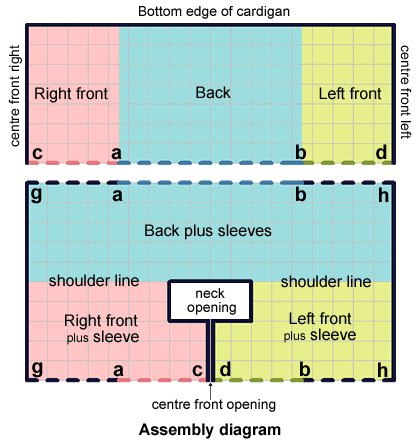
The assembly diagram below shows the smaller size, which requires you to join the bottom of the cardigan to the top sections centred across an uneven number of squares (9) - so involves joining a "half square". The larger size has an even number (10).
All the motifs are made in the same colour - the colour coding below is just to help understand how the sections are joined together.

Join the lower section to the top, joining the centre 9 (10) motifs for the back - shown in the diagram as between points (a) and (b) -
and join the 4½ (5) motifs at each end for the fronts - shown in the diagram as between points (a) and (c) for the right front and (b) and (d) for the left front.

Join the top of garment across the shoulders and tops of sleeves. (There are 7 (8) motifs each side.)

Iron lightly on wrong side of work.

Stitch the sleeve seams - shown in the diagram as between points (a) and (g) for the right sleeve and (b) and (h) for the left sleeve.

Work 5 rows of dc all round the sweater, working a little tighter round
the neckline.
Work 5 rows of dc around each sleeve edge.

Sew in all ends. (I would advise sewing in ends on each motif as you go since this can be a rather daunting task if they are all left to the end).


A Word on the Wool

This is made using cotton 8, which is fine but not that fine.
For comparison, the sort of cotton you would use to make doilies would have been typically (Coats) cotton 20 - and the bigger the number the finer the thread.

You can find cotton 8 on line as rather expensive fine crochet cotton by the likes of DMC, or in more budget versions from bulk distributors such as Hobbii.

The key criteria to look for (even if it's called cotton No 8) is a knitting gauge - often printed on a ball band - of 39 sts x 59 rows to 10 cm square on 2mm needles; and a yardage of something like 285 meters to 50g.
After that you should experiment making a motif or two using a 1½mm hook, and then varying the hook size if necessary to get the right size.

If you want to make this in a fine wool then laceweights would probably suit (again be sure to try a motif). I implied above that the yardage could be used as an indication of suitable thickness when substituting, but not if you are substituting with wool because it has a different density to cotton. You can use the yardage as a guide to how much yarn to purchase to make this garment, but not for any indication of suitable thickness.

Materials

7 (8) x 50g balls cotton No 8 in colour "Heliotrope".

1.5 mm crochet hook

Tension

Each motif measures 5cm, (2 inches)

Size matters

10-12 / 14-16
[32 - 34 / 36 - 38 inch chest]

Crochet abbreviations:

ch: chain
sl st: slip stitch
dc: double crochet
dtr: double treble
yoh: yarn over hook

Remember these are English crochet instructions where dc is equivalent to US single crochet - see "Terminology" in the side bar.

Disclaimer
(well...almost)

In transposing any pattern it is always a risk that errors will be introduced, in spite of dedicated proof reading.
If you have any problems with this pattern, please and I will try and assist.

June 2023

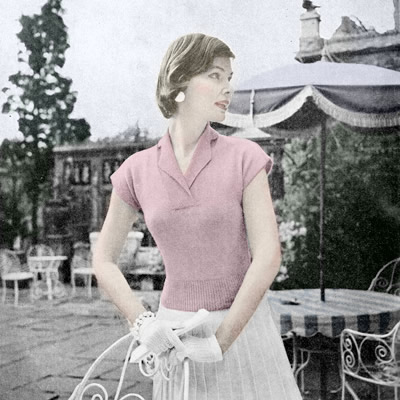
Cap-sleeve summer top

CapSleeveSummerTop.jpg

An understated casual top for summer from the 1950s. "Suits all sizes" - but only up to a 38 inch chest!

Instructions.

Instructions for larger sizes are given in brackets. Where one set of figures is given this applies to all sizes.

Back

**
With No 13 (3¼mm) needles, cast on 114 (122 : 130) stitches and work 4 inches in k1/p1 rib, working into the backs of the knit stitches on every row to give a twisted effect.

With right side facing, change to No 11 (3mm) needles and stocking stitch, starting with a knit row, and shape sides by increasing 1 stitch at each end of the 15th and every following 6th row until there are 132 (140 : 148) stitches.
Work straight until back measures 11½ (12 : 12) inches, ending with a purl row.
**

Here shape the underarm by increasing 1 stitch at each end of the next 8 knit rows: [148 (156 : 164) sts]
Work straight until sleeve edge measures 6½ ( : 7) inches.

With right side facing, shape shoulders by casting off 4 (8 : 10) stitches at the beginning of the next 2 rows, then 10 (10 : 10) stitches at the beginning of the next 10 rows.
Cast off he remaining 40 (40 : 44) stitches fairly loosely.

Front

Work as for back from ** to ** : [132 (140 : 148) sts]
Continue straight until front measures 11½ inches from purl ridge.

Next row: Increase in 1st stitch, k55 (59 : 63), turn, and leave the remaining stitches on a spare needle.

Continue on these stitches for the first shoulder, increasing at the underarm at the beginning of the next 7 knit rows: [64 (68 : 72) sts].
Purl back.

Continue in stocking stitch, shaping neck edge by knitting 2 stitches together at the end of the next and every following 6th row 10 (10 : 12) times in all. Work a few rows straight until sleeve edge measures 6½ ( : 7) inches.

With right side facing, shape shoulder by casting off 4 (8 : 10) stitches at the beginning of the next row, then 10 (10 : 10) stitches at the beginning of the following 5 alternate rows at the armhole edge

With right side facing, return to the remaining stitches, slip the centre 20 (20 : 20) stitches on a spare needle, knit to the last stitch, increase in the last stitch.
Work the right side to correspond with the left.

Collar

For all sizes: Join shoulder seams.

Right half: With No 11 needles k20 from spare needle at the front, increasing 1 stitch in the centre to 21 stitches, and work in moss stitch as follows:

1st row: k1, (p1, k1) 9 times, k2.
2nd row: k2, (k1, p1) 9 times, k1.

Repeat the last 2 rows 3 times more, then the 1st row again.
Next row: k2, (purl into the front then knit into the back of the next stitch), moss stitch to end.
Continue in moss stitch, increasing 1 stitch inside the 2 border stitches on the next 5 rows: [37 sts]
Continue in moss stitch,keeping garter stitch border as before, until piece fits up right side of neck to shoulder, then round to centre back of neck.
Cast off in moss.

Left half: With No 11 needles, cast on 21 stitches.

1st row: k1, (p1, k1) 9 times, k2.
2nd row: k2, (k1, p1) 9 times, k1.

Repeat the last 2 rows 4 times more, then finish to correspond with right half.

To Make Up

Press parts lightly on wrong side under a damp cloth, avoiding ribbing. With right side facing and No 13 needles, pick up and knit 124 (124 : 128) stitches along each sleeve edge. Work 4 rows stocking stitch.
Press facing.
Join side and underarm seams.
Turn facing to wrong side and slip-hem all round.
Join collar neatly at back of neck with a flat seam.
Sew cast-on stitches for left side of collar at back of right border at start of neck; pin centre of collar to centre back of neck, then sew neatly in position all round.
Press seams.


A Word on the Wool

3 ply weight might be a bit hard to find (outside baby wools) - but I believe you could get the right tension by varying needle sizes and using the laceweight yarns such as Rowan Fine Lace (80% baby alpaca, 20% merino; 400m per 50g) or Debbie Bliss Rialto Lace (100% merino; 390m per 50g).
As yet, I have not tried a vintage pattern with these yarns but the fine weight and texture makes them seem ideal. Unfortunately I cannot offer guidance on the yardage of the vintage wools, but from looking at the patterns designed for the modern yarns, it seems that 4 or 5 x 50g balls might be sufficient for an 8 or 9 oz sweater.

Jamiesons have an excellent range of colours in "2ply laceweight" which states: This yarn can be used in vintage patterns which call for "3ply yarns". .

Susan Crawford offers a lovely range of bright colours in Fenella which is designed for use with 3 ply vintage patterns.

As usual with vintage patterns if you are substituting, you cannot rely on the quantities given in the instructions.

Materials

6 (6 : 7) ozs 3 ply crepe in "Flamingo"

A pair each Nos 11 (3mm) and 13 (2¼mm) needles.

Tension

32sts x 40 rows to 4 ins in stocking stitch on No 11 needles.

Size matters

To fit 33-34 (35-36 : 37-38) inch chest; length from top of shoulders 20 (20½ : 21) inches.

Abbreviations

stocking stitch: one row knit and one row purl, ("stockinette").

k2tog or p2tog: knit or purl 2 sts together (decrease one stitch).

tbl: through back loops.

Disclaimer
(well...almost)

In transposing any pattern it is always a risk that errors will be introduced, in spite of dedicated proof reading.
If you have any problems with this pattern, please and I will try and assist.

May 2023

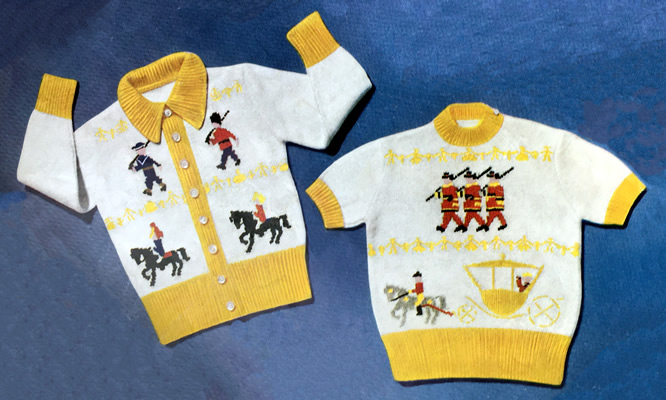
Coronation Twinset

CoronationTwinset.jpg

Just to mark the occasion, for a child (from 3-4 years apparently): a cute little twin set with royal processional motifs.
Even if you don't make this twinset for the event, it has some cute military motifs, which cleverly catch the essence of the servicemen depicted despite the simplicity of the design.

This pattern was created to mark the Queen's coronation in 1953 and depicts the historic Gold State Coach; the latter will also be used by King Charles - but only for the somewhat shorter procession back to the Palace after his Coronation on May 6th. For the outward journey, the more modern and altogether more comfortable Diamond Jubilee Coach will be used.

Instructions:

Motifs may be worked in Fair Isle or embroidered when garment is completed.
When working Fair Isle use separate balls of the contrasting colours for each motif. Always twist the wools round each other when changing colour to avoid leaving a hole.
Knitters may find it easier to ensure a tight edge by knitting the first and last stitches on every purl row.

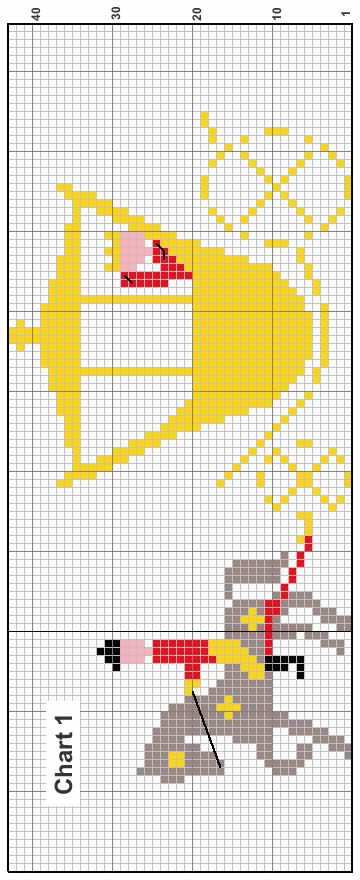
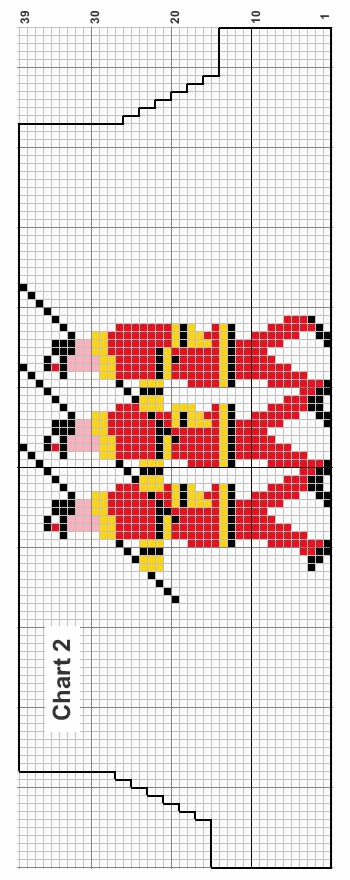
Charts

The charts are included with the pattern instructions below, but for a full version of the charts you can right click on the icon below and choose "save link as" or "save target as" (browser dependent options) to download and save a pdf file.

If you want to view chart images full size in the browser then right click on the image and choose "view image".

THE JUMPER

Jumper Front

Using No 13 needles and gold (L) wool cast on 106 stitches.
Work 3 inches in k1/p1 rib, decreasing 1 stitch at the end of the last row.
Change to No 12 needles and stocking stitch and white (W) wool.

Commence 1st panel:
Work 2 rows in white (W).
In the next row commence motif working the 43 rows from chart 1.
Work 1 row in white (W).
Join in gold (L).
**
Continue as follows:
1st row: * 3W, 1L, 1W, 1L, 4W, 1L, 3W, 1L, 3W, 1L, 3W, 1L, 1W; repeat from * to the last 9 stitches, 3W, 1L, 1W, 1L, 3W.
2nd row: * 1W, 7L, 2W, 1L, 4W, 1L, 1W, 1L, 4W, 1L, 1W; repeat from * to the last 9 stitches, 1W, 7L, 1W.
3rd row: * 1W, 7L, 1W, 3L, 3W, 1L, 1W, 1L, 3W, 3L; repeat from * to the last 9 stitches, 1W, 7L, 1W.
4th row: * 1L, 1W, 5L, 1W, 1L, 1W, 1L, 1W, 1L, 2W, 1L, 1W, 1L, 2W, 1L, 1W, 1L; repeat from * to the last 9 stitches, 1L, 1W, 5L, 1W, 1L.
5th row: * 1W, 1L, 1W, 3L, 1W, 1L, 1W, 3L, 1W, 1L, 2W, 1L, 2W, 1L, 1W, 3L; repeat from * to the last 9 stitches, 1W, 1L, 1W, 3L, 1W, 1L, 1W.
6th row: * 2W, 1L, 1W, 1L, 1W, 1L, 3W, 1L, 3W, 1L, 1W, 1L, 1W, 1L, 3W, 1L, 1W; repeat from * to the last 9 stitches, 2W, 1L, 1W, 1L, 1W, 1L, 2W.
7th row: * 3W, 3L, 9W, 3L, 6W; repeat from * to the last 9 stitches, 3W, 3L, 3W.
8th row: * 4W, 1L, 11W, 1L, 7W; repeat from * to the last 9 stitches, 4W, 1L, 4W.
9th row: * 3W, 3L, 9W, 3L, 6W; repeat from * to the last 9 stitches, 3W, 3L, 3W.
**
Cut L.

Commence 2nd panel:
Work 3 rows in W.
In the next row commence the motif working the first 14 rows from chart 2.
Shape the Armholes

Continuing to work from chart, cast off 6 stitches at the beginning of the next 2 rows.
Now decrease 1 stitch at each end of every knit row 6 times.
Work straight until the 39 rows of chart 2 are completed.
Work 4 rows in W, ending with a knit row.

Join in L.
*** Continue as follows:
1st row: 2W, 1L, 3W, 1L, 3W, 1L, 4W, 1L, 1W, 1L, 4W, 1L, 1W; repeat from * to the last 9 stitches, 2W, 1L, 3W, 1L, 2W.
2nd row: * 3W, 1L, 1W, 1L, 4W, 1L, 2W, 7L, 2W, 1L, 1W; repeat from * to the last 9 stitches, 3W, 1L, 1W, 1L, 3W.
3rd row: * 3W, 1L, 1W, 1L, 3W, 3L, 1W, 7L, 1W, 3L; repeat from * to the last 9 stitches, 3W, 1L, 1W, 1L, 3W.
4th row: * 1L, 2W, 1L, 1W, 1L, 2W, 1L, 1W, 1L, 1W, 1L, 1W, 5L, 1W, 1L, 1W, 1L, 1W; repeat from * to the last 9 stitches, 1L, 2W, 1L, 1W, 1L, 2W, 1L.
5th row: * 1W, 1L, 2W, 1L, 2W, 1L, 1W, 3L, 1W, 1L, 1W, 3L, 1W, 1L, 1W, 3L; repeat from * to the last 9 stitches, 1W, 1L, 2W, 1L, 2W, 1L, 1W.
6th row: * 2W, 1L, 1W, 1L, 1W, 1L, 3W, 1L, 3W, 1L, 1W, 1L, 1W, 1L, 3W, 1L, 1W; repeat from * to the last 9 stitches, 2W, 1L, 1W, 1L, 1W, 1L, 2W.
7th row: * 3W, 3L, 9W, 3L, 6W; repeat from * to the last 9 stitches, 3W, 3L, 3W.
8th row: * 4W, 1L, 11W, 1L, 7W; repeat from * to the last 9 stitches, 4W, 1L 4W.
9th row: 3W, 3L, 9W, 3L, 6W; repeat from * to the last 9 stitches, 3W, 3L, 3W.
***
Cut L, and continue in W.
Work 2 rows.

Shape the Neck
Next row: Knit 32, cast off 17, knit to end.

Now work on and finish each side separately:
Work 1 row.
Keeping arm edge straight, decrease 1 stitch at the neck edge on the next row, and then every alternate row until there are 27 stitches left, ending at the armhole edge.

Shape the Shoulder:
Still decreasing 1 stitch on every alternate row at the neck edge, cast off 6 stitches at the beginning of next and alternate rows at the shoulder edge until all stitches are eliminated.

Rejoin the wool to the other side at the neck edge and complete to match the 1st side.

Jumper Back

Using No 13 needles and L wool cast on 106 stitches.
Work 3 inches in k1/p1 rib, decreasing 1 stitch at the end of the last row.
Change to No 12 needles and stocking stitch and W wool.
Work 46 rows.
Join in L.
Now work as Front from ** to **.
Cut L.
Work 17 rows in W.
Continue in W.

Shape the Armholes:
Cast off 6 stitches at the beginning of the next 2 rows.
Now decrease 1 stitch at each end of every knit row 6 times.
Work 16 rows in W.
Join in L.
Now work as for Front from *** to ***.
Cut L, and continue in W.
Work 12 rows.

Shape the Shoulders:
Cast off 6 stitches at the beginning of every row until there are 33 stitches left.
Cast off.

Jumper Sleeves (both alike)

Using No 13 needles and L wool, cast on 60 stitches.
Work 1 inch in k1/p1 rib.
Next row (increase row): Rib 4, * increase once in the next stitch, rib 3, repeat from * to end. [74 sts].
Change to No 12 needles and stocking stitch and W wool.

Work until sleeve measures 2½ inches from cast on edge, ending with a purl row.

Shape Top:
Cast off 7 stitches at the beginning of the next 2 rows.
Decrease 1 stitch at each end of every row until there are 54 stitches left, then 1 stitch at each end of every alternate row until there are 34 stitches left, and then 1 stitch at each end of every row until there are 22 stitches left.
Cast off.

Jumper Neck Band

Join the right shoulder seam.
Using No 13 needles, with right side of work facing you, and using L wool, knit up 80 stitches round the neck.
Work 1 inch in k1/p1 rib.
Cast off loosely in rib.

Making up the jumper

Press or block each piece separately with a warm iron and a damp cloth, omitting the ribbing.
Embroider the collar and cuff of the Queens' robe in white, and the horses' reins in black.
Darn in all ends of wool.
Sew side and sleeve seams.
Sew left shoulder seam for 1¼ inches from arm edge.
Set in sleeves.
With L wool work 2 rows of double crochet, (US: single crochet), along shoulder opening making, 3 small button loops on the front edge.
Sew on buttons to match.
Press seams.


THE CARDIGAN

Instructions have been given for a boys' cardigan.
If a girls' cardigan is required, the work buttonholes in the right front instead of the left front.

Cardigan Back

Work as for back of jumper.

Cardigan Right Front

With No 13 needles and L. wool cast on 62 stitches.
Work 3 inches in k1/p1 rib.
Next row: Rib to the last 14 stitches, put these 14 stitches on a safety pin for the front band.
Change to No 12 needles and stocking stitch (1 row knit, 1 row purl) and W. wool.

Commence 1st panel:
Work 4 rows in W.
1n the next row start working the motif following the 36 rows from chart No. 3.
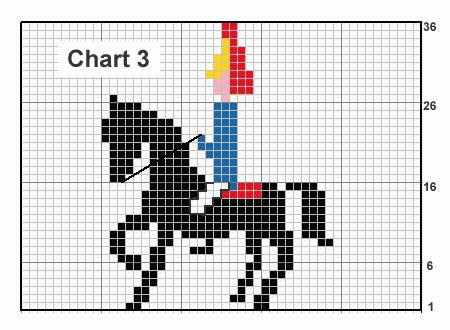
Work 6 rows in W.
Join in L.
Continue as follows:
1st row: * 1W, 1L, 3W, 1L, 3W, 1L, 3W, 1L, 4W, 1L, 1W, 1L, 3W; repeat from * once more.
2nd row: * 1W, 7L, 2W, 1L, 4W, 1L, 1W, 1L, 4W, 1L, 1W; repeat from * once more.
3rd row: * 3L, 3W, 1L, 1W, 1L, 1W, 1L, 3W, 3L, 1W, 7L, 1W; repeat from * once more.
4th row: * 1L, 1W, 5L, 1W, 1L, 1W, 1L, 1L, 1W; repeat from * once more.
5th row: * 3L, 1W, 1L, 2W, 1L, 2W, 1L, 1W, 3L, 1W, 1L, 1W, 3L, 1W, 1L, 1W; repeat from * once more.
6th row: * 2W, 1L, 1W, 1L, 1W, 1L, 3W, 1L, 3W, 1L, 1W, 1L, 1W, 1L, 3W, 1L, 1W; repeat from * once more.
7th row: 6W, 3L, 9W, 3L, 3W; repeat from * once more.
8th row: * 4W, 1L, 11W, 1L, 7W; repeat from * once more.
9th row: * 6W, 3L, 9W, 3L, 3W; repeat from * once more.
Cut L.

Commence 2nd panel:
Work 3 rows in W.
1n the next row start working the motif following the first 15 rows from chart No 4.
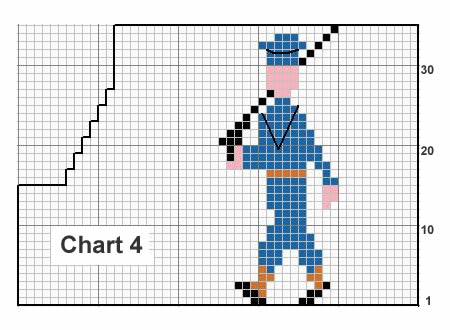
Shape the Armhole:
Still working from chart, cast off 6 stitches at the beginning of the next row, and then decrease 1 stitch on every alternate row 6 times.
Work straight until the 35 rows of the motif are complete.
Work 8 rows in W, ending with a knit row.

Join in L and continue as follows:
1st row: 2W, 1L, 3W, 1L, 3W, 1L, 4W, 1L, 1W, 1L, 4W, 1L, 3W, 1L, 3W, 1L, 3W, 1L, 1W.
2nd row: 1W, 1L, 4W, 1L, 1W, 1L, 4W, 1L, 2W, 7L, 2W, 1L, 4W, 1L, 1W, 1L, 3W.
3rd row: 3W, 1L, 1W, 1L, 3W, 3L, 1W, 7L, 1W, 3L, 3W, 1L, 1W, 1L, 3W, 3L.
4th row: 1W, 1L, 1W, 1L, 2W, 1L, 1W, 1L, 2W, 1L, 1W, 1L, 1W, 1L, 1W, 5L, 1W, 1L, 1W, 1L, 1W, 1L, 2W, 1L, 1W, 1L, 2W, 1L.
5th row: 1W, 1L, 2W, 1L, 2W, 1L, 1W, 3L, 1W, 1L, 1W, 3L, 1W, 1L, 1W, 3L, 1W, 1L, 2W, 1L, 2W, 1L, 1W, 3L.
6th row: 1W, 1L, 3W, 1L, 1W, 1L, 1W, 1L, 3W, 1L, 3W, 1L, 1W, 1L, 1W, 1L, 3W, 1L, .3W, 1L, 1W, 1L, 1W, 1L, 2W.
7th row: 3W, 3L, 9W, 3L, 9W, 3L, 6W.
8th row: 7W, 1L, 11W, 1L, 11W, 1L, 4W.
9th row: 3W, 3L, 9W, 3L, 9W, 3L, 6W.
Cut L.
Continue in W, and work 2 rows.

Shape the Neck:
Next row: Cast off 4 stitches, work to end.
Work 1 row.
Now keeping armhole edge straight, decrease 1 stitch at the neck edge on the next row, and then on every alternate row until there are 27 stitches remaining, ending at the armhole edge.

Shape the Shoulder:
Continue to decrease on every alternate row at the neck edge, and at the same time, cast off 6 stitches at the beginning of next and
alternate rows at the shoulder edge until all stitches are cast off.

Cardigan Left Front

With No 13 needles and L. wool cast on 62 stitches.
Work in k1/p1 rib for ¾ of an inch.
In the next 2 rows make buttonholes as follows:
Next row: Rib 6, cast off 2, rib to end.
In the next row cast on 2 stitches over those cast off on the preceding row.

Continue in rib, making one more buttonhole 1½ inches from the 1st until work measures 3 inches from cast on edge ending at centre-front edge.
Next row: Rib 14 stitches and place on safety pin for the front band, rib to end.
Change to No 12 needles and work in stocking stitch using W wool.

Commence 1st panel.
Work 4 rows in W.
In the next row commence motif working the 36 rows from chart 5.
Work 6 rows in W.
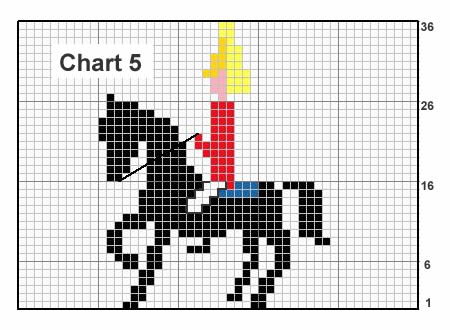
Join in L, and continue as follows :
1st row: * 3W, 1L, 1W, 1L, 4W, 1L, 3W,
1L, 3W, 1L, 3W, 1L, 1W, repeat from * once more.
2nd row: * 1W, 1L, 4W, 1L, 1W, 1L, 4W, 1L, 2W, 7L, 1W; repeat from * once more.
3rd row: * 1W, 7L, 1W, 3L, 3W, 1L, 1W, 1L, 3W, 3L, repeat from * once more.
4th row: * 1W, 1L, 1W, 1L, 2W, 1L, 1W, 1L, 2W, 1L, 1W, 1L, 1W, 1L, 1W, 5L, 1W, 1L; repeat from * once more.
5th row: * 1W, 1L, 1W, 3L, 1W, 1L, 1W, 3L, 1W, 1L, 2W, 1L, 2W, 1L, 1W, 3L; repeat from * once more.
6th row: * 1W, 1L, 3W, 1L, 1W, 1L, 1W, 1L, 3W, 1L, 3W, 1L, 1W, 1L, 1W, 1L, 2W; repeat from * once more.

7th row: * 3W, 3L, 9W, 3L, 6W; repeat from * once more.
8th row: * 7W, 1L, 11W, 1L, 4W; repeat from * once more.
9th row: * 3W, 3L, 9W, 3L, 6W; repeat from * once more.
Cut L
Commence 2nd panel.
Work 3 rows in W
In the next row start working the motif, working the first 14 rows from chart 6.

Shape the Armhole:
Still working from the chart, cast off 6 stitches at the beginning of the next row, and then decrease 1 stitch on every alternate row 6 times.
Work straight until the 36 rows of the motif are complete.

Work 7 rows in W ending with a knit row.
Join in L
Continue as follows:
1st row: 1W, 1L, 3W, 1L, 3W, 1L, 3W, 1L, 4W, 1L, 1W, 1L, 4W, 1L, 3W, 1L, 3W, 1L, 2W.
2nd row: 3W, 1L, 1W, 1L, 4W, 1L, 2W, 7L, 2W, 1L, 4W, 1L, 1W, 1L, 4W, 1L, 1W.
3rd row: 3L, 3W, 1L, 1W, 1L, 3W, 3L, 1W, 7L, 1W, 3L, 3W, 1L, 1W, 1L, 3W.
4th row: 1L, 2W, 1L, 1W, 1L, 2W, 1L, 1W, 1L, 1W, 1L, 1W, 5L, 1W, 1L, 1W, 1L, 1W, 1L, 2W, 1L, 1W, 1L, 2W, 1L, 1W, 1L, 1W.
5th row: 3L, 1W, 1L, 2W, 1L, 2W, 1L, 1W, 3L, 1W, 1L, 1W, 3L, 1W, 1L, 1W, 3L, 1W, 1L, 2W, 1L, 2W, 1L, 1W.
6th row: 2W, 1L, 1W, 1L, 1W, 1L, 3W, 1L, 3W, 1L, 1W, 1L, 1W, 1L, 3W, 1L, 3W, 1L, 1W, 1L, 1W, 1L, 3W, 1L, 1W.
7th row: 6W, 3L, 9W, 3L, 9W, 3L, 3W.
8th row: 4W, 1L, 11W, 1L, 11W, 1L, 7W.
9th row: 6W, 3L, 9W, 3L, 9W, 3L, 3W.
Cut L.

Continue in W
Work 1 row.
Shape neck and complete to match the Right Front.

Cardigan Borders

Left front border:
Rejoin L wool to the stitches left on safety pin and using No 13 needles work in rib making 6 more buttonholes at 1½ inch intervals. Work a further ½ inch after the last buttonhole has been worked.
Cast off.
Work the right front border the same way omitting buttonholes.

[Editor's note: In case of tension variations, you may wish to make the plain border first - which will be the right border for a boy and the left border for a girl - so you can see how many rows you need to fit nicely up the front; you can then work out how best to place the buttonholes evenly up the other side.]

The Collar

Using No 13 needles and L wool cast on 137 stitches.
1st row: * k1, p1; repeat from * to the last stitch, k1.
2nd row: * p1, k1; repeat from * to the last stitch, p1.
Repeat these 2 rows once more.
5th row: k1, p1, k2tog, rib to the last 4 stitches, k2tog, p1, k1.
Repeat, this decrease on every 4th row until there are
123 stitches left.
Work 3 rows.
Cast off in rib.

Cardigan Sleeves (both alike)

Using No 13 needles and L wool cast on 50 stitches.
Work 2½ inches in k1/p1 rib.
Change to No 12 needles and stocking stitch and W wool.
Increase 1 stitch at each end of every 4th row until there are 74 stitches.
Work without further shaping until sleeve measures 10 inches from cast on edge, ending with a purl row.

Shape top as for jumper sleeve instructions.

Making up the cardigan

Press each piece separately with a warm iron and damp cloth, omitting the ribbing.
Embroider the horses reins in black, and the sailors collar and hat band in white as shown on the diagram.
Darn in all ends of wool.
Sew side, shoulder and sleeve seams.
Set in sleeves. Sew borders to fronts.
Sew cast off edge of collar round neck edge starting and finishing at centre front edges.
Sew on buttons.
Press seams.

Materials

3 ply yarn:

Jumper:
2oz White (W)
1oz Linga Gold (L)
Oddments in Scarlet, Black, Pink, and Light Grey.

Cardigan:
3oz white
2oz gold
Oddments in scarlet, black, pink, royal blue, yellow, and tan.
8 buttons.

Pair each of No 12 (2¾mm) and No 13 (2¼mm) needles.
1 "medium" crochet hook.

Tension

36sts and 48 rows to 4 inches.

Size matters

Instructions for 3-4 years.
Chest 23 inches; length 13 inches; sleeve seam: 2¾ inches (jumper) or 10 inches (cardigan).

A word on the wool

Susan Crawford, who specialises in vintage knits, offers lovely Fenella wool which "knits up to that elusive vintage ‘3 ply’ tension".

Jamiesons have an excellent range of colours in "2ply laceweight" which states: This yarn can be used in vintage patterns which call for "3ply yarns".

John Arbon has some wonderful laceweight that looks suitable.

Disclaimer
(well...almost)

In transposing any pattern it is always a risk that errors will be introduced, in spite of dedicated proof reading.
If you have any problems with this pattern, please and I will try and assist.

April 2023

Surf Seekers - overblouse

SurfSeekers1.jpg

I love this brilliantly coloured overblouse - a taste of the Aegean. It can be paired with the sparkling white classic sweater (also in the April entry and shown under the overblouse in the photo), making for a two-piece with just the right look of colour dash for a sixties Continental beach holiday.

Instructions

Instructions are given for 3 sizes.
Carry wool loosely behind slip stitches in pattern to keep even tension and elasticity.

Back

**
With No 10 needles and main shade (M), cast on 120 / 128 / 132 stitches, and work 2 inches in k1 / p1 rib, knitting into the back of the knit stitches on every row to give a twisted rib, and increasing 1 stitch at the end of the last row. [121 / 129 / 133 sts]

Change to No 8 needles and work 2 rows in stocking stitch (1 row knit, then 1 row purl). Leave yarn M hanging and join in turquoise yarn (T).

1st row (right side facing): in T, k1, * slip 3 purlwise, k1; repeat from * to end.
2nd row: in T, p2, * sl1 purlwise, p3; repeat from * to last 3 stitches, sl1 purlwise, p2.
3rd row: knit in T.
4th row: purl in T.
Leave T wool hanging; join in white yarn (W).
5th-8th rows: as 1st to 4th rows in W.
Leave W wool hanging.
9th-12th rows: as 1st to 4th rows in teal blue colour (M).

These 12 rows form pattern. **

Carrying wools loosely up the side of the work, continue in pattern and work straight until back measures 16 inches at centre.

With right side facing, shape armholes, by casting off 6 / 7 / 8 stitches at the beginning of the next 2 rows; then k2tog at each end of the next and every alternate row until 91 / 95 / 99 stitches remain.
Work straight until back measures 24 / 24½ / 25 inches at centre.

With right side facing, shape shoulders by casting off 7 / 7 / 7 stitches at the beginning of the next 6 rows, then 6 / 7 / 8 stitches at the beginning of the next 2 rows.
Cast off remaining 37 / 39 / 41 stitches.

Front

Work as for back from ** to **.
Continue in straight in pattern until front measures 9 inches at centre.

Here divide for front opening:

Next row: right side facing, pattern 54 / 58 / 60, turn and leave remaining stitches on a spare needle, or stitch holder.

Work straight until front measures the same as the back at the side edge.

With right side facing, shape armhole and neck edge as follows:

Next row: cast off 6 / 7 / 8, pattern to last 2 stitches, k2tog.
Next row: work in pattern.

Now continue to shape armhole edge by decreasing 1 stitch at the beginning of the next and following 8 / 9 / 8 alternate rows, and at the same time shape neck by decreasing 1 stitch at the end of the 5th row, then at this edge on every following 6th row.

When the armhole shapings are done, keep this edge straight but continue to decrease at the neck edge on every 6th row as before until 27 / 28 / 29 stitches remain.
Work a few rows straight until front matches back at armhole edge.

With right side facing, shape shoulder, by casting off 7 / 7 / 7 stitches at the beginning of the next and following 2 alternate rows, then 6 / 7 / 8 stitches at the beginning of the following alternate row.

With right side facing, rejoin wool to the remaining stitches on the spare needle or stitch holder. Cast off the centre 13 stitches, pattern to end.
Finish to correspond with the first side, reversing shapings.

Sleeves

With No 10 needles and main shade (M), cast on 52 / 56 / 60 stitches, and work 2 inches twisted k1/p1 rib, increasing 1 stitch at the end of the last row.
[53 / 57 / 61 sts]

Change to No 8 needles and work 2 rows in stocking stitch (1 row knit, then 1 row purl). Leave yarn M hanging, join in turquoise yarn (T), and work 12 rows in pattern as for back.
Continue in pattern and shape sides by increasing 1 stitch at each end of the next and every following 8th row until there are 87 / 91 / 95 stitches.

Work straight until sleeve seam measures 18 inches.

With right side facing, shape top by casting off 6 / 7 / 8 stitches at the beginning of the next 2 rows, then k2tog at each end of the next and every alternate row until 37 / 37 / 37 stitches remain.
Next row (should be a wrong side row): in pattern.

Now (right side facing) cast off 2 stitches at the beginning of the next 2 rows, 3 stitches at the beginning of the following 2 rows, and 4 stitches at the beginning of the following 2 rows.
Cast off the remaining 19 stitches.

Front Border

Join shoulder seams.
Using No 10 needles and M wool, cast on 20 stitches and work 1 inch in twisted k1/p1 rib.

Make a buttonhole in next 2 rows thus:
Next row: rib 7, cast off 6, rib to end.
Next row: work back in rib, casting on 6 over those cast off.
Continue in rib, working a further 2 buttonholes as before at 3-inch intervals.
Work straight until border fits up right front, round back of neck and down left front when slightly stretched; sew in position as you go along.
Cast off in rib.

Collar

Begin by winding off a small ball each of M and T yarns.
Using No 10 needles and M yarn, cast on 196 stitches, and work 6 rows in twisted rib.
Next row: rib 10 M, join in main ball of T and knit to the last 10 stitches in T, join in 2nd ball of M, and rib 10 in M.
Editors note: You are using an intarsia technique here, where the colour changes are joined vertically, so make sure you wind the threads around each other when you start a new colour, to avoid holes.

Next row: rib 10 M, rib 176 in T, rib 10 M.
Repeat the last row 4 times more.
Next row: rib 10 M., rib 10 T, join in W and knit to the last 20 stitches in W; join in 2nd small ball of T, rib 10 T, rib 10 M.
Next row: rib 10 M, rib 10 T, rib 156 W, rib 10 T, rib 10 M.
Repeat the last row until work measures 6 inches.

In rib and using appropriate colours, cast off 10 stitches at the beginning of the next 8 rows.
Cast off.

To Make Up

Press parts lightly under a damp cloth, avoiding ribbing.

Join side and sleeve seams ; insert sleeves.
Sew lower edges of front border neatly in position to main work, right edge over left.
Pin cast off edge of collar in position on wrong side of work on seam of ribbed border and main part, making sure ends are level on fronts.
Sew in position.
Press seams.
Sew on buttons.

Materials

Double Knitting yarn:
11 / 11 / 12 x 1oz balls in main shade (M), teal blue;
7 / 8 / 8 oz in gay turquoise (T);
4 / 5 / 5 oz in snow white (W).

Pair each of No 8 (4mm) and No 10 (3¼mm) needles.

3 large buttons.

Tension

22sts and 30 rows to four inches on 4mm needles over stocking stitch.

Size matters

To fit chest:
34-35 / 36-37 / 38-40 inches;
length from top of shoulders: 24½ / 25 / 25½ inches;
sleeve seam:
18 / 18 / 18 inches.

Abbreviations

k: knit
p: purl
k2tog: knit two stitches together to decrease one stitch
M: main teal blue
T: turquoise
W: white

A word on the wool.

Original yarn was a pure wool double knitting

Disclaimer
(well...almost)

In transposing any patterns it is always a risk that errors will be introduced, in spite of dedicated proof reading.
If you have any problems with this pattern, please and I will try and assist.


Surf Seekers - sweater

SurfSeekers2.jpg

Sparkling white classic sweater which can be teamed with the overblouse (also in the April entry, and pictured in the background here) - for "a two-piece with just the right look of colour dash for a Continental beach holiday". The short-sleeved sweater is long enough to wear over shorts, and the fairly high round turtle band just shows at the neck of the overblouse.

This could also be teamed up with the Sail Away Pullover from POM April 2017, (another favourite of mine).

Instructions

Instructions are given for 3 sizes.

Back

**
With No 10 needles cast on 100 / 106 / 110 stitches, and work 2 inches in k1 / p1 rib, knitting into the back of the knit stitches on every row to give a twisted rib, and increasing 1 stitch at the end of the last row on 2nd and 3rd sizes. [10 / 107 / 111 sts]

Change to No 8 needles and stocking stitch (1 row knit, then 1 row purl), and work straight until back measures 15 inches at centre.

With right side facing, shape armholes, by casting off 5 / 6 / 7 stitches at the beginning of the next 2 rows; then k2tog at each end of the next and every following alternate row until 76 / 79 / 83 stitches remain.
**

Work straight until back measures 19 / 19½ / 20 inches at centre.

With right side facing, divide for back opening:

Next row: right side facing, pattern 38 / 39 / 41, turn and leave remaining stitches on a spare needle, or stitch holder.

Work straight until back measures 22½ / 23 / 23½ inches.

With right side facing, shape shoulder by casting off 6 / 6 / 7 stitches at the beginning of the next row, then 6 / 6 / 6 stitches at the beginning of the following 2 alternate rows, then 5 / 6 / 6 stitches at the beginning of the following alternate row.
Purl 1 row and leave remaining 15 / 15 / 16 stitches on a spare needle, or stitch holder.

With right side facing, rejoin wool to the remaining stitches on the spare needle or stitch holder. For 2nd and 3rd sizes only, cast off the centre stitch, then knit to end for all sizes. [38 / 39 / 41 sts]
Finish to correspond with the first side, reversing shapings.

Front

Work as for back from ** to **.
Continue in straight in pattern until front measures 21 / 21½ / 22 inches at centre.

With right side facing divide for neck as follows:

Next row: knit 30 / 31 / 32, turn and leave remaining stitches on a spare needle, or stitch holder.

Then with wrong side facing, shape neck by casting off 2 stitches at the beginning of the next and following alternate row; then decrease 1 stitch at this (neck) edge on the following 3 rows. [23 / 24 / 25 sts]

Work a few rows straight until front measures the same as the back at the armhole edge.

With right side facing, shape shoulder, by casting off 6 / 6 / 7 stitches at the beginning of the next row, then 6 / 6 / 6 stitches at the beginning of the following 2 alternate rows, then cast off the remaining 5 / 6 / 6 stitches at the beginning of the following alternate row.

With right side facing, slip the centre 16 / 17 / 18 stitches on a spare needle, or stitch holder, rejoin the wool to the remaining 30 / 31 / 32 stitches on the spare needle or stitch holder, and finish to correspond with the first side, reversing shapings.

Sleeves

Using No 10 needles, cast on 62 / 66 / 70 stitches, and work 1 inch in twisted k1/p1 rib, increasing 2 stitches evenly across the last row.
[64 / 68 / 72 sts]

Change to No 8 needles and stocking stitch (1 row knit, then 1 row purl), and shape sides by increasing 1 stitch at each end of the 3rd and every following 4th row until there are 70 / 74 / 78 stitches.

Work a few rows until until sleeve measures 3½ inches.

With right side facing, shape top by casting off 5 / 6 / 7 stitches at the beginning of the next 2 rows, then k2tog at each end of the next and every alternate row until 34 / 34 / 34 stitches remain.
Purl 1 row.

Now (right side facing) cast off 2 stitches at the beginning of the next 2 rows, 3 stitches at the beginning of the following 2 rows, and 4 stitches at the beginning of the following 2 rows.
Cast off the remaining 16 stitches.

To Make Up

Press parts lightly under a damp cloth, avoiding ribbing.
Join shoulder seams.

Neckband:
With right side facing, and No 10 needles, knit across 15 / 15 / 16 stitches from back neck, pick up and knit 20 stitches down left side of neck, knit 16 / 17 / 18 stitches from centre front, and pick up and knit 20 stitches up right side of neck. Then knit across the 15 / 15 / 16 stitches at the back neck. [86 / 87 / 91 sts].
Work 1½ inches in twisted k1/p1 rib stitch; cast off in rib.

Join side and sleeve seams; insert sleeves.
Sew zip into position at the back.
Press seams.

Materials

Double Knitting yarn:
12 / 13 / 14 oz in snow white

Pair each of No 8 (4mm) and No 10 (3¼mm) needles.

6 inch zip.

Tension

22sts and 30 rows to four inches on 4mm needles over stocking stitch.

Size matters

To fit chest:
34-35 / 36-37 / 38-40 inches;
length from top of shoulders: 23 / 23½ / 24 inches;
sleeve seam: 3½ inches, all sizes

Abbreviations

k: knit
p: purl
k2tog: knit two stitches together to decrease one stitch

A word on the wool.

Original yarn was a pure wool double knitting

Disclaimer
(well...almost)

In transposing any patterns it is always a risk that errors will be introduced, in spite of dedicated proof reading.
If you have any problems with this pattern, please and I will try and assist.

March 2023

Green is the colour...

GreenIsTheColour2

Celebrate St Patrick's Day in style in this emerald sweater with unusual cable pattern.

Instructions.

Instructions are (unusually for this era) given for only one medium/small size.
This is originally a French pattern, and before you begin, I recommend you read through the instructions thoroughly, and refer to the photographs, in order to understand how the pattern progresses.

Vertical cable stitch:

Editors note: You begin working the diagonal pattern, and then gradually move to this vertical cable. So these instructions are incorporated into the diagonal pattern below.

Made over 4 stitches in stocking stitch:
On every 6th row, make a cable by slipping the first 2 stitches on to the cable needle to the back of work, knitting the next 2 stitches, then knitting the 2 stitches from cable needle.

Diagonal pattern stitch:

1st row: Cast on 1 stitch, (edge stitch) then, * p6, k1, increase 1 *; repeat from * to *, ending row with p6.
Cast cast on 1 stitch (edge stitch)
2nd and every even numbered row: k1, (edge stitch); purl to the last stitch, k1, (edge stitch).
3rd row: k1, (edge stitch); * p5, slip the next 2 stitches on to the cable needle to the back of work: knit the next 2 stitches, then knit the 2 stitches from the cable needle; repeat from * to *, ending row with p6, k1 (edge stitch).
5th row: knit twice into the first stitch, * p4, Cross5 *; repeat from * to *, ending row with p6, knit twice into the last stitch.
7th row: k1 (edge stitch), * p4, Cross5 *; repeat from * to *, ending row with p4, k1, p3, k1.
9th row: k1, p3, * Cross the Cable by slipping 3 stitches on to the cable needle, place to the back of the work, k2, then k2, p1 from cable needle; p4 *; repeat from * to *, ending row with k2, p3, k1.
11th row: k1, p2, * Cross5, p4 *; repeat from * to *, ending row with k3, p3, k1.
13th row: k1, p1, * Cross5, p4 *; repeat from * to *, ending row with k4, p3, k1.
15th row: k1, * Cross the Cable as in the 9th row, p4 *; repeat from * to *, ending row with p5, then a vertical cable on the next 4 stitches, p3, k1.
17th row: k1, slip 1 stitch on to the cable needle to the back of the work, k3, then purl the stitch from the cable needle, * p4, Cross5 *; repeat from * to *, ending row with p6, k4, p3, k1.
19th row: k1, slip 1 stitch on to the cable needle to the back of the work, k2, then purl the stitch from the cable needle, * p4, Cross5 *; repeat from * to *, ending row with p7, k4, p3, k1.
21st row: k1, slip 1 stitch on to the cable needle to the back of the work, k1, then purl the stitch from the cable needle, * p4, Cross the Cable as in the 9th row *; repeat from * to *, ending row with p8, then a vertical cable on the next 4 stitches, p3, k1.
23rd row: k1, p5, * Cross5, p4 *; repeat from * to *, ending row with p9, k4, p3, k1.
25th row: k1 (edge stitch), * p4, Cross5 *; repeat from * to *, ending after the last oblique cable with p4, k1, p5, k4, p3, k1. This marks the beginning of a new vertical cable at 5 stitches from the first vertical cable as on the 7th row. Continue thus, forming new vertical cables in the same way as the work proceeds, with the oblique cables petering out at the right side edge.

Front:

With No 9 (3¾mm) needles, cast on 94 stitches and work in k2, p2 rib (beginning first row p2), for 4 inches .
Change to No 8 (4mm) needles and work in pattern (109 stitches at the completion of the 5th row).
When the work measures 11½ inches from the top of the ribbing,
Shape the Armholes,by casting off 3 stitches at the beginning of the next 4 rows; 2 stitches at the beginning of the next 2 rows; and 1 stitch at the beginning of the next 6 rows.

Continue to work in pattern until the work measures 15½ inches from the top of the ribbing, then Shape the Neck by casting off the centre 21 stitches, and then finish each side separately.
At the neck edge on alternate rows, cast off 4 stitches once, 2 stitches once, and 1 stitch 3 times. Continue to work in pattern until the armhole measures 7½ inches then Shape the Shoulders:
at the armhole edge on alternate rows, cast off 6 stitches 4 times.

Back:

With No 9 (3¾mm) needles, cast on 94 stitches and work in k2, p2 rib (beginning first row p2), for 4 inches .
Change to No 8 (4mm) needles and work in pattern, omitting to to work the increase at each side edge on the 1st and 5th rows, so at the completion of the 5th row there are 105 stitches on the needle.
Begin the 1st row with k1 (edge stitch), p5, k1, increase 1 etc...
and end it with p5, k1 (edge stitch).
Begin the 3rd row with k1 (edge stitch), p4, then cross the stitches, and end with p5, k1 (edge stitch)
Begin the 5th row with with k1 (edge stitch), p3, and end it with p5, k1 (edge stitch).

Continue the pattern, working 2 stitches fewer at the beginning and end of rows.

When the work measures 11½ inches from the top of the ribbing,
Shape the Armholes,by casting off 3 stitches at the beginning of the next 2 rows; 2 stitches at the beginning of the next 4 rows; and 1 stitch at the beginning of the next 4 rows.

When the work measures 18 inches from the top of the ribbing,
Shape the Neck, by casting off the centre 23 stitches, and then finish each side separately.
At the neck edge on alternate rows, cast off 4 stitches once, 2 stitches twice, and at the same time Shape the Shoulders:
at the armhole edge on alternate rows, by casting off 6 stitches 4 times.

Sleeves:

With No 11 (3mm) needles, cast on 48 stitches and work in k2, p2 rib for 4½ inches.

Change to No 8 (4mm) needles and work in garter stitch (every row knitted), increasing 1 stitch at each end of every 16th row 6 times.

When the work measures 13 inches from the top of the ribbing,
Shape Top, by casting off 1 stitch at the beginning of the next 10 rows.
Then decrease 1 stitch at each end of the following 4th rows twice.
Then cast off 1 stitch at the beginning of the next 28 rows, 2 stitches at the beginning of the next 2 rows, and finally cast off the remaining 14 stitches.

Neckband:

With the No 11 (3mm) needles, cast on 110 stitches, and work in garter stitch for 3 rows. Cast off.

To Make Up:

Sew up the side and shoulder seams.
Sew the sleeve seams and set in the sleeves.
Join the neckband into a ring and sew it around the neck edge.
Press seams lightly.

Materials

Double Knitting: 8 x 50g (synthetic fibre = 1000 metres)

A pair each No 8 (4mm), No 9 (3¾mm) and No 11 (3mm) needles.
A cable needle.

Tension

23 sts x 48 rows to 4 inches.

Size matters

To fit 34 inch bust.

Abbreviations

k2tog: decrease by knitting 2 stitches together.

Cross5: slip 1 stitch on to the cable needle, place at back of work, k4, then purl the stitch from the cable needle.

increase: increase by knitting twice into the next stitch.

decrease: decrease by working 2 stitches together.

stocking stitch: knit on the right side, purl on the wrong side (aka stockinette).

Disclaimer
(well...almost)

In transposing any pattern it is always a risk that errors will be introduced, in spite of dedicated proof reading.
If you have any problems with this pattern, please and I will try and assist.

February 2023

Highland Harmony

HighlandHarmony.jpg

A fairly timeless design for a man's Fair-Isle sweater in lovely muted shades of Shetland wool. As I love this kind of colourwork, and I love men's fashions, it's definitely a hit with me - a lovely gift for a (very) deserving man...

Instructions:

The pullover is given in one (medium man's) size and is worked using the Fair-Isle technique, with colours not in use stranded loosely across back of work.

Charts

The charts are included with the pattern instructions below, but for a larger version of the charts you can right click on the icon below and choose "save link as" or "save target as" (browser dependent options) to download and save a pdf file.

Back

Using No 12 (2¾mm) needles and main shade yarn cast on 175 stitches, and work 3 inches in k1/p1 rib.

Change to No 11 (3mm) needles, and work 2 rows in stocking stitch.

Continue in stocking stitch, working the pattern from the chart thus: reading knit rows from right to left and purl rows from left to right. Work the 87 pattern stitch repeat twice across.

HighlandHarmonyChart-main2.jpg

HighlandHarmonyChart-key.jpg

Continue working rows from the chart until the 12th row of the 4th pattern repeat has been completed. **

Armhole shaping: cast off 13 stitches at the beginning of the next 2 rows.
Continue straight until the 18th row of the 6th pattern repeat has been completed.
Cast off.

Front

Work as for the back until **.

Armhole and neck Shaping:
Next row: cast off 13, pattern 74. Turn.
Purl back in pattern.
Continue on these 75 stitches only.
Next row: knit in pattern to last 4 stitches; k2tog, k2.
Next row: purl in pattern.

Repeat the last 2 rows until 61 stitches remain, then decrease in the same way at the neck edge on every 4th row until 52 stitches remain.
Work 7 rows.
Cast off.

Join wool to inner (neck) edge of the remaining stitches.
Cast off 1 stitch, and complete to match the first side, working "sl1, k1, psso" instead of k2tog for the neck shaping.

Sleeves

Begin at the top of the sleeve.

Using No 11 (3mm) needles and main shade yarn cast on 135 stitches. Knit one row.

Beginning with the 16th row of the chart (a purl row worked from left to right), work thus:
Work 1 stitch to the right of the dotted line, work the (next 6 stitches) 5 times, work the last stitch.

HighlandHarmonyChart-sleeve2.jpg

Continue in pattern as set, decreasing 1 stitch at each end of every 5th row until 87 stitches remain.
Continue straight until 4 complete patterns have been worked.
Work the first 3 rows again.

Continue with main shade only and work 3 rows in stocking stitch.

Change to No 12 (2¾mm) needles and work 3 inches in rib as for the back. Cast off ribwise.

Neckband

Join right shoulder seam.

Using No 12 (2¾mm) needles and main shade, pick up and knit 54 stitches down left front neck, 1 stitch from centre front, 54 stitches up right front neck, and 50 stitches across back neck. [159 sts]

Work 10 rows k1/p1 rib, decreasing 1 stitch each side of the centre front stitch on every row, then work 10 rows k1/p1 rib, increasing 1 stitch each side of the centre front stitch on every row.
Cast off ribwise.

To Make Up

Press parts lightly under a damp cloth.
Join the left shoulder and neckband seams.
Set in sleeves, joining 1½ inches of the sides of the sleeves to the cast off groups at the armhole.
Join the side and sleeve seams.
Fold the neckband in half to the wrong side and catch stitch in place.

Materials

Shetland 2 ply jumper weight (fingering yarn):
7 x 1oz balls in main shade plus 1 oz each in 9 contrast colours: green, grey/brown (light and dark), pink, yellow (light and dark), moss green, mauve, white.

A pair each No 11 (3mm) and No 12 (2¾mm) needles.

Tension

32sts x 32 rows to 4 inches over Fair Isle stitch.
[This is basically a 4 ply equivalent]

Size matters

Chest to fit one size: 40-42 inches.
Length: 25½ inches.
Sleeve: 20½ inches.

Abbreviations

k2tog/p2tog: decrease by knitting/purling 2 sts together.

stocking stitch: one row knit and one row purl, ("stockinette").

A word on the wool

Original yarn "Real Shetland Knitting Wool 2 ply jumper weight" stated as available from a supplier in Edinburgh is likely to be the 2 ply jumper weight from Jamieson and Smith. It's a 4 ply equivalent specifically designed for Fair Isle knitting, and is available in 25g balls from a number of different suppliers in an extensive range of colours.
Editors note: Sadly you have to pay somewhat more than the 19p price per ball quoted for the original yarn in the 1970s!

Disclaimer
(well...almost)

In transposing any patterns it is always a risk that errors will be introduced, in spite of dedicated proof reading.
If you have any problems with this pattern, please and I will try and assist.

January 2023

Plain Jane (or John) Layette

PlainBabyLayette.jpg

Delightfully plain and simple outfit for a new baby. Cardigans are (I am told) the most useful for small babies - trousers optional - and the bootees - well, they are always just impossibly cute aren't they? (even if they rarely stay attached to the baby!).

Instructions.

The cardigan is worked as one piece, starting with the two front, pieces worked separately, then joining them to complete the lower back

Cardigan left front:

Using No 11 (3mm) needles, cast on 34 stitches and knit 2 rows.

Shape front hem, by working short rows as given below, noting that after the first 8 rows in garter stitch (every row knitted), you start to work in stocking stitch (right-side rows knitted, wrong-side rows in purl) on the first 27 stitches, and keep the last 7 front edge stitches (the curved edge) in garter stitch to form the front band

Next row: k26. Turn, knit back to end.
Next row: k27. Turn, knit back to end.
Next row: k29. Turn, knit back to end.
Next row: k30. Turn, work back to end.
Next row: k32. Turn, work back to end.
Next row: k34. Turn, work back to end.
[Editors note: this is where you start to work the stocking stitch section, keeping the front band in garter stitch.]

Continue straight, with the 7 front edge stitches in garter stitch and the 27 side edge stitches in stocking stitch, until work measures 4¾ inches from the start of the stocking stitch, (about 46 rows), ending with a wrong side row.
Cast on 34 stitches at the side edge to create the left sleeve. [68 sts].
Now continue, but working 7 stitches in garter stitch at both edges...
[Editors note: this makes a garter stitch cuff at the sleeve end, and continues the front band.]
...until work measures 6¼ inches from the start of the stocking stitch, (about 62 rows), ending with a right side row.

Shape neck, by casting off stitches at the front edge as follows:

Next row (wrong side facing): cast off 7 stitches at the front edge, work to end of row.
Work 1 row.
Cast off 2 stitches at the beginning of the next, and following alternate row.
Work 1 row.
Cast off 1 stitch at the beginning of the next, and following 2 alternate rows. [54 sts]

Continue straight, as set, keeping the sleeve cuff in garter stitch, until work measures 7¾ inches (about 76 rows), ending with right side facing for the next row.
Break yarn, and leave the stitches on a spare needle.

Cardigan right front:

Work as for the left front, reversing all shapings, and placing 3 buttonholes at the front edge on the 4th, 30th, and 56th row of the stocking stitch.
[Editors note:they rather leave you to your own devices here with the buttonholes. I suggest creating eyelets in the garter stitch band, by knitting 3 stitches in from the edge, yarn over, k2tog, k2. You could choose to put the buttonholes on either the right or left front.]

When you have completed the 76 rows on the right front, join the two fronts together to knit the back:

Cardigan back

Next (joining) row (right side facing): knit 54 stitches from the left front; cast on 22 stitches for the back neck; knit 54 stitches from the right front. [130 sts].

Continue straight for 31 rows, keeping the 7 stitches at each end in garter stitch, for the two sleeve cuffs.

Cast off 34 stitches at the beginning of the next 2 rows. [62 sts].
Continue in stocking stitch for 46 rows (no garter stitch borders), then finish with 8 rows of garter stitch.
Cast off all stitches.

Collar

Using No 11 needles, cast on 11 stitches and knit 2 rows.

Next row: k4. Turn, knit back to end.
Next row: k7. Turn, knit back to end.
Next row: k9. Turn, knit back to end.
Next row: knit across all 11 stitches.

Shape collar:

Next row: k3. Turn, knit back to end.
Next row: k4. Turn, knit back to end.
Knit 8 rows across all 11 stitches.
Repeat the last 12 rows, 12 times more.

Next row: k3. Turn, knit back to end.
Next row: k4. Turn, knit back to end.
Knit 2 rows across all 11 stitches.
Next row: k9. Turn, knit back to end.
Next row: k7. Turn, knit back to end.
Next row: k4. Turn, knit back to end.
Next row: k3. Turn, knit back to end.
Next row: knit across all 11 stitches.

Cast off.

Making up the cardigan

Join side and sleeve seams.
Attach Collar to right side of cardigan using back stitch.
Sew on buttons.

Materials

4ply fingering yarn in 50g balls:
Cardigan: 2 balls.
Trousers: 1 ball.
Bootees: 1 ball

Nos 11 (3mm) needles.
3 buttons.
Elastic for trouser waistband.

Tension

28sts x 32 rows to 4 inches over stocking stitch.

Size matters

To fit one size up to 3 months.
Chest: 18 inches.

Abbreviations

k2tog: decrease by knitting 2 stitches together.
yrn/yfwd/yon: "yarn round needle" / "yarn forward" / "yarn over needle"; make a stitch by passing the yarn over the needle.
sl1: slip one stitch.

A word on the wool.

Original yarn was a synthetic mix of acrylic and rayon (which gave it a ply of a silky thread), and a small percentage of wool.
Approximately 160m per 50g ball.

Disclaimer
(well...almost)

In transposing any patterns it is always a risk that errors will be introduced, in spite of dedicated proof reading.
If you have any problems with this pattern, please and I will try and assist.


Trousers Front

* Using No 11 (3mm) needles, cast on 27 stitches, and work in garter stitch for 8 rows.
Then work 8 rows in stocking stitch, * and leave the stitches on a spare needle.

Make a second leg by repeating these instructions from * to *.

Then join the two legs by knitting across these 27 stitches from the second leg, cast on 8 stitches, and knit across the 27 stitches from the first leg. [62 sts]
**

Work straight on these 62 stitches in stocking stitch for 5½ inches ending with wrong side facing for next row.

Next row: knit.
[Editors note:this makes a ridge to mark the fold line for creating the channel at the waist for the elastic.]

Starting with a knit row, work 8 rows in stocking stitch as before.
Cast off.

Trousers Back

Work as for Front from * to **.
Work straight in stocking stitch on these stitches for 5 inches ending with right side facing for next row.

Shape top by working as follows:

Next row: Work to the last 3 stitches. Turn.
Next row: Work to the last 9 stitches. Turn.
Next row: Work to the last 12 stitches. Turn.
Next row: Work to the last 15 stitches. Turn.
Next row: Work to the last 18 stitches. Turn.

Work 3 rows across all 62 stitches, ending with wrong side facing for next row.

Next row: knit.
Starting with a knit row, work 8 rows in stocking stitch.
Cast off.

Making up the trousers

Join side and leg seams.
Fold down the top of front and back to the wrong side, and slipstitch the hem in place
Insert the elastic.


Bootees

Using No 11 (3mm) needles, cast on 38 stitches, and work for 8 rows in garter stitch.
Then work 16 rows in stocking stitch, ending with right side facing for next row.

Next row: k2, * k2tog, yon; repeat from * to last 2 stitches, k2.
Work 5 rows in stocking stitch, ending with right side facing for next row.

Next row: k24. Turn, and leave the remaining stitches on a spare needle.
Next row: p10. Turn, and leave the remaining stitches on a spare needle.

Continue on these 10 stitches for a further 16 rows in stocking stitch, ending with right side facing for next row.
Break yarn and leave the stitches on a spare needle.

With right side facing, rejoin yarn and knit 14 stitches from spare needle; knit up 12 stitches along the side of the rows just worked; knit across 10 stitches from spare needle; knit 12 stitches down the other side of the rows just worked; knit across 14 stitches from spare needle. [62 sts]

Work 8 rows in garter stitch, ending with right side facing for next row.
Break yarn.

Shape Sole:

Slip the first 26 stitches on to the right hand needle (or "working" needle if you are left handed), and rejoin yarn to work the centre 10 sole stitches; knit 9, k2tog, turn.
Next row: k9, k2tog, turn.
Repeat the last row, gradually decreasing stitches either side of the centre sole until 22 stitches remain.

Cast off.

Finishing:

Join back seam, and join sole at the back.

Make a cord by cast on 100 stitches; knit one row, then cast off.
Thread cord through eyelet holes in bootee.

Make a second bootee in the same way.

Cuddly Mouse Toy

MouseToy1.jpg

This is another simple (and fairly flat) toy which could go with the baby layette.
It's made in two colours using a slip stitch technique to make the pattern. It looks good with the main colour in white, and might work well using up left over yarns.

Instructions

The original pattern used two strands held together of a 4ply weight yarn, but you could easily use a single strand of anything from a double knit through to a chunky yarn, which would ultimately only affect the resulting size of the toy. It's nice to have a fairly firm tension for a toy so adjust the needle size as appropriate.

Body (2 pieces)

Using contrast colour (B), cast on 23 stitches.
1st row: knit in B.
2nd row: purl in B.
Join in white (A)
3rd row: In A, k1, * sl1p, k1; repeat from * to end
4th row: In A, k1, * yf, sl1p, yb, k1; repeat from * to end

These four rows form the colour pattern.

Keeping the pattern correct, continue and cast on 2 stitches at the beginning of the next 2 rows.
Work 2 rows.

Repeat the last 4 rows [31 sts].
Work 2 rows.

Decrease 1 stitch at each end of the next and every following 8th row until 15 stitches remain.
Work 7 rows.
Cast off.

Work a second piece in the same way.

MouseToyBody.jpg

Head (2 pieces)

Using white (A), start at the nose and cast on 3 stitches.
Starting with a knit row, work in stocking stitch, increasing 1 stitch at each end of the 3rd and every following alternate row until there are 21 stitches on the needle.
Work 3 rows.

Decrease 1 stitch at each end of the next row.
Work 1 row.
Cast off 2 stitches at the beginning of the next 4 rows.
Work 1 row.
Cast off the remaining 11 stitches.

Work a second piece in the same way.

MouseToyHead.jpg

Ears (4 pieces)

Using contrast colour (B), cast on 7 stitches, and, starting with a knit row, work in stocking stitch, increasing 1 stitch at each end of the 3rd and following alternate row.
Work 5 rows.
Cast off 2 stitches at the beginning of the next 2 rows.
Work 1 row.
Cast off the remaining 7 stitches.

Work three further pieces in the same way.

MouseToyEars.jpg

Tail (1 piece)

The tail can be either a 4-stitch I-cord, or a twisted cord - make it as long as you think suitable for the toy.

To Make Up

[Editor's note: This toy is designed to have a cotton lining - which I believe is designed to help it keep its flat shape. I stuffed it with concentric layers of flat synthetic quilt padding instead, using the knitted shapes as a guide.]

Cut out the body and head in calico, leaving a 1½cm seam allowance, using the knitted pieces as a template.

Join the side seams of the body and the outside edges of the head, of both the knitted and calico versions. Turn the calico lining to the right side and sew head to body. Fill and sew up lower edge.

Place the lining inside the the knitted version and finish all seams.

[Editor's note: I found the instructions a bit vague here - you just have to use the picture as a guide to see how and where to attach the head to the body, and discover how that all works out with a lining! However this is simple toy so it's easy enough to extemporise.]

Seam the ears together, noting that the reverse stocking stitch is the right side. Sew the cast-off edges of the ears to the head.

Attach the tail to the body.

The eyes can be embroidery or buttons as shown in the picture. There is also a tiny embroidered nose.

Materials

Double Knitting, Aran, or Worsted:
1 ball in each of white (A) and a contrast (B).

Pair of No 9 (3¾mm) needles.

30cm x 30cm (12 inch square) of calico for lining.

Stuffing.

Tension

25 sts and 34 rows to 4 inches measured over stocking stitch. However, as this is a toy the tension is less important - you just need to be consistent.

Size matters

Makes about a 10 inch toy.

Abbreviations:

k2tog or p2tog: knit or purl 2 stitches together (decrease one stitch).
sl1p: slip 1 stitch purlwise.
yf: bring the yarn to the front of the work.
yb: take the yarn to the back of the work.
stocking stitch: one row knit and one row purl, ("stockinette").

A Word on the Wool:

The original yarns used were a quick-knit - that is between a DK and a 4ply - and a 4ply, but the yarns were used double.

The original yarn came in 50g balls of 160 metres.

Disclaimer
(well...almost)

In transposing any pattern it is always a risk that errors will be introduced, in spite of dedicated proof reading.
If you have any problems with this pattern, please and I will try and assist.

© Christina Coutts 2007

Helpful Stuff

Pattern Archive

Categories

Yarn Links

Fabric etc

Stuff to do

  • Little rabbits
  • V&A 1940s Patterns
  • Monkey Socks
  • Necktie Bag
  • Posh Gloves
  • Criss-cross coasters