Home

Weblog

Pattern of
the Month

On the Needles
(...and Off the Needles)

Knitalong

Stitchcraft

Vintage Patterns

About the
Idle Hands


Archive entry for January 2023

« December 2022 | Main | February 2023 »

January 2023

Plain Jane (or John) Layette
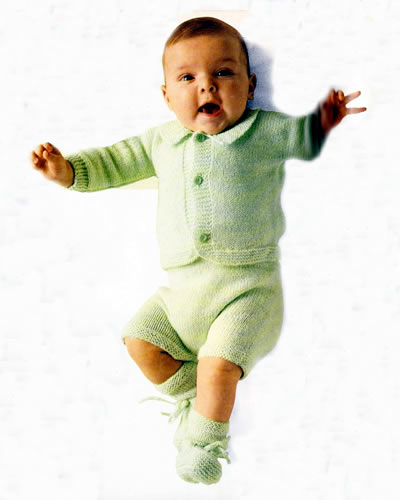
PlainBabyLayette.jpg

Delightfully plain and simple outfit for a new baby. Cardigans are (I am told) the most useful for small babies - trousers optional - and the bootees - well, they are always just impossibly cute aren't they? (even if they rarely stay attached to the baby!).

Instructions.

The cardigan is worked as one piece, starting with the two front, pieces worked separately, then joining them to complete the lower back

Cardigan left front:

Using No 11 (3mm) needles, cast on 34 stitches and knit 2 rows.

Shape front hem, by working short rows as given below, noting that after the first 8 rows in garter stitch (every row knitted), you start to work in stocking stitch (right-side rows knitted, wrong-side rows in purl) on the first 27 stitches, and keep the last 7 front edge stitches (the curved edge) in garter stitch to form the front band

Next row: k26. Turn, knit back to end.
Next row: k27. Turn, knit back to end.
Next row: k29. Turn, knit back to end.
[Editors note: this is where you start to work the stocking stitch section, keeping the front band in garter stitch.]

Next row: k30. Turn, work back to end.
Next row: k32. Turn, work back to end.
Next row: k34. Turn, work back to end.

Continue straight, with the 7 front edge stitches in garter stitch and the 27 side edge stitches in stocking stitch, until work measures 4¾ inches from the start of the stocking stitch, (about 46 rows), ending with a wrong side row.
Cast on 34 stitches at the side edge to create the left sleeve. [68 sts].
Now continue, but working 7 stitches in garter stitch at both edges...
[Editors note:this makes a garter stitch cuff at the sleeve end, and continues the front band.]
...until work measures 6¼ inches from the start of the stocking stitch, (about 62 rows), ending with a right side row.

Shape neck, by casting off stitches at the front edge as follows:

Next row (wrong side facing): cast off 7 stitches at the front edge, work to end of row.
Work 1 row.
Cast off 2 stitches at the beginning of the next, and following alternate row.
Work 1 row.
Cast off 1 stitch at the beginning of the next, and following 2 alternate rows. [54 sts]

Continue straight, as set, keeping the sleeve cuff in garter stitch, until work measures 7¾ inches (about 76 rows), ending with right side facing for the next row.
Break yarn, and leave the stitches on a spare needle.

Cardigan right front:

Work as for the left front, reversing all shapings, and placing 3 buttonholes at the front edge on the 4th, 30th, and 56th row of the stocking stitch.
[Editors note:they rather leave you to your own devices here with the buttonholes. I suggest creating eyelets in the garter stitch band, by knitting 3 stitches in from the edge, yarn over, k2tog, k2. You could choose to put the buttonholes on either the right or left front.]

When you have completed the 76 rows on the right front, join the two fronts together to knit the back:

Cardigan back

Next (joining) row (right side facing): knit 54 stitches from the left front; cast on 22 stitches for the back neck; knit 54 stitches from the right front. [130 sts].

Continue straight for 31 rows, keeping the 7 stitches at each end in garter stitch, for the two sleeve cuffs.

Cast off 34 stitches at the beginning of the next 2 rows. [62 sts].
Continue in stocking stitch for 46 rows (no garter stitch borders), then finish with 8 rows of garter stitch.
Cast off all stitches.

Collar

Using No 11 needles, cast on 11 stitches and knit 2 rows.

Next row: k4. Turn, knit back to end.
Next row: k7. Turn, knit back to end.
Next row: k9. Turn, knit back to end.
Next row: knit across all 11 stitches.

Shape collar:

Next row: k3. Turn, knit back to end.
Next row: k4. Turn, knit back to end.
Knit 8 rows across all 11 stitches.
Repeat the last 12 rows, 12 times more.

Next row: k3. Turn, knit back to end.
Next row: k4. Turn, knit back to end.
Knit 2 rows across all 11 stitches.
Next row: k9. Turn, knit back to end.
Next row: k7. Turn, knit back to end.
Next row: k4. Turn, knit back to end.
Next row: k3. Turn, knit back to end.
Next row: knit across all 11 stitches.

Cast off.

Making up the cardigan

Join side and sleeve seams.
Attach Collar to right side of cardigan using back stitch.
Sew on buttons.

Materials

4ply fingering yarn in 50g balls:
Cardigan: 2 balls.
Trousers: 1 ball.
Bootees: 1 ball

Nos 11 (3mm) needles.
3 buttons.
Elastic for trouser waistband.

Tension

28sts x 32 rows to 4 inches over stocking stitch.

Size matters

To fit one size up to 3 months.
Chest: 18 inches.

Abbreviations

k2tog: decrease by knitting 2 stitches together.
yrn/yfwd/yon: "yarn round needle" / "yarn forward" / "yarn over needle"; make a stitch by passing the yarn over the needle.
sl1: slip one stitch.

A word on the wool.

Original yarn was a synthetic mix of acrylic and rayon (which gave it a ply of a silky thread), and a small percentage of wool.
Approximately 160m per 50g ball.

Disclaimer
(well...almost)

In transposing any patterns it is always a risk that errors will be introduced, in spite of dedicated proof reading.
If you have any problems with this pattern, please and I will try and assist.


Trousers Front

* Using No 11 (3mm) needles, cast on 27 stitches, and work in garter stitch for 8 rows.
Then work 8 rows in stocking stitch, * and leave the stitches on a spare needle.

Make a second leg by repeating these instructions from * to *.

Then join the two legs by knitting across these 27 stitches from the second leg, cast on 8 stitches, and knit across the 27 stitches from the first leg. [62 sts]
**

Work straight on these 62 stitches in stocking stitch for 5½ inches ending with wrong side facing for next row.

Next row: knit.
[Editors note:this makes a ridge to mark the fold line for creating the channel at the waist for the elastic.]

Starting with a knit row, work 8 rows in stocking stitch as before.
Cast off.

Trousers Back

Work as for Front from * to **.
Work straight in stocking stitch on these stitches for 5 inches ending with right side facing for next row.

Shape top by working as follows:

Next row: Work to the last 3 stitches. Turn.
Next row: Work to the last 9 stitches. Turn.
Next row: Work to the last 12 stitches. Turn.
Next row: Work to the last 15 stitches. Turn.
Next row: Work to the last 18 stitches. Turn.

Work 3 rows across all 62 stitches, ending with wrong side facing for next row.

Next row: knit.
Starting with a knit row, work 8 rows in stocking stitch.
Cast off.

Making up the trousers

Join side and leg seams.
Fold down the top of front and back to the wrong side, and slipstitch the hem in place
Insert the elastic.


Bootees

Using No 11 (3mm) needles, cast on 38 stitches, and work for 8 rows in garter stitch.
Then work 16 rows in stocking stitch, ending with right side facing for next row.

Next row: k2, * k2tog, yon; repeat from * to last 2 stitches, k2.
Work 5 rows in stocking stitch, ending with right side facing for next row.

Next row: k24. Turn, and leave the remaining stitches on a spare needle.
Next row: p10. Turn, and leave the remaining stitches on a spare needle.

Continue on these 10 stitches for a further 16 rows in stocking stitch, ending with right side facing for next row.
Break yarn and leave the stitches on a spare needle.

With right side facing, rejoin yarn and knit 14 stitches from spare needle; knit up 12 stitches along the side of the rows just worked; knit across 10 stitches from spare needle; knit 12 stitches down the other side of the rows just worked; knit across 14 stitches from spare needle. [62 sts]

Work 8 rows in garter stitch, ending with right side facing for next row.
Break yarn.

Shape Sole:

Slip the first 26 stitches on to the right hand needle (or "working" needle if you are left handed), and rejoin yarn to work the centre 10 sole stitches; knit 9, k2tog, turn.
Next row: k9, k2tog, turn.
Repeat the last row, gradually decreasing stitches either side of the centre sole until 22 stitches remain.

Cast off.

Finishing:

Join back seam, and join sole at the back.

Make a cord by cast on 100 stitches; knit one row, then cast off.
Thread cord through eyelet holes in bootee.

Make a second bootee in the same way.

Cuddly Mouse Toy

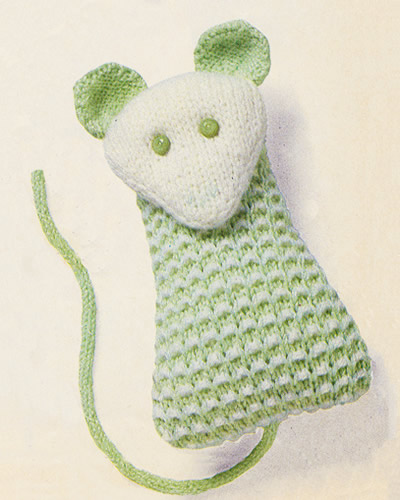
MouseToy1.jpg

This is another simple (and fairly flat) toy which could go with the baby layette.
It's made in two colours using a slip stitch technique to make the pattern. It looks good with the main colour in white, and might work well using up left over yarns.

Instructions

The original pattern used two strands held together of a 4ply weight yarn, but you could easily use a single strand of anything from a double knit through to a chunky yarn, which would ultimately only affect the resulting size of the toy. It's nice to have a fairly firm tension for a toy so adjust the needle size as appropriate.

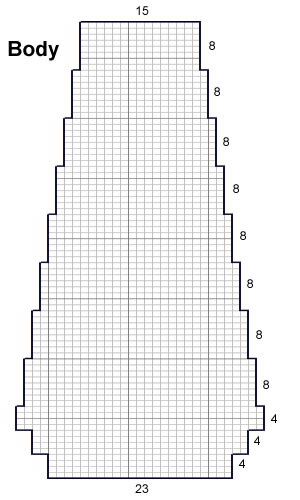
Body (2 pieces)

Using contrast colour (B), cast on 23 stitches.
1st row: knit in B.
2nd row: purl in B.
Join in white (A)
3rd row: In A, k1, * sl1p, k1; repeat from * to end
4th row: In A, k1, * yf, sl1p, yb, k1; repeat from * to end

These four rows form the colour pattern.

Keeping the pattern correct, continue and cast on 2 stitches at the beginning of the next 2 rows.
Work 2 rows.

Repeat the last 4 rows [31 sts].
Work 2 rows.

Decrease 1 stitch at each end of the next and every following 8th row until 15 stitches remain.
Work 7 rows.
Cast off.

Work a second piece in the same way.

MouseToyBody.jpg

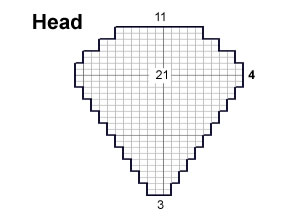
Head (2 pieces)

Using white (A), start at the nose and cast on 3 stitches.
Starting with a knit row, work in stocking stitch, increasing 1 stitch at each end of the 3rd and every following alternate row until there are 21 stitches on the needle.
Work 3 rows.

Decrease 1 stitch at each end of the next row.
Work 1 row.
Cast off 2 stitches at the beginning of the next 4 rows.
Work 1 row.
Cast off the remaining 11 stitches.

Work a second piece in the same way.

MouseToyHead.jpg

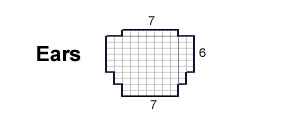
Ears (4 pieces)

Using contrast colour (B), cast on 7 stitches, and, starting with a knit row, work in stocking stitch, increasing 1 stitch at each end of the 3rd and following alternate row.
Work 5 rows.
Cast off 2 stitches at the beginning of the next 2 rows.
Work 1 row.
Cast off the remaining 7 stitches.

Work three further pieces in the same way.

MouseToyEars.jpg

Tail (1 piece)

The tail can be either a 4-stitch I-cord, or a twisted cord - make it as long as you think suitable for the toy.

To Make Up

[Editor's note: This toy is designed to have a cotton lining - which I believe is designed to help it keep its flat shape. I stuffed it with concentric layers of flat synthetic quilt padding instead, using the knitted shapes as a guide.]

Cut out the body and head in calico, leaving a 1½cm seam allowance, using the knitted pieces as a template.

Join the side seams of the body and the outside edges of the head, of both the knitted and calico versions. Turn the calico lining to the right side and sew head to body. Fill and sew up lower edge.

Place the lining inside the the knitted version and finish all seams.

[Editor's note: I found the instructions a bit vague here - you just have to use the picture as a guide to see how and where to attach the head to the body, and discover how that all works out with a lining! However this is simple toy so it's easy enough to extemporise.]

Seam the ears together, noting that the reverse stocking stitch is the right side. Sew the cast-off edges of the ears to the head.

Attach the tail to the body.

The eyes can be embroidery or buttons as shown in the picture. There is also a tiny embroidered nose.

Materials

Double Knitting, Aran, or Worsted:
1 ball in each of white (A) and a contrast (B).

Pair of No 9 (3¾mm) needles.

30cm x 30cm (12 inch square) of calico for lining.

Stuffing.

Tension

25 sts and 34 rows to 4 inches measured over stocking stitch. However, as this is a toy the tension is less important - you just need to be consistent.

Size matters

Makes about a 10 inch toy.

Abbreviations:

k2tog or p2tog: knit or purl 2 stitches together (decrease one stitch).
sl1p: slip 1 stitch purlwise.
yf: bring the yarn to the front of the work.
yb: take the yarn to the back of the work.
stocking stitch: one row knit and one row purl, ("stockinette").

A Word on the Wool:

The original yarns used were a quick-knit - that is between a DK and a 4ply - and a 4ply, but the yarns were used double.

The original yarn came in 50g balls of 160 metres.

Disclaimer
(well...almost)

In transposing any pattern it is always a risk that errors will be introduced, in spite of dedicated proof reading.
If you have any problems with this pattern, please and I will try and assist.

© Christina Coutts 2007

Helpful Stuff

Pattern Archive

Categories

Yarn Links

Fabric etc

Stuff to do

  • Little rabbits
  • V&A 1940s Patterns
  • Monkey Socks
  • Necktie Bag
  • Posh Gloves
  • Criss-cross coasters