Cuddly Mouse Toy

This is another simple (and fairly flat) toy which could go with the baby layette.
It's made in two colours using a slip stitch technique to make the pattern. It looks good with the main colour in white, and might work well using up left over yarns.
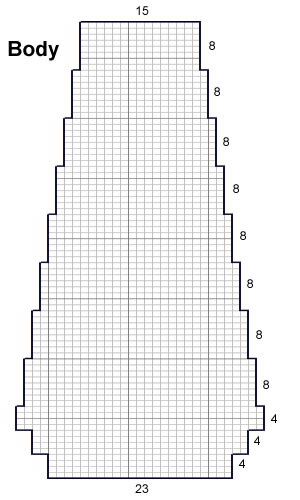
InstructionsThe original pattern used two strands held together of a 4ply weight yarn, but you could easily use a single strand of anything from a double knit through to a chunky yarn, which would ultimately only affect the resulting size of the toy. It's nice to have a fairly firm tension for a toy so adjust the needle size as appropriate. Body (2 pieces)Using contrast colour (B), cast on 23 stitches.
These four rows form the colour pattern. Keeping the pattern correct, continue and cast on 2 stitches at the beginning
of the next 2 rows. Repeat the last 4 rows [31 sts]. Decrease 1 stitch at each end of the next and every following 8th row
until 15 stitches remain. Work a second piece in the same way.

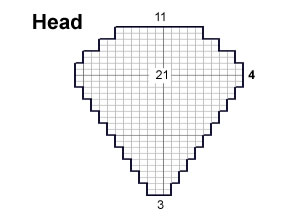
Head (2 pieces)Using white (A), start at the nose and cast on 3 stitches. Decrease 1 stitch at each end of the next row. Work a second piece in the same way.

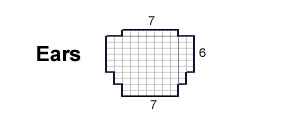
Ears (4 pieces)Using contrast colour (B), cast on 7 stitches, and, starting with a knit
row, work in stocking stitch, increasing 1 stitch at each end of the 3rd
and following alternate row. Work three further pieces in the same way.

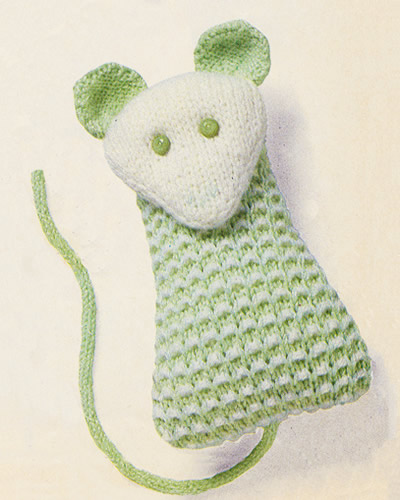
Tail (1 piece)The tail can be either a 4-stitch I-cord, or a twisted cord - make it as long as you think suitable for the toy. To Make Up[Editor's note: This toy is designed to have a cotton lining - which I believe is designed to help it keep its flat shape. I stuffed it with concentric layers of flat synthetic quilt padding instead, using the knitted shapes as a guide.] Cut out the body and head in calico, leaving a 1½cm seam allowance, using the knitted pieces as a template. Join the side seams of the body and the outside edges of the head, of both the knitted and calico versions. Turn the calico lining to the right side and sew head to body. Fill and sew up lower edge. Place the lining inside the the knitted version and finish all seams. [Editor's note: I found the instructions a bit vague here - you just have to use the picture as a guide to see how and where to attach the head to the body, and discover how that all works out with a lining! However this is simple toy so it's easy enough to extemporise.] Seam the ears together, noting that the reverse stocking stitch is the right side. Sew the cast-off edges of the ears to the head. Attach the tail to the body. The eyes can be embroidery or buttons as shown in the picture. There is also a tiny embroidered nose. |
Materials
|
