Instructions:
Motifs may be worked in Fair Isle or embroidered when garment is completed.
When working Fair Isle use separate balls of the contrasting colours for
each motif. Always twist the wools round each other when changing colour
to avoid leaving a hole.
Knitters may find it easier to ensure a tight edge by knitting the first
and last stitches on every purl row.
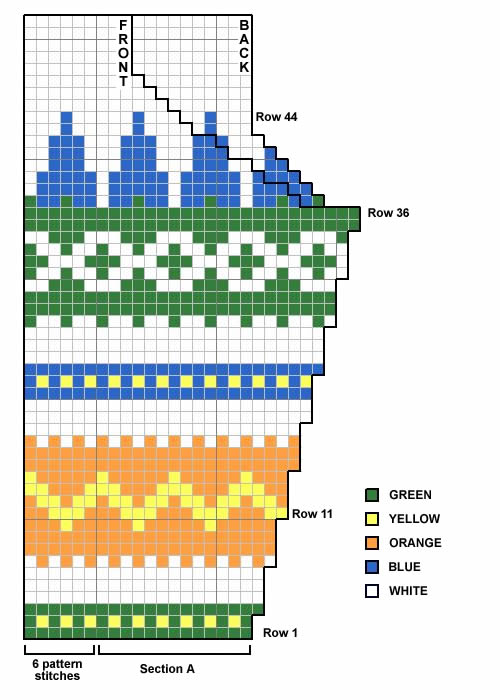
Charts
The charts are included with the pattern instructions below, but for
a full version of the charts you can right click on the icon below and
choose "save link as" or "save target as" (browser
dependent options) to download and save a pdf file.
If you want to view chart images full size in the browser then right
click on the image and choose "view image".
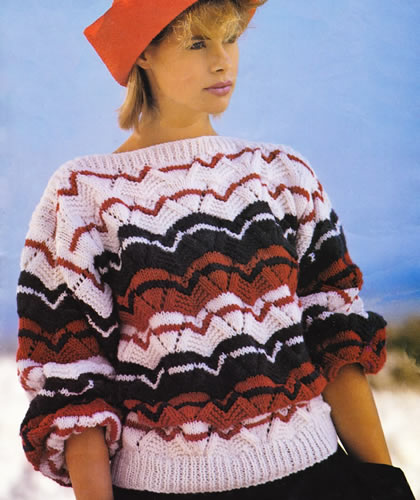
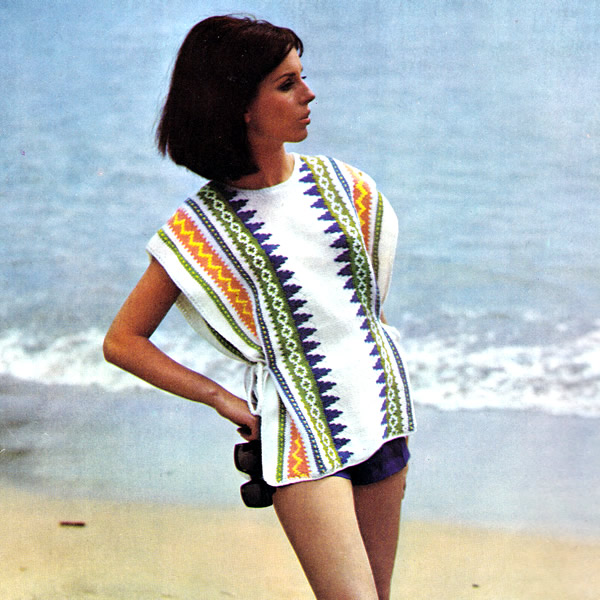
THE JUMPER
Jumper Front
Using No 13 needles and gold (L) wool cast on 106 stitches.
Work 3 inches in k1/p1 rib, decreasing 1 stitch at the end of the last
row.
Change to No 12 needles and stocking stitch and white (W) wool.
Commence 1st panel:
Work 2 rows in white (W).
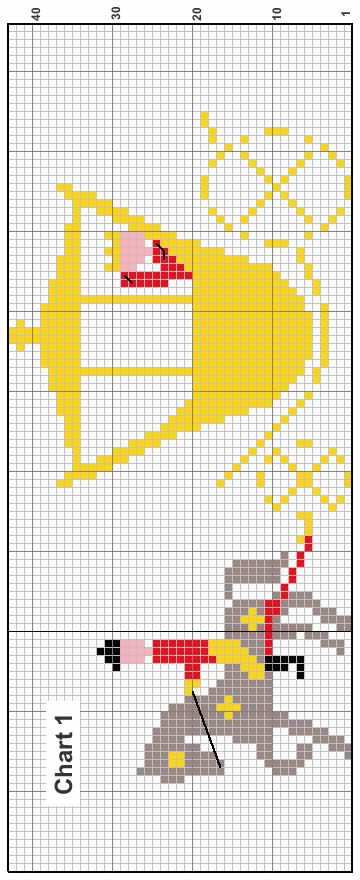
In the next row commence motif working the 43 rows from chart 1.
Work 1 row in white (W).
Join in gold (L).
**
Continue as follows:
1st row:
* 3W, 1L, 1W, 1L, 4W, 1L, 3W, 1L, 3W, 1L,
3W, 1L, 1W; repeat from * to the last 9 stitches,
3W, 1L, 1W, 1L, 3W.
2nd row:
* 1W, 7L, 2W, 1L, 4W, 1L, 1W, 1L, 4W, 1L,
1W; repeat from * to the last 9 stitches,
1W, 7L, 1W.
3rd row:
* 1W, 7L, 1W, 3L, 3W, 1L, 1W, 1L, 3W, 3L;
repeat from * to the last 9 stitches, 1W,
7L, 1W.
4th row: *
1L, 1W, 5L, 1W, 1L, 1W, 1L, 1W, 1L, 2W, 1L, 1W, 1L, 2W, 1L, 1W, 1L; repeat
from * to the last 9 stitches, 1L, 1W, 5L,
1W, 1L.
5th row: *
1W, 1L, 1W, 3L, 1W, 1L, 1W, 3L, 1W, 1L, 2W, 1L, 2W, 1L, 1W, 3L; repeat
from * to the last 9 stitches, 1W, 1L, 1W,
3L, 1W, 1L, 1W.
6th row:
* 2W, 1L, 1W, 1L, 1W, 1L, 3W, 1L, 3W, 1L,
1W, 1L, 1W, 1L, 3W, 1L, 1W; repeat from *
to the last 9 stitches, 2W, 1L, 1W, 1L, 1W, 1L, 2W.
7th row:
* 3W, 3L, 9W, 3L, 6W; repeat from *
to the last 9 stitches, 3W, 3L, 3W.
8th row: *
4W, 1L, 11W, 1L, 7W; repeat from * to the
last 9 stitches, 4W, 1L, 4W.
9th row: *
3W, 3L, 9W, 3L, 6W; repeat from * to the
last 9 stitches, 3W, 3L, 3W.
**
Cut L.
Commence 2nd panel:
Work 3 rows in W.
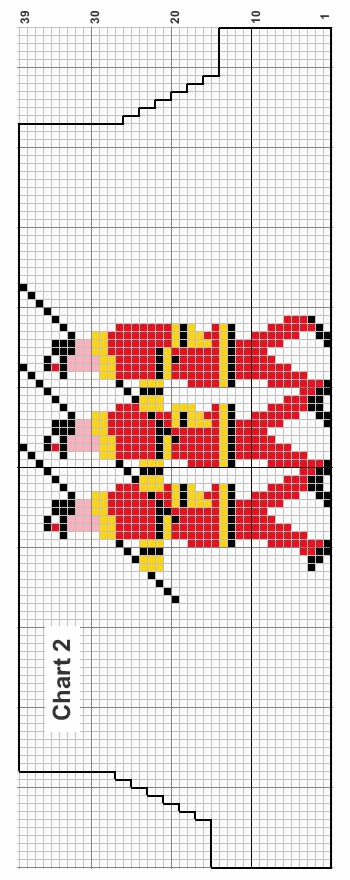
In the next row commence the motif working the first 14 rows from chart
2.
Shape the Armholes
Continuing to work from chart, cast off 6 stitches at the beginning
of the next 2 rows.
Now decrease 1 stitch at each end of every knit row 6 times.
Work straight until the 39 rows of chart 2 are completed.
Work 4 rows in W, ending with a knit row.
Join in L.
*** Continue as follows:
1st row: 2W, 1L, 3W, 1L, 3W, 1L, 4W,
1L, 1W, 1L, 4W, 1L, 1W; repeat from * to the last 9 stitches, 2W, 1L,
3W, 1L, 2W.
2nd row: * 3W, 1L, 1W, 1L, 4W, 1L,
2W, 7L, 2W, 1L, 1W; repeat from * to the last 9 stitches, 3W, 1L, 1W,
1L, 3W.
3rd row: * 3W, 1L, 1W, 1L, 3W, 3L,
1W, 7L, 1W, 3L; repeat from * to the last 9 stitches, 3W, 1L, 1W, 1L,
3W.
4th row: * 1L, 2W, 1L, 1W, 1L, 2W,
1L, 1W, 1L, 1W, 1L, 1W, 5L, 1W, 1L, 1W, 1L, 1W; repeat from * to the last
9 stitches, 1L, 2W, 1L, 1W, 1L, 2W, 1L.
5th row: * 1W, 1L, 2W, 1L, 2W, 1L,
1W, 3L, 1W, 1L, 1W, 3L, 1W, 1L, 1W, 3L; repeat from * to the last 9 stitches,
1W, 1L, 2W, 1L, 2W, 1L, 1W.
6th row: * 2W, 1L, 1W, 1L, 1W, 1L,
3W, 1L, 3W, 1L, 1W, 1L, 1W, 1L, 3W, 1L, 1W; repeat from * to the last
9 stitches, 2W, 1L, 1W, 1L, 1W, 1L, 2W.
7th row: * 3W, 3L, 9W, 3L, 6W; repeat
from * to the last 9 stitches, 3W, 3L, 3W.
8th row: * 4W, 1L, 11W, 1L, 7W; repeat
from * to the last 9 stitches, 4W, 1L 4W.
9th row: 3W, 3L, 9W, 3L, 6W; repeat
from * to the last 9 stitches, 3W, 3L, 3W.
***
Cut L, and continue in W.
Work 2 rows.
Shape the Neck
Next row: Knit 32, cast off 17, knit
to end.
Now work on and finish each side separately:
Work 1 row.
Keeping arm edge straight, decrease 1 stitch at the neck edge on the next
row, and then every alternate row until there are 27 stitches left, ending
at the armhole edge.
Shape the Shoulder:
Still decreasing 1 stitch on every alternate row at the neck edge, cast
off 6 stitches at the beginning of next and alternate rows at the shoulder
edge until all stitches are eliminated.
Rejoin the wool to the other side at the neck edge and complete to match
the 1st side.
Jumper Back
Using No 13 needles and L wool cast on 106 stitches.
Work 3 inches in k1/p1 rib, decreasing 1 stitch at the end of the last
row.
Change to No 12 needles and stocking stitch and W wool.
Work 46 rows.
Join in L.
Now work as Front from ** to **.
Cut L.
Work 17 rows in W.
Continue in W.
Shape the Armholes:
Cast off 6 stitches at the beginning of the next 2 rows.
Now decrease 1 stitch at each end of every knit row 6 times.
Work 16 rows in W.
Join in L.
Now work as for Front from *** to ***.
Cut L, and continue in W.
Work 12 rows.
Shape the Shoulders:
Cast off 6 stitches at the beginning of every row until there are 33 stitches
left.
Cast off.
Jumper Sleeves (both alike)
Using No 13 needles and L wool, cast on 60 stitches.
Work 1 inch in k1/p1 rib.
Next row (increase row): Rib 4, *
increase once in the next stitch, rib 3, repeat from * to end. [74 sts].
Change to No 12 needles and stocking stitch and W wool.
Work until sleeve measures 2½ inches from cast on edge, ending with
a purl row.
Shape Top:
Cast off 7 stitches at the beginning of the next 2 rows.
Decrease 1 stitch at each end of every row until there are 54 stitches
left, then 1 stitch at each end of every alternate row until there are
34 stitches left, and then 1 stitch at each end of every row until there
are 22 stitches left.
Cast off.
Jumper Neck Band
Join the right shoulder seam.
Using No 13 needles, with right side of work facing you, and using L wool,
knit up 80 stitches round the neck.
Work 1 inch in k1/p1 rib.
Cast off loosely in rib.
Making up the jumper
Press or block each piece separately with a warm iron and a damp cloth,
omitting the ribbing.
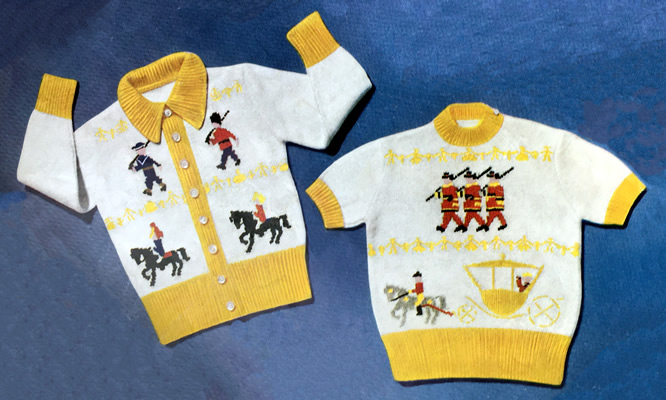
Embroider the collar and cuff of the Queens' robe in white, and the horses'
reins in black.
Darn in all ends of wool.
Sew side and sleeve seams.
Sew left shoulder seam for 1¼ inches from arm edge.
Set in sleeves.
With L wool work 2 rows of double crochet, (US: single crochet), along
shoulder opening making, 3 small button loops on the front edge.
Sew on buttons to match.
Press seams.
THE CARDIGAN
Instructions have been given for a boys' cardigan.
If a girls' cardigan is required, the work buttonholes in the right front
instead of the left front.
Cardigan Back
Work as for back of jumper.
Cardigan Right Front
With No 13 needles and L. wool cast on 62 stitches.
Work 3 inches in k1/p1 rib.
Next row: Rib to the last 14 stitches,
put these 14 stitches on a safety pin for the front band.
Change to No 12 needles and stocking stitch (1 row knit, 1 row purl) and
W. wool.
Commence 1st panel:
Work 4 rows in W.
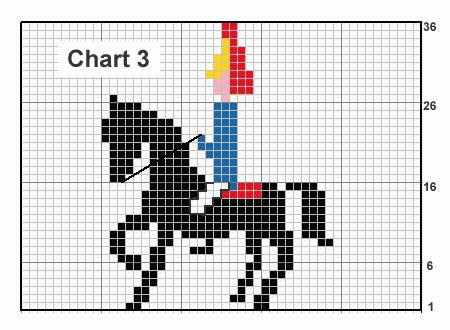
1n the next row start working the motif following the 36 rows from chart
No. 3.
Work 6 rows in W.
Join in L.
Continue as follows:
1st row: *
1W, 1L, 3W, 1L, 3W, 1L, 3W, 1L, 4W, 1L, 1W, 1L, 3W; repeat from *
once more.
2nd row: *
1W, 7L, 2W, 1L, 4W, 1L, 1W, 1L, 4W, 1L, 1W; repeat from *
once more.
3rd row: *
3L, 3W, 1L, 1W, 1L, 1W, 1L, 3W, 3L, 1W, 7L, 1W; repeat from *
once more.
4th row: *
1L, 1W, 5L, 1W, 1L, 1W, 1L, 1L, 1W; repeat from *
once more.
5th row: *
3L, 1W, 1L, 2W, 1L, 2W, 1L, 1W, 3L, 1W, 1L, 1W, 3L, 1W, 1L, 1W; repeat
from * once more.
6th row: *
2W, 1L, 1W, 1L, 1W, 1L, 3W, 1L, 3W, 1L, 1W, 1L, 1W, 1L, 3W, 1L, 1W; repeat
from * once more.
7th row: 6W, 3L, 9W, 3L, 3W; repeat
from * once more.
8th row: *
4W, 1L, 11W, 1L, 7W; repeat from * once more.
9th row: *
6W, 3L, 9W, 3L, 3W; repeat from * once more.
Cut L.
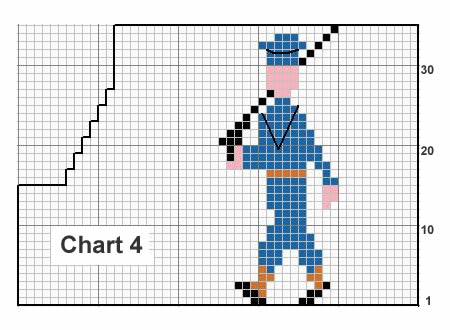
Commence 2nd panel:
Work 3 rows in W.
1n the next row start working the motif following the first 15 rows from
chart No 4.
Shape the Armhole:
Still working from chart, cast off 6 stitches at the beginning of the
next row, and then decrease 1 stitch on every alternate row 6 times.
Work straight until the 35 rows of the motif are complete.
Work 8 rows in W, ending with a knit row.
Join in L and continue as follows:
1st row: 2W,
1L, 3W, 1L, 3W, 1L, 4W, 1L, 1W, 1L, 4W, 1L, 3W, 1L, 3W, 1L, 3W, 1L, 1W.
2nd row: 1W,
1L, 4W, 1L, 1W, 1L, 4W, 1L, 2W, 7L, 2W, 1L, 4W, 1L, 1W, 1L, 3W.
3rd row: 3W,
1L, 1W, 1L, 3W, 3L, 1W, 7L, 1W, 3L, 3W, 1L, 1W, 1L, 3W, 3L.
4th row: 1W,
1L, 1W, 1L, 2W, 1L, 1W, 1L, 2W, 1L, 1W, 1L, 1W, 1L, 1W, 5L, 1W, 1L, 1W,
1L, 1W, 1L, 2W, 1L, 1W, 1L, 2W, 1L.
5th row: 1W,
1L, 2W, 1L, 2W, 1L, 1W, 3L, 1W, 1L, 1W, 3L, 1W, 1L, 1W, 3L, 1W, 1L, 2W,
1L, 2W, 1L, 1W, 3L.
6th row: 1W,
1L, 3W, 1L, 1W, 1L, 1W, 1L, 3W, 1L, 3W, 1L, 1W, 1L, 1W, 1L, 3W, 1L, .3W,
1L, 1W, 1L, 1W, 1L, 2W.
7th row: 3W,
3L, 9W, 3L, 9W, 3L, 6W.
8th row: 7W,
1L, 11W, 1L, 11W, 1L, 4W.
9th row: 3W,
3L, 9W, 3L, 9W, 3L, 6W.
Cut L.
Continue in W, and work 2 rows.
Shape the Neck:
Next row: Cast off 4 stitches, work
to end.
Work 1 row.
Now keeping armhole edge straight, decrease 1 stitch at the neck edge
on the next row, and then on every alternate row until there are 27 stitches
remaining, ending at the armhole edge.
Shape the Shoulder:
Continue to decrease on every alternate row at the neck edge, and at
the same time, cast off 6 stitches at the beginning of
next and
alternate rows at the shoulder edge until all stitches are cast off.
Cardigan Left Front
With No 13 needles and L. wool cast on 62 stitches.
Work in k1/p1 rib for ¾ of an inch.
In the next 2 rows make buttonholes as follows:
Next row: Rib 6, cast off 2, rib to
end.
In the next row cast on 2 stitches over those cast off on the preceding
row.
Continue in rib, making one more buttonhole 1½ inches from the 1st
until work measures 3 inches from cast on edge ending at centre-front
edge.
Next row: Rib 14 stitches and place
on safety pin for the front band, rib to end.
Change to No 12 needles and work in stocking stitch using W wool.
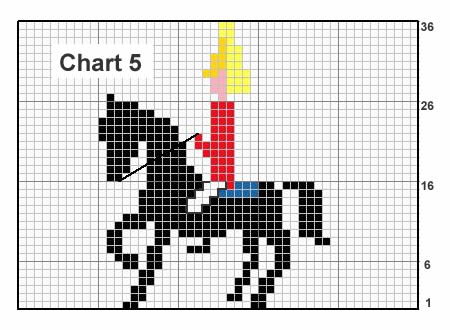
Commence 1st panel.
Work 4 rows in W.
In the next row commence motif working the 36 rows from chart 5.
Work 6 rows in W.
Join in L, and continue as follows :
1st row: *
3W, 1L, 1W, 1L, 4W, 1L, 3W,
1L, 3W, 1L, 3W, 1L, 1W, repeat from * once
more.
2nd row: *
1W, 1L, 4W, 1L, 1W, 1L, 4W, 1L, 2W, 7L, 1W; repeat from *
once more.
3rd row: *
1W, 7L, 1W, 3L, 3W, 1L, 1W, 1L, 3W, 3L, repeat from *
once more.
4th row: *
1W, 1L, 1W, 1L, 2W, 1L, 1W, 1L, 2W, 1L, 1W, 1L, 1W, 1L, 1W, 5L, 1W, 1L;
repeat from * once more.
5th row: *
1W, 1L, 1W, 3L, 1W, 1L, 1W, 3L, 1W, 1L, 2W, 1L, 2W, 1L, 1W, 3L; repeat
from * once more.
6th row: *
1W, 1L, 3W, 1L, 1W, 1L, 1W, 1L, 3W, 1L, 3W, 1L, 1W, 1L, 1W, 1L, 2W; repeat
from * once more.
7th row: *
3W, 3L, 9W, 3L, 6W; repeat from * once more.
8th row: *
7W, 1L, 11W, 1L, 4W; repeat from * once more.
9th row: *
3W, 3L, 9W, 3L, 6W; repeat from * once more.
Cut L
Commence 2nd panel.
Work 3 rows in W
In the next row start working the motif, working the first 14 rows from
chart 6.

Shape the Armhole:
Still working from the chart, cast off 6 stitches at the beginning of
the next row, and then decrease 1 stitch on every alternate row 6 times.
Work straight until the 36 rows of the motif are complete.
Work 7 rows in W ending with a knit row.
Join in L
Continue as follows:
1st row: 1W, 1L, 3W, 1L, 3W, 1L, 3W,
1L, 4W, 1L, 1W, 1L, 4W, 1L, 3W, 1L, 3W, 1L, 2W.
2nd row: 3W, 1L, 1W, 1L, 4W, 1L, 2W,
7L, 2W, 1L, 4W, 1L, 1W, 1L, 4W, 1L, 1W.
3rd row: 3L, 3W, 1L, 1W, 1L, 3W, 3L,
1W, 7L, 1W, 3L, 3W, 1L, 1W, 1L, 3W.
4th row: 1L, 2W, 1L, 1W, 1L, 2W, 1L,
1W, 1L, 1W, 1L, 1W, 5L, 1W, 1L, 1W, 1L, 1W, 1L, 2W, 1L, 1W, 1L, 2W, 1L,
1W, 1L, 1W.
5th row: 3L, 1W, 1L, 2W, 1L, 2W, 1L,
1W, 3L, 1W, 1L, 1W, 3L, 1W, 1L, 1W, 3L, 1W, 1L, 2W, 1L, 2W, 1L, 1W.
6th row: 2W, 1L, 1W, 1L, 1W, 1L, 3W,
1L, 3W, 1L, 1W, 1L, 1W, 1L, 3W, 1L, 3W, 1L, 1W, 1L, 1W, 1L, 3W, 1L, 1W.
7th row: 6W, 3L, 9W, 3L, 9W, 3L, 3W.
8th row: 4W, 1L, 11W, 1L, 11W, 1L,
7W.
9th row: 6W, 3L, 9W, 3L, 9W, 3L, 3W.
Cut L.
Continue in W
Work 1 row.
Shape neck and complete to match the Right Front.
Cardigan Borders
Left front border:
Rejoin L wool to the stitches left on safety pin and using No 13 needles
work in rib making 6 more buttonholes at 1½ inch intervals. Work
a further ½ inch after the last buttonhole has been worked.
Cast off.
Work the right front border the same way omitting buttonholes.
[Editor's note:
In case of tension variations, you may wish to make the plain border first
- which will be the right border for a boy and the left border for a girl
- so you can see how many rows you need to fit nicely up the front; you
can then work out how best to place the buttonholes evenly up the other
side.]
The Collar
Using No 13 needles and L wool cast on 137 stitches.
1st row: * k1, p1; repeat from * to
the last stitch, k1.
2nd row: * p1, k1; repeat from * to
the last stitch, p1.
Repeat these 2 rows once more.
5th row: k1, p1, k2tog, rib to the
last 4 stitches, k2tog, p1, k1.
Repeat, this decrease on every 4th row until there are
123 stitches left.
Work 3 rows.
Cast off in rib.
Cardigan Sleeves (both alike)
Using No 13 needles and L wool cast on 50 stitches.
Work 2½ inches in k1/p1 rib.
Change to No 12 needles and stocking stitch and W wool.
Increase 1 stitch at each end of every 4th row until there are 74 stitches.
Work without further shaping until sleeve measures 10 inches from cast
on edge, ending with a purl row.
Shape top as for jumper sleeve instructions.
Making up the cardigan
Press each piece separately with a warm iron and damp cloth, omitting
the ribbing.
Embroider the horses reins in black, and the sailors collar and hat band
in white as shown on the diagram.
Darn in all ends of wool.
Sew side, shoulder and sleeve seams.
Set in sleeves. Sew borders to fronts.
Sew cast off edge of collar round neck edge starting and finishing at
centre front edges.
Sew on buttons.
Press seams.
|