« Elephants | Main | Books in December »
Tuesday December 25, 2012
Christmas Morning

Here we are on Christmas morning - George is sporting his new reindeer pyjamas and dressing gown - courtesy of Next. (He is not awake enough to object to the picture)
The house is looking very festive with the cushions and quilts I have made over the years, and this year there were some new items.
When I split the (5ply) guernsey yarn to make some thinner yarn, I used the 2 ply to make the Arne and Carlos' Christmas Balls. I expect you are agog to know what happened to the 3 ply.
Well. Make yourselves comfortable.
I made some Christmas lettering, based on an idea from Debbie Bliss magazine No 5 for Winter 2010.
The original pattern spelled out "HOME" (highly non-sectarian and politically correct for the American market no doubt), but the pattern shied away from the difficulty of sloping the knitting by making the letter "M" from felt only.
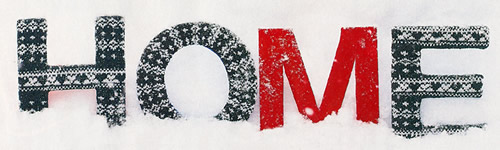
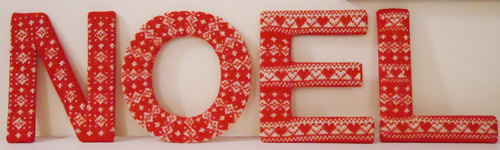
Far from critical, I really like the styling in grey and white with the splash of red - and would have emulated it but... I wanted to spell NOEL and use my split Guernsey yarn. I used the pattern for Debbie's "O" and "E", and easily improvised an "L". However, the N would not have looked so arty in plain red at the start of the word, so with some difficulty both in planning and execution, I made a pattern for the N.
There are a couple of things to note if you want to do this - or rashly decide to make up your own letters (kid's name etc).
After I made my guernsey letters in 3 ply, I felted the pieces - by hand so I could gauge how small I wanted them. It produced a nice fabric, and the cardboard templates make for a very forgiving method to produce nice even letters. I can't really see how the 4ply yarn recommended would make letters of the size given in the pattern. The magazine photos bear this out to some extent as quite a bit of the knitting is lost in some places, wrapped behind the cardboard.
The base of the letters is a cardboard shape - which helps - especially for the sloping letters and internal corners, where you rely on being able to pull the knitting into shape around the cardboard. You can see that I not only used the double sided tape to fix the letters to the card (to hold in place while I worked) but I also laced up the back to pull it all into shape:
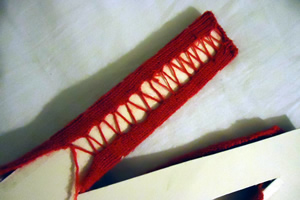
Once the front and back sections (latter from felt) were made up I pressed them under a pile of books, before sewing fronts to backs. Don't forget the felt backings must be mirror images of the letters (for some symmetrical letters this is not important).*

After all that, I was pretty pleased with the result and made sets for myself and for Alison.
* I have not yet made the major confession here that I knitted these on my primitive machine, though I think they are not at all too hard to contemplate making by hand, and you would avoid the mistake I made.
When you work on a knitting machine, the purl side of the knitting (the back) is facing you. I happily started with Debbie's charted E; it worked out well, if a little large, as I started with a 5 ply version. When I turned it around, however, I found I had knitted a 3. The hearts pattern meant I could not turn it upside down as a fix.
Laugh...
I almost did.
Posted by Christina at 12:39 PM. Category: Red Letter Days