Reindeer jacket (for a BIG boy...or girl)
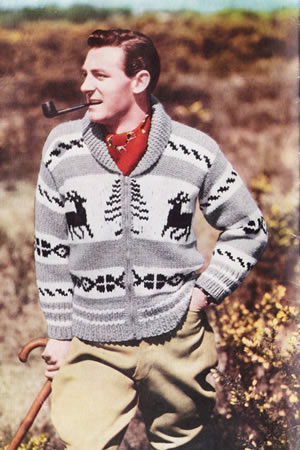
Some 10 years after the entry for the child's version, I discovered an adult cardigan. Astonishingly, it is made using exactly the same instructions - practically word for word - just using a very thick wool.
They published it first as part of the Stitchcraft Moorland (DK) booklet, calling it a North American Indian Coat (pictured above), using 3 strands of the yarn held together, and later as a separate pattern leaflet "by special request" using the new Big Ben yarn, calling it a Western Frontier Jacket (pictured at the end).
With such economy on a rewrite, it's still one (much bigger) size only.
InstructionsBack and fronts are worked together and then divided and worked separately at the armholes. Note that all the charted patterns are worked in shades "dark" and "light". The medium shade is used for bands of colour. Back and Fronts:No 2 (7mm) needles and Medium shade, cast on 127 stitches and work ribbed
welt as follows: Continue using Medium, repeat 1st and 2nd rows 3 times. The ribbed welt is now complete. The remainder of Back and Fronts is worked in stocking stitch, (knit on right side, purl on wrong side), breaking off and joining in colours as required. [Editor's note: You may need to use a circular needle to contain this many stitches in bulky yarn, but you will still work back and forth as if on 2 needles.] Commencing with a knit row, work 4 rows Medium, then 3 rows Light. Starting with a purl row, work rows 1-7 inclusive from Chart A, working 16 stitch repeat 7 times, plus the odd 15 stitches as marked, Read the chart from left to right on purl rows and right to left on knit rows.  [Editor's note: After working Chart A the adult instructions call for a slightly longer length than the child's version.] Then, starting with a knit row, work 3 rows in Light. Work rows 1-20 inclusive from Chart B, working from right-hand side to
the centre stitch; work the centre stitch; then work back to the right-
hand side on every row.  Divide for Back and Fronts:Next row (21st row of Chart B): knit
26 in Light, cast off 11 stitches in Light; (1st left on needle after
cast-off), knit 25 stitches in Light, knit 1 stitch in Dark, knit 26 sts
in Light, cast off 11 stitches in Light. (1st left on needle after cast-off),
knit remaining 25 stitches in Light. [Editor's note: After dividing for back and fronts, the adult instructions again need a slightly longer length in the armhole,. Left Front:Shape armhole and commence to shape front slope: Next row (22nd row of Chart B): purl
2 in Dark, purl 24 in Light. Next row (23rd row of Chart B): knit
26 in Light. Using Medium, work 3 rows. Next row: Using Medium, k2tog, knit to the last 2 stitches, k2tog. [22stitches] This completes the armhole shaping. Starting with a purl row, work rows 1-3 inclusive from Chart C, working the 4 stitch repeat 5 times, reading from left to right on purl rows and from right to left on knit rows.  Next row: Using Light, knit to the
last 2 stitches, k2tog. Starting with a purl row, work 2 rows Light, 1 row Medium. Back:Slip the group of 53 stitches back on to the working needles, and with wrong side facing rejoin Light proceeding for Back as follows: Next row (22nd row of Chart B): purl
24 in Light, p5 in dark, p24 in Light. Work 3 rows in Medium. Next row: Using Medium, k2tog; knit to the last 2 stitches, k2tog. [49sts] Armhole shaping is now complete. Starting with a purl row, work rows 1-3 inclusive from Chart D, working the odd stitch as marked, then the 4 stitch repeat 12 times.  Using Light work 3 rows. Using Medium for the remainder of the Back, continue until the armhole
measures 8½ ins, (that is 8½ ins from the 11 cast-off stitches),
finishing at the end of a purl row.. Right Front:Slip remaining 26 stitches back on to the working needles, rejoin Light, and with wrong side of work facing proceed as for the Left Front, reversing all shapings, and noting that the first 4 rows will read: Next row (22nd row of Chart B): purl
24 in Light, p2 in Dark. ...and then as stated above, complete as for Left front reversing shapings. Sleeves[Editor's note: The sleeves are knitted top down, making for easy length adjustments (or repairs).] Using Medium, and commencing at the top of the Sleeve, cast on 49 stitches and work 8 rows in stocking stitch. Continue in stocking stitch as follows: Work rows 1-7 inclusive from Chart E, working the 16 stitch repeat 3 times, and the odd stitch as marked.  Work 3 rows in Light, 9 rows in Medium, and 3 rows in Light.
Using Medium, work 1st and 2nd rows of rib as on the body. Cast off in rib. Back CollarSlip the 13 stitches from the Back neck on to the working needles, and with right side of work facing proceed in rib as on the welts, increasing 1 stitch at both ends of the 3rd and every following 4th row until there are 27 stitches on the needle. Continue on these stitches until the rib measures 8 inches from the beginning. Sides of CollarWith right side of back collar facing, using Medium colour, knit up 24 stitches along one of the the increase edges, and proceed in garter stitch (every row knit), decreasing 1 stitch at the neck edge on the next and every following alternate row until 2 stitches remain. [Editor's note: The decrease edge is the one which will be sewn to the front slope to make the shawl collar. When the collar is folded over the ribbed section will be visible at the back of the jacket, and the garter stitch sides will be visible at the front of the jacket.] Cast off. Work the other side of the collar to match. To Make UpOmitting the ribbing, with wrong side of work facing block each piece by pinning out round edges. Omitting ribbing, press each piece using a warm iron and damp cloth. Using a back-stitch seam join shoulder and sleeve seams and stitch sleeves into position. Using a flat seam, stitch Collar in position. With right side facing, work 1 row of double crochet along each front edge where the zip is then stitched into position. Press seams. |
Materials
|

