
Brer Rabbit
More....
Please note:
Patterns are for
Personal Use Only
You may freely circulate patterns with the Copyright Statement Preserved.
See terms of use.
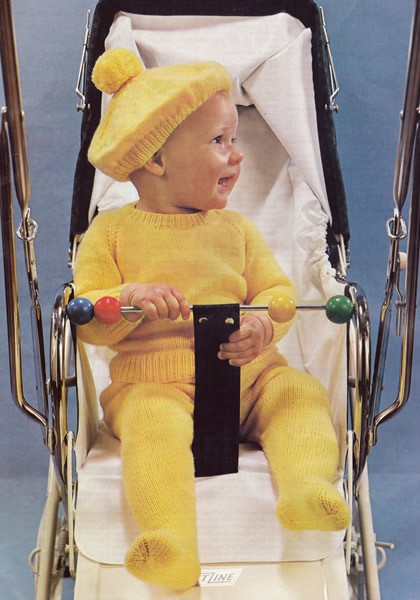
Another delightfully plain and practical pram set for a little one, including leggings, a jumper, and a jaunty beret!
InstructionsJumper Back★ Using size 12 (2¾mm) needles, cast on 72 (76, 80, 84) stitches, and work in k1/p1 rib for 1½ inches ending with a wrong side row. Change to size 10 (3¼mm) needles and stocking stitch (1 row knit,
1 row purl). Shape Raglan Armholes by casting off 3 stitches at the beginning
of the next 2 rows. Jumper FrontFollow instructions for Back from ★ to ★, until 42 (44, 44, 46) stitches remain, ending with a wrong side row. Next row: k2, p2tog , k10 stitches and turn, leaving remaining stitches on a spare needle. Still decreasing at the armhole edge as before, at the same time, decrease
1 stitch at the neck edge on every following alternate row until 5 stitches
remain. Work 1 row; k2tog, and fasten off. Slip the centre 14 (16, 16,
18) stitches onto a spare needle.
Jumper Sleeves Using size 12 needles, cast on 36 (38,
40, 42)
stitches and work in k1/ p1 rib for 1½ inches, ending with a wrong
side row. Shape Raglan Top by casting off 3 stitches at the beginning of
the next 2 rows. Jumper NeckbandUsing a flat stitch, join raglan seams, leaving left back raglan seam
open. With the right side of the work facing and using size 12 needles,
knit across the 6 (8, 8,
10) stitches on the top of the Left
Sleeve;
pick up and knit 12 stitches down the left side of the neck; knit across
the 14 (16, 16,
18) stitches at the centre; pick up
and knit 12 stitches up the right side of the neck; knit across the 6
(8, 8,
10) stitches on top of the Right Sleeve,
and the 26 (28, 28,
30) stitches on the back neck. Work in k1/p1 rib for ¾ inch. Leggings - right leg★ Using size 12 needles, cast on 72 (76,
80, 84)
stitches. Shape Back 1st row: knit 16 (18,
20, 22)
stitches and turn. ★★ Continue in stocking stitch, working across all stitches
for 28 (32, 32,
34) rows. Commence Leg Shaping by casting off 2 stitches at the beginning
of the next 2 rows. Continue on these stitches until work measures 16½ (17¼, 17¾, 18½) inches at the longest (back) edge, ending with a purl row. ★★ Shape Foot Next row: knit 31 (31,
34, 34)
stitches and turn. Work on the centre 13 (13, 14,
14) stitches for 1¾ (2,
2, 2¼)
inches, ending with a purl row. Break off yarn and join it to the inner
edge of the 18 (18, 20,
20) stitches already knitted, pick
up and knit 13 (15, 15,
17) stitches along the first side
of the instep; knit across the 13 (13,
14, 14)
toe stitches, and then knit 13 (15,
15, 17)
stitches along the other side of the instep; then knit the remaining 7
(7, 8,
8) stitches. Commencing with a purl row, work 7 rows in stocking stitch. 1st row: k3, sl1, k1, psso, k1 (1,
2, 2),
k2tog, k27 (29, 30,
32), sl1, k1, psso, k1 (1,
2, 2)
k2tog, k24 (26, 27,
29). Leggings - left legWork as for Right Leg from ★ to ★ . Shape Back 1st row: purl 16 (18,
20, 22)
stitches and turn. Commencing with a purl row, follow the instructions for the Right Leg from ★★ to ★★. Shape Foot Next row: knit 20 (20,
22, 22)
stitches and turn. Work on the centre 13 (13, 14,
14) stitches for 1¾ (2,
2, 2¼)
inches, ending with a purl row. Break off yarn and join it to the inner
edge of the 7 (7, 8,
8) stitches already knitted, pick
up and knit 13 (15, 15,
17) stitches along the first side
of the instep; knit across the 13 (13,
14, 14)
toe stitches, and then pick up and knit 13 (15,
15, 17)
stitches along the other side of the instep; then knit the remaining 18
(18, 20,
20) stitches. Commencing with a purl row, work 7 rows in stocking stitch. 1st row: k24 (26,
27, 29);
sl1, k1, psso, k1 (1, 2,
2), k2tog, k27 (29,
30, 32),
sl1, k1, psso, k1 (1, 2,
2) k2tog, k3. BeretUsing size 12 needles, cast on 132 (132, 136, 136) stitches and work 9 rows in k1/p1 rib. Next row (increase row): rib 7 (7,
9, 9).
* work twice into the next stitch,
rib 2; repeat from * to the last 8
(8, 10,
10) stitches; work twice into the
next stitch, rib 7 (7, 9,
9). Change to size 10 needles and stocking stitch. Shape Crown Break off yarn, thread through remaining stitches, draw up and fasten off securely. To Make UpJumper Leggings Beret |
Materials4 ply yarn 25g balls: Pair each of No 12 (2¾mm) and No 10 (3¼mm) needles. 4 inch zip fastener for jumper Tension30sts and 38 rows to 4 inches Size mattersFinished chest measurement: Abbreviations k: knit A word on the wool.Original yarn was a superwash wool. It appeared as 1 oz balls, then as per this pattern in 25g balls, and finally in 50g balls. Possible yardage based on the 50g ball information is 93 yards (85 metres) to 25g. Disclaimer
|
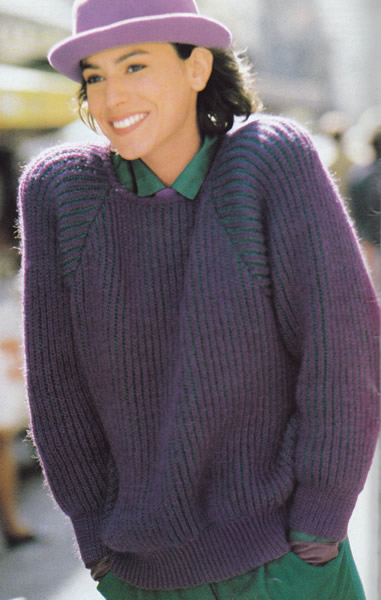
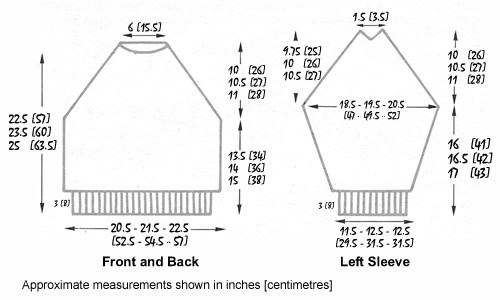
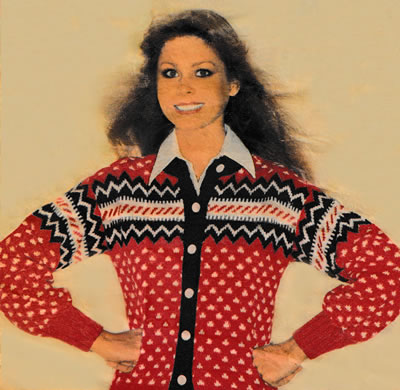
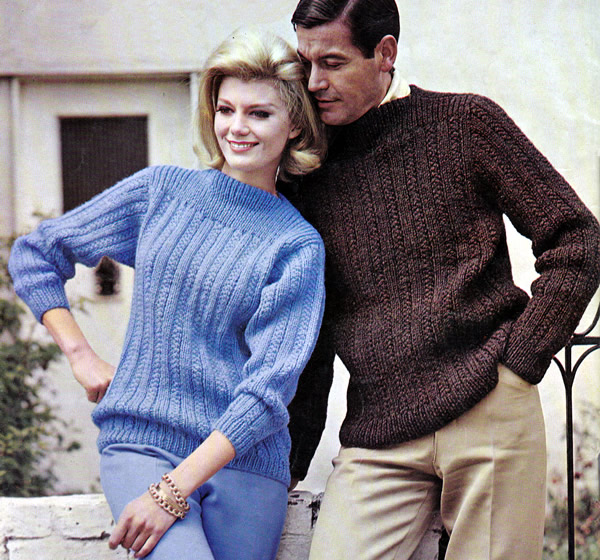
Wonderfully cosy raglan sweater stitched in two vibrant colours. Fisherman's rib - or brioche as it now seems to be called, (no link to French bread as far as I can see) - is fantastically squishy and lovely - well worth the effort.
Instructions 3 sizes - larger sizes are given between brackets - [Editor's note:
If you are not familiar with fisherman rib stitch or brioche worked with
two colours, it should be quite easy to pick up from the instructions
below, once you understand that you do two rows with right side facing
(one in each colour) and then two wrong side rows (one in each colour)
- hence the need for double-pointed needles. Striped Fisherman Rib PatternThe two-colour brioche pattern has to be worked on needles or circular with points at both ends. 1st row (right side): With B, k1;
* p1, slip1pw, yrn; repeat from
* to last 2 stitches, p1, k1. 2nd row (right side): With A, k1;
yft, slip1pw, * yon, knit the next
stitch together with the loop made on the previous row, yft, slip1pw;
repeat from * to last stitch, yon,
k1. 4th row (wrong side): With A, k1,
yft, * slip1pw, yrn, purl the next
stitch together with the loop made on the previous row; repeat from
* to the last 2 stitches, slip1pw, yon,
k1. The last 4 rows from 2nd to 5th inclusive, form the pattern. Important notes on the brioche pattern:
BackUsing No 11 (3mm) needles, and main colour A, cast on 85 (89,
93) stitches and work in single rib: Repeat these two rows until work measures 3 inches (8cm) from the beginning,
ending with 1st rib row. Change to No 9 (3¾mm) needles, join in contrast B, and work in fisherman rib pattern as given above. Continue until work measures 13½ (14, 15) inches from the beginning. Raglan Shaping: Decrease 1 stitch at both ends of every alternate row 9 (10, 12) times, then at both ends of every following 4th row 28 (29, 29) times. Cast off remaining 31 stitches for back neck. FrontWork as for back until 114 (120, 124) rows have been worked from the beginning of the raglan shaping; 39 stitches remain for all sizes, ending with a decrease row. Neck Shaping: Next row: Pattern 13, and leave these
stitches on a holder; cast off the next 13 stitches; pattern to end.
Rejoin the correct colour to the other set of 13 stitches, and complete in the same way, from *** reversing shaping. Note that the front is overall 4 rows shorter than the back. Left SleeveUsing No 11 (3mm) needles, and main colour A, cast on 51 (55, 55) stitches and work as for back welt from ** to **. Increase row: Rib 4 (6, 6), [double increase, rib 13] 3 times, double increase, rib 4 (6, 6). [59 (63, 63) sts] Change to No 9 (3¾mm) needles, join in contrast B, and work in fisherman
rib pattern, but increase 1 stitch at both ends of every following 10th
row 6 (8, 3)
times, then every following 8th row 12 (10,
17) times, working the extra stitches into
the pattern. Continue straight until work measures 16 (16½, 17) inches from the beginning, ending with a 3rd (5th, 5th) pattern row. Raglan Shaping: Decrease 1 stitch at both ends of every alternate row 9 (10,
12) times, then at both ends of every following
4th row 22 (23, 23)
times; for all sizes 33 stitches remain, ending with a 5th pattern row. Neck Opening: 2nd pattern row (right side): Pattern 16 and leave these stitches for the back sleeve section on a spare needle; cast off 1 stitch; pattern to end. Continue on 16 stitches now remaining on the needle for front section
of sleeve. Rejoin the correct colour to the stitches on the spare needle for back
sleeve section. Note that front edge off sleeve is 4 rows shorter than back edge. Right SleeveWork as for left sleeve to ****. Neck Opening: 2nd pattern row (right side): Pattern 16 and leave these stitches on a spare needle for front sleeve section; cast off 1 stitch; pattern to end. Continue on 16 stitches now remaining on the needle for back section of right sleeve, and complete as for back section of left sleeve, reversing shapings. Rejoin the correct colour to the stitches on the spare needle for front sleeve section, and complete as for front section of left sleeve, reversing shapings. Make Up and Neck BordersJoin front raglan seams and right back seam matching vertical stripes.
With right side of work facing and using No 11 (3mm) needles, using main
colour A, pick up and knit 15 stitches along the neck opening at the top
of the left sleeve, 41 stitches round front neck edge, 15 stitches along
neck opening at the top of the right sleeve and 32 stitches
across the back neck. You should not press or iron any of the single or fisherman rib. |
Materials Double Knitting yarn, 50g balls: One pair of No 11 (3mm) needles, and two (long) double pointed needles or circular, No 9 (3¾mm) for working the pattern. Tension20 sts x 50 rows to 4 inches measured over pattern; work a sample on 25 stitches beginning with 2 rows of rib in contrast A then continue in pattern. Size mattersTo fit chest 32-34, (36, 38-40) Abbreviations:k/p: knit/purl A Word on the WoolThe original yarn was a standard double knitting wool (50% ) mix, with acrylic (40%) and mohair (10%). The quoted yardage was 125 meters, (137 yds), per 50g ball. Disclaimer
|
InstructionsSweater Back and Front alike:With No 10 (3¼mm) needles and MC, cast on 85 stitches. Work 10 rows stocking stitch, beginning with a knit row. *

Continue until 3 complete patterns have been worked (or until work measures
16 inches from hemline), ending with a purl row. Shoulder Shaping: Cast off 8 stitches at the beginning of the next 6 rows. Purl 1 row (hemline). Work 6 rows in stocking stitch, beginning with a purl row, increasing 1 stitch at the beginning of every row. Cast off. Sleeves:With No 10 needles and MC cast on 49 stitches. Trousers Right Leg:Beginning at the ankle, with No 10 needles, and MC cast on 76 stitches.
Work 7 rows in stocking stitch knit 1 row (hemline). Decrease 1 stitch at each end of the 5th and every following 6th row until 68 stitches remain. Continue until work measures 24½ inches from hemline *, ending with a knit row. ** Shape back by working short rows thus: Change to No 10 needles and work 1 inch in k1/p1 rib. Trousers Left Leg:Work as right leg to *, ending with
a purl row. Hat:With No 10 needles and MC cast on 97 stitches. Work 6 rows in stocking stitch, decreasing 1 stitch at the end of 1st row. [96 sts]. Shape top thus: Continue decreasing in this way on every alternate row until 24 stitches
remain. Purl 1 row. Mitts (make 2 alike):With No 10 needles and MC cast on 39 stitches. With right side facing and 32 stitches on right hand needle, rejoin
yarn at the base of the thumb; pick up and knit 2 stitches at the base
of thumb, knit the 6 stitches to the end of the row end. [40 sts]. To Make Up Press or block work. Sweater: Join shoulder and neck facing seams. Trousers: Join front and back seams. Hat: Join seam. Mitts: Join seam. |
MaterialsWorked in a standard double knitting yarn (swatch as per tension given). Sweater: Hat: Trousers: Mitts: Pair each of No 9 (3¾mm), and Waist length of elastic. Tension26sts to 4 inches over fair-isle, 24sts over stocking stitch on 3¾mm needles. Size mattersSweater: Trousers: Abbreviations k: knit MC = main colour Disclaimer
|
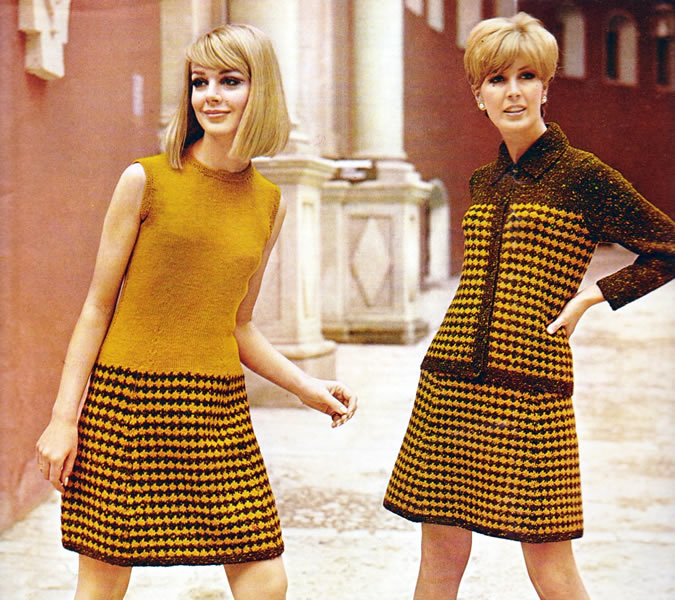
Striking (or startling) sixties "costume" of a jacket with a matching dress or skirt. The colours are very much of the time, so it might be slightly more appealing to current taste if executed in, say, black or navy with a neutral white or cream (but if you like it, I expect you'd already thought of that!).
Instructions for Jacket and Skirt SuitJacket BackUsing No 10 (3¼mm) needles and B, cast on 80 / 84
/ 88 / 92
stitches and work 10 rows in garter stitch. With right side facing, change to No 7 (4½mm) needles, join in D
and work in pattern as follows:— Work straight in pattern until back measures approximately 14 inches,
ending with 8th pattern row. Now decrease 1 stitch at each end of next and every alternate row until 69 / 73 / 79 / 83 stitches remain. Break D. Next row: in B, purl 3 / 6
/ 2 / 5,
p2tog, * p4, p2tog; repeat from *
to last 4 / 5 / 3
/ 4 stitches, purl 4 / 5
/ 3 / 4. Work straight in stocking stitch in B, starting with a knit row, until
back measures 21 / 22 / 22
/ 22½ inches down centre. Jacket Left FrontUsing No 10 needles and B, cast on 38 / 40
/ 42 / 44
stitches and work 10 rows in garter stitch. With right side facing, change to No 7 needles and diamond pattern, starting with 1st pattern row, and work straight until front matches back at side edge, ending with 8th pattern row. With right side facing, shape armholes by casting off 5 / 5
/ 6 / 6
stitches at the beginning of the next row. Next row: in B, purl 3 / 4
/ 3 / 1,
p2tog, * purl 3 / 2
/ 2 / 2,
p2tog; repeat from * to last 3 / 3
/ 3 / 1
stitches, purl 3 / 3 / 3
/ 1. Work straight in stocking stitch in B, starting with a knit row, until
front measures 19½ / 20 / 20
/ 20½ inches down centre. Jacket Right FrontWork to correspond with left front, reversing shapings. SleevesUsing No 10 needles and B, cast on 40 / 42
/ 42 / 44
stitches and work 11 rows garter stitch. Work straight until sleeve seam measures 15 / 15½
/ 15½ / 16
inches. CollarUsing No 10 needles and B, cast on 60 / 62
/ 64 / 66
stitches and work in garter stitch, shaping collar by increasing 1 stitch
at each end of the next and every alternate row until there are 70 / 72
/ 74 / 76
stitches Work 7 rows straight. Work 7 rows straight. Work 7 rows straight, Work 7 rows straight. Cast off. Front BandsRight: With No 10 needles and B, pick up and knit 107 / 109
/ 109 / 111
stitches up right front to start of neck shaping. Left: Work to correspond with right front band, omitting buttonholes. To Make UpPress parts lightly on wrong side under a damp cloth, avoiding garter
stitch borders. SkirtFirst panel: With right side facing, change to No 7 needles, join in D and work in
pattern as follows:— Work a further 4 / 8 / 10
/ 16 rows straight in pattern. Work 3 / 3 / 1 / 1 rows straight, then, decrease 1 stitch at each end of next and every following 6th row until 31 / 33 / 35 / 37 stitches remain. Work a few rows straight until panel measures 20 / 20½
/ 21 / 21½
inches down centre, ending with 8th pattern row. Change to No 10 needles, and work 1 inch k1/p1 rib in B. To Make UpPress parts lightly on wrong side under a damp cloth, avoiding garter
stitch borders. |
MaterialsJacket: Skirt: Pair each of No 7 (4½mm), and 7 buttons. Tension16sts and 27 rows over 3 inches on 4½mm needles over diamond pattern. 18sts and 25 rows to 4 inches in tweed yarn on 4½mm needles over
stocking stitch. Size mattersJacket: Skirt: Abbreviations k: knit D = plain double knitting colour A word on the wool.The original yarn was Patons Bracken combined with a plain DK. I would substitute with Rowan Felted Tweed DK (because I love it and
there is a wonderful range of colours); however it's a finer yarn, and
much loftier and light weight yarn than Bracken, which knitted up quite
firmly, and the tension here aligns Bracken more towards being an Aran
yarn rather than a DK. Disclaimer
|
Instructions for DressSkirt sectionsWork panel as given for skirt above from **
to **. Work a few rows straight until panel measures 16½ / 17
/ 17½ / 18
inches down centre, ending with 4th pattern row, and increasing 1 stitch
in the centre of this row for the 2nd
and 4th sizes only. Break off B yarn, and leave the stitches on a spare needle or stitch holder. Make another 3 panel sections the same, and number each panel 1, 2, 3 and 4. Bodice back:To make the bodice, arrange the stitches from the skirt panels as follows:— *** Continue working back and forth
in stocking stitch on these 94 / 100
/ 106 / 112
stitches for the back, starting with a purl row and work 3 rows straight.
Work straight until bodice measures 12½ / 12½
/ 12 / 12
inches from start. Work a few rows straight until bodice measures 15½ inches down centre,
ending with right side facing. With right side facing, rejoin the yarn to the remaining stitches and finish to correspond with first side of back. Bodice front: With No 8 needles and right side facing, using D yarn, work as follows:—
Work as for Bodice back from ***
to ***. Here divide for neck:- With right side facing, shape shoulder as given for back. With right side facing, slip centre 14 / 16
/ 18 / 20
stitches on a spare needle or stitch holder, rejoin wool to remaining
stitches, and knit to end. To Make Up Press parts carefully on wrong side under a damp cloth, avoiding garter
stitch borders. Neckband: With right side facing, and using the set of No 10 needles,
or circular needle, work in D yarn as follows:— Arranging the stitches evenly on 3 needles, or using circular needle,
work backwards and forwards in garter stitch (every row knitted) for 3
rows. Work a further 3 rows garter stitch. Cast off. Armbands: With right side facing, and using No 10 needles, work
in D yarn as follows:— Join side seams and armbands with a flat seam. |
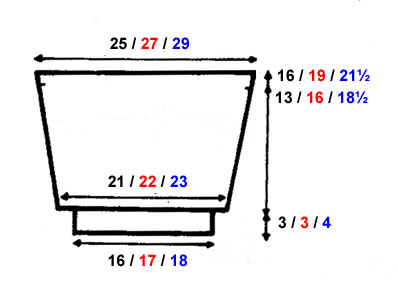
Materials12 / 13 / 14
/ 15 x 1oz balls in plain double knitting
("Amberglow") Pair each of No 7 (4½mm), No 8 (4mm), and No 10 (3¼mm) needles. A 5 inch zip fastener for back of dress. Tension16sts and 27 rows over 3 inches on 4½mm needles over diamond pattern.
Size mattersTo fit chest: Abbreviations k: knit D = plain double knitting colour A word on the wool.The original yarn was Patons Bracken combined with a plain DK. I would substitute with Rowan Felted Tweed (because I love it and there
is a wonderful range of colours); however it's a much loftier and light
weight yarn than Bracken, which knitted up quite firmly. Disclaimer
|
Still beside the sea, as the weather turns cooler. An altogether pleasing design for jackets with broken cable pattern - for him: a zip closure with angled pockets, and for her: a smooth line with buttons.
Instructions for woman's jacketNote: instructions are given for 3 sizes. BackWith No 8 (4mm) needles cast on 122 / 128 / 136 stitches, and work 11 rows in k1/p1 rib, increasing 1 stitch at the end of the last row on the middle size only. [122 / 129 / 136 sts] 12th row: k1, purl to the last stitch,
k1. Change to No 6 (5mm) needles and pattern: 1st row: k1, p2, *
k4, p3; repeat from * to last 7 sts;
k4, p2, k1. ** Repeat from ** to ** twice more, then repeat the 3rd, 2nd, and 1st rows once more, in that order. Change to No 7 (4½mm) needles. 24th row: k1, purl to the last stitch,
k1. These 34 rows form the pattern. Change to No 6 needles and repeat from 1st to 34th rows inclusive once,
then 1st to 24th rows inclusive once. Keeping pattern correct and changing needles as before, shape armholes
by casting off 7 / 8 / 9
stitches at the beginning of the next 2 rows. Repeat the last 6 rows until 32 / 37 / 42 stitches remain, ending with right side facing. For the 2nd size: work 4 more rows, decreasing 1 stitch at each end of the 1st and 3rd rows. For the 3rd size: work 8 more rows, decreasing 1 stitch at each end of the 1st and then alternate rows. For all sizes: cast off the remaining 32 / 33 / 34 stitches, firmly. Left FrontWith No 8 needles cast on 66 / 72 / 80 stitches, and work exactly as for back to ***. Keeping pattern correct and changing needles as before, shape armhole: Next row: cast off 7 / 8
/ 9 stitches, work in rib to end. Continuing on No 6 needles: SHAPE NECK: For the 2nd and 3rd
sizes: continue decreasing as before but at each end
of the needle until 31 / 21
stitches remain. Right FrontWork exactly as for left front to the start of the armhole shaping, then work one more row in rib to end with the wrong side facing. Now shape the armhole: Next row: cast off 7 / 8
/ 9 stitches, purl to the last stitch, k1.
Continuing on No 6 needles: SleevesWith No 8 needles cast on 40 / 40 / 42 stitches, and work 11 rows in k1/p1 rib, increasing 5 / 5 / 10 stitches evenly across on the last row. [45 / 45 / 52 sts] Next row: k1, purl to the last stitch, k1. Change to No 6 needles and cable pattern, as for the back, and work Continue working in cable and rib pattern, increasing 1 stitch at each end of the next and every following 4th row until there are 89 / 91 / 98 stitches. Then continue straight until the 28th row of the 3rd pattern has been completed - that is, finishing on on the same row as the back before the start of the armhole shaping. Shape armhole exactly as for back until 43 / 43
/ 48 stitches remain. Front BordersLeft: With No 7 needles, cast on 11 stitches. 1st row: k2, *
p1, k1; repeat from * to last stitch,
k1. Repeat these 2 rows until border fits up edge of left front to the start
of the neck shaping when slightly stretched. Right: Work a similar strip for the right front, with the
addition of 8 buttonholes; the first to come in the 5th and 6th rows up
from the lower edge, and the 8th just below the start of the neck shaping,
and the remaining 6 spaced evenly in between. To make a buttonhole: with right side facing, rib 4, cat off 3, rib 4;
rib back, casting on 3 over those cast off. When border is finished, cast off evenly in rib, and sew in position. CollarWith No 7 needles, cast on 139 / 141
/ 145 stitches, and work in k1/p1 rib as
given for left front border, until collar measures 4 inches. Cast off
24 / 25 / 27
stitches at he beginning of the next 4 rows.
To Make UpPin out the pieces to sizes required and block or press according to
the instructions for the wool you are using (usually given on the ball
band). |
MaterialsAran or worsted weight yarn: Pair each of No 6 (5mm), No 7 (4½mm), and No 8 (4mm) needles. 8 buttons. Tension19sts and 24 rows to four inches on 5mm needles over stocking stitch.
Size mattersTo fit chest: Abbreviations k: knit A word on the wool.The original yarn was Patons Ariel designed for outer wear with a slightly
rough texture. It was one of those "tripleknit" yarns which
never really caught on in the UK. More or less Aran or American worsted
weight. It came in 2oz (57g) balls at 89m/97yards, 80% wool, 20% man-made
fibres. Disclaimer
|
"The sporty out-door look is perfectly typified in this popular, but first-class looking, zipped jacket. Companion to the woman's jacket, in the same attractive crunchy broken rib pattern. Lovely waterside colour of deep, shimmering blue, lightweight, but windproof by the sea, in the special triple-knit texture."
Instructions for man's zipped jacketNote: instructions are given for 2 sizes. BackWith No 8 (4mm) needles cast on 136 / 142 stitches, and work 11 rows in k1/p1 rib, increasing 7 stitches evenly across on the last row. [143 / 150 sts] 12th row: k1, purl to the last stitch,
k1. Change to No 6 (5mm) needles and pattern: 1st row: k1, p2, *
k4, p3; repeat from * to last 7 sts;
k4, p2, k1. ** Repeat from ** to ** twice more, then repeat the 3rd, 2nd, and 1st rows once more, in that order. Change to No 7 (4½mm) needles. 24th row: k1, purl to the last stitch,
k1. These 34 rows form the pattern. Change back to No 6 needles and continue in pattern until 3 complete patterns have been completed from the start. Keeping pattern correct and changing needles as before, with right side facing, shape armholes by casting off 4 stitches at the beginning of the next 2 rows, then decrease 1 stitch at each end of every row until 103 / 98 stitches remain. Now decrease 1 stitch at each end of the next and every alternate row until 41 / 42 stitches remain, ending with right side facing. Leave these stitches on a spare needle or stitch holder. Right FrontWith No 8 needles cast on 66 / 72 stitches, and work 11 rows in k1/p1 rib, increasing 7 / 8 stitches evenly across on the last row. [73 / 80 sts] 12th row: k1, purl to the last stitch, k1. Change to No 6 needles and pattern as given for the back. Here divide for pocket. Next row: rib 21 / 28
and slip these stitches onto a spare needle or stitch holder, cast off
3, pattern to end. Keeping pattern correct and changing needles as before, shape as follows:
Repeat the last 2 rows 10 times more. [27 / 27
sts] With right side facing, rejoin yarn to the last 21 / 28
stitches; cast on 3, and rib to end. Continue in pattern, casting on 2 stitches at the beginning of the next and every alternate row until there are 46 / 53 stitches, taking the cast on stitches into the pattern as they are made, and ending at the side edge. Now continue in pattern over all stitches, until front matches back at side edge, ending with wrong side facing. Keeping pattern correct and changing needles as before, shape raglan armhole: Next row: cast off 4, pattern to end. Now decrease 1 stitch at the armhole edge on the next 10 / 22
rows. [59 / 54 sts] Shape neck: Next row: cast off 12 / 13,
pattern to end. Left FrontWith No 8 needles cast on 66 / 72 stitches, and work 11 rows in k1/p1 rib, increasing 7 / 8 stitches evenly across on the last row. [73 / 80 sts] 12th row: k1, purl to the last stitch, k1. Change to No 6 needles and pattern as given for the back. Here divide for pocket. Next row: pattern 52 / 52
and slip the remaining 21 / 28 stitches
onto a spare needle or stitch holder. Next row: cast off 2, pattern to
end. Break yarn and leave these 27 stitches onto a spare needle or stitch holder. With wrong side facing, rejoin yarn to last 21 / 28
stitches. With wrong side facing, rejoin yarn at front edge, and continue in pattern over all stitches, and finish to correspond with right front, reversing all shapings. SleevesWith No 8 needles cast on 48 / 52 stitches, and work 2½ inches in k1/p1 rib, increasing 11 / 14 stitches evenly across on the last row. [59 / 66 sts] Change to No 6 needles and cable pattern, as for the back, and work Continue working in cable and rib pattern, increasing 1 stitch at each end of the next and every following 4th row until there are 109 / 110 stitches, taking the increased stitches into the pattern as they are made. Then continue straight until the 34th row of the 3rd pattern has been completed - that is, finishing on on the same row as the back before the start of the armhole shaping. Shape top by casting off 4 stitches at the beginning of the next 2 rows, then decrease 1 stitch at each end of the next 18 rows. [65 / 66 sts] Now decrease 1 stitch at each end of the next and every following alternate row until 5 / 6 stitches remain, ending with right side facing. Leave these stitches on a spare needle or stitch holder. CollarJoin raglan seams, matching patterns. Next row: k1, *
p1, k1; repeat from * to end. Next row (increases): rib 4, pick
up horizontal loop lying before next stitch and knit into the back of
it; rib to last 4 stitches, pick up horizontal loop lying before next
stitch and knit into the back of it, rib 4. Pocket Linings an BordersLinings: With No 6 needles and right side facing, pick up and
knit 32 stitches along top slope of each pocket and work 4 inches in stocking-stitch,
starting with a knit row. Cast off.
To Make UpPin out the pieces to sizes required and block or press according to
the instructions for the wool you are using (usually given on the ball
band). |
MaterialsAran yarn: Pair each of No 6 (5mm), No 7 (4½mm), and No 8 (4mm) needles. A zip fastener (double-ended - suitable for a jacket). Tension19sts and 24 rows to four inches on 5mm needles over stocking stitch.
Size mattersTo fit chest: Abbreviations k: knit A word on the wool.The original yarn was Patons Ariel designed for outer wear with a slightly
rough texture. It was one of those "tripleknit" yarns which
never really caught on in the UK. More or less Aran or American worsted
weight. It came in 2oz (57g) balls at 89m/97yards, 80% wool, 20% man-made
fibres. Disclaimer
|
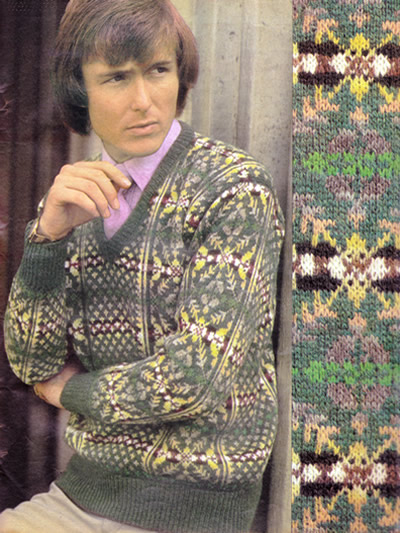
A fairly timeless design for a man's Fair-Isle sweater in lovely muted shades of Shetland wool. As I love this kind of colourwork, and I love men's fashions, it's definitely a hit with me - a lovely gift for a (very) deserving man...
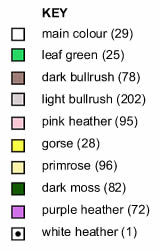
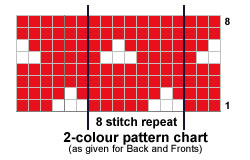
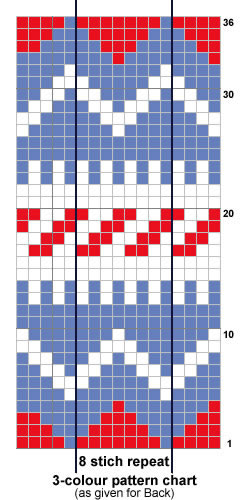
Instructions:The pullover is given in one (medium man's) size and is worked using the Fair-Isle technique, with colours not in use stranded loosely across back of work. ChartsThe charts are included with the pattern instructions below, but for a larger version of the charts you can right click on the icon below and choose "save link as" or "save target as" (browser dependent options) to download and save a pdf file.
BackUsing No 12 (2¾mm) needles and main shade yarn cast on 175 stitches, and work 3 inches in k1/p1 rib. Change to No 11 (3mm) needles, and work 2 rows in stocking stitch. Continue in stocking stitch, working the pattern from the chart thus: reading knit rows from right to left and purl rows from left to right. Work the 87 pattern stitch repeat twice across.
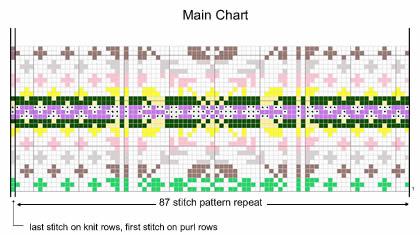
Continue working rows from the chart until the 12th row of the 4th pattern repeat has been completed. ** Armhole shaping: cast off 13 stitches at the beginning of the
next 2 rows. FrontWork as for the back until **. Armhole and neck Shaping: Repeat the last 2 rows until 61 stitches remain, then decrease in the
same way at the neck edge on every 4th row until 52 stitches remain. Join wool to inner (neck) edge of the remaining stitches. SleevesBegin at the top of the sleeve. Using No 11 (3mm) needles and main shade yarn cast on 135 stitches. Knit one row. Beginning with the 16th row of the chart (a purl row worked from left
to right), work thus:
Continue in pattern as set, decreasing 1 stitch at each end of every
5th row until 87 stitches remain. Continue with main shade only and work 3 rows in stocking stitch. Change to No 12 (2¾mm) needles and work 3 inches in rib as for the back. Cast off ribwise. NeckbandJoin right shoulder seam. Using No 12 (2¾mm) needles and main shade, pick up and knit 54 stitches down left front neck, 1 stitch from centre front, 54 stitches up right front neck, and 50 stitches across back neck. [159 sts] Work 10 rows k1/p1 rib, decreasing 1 stitch each side of the centre front
stitch on every row, then work 10 rows k1/p1 rib, increasing 1 stitch
each side of the centre front stitch on every row. To Make UpPress parts lightly under a damp cloth. |
|
Materials Shetland 2 ply jumper weight (fingering yarn): A pair each No 11 (3mm) and No 12 (2¾mm) needles. Tension32sts x 32 rows to 4 inches over Fair Isle stitch. Size mattersChest to fit one size: 40-42 inches. Abbreviationsk2tog/p2tog: decrease by knitting/purling 2 sts together. stocking stitch: one row knit and one row purl, ("stockinette"). A word on the woolOriginal yarn "Real Shetland Knitting Wool 2 ply jumper weight"
stated as available from a supplier in Edinburgh is likely to be the 2
ply jumper weight from Jamieson
and Smith. It's a 4 ply equivalent specifically designed for Fair
Isle knitting, and is available in 25g balls from a number of different
suppliers in an extensive range of colours. Disclaimer
|
Delightfully plain and simple outfit for a new baby. Cardigans are (I am told) the most useful for small babies - trousers optional - and the bootees - well, they are always just impossibly cute aren't they? (even if they rarely stay attached to the baby!).
Instructions.The cardigan is worked as one piece, starting with the two front, pieces worked separately, then joining them to complete the lower back Cardigan left front:Using No 11 (3mm) needles, cast on 34 stitches and knit 2 rows. Shape front hem, by working short rows as given below, noting that after the first 8 rows in garter stitch (every row knitted), you start to work in stocking stitch (right-side rows knitted, wrong-side rows in purl) on the first 27 stitches, and keep the last 7 front edge stitches (the curved edge) in garter stitch to form the front band Next row: k26. Turn, knit back to
end. Continue straight, with the 7 front edge stitches in garter stitch and
the 27 side edge stitches in stocking stitch, until work measures 4¾
inches from the start of the stocking stitch, (about 46 rows), ending
with a wrong side row. Shape neck, by casting off stitches at the front edge as follows: Next row (wrong side facing): cast
off 7 stitches at the front edge, work to end of row. Continue straight, as set, keeping the sleeve cuff in garter stitch, until work
measures 7¾ inches (about 76 rows), ending with right side facing
for the next row. Cardigan right front:Work as for the left front, reversing all shapings, and placing 3 buttonholes
at the front edge on the 4th, 30th, and 56th row of the stocking stitch. When you have completed the 76 rows on the right front, join the two fronts together to knit the back: Cardigan backNext (joining) row (right side facing):
knit 54 stitches from the left front; cast on 22 stitches for the back
neck; knit 54 stitches from the right front. [130 sts]. Continue straight for 31 rows, keeping the 7 stitches at each end in garter stitch, for the two sleeve cuffs. Cast off 34 stitches at the beginning of the next 2 rows. [62 sts]. CollarUsing No 11 needles, cast on 11 stitches and knit 2 rows. Next row: k4. Turn, knit back to
end. Shape collar: Next row: k3. Turn, knit back to
end. Next row: k3. Turn, knit back to
end. Cast off. Making up the cardiganJoin side and sleeve seams. |
Materials4ply fingering yarn in 50g balls: Nos 11 (3mm) needles. Tension28sts x 32 rows to 4 inches over stocking stitch. Size mattersTo fit one size up to 3 months. Abbreviationsk2tog: decrease by knitting 2 stitches together. A word on the wool.Original yarn was a synthetic mix of acrylic and rayon (which gave it
a ply of a silky thread), and a small percentage of wool. Disclaimer
|

Trousers Front* Using No 11 (3mm) needles, cast
on 27 stitches, and work in garter stitch for 8 rows. Make a second leg by repeating these instructions from * to *. Then join the two legs by knitting across these 27 stitches from the
second leg, cast on 8 stitches, and knit across the 27 stitches from the
first leg. [62 sts] Work straight on these 62 stitches in stocking stitch for 5½ inches ending with wrong side facing for next row. Next row: knit. Starting with a knit row, work 8 rows in stocking stitch as before. Trousers BackWork as for Front from * to **.
Shape top by working as follows: Next row: Work to the last 3 stitches.
Turn. Work 3 rows across all 62 stitches, ending with wrong side facing for next row. Next row: knit. Making up the trousersJoin side and leg seams. 
BooteesUsing No 11 (3mm) needles, cast on 38 stitches, and work for 8 rows in
garter stitch. Next row: k2, *
k2tog, yon; repeat from * to last
2 stitches, k2. Next row: k24. Turn, and leave the
remaining stitches on a spare needle. Continue on these 10 stitches for a further 16 rows in stocking stitch,
ending with right side facing for next row. With right side facing, rejoin yarn and knit 14 stitches from spare needle; knit up 12 stitches along the side of the rows just worked; knit across 10 stitches from spare needle; knit 12 stitches down the other side of the rows just worked; knit across 14 stitches from spare needle. [62 sts] Work 8 rows in garter stitch, ending with right side facing for next
row. Shape Sole: Slip the first 26 stitches on to the right hand needle (or "working" needle if you are left handed), and rejoin yarn to work the centre 10 sole stitches; knit 9, k2tog, turn. Cast off. Finishing: Join back seam, and join sole at the back. Make a cord by cast on 100 stitches; knit one row, then cast off. Make a second bootee in the same way. |
|
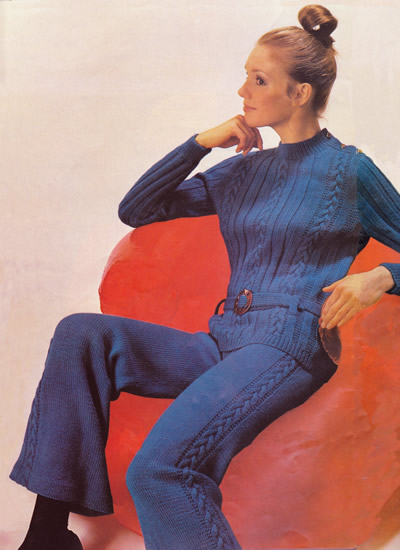
Having spent years making tongue-in-cheek comments about knitted trousers, I find they seemed to become a kind of pandemic fashion item - safely out of site during Zoom meetings. I'm not sure the fashion was really for anything like hand-knitted trousers; however, sitting (unobserved!) in my poorly-insulated chilly office at the top of the house, cosy woollen trousers are taking on some kind of appeal.
Even if the trousers don't appeal, there is a rather nice matching low-belted long-line cable sweater - very much of the period.
Instructions. 3 sizes - larger sizes are given between brackets - Jumper BackUsing No 10 (3¼mm) needles, cast on 94 (106,
116) stitches and work 11 rows in k1/p1 rib.
Change to No 8 (4mm) needles and pattern: 1st row (right side facing): k5 (4, 1);
[p4, k4] one (two, three)
times; * p2, k9, p2, [k4, p4] twice,
k4; repeat from * once, p2, k9, p2,
[k4, p4] one (two, three)
times, k5 (4, 1). These 8 rows form the pattern. Continue in pattern until work measures 16 inches from the beginning, ending with a wrong side row. Shape Armholes: * Continue without further shaping until work measures 7 (7½, 8) inches from start of armhole shaping, ending with a right side row. Shape Shoulders: With wrong side of work facing, join in yarn at the neck edge and work
to end. Jumper FrontFollow instructions for Back from *
to *. Shape Neck: Shape Shoulder: Shape Shoulder: Jumper SleevesUsing No 10 (3¼mm) needles, cast on 52 (54,
56) stitches and work 15 rows in k1/p1 rib. Change to No 8 (4mm) needles and rib pattern. These 2 rows form the pattern. Shape Top: Jumper Shoulder EdgingUsing size 10 needles, cast on 11 stitches. 1st Buttonhole row: Rib 4, cast off
3, rib to end. Jumper Neckband Using a back stitch, join right shoulder seam. Next row (wrong side facing): p1,
* k1, p1, repeat from *
to end. Continue in rib, making a third buttonhole 1¾ (2,
2¼) inches from base of previous buttonhole.
Jumper BeltUsing No 10 needles, cast on 13 stitches. Belt Tabs (Make 4): Using No 10 needles, cast on 7 stitches. Making Up JumperUsing a back stitch, join side and sleeve seams. |
Materials
|
Trousers Right LegUsing No 8 (4mm) needles, cast on 121 (129,
137) stitches and work 9 rows stocking stitch,
(1 row knit, 1 row purl). Commence pattern: 1st row (right side facing): k53
(57, 61);
p2, k9, p2; k55 (59, 63). These 8 rows form the pattern. Keep continuity of cable panel: Next row: k2tog, work to last 2 stitches,
k2tog. [113 (121, 129)
sts] Trousers Left Leg Using No 8 (4mm) needles, cast on 121 (129,
137) stitches and work 9 rows stocking stitch,
(1 row knit, 1 row purl). Commence pattern: 1st row (right side facing): k55
(59, 63);
p2, k9, p2; k53 (57, 61). These 8 rows form the pattern. Keep continuity of cable panel: Next row: k2tog, work to last 2 stitches,
k2tog. [113 (121, 129)
sts] Next row: Work to last 2 stitches,
k2tog. [110 (118, 126)
sts] Trousers Waistband Using backstitch, join front and inside leg seams. Making Up TrousersSew in zip to centre back seam, placing top of zip in line with base
of waistband, then join |
|
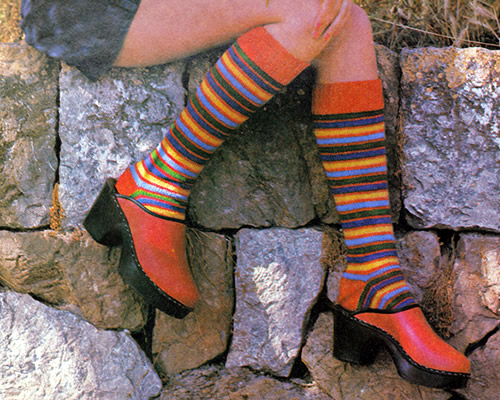
These socks are made using 2 needles, with one main colour and 4 contrasts. Of course, you can have as many contrasts as you like, and it would be good for using up lots of bright leftovers yarns; however it's always good to have a consistent main colour to tie it all together.
Alternatively you could easily substitute a suitably cheerful self-striping yarn either for the contrast stripes, or used plain throughout, allowing it to do its thing.
whatever you choose, complete the look with clogs*.
Just the thing to jazz up your jeans. Make them with or without toes — and the brighter the better!
* note: if you knit separate toes, it might be a bit overcrowded in clogs...
Instructions.The socks are worked on two needles. Right Leg** Using No 11 needles and colour A, cast on 80 stitches. Join in colour B. Beginning with a knit row, continue in stocking stitch,
(1 row knit, 1 row purl), working in striped sequence of 4 rows B, 2 rows
A, 4 rows C, 2 rows A, 4 rows D, 2 rows A, 4 rows E and 2 rows A throughout.
Shape leg:Next row: k1, sl1, k1, psso; knit to the last 3 stitches k2tog, k1. Keeping striped sequence correct. Continue in this way, decreasing 1
stitch at each end of every following 6th row until 60 stitches remain. Divide for heel and instep With right side of work facing, slip the first 15 stitches on to a stitch
holder for the heel. InstepWork 6½ inches (16½cm) in the striped sequence for the instep, ending with 2 rows in colour A (wrong side row). Editor's note: Now you need to decide if you want "normal" socks, or socks with separate toes - useful for bar-toe sandals! - and if you are knitting toes then you leave the stitches on a stitch holder at this point while you continue to knit the heel. Shape instep top without toes ("normal" sock) Next row: Using colour A throughout,
k1,sl1, psso; knit to the last 3 stitches, k2tog, k1. Version including toesBreak off yarn and leave the stitches on a holder while you continue with the instructions to shape the heel. Shape heelEditor's note: heel shaping instructions for both versions of sock, with or without toes. Slip the 30 stitches you previously left on holders on to the needle,
placing the outside edges together in the middle. Using colour A and with right side of work facing, shape the heel, working short rows as follows: 1st row (right side facing): sl1
knitwise, k28. Turn. Continue in this way, working one stitch less on every row until you have worked the row: "sl1 purlwise, p13. Turn." has been completed, leaving 8 stitches unworked at each side. Next row: sl1 knitwise, k13. Pick
up the loop lying between Shape sole top without toes ("normal" sock)Shape the top by working exactly the same as for the instep shaping. ** Version including toesHaving completed the heel, return to the instep stitches that you left on a holder. Big toe:
Next row: Using colour A, knit across
instep stitches, then knit 10 stitches from the sole. Turn, and cast on
2 stitches. Using A throughout, and working on these 24 stitches, work 16 rows in stocking stitch. Shape top: Second toeWith right side of work facing, using the right hand needle and colour
B, pick up 3 stitches at the base of the big toe. K5 stitches. Turn, and
cast on 2 stitches. Using B throughout, and working on these 17 stitches, work 14 rows in stocking stitch. Shape top: Third toeWith right side of work facing, using the right hand needle and colour
C, pick up 3 stitches at the base of the second toe. Using C throughout, and working on these 17 stitches, work 12 rows in
stocking stitch. Fourth toeWith right side of work facing, using the right hand needle and colour
D, pick up 3 stitches at the base of the third toe. K4 stitches. Turn,
and cast on 2 stitches. Using D throughout, and working on these 15 stitches, work 12 rows in stocking stitch. Shape top: Little toeWith right side of work facing, using the right hand needle and colour
E, pick up 3 stitches at the base of the fourth toe. Knit to end. Turn. Using E throughout, and working on these 15 stitches, work 10 rows in
stocking stitch. Left LegWork as for right leg from ** to
**. Version including toesSet the position of the toes for the left foot as follows: Big toe: Next row: Using colour A, knit across
the sole stitches, then knit 10 stitches from the instep. Turn, and cast
on 2 stitches. Complete the big, second, third, fourth, and little toes, as given for
the right leg. Making upOmitting ribbing, press parts lightly under a damp cloth with |
Materials3 x 25g balls of 4 ply yarn in main shade (A) and 1 ball in each of 4 contrast colours (B, C, D, and E). One pair of No 11 (3mm) needles. Tension30 sts x 40 rows to 4 inches over stocking stitch on No 11 (3mm) needles. Size mattersTo fit and "average" adult foot: 9/9½ inches (23/24cm).
Length from top of heel: 13½ inches (34½ cm). Abbreviationssl1: slip the next stitch k2tog or p2tog: work 2 sts together to decrease. A Word on the Wool.Original yarn was a superwash 4ply. These days there is a huge choice of wool for socks, but I would recommend some nylon content. Disclaimer (well...almost)In transposing any pattern it is always a risk that errors will be introduced, in spite of dedicated proof reading. If you have any problems with this pattern, please and I will try and assist. |
This wasn't my original choice for this month, but recently I have noticed a trend for monochrome wool dresses in some fashion articles. Not too hard to knit as the two-colour effect is formed by slipping stitches - so only one colour in any one row.
Instructions.A tweed dress in 3 sizes (small/medium/large). Back** 1st row (right side facing): Purl
in L - do not break yarn L. These 8 rows form the pattern. Work straight until back measures 3 inches, ending with a 4th or 8th
pattern row. Work straight until back measures 6 inches, ending with a 4th or 8th
pattern row. Work straight until back measures 9 inches, ending with a 4th or 8th
pattern row. Work straight until back measures 12 inches, ending with a 4th or 8th pattern row. Continue in this way, decreasing 4 stitches on every 1st or 5th pattern row at 3 inch intervals, until 97/103/109 stitches remain. Work straight until back measures 29½ inches down centre, ending
with 2nd or 6th pattern row. Work a few rows straight until back measures 31/31½/32 inches, ending with right side facing. Here divide for back opening: Continue straight on these 37/38/41
stitches for first side, until back measures 36½/37/37½
inches. With right side facing, rejoin wool to remaining stitches, cast off the centre stitch, then finish to correspond with first side, reversing shapings. FrontWork as for back from ** to **
. Work straight until front measures 34/34½/35 inches, ending with right side facing. Here divide for neck: Next row: pattern 28/29/30,
turn, and leave remaining 47/50/53
stitches on a spare needle. Continue on these stitches for first side, decreasing 1 stitch at the neck edge on the next and every alternate row until 20/21/22 stitches remain. Work a few rows straight until front matches back at armhole edge, ending with right side facing. Shape shoulder as given for back. With right side facing, rejoin wool to the remaining stitches, cast off
the centre 19/21/23
stitches, and pattern to end. To Make UpPress parts or block lightly on the wrong side under a damp cloth. Neck Facing: Armhole Facing: Join side seams. |
MaterialsDouble knitting: Pair each of 6 inch zip. Tension22sts to 4 inches on 4mm needles over pattern. Size mattersTo fit chest: Abbreviations k: knit A word on the wool.Original yarn was pure wool in a standard DK weight. Disclaimer
|
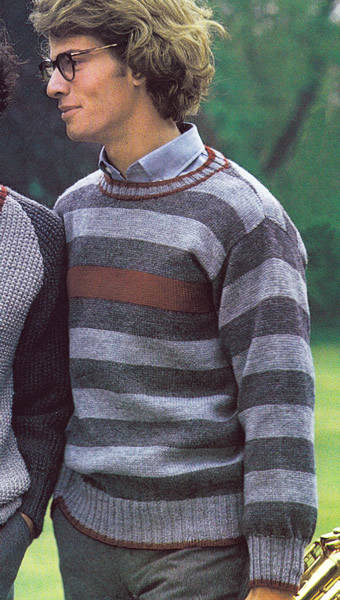
well... they prefer... grey if my experience is anything to go by (whether it's 50 shades or maybe just 2); even the muted coloured stripe is a risk. However, colour choices are easily adapted to the taste of the wearer, and in my case: I love stripes (both wearing and knitting them), whatever the colours.
Otherwise - the greys have it.
Instructions.A man's plain loose sweater in 3 sizes (small medium and large). BackUsing No 11 (3mm) needles and red contrast colour (R), cast on 118/122/126
stitches, and work 3 rows k2/p2 rib. Break yarn. Change to No 9 (3¾mm or 3½mm) needles and join in dark grey
contrast (G) to start working the striped stocking stitch pattern, increasing
2 / 3 / 4
stitches, evenly across the first row. After the first 12 rows of the seventh stripe (which is in in colour G), shape the armholes by casting off 9/10/11 stitches at the beginning of the next 2 rows. [102/105/108 sts]. Change to colour R and work 14 rows for the 8th stripe. Change to colour G and continue in striped stocking stitch alternating
between colours G and M. Cast off 9 stitches at the beginning of the next 2 rows. With wrong side facing, rejoin the yarn to the right back at the neck edge and purl 8/9/10. Turn and cast off the remaining 8/9/10 and fasten off, thus completing the right shoulder FrontWork as for back until work measures 23¼ / 23½ / 24 inches. Keeping continuity of the striped pattern shape neck as follows: At the beginning of the next row cast off 4 stitches. Then at the neck edge on every following alternate row, cast off: 3 stitches once, 2 stitches 3 times, and 1 stitch 4 times. [26/27/28 sts]. Continue straight on these stitches until front matches back to the shoulder.
With wrong side facing, at the armhole edge, shape shoulder by
casting off 9/9/9
stitches on the next and following alternate row. Knit 1 row and then
cast off the remaining 8/9/10
stitches. With wrong side facing, return to the stitches for the right side of
the front, rejoin the yarn to the neck edge, and cast off 4 stitches,
purl to end. Then at the neck edge on every following alternate row cast
off: 3 stitches once, 2 stitches 3 times, and 1 stitch 4 times. [26/27/28
sts]. SleevesUsing No 11 (3mm) needles and red contrast colour (R), cast on 66/70/74
stitches, and work 3 rows k2/p2 rib. Break yarn. With right side facing, change to No 9 (3¾mm or 3½mm) needles
and join in contrast to start working the striped stocking stitch pattern,
increasing 18/19/20
stitches, evenly across the first row. Increase 1 stitch at each end of every following 10th row, 11 times.
Continue until work measures 20 / 20¾
/ 21½ inches from the beginning, [Editor's
note: This should be 126/128/140
rows in stocking stitch.], which should be an exact number of stripes,
ending with the darker grey colour G - for the second (medium) size you
should work 16 rows in colour G on this last stripe. To Make UpPress parts or block lightly under a damp cloth, avoiding ribbing. Neck Border: Sew in sleeves. [Editor's
note: The instructions are not explicit on this point but as the top of
the sleeve is a straight edge, I would be inclined to sew it to the straight
edge of the armhole, and sew the top half inch of the side of the sleeve
to the cast off stitches of the armhole.] Diagram showing dimensions for smallest size:
|
MaterialsDouble knitting yarn: Pair each of Tension22sts x 30 rows to four inches on 3½mm needles over stocking stitch.
Size mattersTo fit chest: Abbreviations k: knit A word on the wool.Original yarn was mixed fibre double knitting equivalent. Disclaimer
|
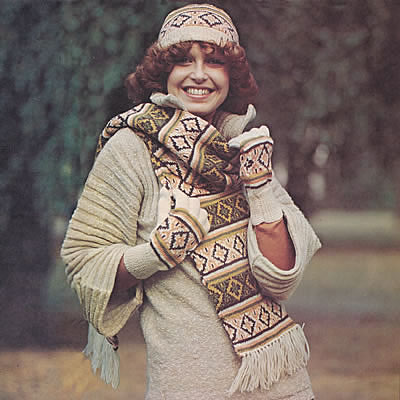
A "long, long" scarf worked in bands of stripes and jacquard pattern, with a matching pull-on hat and gloves to complete the set. These are all knitted in a lighter weight yarn, but the scarf is double thickness so will be very snug; it's also pretty long, so check that's what you want, as obviously you can make it to whatever length you like.
InstructionsThe scarf is worked on 4 needles in the round to make a tube, which is then flattened; the result is a flat scarf with two layers of knitted fabric, and means you don't have to worry about seeing the "wrong side" of the knitting. This is a standard way to make - especially commercial - scarves. Although often seen made in the round, both the hat and the gloves are worked flat on two needles, with a seam making them into the required round shape. It would be simple enough to adapt this pattern and make the hat in the round, especially as you have the method given for the scarf. If this is your first attempt at gloves, however, making them flat may be a good way to start. ScarfUsing the set of 4 No 10 (3¼mm) needles - or the circular needle
- cast on 112 sts in Main Shade (A). Pattern as follows: ** 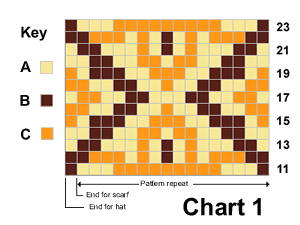 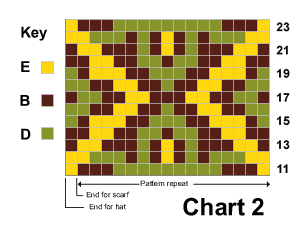 These 46 rounds form the pattern. Cast off using A. To make up the ScarfDarn in all ends on the wrong side. HatUsing No 12 (2¾mm) needles, and main shade A, cast on loosely 144
stitches. Work 20 rows K1/P1 rib, increasing 1 stitch at the end of the
last row. [145 sts] Continue in pattern until work measures 18cm (7 inches) from the beginning, ending with a purl row. Shape the crown Decrease for the crown, keeping the continuity of the striped pattern: To make up the HatPress as given for the scarf. GlovesNote: When working the gloves, use separate balls of yarn for the palm and thumb, twisting the yarns at the back of the work when changing colours. Right hand gloveUsing No 12 (2¾mm) needles and main shade A, cast on 56 stitches.
Start thumb shaping: 1st row: using first ball of B, k28;
using A, increase one stitch in each
of the next 2 stitches, k1; using a 2nd ball of B, k25. Continue in pattern as given for chart, increasing the thumb stitches
as before on the 3rd and then every foil 4th row until the 24th row has
been completed, decreasing one stitch at the end of the last row. 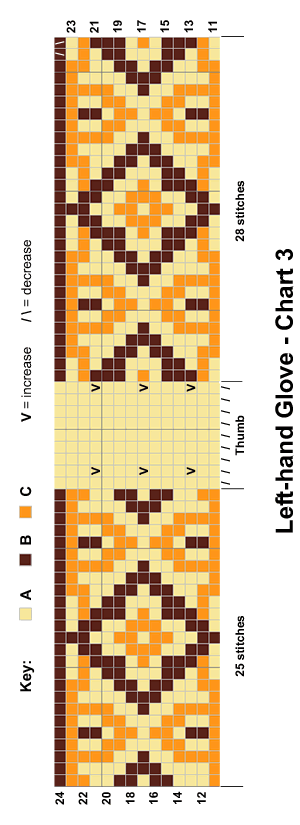 Thumb: Next row: using B, k28; using A,
k16 stitches; turn and cast on 2
stitches. [Editor's note: For this method you keep all the stitches on the needles as you work the thumb and each finger separately. At this point for the thumb, you keep 28 stitches unworked on the right hand needle, and 25 stitches unworked on the left hand needle, while you work on the centre 16 stitches (which you have increased to 20 by casting on 2 extra stitches on each side. You knit the thumb flat, back and forth up to the tip, then you fasten off and sew it up into the thumb shape.] Shape top: With right side of work facing and using B, knit up 4 stitches from the
base of the thumb, knit to end. [57 sts]
Divide for fingers: 1st finger Shape top: 2nd finger 3rd finger 4th finger Shape top Left hand gloveWork as given for right hand glove, reversing the pattern and the position of thumb as follows: 1st row: using 1st ball of B, k25;
using A, increase one stitch in each of Continue as given for right hand glove until 24th row of pattern has been completed. Thumb Next row: using B, k24; using A,
k16, turn and cast on 2 stitches. Complete as given for right hand glove working from *** to ***. To make upPress as given for scarf. |
Materials25g balls of 4 ply (fingering) yarn: Scarf: 4 balls in main shade A One set of 4 3¼mm (UK 10) double pointed needles (dpn), or a circular needle. Hat and gloves: One pair of 3mm (UK 11), and one pair of 2¾mm (UK 12) needles Tension28sts x 36 rows to 4 ins over stocking stitch on 3¼ mm needles. Size mattersScarf: 20½ cm (8 inches) wide, by 183cm (72 inches) long,
excluding the fringe Abbreviationsk2tog: knit 2 sts together. increase: by knitting into the front and back of the next stitch A word on the wool.The original yarn was standard 4 ply superwash wool; about 92 yards (84 m) per 25g ball. Disclaimer
|
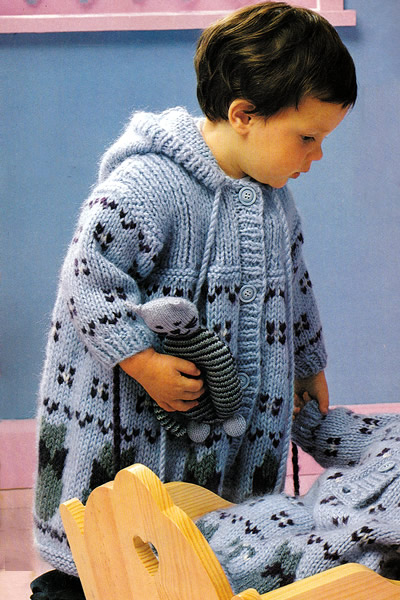
The cutest hooded gown made in a soft chunky yarn - perfect for bedtime, (or other occasions, as it is described as a "coat"). The lower section has a design of kittens - and there is a cute toy cat to match.
InstructionsThe pattern is given in 3 sizes: 12 (18
: 24) months. Where only one set
of instructions is given it applies to all sizes. SleevesWith 5mm needles and main colour (M), cast on 22 (24
: 26) stitches and work 3 (3
: 4) cm in k1/p1 rib, ending with
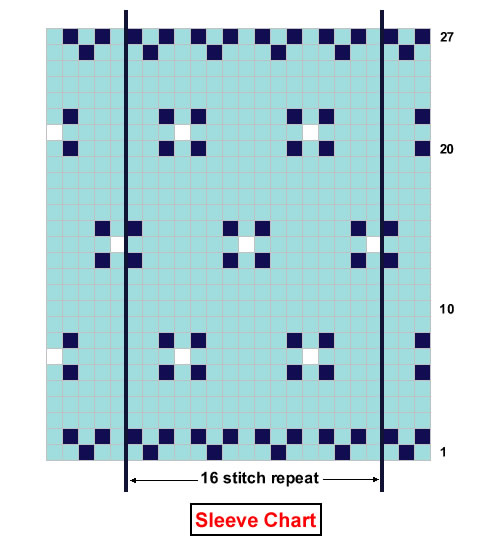
wrong side facing for next row. Now change to 6mm needles and stocking stitch following the Fair Isle colour pattern in the chart for the sleeve:
For the first size, begin with 1 stitch in black (B) then 1 in main shade
(M); for the second size, begin with 1M, 1B,
1M; for the third size, begin with 4M,
1B, 1M, 1B, 1M. Leave the stitches on a stitch holder or spare needle and work a second sleeve in the same way. Body (knitted as a single piece)Using size 5mm needles and main colour (M), cast on 113 (121 : 129) stitches and work 6 rows in garter stitch. Change to 6mm needles and work 2 (2 : 6) rows in stocking stitch. Continue stocking stitch and follow the Fair-Isle pattern working from the charts.

Work 2 rows as in Chart 1, commencing with 1M, 1B, then repeating the 8 stitch pattern across the row ending 1M, 1B, as indicated.
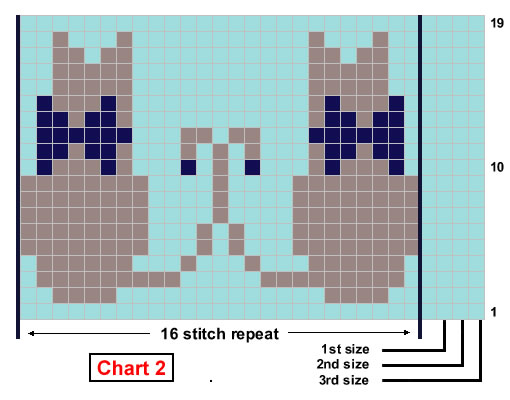
Now work the 19 rows of the cat pattern from Chart 2, 4 times across the row, placing 3 (5 : 7) stitches between each group, and working 2 (3 : 4) stitches in main shade before the first and after the last group.

Work 2 rows as in Chart 3, commencing with 2M, then repeating the 8 stitch pattern across the row ending 1B, 1M, as indicated. Work 4 rows in stocking stitch.
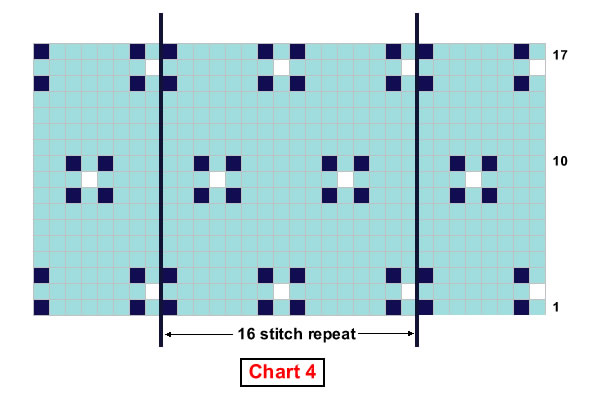
Work 4 rows in stocking stitch. Repeat the 2 rows as in Chart 3, as before, (commencing with 2M, then repeating the 8 stitch pattern across the row ending 1B, 1M, as indicated). Work 3 (2 : 2) rows in stocking stitch, and (wrong side facing) work 4 rows in garter stitch. At this point you have completed 58 (64 : 68) rows and your work should measure 32 (35 : 38) cm. Now you must divide the work and continue knitting the back and fronts separately. Change to 5mm needles and work in k1/p1 rib as follows, casting off some stitches for the armholes, as well as decreasing across the row. Next (right side facing, decrease) row:
k2, (p1, k1) 3 (3
: 3) times, p1, k2tog, (p1, k1) 2
(3 :
4) times, p1, k2tog, (p1, k1) 3 (3
: 3) times, k1; place these 23
(25, 27 ) stitches
on a spare needle or stitch holder...
Upper Left FrontNext row (wrong side facing): p2, * k1, p1, repeat from * to last stitch, p1. [23 (25 : 27) sts] With right side facing, continue in k1/p1 rib for a further 19 (21
: 23) rows, then shape the neck
as follows: cast off 3 (4
: 4) stitches on the next row, then
2 (2 :
2) on the following alternate row. Continue to decrease at the neck edge, and shape shoulders as
follows: Upper Right FrontRejoin yarn to the right front section at the front edge. Next row (right side facing): k2, * p1, k1, repeat from * to last stitch, p1. [23 (25 : 27) sts] With wrong side facing, continue in k1/p1 rib for a further 19 (21
: 23) rows, then shape the neck
as follows: cast off 3 (4
: 4) stitches on the next row, then
2 (2 :
2) on the following alternate row. Continue to decrease at the neck edge, and shape shoulders as
follows: Upper Back sectionWith wrong side facing, rejoin the yarn to the remaining stitches in
the centre. Work a further 26 (28 : 30) rows in k1/p1 rib. Now shape shoulders and back neck by casting off 5 (5 : 6) stitches at the beginning of the next row. Next row (wrong side facing): cast
off 5 (5 :
6) stitches, rib 15 (17
: 19) (including the stitch already
on the needle), cast off 7 stitches, and rib to end. This completes the right side of the Back neck. Rejoin the yarn to the remaining stitches at the neck edge and, right side facing, rib one row. Next row (wrong side facing): cast
off 5 (6 :
6) stitches, rib 10 (11
: 12) (including the stitch already
on the needle). This completes the left side of the Back neck. Button BandUsing 5mm needles, cast on 65 (71 : 77) stitches in main shade (B), and work in k1/p1 rib for 5 rows, keeping the 2 stitches at each end of the row in stocking stitch - like this: Next row: k2,
* p1, k1, repeat from *
to last stitch, k1. And so on for 5 rows in all. Purl one row, then knit 3 rows in stocking stitch using waste yarn of a different colour. Leave these stitches on a spare needle or holder. Make a second (right hand) band in the same way, adding 3 button holes on the 4th row: 4th row: k2,
p1, k1, cast off 2, rib 10 (12
: 13), cast off 2, rib 10 (12
: 13), cast off 2, rib to end. Complete with 3 rows of waste yarn as before. HoodUsing 5mm needles, cast on 69 (73 : 75) stitches in main shade (B), and work in k1/p1 rib for 8 rows. Change to 6mm needles and work 11 (13
: 15) rows in stocking stitch. Wrong side facing, continue in stocking stitch, increasing 1 stitch at
each end of every 4th row 3 times. [21 (23
: 25) sts] Right side facing, continue in stocking stitch, decreasing 1 stitch at
each end of every 6th (6th
: 5th) row 3 (3
: 4) times. [15 (17
: 17) sts] To Make UpSew shoulder and sleeve seams up to the coloured markers. Sew the button band, stitch by stitch, to the right side of the work using back stitch, (undo the rows of waste yarn). Sew up the sides of the hood. Fold the front edge in half inwards and
sew round like a hem to make a channel to thread the cord through. Finish the buttonholes with embroidery if desired, and sew on buttons. |
Materials
|
MittensThis is a pattern for a very simple little pair of mittens in matching colours. The mittens are attached to a cord which is threaded through the armholes of a coat so that they can hang free at the ends of the sleeves if removed (and thus don't get lost). With 5mm needles and dark contrast colour (B), cast on 18 (18
: 20) stitches and work 3 cm in k1/p1
rib. Next row: k1, sl1, k1, psso, k4 (4
: 5), k2tog, sl1, k1, psso, k4 (4
: 5), k2tog, k1.
|
|
This drop-shoulder design cardigan in cheering Nordic colours is taken from a much-loved and much-handled pattern.
Instructions.Instructions are given for 3 sizes - the larger sizes are shown in brackets. When working the pattern weave the yarns not in use loosely across the wrong side of the work; do not strand the threads over more than 3 stitches at a time in order to keep the fabric elastic, joining in and breaking off colours as required. Back and Fronts (worked in one piece up to the armholes)With No 10 (3¼mm) needles and main shade (R), cast on 194 [206, 218] stitches and work as follows: 1st row: k2, *
p2, k2; repeat from * to end. These two rows form the rib. Work a further 31 rows. Next (increase) row: p9 [12, 4], m1, * p8 [7, 7], m1; repeat from * until p9 [12, 4] stitches remain; purl to end. {217 [233, 249] sts} Change to No 8 (4 mm) needles and join in white (W). Weaving in the yarns not in use, work the 2-colour pattern entirely in stocking stitch, beginning, on the right side of the work, with a knit row. Note: only the colours are specified below. 1st row (knit): 3R, *
3W, 5R; repeat from * ending the last
repeat with 3R instead of 5R.
These 8 rows form the 2-colour pattern. Work a further 59 rows, up to the armholes, ending with a 3rd pattern row. Divide to separate back and fronts: With red, (R) p51 [55,
59] stitches; increase in the next stitch
and leave these 53 [57, 61]
stitches on a spare needle or stitch holder to be worked later for the
left front; BackOn these 113 [121, 129] stitches work the 36 row 3-colour pattern, weaving in the yarns not in use at the back of the work. Once again, the pattern is worked entirely in stocking stitch beginning with a knit row so only the colour details are shown. Join in blue (B). 1st row (knit): 4R, *
1B, 7R; repeat from * until 5 stitches
remain; 1B, 4R. [Editor's note: Rows 21-36 are a repeat of rows 1-16 worked in exact mirror image so Row 21 is the same as row 16, row 22 is the same as row 15, and so on back to the first row the same as row 36..]
21st row: knit across all stitches
in white (W).
Break off blue and continue in the 2-colour pattern, beginning with the 3rd row. Work 10 [10, 14] rows. Slope shoulders: Cast off 7 [6,
8] stitches at the beginning of the next
2 rows, 7 [7, 8]
stitches at the beginning of the following 2 rows, then cast off 6 [7,
7] stitches at the beginning of the next
8 rows. Left FrontWith right side facing, rejoin the yarns to the the inner (armhole) end of the 53 [57, 61] stitches, and work in the 3 colour pattern as follows. 1st row (knit): 4R, *
1B, 7R; repeat from * until 1 [5,
1] stitches remain; 1B [(1B,
4R), (1B)] . These 4 rows set the position of the 3-colour pattern. Work a further 32 rows in pattern to match the back. Break off blue (B). With red (R) knit 1 row. To shape the neck: 1st row (purl, wrong side facing):
with red (R), cast off 9 [10, 11]
stitches, purl to end. ** Keeping continuity of the 2-colour pattern to match the main part, decrease 1 stitch at the neck edge on the next 5 rows — when working the right front read 6 rows here instead — {38 [41, 44] sts}. Pattern 2 [2, 6] rows. Slope shoulder: Cast off 7 [6,
8] stitches at the beginning of the next
row, then 7 [7, 8]
stitches at the beginning of the following alternate row. Right FrontWith wrong side facing, rejoin red (R) at the the inner (armhole) end, increase in the first stitch, and purl to end. {53 [57, 61] sts} Work in the 3 colour pattern as follows: 1st row (knit): 1B [(4R,
1B), (1B)], *
7R 1B; repeat from * until 4 stitches
remain; 4R. These 4 rows set the position of the 3-colour pattern. Break off blue (B). With red (R) work 2 rows. To shape the neck: 1st row (knit, right side facing): with red (R), cast off 9 [10, 11] stitches; knit k1R [(4R), (2W, 5R)]; * 3W, 5R; repeat from * until 2 stitches remain; 2W. Work as given for left front from ** to end, noting the variation. Sleeves (both alike)With No 10 (3¼mm) needles and main shade R, cast on 48 [48, 52] stitches and work 32 rows in double rib as for main piece. Next (increase) row: k4, m1, * k1, m1; repeat from * until 4 stitches remain;k4. {89 [89, 97] sts} Purl one row in red (R). Change to No 8 (4 mm) needles and work 72 rows in the 2-colour pattern as given on main piece (back and fronts). Work the 36 rows of the 3-colour pattern as given on back. With red (R) knit one row, then cast off. Button BandWith No 10 (3¼mm) needles and blue (B) cast on 13 stitches, and
work 158 [158, 162]
rows in k1/p1 single rib, beginning odd numbered rows with k1, and even
numbered rows with p1. Buttonhole BandWith No 10 (3¼mm) needles and blue (B) cast on 13 stitches, and work 6 [6, 10] rows in k1/p1 single rib, as given for button band. 1st (buttonhole) row: Rib 5, cast
off 3 stitches, rib to end. Repeat the last 26 rows 4 times more, then the 2 buttonhole rows again. Rib 19 more rows, leaving the stitches on the needle. NeckbandJoin shoulder seams. Using the No 10 (3¼mm) needles holding the 13 stitches of the buttonhole band, and continuing the last row, pick up and knit 23 [24, 27] stitches from right neck shaping, knit across 37 [39, 41] stitches from the back, increasing 3 stitches evenly across, pick up and knit 23 [24, 27] stitches from left neck shaping, and finally rib across the 13 stitches (from the safety pin) of the button band. {112 [116, 124] sts} 1st rib row: k1, *
p1, k1; repeat from * 5 times, k2;
** p2, k2; repeat from **
until 13 sts remain; p1, * k1, p1;
repeat from this last * to end. These two rows set the rib. Work 3 rows. 1st (buttonhole) row: Rib 5, cast
off 3 stitches, rib as set to end. Work 12 rows in rib as set, then work the 2 buttonhole rows again. Making UpPress parts lightly on wrong side with a warm iron over a dry cloth, or following any instructions on the ball band. Set sleeves into armholes, and join the sleeve seams. |
Materials 5 [5, 6]
50g balls DK in main shade (R) red, plus Pair each No 8 (4mm) and No 10 (3¼mm) needles. 7 buttons. Tension26 stitches x 27 rows to 4 ins (10cm) over the pattern on No 8 (4mm) needles. Size mattersTo fit chest 34 [36, 38]
inches, (86 [91, 97]
cm); Abbreviationsk2tog or p2tog: knit or purl 2 stitches together (decrease one stitch). stocking stitch: one row knit and one row purl, ("stockinette"). dec: decrease by working 2 stitches together. inc: increase by working twice into the same stitch. m1: make 1 stitch by picking up horizontal A word on the woolThe original design was in Patons Fiona - a yarn I was very fond of, both in quality and rich colour range. It was a standard DK; some information given on the web implies it was slightly thicker and others slightly thinner. In the 1970s it was sold in 50g balls: 175 yds/160m meters); 51% wool, 49% acrylic. In my opinion a similar substitute would be Rowan Felted Tweed DK. "Always check your tension" [Good Advice]. Disclaimer
|
Simply styled early sixties casual sweaters with separate instructions for her and for him. They are knitted in "triple knitting" yarn - a short-lived experiment by the yarn companies to introduce what is now the American "worsted" weight standard to British knitters. However, we were too much in love with our double knitting yarn - I mean that was bulky enough surely?!
However, owing to globalisation, we have now fully embraced worsted weight yarns which means we can easily find a good selection of yarn colours and fibre mixes to use with this pattern. [Failing that we always have Aran yarns to fall back on...]
|
The man's and womans versions are very similar - and similar in chest sizes offered as well. The changes are mainly to the proportion. However, the man's version has a set-in sleeve, while the woman's is more of square almost drop-shoulder - you can see this in the photo. I prefer the set in sleeve and if you are a woman of size 36-40 then it would be quite feasible to knit the man's sweater, adjusting sleeve and overall length to suit. Instructions for WOMAN's version.Instructions are given for three sizes with larger sizes given in bold or colour between slashes. Where one set of figures is given this applies to all sizes. Back and Front alike (knit 2)With No 8 (4mm) needles, cast on 80/86/92 stitches and work 2 inches in k1/p1 rib. Increase 5/7/9 stitches evenly across on last row. [85/93/101 sts] With right side facing change to No 4 (6mm) needles and work in pattern as follows: 1st row: *
p1, Cross2K, k1, p1, k3; repeat from *
to last 5 stitches; p1, Cross2K, k1, p1. These two rows form the pattern. Continue straight in pattern until work measures 15 inches down centre, ending with row 2. With right side facing shape armholes, by casting off 8 stitches at the beginning of the next 2 rows. [69/77/85 sts] Continue straight in pattern until work measures 21/21/21½ inches, ending after a first row with wrong side facing. Next row: purl, increasing 9 stitches evenly across the row by working twice into every 7th/8th/9th stitch. [78/86/94 sts] Change to No 6 (5mm) needles and continue in k1/p1 rib until work measures 24/24/24½ inches. With right side facing, shape shoulders, by casting off 11/12/13
stitches at the beginning of the next 4 rows. Work a further 6 rows in
rib on the remaining 34/38/42
stitches, increasing 1 stitch at each end of every row. SleevesWith No 8 needles, cast on 40/40/44 stitches, and work 2 inches in k1/p1 rib. Increase 5/5/9 stitches evenly across on last row. [45/45/53 sts] With right side facing, change to No 4 needles and work in pattern, shaping
sides by increasing 1 stitch at each end of the 5th/5th/9th
and every following 4th row until there are 83//83/89
stitches, taking the increased stitches into the pattern as they
are made. To Make UpIMPORTANT: Press parts on wrong side using a dry cloth
and cool iron. Join shaped ends of neck facing with flat seam, then turn under 6 rows
of the rib to the wrong side at the back neck and catch down loosely;
turn under rib in the same way across the front graduating the hem to
a depth of 12 rows at the centre front. Instructions for MAN's version.Instructions are given for three sizes with larger sizes given in bold or colour between slashes. Where one set of figures is given this applies to all sizes. Back and Front alike (knit 2)With No 8 (4mm) needles, cast on 90/96/102 stitches and work 2½ inches in k1/p1 rib. Increase 3/5/7 stitches evenly across on last row. [93/101/109 sts] With right side facing change to No 4 (6mm) needles and work in pattern as follows: 1st row: *
p1, Cross2K, k1, p1, k3; repeat from *
to last 5 stitches; p1, Cross2K, k1, p1. These two rows form the pattern. Continue straight in pattern until work measures 16/16½/16½ inches down centre, ending with row 2. With right side facing shape armholes, by casting off 4 stitches at the beginning of the next 2 rows; then decrease 1 stitch at each end of the next and every alternate row until 69/77/85 stitches remain. Continue straight in pattern until work measures 23 inches down centre, ending after a second row with right side facing. Change to No 6 (5mm) needles. Continue in k1/p1 rib until work measures 25½/26/26 inches down centre. With right side facing, shape shoulders, by casting off 8/8/9
stitches at the beginning of the next 2 rows; then 7/8/9
stitches at the beginning of the next 4 rows. Work a further 6 rows in
rib on the remaining 38/42/44
stitches, increasing 1 stitch at each end of every row. SleevesWith No 8 needles, cast on 46 stitches, and work 2½ inches in k1/p1 rib. Increase 7 stitches evenly across on last row. [53 sts] With right side facing, change to No 4 needles and work in pattern, shaping
sides by increasing 1 stitch at each end of the 3rd
and every following 8th//8th/6th
row until there are 73/73/77
stitches, taking the increased stitches into the pattern as they are made.
With right side facing, shape top, by casting of 3 stitches at the beginning
of the next 2 rows, then decrease 1 stitch at each end of the next and
every alternate row until 45/45/51
stitches remain. Work 1 row back, so that the right side is facing again. Cast off loosely. To Make UpIMPORTANT: Press parts on wrong side using a dry cloth and cool iron. Join shoulder, side and sleeve sleeve seams; insert sleeves. Join shaped ends of neck facing with flat seam, then turn under 6 rows
of the rib to the wrong side at the back neck and slip stitch loosely
in position; turn under the rib in the same way across the front graduating
the hem to a depth of 12 rows at the centre front. [Editor's note: I imagine the heavy emphasis on the ironing instructions are specific to the original yarn. In general, if using an iron, press only very gently with a cool iron using either a dry or damp cloth as appropriate to the yarn; use the instructions on the ball band if any are given.] |
MaterialsIn Aran or worsted weight yarn. Woman's version: Man's version: A pair each of Nos 4 (6mm), 6 (5mm), and 8 (4mm) needles. Tension17 sts x 22 rows to 4 ins on No 4 (5mm) needles. Size mattersWoman's version To fit chest: 34/36/38
inches. Man's version Abbreviationsstocking stitch: one row knit, one row purl. Cross2K: knit into the back of the 2nd stitch on the left hand (but do not slip off the needle), then knit into the front of the 1st stitch, and slip both stitches off the needle together. Cross2P: purl into the front of the 2nd stitch on the left hand (but do not slip off the needle), then purl into the front of the 1st stitch, and slip both stitches off the needle together. k2tog or p2tog: work 2 sts together to decrease. A Word on the WoolThe original yarn was Patons Ariel designed for outer wear with a slightly
rough texture. It was one of those "tripleknit" yarns which
never really caught on in the UK. More or less Aran or American worsted
weight. It came in 2oz (57g) balls at 89m/97yards, 80% wool, 20% man-made
fibres. Disclaimer
|
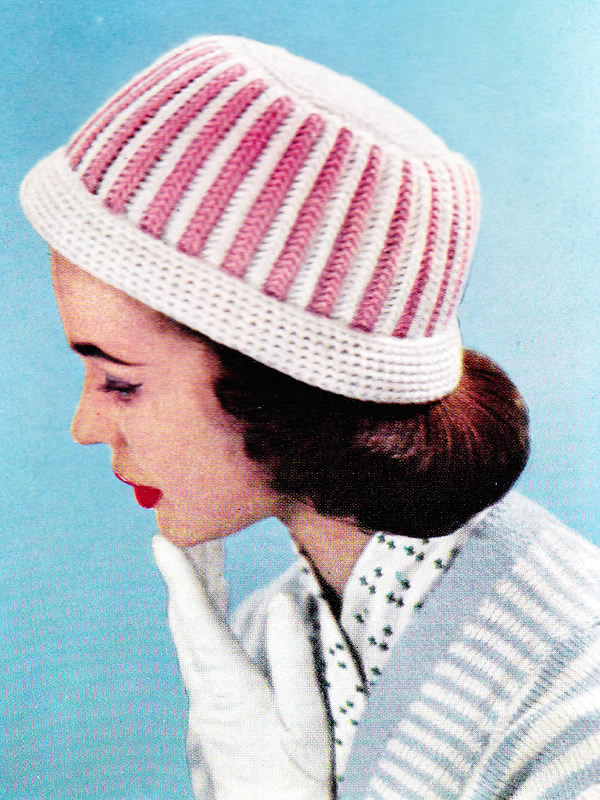
Knitting and crochet combine in this eye-catching candy floss striped hat which can be quickly put together in double knitting weight yarn.
This hat was designed for smart summer holidays (in the UK) in the 1950s, though it's hard to imagine wearing a woolly hat in the summer these days (even in the UK) - which is more a comment on fashion than global warming. However - easy to adapt the colour scheme for autumn and winter days.
Instructions.The main part of the hat is knitted in a fancy striped stitch (which is easier to do than to describe - see below); the top of the crown and brim are in simple double crochet. CrownBegin with the striped part: with pink wool, on No 10 needles, cast on 33 stitches and work in pattern thus: 1st row: k1, *
insert needle into next stitch and knit, winding wool twice round needle;
repeat from * to end. Next row: As 3rd in white. 3rd row forms pattern and this row is now repeated throughout, working
two rows in each shade, ie your next 2 rows will be in pink Continue thus until you have 26 pink stripes. Next 2 rows: in white. Cast off in white as follows: With No 8 hook and white wool, make 3 chain, join into a ring with a 1st round: *
2 dc in 1 dc; repeat from * to end.
[12 dc] Fasten off. Brim:With white wool and No 5 hook, make 101 chain fairly loosely. Join into
a ring with a slip stitch. Next round: *
1 dc in 1 dc but going through the back loop only of each dc; repeat from
* to end. To Make UpPress top of crown only. Don hat with best frock and cotton gloves, and go for a promenade on the sea front. |
Materials
|
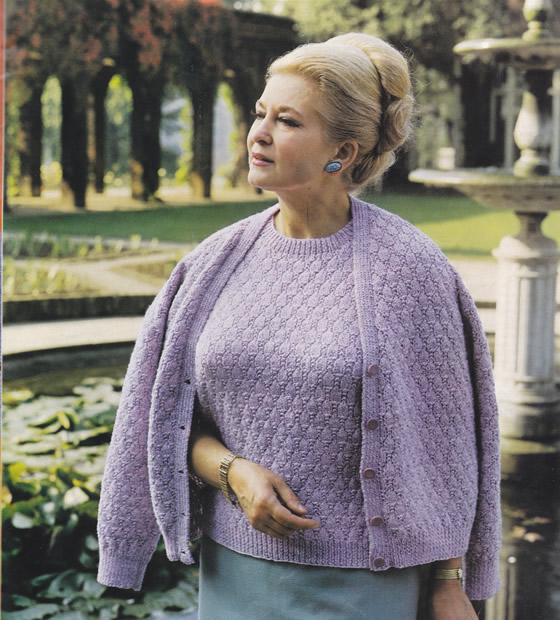
"Fuller figure" shown off on a suitably matronly figure for the post-rationing 1950s - but actually means a pleasing pattern in a reasonable size range for this century.
Instructions.Instructions are given for 6 sizes - larger sizes given in brackets. Jumper Back† Next row: Rib 4 (7
: 10 : 6 : 9
: 8), *
work twice into the next stitch, rib 5, repeat from *
to last 4 (7 : 10
: 6 : 9 : 8)
stitches, work twice into next the stitch, rib 3 (6
: 9 : 5 : 8
: 7). Change to size 8 (4mm) needles and pattern as follows: 6th row: *
knit into back of stitch, p1, knit into back of stitch, p3, repeat from *
to last 3 stitches, knit into back of stitch, p1, knit into back of stitch. Shape Raglan Armholes: Jumper FrontFollow the instructions for the Back from † to † until 69 (73 : 77 : 79 : 83 : 93) stitches remain, ending with a wrong side row. Shape Neck: 1st size only: Keeping the neck edge straight, decrease 1 stitch at the armhole edge
on every row until 2 stitches remain. 2nd, 3rd
and 4th sizes only 5th and 6th
sizes only: All sizes: Jumper Short Sleeves Using size 10 needles, cast on 80 (86
: 86 : 92 : 92
: 98) stitches and work in k1, p1
rib for ¾ of an inch, ending with a wrong side row and increasing
1 stitch at the end of the last row. Change to size 8 needles and work in pattern as given for the Back until the work measures 3 (3 : 3½ : 3½ : 3½ : 3½) inches from the beginning, ending with a wrong side row. Shape Raglan Top: Jumper Neckband Using a back stitch, join raglan seams, leaving left back raglan seam
open. Work in k1, p1 rib for 1 inch. Cardigan BackFollow the instructions exactly as for the Jumper, but on completion cast off the stitches at the back neck. Cardigan Left FrontUsing size 10 needles, cast on 60 (60 : 66 : 66 : 70 : 76) stitches and work in k1, p1 rib for 2 inches, ending with a right side row. Next row: Rib 6 (6
: 5 : 5 : 5
: 8), *
work twice into the next stitch, rib 5 (5
: 6 : 6 : 5
: 5), repeat from *
to last 6 (6 : 5
: 5 : 5 : 8)
stitches, work twice into next stitch, rib 5 (5
: 4 : 4 : 4
: 7). Change to size 8 needles and pattern as given for Back until work measures 12 (12 : 12½ : 12½ : 13 : 13) inches, from the beginning, ending with a wrong side row. Shape Raglan Armhole and Neck: 2nd, 3rd,
4th, 5th
and 6th sizes only: All sizes: Cardigan Right FrontFollow the instructions exactly as for Left Front, reversing all shapings. Cardigan Long Sleeves Using size 10 needles, cast on 58 (60
: 60 : 62 : 62
: 64) stitches and work in k1, p1
rib for 2½ inches, ending with a right side row. Change to size 8 needles and pattern. Shape Raglan Top: Cardigan Front Bands Using size 10 needles, cast on 11 stitches. To Make UpJumper Cardigan |
Materials
|
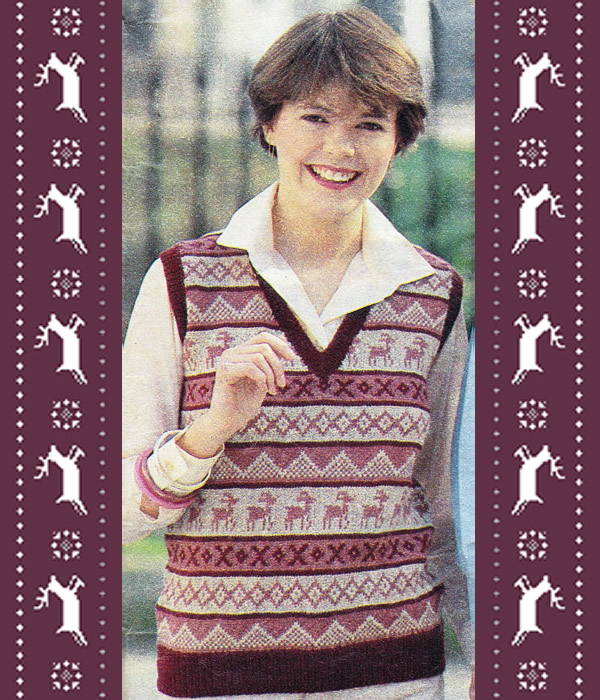
A cute seasonal sleeveless sweater.
Co-incidentally I see that Wardrobe Icons have featured "knitted vests" as an "unexpected hero" this week, having "fallen in love with how versatile it is as a layering piece". They illustrate it with 3 shapes including fair-isle patterns with a closer fit and plain with a relaxed fit.
You could replace the Nordic style pattern given here with any fair-isle pattern of your choosing, just repeating it across the width of the sweater, making sure to centre the pattern - for example the Shetland Folklore pattern which is worked over a 10 stitch repeat.
I have a "relaxed fit" example in polka dots, which could easily be knitted plain.
Instructions Note: When working the colour pattern from the chart, strand
the yarns loosely across the back of the work over not more than 3 stitches
at a time, to keep the fabric elastic. BackWith No 12 (2¾mm) needles and main shade (MS), cast on 106 [114, 120, 128] stitches and work in K1/P1 for 2½ inches, ending with a right side row. Next row: Rib 1 [5,
4, 4] *
m1, rib 4; repeat from * to last 1
[5, 4,
4] stitches, m1, rib 1 [5,
4, 4]. Change to No 10 (3¼mm) needles and work in pattern from the chart, joining in and breaking off colours as required, working the first 4 [1, 5, 3] and last 3 [0, 4, 2] stitches on knit rows, and the first 3 [0, 4, 2], and the last 4 [1, 5, 3] stitches on purl row as indicated, and working the 14 stitch repeat pattern 9 [10, 19, 11] times across in between. Continue until back measures 14½ inches, ending with a wrong side row. ** Shape Armholes: Work without further shaping until back measures 22½ [23, 23, 23½] inches, ending with a wrong side row. Shape Shoulders: Leave stitches on a spare needle or stitch holder. FrontWork as for Back up to **. Shape Armholes and Neck: Next row: keeping pattern correct, cast off 6 stitches, and pattern until 60 [64, 68, 73] stitches are on the right hand needle; turn and leave remaining stitches on a spare needle or stitch holder. Continue on first set of stitches only. Decrease 1 stitch at the armhole edge on the next 9 [11, 11, 15] rows, and then on every alternate row, at the same time, decrease 1 stitches at the neck edge on the next row, and every alternate row until 38 [39, 41, 42] stitches remain. Then continue to decrease 1 stitch at the neck edge only on every alternate row until 32 [34, 37, 39] stitches remain. Then decrease 1 stitch at the neck edge only on every following 3rd row until 25 [26, 28, 29] stitches remain. Work without further shaping until front matches back to start of shoulder shaping, ending with a wrong side row. Shape Shoulder: Work one row, and then cast off. With right side facing, slip centre stitch on to a safety pin, and rejoin yarn to the remaining 66 [70, 74, 79], and pattern to end. Work to match the first side, reversing the shaping. Making UpPress lightly using a cool iron and dry cloth - or as instructed on the ball band - omitting the ribbing. Join right shoulder seam. Neckband: With right side facing, No 12 needles and MS, pick up
and knit 72 [76, 78,
82], stitches down left neck, knit stitch from safety pin (mark
this stitch with a coloured thread), pick up and knit 72 [76,
78, 82], stitches up right neck, then
knit 45 [47, 49,
51] stitches from Back, decreasing 3 stitches evenly. 1st row wrong side facing): * p1, k1; repeat from * to last 2 stitches before the marked stitch, p2tog, p1, p2togtbl; ** k1, p1; repeat from ** to end. 2nd row: k1, * k1, p1; repeat from * to last 2 stitches before the marked stitch, p2tog, p1, p2togtbl, k1; ** p1, k1; repeat from ** to end. Repeat the last 2 rows 3 times more, then the 1st row again. Armhole Borders: With right side facing, No 12 needles and MS, pick up and knit 118 [124, 132, 138], stitches round each armhole. Work in k1/p1 rib for 9 rows. Join side seams and armhole borders. |
Materials2 x 50g balls 4 ply in each of the three colours (all sizes). Pair each No 12 (2¾mm), and No 10 (3¼mm) needles. Tension32 stitches x 32 rows to 4 ins (10cm) measured over pattern using 2¾mm needles. Size mattersTo fit chest 32 [34, 36,
38] inches; Abbreviationsk2tog or p2tog: knit or purl 2 stitches together (decrease one stitch). m1: make 1 stitch by picking up horizontal p2togtbl: purl 2 stitches together through back loops. A word on the woolThe original design was in Patons Clansman 4ply. Disclaimer
|
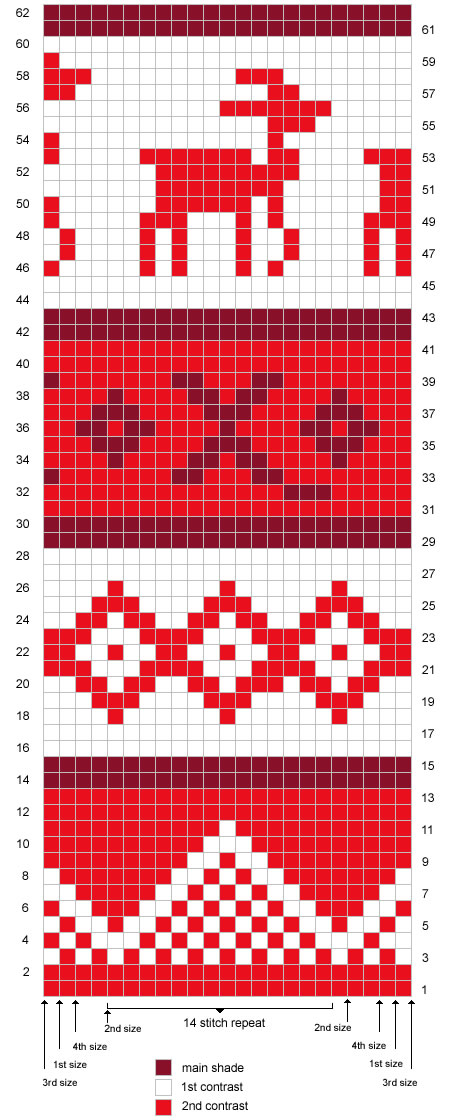 |
|
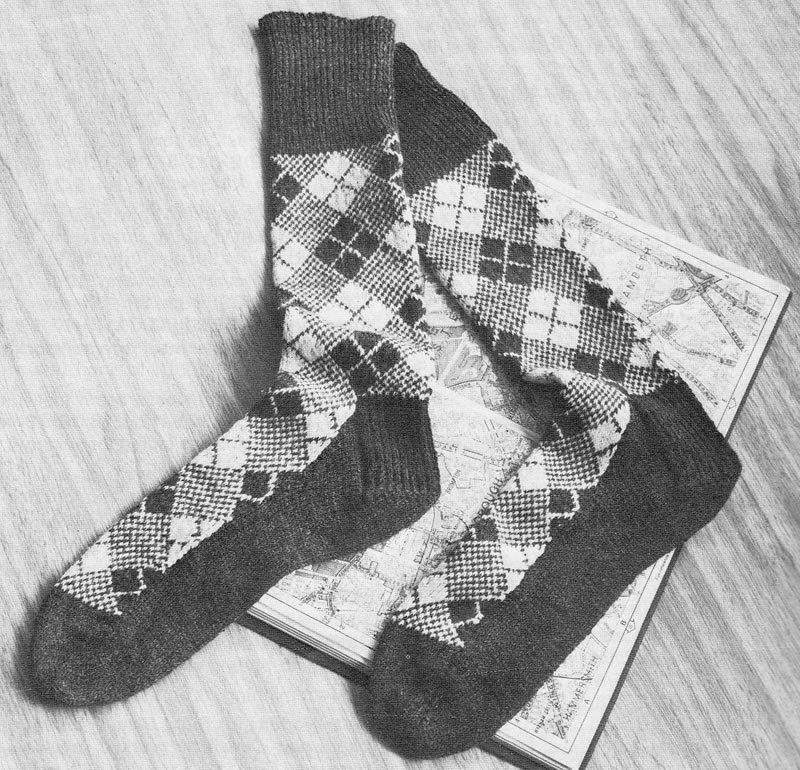
Socks created in two colours with the fair isle technique. Less common these days, now that we can create such exciting coloured socks with self-patterning yarns. Nonetheless quite satisfying since space dyed skeins cannot produce this lovely traditional Argyll pattern.
Instructions.Each sock is worked in three (attached) sections - leg, upper foot, and
lower foot - and mostly using only 2 needles, but these needles need to
be double points (that is, pointed at both ends). Leg and instepStarting at the top leg, using 2 needles and Main Shade (MS), cast on 78 stitches and work in k1/p1 rib for 4 inches, decreasing 1 stitch at the end of the last row : 77 stitches. Start with a knit row, working in stocking stitch in pattern from chart, joining in Contrast (C), reading odd rows knit from right to left and even rows purl from left to right, until 75 rows have been worked. 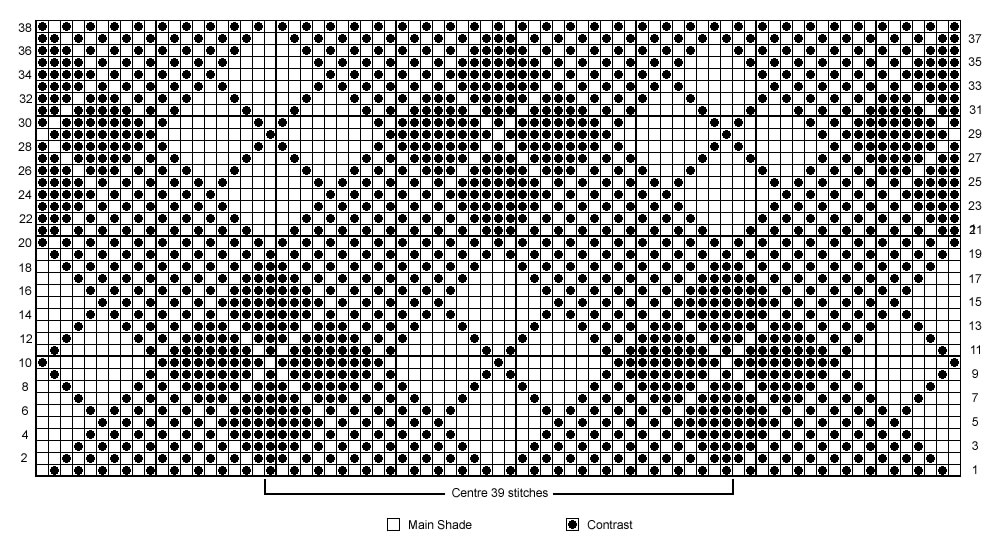
Next row: pattern 18, increase in
the next stitch, pattern to last 19 stitches, increase in the next stitch,
pattern to end : 79 stitches. Slip first and last 20 stitches on spare needles for heel. Continue in MS and stocking stitch (1 row knit one row purl), starting with a knit row, until foot is required length, allowing 2½ inches for toe shaping and ending with a purl row. Leave stitches on a spare needle. Heel and sole:Slip the 2 groups of 20 stitches on to one needle....
1st row: k19, k2tog, k19. Turn heel as follows: Continue in this way until all the stitches have been worked : 21 stitches. Next row: p21 stitches, then pick
up and purl 18 stitches down side of heel piece, turn. Continue straight until work matches the patterned instep piece, ending with a purl row. Toe:Next row: k18 and now (finally) arrange
the stitches on 3 needles for working the toe in the round as follows: Work in rounds shape toe as follows: Making upOmitting ribbing, press parts lightly on wrong side following instructions on the ball band. Sew seams down back of leg, and on each side of the sole, using a flat seam technique (not mattress stitch for example). Sew in all ends. Make a second sock to match. |
Materials3 x 25g balls of 3 ply yarn in main shade and 1 in lighter contrast. Set of four No 13 (2¼mm) needles, pointed at both ends.
Tension36 sts x 44 rows to 4 inches Size mattersLength from top to base of heel: 13½ inches (34 cm); AbbreviationsMS is main shade (Lovat Heather). sl1: slip the next stitch k2tog or p2tog: work 2 sts together to decrease. psso: pass the slipped stitch over, ("sl1, k1, psso" also known as "ssk") A Word on the Wool.Original yarn was Patons Nylox 3ply in colours Lovat Heather (2002) and Snow White (504). Disclaimer (well...almost)In transposing any pattern it is always a risk that errors will be introduced, in spite of dedicated proof reading. If you have any problems with this pattern, please and I will try and assist. |

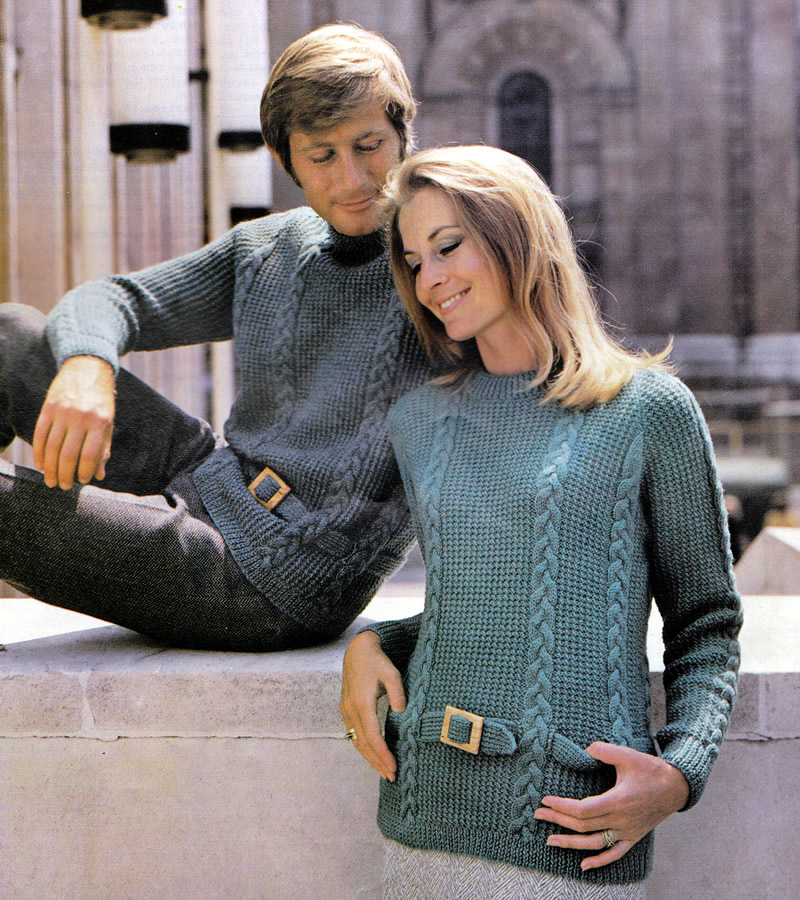
Long-line sweaters with belts at hip level. Very up-to-the-minute sixties styling - but somehow I feel they should have been shown in Lincoln Green - no?
InstructionsThe main body of the sweater is knitted in "rice stitch" which is knitting a kind of sparse moss or seed stitch with some of the knit stitches on the right side worked into the back of the stitch. Back:‡ Change to size 8 needles and pattern: 2nd row: k8 (8, 10, 14, 18, 18, 20), p9, k17, p9, k29 (33, 33, 33, 33, 37, 37); p9, k17, p9; k8 (8, 10, 14, 18, 18, 20). 3rd row: [p1, k1tbl] 3 (3, 4, 6, 8, 8, 9) times, * p2, sl3F, k3, k3 from cable needle, k3, p2, [k1tbl, p1] 6 times, k1tbl, p2, sl3F, k3, k3 from cable needle, k3, p2, * [k1tbl, p1] 12 (14, 14, 14, 14, 16, 16) times, k1tbl, repeat from *to * once, [k1tbl, p 1] 3 (3, 4, 6, 8, 8, 9) times. 4th row: As 2nd row. 7th row: [p1, k1tbl] 3 (3, 4, 6, 8, 8, 9) times, * p2, k3, sl3B, k3, k3 from cable needle, p2, [k1tbl, p1] 6 times, k1tbl, p2, k3, sl3B, k3, k3 from cable needle, p2, * [k1tbl, p1] 12 (14, 14, 14, 14, 16, 16) times, k1tbl, repeat from * to * once, [k1tbl, p1] 3 (3, 4, 6, 8, 8, 9) times. 8th row: As 2nd row. These 8 rows form the pattern. Make Slots for Belt: Next row: Pattern 6 (6,
8, 12, 16,
16, 18) stitches and turn, leaving
remaining stitches on a spare needle. Join in yarn to remaining stitches, pattern 13 stitches and turn, leaving
remaining stitches on a spare needle. Join in yarn to remaining stitches, pattern 13 stitches and turn, leaving
remaining stitches on a spare needle. Join in yarn to remaining stitches, pattern 13 stitches and turn, leaving remaining stitches on a spare needle. Work 8 rows on these stitches. Break off yarn. Join in yarn to remaining stitches, pattern 25 (29,
29, 29, 29,
33, 33) stitches and turn, leaving
remaining stitches on a spare needle. Join in yarn to remaining stitches, pattern 13 stitches and turn, leaving
remaining stitches on a spare needle. Join in yarn to remaining stitches, pattern 13 stitches and turn, leaving
remaining stitches on a spare needle. Join in yarn to remaining stitches, pattern 13 stitches and turn, leaving remaining stitches on a spare needle. Work 8 rows on these stitches. Break off yarn. Join in yarn to remaining 6 (6, 8,
12, 16, 16,
18) stitches, work to end. Next row: Work in pattern across all stitches. Continue in pattern until work measures approximately 15 (15½, 15½, 16, 16, 16½, 16½) inches from the beginning, ending with a wrong side row. Mark each end of the last row with a coloured thread to facilitate easier working when joining raglan seams. Shape Raglan Armholes: 1st, 2nd, 3rd, 4th, and 7th sizes only. Decrease 1 stitch at each end of the next and 3 (3, 3, 3, -, -, 1) following 4th rows. 107 (111, 115, 125, -, -, 143) remaining. All sizes . Decrease 1 stitch at each end of the next and every following alternate
row Shape Shoulder Sections: Front:Follow instructions as for the Back from ‡ to ‡, until 79 (81, 81, 85, 87, 89, 91 ) stitches remain, ending with a wrong side row. Shape one side of the Neck: Shape other side of the Neck: Sleeves:Using size 10 needles, cast on 53 (53, 57, 57, 61, 61, 61) stitches. Using size 10 needles, cast on 115 (119,
123, 131, 139,
143, 147) stitches. Change to size 8 needles and pattern: 2nd row: k22 (22, 24, 24, 26, 26, 26), p9, k17, p9, k29 (33, 33, 33, 33, 37, 37); p9, k22 (22, 24, 24, 26, 26, 26). 3rd row: [p1, k1tbl] 10 (10, 11, 11, 12, 12, 12) times, p2, sl3F, k3, k3 from cable needle, k3, p2, [k1tbl, p1] 10 (10, 11, 11, 12, 12, 12) times. 4th row: As 2nd row. 7th row: [p1, k1tbl] 10 (10, 11, 11, 12, 12, 12) times, p2, k3, sl3B, k3, k3 from cable needle, p2, [k1tbl, p1] 10 (10, 11, 11, 12, 12, 12) times. 8th row: As 2nd row. These 8 rows form the pattern. Increase and work into pattern, 1 stitch at each end of the next and
every following 10th (9th, 9th,
8th, 8th, 7th,
6th) row until there are 73 (77,
81, 85, 89,
93, 97) stitches on the needle. Shape Raglan Top: Work 1 row. Now decrease 1 stitch at each end of the next and every following alternate
row until 13 stitches remain, ending with a wrong side row. NeckbandWith right side of work facing and using size 8 needles, knit across
the 13 stitches on top of Left Sleeve, pick up and k20 (20,
22, 22, 24,
24, 24) stitches down left side of
neck, knit across the 17 (19, 19,
21, 21, 21,
23) stitches at centre, pick up and k20 (20,
22, 22, 24,
24, 24) stitches up right side of
neck, knit across the 13 stitches on top of Right Sleeve and the 31 (33,
33, 35, 35,
37, 39) stitches on back neck: 114
(118, 122,
126, 130, 132,
136) stitches. BeltUsing size 10 needles, cast on 13 stitches. 1st row (Right side facing): * k1,
p1, repeat from * to last stitch, k1. Decrease 1 stitch at each end of the next and every following alternate row until 3 stitches remain. Knit 3 together and fasten off. To Make UpUsing a back stitch, join raglan seams, shoulder sections and neckband,
matching coloured threads on raglan to coloured threads on sleeve top. Press seams lightly under a damp cloth. |
Materials23 (24, 26, 27, 29, 30, 31) x 25g balls double knitting wool. Pair each No 8 (4mm) and Buckle for belt. Tension24sts x 34 rows to 4 ins measured over rice stitch. Size mattersActual chest measurement: 34 (36,
38, 40, 42,
44 46) inches
Length to centre back neck: 23 (23¾,
24¼, 25¼, 25¾,
26½, 27) ins
Her sleeve seam: 16 (16½, 16½,
17, 17, 17½,
17½) inches Abbreviations k1tbl: knit through the back of the stitch. A word on the wool.Original yarn was a pure wool superwash yarn. Disclaimer (well...almost)In transposing any pattern it is always a risk that errors will be introduced,
in spite of dedicated proof reading. |
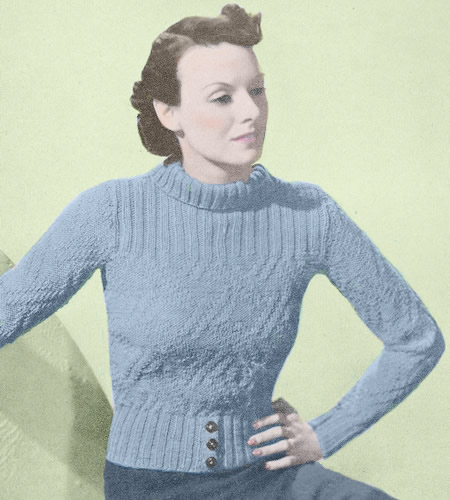
This 1930s sweater has good news and bad news. The good is that it's made in a yarn weight that is more popular today than then - that is a heavy DK or worsted. And as a consequence, the bad news is that the instructions are only given for one size, and with limited opportunity to alter the size by using thicker yarn.
I have referenced some reading material at the end of the instructions, that might help you with adaptations if you are feeling that adventurous.
" An unusual broken trellis pattern makes this warm country jumper. The casual polo collar does up at the back with three buttons, and the button-up idea is carried out again on the front of the welt. ".
Instructions.Instructions are given for only one small/medium size. BackWith No 8 needles, cast on 70 stitches and work 3½ inches in k2,
p2 rib. In the last row increase to 80 stitches by working twice into
each of the first and last 5 stitches of the row. Change to No. 7 needles
and pattern as follows: These 24 rows form the pattern, which is repeated throughout. Next row: Rib across the first 30 stitches, k6, turn, leaving remaining stitches on a spare needle. Work on these 36 stitches, keeping the 6 stitches at the inside edge in stocking-stitch, and after ½ an inch make a buttonhole as in the front welt (see instructions below). To make a buttonhole: When work measures 19 inches from commencement cast off 9 stitches at
the beginning of the following 2 alternate rows at the armhole edge, and
in the same row as the first casting-off make another buttonhole as before.
Return to the remaining 30 stitches, cast on 6 stitches and, keeping
these in stocking-stitch, work to correspond with the first side, but
omitting the buttonholes. Front:Begin with the right welt. 1st row: k6, *
p2, k2, repeat from * to last 2 stitches,
p2. Repeat these 2 rows once and then make a buttonhole as follows: Continue in pattern for 1 inch, and then make another buttonhole in the
same way, then work for 1 more inch and make another buttonhole. Now change to No 7 needles and pattern as for back, and continue until 3½ inches of the yoke ribbing have been done. Next row (right side facing): Rib
27, leave 12 stitches on a spare needle, rib 27. Cast off 9 stitches at the beginning of the following 2 alternate rows,
at the armhole edge. Sleeves:With No 8 needles, cast on 32 stitches and work in k2, p2 rib for 3 inches.
Now change to No 7 needles and pattern, but after 2 inches have been done, increase in the next and every following 4th row until there are 62 stitches on the needle, taking the increased stitches into the pattern. Work straight until sleeve measures 18½ inches from commencement,
then, cast off 4 stitches at the beginning of the next 2 rows, then k2tog
at each end of every row until 20 stitches remain. CollarJoin shoulder seams. With the set of No 8 needles and front of work facing, take the 18 stitches
from the spare needle at the left back, pick up and knit 19 over the left
shoulder, take 12 from the spare needle at the front, pick up and knit
19 over the right shoulder, and take the 18 from the spare needle at the
right back. To Make UpSew up side and sleeve seams, and insert sleeves. |
Materials
|
A word on the wool...This 1930s pattern is given in only one size - which to be fair is a "medium" although I suspect the average size for women is rather larger than medium these days. The original yarn was Patons Totem - which was a double knit weight but came in a number of guises over the years I believe - and the tension and needles indicate it's more like a worsted weight. So it's not so easy to simply increase the size by using a thicker yarn - it might work if you check your tension, but the resulting sweater might be unappealingly chunky for the intended style. Geraldine Warner has produced a helpful book about how to approach adapting
vintage patterns - however, don't be confused as it is published under
two different titles - but it's the same book. Also note that this
is a book of techniques and "how to" - it's does not contain
any knitting patterns: Whatever you choose to do, when adapting - always knit a swatch! Pattern detail: 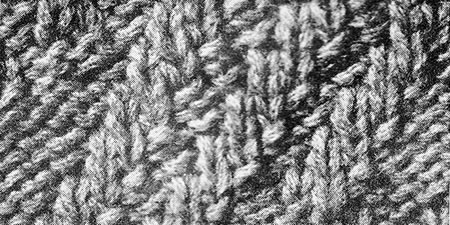 |
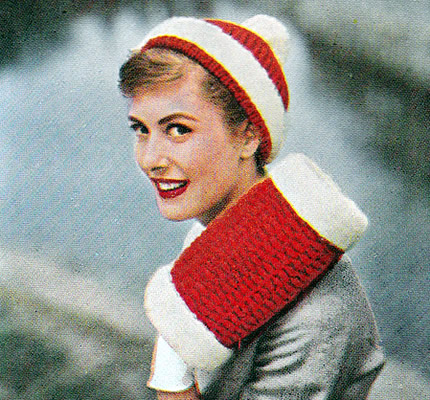
Charming offering from the mid-fifties - the era of the "set".
I'm not sure how much of a commonplace activity skating was or is. I guess the climate in the south of the UK and the constant dangers warned of in skating on lakes and ponds meant that in my youth at least it was not a general pursuit outside of ice rinks. I was very keen on roller skating - another 1950s and 60s popular sport - I even owned my own roller skates etc; however the only times I ever tried skating on ice, was at a rink with hired skates.
In the celluloid world, however, any wintry film would not have been complete without its skating scene, and this would have made the perfect accessory. Luckily you could also consider using it without the skating - though it does rather draw to mind US costume dramas.
InstructionsNote: Muff and all white borders are worked using yarn doubled. MuffPocket lining: Main Part: 1st row (right side facing): k1,
* k1tbl, p1; repeat from *
to last 2 stitches, k1tbl, k1. These 8 rows form the pattern. Next row: Pattern 9, cast off 31,
pattern to end. Continue straight in pattern until work measures 14 inches from start.
Borders: Making upPress work lightly on wrong side under a damp cloth. Join short sides of muff; insert pocket, joining top to 31 cast-off stitches,
then catch down pocket neatly all round. Turn muff inside out. Wrap 2 layers of wadding round muff and join ends.
Join short sides of lining material. Slip lining over wadding and hem
neatly to main work just inside ends of muff. I seem to remember from my youth that muffs generally had a string attached to hang them round your neck so that you could have both hands free if necessary. I'm not sure if this was just because I was a child and was the equivalent to having your gloves on a string (threaded through your coat sleeves!), but it certainly would make it more practical if you planned to use it for more than skating expeditions.] CapUsing single strand of red wool, cast on 108 stitches and work 4½ inches in k1/p1 rib. Change to twisted rib and shape crown as follows: 1st row: *
p1, k1 through back of loop; repeat from *
to end. Continue in twisted rib decreasing 6 stitches in the same way on every
Next row: purl. Break wool, draw through remaining stitches and fasten off. Border: Making upPress lightly on wrong side under a damp cloth. |
MaterialsDouble knitting yarn: 8 oz in Scarlet and 4 oz in white. One pair of No 7 (4½mm) needles. 6-inch zip fastener. White fabric to line muff, and 2 pieces of wadding for padding. TensionCap: 24 sts to 4 inches (10cm) over twisted rib pattern using
single strand of yarn. Size mattersCap to fit "an average head". Abbreviationsk2tog or p2tog: work 2 sts together to decrease. k1tbl/p1tbl: knit/purl 1 stitch through back loop. k2togtbl/p2togtbl: knit/purl 2 stitches together through back loops. stocking stitch: one row knit and one row purl, ("stockinette"). Disclaimer
|

I have always loved Lopi sweaters (whatever the era) and I thought the one worn by Martin Freeman in Sherlock (2011 - was it that long ago?!) was especially good. I love the navy base and the Christmassy air about it. For all I know, in the context of the show, it may have been meant as a joke Christmas jumper - but I love it despite many Sherlock fans labelling as ugly (ugly?!).
As you can see this pattern I have provided here, as made popular in the 70s and 80s, goes with the muted natural tones of the era, so you would need to change the colours to your own choice - mine being navy white and red, of course. You can, however, see in the picture what a difference the colour scheme makes; both his and hers sweaters are knitted to the same pattern, and yet with a change to the main shade and order of contrasts it looks like quite a different pattern.
Instructions.Note: When working colour pattern from chart, strand yarn not
in use loosely across wrong side of work over not more than 3 stitches
at a time to keep fabric elastic. Back and Front (alike)With 5mm needles and main shade A, cast on 75 [79,
83, 87, 91,
95] stitches, and work in K1/P1 rib
for 4 inches (10cm), right-side rows having K1 at each end, and ending
with wrong side facing for next row. Change to 6mm needles and starting with a knit row, work in stocking stitch until work measures 15½ (15½, 15, 14½, 15, 14½] inches, (39 [39, 38, 37, 38, 37] cm), ending with a purl row. Shape armholes by casting off 5 stitches at the beginning of the
next 2 rows. Sleeves (two alike)With 5mm needles and main shade A, cast on 33 [35,
37, 39, 39,
41] stitches, and work in rib as
on Back for 4 inches (10cm), and ending with wrong side facing for next
row. Change to 6mm needles and starting with a knit row, work in stocking stitch, shaping sides by increasing 1 stitch at each end of the 3rd [3rd, 5th, 3rd, 7th, 7th) row. Continue in stocking stitch in main colour
only on 6mm needles and increase 1 stitch at each end of every following
8th [8th, 9th,
9th, 9th, 8th]
row until there are 58 [60, 60,
64, 64, 68]
stitches. Shape armholes by casting off 5 stitches at the beginning of the
next 2 rows. 1st, 3rd, 4th and 6th sizes only: Decrease 1 stitch at each end of the next row. Work 1 row. All sizes: Leave remaining
44 [46, 44,
48, 48, 50]
stitches on a spare needle or stitch holder. Yoke and Neck BorderWith right side facing, slip the first 32 [33,
34, 36, 37,
38] stitches from the back on a spare
needle with points at both ends. If you are using 6 double pointed needles, then divide the stitches evenly
on 5 needles. Mark the first stitch of the round with a coloured thread,
then joining in and breaking off colours as required, work the 32 [32,
32, 36, 36,
36] rounds from Chart A [A,
A, B, B,
B], repeating the 8 pattern stitches
27 [28, 28,
30, 31 , 32]
times across and decreasing where indicated. Chart A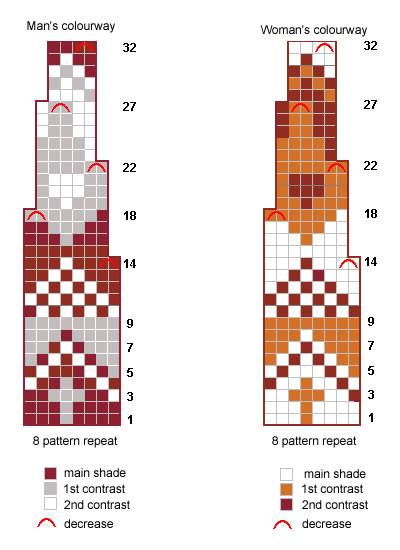 Chart B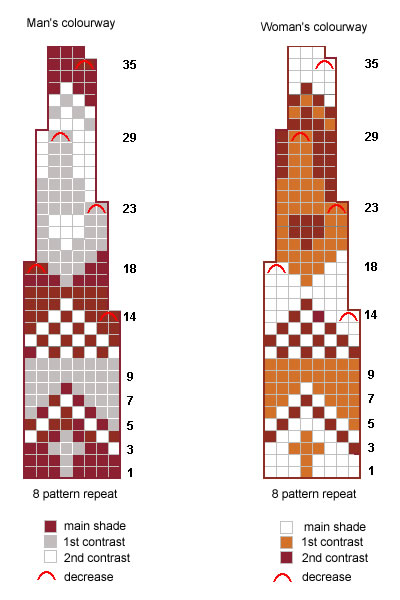 Break 1st and 2nd contrasts and continue in main shade only. Shape Back as follows: Change to set of four (or circular) 5mm needles and decrease 1 stitch
on the first round on 1st and 5th sizes only
(to make them an even number of stitches). To Make UpWith wrong side of work facing, block each piece by pinning out round edges, and omitting ribbing press lightly following any instructions on the ball band. When making up a chunky garment it is easier to use an oddment of finer yarn in a toning shade for the sewing. If you prefer to make up with the original yarn, use 76cm lengths and a large needle, making sure the yarn keeps its original twist by turning the needle clockwise between fingers and thumb after every few stitches. Join armhole, side and sleeve seams. Press seams. |
MaterialsChunky knitting yarn: 2 balls in each of 2 contrast colours for all sizes. Pair each 5mm, 6mm, and 6½mm needles. Tension15sts and 20 rows to four inches on 6mm needles over stocking stitch.
Size mattersTo fit chest: Abbreviations k: knit A word on the wool.Original yarn was Patons Husky Chunky. Disclaimer
|
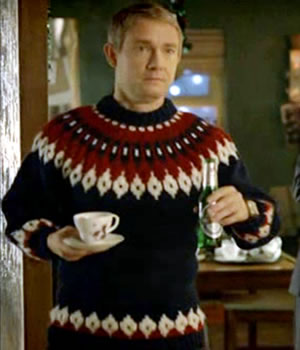
Note that Dr Watson has patterning just above the welts on the body and the sleeve.
If you want to knit the actual original, it is Alafoss 52 - again looking quite different in the natural tones associated with Icelandic sweaters.
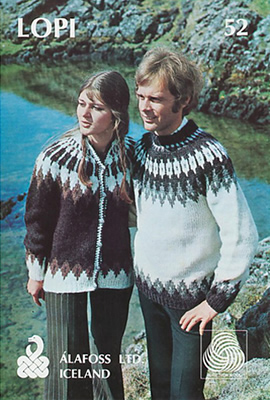
Fair-Isle pullover or vest in bright colours, with the added interest in that it is knitted sideways.
Instructions:The pullover is worked sideways using the Fair-Isle technique. Strand
the wools not in use loosely across the back of the work. BackBegin at the left side edge. Using No 9 (3¾mm) needles and main
shade natural yarn cast on 84 stitches. Continue in stocking stitch, working the pattern from the chart, reading knit rows from right to left and purl rows from left to right. Work the 12 pattern stitches 7 times across. When the 10th row of the chart has been completed, continue in pattern,
working armhole increasings as shown on the chart, and keeping
the extra stitches in pattern as indicated. Continue in pattern, increasing 1 stitch at the shoulder edge at the
end of the 29th, 37th, 45th, and 53rd rows as indicated. [151 sts] For the second half of the back, work down from top of chart, that is:
77th, 76th, 75th, 74th rows, etc, still reading from right to left on
knit rows and left to right on purl rows. Work straight to the end of the chart, then purl 1 row in natural. FrontBegin at the right side and work exactly as for the first half of the back until the 57th row has been completed. [151 sts]. Divide for neck opening: Continue in pattern, casting off 5 stitches at the beginning of the next
9 purl rows as indicated on the chart. [91 sts] For the second half of the front, work down from the top of the chart as before, casting on stitches at the neck edge to correspond with those cast off on the first half, and decreasing at the shoulder and armhole edges as indicated. When the chart is complete, purl 1 row in natural. Ribbed weltWith the right side of the work facing, using No 12 needles and main shade natural, pick
up and knit 140 stitches along the lower edge of the back. Work the front welt in the same way. NeckbandJoin shoulder seams. With the right side of the work facing, using No 12 needles and main shade natural, beginning at the centre back, pick up and knit 88 stitches to centre front. Work 10 rows k1/p1 rib, decreasing 1 stitch at the centre front on alternate rows; cast off in rib. Work the other half to correspond. Armhole bandsWith the right side of the work facing, using No 12 needles and main shade natural, pick up and knit 160 stitches round each armhole. Work 10 rows k1/p1 rib; cast off in rib. To Make UpPress parts well under a damp cloth. |
|
Materials4 x 1oz balls of 4 ply fingering in main shade (natural), plus 1 oz each in 6 contrast colours: brown, yellow, blue, rust, emerald, white. A pair each No 9 (3¾mm) and No 12 (2¾mm) needles. Tension30sts to 4 inches Size mattersChest to fit one size: 39-41 inches. Abbreviationsk2tog/p2tog: decrease by knitting/purling 2 sts together. stocking stitch: one row knit and one row purl, ("stockinette"). A word on the woolOriginal called for Patons Fair Isle Fingering about which there is some information available on Ravelry. This pattern is in ounces but it seems the yarn
stuck around for a while as some vintage stocks can be seen in 25g balls. Jamiesons are Kings (or Queens) of Fair Isle and Shetland knitting - their Spindrift yarn sounds a good substitute: equivalent to a traditional 4ply; ideal for Fair Isle knitting; extensive colour pallet of over 220 colours; supplied in 25g Balls (105m); tension: 30sts x 32 rows on 3¼mm needles. Disclaimer
|
|
For a pdf version of the chart you can right click >>here<< and choose "save link as" or "save target as" (browser dependent options) to download and save a pdf file. |
I like hooded jackets and textured fabrics. The benefit of this texturing is that it's all in the stitch, and you don't have to worry about sourcing a replacement for a unique vintage yarn. I can't say how effective the pattern is other than from the photo - so may be best to try a sample swatch first (always a Good Idea - no?!). I'm sure the jacket would work just as well plain.
...attractive loop-stitch texture gives extra warmth to this eyecatching week-end jacket - and a hood can be added for a colder-day version...
InstructionsInstructions are for 4 sizes. BackUsing No 8 (4mm) needles, cast on 79/83/87/91 stitches and work 7 rows in garter stitch, (ie every row knit). Change to No 5 (5½mm) needles and pattern as follows: 1st row (right side facing): knit. These 8 rows form the pattern for the back. Work a further 8 rows straight in pattern. Continue in pattern, shaping sides by decreasing 1 stitch at each end of the next and every following 6th row until 71/75/79/83 stitches remain, then on every following 4th row until 67/71/75/79 stitches remain. Work straight until back measures 18½ inches (47 cm) at centre, ending with right side facing. Shape raglans as follows: Now repeat 1st and 2nd rows until 23/23/25/25
stitches remain, ending with right side facing. Pocket linings (make 2)Using No 5 needles, cast on 21 stitches and work 23 rows stocking stitch,
starting with a purl row. Left Front**Using No 8 needles, cast on 35/37/39/41 stitches and work 7 rows garter-stitch. ** Change to No 5 needles and pattern as follows: 1st and 3rd sizes: 2nd and 4th sizes: All sizes: Continue in pattern, shaping side edge by decreasing
1 stitch at the beginning of the next and following 6th row. [33/35/37/39
sts]. Place pocket lining as follows: Keeping continuity of pattern, work straight until front matches back at the side edge, ending with right side facing. Shape raglan as follows: Now repeat 1st and 2nd rows until 13/13/14/14 stitches remain, ending with right side facing. Continue decreasing at raglan edge as before on the next and every alternate row, and at the same time decrease 1 stitch at the neck edge on every row until 8/8/6/6 stitches remain, then on every following alternate row until 4 stitches remain, all sizes. Now keep the neck edge straight and work 1 more raglan decrease as before.
[3 sts].. Right FrontWork as for left front from ** to
**. 1st and 3rd sizes: 2nd and 4th sizes: All sizes: Finish to correspond with left front, reversing shapings and working 'k2tog' when shaping raglan instead of 'k2togtbl'. SleevesUsing No 8 needles, cast on 35/35/39/39 stitches and work 7 rows garter stitch. Change to No 5 needles and pattern as for back, shaping sides as follows: 3rd and 4th sizes: Now increase 1 stitch at each end of every following 10th/8th row until there are 55/59 stitches. All sizes: Work a few rows straight until sleeve seam measures 16 inches (41 cm), ending with the right side facing. Shape raglans as for back until 7 stitches remain all sizes. Front BordersLeft: With No 8 needles, cast on 11 stitches and work a strip
in garter stitch to fit up left front to start of neck shaping, when slightly
stretched, ending with right side facing. Right: With No 8 needles, cast on 11 stitches and work 6 rows
garter stitch. Work in loop pattern as follows: Neck Border for version without hood Join raglan seams. 1st row: k11, keeping continuity
of loop pattern as for right border work to end. HoodJoin raglan seams. With right side facing and No 8 needles, start at the centre of the right border and pick up and knit 5 stitches, pick up and knit 9 stitches up right side of neck, k5 from right sleeve, knit 23/23/25/25 from back, k5 from left sleeve, pick up and knit 9 down left side of neck, then k5 from left border to centre. [61/61/63/63 sts] Work 5 rows k1/p1 rib, rows on right side having a k1 at each end. 1st row: rib 4/4/1/1, m1, * rib 4, m1; repeat from * last 5/5/2/2 stitches, rib 5/5/2/2. [75/75/79/79 sts] Change to No 5 needles. Keeping 12 stitches at each end in stocking stitch, continue in loop pattern until work measures 11 inches (28 cm) from start of ribbing, ending with right side facing. Cast off 24 stitches at the beginning of the next 2 rows. Hood BorderWith No. 8 needles, cast on 103/103/107/107
stitches, and knit 2 rows, then work 16 rows in loop pattern as for right
border, starting with 1st row. To Make UpUsing a warm iron and damp cloth, press parts lightly on wrong side, omitting loop and garter stitch borders and taking care not to spoil the pattern. Join side and sleeve seams. Pocket Tops: With right side facing and No 8 needles, knit across
each set of 21 pocket stitches decreasing 1 stitch in centre. [20 sts]. Cut petersham the same length as right border plus 1 inch (2 cm) for
turnings. Hooded Version: Join sides to top of hood. |
Materials
25/26/27/28
x 50g balls of chunky yarn. Pair each No 5 (5½mm) and No 8 (4mm) needles. 2 stitch-holders. 2½ inch wide petersham for buttonhole border. Tension17 sts and 21 rows to 4 inches measured over stocking stitch on No 5 (5½mm) needles. Size mattersThe pattern is given in 4 sizes to fit bust: Abbreviations:k2tog or p2tog: knit or purl 2 stitches together (decrease one stitch). stocking stitch: one row knit and one row purl, ("stockinette"). tbl: through back loops. [k2tog tbl also known as "ssk" or slip, slip, knit] m1: make 1 stitch by picking up horizontal loop lying before next stitch and working into the back of it. L1: knit next stitch, winding yarn over needle and first finger
of left hand once, then over
needle again, then place the 2 loops back on the left needle and knit
them together with the stitch through back of loops. A Word on the Wool:Original knitted in Patons Doublet. Disclaimer
|
I was told last autumn that red was definitely THE colour of the season, and then - after my wardrobe became impossibly bold - I was told that it was all about neutrals! Similarly last Spring I was told that yellow was the colour - just a splash or dash - and now apparently it is definitely THE colour for Spring.
Whatever you believe, this is a staple 50s jacket which you can knit in a single colour - entirely in yellow - or entirely without yellow. Whatever colour scheme you go for, make sure of those wonderful coordinating giant buttons before you start.
So: "Use a clear sharp sulphur yellow -- vivid contrast with white."
Instructions.Instructions give for 2 sizes- larger size given in brackets thus ().
BackWith No 8 needles white yarn (W), cast on 104 (110) stitches and work 1½ inches in twisted stocking stitch [that is: knit into the back of every stitch on the knit rows throughout], ending with a purl row. Next row (right side facing): Purl,
working into the back of every stitch. With right side facing, continue straight in twisted stocking stitch until back measures 15 (15) inches from hemline ending with a purl row. Shape armholes by casting off 5 stitches at the beginning of the next 2 rows, then decrease 1 stitch at each end of following 6 (8) knit rows. [82 (84) sts] Work straight until back measures 23½ (23½) inches from hemline. With right side facing, shape shoulders by casting off 6 (6)
stitches at the beginning of the next 2 rows, then 5 (5)
stitches at the beginning of the next 8 rows. Pocket linings (make 2 the same)Begin by making pocket linings. Left Front: With No 8 needles and W, cast on 44 (48)
stitches and work 1½ inches in twisted stocking stitch, ending with
a purl row. Next row (right side facing): Purl,
working into the back of every stitch. Continue in twisted stocking stitch as follows: Introduce pocket as follows: Now continue straight in twisted stocking-stitch as before until front measures 15 (15) inches from hemline, ending with a purl row. Continue in pattern shaping armhole and increasing 6 stitches in the border after the slipstitch as follows: Next row: Cast off 5, knit to last
18 stitches, Slip 1 purlways, [increase 1 by picking up horizontal thread
before next stitch and knitting into back of it, k3] 5 times, increase
1 as before, k2. Next row (wrong side facing): join
in yarn Y, (k1, wool forward, slip 1 purlways, wool over needle] 11 times,
k1 in Y; rejoin W and purl to end in W. Repeat the last 2 rows 5 (7) times
more. Now continue straight until front measures 21½ inches from the hemline, keeping 23 stitches of border in twisted rib pattern in Y for revers as before. With wrong side facing, shape neck by casting off 23 stitches in Y. Continue in twisted stocking stitch in W decreasing 1 stitch at the neck
edge on the next 8 (8) rows. [26 sts].
With right side facing, shape shoulder by casting off 6 (6) stitches at the beginning of the next row, then 5 (5) stitches at the beginning of the following 4 alternate rows, at the armhole edge. Right Front: With No 8 needles and W, cast on 44 (48)
stitches and work 1½ inches in twisted stocking stitch, ending with
a purl row. Work to correspond with left front reversing shapings and with the addition of 3 double buttonholes. First to come 3½ inches up from lower edge and remaining 2 at 5-inch intervals. To make a buttonhole: Your pocket row will read: (right side facing), k17, slip 1 purlways, k22 (23), cast off 24 (26), k15 (16). The increase row before start of armhole will read: (right side facing), k2, increase 1 by picking up horizontal thread before next stitch and knitting into back of it, [k3, increase 1 as before] 5 times, slip 1 purlways, knit to end. On the next row start armhole shaping and introduce fancy rib
in Y. as follows: Sleeves:With Y yarn, cast on 53 stitches. 1st row (wrong side facing): *
k1, wfd., Slip 1 purlways,won; repeat from *
to last stitch, k1. Continue in fancy rib for 3 inches ending with 2nd pattern row. Continuing in pattern start to increase 1 stitch at each end of the next
and every following 6th row until there are 93 stitches Work straight in pattern until sleeve seam measures 18 (19) inches from start of fancy rib pattern, ending with 2nd pattern row. With wrong side facing, continue in pattern shaping top by casting
off 5 stitches at the beginning of the next 2 rows, then k2tog at each
end of the next and every alternate row until 59 stitches remain, then
at each end of every row until 19 stitches remain. CollarJoin shoulder seams. With right side facing and yarn Y, pick up and k. 93 stitches all round
neck, beginning and ending at the slipped-stitch of front borders. Next row: Purl, across all stitches,
picking up horizontal loops in the same way. To Make UpPress stocking stitch parts lightly on wrong side under a damp cloth.
Now make up double collar and double front borders as follows: Slip-hem front facing in position on wrong side [note that the slipped stitch in the knitting marks the edge of the fold up the front edges]. Oversew loosely around the double buttonholes. Join side and sleeve seams; insert sleeves. Turn under 1½ inches of stocking-stitch up to hemline all round lower Catch down pocket linings, then with yarn W and (right side facing), pick up and knit 24 (26) stitches along cast-off edge of each pocket opening. Work 2 inches twisted stocking-stitch; cast off loosely. Fold pocket tops in half to wrong side and slip-hem, then catch down sides of pocket tops to main work. Press all seams and hems. |
Materials
|
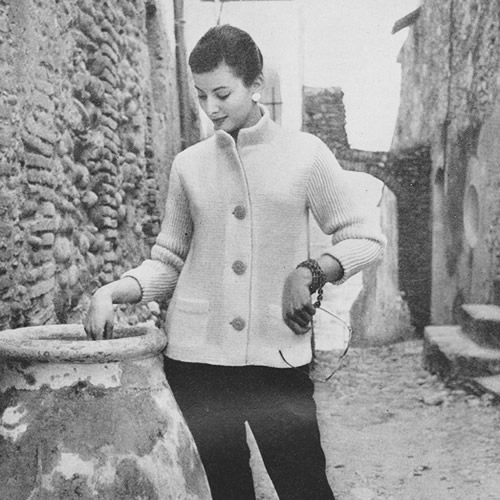
It is interesting to note that this jacket is referenced as being a revamp of a previous model (which I have yet to find). This picture above is obviously how it was made up for the photo shoot - ie in a single colour. You can peer at the detail in the colour photo and pretty easily see that the yellow colour has been painted in after the event. I am keen on trying out changes to the photos - lightly tinting black and white pictures etc - but these changes would have been made by skillful application using a real air brush technique rather than Photoshop.
Splendidly cosy knee-length wrap in Irish Knot stitch with garter stitch borders forming a soft shawl collar.
Instructions.Figures in brackets refer to larger sizes; where only one figure is given, this refers to all sizes. Make knot (MK) in pattern as follows: BackWith No 9 needles cast on 98 [104
: 110: 116 : 122]
stitches. With No 3, (6½ mm), needles, cast on 18 stitches and Change to No 2 (7 mm) needles and work in pattern as follows: 1st row (wrong side facing): k9 [6
: 8 : 10 : 7];
* p2, k1, p1, k1, p2, k7; repeat
from * to
last 16 [13 : 15
: 17 : 14] stitches; p2, k1, p1, k1,
p2, k9 [6 : 8
: 10 : 7]. These 12 rows form the pattern. Continue in pattern until Back measures 10 inches (25 cm), ending with right side facing for next row. Change to No 3, (6½ mm), needles, and keeping continuity of pattern, work
Pocket Linings as follows: Repeat the last 2 rows 13 times more, then the first of these 2 rows again, thus ending with right side facing for next row. Next row: Cast off 18 stitches, pattern to last 18 stitches, cast off remaining stitches. Break yarn. With wrong side facing, rejoin yarn to remaining stitches and continue in pattern until Back measures 21½ inches (55 cm). Change to No 4 (6 mm) needles and continue in pattern until Back measures 26½ inches (67 cm), ending with right side facing for next row. Keeping continuity of pattern, shape armholes, by casting off
5 stitches at the beginning of the next 2 rows, then decrease 1 stitch
at each end of the next 5 [7 : 7
: 7 : 9] rows. Now decrease 1 stitch at each end of the next and every alternate Shape shoulders by casting off 7 stitches at the beginning of
the next 4 rows, then 6 [6 : 7
: 8 : 8] stitches at the beginning
of the Left frontWith No 3, (6½ mm), needles, cast on 55 [61
: 63 : 65 : 67]
stitches. These 12 rows form the pattern. Continue in pattern until Front measures 10 inches (25 cm), ending with right side facing for next row. Change to No 3, (6½ mm), needles and keeping continuity of pattern,
shape for Pocket Border as follows: Next row: Cast on 5 stitches, pattern across these stitches, pattern to end. (55 [61, 63, 65, 67] sts). Continue in pattern until 32 rows less than on Back have been worked before start of armhole shaping, ending with right side facing for next row. Keeping continuity of pattern, shape front slope as follows: 1st size: Decrease 1 stitch at the end of the next row, and then at the same edge on every following 3rd row until 44 stitches remain, noting that when Front measures 21½ inches (55 cm), change to No 4 (6 mm) needles. 2nd, 3rd, 4th and 5th sizes: Decrease
1 stitch at the end of the next, and every following alternate row until
- [54, 54,
56, 60] stitches remain, then decrease
1 stitch at the front edge All sizes: Work 1 row, thus ending with right side facing for next row. Shape armhole by casting off 5 stitches at the beginning of the next row. Next row: Work 2tog, pattern to end. Decrease 1 stitch at armhole edge on next 5 [7 : 7 : 7 : 9] rows, then on he following 2 [3 : 3 : 3 : 4] alternate rows, and at the same time decrease 1 stitch at the front edge on every 3rd row from previous decrease until 28 [28 : 29 : 31 : 31] stitches remain. Continue decreasing 1 stitch at the front edge only on every 3rd row
from previous decrease until 20 [20
: 21 : 22 : 22]
stitches remain. Shape shoulder by casting off 7 stitches at the beginning of the
next and following alternate row. Right frontWith No 3, (6½ mm), needles, cast on 5 stitches and leave on a spare
needle. With No 3, (6½ mm), needles, cast on 55 [61
: 63 : 65 : 67]
stitches. These 12 rows form the pattern. Continue in pattern until Front measures 10 inches (25 cm), ending with right side facing for next row. Change to No 3, (6½ mm), needles and keeping continuity of pattern,
shape for Pocket Border as follows: With wrong side facing, rejoin yarn and work 29 rows in pattern. Continue in pattern and complete to correspond with the Left Front, reversing shapings and changing needles as required. SleevesWith No 4 (6 mm) needles, cast on 53 [53,
57, 61, 61]
stitches, and work 7 rows garter stitch (every row: sl1k, knit to end).
Now work in pattern as follows: 1st row (wrong side facing),: k6
[6, 8,
10, 10]; *
p2, k1, p1, k1, p2, k7; repeat from *
to last 13 [13, 15,
17, 17] stitches, p2, k1, p1, k1,
p2, K6 [6, 8,
10, 10]. These 12 rows form the pattern. Continue in pattern, shaping sides by increasing 1 stitch at each
end of the next and every following 18th [14th,
18th, 18th, 12th]
row until there are 69 [71, 73,
77, 81] stitches, taking increase
stitches into the pattern. Shape top by casting off 5 stitches at the beginning of the next
2 Now decrease as before at each end of every row until 21 stitches remain. To Make UpPress parts lightly on wrong side following instructions (if any) on
the ball band. Pocket Borders: With right side facing and No 4 (6 mm) needles,
knit up 23 stitches evenly along side edge of front between cast-off and
cast-on stitches. Join sleeve seams; insert sleeves. Left Front Border and Collar: Shape Collar by increasing 1 stitch at the beginning of the next
and every following 6th row until there are 21 stitches. Right Front Border and Collar: |
Materials
|
|
|
Continental after-ski casuals - fifties style .
... even though my sporty friends tell me that even more recent items that I think of as acceptable ski-wear have very quickly dated on the slopes.
"Hey look - over there - someone's wearing socks to match my sweater!"
[...and in case you were wondering - I think it's an orange she's holding.]
Instructions.The pattern is in three colours - White is represented by W, Black by
B, and Red by R. FrontWith No 8 needles and white yarn W, cast on 99 stitches and work 3 inches in k1/p1 rib, rows on right side having a k1 at each end, and ending with a wrong side row. With right side facing, change to pattern introducing the fair-isle pattern (worked from the chart) in stocking-stitch and the red panel in red yarn (R) worked in rib up the centre.
Continue setting out the panels as follows:— Keeping centre rib and pattern correct work 9 rows straight. Next row: k12 W; k2tog W; pattern
31; k1 R; using R pick up horizontal loop before next stitch and knit
into the back of it; p1 R, k1 R, p1 R, using R pick up horizontal loop
before next stitch and knit into the back of it, k1 R; pattern 31; p1
W, k1 W, k2tog W through back of loops, k12 W. Next row: k11 W; k2tog W, k1 W, p1
W; pattern 31, k1 R; using R pick up horizontal loop before next stitch
and purl into the back of it; using R (k1, p1) twice, k1 R, using R pick
up horizontal loop before next stitch and purl into the back of it, k1
R; pattern 31; p1 W, k1 W, k2tog W through back loops, k11 W. Keeping pattern and rib correct work 14 rows straight. Continue in pattern increasing the rib stitches in this way and decreasing in the White panel at each end, on the next and every following 16th row until work measures 13½ inches from the start, and ending with right side facing. Shape sleeves as follows: This completes the sleeve shaping Continue in pattern shaping on every 16th row as before until sleeve edge measures 4 inches ending with right side facing. Shape neck as follows: Next row: Work 124, rib the next 17 stitches, placing them on to a stitch-holder and leave for the time being; work 124 stitches to end. Continue on the last 124 stitches only, decreasing 1 stitch at the neck edge on the next 2 rows. Next row: Cast off 31, work to last
2 stitches, p2tog. With wrong side facing, shape shoulder by casting off 7 stitches
at the beginning of the next and following alternate row. With wrong side facing, rejoin yarn to the remaining 124 stitches, work
to end. Decrease 1 stitch at the neck edge on the next 2 rows, then finish
to correspond with right shoulder. BackWith No 8 needles and W yarn, cast on 95 stitches and Change to stocking-stitch, working in White throughout, and work straight until side edge measures same as front ending with right side facing for next row. Shape for sleeves by casting on: 2 stitches at the beginning
of the next 10 rows; 5 stitches at the beginning of the next 4 rows; 6
stitches at the beginning of the next 2 rows; 7 stitches at the beginning
of the next 2 rows; 8 stitches at the beginning of the next 2 rows; 9
stitches at the beginning of the next 2 rows; 10 stitches at the beginning
of the next 2 rows; 11 stitches at the beginning of the next 2 rows; 12
stitches at the beginning of the next 2 rows. [261 sts] Continue straight in stocking-stitch until sleeve edge measures 4 inches
ending with right side facing. Shape sleeves and shoulders by casting
off 31 stitches at the beginning of the next 6 rows; 7 stitches at the
beginning of the next 4 rows; 9 stitches at the beginning of the next
2 rows. [29 sts] NeckbandJoin shoulder seams. Work in rounds of k1/p1 rib for 2½
inches. Cuffs With right side facing, using two No 10 needles and Black yarn B, pick
up and knit 40 stitches along sleeve edge. Work 3 inches k1/p1 rib. To Make UpPress work lightly under a damp cloth, avoiding ribbing. |
MaterialsOriginal pattern calls for double knitting yarn: 13 oz in white (W), 3 oz in black (B), and 1 oz in "lipstick" red (R). One pair of No 8 (4mm) needles 2 stitch holders. Tension22 sts x 30 rows to 4 ins on No 8 (4mm) needles. Size mattersTo fit chest Abbreviationsstocking stitch: one row knit, one row purl. k2tog or p2tog: work 2 sts together to decrease. Disclaimer
|
And here we see the whole splendid outfit.
[... and she's still holding on to that orange...]

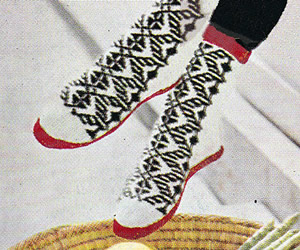
Sports wear.... skiing!
... even though my sporty friends tell me that even the items I think of from more recent years as acceptable ski-wear have very quickly dated on the slopes.
Anyway - to kick off in fifties style - "ankle-warm slipper boots".
InstructionsMake two socks alike. Main body:Using the pair of No 10 needles and red (R) yarn, cast on 51 stitches, and work as follows: 1st row: k2, *
p1, k1; repeat from * to last stitch,
k1 7th row: k2, (p1, k1) 5 times, p1,
(k3, increase in next stitch) 6 times, k1, (p1, k1) 5 times, p1, k2. [57
sts] Join in white (W) and purl 1 row. Now introduce black yarn B and work the fair-isle pattern over the centre
31 stitches, using stocking stitch and reading from the chart, and keeping
13 stitches on either side in rib as before.
Work rows 1 through 12 from the chart, 3 times in all, then 1st and 2nd rows again. Next row: Rib 13 and slip these stitches
on to a length of wool or a stitch holder for the time being, pattern
across the next 31 stitches, slip the remaining 13 stitches on a length
of wool as before. Next row: (k2, k2tog.) 7 times, k1,
k2tog. [23 sts] Adjust length of foot here: For size 5 foot work 2 rows straight in stocking stitch; Continue in stocking stitch, shaping toe by decreasing 1 stitch at each
end of the next and every knit row until 15 sts remain, then at each end
of every row until 9 stitches remain. To make heel:Slip the 26 stitches left on spare wool or stitch holders on to one needle
and with right side facing, join in W 1st row: k2, (p1, k1) 5 times, p2tog.,
(k1, p1) 5 times, k2. To shape instep, using needle with the 1 stitch remaining, pick
up and knit 10 stitches along the side of the heel. With right side facing, pick up and knit 11 stitches along the other
side of the heel and work to correspond. Making upPress the pattern parts lightly under a damp cloth. Stitch slipper firmly to sole. |
MaterialsOriginal pattern calls for double knitting yarn: 2 oz in white (W), 1 oz in black (B), and 1 oz in "lipstick" red (R). One pair of No 10 (3¼mm) needles Two 4 inch zip fasteners. A pair of slipper soles. Tension24 st and 32 rows to 4 inches (10cm). Size mattersTo fit UK women's size 5,6,7. Abbreviationssl1: slip one stitch by passing it between the needles without knitting it. psso: pass the slipped stitch over. k2tog or p2tog: work 2 sts together to decrease. Disclaimer
|
A slightly clearer picture of the boots, showing the snazzy back zip closing.
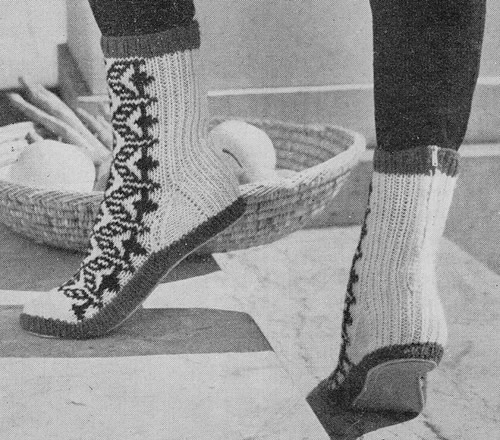
There maybe just enough time to crochet a simple cover if you can get over the lurid sixties colour schemes. [I'm sure you can choose your own combinations which would be less traumatic for a baby].
InstructionsThe crochet blanket is made up of a number of large motifs sewn together and then joined with smaller motifs which are integrated as you work. Large Motif (make 24)Using No 7 (4½mm) hook and DK in Light colour (L) make 6ch loosely and join in a ring using a slip stitch. 1st round: 3 chain, work 23tr into
the ring and join with a slip stitch to top of 3ch. [24 sts]. This completes the motif. To Make UpUsing L, join motifs by stitching centre stitches of each motif together,
and making 6 rows of 4 motifs. Work 15 small motifs to fill the spaces formed by the larger motifs and join together as follows: Small Motif (make 15 - joining as you work)The smaller motifs are worked in 4 ply. 1st round: 6 chain, work (1tr, 3ch)
7 times into the ring and join with a slip stitch to 3rd of 6 ch. This completes the motif - work the other 14 in the same way. FinishingWith right side facing, Using No 7 (4½mm) hook and M in DK, work
1 round of dc around scalloped edge of cover. Block the blanket by pinning it out and dampening; leave to dry. You can press very lightly with a damp cloth - just hold the iron above the cloth so it heats it but do not press down. You want to leave the texture of the stitches in place, so do not press heavily. Cut the lining material to fit around the scalloped edges. Turn in the edges and catch down all around the scallops inside the dc border. |
Materials
|
The original yarn was bri-nylon - famous for its hard wearing properties and luminous colour ranges. Although "bri-nylon" is not very marketable now, modern acrylic yarns are a worthy replacement being soft yet robust with a wide choice of colours.
Stylecraft have a good range of acrylics with equivalent colours available in DK and 4ply.
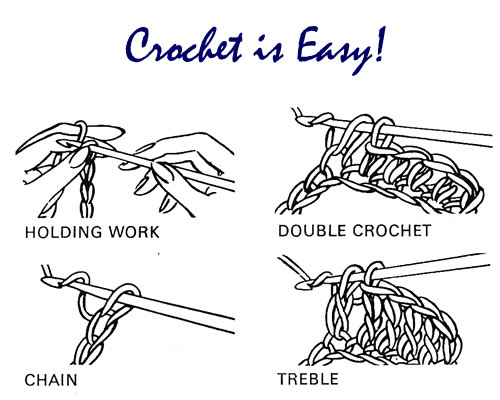
There maybe just enough time to knit a simple cover if you can get over the dramatic sixties colour scheme. [I'm sure you can choose your own combinations].
InstructionsThe pattern uses DK weight yarn with 2 strands held together. Motif (make 12)Using main shade (M) cast on 96 stitches and work 11 rows in garter stitch (every row knit but slip the first stitch of every row). Next row: Sl1, k7, slip these 8 stitches on to a thread; k4, increase in the next stitch, (k9, increase in next stitch) 7 times; k5; slip the next 8 stitches on to a thread (88 sts). Joining in contrast (C) as required and work in pattern as follows: 1st row: Sl1, k2C, *
k4M, k2C, repeat from * to last stitch,
k1M. These 8 rows form the pattern. Continue in pattern until main part measures approximately 26½ inches
ending with a 2nd pattern row. Borders and finishingWith wrong side facing, rejoin M to the 8 border stitches on left
side and work in garter stitch until Border measures 26 inches from cast-on
edge, ending with wrong side facing. Sew remaining Border in position. |
Materials
|
The original yarn was bri-nylon - famous for its hard wearing properties and luminous colour ranges. Although "bri-nylon" is not very marketable now, modern acrylic yarns are a worthy replacement being soft yet robust with a wide choice of colours.
You could also consider knitting a single strand in a heavier weight yarn - Aran, worsted, even chunky. However you would need to knit a tension square in the pattern stitches.
Pullover in a range of sizes, with an interesting plaid effect made by slipping stitches.
Joy first knitted it 35 years ago for her husband and he liked it so much he was always asking her to redo it. It took a while but she finally managed it - see her satisfied hubby at the end....
Instructions:The instructions are given in 9 sizes with smallest size given first
and the larger sizes in brackets. Back† 1st row (right side): K1, *
p1, k1; repeat from * to end. Change to No 8 (4mm) needles and commence pattern. 1st, 2nd, 4th, 5th, 6th, 8th, and 9th sizes only 1st row: Purl 3rd and 7th sizes only 1st row: Purl Continue in pattern ... † ....until work measures 14 [14½; 14½; 15; 15; 15½; 15½; 16; 16] inches from the beginning , ending with a wrong side row. Shape Armholes: Continue without further shaping until work measures 8¼ [8½; 8¾; 9; 9¼; 9½; 9¾; 10; 10¼] inches from the commencement of the armhole shaping, ending with a wrong side row. Shape Shoulders: FrontWork as given for back from † to † until work measures 8 rows less than the Back to armhole shapings ending with a wrong side row. Shape First side of neck Shape Armhole: †† Shape Shoulder: Return to the stitches on the spare needle on the other half of the front. Slip the centre stitch onto a safety pin. Shape second side of neck: Shape Armhole: Complete to match the first side, working from †† to ††. NeckbandUsing a back stitch and matching yarn, join right shoulder seam. With right side of work facing, using No 10 (3¼ mm) needles and yarn B, pick up and knit 68 [70; 72; 74; 76; 78; 80; 82; 84] stitches down left side of neck, knit centre from safety pin (mark this stitch with a coloured thread or stitch marker), pick up and knit 68 [70; 72; 74; 76; 78; 80; 82; 84] stitches up right side of neck, knit across the 29 [31; 33; 33; 35; 35; 37; 39; 41] stitches of back neck, increasing into last stitch: 167 [173; 179; 183; 189; 193; 199; 205; 211] stitches. 1st row: Work in k1/p1 rib to 1 stitch
before centre stitch; slip next stitch onto right hand needle, slip next
stitch onto cable needle and leave at back of work, place stitch on right
hand needle back onto Repeat these 2 rows twice more, then the first row once. ArmbandsUsing a back stitch and matching yarn, join left shoulder seam and Neckband.
With right side of work facing, using No 10 (3¼ mm) needles and yarn
B, pick up and knit 90 [94; 96;
100; 102;
104;
108; 110;
112] stitches evenly along armhole edge. For each armhole, with right side facing and using No 11 needles pick
up and knit 90 [96; 102;
108] stitches evenly round armhole.
Cast off ribwise. To Make UpPin out to correct measurements and steam very gently, using a warm iron
over a damp cloth. |
Materials Yarn A - bouclé double knitting: 3 [3;
4; 4;
4; 4;
5; 5;
5] x 50g balls A pair each No 10 (3¼mm), No 9 (3¾mm) and No 8 (4mm) needles. Tension22sts to 4 inches Size mattersChest to fit: 32 [34; 36; 38; 40; 42; 44; 46; 48] inches. Chest actual: 34 [36; 38; 40; 42; 44; 46; 48; 50] inches. Length: 23-27 ins. Abbreviationsk2tog/p2tog: decrease by knitting/purling 2 sts together. sl: slip yb: yarn back A word on the woolYou can see in the picture this is knitted in two different colours and textures of double knitting yarn. Finding a substitute will not be impossible as DK yarns are fairly standard, though it might be trickier to find the bouclé. The example shown, used Stylecraft double knitting yarn in just the one
texture (no bouclé). It took 125g of the maroon colour and just
under 100g of the grey (or silver). Disclaimer
|
This has to be a favourite for me, combining a boating theme with navy and white.
It is a pattern from the seventies but was quite a new idea - a forerunner of those drop shoulders and cowl neck designs which were so ubiquitous in the eighties - and seemingly popular now.
Instructions.Instructions for six sizes with larger sizes given in brackets. The pattern is in two colours (dark and light) - Navy is represented by D (dark) and Cream represented by L (light). BackWith No 9 needles and yarn D, cast on 84 (92
: 97 : 100 : 108
: 112) stitches and work in rib as
follows: Repeat these 2 rows until rib measures 3 inches, ending with wrong side facing for next row. Change to No 5 needles and knit 1 row, increasing 1 stitch at centre:. [85 (93 : 97 : 101 : 109 : 113) sts] Join in yarn L, and work in pattern as follows: 1st row: right side facing,
in L, k6 (2 : 4
: 6 : 2 : 4),
sl1, {k1, sl1} 4 times, * k7, sl1, {k1, sl1} 4 times; repeat from * to
last 6 (2 : 4
: 6 : 2 : 4)
stitches, k6 (2 : 4
: 6 : 2 : 4).
17th row: in L, sl1, {k1,
sl1} 3 (1 : 2
: 3 : 1 : 2)
times, k7, * sl1, {k1, sl1} 4 times, k 7 ; repeat from * to last 7 (3
: 5 : 7 : 3
: 5) stitches , sl1, {k1, sl1} 3 (1
: 2 : 3 : 1
: 2) times. These 32 rows form pattern. Repeat them until back measures 15 (15 : 15 : 16 : 16 : 16) inches, ending with right side facing. Shape armholes by casting off 5 stitches at the beginning of the next 2 rows. [75 (83 : 87 : 91 : 99 : 103) sts]. Keeping continuity of pattern, work straight until back measures 23 (23 : 24 : 25 : 26 : 26) inches, ending with right side facing Shape shoulders by decreasing 1 stitch at each end of every row
until 51 (59 : 63
: 67 : 75 : 79)
stitches remain. FrontWork as for back to start of armhole shapings. Shape armholes by casting off 5 stitches at the beginning of the
next 2 rows. Next row: pattern 23 (25 : 26 : 28 : 31 : 33), slip these stitches on a spare needle, cast off 29 (33 : 35 : 35 : 37 : 37) stitches, pattern to end. Continue on these last 23 (25 : 26 : 28 : 31 : 33) stitches for the first side and work straight until front matches back at armhole edge, ending with right side facing. Shape shoulder by decreasing 1 stitch at end of next row, then at the same edge on every row until 11 (13 : 14 : 16 : 19 : 21) stitches remain. Work 1 row straight, then cast off 3 (4
: 5 : 5 : 6
: 7) stitches at the beginning of
the next and following alternate row. With wrong side facing, rejoin appropriate yarn colour to remaining stitches
and finish to correspond with first side, reversing shapings. SleevesWith No 9 needles and D, cast on 40 (40 : 44 : 44 : 48 : 48) stitches and work 3 inches in rib as for back, ending with wrong side facing. Change to No 5 needles. Join in L and pattern 4 rows as for 2nd (2nd : 3rd : 3rd : 4th : 4th), size of back. Shape sides by increasing 1 stitch at each end of the next and every following 8th row until there are 73 (73 : 81 : 81 : 89 : 89) stitches, taking increased stitches into pattern. Work straight until sleeve measures 17½ (17½ : 18½ : 19 : 20 : 20) inches down centre, ending with right side facing. Now increase 1 stitch at each end of the next and every alternate row until there are 83 (83 : 91 : 91 : 99 : 99) stitches. Break L. Change to No 9 needles. Work 7 rows rib as for back. To Make UpPress parts on wrong side following instructions on the ball band and
omitting ribbing. Collar: With right side facing, using the set of four (or circular) No 9 needles
and D, work as follows: Divide stitches evenly on 3 needles to facilitate working. Join side seams and sleeve seams up to rib. |
MaterialsAran weight yarn: 10 (11 : 12 : 13 : 14 : 15) 50g balls in Navy and 6 (7 : 7 : 8 : 8 : 9) in Cream. A pair each of Nos
9 (3¾mm) and 5 (5½mm) needles. TensionThis cable pattern is difficult to measure but it is equivalent to a basic tension of 19 sts x 36 rows to 4 ins measured over pattern on No 5 (5½mm) needles. Size mattersTo fit chest 34 (36 : 38
: 40 : 42 : 44)
inches, 86 (91 : 97
: 102 : 107 : 112)
cm. Abbreviationssl1: slip one stitch purlwise with yarn at back. m1: make 1. Increase 1 stitch by picking up horizontal loop lying before next stitch and working into the back of it k2tog or p2tog: work 2 sts together to decrease. A Word on the WoolThe original yarn was Patons Capstan - an Aran weight yarn knitting to a tension of 18 sts to 4 inches over stocking stitch. No clues as to the yardage but it was a fairly dense pure wool so I would not expect it to have a long yardage Disclaimer
|
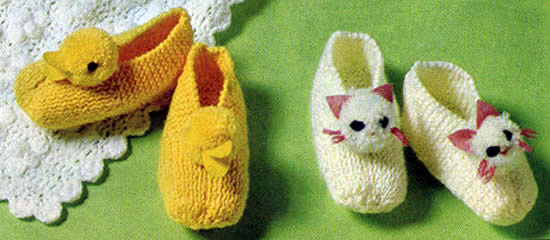
Cute little slippers with ducklings, or kittens.
Easy and quick to knit, with their very effective little pom-pom heads.
[I'm guessing that with a little adaptation you could close in the top of the slippers and stuff them to make tiny duckling toys - if you are feeling adventurous....?!]
InstructionsThere are two sizes with instructions for the second size given in brackets. Both versions:Using either yellow (for duckling) or white (for kitten) and No 9 needles, cast on 20 (26) stitches and work as follows: 1st row (wrong side facing): sl1,
k8(11), p2, k9(12) 2nd size only Both sizes - continue as follows: 1st row: sl1, knit to end. Repeat the last 2 rows until work measures 2½ (3) inches ending with a 1st row. Next row: sl1, {m1, k3}, 2(3)
times, m1, k2, p1, {k2, m1} 3(4) times,
k 2(3), p1, k2, {m1, k3} 2(3)
times, m1, k1. [37(49) sts] Repeat the last 2 rows until work measures 4½ (5½) inches ending with right side facing. Next row: k1, {k2tog} 5(7) times, p1, k1 p1, {k2tog} 1(2) times,rib 5, {k2tog} 1(2) times, p1, k1 p1, {k2tog} 5(7) times, k1. Next row: rib 1(2), {p2tog} 3(4) times, rib 1, {p2tog} twice, rib 1, {p2tog} twice, p1, {p2tog} 3(4) times, rib 1(2). Next row: {k2tog} 3(2) times, {k3tog} 1(3) times, {k2tog} 3 times. [7(8) sts] Break yarn and thread through remaining stitches; draw up tightly and
fasten off securely. Completing the Duckling version:Make 2 pom-poms with remaining yellow yarn, each 1½ inches in diameter.
Trim to neaten and sew one to the front of each slipper. Completing the Kitten version:Make 2 pom-poms with remaining white yarn each 1½ inches in diameter.
Trim to neaten and sew one to the front of each slipper. 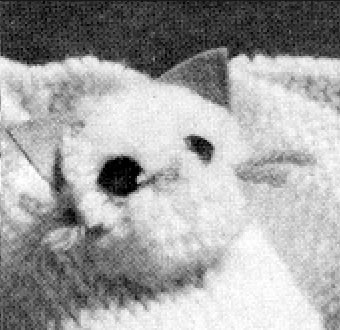 |
Materials
|
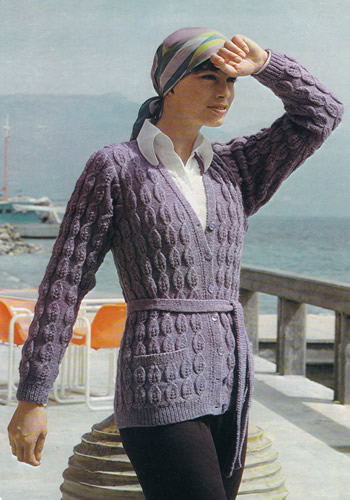
Cosy and snug wrap cardigan with a sash belt. I would probably knit it for myself as shown, but it may be more stylish if worn longer or over-sized and perhaps without pockets.
The original yarn was a soft heathered and slightly fluffy Shetland type. I think this would be lovely knitted in the hand-dyed yarn available from the Little Grey Sheep.
Instructions.Instructions are given for 4 sizes - larger sizes given in brackets. [Editor's note: I have copied the note above from the original pattern - it will make more sense when you start knitting as the the number of stitches you end up with at the end of each row increases and decreases as part of the pattern stitch.] BackWith No 11 needles, cast on 112 (120 : 126 : 132) stitches, and work 2 inches in k1/p1 rib. Next row: rib 14 (15 : 15 : 15), {ml, rib 14 (15 : 15 : 15)} 6 (5 : 6 : 6) times, ml, rib to end. [119 (126 : 133 : 139) sts] Change to No 9 needles and work as follows: Next row (right side facing):
k1, p3 (2 : 1
: 4), * k3, p6; repeat from
* to last 7 (6
: 5 : 8) stitches, k3, p3 (2
: 1 : 4), k1. 1st row (wrong side facing):
k4 (3 : 2
: 5), * p3, k6; repeat from
*
to last 7 (6 : 5
: 8) stitches, p3, k4 (3 :
2 : 5). These 14 rows form pattern for back. Keeping continuity of pattern shape armholes as follows: Next row: cast off 17 (19
: 21 : 21), k4 (1
: 7 : 1), *
p3, k6 repeat from * to last 7 (6
: 5 : 8) stitches, p3, k4 (3
: 2 : 5). Continue straight in pattern until back measures 25½ (26 : 26½ : 27) inches, ending with right side facing. Shape shoulders by casting off 8 (8 : 8 : 9) stitches at the beginning of the next 4 rows, then 7 (8 : 9 : 9) stitches at the beginning of the following 2 rows. Cast off remaining 39 (40 : 41 : 43) stitches. Pocket LiningsWith No 9 needles, cast on 30 stitches and work 29 rows stocking stitch,
starting with a purl row Left Front** Next row: rib 9 (11
: 15 : 14), {ml, rib 12 (12
: 16 : 12)} 3 (3
: 2 : 3) times, ml, rib to end: [58
(62 : 65
: 68) stitches] Change to No 9 needles and place pattern panels as follows: Next row (right side facing): k1, p3 (2 : 1 : 4), * k3, p6; repeat from * to last 9 (5 : 9 : 9), stitches, k3, p5 (1 : 5 : 5), k1. Now continue in pattern as for back Your first 2 rows will read: 1st row (wrong side facing):
k6 (2 : 6
: 6), * p3, k6; repeat from
* to last 7 (6
: 5 : 8) stitches, p3, k4 (3
: 2 : 5). Keeping continuity of pattern, work a further 27 rows, thus ending with 1st pattern row. Place pocket lining as follows: Next row: pattern 11 (10 : 9 : 12), slip next 34 stitches on a stitch holder and in place of these, pattern across stitches of first pocket lining, pattern 13 (18 : 22 : 22). Continue straight in pattern until 14 rows less have been worked than on back to start of armhole shaping, thus ending with 14th pattern row. Shape front edge as follows: Next row: k2tog, k4 (9
: 4 : 4), pattern to end. Decrease 1 stitch at the front edge on the next and every following 4th row until 54 (58 : 61 : 64) stitches remain, keeping stitches at front edge in reverse stocking stitch as placed. Work 1 row straight. Next row: k11 (7 : 11 : 11), pattern to end. Shape armhole as follows: Keep armhole edge straight and continue to decrease 1 stitch at front edge on next and every following 4th row until 23 (24 : 25 : 27) stitches remain. Note: When shaping at front edge do not continue panel pattern nearest this edge if there are insufficient stitches to work another complete pattern; instead take stitches into reversed stocking stitch. Work a few rows straight until front matches back at armhole edge, ending with right side facing. Shape shoulder by casting off 8 (8
: 8 : 9) stitches at the beginning
of the next and following alternate row. Right FrontWork as for left front from **
to **. Next row (right side facing): k1, p5 (1 : 5 : 5), * k3, p 6; repeat from * to last 7 (6 : 5 : 8) stitches, k3, p3 (2 : 1 : 4), k1. Next row (right side facing): k1, p3 (2 : 1 : 4), * k3, p6; repeat from * to last 9 (5 : 9 : 9), stitches, k3, p5 (1 : 5 : 5), k1. Now continue in pattern as for back Your first 2 rows will read: 1st row (wrong side facing):
k4 (3 : 2
: 5), * p3, k6; repeat from
* to last 9 (5
: 9 : 9) stitches, p3, k6 (2
: 6 : 6). Keeping continuity of pattern work a further 27 rows, thus ending after 1st pattern row, with right side facing for next row. Place pocket lining as follows: Next row: pattern 13 (18
: 22 : 22), slip next 34 stitches
on a stitch-holder and in place of these, pattern across stitches of second
pocket lining, pattern 11 (10 : 9
: 12). SleevesWith No 11 needles, cast on 46 (48 : 50 : 52) stitches and work 2 inches in k1/ p1 rib. Next row: rib 7 (7 : 7 : 6), {ml, rib 8 (5 : 4 : 5)} 4 (7 : 9 : 8) times, ml, rib to end. [51 (56 : 60 : 61) sts] Change to No 9 needles and place pattern panels as follows: Next row (right side facing):
k1, p5 (3 : 5
: 1), * k3, p6; repeat from
* to last 9 (7
: 9 : 5) stitches, k3, p5 (3
: 5 : 1), k1. 1st row: k6 (4
: 6 : 2), *
p3, k6; repeat from * to last 9 (7
: 9 : 5) stitches, p3, k6 (4
: 6 : 2). Continue in pattern, shaping sides by increasing 1 stitch at each end
of the 12th (10th : 8th
: 2nd), and then every following 4th row until there
are 101 (108 : 114
: 121),stitches , taking increased stitches into pattern. Cast off. To Make UpUsing a warm iron and slightly damp cloth, press parts lightly on wrong
side, omitting welts.
Front Borders
Left: With No 11 needles, cast on 9 stitches and work in rib
as follows: Repeat the last 2 rows until strip fits up left front and round to centre back of neck, when slightly stretched. Sew in position as you go along. Cast off in rib. Right: Work to correspond with left, with the addition of 7 buttonholes,
first to come ½ inches up from lower edge, 7th at start of neck shaping
and remainder spaced evenly. To make a buttonhole: with right side facing, rib 3, cast off 3, rib to end, then when knitting the next row back, cast on 3 over those cast off. [Editor's note: If you are making an over-sized cardigan, you may wish to omit the buttonholes and just have the tie belt for closure.] Pocket TopsWith right side facing and No 11 needles, k34 stitches from stitch holder,
increasing 1 stitch in centre. [35 sts] Catch down sides of pocket tops neatly on right side and pocket linings lightly on wrong side. BeltWith No 11 needles, cast on 13 stitches, and work 52 (54 : 56 : 58) inches in rib as for front borders. Cast off evenly in rib. Press seams. Sew on buttons. |
Materials
|
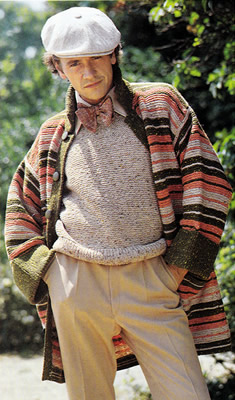
....or "coatigan" *.
Shown on a chap but I would like it for me... and let's face it - he looks pretty silly - even for 1976 as I remember it....
It's a very simple knit being made up of rectangles in garter stitch - if I had a loom wide enough I would actually like to have a go at weaving the fabric - but here is the knitted version - plus a man's vest or slipover which is illustrated with it.
[* I believe I am not the only one who hates this word - I am not sure it adds anything much to the meaning but .... it is the jargon of the moment]
Coat Instructions.Instructions for larger sizes given in brackets. Where one set of figures
is given this applies to all sizes. Left Front** Continue with double yarn and garter stitch and work 2 rows A; 6 rows C. Break off C and one strand of A. Change to No 6 (5mm) needles and continue in garter stitch with single
yarn, working in stripes as follows: These 42 rows form the striped pattern. Repeat them 4 times more, then rows 1-24 inclusive again. ** Continue in pattern but shaping neck as follows: Rejoin yarn at neck edge and keeping side edge straight, decrease 1 stitch at the neck edge the next 3 rows, then on the following 4 alternate rows, ending at side edge. Shape shoulder as follows: Now cast of 5 stitches at the beginning of the following 2 alternate
rows. Right FrontWork as for left front from ** to
**. Finish to correspond with left front reversing shapings. BackWith No 8 (4mm) needles and using yarn C double, cast on 95 (99
: 103) stitches. Continue with double yarn
and work 5 rows in C; 2 rows A; 6 rows C. Change to No 6 (5mm) needles and continue in garter stitch with single yarn, continue in garter stitch striped pattern as for left front. Work straight until back measures same as front to the start of the shoulder shaping, ending with same row as left front. Shape shoulders by casting off 4 (5
: 6) stitches at the beginning of the next
2 rows, 5 (5 : 5)
stitches at the beginning of the next 10 rows, then 4 (5
: 6) stitches at the beginning of the following
2 rows. SleevesWith No 8 (4mm) needles single yarn C, cast on 105 stitches. 1st row: *
k1, p1; repeat from * to last stitch,
k1. Repeat the 1st and 2nd rows until sleeve measures 7 inches, ending with a 1st row. Next row: k2 * k2tog, k5; repeat from * to last 5 stitches, k2tog, k3. [90 sts] Join in A and work in garter stitch striped pattern, as given for Left Front, repeating the 42 rows 3 times in all, and then rows 1-5 inclusive again. Cast off. Right Border (for a man - left border for a woman)With No 8 (4mm) needles single yarn C, cast on 15 stitches. 1st row (right side facing): k2 *
p1, k1; repeat from * to last stitch,
k1. Repeat the 1st and 2nd rows until border fits up the front - when slightly
stretched - to the start of the neck shaping, ending with a 2nd row. Left Border (for a man - right border for a woman)Work to correspond with right border, with the addition of 6 buttonholes, the first to come 6 inches up from the lower edge and the 6th to come ¾ inch below the start of the neck shaping and the rest spaced evenly in between. First mark the positions of the buttons on the opposite border, and work the holes to correspond. To make a buttonhole: Sew second border in position, taking care that the stripes are level with those on the opposite front. Pockets (make 2)With No 6 (5mm) needles and C, cast on 31 stitches and work in garter stitch stripes as follows: 5 rows C Break off B and A. Change to No 8 (4mm) needles and join in an extra strand of C - using
C yarn double, knit a further 5 rows. Make a second pocket in the same way. CollarWith No 8 (4mm) needles single yarn C, cast on 113 stitches. 1st row: *
k1, p1; repeat from * to last stitch,
k1. Repeat these 2 rows for 7 inches, ending with 2nd row, and cast off in rib. To Make UpPress parts lightly on wrong side following instructions on the ball
band. Join shoulder seams. Pin pockets on fronts, lower edge of pocket to come at start of 3rd broad
stripe in C, 1¼ inches from side seam. |
Materials
|
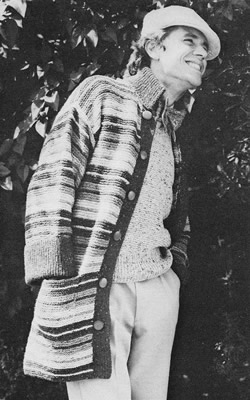
Here is a version of the coat that I made. I have written copious notes about its construction in a blog entry "The Age of Aquarius"!
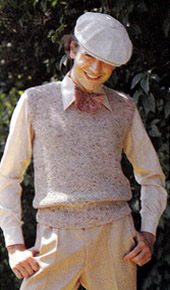
Slipover Instructions.Instructions for larger sizes given in brackets. Where one set of figures
is given this applies to both sizes. The slipover is worked in one colour. Front ** 1st row: k2 *
p1, k1; repeat from * to last stitch,
k1. Repeat the 1st and 2nd rows for 4 inches, ending with a 2nd row. Change to No 6 (5mm) needles. Next row (right side facing): knit 5 (7 : 4), k2tog, * k4, k2tog; repeat from * to last 6 (8 : 5) stitches, knit to end. [87 (91 : 95) sts] Continue in garter stitch and work straight until front measures 16 (16
: 16½) inches ending with right side
facing. Shape armholes by casting off 5 (6
: 7) stitches at the beginning of the next
2 rows, then decrease 1 stitch at each end of the next and every alternate
row until 69 (71 : 73)
stitches remain. Continue shaping armhole and shape neck as follows: Next row: k2tog, k32 (33 : 34). Turn and leave remaining stitches on a spare needle. Continue on these 33 (34 : 35) stitches only for the first side, and work 3 rows straight, then decrease 1 stitch at each end of the next and every following 4th row until 27 (28 : 29) stitches remain. Now keep armhole edge straight and continue decreasing 1 stitch at the neck edge on every 4th row until 16 (17 : 18) stitches remain. Work a few rows straight until front measures 25 (25 : 25½) inches, ending at the armhole edge. Shape shoulder by casting off 4 (5
: 5) stitches at the beginning of the next
row, then 4 (4 : 4)
stitches at the beginning of the following 2 alternate rows. Work 1 row
straight. With right side facing, slip centre stitch on to a safety pin, and rejoin yarn to remaining stitches; knit to the last 2 stitches, k2tog. Finish to correspond with first side, reversing shapings. BackWork as for front from ** to **.
Now decrease 1 stitch at each end of the next and every alternate row until 67 (69 : 71) stitches remain, and then on every following 4th row until 61 (63 : 65) stitches remain. Work straight until back matches front to shoulder at armhole edge. Shape shoulders and back neck as follows: 1st row: k2tog, knit to end. Cast off remaining 4 (5 : 5) stitches. With right side facing, leave centre 23 stitches on a spare needle, rejoin yarn to remaining stitches, knit to end. Finish to correspond with first side. To Make UpPress as for coat. Join right shoulder seam. Neck Border: 1st row (wrong side facing): *
p1, k1; repeat from * to within 2
stitches of centre marked stitch, p2tog, p1, p2tog tbl, **
k1, p1; repeat from **
to end. Repeat 1st and 2nd rows twice more, and then 1st row again. Join left shoulder seam and border. Armhole Borders: Join side seams and armhole borders. Press seams. |
Materials
|
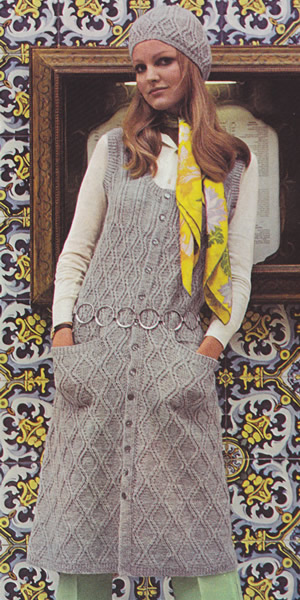
The trend for the winter is layers of knitwear, including long sleeveless cardigans, worn over knitted dresses, (which I would personally find too warm in this era of stifling central heating in most public spaces). However, there are other ways to wear it especially "between seasons" - and this is a nice example from the seventies, (but not too dissimilar to those around at the moment).
I have seen examples where front and back are split up the sides, which would give it a modern edge; this design is knitted "all in one" up to the armholes but if you are a more experienced knitter you could work out how to make fronts and backs separate up to about mid thigh.
Cardigan Instructions.Instructions for larger sizes given in brackets. Where one set of figures
is given this applies to all sizes. Pocket liningsWith No 8 needles, cast on 34 stitches and work 5½ inches in stocking stitch, ending with a knit row. Next row: p2, m1p, (p6, m1p) 5 times, p2. [40 sts] Leave stitches on a spare needle and make second pocket lining the same. Back and FrontsWith No 10 needles, cast on 290 (308
: 326 : 344) stitches and work 7 rows
k1/p1 rib. Change to No 8 needles. Repeat the last 24 rows twice more, then rows 1 to 22 inclusive again.
[Editor's note: If you have knitted fronts and back separate to this point, join them here - on the last or the following row.] Shape sides as follows: Next row: p1, *
k1, p2, k1, p2 tog, p6, p2tog, k1,p. 2, k1 ; repeat from *
to last last stitch, p1. [258 (274
: 290 : 306) sts] Continue in pattern as follows: 1st row: p1, *
(Tw2L, p1) twice, p4, (p1,Tw2R) twice; repeat from *
to last last stitch, p1. Repeat the last 20 rows once more, then rows 1 to 12 inclusive again. Place pocket linings as follows: Next row: pattern 17, * slip next 40 stitches on a stitch-holder, and in place of these, pattern across 40 stitches of one pocket lining *, pattern to last 57 stitches, repeat from * to *, pattern last 17 stitches. Work a further 7 rows straight in pattern, then work rows 1 to 18 inclusive again. Next row: p1, *
k1, p2, k1, p2tog, p4, p2tog, k1, p2, k1; repeat from *
to last stitch, p1. [226 (240 : 254
: 268) sts] **
Repeat the last 16 rows once more, then rows 1 to 14 inclusive again. Next row: as 15th. The last 2 rows form bodice pattern. Repeat them until work measures 35 inches at centre, ending with right side facing. Shape neck and at the same time divide for fronts as follows: Next row: cast off 7, pattern 49 (52 : 56 : 59), turn and leave remaining stitches on a spare needle. Continue on these stitches for RIGHT FRONT, shaping armhole
and neck as follows: Now decrease 1 stitch at each end of every row until 29 (32 : 32 : 35) stitches remain, then at each end of next and every alternate row until, 19 (22 : 22 : 25) stitches remain. Now keep neck edge straight and continue decreasing at armhole edge on following 1 (3 : 2 : 4) alternate rows. [18 (19 : 20 : 21) sts] Work straight until front measures 43 (43½ : 43½ : 44) inches at centre, ending with wrong side facing. Shape shoulder by casting off 6 (7 : 6 : 7) stitches at the beginning of the next row, then 6 (6 : 7 : 7) stitches at the beginning of the following 2 alternate rows. With right side facing, rejoin yarn to remaining stitches; cast off 8,
pattern 106 (114 : 120
: 128), turn, and leave remaining stitches on a Now decrease 1 stitch at each end of the next and every alternate row, until 74 (78 : 82 : 86) stitches remain. Work straight until back matches front at armhole edge, ending with right side facing. Shape shoulders by casting off 6 (7 : 6 : 7) stitches at the beginning of the next 2 rows, then 6 (6 : 7 : 7) stitches at the beginning of the next 4 rows. Leave remaining 38 (40 : 42 : 44) stitches on a spare needle. With right side facing, rejoin yarn to remaining stitches for LEFT FRONT, cast off 8, pattern to end. Next row: cast off 7, pattern to
end. Front Borders: Left: With No 10 needles, cast on 11 stitches. Leave stitches on a safety-pin at top and sew border neatly in position. Right: Work to correspond with left border with the addition of
12 buttonholes. 1st to come 7½ inches above lower edge, and 12th
to come 2¼ inches below start of neck shaping, with the remainder
To make a buttonhole: rib 4, cast off 3, rib to end; on the next row, cast on 3 stitches over those cast off. To Make UpUsing a warm iron and damp cloth, press parts very lightly on wrong side, omitting ribbing and taking care not to over-press and spoil the pattern. Armhole Borders: With right side facing and No 10 needles, pick
up and knit 116 (128 : 128
: 140) stitches round each armhole and work 7 rows k1/p1 rib. Join shoulder seams. Neck Border: With right side facing and No10 needles, work as
follows: Work 1 row k1/p1 rib as for border. Make 13th buttonhole in next 2 rows
as before, then work a further 4 rows in rib. Pocket Tops:With right side facing and No 10 needles, knit across each set of 40
pocket stitches, decreasing 1 stitch in centre. [39 sts] Press seams. Sew on buttons. |
Materials
|
|
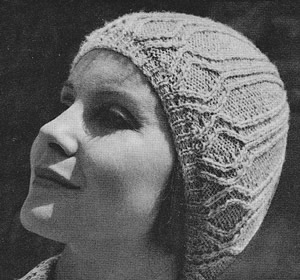 Hat Instructions.With No 10 needles, cast on 104 stitches, and work 6 rows k1/p1 rib. Change to No 8 needles. Work 16 rows in pattern as for main part from **
to **
as given in cardigan instructions to make one diamond pattern panel (see
photo). Shape crown as follows: Keeping continuity of pattern, work 1 row straight. Next row: p1, *
k1, p2, k1, p1, p2tog, p2, k1, p2, k1; repeat from *
to last stitch, Change to stocking stitch, starting with a knit row, and continue shaping as follows: Next row: k3, k2tog, *
k5, k2tog; repeat from * to last 4
stitches, k4 : 68 stitches Next row:
purl. Break yarn. Thread through remaining stitches, draw up tightly and fasten off. Press work very lightly on wrong side, omitting ribbing. |
Materials
|
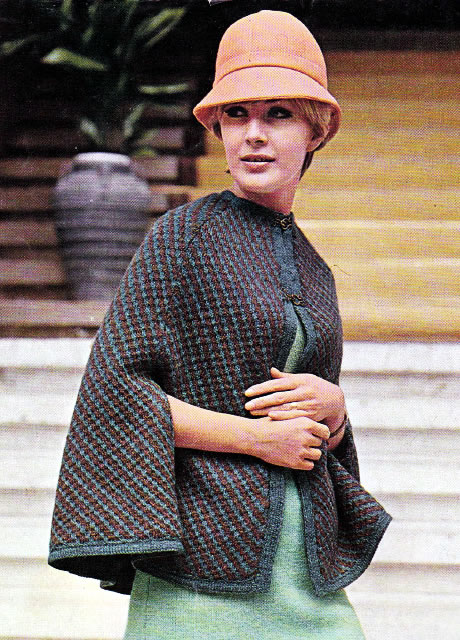
This is an earlier version of a knitted cape and includes a (knitted) lining - so potentially nice and warm. I thought it was a good option to publish alongside the seventies version.
The lining is knitted but if you did not want to commit to all that knitting I think it might be simple enough to cut out the shapes in fabric to create the lining - as long as you choose a material that's not too stiff or thick, although the cape as shown seems to be styled with quite a firm structure.
Of course you could easily knit the cape in a plain stitch instead of the pattern illustrated.
Instructions.Instructions for only one medium size - could be adapted by using a thicker
yarn and bigger needles - but do work out your tension to check the size. Cape section (make 6)With No 7 (4½mm) needles and D, cast on 80 stitches and work in pattern as follows: 1st row (right side facing): in B
k5, * with wool at back, slip 2 purlwise,
k4; repeat from * to last 3 stitches,
slip 2 purlwise, k1. These 12 rows form the pattern. Keeping pattern correct and keeping a knit stitch at each end of every purl row, as before, shape sides by decreasing 1 stitch at each end of the next and every following 10th row, until 46 stitches remain. Now decrease 1 stitch at each end of every following 6th row until 34 stitches remain, then at each end of every 4th row until 20 stitches remain. Work 1 row. Make 5 more sections in same way. Lining section (make 6)With No 10 (3½mm) needles cast on 70 stitches and work 5 rows in stocking stitch, starting with a knit row. Next row: knit. Work a further 5 rows in stocking stitch, starting with a knit row. Change to No 8 (4mm) needles and continue in stocking stitch for a further
38 rows. Make 5 more sections in the same way. To Make Up Use a large tapestry needle and 12 inch lengths of wool for sewing,
Press parts very lightly on wrong side under a damp cloth. Now join one of the 2 remaining sections to one side of cape as follows
(to make armhole slits at the front): Join the lining in the same way, measuring the 4 inches up to the arm
slits from the purl ridge. Pin cape to lining, wrong sides together, lower edge of cape in line
with markers on lining ; tack in position. Right Front Border: With No 10 (3¼mm) needles and D, cast
on 13 stitches. Repeat these 2 rows until strip fits up right front edge when stretched,
ending with right side facing. Next row: cast off 7, knit to end. Slip stitches on a safety pin. Left Front Border: Work as for right border, ending with wrong
side facing. Sew one edge of border in position to cape, from lower edge to 9 inches
below neck, without stretching. Now ease the last 9 inches of the front
edge on to the remainder of the band. Neck Border: With right side of cape facing, No 10 (3¼mm) needles and D, k6 stitches of right border, pick up and knit 14 stitches from the top of each section, k6 border stitches. [96 sts] Work 5 rows stocking stitch, starting with a purl row. Work a further 4 rows in stocking stitch, starting with a purl row. Fold the neck border in half at the ridge, and slip-hem in position to
the lining. Sew on fastenings as in photo. |
Materials
|
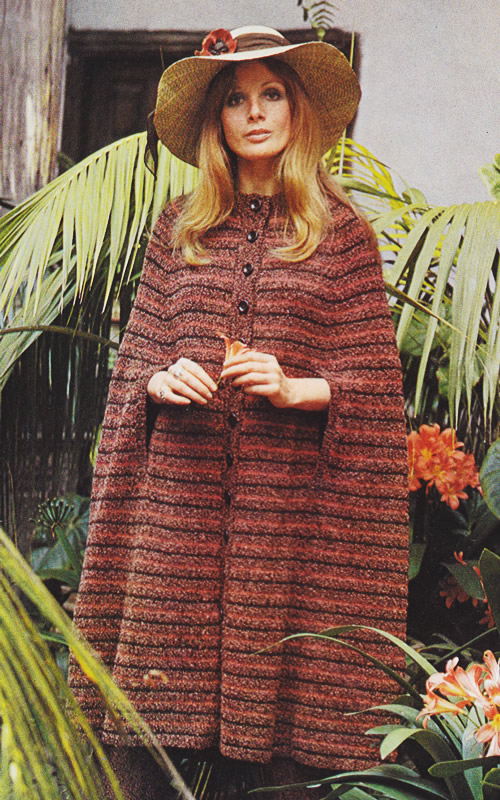
Capes being the thing of the moment (though maybe not quite like this one).
Styled "Edwardian" from the early 1970s - hence the floppy hat and slightly whimsical setting a la Laura Ashley - I might choose to make this somewhat shorter, plain rather than striped, and use a tweed or textured yarn of some sort.
So.... a midi cape - and if that were not wonderful enough... it comes with matching trousers! How great is that?!
Cape Instructions.Instructions for larger sizes given in brackets. Where one set of figures
is given this applies to all sizes. BackWith No 10 needles and M, cast on 92 (98 : 104) stitches and work 4 rows k1/p1 rib. Next row: rib 7 (3 : 6) m1, * rib 6 (7 : 7), m1 ; repeat from * to last 7 (4 : 7) stitches, rib 7 (4 : 7). [106 (112 : 118) sts] Join in D, change to No 8 needles and using stocking stitch, start with a knit row, and work in stripes as follows: 1st and 2nd rows: in D. These 12 rows form the striped pattern. [Note: Carry yarns loosely up side of work.] Continue in pattern and work a further 12 rows straight. Shape sides: Work a few rows straight until back measures 32 inches (81 cm) at centre,
ending with right side facing. Continue decreasing 2 stitches as before, but on the next and every following 4th row until 38 (44 : 50) stitches remain. Work 3 rows straight, then decrease 2 stitches as before on the next and every alternate row until 28 (30 : 32) stitches remain. Work 1 row straight, and leave stitches on a spare needle or stitch holder. Left FrontWith No 10 needles and M, cast on 46 (48 : 52) stitches and work 4 rows k1/p1 rib. Next row: rib 3 (3 : 3) m1, * rib 8 (7 : 9), m1 ; repeat from * to last 3 (3 : 4) stitches, rib 3 (3 : 4). [52 (55 : 58) sts] Join in D, change to No 8 needles and using stocking stitch, start with a knit row, and work 24 rows straight in striped pattern. Continue in striped pattern, shaping side edge as follows: Repeat the last 12 rows until 34 (37 : 40) stitches remain. Work a few rows straight until front matches back to marker, ending with right side facing. Place a marker at each end of the last row. Now decrease 1 stitch as before, but on the next and every following 4th row until 20 (22 : 24) stitches remain. With wrong side facing, shape neck by casting off 4 (5 : 5) stitches at the beginning of the next row. Continue decreasing at the side edge on every 4th row from previous decrease,
and at the same time decrease 1 stitch at the neck edge
on the next and every alternate row until 9 (13
: 16) stitches remain. Now decrease 1 stitch at the side edge as before, but on the next and every alternate row, and at the same time continue decreasing at neck edge on the next and following 1 (3 : 5) alternate rows. [5 (5 : 4) stitches remain]. Now keep neck edge straight and continue decreasing at side edge as before on following 2 (2 : 1) alternate rows. [3 sts] Next row: purl. Right FrontWork to correspond with left front, reversing shapings and working 'togtbl' when shaping side edge. Side Panels (make 2)With No 10 needles and M, cast on 80 (84 : 88) stitches and work 4 rows k1/p1 rib. Next row: rib 1 (3 : 5), m1, * rib 7, m1 ; repeat from * last 2 (4 : 6) stitches, rib 2 (4 : 6). [92 (96 : 100) sts] Join in D, change to No 8 needles, and stocking stitch, and starting with a knit row, work 24 rows straight in striped pattern. Continue in striped pattern, shaping sides as follows: Next row: k2, k2tog, knit to last
4 sts, k2togtbl, k2. Repeat the last 12 rows until 56 (60 : 64) stitches remain. Work a few rows straight until work matches back to markers, ending with right side facing. Place a marker at each end of the last row. Continue decreasing as before, but on the next and every following 4th row until 28 (32 : 36) stitches remain. Work 3 rows straight, then decrease 2 stitches as before on the next
and every alternate row until 10 stitches remain all sizes. Leave stitches on a safety-pin. Make a second side in the same way. Left Front BorderWith No 10 needles and M, cast on 9 sts. 1st rows (right side facing): k2,
(p1, k1) 3 times, k1. Repeat the last 2 rows until the strip fits up the left front to the
start of the neck shaping, when slightly stretched, ending with right
side facing. Right Front BorderWork to correspond with the left border with the addition of 13 buttonholes. The first buttonhole is to come 4 inches (10 cm) up from the lower edge, and the 13th is 2 inches (5 cm) below the start of the neck shaping; the remainder are spaced evenly between. First mark position of buttons on left front with pins to ensure even spacing, then work holes to correspond. To make a buttonhole: To Make Up Using a cool iron and dry cloth, press parts lightly on the wrong side,
omitting the ribbing. In the same way, join the front panels to side panels, leaving 9 inch
(23 cm) slits for hands, bottom of slit to come 18½ inches (47 cm)
up from the lower edge.
Right Slit Border: Left slit border: work to correspond. Neck Border: Rib 9 from right border, pick up and knit 15 (16 : 17) stitches up right side of neck, k10 from side panel decreasing 1 stitch in centre, 28 (30 : 32) stitches from back decreasing 3 stitches evenly, 10 stitches from side panel decreasing 1 stitch in centre, then pick up and knit 15 (16 : 17) down left side, and finally rib 9 from left border. [91 (95 : 99) stitches. Work 5 rows in k1/p1 rib. Fold neck border in half to the wrong side and slip-hem loosely in position all round. Oversew loosely round double buttonhole. Catch down short ends of slit borders neatly to main work. |
Materials
|
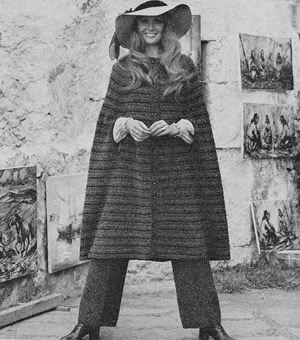
Trousers Instructions.Instructions for larger sizes given in brackets. Where one set of figures
is given this applies to both sizes. The trousers are worked in one colour. Left Leg ** Next row: rib 4 (6 : 6 : 8 : 8 : 6), m1, * rib 11 (11 : 12 : 12 : 13 : 14), m1; repeat from * to last 5 (7 : 6 : 8 : 7 : 6) stitches, rib 5 (7 : 6 : 8 : 7 : 6). [94 (98 : 104 : 108 : 114 : 118) sts] Change to No 8 needles and stocking stitch, starting with a knit row, and work straight until leg measures 25 (25 : 25½ : 25½ : 26 : 26) inches (63 (63 : 65 : 65 : 66 : 66) cm), ending with right side facing. Shape leg as follows: Next row: (k1, m1, knit 45 (47
: 50 : 52 : 55
: 57), m1, k1) twice. Next row: (k1, m1, knit 47 (49
: 52 : 54 : 57
: 59), m1, k1) twice. Next row: (k1, m1, knit 49 (51
: 54 : 56 : 59
: 61), m1, k1) twice. Place a marker at each end of the last row. Cast off 2 stitches at the beginning of the next 2 rows, then decrease
1 stitch at each end of the next and every alternate row until 96 (100
: 106 : 110 : 116
: 120) stitches remain. Work 1 row straight. *** Shape back as follows: 1st row: k29, turn. Change to No. 10 needles and work 1 inch (2 cm) k1/p1 rib. Right Leg Work as for left leg from ** to
**. To Make UpUsing a cool iron and dry cloth, press parts lightly on the wrong side, omitting the ribbing. Joint front, back and inside leg seams. Cut elastic to fit waist and join in a ring; sew to the inside of the waist ribbing using herringbone-stitch over the over the elastic to form a casing. |
Materials
|
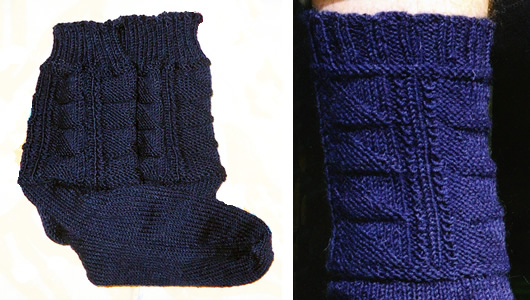
One of my earliest POMs was for a "flag dishcloth" as I really like this traditional Guernsey pattern. These are 5ply socks which reflect this design on the upper part of the sock - the feet are knitted plain. This is a nice wool weight if you want a slightly thicker sock, and no need to be limited to navy or cream (nice though that is), as 5ply is generally available in a good range of colours.
It can also be a good way to use up left over 5 ply, especially if you bought the wool for a guernsey in large cones.
Instructions (work 2 alike).Using No 11 needles, cast on 102sts. First Round: * K2tog, k1, p2tog, p1. Repeat from * to end. [68 sts] [Editor's note: Casting on 2 or 3 times the required stitches and then immediately decreasing on the first row provides a method of making sure you have a nice loose cast-on for the top of the sock. Otherwise chaps have a habit of yanking on their socks and right away breaking the first row of stitches, (ask me how I know...).] Work 2 rounds in k2, p2 rib, then change to No 12 needles and work 8 more rounds in rib. Next Round: Knit. Change to No 11 needles and knit 1 round. Flag PatternThis pattern is worked down the leg as far as the ankle. 1st Round: * (p1, k1) 3 times; p2,
k9; repeat from * to end. Repeat these 10 pattern rows 3 more times.
Next Round: Knit. Knit 3 rounds. Divide for heelNext Row: K14; turn. Divide the remaining stitches on to two needles and leave to pick up later for the instep. 2nd Row: Slip 1; k27. Repeat 2nd and 3rd rows, 12 times more. Turn HeelNext Row: K18, slip 1, k1, psso (pass the slipped stitch over), turn. Next Row: P9, p2tog, turn. Repeat the last 2 rows until all stitches are taken up and 10 sts remain,
and (right side of work facing) knit across the 10 sts, then, pick up
and knit 14 sts along side of heel. Shape instep:Knit one round on all stitches. Next round: 1st needle: knit
to the last 3sts, k2tog, k1. Repeat these two rounds until 56 stitches remain. Continue on these stitches until work measures 5½(6, 6½) inches, or desired length for foot. Shape Toe:1st round: 1st needle: knit
to the last 3sts, k2tog, k1. 2nd round: Knit. Repeat these 3 rounds until 28 sts remain. Making UpKnit stitches from 1st needle on to end of 3rd needle. |
Materials2 x 50g balls British Breeds Guersey 5ply One set of 4 number 12 (2¾mm) needles, (or 2½mm if necessary),
and, A stitch marker. Tension26sts and 32 rows to four inches on No 11 (3mm) needles. Size mattersTo fit men's shoe sizes: 10 (10½, 11). Abbreviationsk2tog/p2tog: knit/purl 2 sts together. SL 1: slip 1 stitch SL 1, k1, psso: slip 1, knit 1, pass the slipped stitch over; also known as "ssk" (slip, slip, knit). Disclaimer
|
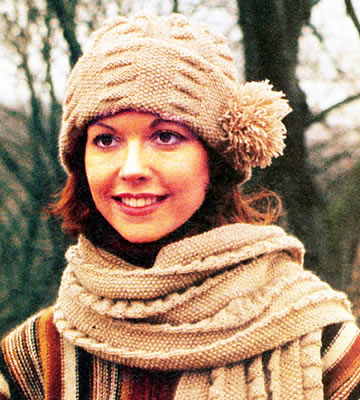
This is the month for the Sailor's Society** "woolly hat week" (8th-14th February 2015). So I thought I would post this hat and scarf combination - easy to knit in 4 ply fingering weight knitting yarn - perhaps suitable for a sailor if you omit the pom-pom decoration!
You can find other patterns as well as where to send your hats on their website link above. Also see my previous POM from 2008 with other chunky hat patterns - including my all time favourite appropriately knitted in Fisherman's rib.
Here's what Hannah says: "Our international network of port chaplains and ship visitors give your amazing hats out to seafarers visiting port, while others are wrapped and included in the Christmas welfare parcels that are taken on board ship for the festive season. The need for more hats is ever-increasing! Drew, our Port Chaplain in Invergordon, has been known to give out 500 in a day on occasion!"
InstructionsPanels of moss stitch and flag stitch are used for this cosy scarf and pull on hat. The scarf is fringed and the hat trimmed with a large pom-pom. ScarfCast on 72 sts These 8 rows form the pattern. Continue in pattern until scarf measures 167½ cm (66 inches) from beginning, (or however long you want the scarf to be) ending with an 8th pattern row. Cast off. To make up the ScarfDo not press. HatCast on 144 stitches. Work in pattern as given for scarf, but without the moss stitch border on both sides. So set out your rows as follows: 1st row (right side): *
(k1, p1) 4 times, k1, p7; repeat from *
end. Continue until work measures 25½ cm (10 inches) from beginning, ending with an 8th pattern row. Shape crownNext row: * Moss st 8, k1, p2, ybk, sl 1, yfwd, p2tog, psso, p2; repeat from * to end of row. [126 sts] Next row: * k4, p2, moss st 8; repeat from * to end of row. Next row: * Moss st 8, k2, sl 1, p2tog, psso, p1; repeat from * to end of row. [108 sts] Next row: * k1, p3, moss st 8; repeat from * to end of row. Next row: * Moss st 8, k1, sl 1, k2tog, psso; repeat from * to end of row. [90 sts] Next row: Moss st to end of row. Next row: * Moss st 7, sl 1, k2tog, psso; repeat from * to end of row. [72 sts] Next row: Moss st to end of row. Next row: * Moss st 5, sl 1, k2tog, psso; repeat from * to end of row. [54 sts] Continue decreasing in this way on every alternate row until 18 sts remain.
Break off yarn, thread through sts, draw up and fasten off. To make up the HatDo not press. Trim with a large pom-pom. |
Materials
|
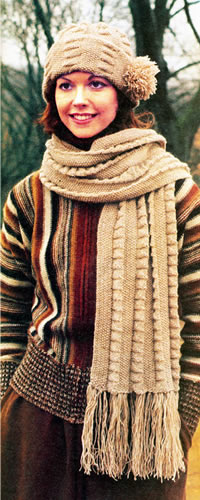
** Please note that the Sailors Society does seem to be a religious organisation, which I mention not through any disapproval on my part, but in case you would care to look at their website and ensure its aims do not go against anything you believe in.
Wonderfully stylish mid-1950s tweed coat-style cardigan. I had to leave the background in the photo - indicating knitwear alla moda - and an exotic photo-shoot.
"Double-knitting and bouclet are worked together to produce this attractive tweed-knit fabric."
The style is simple enough to knit (all boxy shapes) and one feels could be adapted to larger sizes. However the real issue here will be choosing an appropriate yarn; the pattern indicates it is mostly knitted in a bouclé yarn knitted double and yet the resulting tension seems relatively fine (over the pattern stitch).
Instructions.The DK is used singly throughout and the Bouclet is used double with
either one ball of white together with one ball of black or two balls
of black, as stated in the pattern instructions. BackWith No 9 needles and black and white bouclet held together, cast on 142 sts fairly loosely and work in pattern as follows: 1st row
(right side facing): Knit in double boucle. These 8 rows form the pattern. Continue straight in pattern until back measures 14½ inches at centre. Place a coloured thread at each end of the row here to mark the start of the armholes as no actual shaping is done. Continue straight in pattern until back measures 24½ inches. With right side facing, shape shoulders by casting off 10 sts at the beginning of the next 10 rows; cast off remainder. Pocket linings (make 2 the same)Begin by making pocket linings. Left Front:With No 9 needles and black and white bouclet held together, cast on 82 sts and work 2½ inches straight in pattern ending with same pattern row as the pocket lining. Here start pocket opening. Next row (right side facing): pattern across 15 sts; (slip last 67 sts on a spare needle or a needle holder for the time being); pattern across 32 sts of one of the pocket linings [47 sts] Work 5½ inches straight in pattern on these 47 stitches, ending with a row on the right side of the work. Next row (wrong side facing): cast off 32 fairly loosely and pattern to end; leave these 15 sts on a second spare needle or a needle holder. With right side facing, rejoin wool to the remaining 67 sts. Next row (right side facing): pattern across 15 sts on spare needle, then on to the same needle pattern across the last 67 sts [82 sts] Continue straight in pattern over all stitches until front matches back
to Then keep the neck edge straight, and at the same time, when front Right Front:Work as for the left, reversing all shapings and making To make a buttonhole: For the right front, your 1st row of the pocket shaping will read: Next row (right side facing): pattern
across 67 sts and slip on a spare needle or a needle holder for the time
being. With right side Finish to correspond with left front reversing the instructions in line with the above. Sleeves:With No 12 needles and double black bouclet, cast on 62 sts and work 1½ inches k1, p1 rib. Break off 1 ball of black and join in 1 ball of white bouclet. Work straight until sleeve measures 15½ inches. Cast off right across fairly loosely. NeckbandJoin shoulder seams. With right side facing, No 12 needles and double black bouclet, begin
at right shoulder seam and pick up and knit 42 sts across back of neck,
* turn and rib back, picking up and purling
4 sts from side of neck at end of row; turn and rib back, picking up and
knitting 4 sts from Rib to end of row; cast off in rib. To Make UpPress parts on wrong side under a damp cloth. Face both front edges on wrong side with ribbon, turning under 1 stitch of the knitting as you do so and taking care not to stretch the knitting. Cut holes in the ribbon to correspond with those in the knitting, then oversew around the holes with matching sewing cotton. The original pattern intended for you to cover button moulds with rounds
of single black bouclet in double crochet, drawing crochet With right side facing, No 12 needles and double black bouclet, pick
up and knit 26 sts down front piece of each pocket slit. Press all seams. |
Materials
|
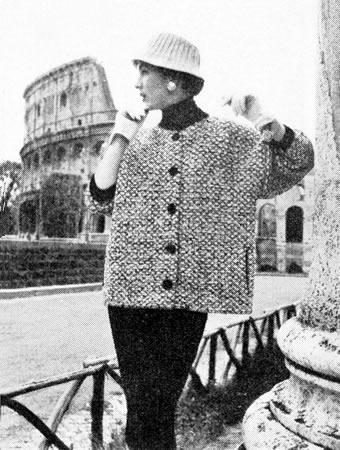
|
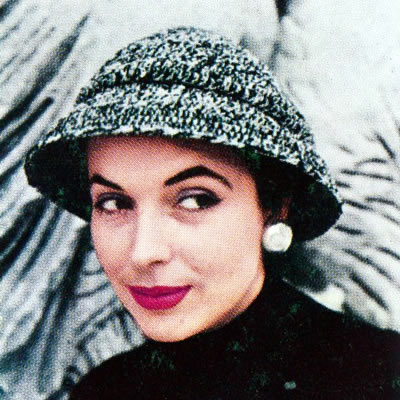
An amusing little tweed hat from the 1950s for you to crochet.
It uses the same yarn and technique as the tweed coat for January 2015.
Instructions.Note: The Bouclet is used double throughout with one ball of white together with one ball of black. Begin at the centre crown. Make 4 chain, join into a ring with a slip stitch 1st round: 9 dc through centre of
ring, join with a slip stitch 4th round: 3 ch; *
2 htr in 1 dc , 1 htr in l dc; repeat from *
9 times more. Fasten off. BrimMake 100 ch, join into a ring with a slip stitch. 1st round: 100 dc in 100 ch. 7th round: 3 ch, *
1 htr in 1 dc; repeat from * all round,
join with a slip stitch. Fasten off securely. To Make UpSew over bare ends of wire with wool. |
Materials
|
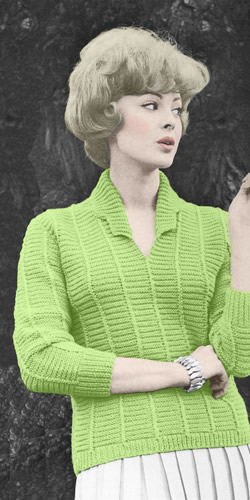
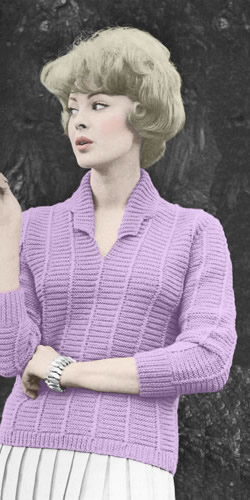
I thought this looked like highly wearable jumper with a very flattering neckline. From the picture it looks like it has bracelet length sleeves - which I very much favour - but the instructions imply they are full length; I like the look of the pushed-up sleeves in the photo so much that I think I would knit them shorter. There is shaping through the body but this could be omitted - you would need to cast on 106 (112) instead of 94 (100) and knit straight to the armhole.
The pattern suggests using a violet colour but I envisioned it in chartreuse.
Instructions.Instructions for large size given in brackets. Where one set of figures is given this applies to both sizes. Back‡‡ With No 10 (3¼mm) needles cast on 94 (100) stitches and work 1 inch in k1/p1 rib. Change to No 9 (3¾mm) needles and pattern as follows: 1st row (right side facing): k10, * cross2K, k10 (11), repeat from * to last 12 stitches, cross2K, k10. 2nd row: p10, * cross2P, p10 (11), repeat from * to last 12 stitches, cross2P, p10. 3rd row: p10, * cross2K, p10 (11), repeat from * to last 12 stitches, cross2K, p10. 4th row: k10, * cross2P, k10 (11), repeat from * to last 12 stitches, cross2P, k10. These 4 rows form the pattern.
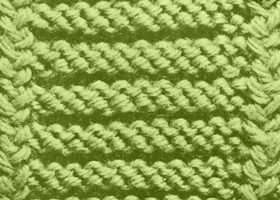
Continue straight in pattern until back measures 4 inches. ‡‡ With right side facing, shape armholes by casting off 5(5)
stitches at the beginning of the next 2 rows, then decrease 1 stitch at
each end of the next and every following alternate rows until 86 (90)
stitches remain. With right side facing, shape shoulders by casting off 9 (9)
sts at the beginning of next 4 rows, then 9 (10)
sts at the beginning of next 2 rows. FrontWork as back from ‡‡ to ‡‡. With right side facing, shape armholes and divide for neck as follows: Next row (right side facing): cast
off 5 (5) stitches, pattern 47 (50). Next row: cast on 2, pattern to end, taking the 2 cast-on stitches into the ridge pattern. [49 (52) sts] Continue shaping armhole by decreasing 1 stitch at this edge on next and following 4 (5) alternate rows. [44 (46) sts] Work a few rows straight until front opening measures 2 inches. With wrong side facing, cast on 10 sts for collar, pattern to end, taking the 10 cast-on stitches into the ridge pattern. [54 (56) sts] Work straight until outside edge of collar measures 2 inches from the
10 cast-on stitches. Continue straight in pattern until front matches back at armhole edge. With right side facing, shape shoulders by casting off 9 (9)
sts at the beginning of the next and following alternate row, then 9 (10)
sts at the beginning of the following alternate row. With right side facing, rejoin wool to remaining 54 (57) sts, pattern to end. Next row (wrong side facing): cast off 5 (5) stitches, pattern to end. Now decrease 1 st at armhole edge on following 5 (6) alernate rows. [44 (46) sts]. Finish to correspond with first shoulder, with reversed shapings. SleevesWith No 10 needles, cast on 48 (50) stitches and work 2½ inches in k1/p1 rib, increasing 2(3) sts evenly across last row. Change to No 9 needles and pattern across as follows: 1st row (right side facing): k6, * cross2K, k10 (11), repeat from * to last 8 stitches, cross2K, k6. 2nd row: p6, * cross2P, p10 (11), repeat from * to last 8 stitches, cross2P, p6. 3rd row: p6, * cross2K, p10 (11), repeat from * to last 8 stitches, cross2K, p6. 4th row: k6, * cross2P, k10 (11), repeat from * to last 8 stitches, cross2P, k6. These 4 rows form the pattern. Continue in pattern increasing 1 stitch at end of next and every following
8th row until there are 76 (79) stitches,
taking the increased stitches into the pattern as they are made. With right side facing, shape top by casting off 4 (4) sts at the beginning of the next 2 rows, then decrease 1 stitch at each end of the next and every following alternat row until 30 (37) sts remain, then at each end of every row untl 14 (15) sts remain. Cast off. To Make UpPress parts very lightly on wrong side under a damp cloth, taking care
not to spoil the ridge pattern. |
Materials
|

Another scarf/hood combination from the 1940s that is the partner of last year's pattern. It has a firm headband to frame the face, and a pocket construction at the back (see photo below) to keep that forties hairdo in good shape. The scarf ties are double thickness.
The Back with elastic casing:Cast on 300 stitches Repeat the 3rd and 4th rows until 108sts remain. Repeat the 3rd row 4 times. 12th row: Slip 1, purl to the last
stitch k1. The Head Piece:Cast on 300 stitches Repeat the 3rd and 4th rows until 108sts remain. 1st row: K2tog, knit to the last
2sts k2tog. Repeat the 1st and 2nd rows until 68sts remain. The Border:Cast on 120sts. To Make Up the StormcheaterPress each piece separately on the wrong side under a damp cloth.  |
Materials4 ozs 3ply wool. One pair No 10 (3¼mm) knitting needles. 9½ inches elastic. TensionApprox. 32sts to 4 inches on No 10 needles. Size mattersTo fit an average sized head. Abbreviationsk2tog: (decrease) knit 2 sts together. A word on the woolOriginal knitted in Sirdar Majestic 3-ply Wool. Disclaimer
|
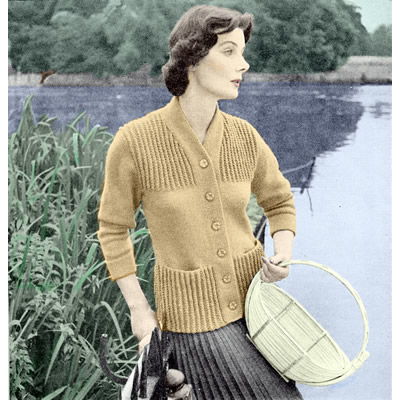
This is a lovely 1950s Autumn jacket which is defined as "chunky" though this means "not fine" in modern parlance, as the wool weight is a pretty standard double knitting.
I love this style and always meant to make for myself but have not yet done so - hence it is untested, and the original instructions are available in only one size. The instructions are not intended for a beginner - you need to keep your eye on right and wrong sides, and preserving the button band stitches - but having said that, I think it is fairly clearly explained.
Instructions.Fancy rib pattern worked as follows: 1st row (wrong side facing): *
k2, p3tog; repeat from * to last 2 sts, k2 These 2 rows form pattern. BackWith No 8 (4mm) needles cast on 90 stitches loosely and work 4 inches
in stocking stitch, ending with a purl row. Next row: Purl, increasing 3 sts, evenly across the row [93 sts] Work straight in stocking stitch until back measures 7 inches from lower edge. With right side facing continue in stocking-stitch, shaping waist as
follows: Next row: k2tog, k25, k2tog, k27;
sl1, k1, psso; k25; k2tog. [81 sts] With right side facing continue shaping as follows: Next row: Increase in 1st stitch,
k26; increase 1 by picking up horizontal thread before next stitch and
knitting into back of it; k31; increase 1 as before; k26; increase in
last stitch [89 sts] Next row: Increase in 1st stitch,
k27; increase 1 by picking up horizontal thread before next stitch and
knitting into back of it; k33; increase 1 as before; k27; increase in
last stitch [93 sts] Next row: Increase in 1st stitch,
k28; increase 1 by picking up horizontal thread before next stitch and
knitting into back of it; k35; increase 1 as before; k28; increase in
last stitch [97 sts] Next row: Increase in 1st stitch,
knit to last stitch, increase in last stitch [99 sts] Next row (wrong side facing): P9; * purl twice in next stitch, p6; repeat from * to end [89 sts] Next row (right side facing): * p2, wrn, p1, wrn; repeat from * to last 2 sts, p2. [147 sts] With wrong side facing. change to fancy rib pattern, starting with 1st
pattern row and work straight until back measure 23½ inches down
centre ending with 1st pattern row [89 sts] Pocket LiningsWith No 8 needles, cast on 26 sts and work 6 inches in stocking stitch
ending with a knit row. Make second pocket in the same way. Left FrontWith No 8 needles, cast on 95sts and work as follows: Next row (right side facing): purl to last 23 sts; k11, sl1 purlways, k11. Change to pattern with button border in stocking stitch and remainder
in pattern as follows: 1st row (wrong side facing): p23;
* k2, p3tog; repeat from *
to last 2 sts, k2 Repeat these 2 rows until front measures 7 inches, ending with 1st pattern
row [67 sts] Next row: K5; increase 1, k4, cast off 26, k20 sl1 purlways, k11. Next row: P32, pur1 across one set of 26 pocket stitches in place of those cast off; p10 [68 sts]
Next row: K2tog, k27. k2tog, knit
to end. Next row: K2tog, k26. k2tog, knit
to end. Next row: K2tog, k25. k2tog, knit
to end. [62 sts] With right side facing, continue shaping as follows: Next row: Increase in 1st stitch,
k 25, increase 1, knit to end. Next row: Increase in 1st stitch,
k 26, increase 1, knit to end. Next row: Increase in 1st stitch,
k 27, increase 1, knit to end. Next row: Increase in 1st stitch,
k 28, increase 1, knit to end. Next row: Increase in 1st stitch, knit to end [71 sts] Work straight until front measures same as back at side edge. With right side facing, shape armhole by casting off 6 sts at the beginning of the next row, then k2tog at this edge on the following 4 alternate rows [61 sts] Next row: Purl. Next row: * p2, wrn, p1, wrn; repeat from * to last to last 25 sts; p2, k11, sl1 purlways, k11. [85 sts] With wrong side facing, continue in fancy rib pattern as follows: 1st row (wrong side facing): P23;
* k2, p3tog; repeat from *
to last 2 sts, k2 Repeat these 2 rows until front measures 20 inches, ending with 1st pattern row. Shape neck as follows: Next row: * p2, wool round needle, p1, wool round needle; repeat from * to last 25 sts; p2tog, k11, sl1 purlways, k11. Continue decreasing thus inside the 23 border sts on the following 10 alternate rows. Pattern back (1st pattern row). [50sts] Work a few rows straight in pattern, until back measures same as front
ending with 1st pattern row. With right side facing, continue in p2/k1 rib keeping stocking-stitch border as before, and shape shoulder by casting off 9 sts at the beginning of the next and following 2 alternate rows - armhole edge. Leave remaining 23 sts on a spare needle or stitch holder. Right FrontWith No 8 needles, cast on 95sts and work as follows: Next row (right side facing): K11, sl1 purlways, k11, purl to end. Change to pattern as follows (button border in stocking stitch as before): 1st row (wrong side facing): *
k2, p3tog; repeat from * to last 25sts; k2,
p23. Repeat these 2 rows for 1½ inches, ending with 1st pattern row. With right side facing, make double buttonhole in next 2 rows as follows: k4, cast off 3, k4, sl1, k4, cast off 3, k4, work to end and back, casting on 3 sts over those cast off Finish as for left front reversing all shapings, making another 5 double buttonholes as above at 3-inch intervals. Your pocket row will read: SleevesWith No 10 needles, cast on 48 sts loosely and work 5 inches in stocking stitch, ending with a purl row. With right side facing, change to No 8 needles and continue in stocking-stitch,
shaping sides by increasing 1 stitch at end of 3rd and every following
6th row until there are 78 sts. With right side facing, shape top by casting off 4 sts at the beginning of the next 2 rows, then k2tog at the beginning of every row until 40 sts remain; then k2tog at each end of every row until 20 sts remain. Cast off. To Make UpPress stocking-stitch parts only under a damp cloth. Join shoulder, side and sleeve seams; insert sleeves. Now with No 8 needles, k23 border sts. from spare needle at top of right
front and work straight on these sts, slipping centre stitch as before
until border fits to centre back of neck. Cast off. Oversew round double buttonholes. |
Materials
|
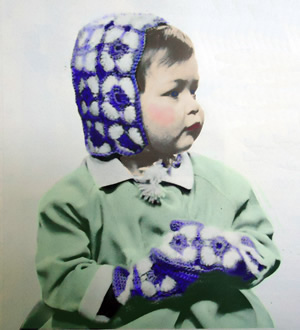
This looks like a little Victorian cherub, though the pattern is much later. It uses a combination of smooth and fluffy 4 ply yarns in a relatively simple crochet motif.
I think the bonnet is particularly cute.
Instructions:The items are made by piecing together a basic motif: Using blue colour (B), make 8 chain and join into a ring with a slip
stitch. Bonnet:Make 14 motifs the same and join together as shown in diagram.
Back of bonnet: 1st row: 1 dc into 2nd ch from hook,
1 dc into each of next 27 ch Continue in dc increasing 1 stitch at each end of every 4th row until
there are 36 dc. Making up the Bonnet: Pin one edge of front piece up sides and all round top edge of back piece.
With right side of work facing and B, crochet the 2 pieces together but
working 4 dc into edge of back piece only between motifs Fasten off. Mitts:Starting with the front of the mitts: Using B, make 21 ch Now work the back of the mitts: Work 2 motifs as given for bonnet and join together as before. With right side of motifs facing, start in corner and work along one
long edge as follows:- Turn and work 9th and 10th rows as given for front of mitt. Thumb: Using B, make 2 ch. Join thumb seam from top down as far as marker. Making up the mitts: Make another mitt in the same way but inserting thumb on opposite side
to first mitt when making up. |
Materials2 ozs 4 ply, in Powder Blue and One No 12 (2¾mm) crochet hook. TensionEach motif measures about 2 inches square. 6½ dc to an inch over
plain dc. Size mattersBonnet: All round front edge measures 15½ inches. Crochet abbreviations:ch: chain [Editor's note: Remember these are English crochet instructions where dc is equivalent to US single crochet - see "Terminology" in the side bar.] A word on the wool.Original yarn was Patons Beehive 4ply and Fuzzy Wuzzy angora. Disclaimer
|
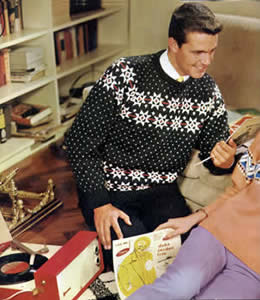
"Carefree and colourful sweater for him uses sparkling motif designs to wear out and about over the week-end when the sun shines"
Carefree it may be.. but a double knitting fair-isle for Spring? That's a novel idea. However, I'm sure "a thick sweater to wear on a wet Spring weekend" is also a suitable maxim, so here we are.
[Editor's note: Here we are indeed.... I wrote this at the end of February - and now on March 11th we have sub-zero temperatures and blizzards raging in the South of England (and the Channel Islands). So this sweater choice.... "just perfick" for March.]
The main picture is a low resolution photo that does not quite show the pattern detail to the full; this is because I just had to include the wonderful backdrop to the sweater with record player and vinyl albums. These cool cats are from the early sixties but are listening to 1950s American jazz. You can see more clearly how the pattern looks in the chart at the end.
InstructionsTwo sizes are given, with the larger size created by using a larger sized
needle. Do check your tension with whatever yarn type you use, as the
fair-isle patterning will tend to make the knitted fabric tighter than
normal. Back:** [Editor's note: The original instructions are written out line by line as reproduced below. I have created a chart which you can see at the end of the pattern.] Change to No 8 (4mm) [7 (4½mm)] needles, join in white (W), and star pattern as follows: 1st row (right side facing):
knit: 1W; * 5C, 1W; repeat from *
to end. Break C and join in Nasturtium Red (N). 8th row: purl: *
5N, 3W, 3N, 3W, 4N; repeat from *
to last stitch, 1N. Repeat rows 7 through to 1 inclusive, in that order. (That is, the reverse
of what you just knitted). Rejoin W and continue as follows:- 19th row: knit: , *
3C, 1W, 2C, repeat from * to last
stitch, 1C Break C and join in N Break N and rejoin C repeat rows 26 - 19 inclusive in that order (that
is, reversed as in previous sequence) Continue in snowflake pattern as follows:- 1st row: purl. Rejoin W Rejoin W Repeat the last 8 rows 5 [4 or 5] times more, then rows 1-5 inclusive again. Shape armholes: Cast off 8 sts. at the beginning of the next 2 rows. Rejoin W. 1st row: k2tog W; knit: 5C,
* 1W, 5C; repeat from *
to last 2 stitches, k2tog W. 8th row: purl: 2N, *
3W, 3N, 3W, 9N; repeat from * to last
11 stitches, 3W, 3N, 3W, 2N. 9th row: k2tog, knit: 1W, *
(1C, 2W) 3 times, 7C, 2W; repeat from *
to last 10 stitches, (1C, 2W) twice, 1C, 1W, k2tog. 16th row: purl. Next row: k2tog W, knit: 5C, *
1W, 5C; repeat from * to
last 2 stitches, k2tog W. Next row: purl. Next row: purl. Keeping continuity of pattern continue decreasing 1 stitch at each end of every alternate row until 47 stitches remain. Pattern back and leave stitches on a spare needle. Front:Work as for back from ** to **. Shape neck: Next row: k2tog, k16, k2tog, turn and leave remaining stitches on a spare needle. Continue in pattern on first 18 stitches, decreasing 1 stitch at each end of every knit row until 2 stitches remain. K2tog and fasten off. With right side facing, return to remaining stitches, slip centre 25 stitches, on a spare needle, rejoin wool to last 20 stitches, k2tog., pattern to last 2 stitches, k2tog. Finish to correspond with first side. Sleeves:With No 10 needles and C, cast on 56 stitches and work 3 inches k1, p1 rib. Next row: *
k2, knit twice in next stitch, repeat from *
to last 2 stitches, k1, knit twice in last stitch. [75 sts] Change to No. 8 [7] needles, join in W and continue in snowflake pattern as follows:- 1st row: knit:
1C, 1W, * 5C, 1W; repeat from *
to last stitch, 1C. 2nd row: purl. 5th row: knit: 5C, *
1W, 5C; repeat from * to end. 6th row: purl. Keeping continuity of pattern increase 1 stitch at each end of the next and every following 6th row until there are 109 stitches. Work straight until 13 complete patterns and 2 rows of 14th have been done from start. Now shape top working as for back from †† to †† : 55 stitches remain. Next row: purl. Keeping continuity of snowflake pattern decrease 1 stitch at each end of every row until 5 stitches remain. Leave these stitches on a spare needle. To Make UpPress parts on wrong side under a damp cloth, avoiding ribbing. Join remaining raglan seam. Press all seams, avoiding ribbing. |
Materials
|
Chart of the first pattern section as given for the Back. This shows the pattern detail not fully visible in the main photo.
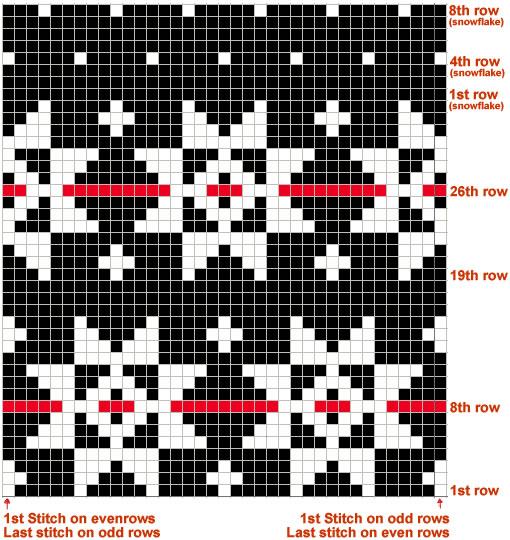
From the original photo I can just make out the records in the foreground - the ones on the sofa behind the models defeat me...

The Duke Jordan Trio look like they are on the turntable (if not our model's companion is bending the vinyl in the sleeve to an ill-advised angle). The album was recorded on January 28th 1954. Tracks are: Jordu, Scotch Blues, Wait And See, Darn That Dream, Embraceable You, Just One Of Those Things, They Can't Take That Away From Me, and, Confirmation.
Next up for consideration (our model is reading the sleeve notes) is "Krupa and Rich" - both drummers - with an eponymous recording from 1956.
Examples of the music can be found on You Tube.
It has to be a Dansette doesn't it?
I have to admit I was totally ignorant about this famous brand until very recently. I can't exactly say they were before my time, as they were manufactured between 1952 and 1969, and we did have a record player in that era which was likely to have been a Dansette, but I cannot remember it well enough to say one way or the other.
As to the model in the picture - it looks a bit like the "Bermuda" shown on this fabulous site, though there are some differences. It seems likely as Julie says: "The Dansette Bermuda is by far the model we have the most of in all colours".
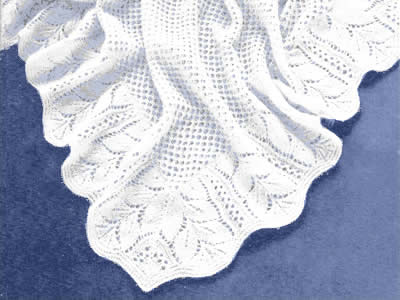
A lace baby shawl made in a 3 ply fingering weight, which makes it a bit more feasible to contemplate as a viable project than the traditional 2 ply, while yet remaining fine and lacey. Added to that, it is made up in sections, rather than a single piece which makes it easier to handle, with all the decreasing lace stitches.
Note added September 2018: since I first transposed this pattern I have had a number of queries so I have recently checked the pattern by knitting it myself from the instructions, and as a consequence corrected some scripting errors (random capital letters and typos), plus I have added the number of stitches after each alternate pattern row on the border pieces. I hope this will help, because despite the fact that the stitches overall are gradually decreasing, on some rows the stitch count increases.
I hope I have caught all the remaining issues, but, as ever, I always welcome anyone sharing any problems they may encounter while knitting it.
InstructionsThe shawl is made in 5 pieces: first a centre square, and then 4 mitred borders that are sewn on each side of the centre. Centre SquareWith No 8 needles, cast on 162 stitches. 1st row: knit. Repeat the last 4 rows until work measures 21 inches. Borders (make 4)With No 9 needles, cast on 206 stitches. 1st row: knit. Repeat 2nd and 3rd rows twice more [200 sts]. Change to pattern as follows:- 1st row: p2tog, p4, k2tog, wrn, p2,
* (k1, wfd) twice, k2, k2tog, p1,
sl1, k1, psso, k1, k2tog, p1, sl1, k1, psso, k1, k2tog, p1, sl1, k1, psso,
k2, (wfd, k1) twice, p2, k2tog, wrn, p2; repeat from *
5 times more, p2, p2tog. [186 sts] Cast off 162 stitches. Make 3 more pieces the same. To Make UpPin parts out and press very lightly under a damp cloth (so not to flatten the pattern stitches too much). |
Materials
|

A lovely warm idea that has never lost its popularity: a scarf/hood combination. This has an interesting construction with the scarf being double sided, and the hood being more a like a pocket with the intention that it should form soft folds when worn. [I'm more used to a pixie hood type design with a centre back seam].
Hood Scarf:Using the main colour wool (MC) cast on 108 sts. 1st row: Slip 1, knit to end of row. ** Join in the first contrast (B) and working the 1st and 2nd rows as shown on the chart proceed as follows: 1st row: *
Knit 2MC, 3B, 3MC, 3B, 1MC, repeat from *
to end of row. Break off first contrast (B) and join in the second contrast
(Y).
Repeat from ** to ** twice. Continue in stocking stitch until the work measures 40 inches Work 18 rows in stocking stitch. Hood Border:Work a border along one 16 inch side of the hood opening as follows: Next row (right side): Slip 1, purl
to the last stitch k1. 1st row: *
Knit 2MC, 3B, 3MC, 3B, 1MC, repeat from *
to end of row. Break off first contrast (B) and join in the second contrast
(Y). Commencing with the 3rd row, proceed as shown on the chart, changing
the colours when necessary, until the 15th row has been worked. Proceed as follows: To Make Up the Scarf.Sew the ends of the scarf together on the wrong side. |
Materials5 ozs 3ply in main shade plus "medium-sized" balls in each of four contrast colours eg blue, yellow, green and pink. One pair No 9 (3¾ mm) knitting needles. TensionApprox. 30sts to 4 inches on No 9 needles. Size mattersWidth round face edge is 16 inches. A word on the woolOriginal knitted in Sirdar Majestic 3-ply Wool Disclaimer
|
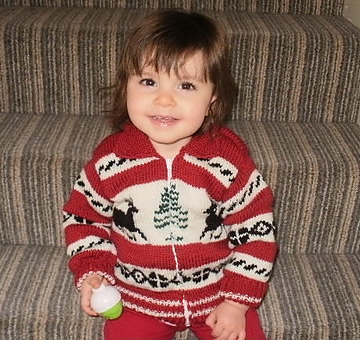
This looks so cute and would make a lovely Christmas cardigan for a toddler. The fair-isle design is not too challenging and hopefully you have plenty of time to knit for this year's festivities.
One size only I'm afraid, but you could increase it slightly by increasing the yarn weight and needle size.
This was beautifully knitted by Sara for her daughter, who also models it. The original (boy) model seen after the pattern instructions.
InstructionsBack and fronts are worked together and then divided and worked separately at the armholes. Note that all the charted patterns are worked in shades "dark" and "light". The medium shade is used for bands of colour. Back and Fronts:Using No 8 (4mm) needles and Medium shade, cast on 127 sts. Change to No 7 (4½mm) needles and work remainder of Back and Fronts
in stocking stitch, (knit on right side, purl on wrong side). Commencing with a knit row, work 4 rows Medium, then 3 rows Light. Starting with a purl row, work rows 1-7 inclusive. from Chart A, reading chart from left to right on purl rows and right to left on knit rows.  Starting with a knit row, work: Work rows 1-20 inclusive from Chart B, working from right-hand side to
the centre stitch; work the centre stitch; then work back to the right-
hand side on every row.  Divide for Back and Fronts:Next row (2lst row of Chart B): K26
in Light, cast off 11 sts in Light; (1st left on needle after cast-off),
k25sts in Light, k1 st in Dark, k26 sts in Light, cast off 11 sts in Light.
(1st left on needle after cast-off), knit remaining 25 sts in Light. Next row (22nd row of Chart B): P2
in Dark, p24 in Light. Using Light, work 2 rows. Work 3 rows in Light, decreasing 1 stitch at the neck edge on every row. [20 sts] Starting with a purl row, work rows 1-3 inclusive from Chart C.  Starting with a purl row, work 2 rows Light, 1 row Medium. Back:Slip the group of 53 sts back on to the working needles, and with wrong side facing rejoin Light proceeding for Back as follows: Next row (22nd row of Chart B): P24
in Light, p5 in dark, p24 in Light. Work 3 rows in Medium. Next row: Using Medium, k2tog; knit to the last 2 sts, k2tog. [49sts] Armhole shaping is now complete. Starting with a purl row, work rows 1-3 inclusive from Chart D. 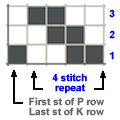 Using Medium for the remainder of the Back, continue until the armhole
measures 5 ins, (that is 5 ins from the 11 cast-off sts), finishing at
end of a purl row.. Right Front:Slip remaining 26 sts back on to the working needles, rejoin Light, and with wrong side of work facing proceed for Right Front as for Left Front, reversing all shapings, and noting that the first 4 rows will read: Next row (22nd row of Chart B): Purl
24 in Light, 2 in Dark. Sleeves[Editor's note: The sleeves are knitted top down, making for easy length adjustments (or repairs).] Using No 7 needles and Medium, and commencing at the top of the Sleeve,
cast on 49 sts. Work rows 1-3 inclusive from Chart D. Work rows 1-7 inclusive from Chart E. 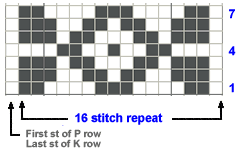 Work 3 rows in Light, 9 rows in Medium, and 3 rows in Light.
Next row: Using Medium, (p1, p2tog, p2, p2tog) 7 times. [35 sts] Change to No 8 needles, and commence the cuff, working stripes in rib
as for back and fronts welt as follows: Back CollarUsing No. 8 needles and Medium slip 13 sts. from Back neck on to the
working needles, and with right side of work facing proceed in rib as
on welts, increasing 1 st. at both ends of the 3rd and every following
alternate row until there are 33sts. Right part of CollarUsing No. 8 needles and Medium, cast on 2 sts. 1st row: Increase in the 1st stitch,
k1. Cast off. Left part of CollarUsing No. 8 needles and Medium, cast on 2 sts. 1st row: Increase in the 1st stitch,
k1. Cast off. To Make UpOmitting the ribbing, with wrong side of work facing block each piece by pinning out round edges. Omitting ribbing, press each piece using a warm iron and damp cloth. Using a back-stitch seam join shoulder and sleeve seams and stitch sleeves into position. Using a flat seam, stitch cast-off edge of Right Portion of Collar to
shaped edge of Back Collar noting that turnings should be placed nearest
to neck edged. Stitch side of Collar into position. Stitch zip into position. Press seams. |
Materials
|
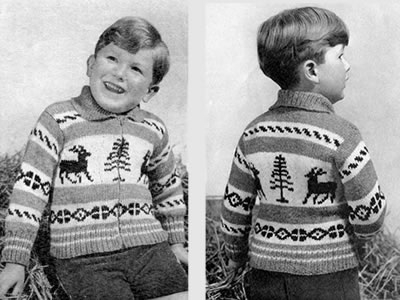
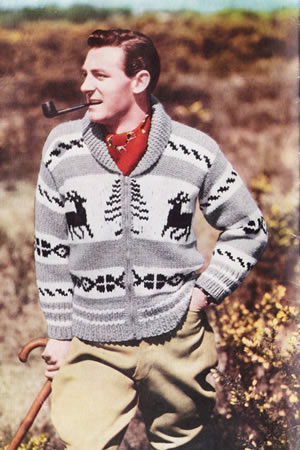
Some 10 years after the entry for the child's version, I discovered an adult cardigan. Astonishingly, it is made using exactly the same instructions - practically word for word - just using a very thick wool.
They published it first as part of the Stitchcraft Moorland (DK) booklet, calling it a North American Indian Coat (pictured above), using 3 strands of the yarn held together, and later as a separate pattern leaflet "by special request" using the new Big Ben yarn, calling it a Western Frontier Jacket (pictured at the end).
With such economy on a rewrite, it's still one (much bigger) size only.
InstructionsBack and fronts are worked together and then divided and worked separately at the armholes. Note that all the charted patterns are worked in shades "dark" and "light". The medium shade is used for bands of colour. Back and Fronts:No 2 (7mm) needles and Medium shade, cast on 127 stitches and work ribbed
welt as follows: Continue using Medium, repeat 1st and 2nd rows 3 times. The ribbed welt is now complete. The remainder of Back and Fronts is worked in stocking stitch, (knit on right side, purl on wrong side), breaking off and joining in colours as required. [Editor's note: You may need to use a circular needle to contain this many stitches in bulky yarn, but you will still work back and forth as if on 2 needles.] Commencing with a knit row, work 4 rows Medium, then 3 rows Light. Starting with a purl row, work rows 1-7 inclusive from Chart A, working 16 stitch repeat 7 times, plus the odd 15 stitches as marked, Read the chart from left to right on purl rows and right to left on knit rows. [Editor's note: After working Chart A the adult instructions call for a slightly longer length than the child's version.] Then, starting with a knit row, work 3 rows in Light. Work rows 1-20 inclusive from Chart B, working from right-hand side to
the centre stitch; work the centre stitch; then work back to the right-
hand side on every row. Divide for Back and Fronts:Next row (21st row of Chart B): knit
26 in Light, cast off 11 stitches in Light; (1st left on needle after
cast-off), knit 25 stitches in Light, knit 1 stitch in Dark, knit 26 sts
in Light, cast off 11 stitches in Light. (1st left on needle after cast-off),
knit remaining 25 stitches in Light. [Editor's note: After dividing for back and fronts, the adult instructions again need a slightly longer length in the armhole,. Left Front:Shape armhole and commence to shape front slope: Next row (22nd row of Chart B): purl
2 in Dark, purl 24 in Light. Next row (23rd row of Chart B): knit
26 in Light. Using Medium, work 3 rows. Next row: Using Medium, k2tog, knit to the last 2 stitches, k2tog. [22stitches] This completes the armhole shaping. Starting with a purl row, work rows 1-3 inclusive from Chart C, working the 4 stitch repeat 5 times, reading from left to right on purl rows and from right to left on knit rows. Next row: Using Light, knit to the
last 2 stitches, k2tog. Starting with a purl row, work 2 rows Light, 1 row Medium. Back:Slip the group of 53 stitches back on to the working needles, and with wrong side facing rejoin Light proceeding for Back as follows: Next row (22nd row of Chart B): purl
24 in Light, p5 in dark, p24 in Light. Work 3 rows in Medium. Next row: Using Medium, k2tog; knit to the last 2 stitches, k2tog. [49sts] Armhole shaping is now complete. Starting with a purl row, work rows 1-3 inclusive from Chart D, working the odd stitch as marked, then the 4 stitch repeat 12 times. Using Light work 3 rows. Using Medium for the remainder of the Back, continue until the armhole
measures 8½ ins, (that is 8½ ins from the 11 cast-off stitches),
finishing at the end of a purl row.. Right Front:Slip remaining 26 stitches back on to the working needles, rejoin Light, and with wrong side of work facing proceed as for the Left Front, reversing all shapings, and noting that the first 4 rows will read: Next row (22nd row of Chart B): purl
24 in Light, p2 in Dark. ...and then as stated above, complete as for Left front reversing shapings. Sleeves[Editor's note: The sleeves are knitted top down, making for easy length adjustments (or repairs).] Using Medium, and commencing at the top of the Sleeve, cast on 49 stitches and work 8 rows in stocking stitch. Continue in stocking stitch as follows: Work rows 1-7 inclusive from Chart E, working the 16 stitch repeat 3 times, and the odd stitch as marked. Work 3 rows in Light, 9 rows in Medium, and 3 rows in Light.
Using Medium, work 1st and 2nd rows of rib as on the body. Cast off in rib. Back CollarSlip the 13 stitches from the Back neck on to the working needles, and with right side of work facing proceed in rib as on the welts, increasing 1 stitch at both ends of the 3rd and every following 4th row until there are 27 stitches on the needle. Continue on these stitches until the rib measures 8 inches from the beginning. Sides of CollarWith right side of back collar facing, using Medium colour, knit up 24 stitches along one of the the increase edges, and proceed in garter stitch (every row knit), decreasing 1 stitch at the neck edge on the next and every following alternate row until 2 stitches remain. [Editor's note: The decrease edge is the one which will be sewn to the front slope to make the shawl collar. When the collar is folded over the ribbed section will be visible at the back of the jacket, and the garter stitch sides will be visible at the front of the jacket.] Cast off. Work the other side of the collar to match. To Make UpOmitting the ribbing, with wrong side of work facing block each piece by pinning out round edges. Omitting ribbing, press each piece using a warm iron and damp cloth. Using a back-stitch seam join shoulder and sleeve seams and stitch sleeves into position. Using a flat seam, stitch Collar in position. With right side facing, work 1 row of double crochet along each front edge where the zip is then stitched into position. Press seams. |
Materials
|

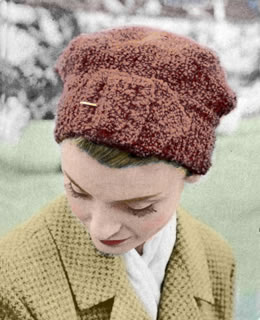
Charming retro hat with decorative band and buckle.
I learned from the Debbie Bliss Magazine Autumn/Winter 2012 that one of my favourite designers, Louisa Harding, has been facing up, with her husband, to his challenge of being treated for lymphoma. In appreciation for the help of Macmillan nurses, Louisa is taking part in Macmillan's Nepal Hiking Challenge and seems well on her way to raising her goal of £5000.
To help achieve the target She has put together a series of seven knitting patterns called 'Himalayan Hiking Hats'. She will have her photo taken wearing each one of the hats on the first 6 days of the trek. The seventh hat pattern in the series will be knitted 'en route' and photographed on the 7th (last) trekking day.
Download the hat patterns from her site and show your support by sending a donation.
Instructions.The main hat is knitted in reverse stocking stitch, with the band in garter stitch. The design is intended for a textured yarn. CrownUsing the 5 No 10 needles, cast on 8 stitches, placing 2 stitches on each of 4 needles. 1st (and every alternate) round:
purl 6th round: *
k2, knit twice in next stitch; repeat from *
all round. [32 sts] Continue increasing 8 stitches thus on every alternate round until there
are 36 stitches on each needle. [144 stitches] Next round: *
k16, k2tog; repeat from * all round.
[136 sts] Cast off. BandCast on 16 stitches, and work a strip in garter-stitch (every row knit)
22 inches long - or length required to fit round head with 3 inches to
spare. Now decrease 1 stitch at each end of the next and every alternate
row until 2 stitches remain; k2tog and fasten off. This forms a point. Stitch the cast-on edge of the band to the buckle, then slot the shaped end through the buckle pulling it through until the band fits round the head snugly. To Make UpPin band in position evenly all round crown noting that the purl side
of the crown is the right side. |
Materials
|
A word on the wool.Patons Rimple was a softly textured bouclé yarn, (97% wool, 3% nylon), which knitted to a double knitting tension. This hat is knitted on finer needles than usual so the knitted fabric will be denser and stiffer, giving the hat more body. There are a few double knitting bouclé yarns available though many tend to be chunky weight. Debbie Bliss seems to have discontinued the Cashmerino Astrakhan but you can still obtain it at some outlets on the internet (and often discounted). Rowan have recently brought out a British Sheep Breeds "fine" bouclé but this still seems to knit up to a chunkier tension. You can try and obtain the right tension with finer needles - and I think this would produce an excellent knitted fabric for the hat - but be warned that knitting bouclé tightly on small needles is very hard work. I cannot supply the yardage of Rimple, and can only guess that "Harlequin" was a multi-coloured tweed. | |
This is small blanket or cot cover made from 12 crochet squares in chunky yarn (so quick to make). It's based the usual granny-square principle, but a very pretty example of it incorporating the central flower motif.
InstructionsThere are a couple of new stitches used in this pattern, as well as basic chain, dc, and treble. There is a "cluster" used in making the central flower, and crab stitch for the edging. Make cluster: Working all into the same stitch, **yoh,
draw through loop **; repeat from
** to **
4 times (9 loops on hook); yoh, draw loop through all loops on hook; yoh,
draw loop through stitch on hook. Crab stitch is worked exactly as you do double crochet - but from right to left instead of left to right. It seems very awkward but just force yourself to do it; push the hook through the stitch to the right of your needle, pull through a loop, then yoh and pull through both loops on hook. It creates a very attractive twisted ribbed edge. There a is you tube extract inserted at end of this item - or go search the web for "crab stitch" for a variety of explanations. Motif (make 12)Starting at the centre of the square: using 7mm hook and first contrast, (plum), make 6ch and join in a ring using a slip stitch. 1st round: 8dc into the ring and
join with a slip stitch to top of first dc. Fasten off. This completes the motif.  To Make UpMake 12 squares altogether. With 7mm hook and 3rd contrast (lime), join 2 squares together; hold
right sides together and slip stitch through the back loop of each dc,
leaving the front loops exposed as a decorative ridge on the right side
(see photos). Join 3 squares in a row, then join the 4 rows together. Finally, using first contrast (plum) and right side facing, work a row of dc all around the blanket, and work 2 or 3sts into the 4 corner sts, to make it curve properly. Then, keeping the right side facing you, change to a 6mm hook and go back the way you came, working one row of crab stitch right to left. Sew in all ends. Block the blanket by pinning it out and dampening; leave to dry. You can press very lightly with a damp cloth - just hold the iron above the cloth so it heats it but do not press down. You want to leave the texture of the stitches in place, so do not press heavily. |
Materials
|
Here is a You Tube item showing how to do crab stitch,
(a picture painting a thousand words and so on).
Father George: so fond of his bedsocks that they get worn out. [Since he is not bedridden I can only surmise he does not restrict their use to the bedroom!] Hence - by request - here are some more.
The patterned section of the sock is knitted sideways using a variation of a honeycomb stitch; it's an opportunity to use up really small amounts of double knitting yarn. I rotated 4 contrast colours but you could use a different colour for every set of rows; the key is to keep some consistency in the main colour.
Instructions.The first section of these socks is knitted sideways making a "T"
shape where the upright of the "T" is the upper foot, and the
cross bar curls around the leg to form the cuff, meeting at the back seam. First section (knit 2)Starting at the back leg seam, with main shade (M) cast on 23 sts on 2 needles and knit one row. Commence pattern. Join in contrasts (C1, C2 etc): Repeat rows 1-10 using different contrasts, once more. Next row(wrong side facing): Cast
on 40 sts, and then work across them and all sts, as for 1st row of pattern. [63sts] Continue to work the pattern on these 63 sts, working rows 1-10 three
times, and then rows 1-4. Next row(wrong side facing): Using main shade, cast off 40 sts, and purl across remainder. [23sts] Continue to work the pattern on these 23 sts, working rows 6-10, then
rows 1-10 once, times, and then rows 1-4. Second section (heel and sole).The remainder of the socks are worked entirely in the main shade. For the heel: with right side of the first section facing, oriented like an upside down "T" pick up 11 sts from each side of the instep:
Pick up and knit 11 sts from the left side first, ending at the cast on edge (which will be the centre back, and then turn the work over and bend round the second side, and pick up 11sts from the right side. The sock cuff now forms a circle with the back seams together, but not yet sewn.
Turn and purl 1 row across these 22 sts. Next row(right side facing): *
Sl1, k1, repeat from * to end. Repeat the last 2 rows 10 times more. Turn the heel: Next row: Sl1, k12, k2tog, k1. Turn. Continue to work short rows and decrease in this way until all sts have been incorporated. [14sts]. Next row(right side facing): Sl1,
k13, pick up and knit 13 sts down side of heel. Turn. Now work the instep decreases and sole: Next row: K1, sl1, k1, psso; knit
to last 3 sts, k2tog k1. Turn. Repeat the last 2 rows until 22 sts remain. Continue to work a further 50 rows to make the sole - upper and lower
foot sections should be about the same length. ToeNow we move to working in the round. Knit 11 sts on first double-pointed needle, 11sts on second, then with
right side facing, using third needle, pick up and knit 24 sts across
the toe edge of the first section. Next round: K1, sl1, k1, psso; knit to last 3 sts on third needle, k2tog k1. Complete the round by knitting the 11 sts on each of the first and second needles. [44 sts] Next round: K1, sl1, k1, psso; knit
to last 3 sts on third needle, k2tog k1; on first needle, k1, sl1, k1
psso; knit to end; on second needle, knit to last 3 sts, k2tog k1. Repeat the last 2 rounds until 16sts remain. Making upSew seams on each side of the sole, using a flat seam technique (not mattress stitch for example). Using double pointed needles and main shade, pick up 60-66 sts round top of sock and knit a k3/p3 rib for about 8 rows (or as long as you want), to form the welt. Cast off loosely. Sew in all ends. |
Materials2 x 50g balls of double knitting yarn, and a variety of left over DK colours. One pair and one set of four No 8 (4mm) needles, pointed at both ends. Tension22 stitches = 4ins Size mattersLength of foot, 9 inches (adjustable). AbbreviationsM is main shade (olive). sl1: slip the next stitch k2tog or p2tog: work 2 sts together to decrease. psso: pass the slipped stitch over, (also known as "ssk"; effectively you are "knitting 2 together through back loops") A Word
|

The third (and final) fair-isle design for November is a 1950s or early 60s cardigan in a double knitting weight yarn. No clues as to the original colour scheme here, and although for today it would seem appropriate to go with the grey palette, I am sure the original would have been more colourful.
InstructionsThe Back and Fronts are worked in one piece up to the armhole shaping. Back and Fronts:Using No. 10 (3¼mm) needles and light colour, cast on 146 sts. Change to No 7 (4½mm) needles and proceed as follows: 1st row: Knit Continue increasing in this manner on next and every following 4th row
until there are 183 sts. Next row: P7, (increase in next stitch p12) 13 times, increase in next stitch, purlto end. [197 sts] Work rows 1 to 16 from Chart (odd rows knit, even rows purl), working
bracketed repeat 7 times across row and odd stitch at end of 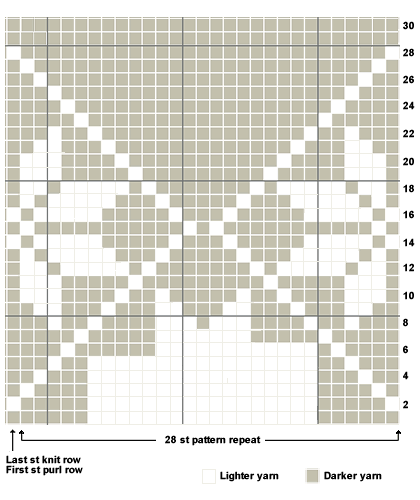 Divide for Back and Fronts:Next row (17th row of chart): Pattern
44 cast, off 10, pattern 88 (there now being 89 sts. on needle after cast-off);
cast off 10, pattern to end.
Proceed on first group of 44 sts. for first front as follows: Keeping pattern correct by working rows 18 to 30 inclusive of Chart,
shape armhole by decreasing 1 st. at armhole edge on next and every
alternate row until 39 sts. remain. Using darker colour for remainder of front, continue in stocking stitch until work measures 5 ins, from beginning of armhole shaping, finishing at front edge. Shape neck: by casting off 4 sts. at beg. of next row. Shape shoulder: by casting off 10 sts. at beg. of next and every alt, row until all sts. are cast off. Rejoin wool to next group of 89 sts. and proceed for Back as follows: Keeping pattern correct from Chart, shape armholes by decreasing 1 st
at both ends of next and every alternate row until 81sts remain. Continue
on these sts. until work matches first front up to shoulder shaping. Rejoin wool to remaining group of 44 sts. and complete to match first
front reversing all shapings. Sleeves:Using No. 10 needles and Light, cast on 50 sts. Change to No. 7 needles and proceed in stocking stitch, increasing 1
st. at both ends of 5th and every following 9th row until there are 73
sts. Next row: P3; (increase in the next stitch, p5) 11times; increase in the next stitch; purl to end. [85 sts] Work rows 1 to 16 inclusive from the chart, noting that bracketed repeat is worked 3 times across row, and odd st. at end of knit row and beginning of purl row as marked on chart throughout. Keeping pattern correct from chart until 30th row of chart has been completed,
and working remainder of sleeve in dark colour, shape top by casting off
4 sts at the beginning of the next 4 rows, 3 sts at the beginning of the
next 4 rows, and then 2 sts at the beginning of the next 4 rows. Right Front Band:Using No. 10 needles and light colour, cast on 11 stitches. 1st row: K2; (p1, k1) 4 times; k1. Left Front Band:Omitting buttonholes, work to match Right Front Band. Neckband:Using a back-stitch seam join shoulders of Back and Fronts. Next row: *
k1, p1, rep from * to last stitch,
k1. Work 3 more rows in rib. To Make UpOmitting k1/p1 rib, with wrong side of work facing, block each piece
by pinning out round edges. "In order to preserve the lovely crepe appearance of Totem fabrics, these must be pressed very lightly as over-pressing will spoil the appearance of the finished fabric." Using a flat seam for k1/p1 rib, and a back-stitch seam for remainder,
join sleeve seams and stitch sleeves into position. Flat stitch front
bands into position. |
Materials
|

The second nordic-style sweater for November in a slightly lighter weight yarn. Like the previous design it has a straight inset sleeve, as well as the bright ("modern") colour combination of the 1980s. The pattern includes instructions for plain leg warmers.
InstructionsThis pattern uses 3 familiar stitch types: Double Rib: repeated sequence of k2, p2 rib. Back:Using No 9 (3¾mm) needles and main shade (O), cast on 86 /
90 / 94 sts work 3½ inches
in double rib. Change to No 7 (4½mm), needles and stocking stitch,
increasing 15 sts evenly across first row [101/ 105/
109 sts]. Continue joining in contrast (R)
for dotted fair-isle stocking stitch pattern as per the lower section
of chart. When the fair-isle motif is complete, change back to No 7 needles and continue in dotted fair-isle until work measures 27½ / 28 / 28½ inches. Shape shoulders: Then cast off 8 sts, (all sizes), knit 6 / 7
/ 8 (7/8/9
sts on right hand needle), and turn leaving the remaining sts unworked
but still on the needle to pick up in a moment, . Return to the sts still on the needle for the neck and left side. Place the centre 43 sts on a stitch holder for the back neck, and then rejoin yarn to the remaining sts and knit 1 row. Then cast off 8 sts, (all sizes) purlwise, purl 6 /
7 / 8 (7/8/9
sts on right hand needle), and turn, knit back 1 row. Front:Using No 9 (3¾mm) needles and main shade (O), cast on 90 /
94 / 98 sts work 3½ inches
in double rib. Change to No 7 (4½mm), needles and continue in dotted
fair-isle stocking stitch pattern as for the back, increasing 15 sts evenly
across first row [105/ 109 / 113
sts]. When work measures 18 inches (same as back to armhole), shape the armholes
by casting off 8 / 9 / 10
sts at beg of next 2 rows [89 / 91
/ 93 sts]. When work measures 25½ / 26
/ 26½ inches, shape neck: When work measures 27½ / 28 / 28½ inches, work shoulder shaping as you did for the back, casting off at armhole edge on every alternate row as follows: 8 sts (twice), 7 / 8 / 9 sts (once). Sleeves:Using No 9 (3¾mm) needles and main shade (O), cast on 54 / 58 / 62 sts work 3½ inches in double rib. Change to No 7 (4½mm), needles and continue in dotted fair-isle, increasing 17 sts evenly across first row [71 / 75 / 79 sts]. Increase 1 st at each end of every 8th row 9 times, [89 / 93 / 97 sts]. When work measures approximately 11½ / 12½ / 13½ inches, . (11 change to No 6 needles and work the fair-isle motifs. Cast off when you have completed the second border pattern, before you start the dotted fair-isle. To Make UpPress parts lightly on wrong side with a damp cloth Stitch one shoulder seam. Using No 9 needles and main shade, pick up
and knit 98 / 102 /
106 sts evenly round neck. Work 1¼
inches in double rib. Stitch second shoulder seam and neck border seam. Sew in sleeves. Stitch side and sleeve seams. |
Materials
|
This is the main chart showing the fair-isle design described in the pattern. It leaves a lot to work out yourself, showing the centre point and allowing you to work our where to start your row for each of the sizes.
Working it out yourself is made more difficult since the main panel pattern
is a 34 stitch repeat, while the border above and below is a 6 stitch pattern repeat like the dotted body pattern.
You can match up your first border with the dots, and use the chart below to see where to start and end your main panel pattern.
Then match your second border spacing it the same as the first one.
This is the chart marked with start and end points for the back showing the 3 sizes, and the 34 stitch repeat. The front has 4 extra stitches up to the amhholes, so start 2 sts further out for the front.
This is a similar chart for the sleeve marking with start and end points for the 3 sizes.
[Editor's note: I worked out and drew the charts myself, and made lots of trivial errors before I was satisfied that they were right. So if you are having difficulty with the charts, or if you think there may be a mistake, please do let me know.]
LegwarmersThe legwarmers are worked in rib throughout. InstructionsUsing No 11 (3mm) needles and main shade, cast on 62sts, and work in
double rib for 4¾ inches. Cast off loosely. [Editor's note: You are working from the ankle upwards; you cast on for the bottom of the item and cast off at the top, so it needs to be loose.] Stitch the seam using a flat seam technique. Work a second legwarmer in the same way. |
Materials
|
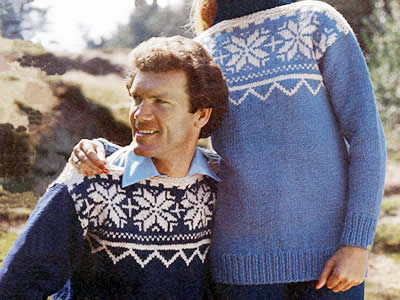
My title refers to the current season's fashion for nordic style sweaters - snowflake, as well as (astonishing to me) reindeer. This sweater's shape betrays its original design era, but that does make it simple to construct - and wear. Update to better reflect the current themes by choosing monochrome colour schemes, using black or greys with cream.
"Traditional motifs in cream make striking winter sweaters; simple easy styling, with straight necklines and drop shoulders, is easy to knit in thick soft yarn on big needles."
InstructionsT-shaped chunky sweater with simple snowflake pattern worked from the charts. Back and Front alike:With No 6 (5mm) needles and main shade, cast on 47 / 51 / 55 / 59 / 63 / 65 / 71 / 73 / 77 sts and work in K1/P1 rib for 2½ / 2½ / 2½ / 3 / 3 / 3 / 3½ / 3½ / 3½ inches, ending with wrong side facing for next row. Next row (wrong side): Rib 3 / 3 / 5 / 4 / 4 / 5 / 5 / 5 / 6; m1; * rib 8 / 9 / 9 / 10 / 11 / 11 / 12 / 9 / 13; m1; repeat from * to last 4 / 3 / 5 / 5 / 4 / 5 / 6 / 5 / 6 sts; rib to end. [53 / 57 / 61 / 65 / 69 / 71 / 77 / 81 / 83 sts]. Change to No 4 (6mm) needles and work in stocking stitch, starting with a knit row, until work measures 13½ / 14½ / 16 / 15 / 16 / 17 / 17½ / 18½ / 19½ inches, ending with a purl row. 1st to 3rd size: Join in contrast colour and work 2 rows. All sizes: 1st to 3rd size: Work rows 1 to 24 from chart A, repeating the 20 pattern sts 3 times across and working the first 0 / 2 / 4 sts and last 1 / 3 / 5 sts on knit rows and first 1 / 3 / 5 sts and last 0 / 2 / 4 sts on purl rows as indicated. 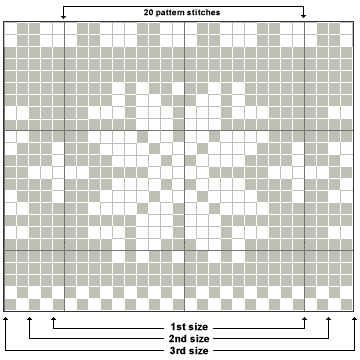 4th to 9th size: Work rows 1 to 36 from chart B, repeating the 20 pattern sts 3 / 3 / 4 / 4 / 4 / 4 times across and working first 6 / 8 / 0 / 3 / 5 / 7 sts and last 7 / 9 / 1 / 4 / 6 / 8 sts on knit rows and first 7 / 9 / 1 / 4 / 6 / 8 sts and last 6 / 8 / 0 / 3 / 5 / 7 sts on purl rows as indicated. 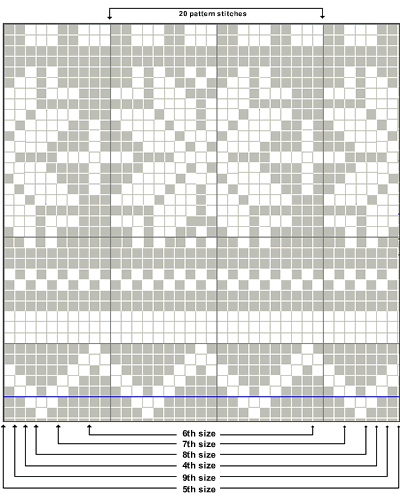 All sizes: Break main shade, and complete in contrast. Next 2 rows: Knit. Next row: K3 / 1 / 3 / 1 / 0 / 5 / 4 / 2 / 4, k2tog, * k2 / 2 / 2 / 2 / 3 / 2 / 2 / 2 / 2, k2tog; rep from * to last 4 / 2 / 4 / 2 / 0 / 6 / 5 / 3 / 6 sts, knit to end. [47 / 49 / 53 / 55 / 61 / 63 / 67 / 69 / 73 sts] Next row: Knit Cast off. Sleeves:With No 6 (5mm) needles and main shade cast on 25 / 27 / 27 / 29 / 29 / 31 / 31 / 33 / 33 sts and work in rib as on body sections for 2½ / 2½ / 2½ / 3 / 3 / 3 / 3½ / 3½ / 3½ ins, ending with right side facing for next row. Change to No 4 (6mm) needles and work in stocking stitch, starting with a knit row, shaping sides by inc 1 stitch at each end of 3rd / 3rd / next / 7th / next / 5th / 3rd / 9th / 5th and every following 4th / 5th / 5th / 5th / 5th / 5th / 4th / 4th / 4th row until there are 51 / 51 / 55 / 55 / 59 / 59 / 67 / 67 / 69 sts. Work straight until sleeve seam measures 14 / 15½ / 17 / 18½ / 19 / 19 / 19½ / 20 / 20 ins, ending with a purl row. Cast off. To Make UpOmitting garter stitch and ribbing, press parts lightly on wrong side with a damp cloth When making up a chunky garment it may be easier to use an oddment of
finer yarn in a toning shade for the sewing. Join shoulder seams leaving 7 / 7½ / 8 / 9 / 9½
/ 9½ / 10 / 10½ / 10½ ins open at centre
for neck opening. |
Materials
|
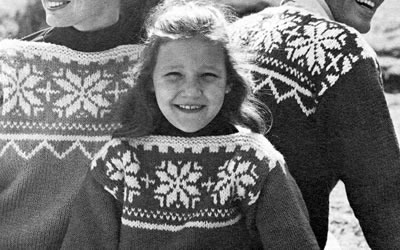

A pattern from the mid 1970s, knitted in a bouclé wool called Jaeger Catkin. As it was a speciality wool, I decided to splash out and buy the recommended stuff to get the right effect. Originally, I "improved" the pattern by making bell shaped sleeves, which, I seem to remember, were highly fashionable at the time. I wore it like this, day after day throughout my year in Southampton University in 1977.
In the 1980s, I unravelled the sleeves and reknitted them straight.... I can only assume I wore it again at that time.
Although I can still just squeeze into this sweater, it is really too small for me now - which some may consider a Good Thing - but I still love it.
Instructions.The sleeves and yoke of this tunic are knitted from cuff to cuff and the back and front (knitted in the usual vertical manner) are sewn onto it at the armhole. Back and Front alike.Work 2 pieces as follows: Using No 8 (4mm) needles and main shade (M), cast on 65 [69
: 73 : 77]
sts loosely and knit 7 rows in garter stitch (every row knit). Change
to No 5 needles, and beginning with a knit row work 6 inches in stocking
stitch, ending with a purl row. Next row: K12 [13
: 13 : 14],
k2tog tbl, knit to the last 14 [15
: 15 : 16];
k2tog; knit to end. Left Sleeve and Yoke** Using No 8 needles and main shade (M), cast on 57 [61 : 61 : 65] sts loosely and knit 7 rows in garter stitch. Break off M. Change to No 5 needles, and join in contrast colour (C). Beginning with a knit row continue in stocking stitch, until sleeve measures 19 [19 : 19½ : 19½] inches from the beginning, ending with a purl row. Place coloured marker at each end of last row. Work a further 8 [8 : 10 : 10] rows in stocking stitch.
Next row: K28 [30 : 30 : 32], pick up loop lying before next st and m1, k1, m1; k28 [30 : 30 : 32] Work 9 [9 : 11 : 11] rows in stocking stitch. Next row: K29 [31 : 31 : 33], pick up loop lying before next st and m1, k1, m1; k29 [31 : 31 : 33]. {61 [65 : 65 : 69] sts} Work 13 [15 : 15
: 17] rows in stocking stitch, ending
with a purl row. Divide for neck: Next row: K30 [32 : 32 : 34], and turn, leaving the remaining sts on a holder. Complete this side first. Work a further 15 [16 : 16 : 17] rows. Cast off. With right side of work facing, slip the first 10 sts on to a holder, and rejoin yarn to remaining 21 [23 : 23 : 25] sts. Work a further 12 [12 : 12 : 14] rows. Break off C. Change to No 8 needles, join in M and knit 7 rows. Right Sleeve and YokeWork as given for left sleeve and yoke from ** to **. Divide for neck: Next row: K21 [23 : 23 : 25], and turn, leaving the remaining sts on a holder. Complete this side first. Work a further 11 [11 : 11 : 13] rows. Break off C. Change to No 8 needles. Join in M and knit 7 rows. With right side of work facing, slip the first 10 sts on to a holder,
and work 16 [17
: 17 : 18]
rows. Cast off. To Make UpPress the sleeve pieces very lightly under a damp cloth with a warm iron on wrong side, omitting the 9 st borders. Join centre back yoke seam. Neck border: Hood: Next row: K9 [12 : 12 : 12]; (m1, k2 [2 : 2 : 3]) 5 [8 : 8 : 3] times; (m1, k1 [1 : 1 : 2]) 12 [2 : 2 : 10] times; (m1, k2 [2 : 2 : 3]) 5 [8 : 8 : 3] times; m1; k9 [12 : 12 : 12]. {73 [77 : 77 : 79] sts}. Change to No 5 needles. 1st row (right side): Knit to end.
Repeat the last 2 rows until hood measures 11½ ins from beginning, ending with a wrong side row. Next row: K4, slip these 4 sts on
to a holder, cast off next 20 [21
: 21 : 22]
sts; k25 [27
: 27 : 27]
sts, (including stitch on needle); k4 and slip these 4 sts on to a holder. With wrong side of work facing, rejoin yarn to rem 25 [27 : 27 : 27] sts and beg with a purl row, cont in stocking stitch until side edge fits along cast off edge of hood to within 4 sts on holder. Cast off. Sew cast off edges to side edge of centre piece. Left border: Right border: Join borders and sew in position around hood. [Editor's note: I used a duffle toggle and loop to fasten neck rather than a cord.] |
Materials
|
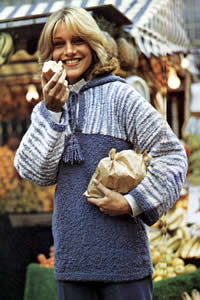
|
|
You can see similar patterns - some with front pockets - in the vintage patterns section: |
||
Sweater with hood and stripes
|
Mother and daughter tunics
|
|
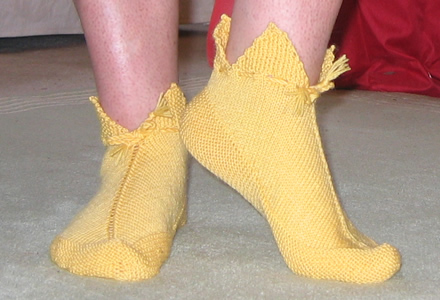
These socks were adapted from a wonderful elderly pattern, and were lots of fun to knit, (and wear!). They make me think of those dusty Jester colours though - mustard yellow, a dull brick red, a saddened teal...
Instructions.Cast on 128 stitches and start working in garter stitch - knit 4 rows. 5th row: increase in first stitch,
k62, increase in next stitch, increase in next stitch, K62, increase in
last stitch. Knit another 13 rows on these 148 stitches. Repeat 29th and 30th rows 14 times, thus completing 58th row. 59th row: K38, k2togtbl, k2tog, k40. Make slots for ribbon on next row thus: 2nd row (first point): P1, (k1, p1) 10 times. Continue in rib but decrease 1 stitch at each ent of the next row and
every alternate row until 3 sts. remain. With right side of work facing you. join wool to inner end of sts on
spare needle, then k1, (p1, k1) 10 times, turn, leaving the remaining
11 sts on the spare needle. Join underfoot and back seam. With right side of work facing you, join wool to inner end of sts on
spare needle. (k1, p1) 5 times, then knit last stitch on spare needle
together with first stitch on on the thread, after which (p1, k1) 5 times
over remaining sts on thread. Make another sock in the same way. Run ribbon through slots at ankles. Cuff VariationYou can see from the photo below that I added another layer of points to my sock.I cast on 64 sts and worked 6 rows in rib. I then worked the points in moss stitch as given for the points on the main sock, but I decreased on every 3rd row instead of every alternate row to make the points longer. When I had finished I sewed the cuff to the inside of the sock matching the points on the second cuff to the gaps between the points on the sock. I attached the cuff just below the eyelet row.
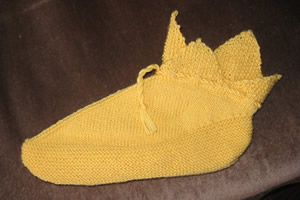
|
Materials2 x 50g balls 4ply A pair each of No A yard of narrow ribbon. Tension32sts x 40 rows to 4 ins over stocking stitch. Size mattersFoot length about 9 inches, length down back about 5 inches. AbbreviationsIncrease: increase by knitting into front and back of the next
stitch. A word on the wool.The original socks were knitted in "Wendy Family Wool 4ply". I chose to use Cygnet yarn not only because it is a good (75/25) blend for socks but also I wanted the lovely bright "Jester" yellow - and I was surprised that in the vast array of available yarns in my local John Lewis, I could not find any true yellows in any weight of wool - obviously not fashionable currently. The "brights" seem to be limited to cotton blends, which in my experience are not good for socks. Disclaimer
|

This is a very flattering hat - speaking as one who has difficulty with hats, which always leads to sartorial dilemmas in weather such as we have in the UK at the moment. However, not only flattering and warm, but amazingly speedy to knit, which can be very useful at this time of year. I completed it in one afternoon.
Instructions.The main part of the hat is a simple six-row pattern where you increase at the beginning and decrease at the end of every alternate row to create the diagonal effect. At the same time you alternate 3-row bands of stocking stitch and reverse sticking stitch. SideCast on 20sts. 1st row: Knit These 6 rows form the pattern. BrimWith right side facing, pick up and knit 72sts along one edge of the
side piece - that is 3 sts to each knit and purl stripe. Work 10 rows in k1/p1 rib, and then cast off in rib. Join side piece and brim neatly with a flat seam. Press seam lightly. CrownCast on 14sts, and work in stocking stitch, starting with a purl row (this is right side of work), and increasing at each end of the first and every alternate row until there are 28 sts. Knit one row. Then continue, decreasing at each end of next and every following alternate row until 14sts remain. Cast off. To Make UpPin crown in position to side of hat on wrong side, so that purl side
of crown is on the outside. Back stitch in position very neatly on wrong
side with a tailored seam Fold ribbed brim in half to wrong side and slip stitch in position round lower edge. Place on head. Wrap in Christmas paper. Put under tree. |
Materials
|
|
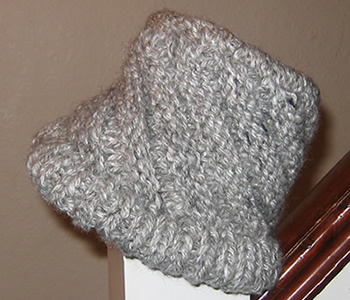
|
Handspun YarnI bought some Spelsau
fleece at Woolfest in 2009; there was a workshop on knitting direct from
the fleece but I intended to spin my sample. I made a 2 ply yarn which
was softer than I had expected, but kempy (as I had not attempted to remove
the coarser fibres). There was only a small amount - I did not measure
the yardage, but I started with 100g, the yarn was chunky weight, and
I knitted 2 strands of yarn together by combining it with an aran-weight
handspun merino/silk blend to achive the bulky weight required. As you
can see, the fleece was a lovely combination of natural grey tones. The description of the Spelsau fleece is as follows (taken from the reference above):
|
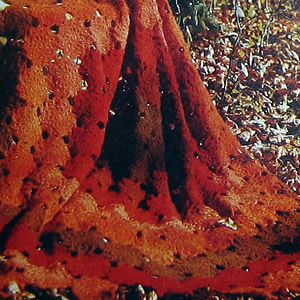
I love the rich autumn colours in this simple 1970s throw. Don't spurn the simple crochet motif; while not technically challenging, they do make an ideal handbag project for your holiday or your commute to work. You may think it's a bit early to think about autumn but there are just under 200 motifs make up the full size blanket... so maybe in time for Autumn 2011!
Crochet abbreviations:ss = slip stitch Remember the above are English crochet instructions where dc is equivalent to US single crochet - see "Terminology" in the side bar. Editor's note: While writing this I found a simply excellent free form crochet site from James Walters which reflects his own work alongside Sylvia Cosh and has - among other things - some great crochet information. As the author states - the information was originally intended as worksheets for their students - however I found they do offer useful guidance (available in both what I will call "English" as well as "US English"!) InstructionsMake 4 ch and join with a ss to make a ring. 1st round: 3ch; 11 tr into ring; ss to 3 ch. 2nd round: 3ch; 1 tr into same place as ss; * 2ch, 2tr into next tr, repeat from * to end, finishing with: 2ch, ss to 3rd of 3ch. 3rd round: 3ch; 2tr into first 2ch
space; * 2ch, 1tr into same space, work 2
tr tog (see abbreviations) with first leg in the same space and second
leg in the next space, 1tr into same space, repeat from *
to end, finishing with: 2ch 1tr into same space, ss to 3rd of 3ch. 4th round: * 1ch, 5tr in space, 1ch, 1dc into 2 tr tog, repeat from * to end, finishing with ss into ss of previous round. Fasten off. This completes your first motif. Make 7 for the centre and then 48, 44, 44, and 46 in the other colours. Here's a close-up picture of one of the motifs. Hopefully it will help you see how they should look.
Making upJoin 2 shells to each adjacent motif, using the following pattern as a guide to placement. It is a good idea to sew this together gradually as you go along - you can stop any time you feel it's big enough, leave the throw as a circular shape, or continue with the pattern to make a rectangle.
Sew in all ends. |
Materials4ply/Fingering yarn in 5 autumnal colours. You will need about 1 ball for the centre and about 8 balls for each of the other 4 colours. One number 11 (3mm) crochet hook. TensionOne motif measures about 4 inches in diameter. Size mattersApproximately 52 by 60 inches. Disclaimer
|

Knitted in a light weight yarn and originally designed in the 1950s to wear under or over a sweater with a lower neckline. The original is a "fringed cable yoke" (in case you want to show it off over the sweater) but I have omitted the fringing; I wear it as a convenient alternative to a scarf. The yarn I used is more a 4ply than a 3ply weight so my version is very slightly bulkier and longer than the original.
Instructions.Cables are worked as follows: Cable 8: Slip next 4sts. onto a cable
needle and leave at back of work; k4, then k4 from cable needle. Now begin the yoke, which is worked in one piece. Cast on 288 sts fairly loosely and work in cable pattern as follows: 1st row (right side facing): P4,
* k8, p8; repeat from *
to last 12 sts, k8, p4. Repeat the 1st and 2nd rows 3 times more. 9th row: P4, *
cable8, p8; repeat from * to last
12 sts, cable8, p4. Work 5 rows straight keeping the continuity of the cable rib pattern. 24th row (decrease row): K4, *
p7, k3, k2tog, k2; repeat from * to
last 11 sts, p7, k4. [236 sts] Work 4 rows straight keeping the continuity of the cable rib pattern. 30th row (decrease row): K4, * p3, k2tog, p2, k6; repeat from * to last 11 sts, p3, p2tog, p2, k4. [218 sts] Work 2 rows straight keeping the continuity of the cable rib pattern. 33rd row: P4, * cable6, p6; repeat from * to last 10 sts, cable6, p4. Work a further 2 rows straight keeping pattern as before. Continue thus, working a cable on every 8th row from previous cable, at the same time decreasing alternately in the knit and then in the purl panels, that is: decrease 1 stitch in each of the 15 knit panels on next row, then 1 stitch in each of the 17 purl panels on the following 6th row, omitting the 4 border stitches at each end. Repeat these 2 decrease rows with 5 rows straight between each and always keeping continuity of cable rib pattern until you have worked 10 decrease rows in all, when 113 sts remain and 3 sts remain in each of the knit and purl panels with the 4 border stitches at each end. Work a further 4 rows straight. Next row: P4, * cable3; repeat from * to last 7 sts., cable 3, p. 4. Work a further 5 rows straight in rib, then work another row cabling across the 3 knit stitches as before. Repeat last 6 rows until work measures 8 inches, then work a further 2 rows in rib. Cast off. To work the buttonholes: Optional fringing: To Make UpSew in all ends. |
MaterialsOriginal materials called for: 2 ozs. Patons Beehive Fingering 3-ply. ** A pair of No 12 (2¾mm) needles. TensionOriginal yarn knits 34sts x 42 rows to four inches over stocking stitch on No 12 needles. Substitute yarn knits 27sts x 38 rows to four inches on 2½mm needles. Size mattersOne size. Depth: 8 inches, excluding fringe. **A word on the wool.I used a vintage Phildar yarn called Anouchka (80% acrylic 16%, mohair, 4% wool), in a bright red. It knits to a tension of 27sts x 38 rows on 2½mm needles, and I used No 13 (2¼mm) regardless of tension. CrochetDouble crochet in the UK is equivalent to US single crochet - see "Terminology" in the side bar. Disclaimer
|
 |
|
In need of an additional gift that you can speedily knit? - then this is for you. (Unless you live in the tropics, when it would probably never be for you).
I made these mittens to go with the beret Featherbed by Louisa Harding from her book Little Cake. I like Louisa's work, and yarns; however, I made her beret in Rowan Kid Classic as I needed a particular colour, and in consequence had sufficient left to make mittens, using a similar stitch pattern.
Using Kid Classic was fine but made for an even more lightweight beret - I think I would like to try the recommended yarn for a slightly bulkier feel as intended.
The mittens are lovely and warm and .... feathery.
Instructions:(Make two gloves alike) Cast on 36 stitches, arrange evenly over 3 needles. 1st round: *
K3, p1, k1, p1; repeat from * 6 times to
end of round. 5th round: *
Slip1, k2, then pass the slipped stitch over the 2 knitted sts; p1, k1,
p1; repeat from * 6 times to end of round.
[30sts] Repeat rounds 5 through 8 four times more times. 21st round: as 5th. 23rd round: *
K3, p1, k2, p1; repeat from * 6 times to
end of round. 39th round: *
K3, p1, k2, p1; repeat from * 5 times. 40th round: Begin the next round continuing with the waste yarn, and k5. Slip these 5 sts back onto the left needle and knit them again using working yarn. Then finish the round as follows: k1, yon, p1; * k3, p1, k2tog, yon, p1; repeat from * 5 times to end of round. [43sts] 41st round: Slip1, k2, then pass the slipped stitch over the 2 knitted sts; p1, k2tog, k1, p1; * slip1, k2, then pass the slipped stitch over the 2 knitted sts; p1, k2, p1; repeat from * 5 times to end of round. [36sts] 42nd round: * K1, yon, k1; p1, yon; slip1, k1, psso; p1; repeat from * 6 times to end of round. [42 sts] Repeat rounds 23 through 26 twice more. Cast off 42 sts (not too tightly). Work the thumb. Go back to the waste yarn and carefully remove it, placing the resulting
live sts on two double-point needles; there will be 7 Now set off working in a round; starting with the 7 sts below the opening, arrange the sts as follows: Place the first 2 sts on a needle and leave for the end of the round. Join in the yarn and using another needle, k3, p1, then k2tog (the last
of the 7 lower sts and the first of the 8 upper sts), yon, then purl the
second stitch from the upper needle. This is "needle one" and
has 7 sts. 1st round: *
Slip1, k2, then pass the slipped stitch over the 2 knitted sts;
p1, k2, p1; repeat from * once to end of
round. [12sts] Cast off 14 thumb sts loosely. Making up: |
Materials1 x 50g ball Rowan Kid Classic. Small length of waste yarn in contrasting colour, (something slippery like cotton preferably). One set of 4 No. 8 (4 mm) needles. TensionKid Classic knits to a tension of 18sts and 24 rows to 4 inches on 6mm
needles. Size mattersWidth all round above thumb, 7 ins. To alter the size use larger or smaller needles as required. Abbreviationsyon: yarn over needle - makes an extra stitch which forms a small pattern hole when knitted on the next row. psso: pass the slipped stitch over. Effectively you are "knitting
2 together through back loops" Disclaimer
|
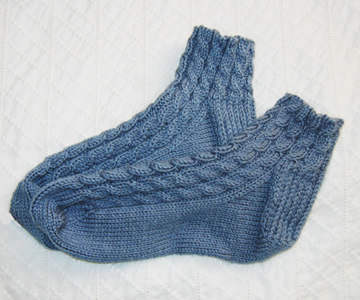
Father George recently handed back his bedsocks as they had holes in the heels. I dutifully mended them, but thought this a good excuse to give him another pair.
These socks are one size, but easily stretch to fit comfortably around a man's foot, as well as fitting round my own foot (small lady's), albeit loosely. If you want cosy house socks for a female foot then simply adjust the length. These are intentionally short at the ankle, but again you can easily knit them longer for the size you need.
InstructionsWith No. 9 needles, cast on 60 stitches loosely, and arrange over 3 needles. 1st round: *
K4, p2; repeat from * to end of round. These are the six basic pattern rounds. Repeat these six rounds twice more, (or as many times as you need to
lengthen the sock at the ankle), and then the first round once again. Divide for heel flap. Next Row: Knit the first 28 sts of the round on to one needle to work for the heel. Divide the remaining 32 sts across 2 needles, and leave to work the instep later. If you have worked the pattern correctly there will be a symmetrical set of complete cables across the 32 instep sts, starting and ending with p2. Return to your heel sts, and turn the work so that you can work back and forth across the heel sts using 2 needles. Next Row: Slip1 purlwise then purl
across the remaining 27 sts. [28 sts]. Repeat the last 2 rows 12 times more. Turn the heel. Work short rows as follows: Next Row: Slip1 purlwise then purl
across 15sts, p2tog, p1. Turn Continue working in this way until all the sts have been incorporated [16sts], ending with a knit row, and right side facing. Continuing to work onto the same needle (needle 1), pick up and knit
15 sts along side of heel. [Editor's note: I
am not one to encourage a sloppy attitude to knitting, but... Shape the instep: 1st round:
1st needle: knit to the last 3sts, k2tog, k1. Repeat these two rounds until 60sts remain (14 on the first needle, 32 on the second needle, 14 on the third needle). Continue on these sts, (continuing the cable pattern on the upper foot
as set), until you have completed 12 cable patterns from the very beginning
of the work, or until work measures 2 inches less than the desired foot
length. Shape toe: Continue in stocking stitch only (no more cables), as follows: knit the sts from Needle 1, then knit the first st from Needle 2 and put it on Needle 1. Knit 30 sts from Needle 2, then place the last st onto Needle 3. Knit across 15 sts on Needle 3. 1st round:
1st needle: knit to the last 3sts, k2tog, k1. Repeat these 2 rounds until 32 sts remain, ending with 1st round. Then repeat round 1 twice more [24 sts]. Making up. Knit the sts from needle one, break the thread leaving a long tail. Graft
the two sets of 12 sts together. Make a second sock to match. |
MaterialsAbout 1 x 50g skein (139 metres) Phildar
Oxygene, colour 38, Neptune. One set of 4 No. 9 (3½mm) double- pointed needles. Tension23 sts x 30 rows to 4 inches measured over stocking stitch on No 9 (3½mm) needles. Size mattersThe pattern as written should fit a foot of 11 inches in length. AbbreviationsC4B: "cable 4 back"; slip the next 2sts onto a cable
needle and leave at the back of the work, k2, then k2 from cable needle. psso: pass the slipped stitch over. Effectively you are "knitting
2 together through back loops" Disclaimer
|
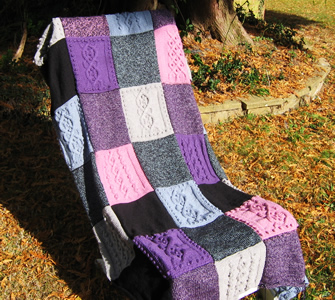
The Knitter magazine, supported by Rowan, have set up the Macmillan Comfort Blanket campaign. The idea is to knit blanket squares with your knitting group, and sew them all together at the fund-raising World's Biggest Coffee Morning* on September 25th. You can hand in your completed blankets either at a drop off point or at The Alexandra Palace show in October. Details all provided in the link.
*The coffee mornings are fund-raising events; you can register to hold one or join one. Again - details all provided in the link.
Blankets that are donated to Macmillan will be used to support and raise awareness of the charity's campaign to freeze out fuel poverty for cancer patients. I am an enthusiastic supporter of Macmillan and other cancer charities involved with care of cancer sufferers (like Maggie's). Cancer is (mainly) a disease of the old, and the unpalatable truth is that the longer we live, the more likely we all are to be affected. It is a great comfort to know that such professional and caring organisations exist to help us when we need them.
At the Macmillan
website you can see that Rowan have gained the support of top international
designers to create a square pattern for the campaign.
That is:- "top international designers" - and - the idle hands ....!
AbbreviationsMB: make bobble by knitting into the front, back, front, back,
front and back of next stitch, then pass 2nd, 3rd, 4th, 5th and 6th sts
over 1st stitch. m1: make a stitch by picking up the loop between the sts and knitting into the back of it. C4B: "cable 4 back"; slip the next 2sts onto a cable needle and leave at the back of the work, k2, then k2 from cable needle. C4F: "cable 4 front"; slip the next 2sts onto a cable needle and leave at the front of the work, k2, then k2 from cable needle. C6B: "cable 6 back"; slip the next 3sts onto a cable needle and leave at the back of the work, k3, then k3 from cable needle. T3B: "transpose 3 back"; slip the next (purl) st onto a cable needle and leave at the back of the work, k2, then p1 from cable needle. T3F: "transpose 3 front"; slip the next 2 (knit) sts onto a cable needle and leave at the front of the work, p1, then k2 from cable needle. T4B: "transpose 4 back"; slip the next 2 (purl) sts onto a cable needle and leave at the back of the work, k2, then p2 from cable needle. T4F: "transpose 4 front"; slip the next 2 (knit) sts onto a cable needle and leave at the front of the work, p2, then k2 from cable needle. T5B: "transpose 5 back"; slip the next 2 (purl) sts onto a cable needle and leave at the back of the work, k3, then p2 from cable needle. T5F: "transpose 5 front"; slip the next 3 (knit) sts onto a cable needle and leave at the front of the work, p2, then k3 from cable needle. k2tog = decrease a stitch by knitting 2 sts together. Chain and Vines Square |
MaterialsOne ball of double knitting yarn at about 100m or 108 yards in length makes about 2 squares. Rowan are supporting this initiative but you are not compelled to use their wools - you are encouraged to use wool from your stash. Size matters8 inch squares making up a 40x64 inch blanket. TensionGeneral DK tension: 22 stitches and 30 rows to 4 inches over stocking stitch. or gauge to make the 8 inch square. These bobble squares: 23 sts to 4 inches using 3¾mm needles. A Word
|
Pattern inspirations for the squares
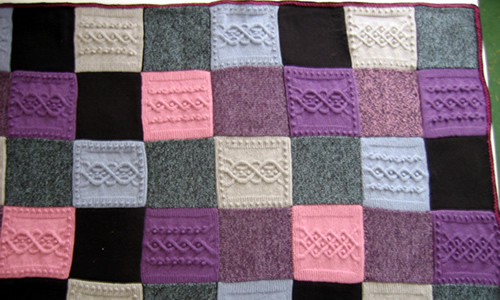
I used my squares in combination with the "Debbie Bliss Square" shown below.
|
Rather Pleasing EdgingThe method for the basic stitch pattern is as follows, assuming using a combination of DK and extra-thick chunky type wool, and working back and forth across the rows on two needles:
Row 1 (right side): Using DK and suitable needles (eg 4mm), knit. When edging the blanket, I picked up sts around the whole blanket, and I worked from the right side for all rows, so on row 4, I purled the chunky sts, and all all other rows were knitted. To achieve this with such a large number of sts round the whole blanket, I started every row with a new ball of yarn, and worked in sections, completing all rows and casting off for a section before picking up the next set of sts. I did not break the multiple yarn strands between sections. |
Cabling without a NeedleIt was while I was making the Estonian socks from the Interweave Knits Sock book that I first became aware that this was a bona fide knitting technique. Before that, I always thought it was just some dexterous manipulation that I was forced into when knitting on the train and found that I had forgotten to take my cable needle with me. Now it seems to be the technique of the moment, with a Beyond the Basics lesson on it in the 2009 autumn issue of Interweave Knits, plus a full explanation in Knitting Daily. It works like this:- for example, when cabling over 4 stitches as in C4B above, work to just before the stitches to be cabled. With the yarn at the back of the work, slip all four stitches purlwise to the right-hand needle. Bring the left-hand needle to the back of the work and insert it into the backs the two sts further from the left hand needle. Between the left thumb and forefinger, pinch the base of the four stitches firmly. Pull the right-hand needle completely free of all four stitches; half will be on the left-hand needle; half will be free for a moment. Maintaining the front/back positions as established, quickly reinsert the right-hand needle into the free stitches at the front of the work. Make sure all the stitches are seated correctly on the needle; if they are held firmly, the stitches won't have twisted or moved at all during the time that they were dropped. Finally slip the two stitches on the right-hand needle back to the left-hand
needle. The stitches are now crossed over. Knit all four sts as usual
to complete the C4B. This works well for cabling with smaller numbers of stitches (less than 6) and proved to be very useful for me while knitting these squares. |
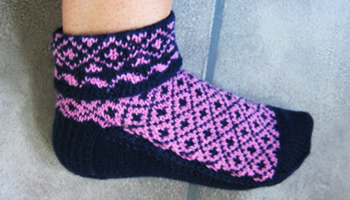
Early 1950s tennis socks originally knitted in crisp navy and white wool. I love cuffed socks but detect that some others (my sister) clearly do not. These have the design made specifically to fold down though - so there's no way out.
Instructions.The pattern works the instep and the sole separately on two needles to enable you to work the fair isle pattern across the instep only. It is not possible to achieve this in the round. However, you join the two together as you knit. Using No 12 needles with main shade (M), cast on 59 sts loosely and join in a round. Work 4 rounds in moss (also known as seed) stitch [every row k1 p1]. Next Round (increasing): K3; (m1, k8) 7 times. [66 sts] Cuff border:Change to No 11 needles and join in contrast (C) and work wave pattern border by repeating the 6 stitch pattern 10 times:
1st Round: *
k3 contrast (C), k3 navy (N); repeat from *
to end. Now continue with cuff diamond pattern, repeating the 8 stitch pattern 8 times across one round:
6th Round: *
k1(C), k2(N), k1(C), k2(N), k2(C); repeat from *
to end. Now break off C and continue with N only; change to No 12 needles and work 7 rounds knitting. Then turn the work so you are working the rounds in the other direction. This reverses the work to allow the cuff to fold over with the right side visible. Work 8 more rounds knitting; at the end of the first round knit into
the stitch below the first stitch of the round and knit it together with
the last stitch of the round to avoid a small hole in the work. Join in C, working main diamond pattern, repeating the 8 stitch pattern 8 times:
1st Round: *
k1(N), k2(C), k1(N), k2(C), k2(N), ; repeat from *
to end. These 8 rows form the pattern. Continue with N only and divide for the heel, however do not break off C. Divide for heelNext Row: Using navy wool only, knit the next 31 stitches on to one needle to work for the heel. Divide the remaining 33 sts across 2 needles, and leave to work the instep later. If you have worked the pattern correctly there will be a symmetrical set of complete patterns across the 33 instep sts. Make sure that it looks like this (you will have just completed row 5, the middle row in the picture):
[ Editor's note: If it doesn't look like this... you can compensate by knitting more or fewer sts for the heel flap until you get to the pattern boundary. Then when you purl back on the row below, follow the instructions as set to get your 30 sts. You should have your instep sts set correctly as above. If you still haven't then there is likely a mistake in your fair isle pattern.] Return to your heel sts, and turn the work so that you can work back and forth across the heel sts using 2 needles. Next Row: Purl back across 15 sts,
p2 together, purl remaining 14 sts. [30 sts]. Heel flapNext Row: *
Slip 1, knit 1; repeat from * across
all 30 sts. Repeat last 2 rows 13 times more. Turn heelTurn the heel by working short rows: Next Row: Slip the first stitch,
p16, p2tog, p1; turn. Continue in this way until all the sts have been incorporated in the row, ending with a knit row. [18 sts] Turn. Purl one row. Pick up and purl 16 sts down side of heel flap to bring the navy wool back to work the patterned instep. Leave these 16 sts along with the 18 heel sts, on a spare needle or stitch holder. Upper foot panelTake 33 sts left on needles 1 and 2, and slip them on to one needle. Continue to use the navy yarn and pick up the contrast C, which should
be waiting for you at the beginning of a purl side instep row (row 6 of
the pattern). Begin working back and forth across these 33 sts, keeping
the continuity of the pattern starting with a purl row and working from
row 6 of the chart where you left off; work alternate rows in knit and
purl. Continue for 5½ inches or 4 inches less than overall desired foot
length, ending with a knit row. Break contrast yarn, and continue in navy only. Turn the work and purl across 15 sts; p2tog; p16. Continue with wrong side facing, using another No 12 needle, pick up
and purl about 27sts from the slipped sts down the right side of the upper
foot panel, and from the edges of the first 5 rows you knitted. Using the same No 12 working needle, pick up and purl 17 sts from side of heel flap, then purl 9 sts from the heel. Using another No 12 working needle, purl the 9 remaining heel sts, and then purl the 16 sts you already picked up from the other side of the heel flap. Mark the stitch with a piece of waste wool, as before. Continuing with this needle, purl along the left side of the upper foot panel, picking up 27 sts from the edges of the first 6 rows you knitted and from the slipped edge sts.
The work is arranged on 3 needles. The picture shows the working needle
in the process of knitting across the sole,
and the waste wool markers in white. Purl across the 32 sts at the top of the panel. Then using one of the
spare needles, purl down the right side of the panel again, as far as
the stitch marker.] Do not turn the work. SoleUsing the No 12 working needles, you are going to knit back and forth across the sole (between the markers) in stocking stitch, knitting the last stitch from each row together with one stitch from the upper foot panel. 1st Row: (Wrong side facing) Slip1,
p24 from first needle, (16 sts up side of heel and 9 sts from heel flap),
then purl 24 sts from second needle, up to 1 stitch before the stitch
marker. Purl the last stitch of the sole section together with the first
of the instep sts. [50sts between the markers] 2nd Row: (Right side facing) Pass
the waste wool marker between the sts. Slip 1, ssk2tog; knit to the last
3 sts before the marker; k2tog, ssk the last stitch of the row together
with the next instep stitch as before. [48sts between the markers] Turn. Repeat 2nd and 3rd rows, shaping the sole by decreasing 2 sts on the knit rows, until 28 sole sts remain between the markers. Then continue without shaping as follows (continuing to weave in the markers as before): Next Row: Slip 1, purl to the last
stitch before the marker; purl together the last of the sole sts with
the first instep stitch as before. Repeat the last 2 rows until all the sts from the sides of the upper
foot have been joined to the sole. Do not join any of the sole sts to
the 32 sts left on the 4th needle at the end of the panel. ToeNow you continue to work the sole and upper foot sts together in a round, as follows: With right side facing, using your working needle (needle 1), knit across
32 sts from the upper foot. Knit the next 14 sts from the sole on to the
next needle (needle 2), and knit the final 14 sts from the sole on to
the next needle (needle 3). You have 60 sts arranged with 30 sts on needle 1, and 15 sts on each off needles 2 and 3. Continue to work in rounds as follows: [ Editor's note: This is where you can adjust the length of the foot if your feet have not grown to a multiple of half inches. Work a couple of extra plain rounds here before starting the decreasing.] 1st Round: Needle 1: k1, ssk2tog;
knit to the last 3 sts; k2tog, k1. Repeat rounds 1 and 2 until 24 sts remain. Slip the sts from needles 1 and 2 on to one needle and graft together with the sts on needle 3. Making upSew in all ends. Fold down cuff. |
Materials4 ply: 2 ozs navy, 1 oz contrast colour. One set each of 4 double pointed needles (dpns) size 11 (3mm) and 12
(2¾mm). Tension30 stitches and 32 rows to 4 inches over pattern. Size mattersLength from top to bottom of heel, top turned down, 5 inches; length of foot 9 inches (adjustable). AbbreviationsN is main shade (navy). m1: make one by picking up the loop between sts and knitting into the back of it ssk/ssk2tog: (slip, slip, knit) - or (slip1, knit 1, pass the slipped stitch over). Effectively you are "knitting 2 together through back loops".
A Word
|
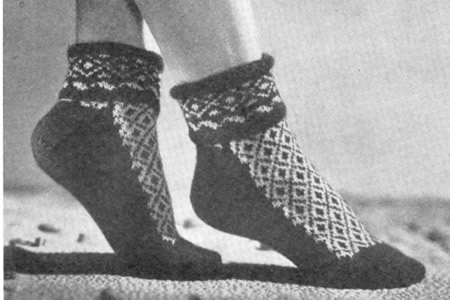
Original photo from Stitchcraft April 1950, constructed using a different pattern on 2 needles with seam under sole. Generally, seams in socks are avoided so they are more comfortable to wear; a seam right under the ball of the foot cannot be ideal as sportswear. I imagine these socks were for visual impact rather than practicality.
I was inspired to make these mitten patterns by brightly coloured offerings from 1975. This is the posh version, even cuter than the intarsia version I think.
They are a close fit on my hands, but though my hands are small, I tend to have short fingers only; the measurement around my hand is just over 7 inches.
Instructions:Begin working the RIGHT GLOVE: Thread 12 beads on to the yarn. Cast on 48 stitches, using "backward loop method" as follows: loop 2, slide a bead up next to the loops; loop 4, slide next bead into place; slide next bead into place; and so on to the last bead and then end with loop 2 [48 loops].
Knit one row. Begin fancy rib as follows: 1st round: *
P1, k2, p1, k2, p2; repeat from * to end
of round. 6th (cable) round: *
P1, CB5 (cable over 5 sts "back" by slipping the next 3 sts
on to a cable needle and leaving at the back of the work; k2, then (p1,
k2) from cable needle), p2; repeat from *
to end of round. Thumb gusset 1st round: K24, p1, k2, p1, k20. Now set aside the thumb stitches and continue with the main glove - at the same time work the first row of the pattern from the chart, setting the position of the beaded hearts as follows, repeating the 9 pattern sts 3 times: Row 1: K4; hook bead and slip this
beaded st, passing the yarn behind, and pulling it firmly as you go into
the next st; (k8, hook bead) twice; k5; slip the next 18 sts on to a safety
pin; cast on 2 sts, k24 to complete the round. [54 sts]
Continue straight, working from the chart for the 9 rows, and completing the three hearts. Row 10: K1, m1, k52, m1, k1. [56 sts] Work 4 rows straight. Divide for fingers Next round (forefinger): Knit
the first 20 sts of the round and place on a stitch holder; place the
last 20sts of the round on a second stitch holder; Knit 16; cast on 2
sts. [18 sts] Next round (middle finger):
Slip the last 7sts on the first stitch holder (the ones nearest to the
forefinger) onto a needle and knit them; pick up and knit 2 from the cast
on sts at the base of the forefinger; slip the first 7sts on the second
stitch holder (the ones nearest to the forefinger) onto a needle and knit
them; cast on 2 sts. [18 sts]. Next round (third finger): Work and complete as for middle finger. Next round (little finger):
Pick up 2 sts at the base third finger; slip the remaining 6 sts on the
second stitch holder onto a needle and knit them; slip the remaining 6
sts on the first stitch holder onto a needle and knit them. [14sts] Thumb: LEFT GLOVE: Thread 12 beads on to the yarn, cast on 48 stitches, and knit one row,
as for right glove. Begin fancy rib as follows: 1st round: *
P2, k2, p1, k2, p1; repeat from * to end
of round. 6th (cable) round: *
P2, CF5 (cable over 5 sts "forward" by slipping the next 2sts
on to a cable needle and leaving at the front of the work; k2, p1, then
k2 from cable needle), p1; repeat from *
to end of round. Thumb gusset You work the thumb gusset in the same way as you did for the right glove, but set the position of the thumb differently as follows: 1st round: K20, p1, k2, p1, k24. Continue in this way as for right glove, but following the stitch layout as set until you reach row 25. 25th and 26th rounds: K23, p1, k18, p1, k27. [70 sts] Now set aside the thumb stitches and continue with the main glove - at the same time work the first row of the pattern from the chart, setting the position of the beaded hearts as follows, repeating the 9 pattern sts 3 times: Row 1: K24; slip the next 18 sts
on to a safety pin; cast on 2 sts; k5; hook bead and slip this beaded
st, passing the yarn behind, and pulling it firmly as you go into the
next st; (k8, hook bead) twice; k4. [54 sts] Once you have set the position of the thumb and the bead hearts, you can work the rest of the left glove exactly as for the right glove. Making up: |
MaterialsExample shown is knitted in 1 x 50g ball Sunbeam St Ives 4 ply in cream 3103. One set of 4 No. 12 (2½ mm) needles. A tiny crochet hook for placing the beads. 66 beads size 6/0 TensionApprox. 32sts and 44 rows to 4 inches on No 12 needles. Size mattersWidth all round above thumb, 7 ins. To alter the size use larger or smaller
needles as required. A word on the woolThe wool I used was from my store room. BeadingFor those of you who think "Less is More" you might prefer to work a single bead heart, positioned on row 20, with the first bead on the 7th st from the edge. Disclaimer
|
Cast on loop method |
|
Hooking Beads.This method means you don't have to pre-string the beads on your yarn - I think it is good for placing a few beads amid a lot of knitting, when you don't want to carry just a few beads across miles of yarn before you use them, and you also don't want to break your thread. This information appeared in Knitty.com. (Spring 2006 edition) in an article by Sivia Harding.
|

I was inspired to make these mitten patterns by brightly coloured offerings from 1975. By the time I had tried out a number of versions - and had many more examples of right-hand gloves than I want or need - my final designs differ substantially from the original. But they are cute aren't they?
They are a close fit on my hands, but though my hands are small, I tend to have short fingers only; the measurement around my hand is just over 7 inches.
Instructions:Begin working the RIGHT GLOVE: Using contrast colour, cast on 48 stitches; purl one row, and join into a round. Change to main colour and knit one row. Thumb gusset 1st round: K24, p1, k2, p1, k20. Now set aside the thumb stitches and continue with the main glove as
follows: Work 2 rounds straight. Cut 6 lengths of contrast wool, about 28 inches in length, and 6 of main
shade; do not use bobbins, just the lengths of wool.
Row 1: K4 from the ball of main shade, k1 using first strand of contrast yarn, k8 using first strand of main shade, k1 contrast using second strand of contrast, k8 using second strand of main shade, and so on the the last 4 sts; k3 in last strand of main shade, slip the last st. Still using the last working needle, pick up the st below the first st of the round and knit into it, then pass the slipped st over this st. Turn the work.
[Editor's note: Use the pop-up from the above picture for more detailed photos of this technique.] Row 2: P3 in main shade, p3 in contrast,
p6 in main shade, and so on; use the intarsia method
and twist the two yarns together when you change colour. Continue in this
way until you get to the last stitch in the row, and slip this stitch.
Still using the first working needle, pick up the st below the last st
of the round and purl into it, then pass the slipped st over this st.
Turn the work. Now go back to working in the round, and continue in main shade only,
using the main ball of wool. Divide for fingers Next round (forefinger):
Knit the first 20 sts of the round and place on a stitch holder; place
the last 20sts of the round on a second stitch holder; Knit 16; cast on
2 sts. [18 sts] Next round (middle finger):
Slip the last 7sts on the first stitch holder (the ones nearest to the
forefinger) onto a needle and knit them; pick up and knit 2 from the cast
on sts at the base of the forefinger; slip the first 7sts on the second
stitch holder (the ones nearest to the forefinger) onto a needle and knit
them; cast on 2 sts. [18 sts]. Next round (third finger): Work and complete as for middle finger. Next round (little finger):
Pick up 2 sts at the base third finger; slip the remaining 6 sts on the
second stitch holder onto a needle and knit them; slip the remaining 6
sts on the first stitch holder onto a needle and knit them. [14sts] Thumb: LEFT GLOVE: 1st round: K20, p1, k2, p1, k24. Continue in this way as for right glove, but following the stitch layout as set until you reach row 25. 25th and 26th rounds: K23, p1, k18, p1, k27. [70 sts] Now set aside the thumb stitches and continue with the main glove as
follows: Once you have set the position of the thumb, you can work the rest of the left glove exactly as for the right glove. Making up: |
MaterialsExample shown is knitted in 1 x 50g ball 4 ply in main shade, and small amount of contast colour. One set of 4 No. 12 (2½ mm) needles. TensionApprox. 32sts and 44 rows to 4 inches on No 12 needles. Size mattersWidth all round above thumb, 7 ins. To alter the size use larger or smaller needles as required. A word on the woolThe wool I used was from my store room. IntarsiaHere is a nice little video clip about intarsia knitting. Don't be put off by her continental knitting method. Disclaimer
|
|
Intarsia.Text and Pictures taken from Ethknits "How to knit" page. Hold the working yarn in your right hand and the yarn to be woven in your left. |
|
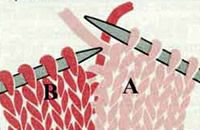 |
 |
|
Changing on a knit row: Knit with yarn A until you want to change. Pull yarn A over to the left and wrap yarn B across the back of A as you knit the next stitch. |
Changing on a purl row: Purl with yarn A until you want to change. Pull yarn A over to left and wrap yarn B under A as you bring it across to purl the next stitch. |
|
You can see from the purl row picture that the edge resembles a sideways knitted row as on each row you cross the yarns over. This way you should get no holes. Don't worry if you see holes where the yarn is loose in some places. When you finish your work you will have lots of ends to sew in and you can pull these tight and sew up any holes that still appear. |
|
Speedy, speedy knitting from the 1970s. Flattering sleeveless top, warm and simple to knit.
Instructions.The pattern is worked back and forth on circular needles, in 5 stitch repeats over four basic rows: 1st Row: Wrong side facing, {p3,
k2}. Body:Note: The back and fronts are knitted as one piece up to the armholes. With smaller circular needles cast on {100/110}120 stitches and work 6 rows in garter stitch, noting that the first row is a wrong side row. Next Row: (Wrong side facing, 1st
pattern row), knit 4 and slip this 4 sts on to a safety pin or stitch
holder. Change to larger circular needles and commence pattern thus: k2,
*p3,k2; repeat from *
to the last 4 sts. Turn, slipping the last 4 sts onto a safety pin, without
knitting them. [{92/102}112 pattern sts] Next Row: (2nd pattern row), p2, *k1, yfwd, slip1, k1, psso, p2; repeat from * to end. Next Row: (3rd pattern row), as first pattern row. Next Row: (4th pattern row), p2, *k2tog, yfwd, k1, p2; repeat from * to end. Continue in pattern for 10 inches (or desired length), ending with a
4th row pattern, and wrong side facing to begin the next row. †† Leave the main work on the circular needles to one side now, still with wrong side facing - the row you have just knitted is not completed until after you make the front borders. Front Borders:At this point you need to go back to the 4sts you left on safety pins on each side of the work, to make the front borders. Using the pair of smaller needles, and working each set of 4sts separately, rejoin the wool and continue to knit the borders; it is important you join the wool and start knitting from the correct side of each border to continue in the right sequence for garter stitch. This means that, provided you have followed the instructions exactly
as above, for both borders, you need to join the wool at the edge which
will later be sewn to the main body. Work each border in garter stitch until, when very slightly stretched,
the border fits the length of the main body that you have just knitted,
finishing the left border on a wrong side row, and the right border on
a right side row. For both borders the yarn end will be at the edge next
to the main body. Break the yarn. Now return to your main work, on the circular needle. With wrong side facing, take up your last row of plain knitting (see the marker above ††) and complete the row by knitting the 4 sts of the right front border - make sure the border is not twisted. [{96/106}116sts]. Turn the work (right side facing) and knit across all {96/106}116 sts and then complete the row by knitting the 4 sts of the left front border - make sure the border is not twisted. [{100/110}120sts]. Now divide for front and back, with wrong side facing, knit the
first {25/29}32 sts (includes your extra
4 sts at front border) and place these sts on a stitch holder, to make
the left front, later. Continuing without turning, cast on 3 sts using the working yarn, knit
these 3 sts, knit {46/52}56 sts cast on 3
sts. Leave the remaining 32 sts on a stitch holder, to make the right
front, later. [{52/58}62 sts]. Back:With right side facing, work straight in garter stitch (every row plain)
for 8 inches (or the required length for the arm hole), ending with right
side facing. Shape shoulders by casting off {3/3}3 sts at the beginning of the next 4 rows, {3/4}4 sts at the beginning of the following 2 rows, {4/4}5 sts at the beginning of the following 2 rows, and {4/5}5 sts at the beginning of the following 2 rows, and leave the remaining {18/20}22 sts on a stitch holder. Left front:With right side facing return to the left front, slipping the {25/29}32 sts you left on the stitch holder back on to a left hand working needle. Rejoin the wool at the armhole edge to start your next row.
[Editor's note: it
is worth double checking here that:
If you have completed the steps as written, this should be how it works out.] Cast on 3 extra sts with the working wool; knit across these 3 sts followed
by the {25/29}32. [{28/32}35
sts]. Continue to work in garter stitch until 8 rows less than on back
have been worked to the start of the shoulder shaping, ending at the armhole
edge with right side facing to commence the next row. ** Shape shoulder by casting off {3/3}3
sts at the beginning of the next and following alternate row, {3/4}4
sts at the beginning of the following alternate row, {4/4}5
sts at the beginning of the following alternate row, then cast off the
remaining {4/5}5 sts. Right front:With wrong side facing return to the right front, slipping the {25/29}32 sts you left on the stitch holder back on to a left hand working needle. Rejoin the wool at the armhole edge to start your next row. [Editor's note:
it is worth double checking here that:
If you have completed the steps as written, this should be how it works out.] Cast on 3 extra sts with the working wool; knit across these 3 sts followed by the {25/29}32 sts, [{28/32}35 sts]. Commence working in garter stitch and make buttonholes on the following 6th and 28th (wrong side) rows as follows: Buttonhole row 1: (wrong side), knit
to the last 6 sts, cast off 2, knit to end. Continue to work in garter stitch until 8 rows less than on back have
been worked to the armhole edge, ending at the armhole edge with wrong
side facing to commence the next row. Work to complete the right front exactly as the left from ** to **. Neck Border:With right side facing and smaller needles, starting at the top of the
right front border, k{8/9}10 sts from stitch
holder, pick up and k9 sts up right side of neck, k{18/20}22
sts from back neck, pick up and k9 sts down left side of neck, then k{8/9}10
sts from stitch holder. [{52/56}60 sts].
To Make UpPress very lightly on wrong side under a damp cloth. Join shoulder seams,
using a flat seam, (or by grafting, working from the wrong side and making
a purl ridge on the right side). |
|
MaterialsAbout 7 x 100g balls of a chunky or "big" wool that knits to
the required tension on 7½mm needles. No 2 (7mm), and No 1 (7½mm) circular needles. Two 1½ inch buttons. Tension11sts x 16 rows to four inches measured over stocking stitch on 7½mm needles. Size mattersI made the main size shown in black text, which is a slightly large on me (UK size 12-14, maximum size 38 inches). The original pattern was multi-sized, so I have included {2 smaller size options}, in red ink with curly brackets, as shown. They are sized to fit {34/36}38 inches, and actual sizes more like {35/38}42 inches. Length from top of shoulder in my version is approximately 21 inches. See "adapting the size". A word on the wool.I used a pure wool Aran knitted double throughout, and this was about 450m as if knitted with a single strand of bulky wool. Original knitted in Patons Pablo. Abbreviations: yfwd: yarn forward - bring the yarn to the front of the work and when you knit the following stitch, you will have created an extra stitch, in a way that makes a decorative eyelet hole. "Yarn forward" or "yarn over needle" is often used in conjunction with knitting 2 sts together (so you avoid increasing the overall number of sts) in knitted lace patterns.
garter stitch: the simplest stitch pattern of all - every row is knittted, (when worked back and forth on two needles), and the back and the front of the work look the same. It makes a fabric that stretches vertically. Disclaimer
|
|
Adapting the size:Altering the size is fairly simple, as you are knitting a big rectangle, with the pattern being a 5 stitch repeat. Working to the required gauge, means that every addition of 5 sts gives you almost 2 inches extra room. Once you get to divide the work, you change to working garter stitch (no pattern), and can work it out so that half the sts go to make the back, leaving a quarter each for the two fronts. If you do not have stitches divisible exactly by four you can put the extra ones into the back, and incorporate them into the back neck. |
|
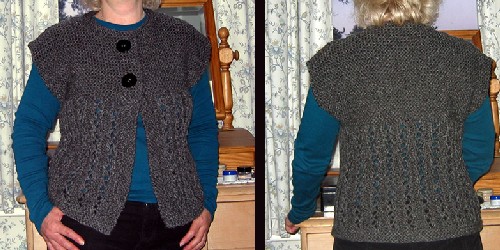
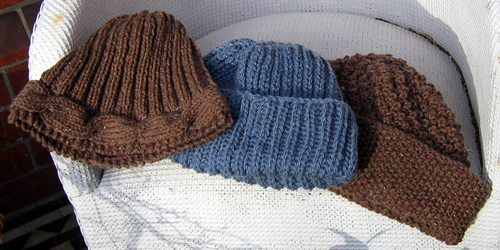
This wasn't my intended pattern for April, but I received a leaflet through the post telling me about the Sailors' Society [**please see footnote at the end], who are launching their woolly hat campaign for 2008. The campaign's aim is to provide seafarers arriving in the UK, (from foreign climates and thus ill-prepared for our weather), with hand-knitted hats to keep warm. Also worth noting is that these sailors often spend many months at sea in harsh conditions, sometimes not even speaking the same language as their colleagues, and these gifts can give a feeling of belonging and overcome feelings of isolation.
Last year's Woolly Hat Campaign saw over 15,000 hats distributed to seafarers throughout the UK and to Russia, Antwerp and South America, with over 6,000 given as part of Christmas packages.
If this inspires you, here are some patterns.
If you don't like any of these three hat patterns I have given for this month, the Yarn Harlot has an excellent free pattern for a "seriously quick hat".
** Please note that the Sailors Society does seem to be a religious organisation, which I mention not through any disapproval on my part, but in case you would care to look at their website and ensure its aims do not go against anything you believe in.
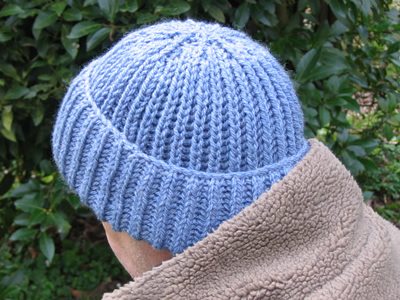
This is my favourite hat of the three this month. It's simple, warm, comfortable, and looks like a serious seafarer's hat! Even though I don't like knitting rib that much, and Fisherman's rib means you have to put in a lot more knitting to get the length you need.... it was nonetheless very satisfying.
InstructionsWith No. 6 (5mm) circular needle cast on 68 stitches, and join into a
round, and purl the first round. Place a stitch marker to mark the beginning
of the round. 1st round: *
K1B (knit one below, by knitting into the stitch below the next stitch,
and slipping both sts off the needle together); p1. Repeat from *
to end of round. These 2 rounds form the pattern. Continue in pattern until work measures 9inches from the beginning, ending with round 2. Shape Crown as follows, keeping continuity of the pattern: Next round: (K3tog; p1,k1,p1) 11
times; k2tog. [45 sts] Break yarn, thread through remaining sts; draw up and fasten off securely. Making up: Changing the hat size, or substituting the wool.You may want to alter the size (circumference) of your hat, or compensate for a different gauge. Simply work out how many sts you need to cast on according to your own
gauge eg divide the number of sts by 16 and multiply by the number of
sts you knit to 4 inches. A word on the wool.If you work in pure wool you may need more than my stated quantities of yarn. Fisherman's rib is a very yarn-hungry stitch which produces a satisfying elasticated bulky fabric, by effectively knitting the yarn double, (nice and warm!). Original pattern called for 3 x 50g balls Patons Husky Chunky, which
is a pure wool chunky; the blend I used, no doubt, has a better yardage. |
MaterialsExample shown is knitted in 3 x 40g balls of vintage Argyll Ferndale Shetland Chunky (an acrylic and wool blend). Size 6 (5mm) and circular needle - short length suitable for a hat. TensionApprox. 8st to 2 inches on No 6 (5mm) needles. Size mattersThere is a lot of give in the ribbed stitch, making the sizing very flexible. Disclaimer
|

A 1970s hat using blackberry stitch, with a moss stitch brim. George did not think this was very "manly", but I leave that artistic decision to you, [George has also had experience of "life on the ocean wave" and says that as long as it's warm it will be welcome].
InstructionsWith No. 6 (5mm) circular needle cast on 89 stitches, and work in rounds of k1, p1, moss stitch for 3 inches. Increase 7sts evenly across the last row. [96 sts] Change to No. 4 (6mm) circular needle and work pattern as follows: [Editor's note: this pattern (blackberry stitch) is worked over groups of 4 sts, and the hat is knitted up from the wrong side throughout.] 1st round: (wrong side) Knit. These 4 rows form the pattern. Continue in pattern until work measures 8½ inches from the beginning, ending with round 4. Shape Top as follows, keeping continuity of the pattern: Next round: K1 *k2,
k2tog. Repeat from * to last st., k1. [72
sts] Next round: *K2tog,
k1. Repeat from * to end of round. [48 sts] Break yarn, thread through remaining sts; draw up and fasten off securely. Making up: Changing the hat size, or substituting the wool.You may want to alter the size (circumference) of your hat, or compensate for a different gauge. Simply work out how many sts you need to cast on according to your own
gauge eg divide the number of sts by 18 and multiply by the number of
sts you knit to 4 inches. Do the same calculation when increasing for the blackberry stitch, taking note that your number of sts needs to be divisible by 4. Example:
I have a gauge of 18 sts to 4 inches on no UK 6 (5mm) needles. Cast on 89 sts becomes 89/18*15 = 74, and you cast on 75, as it needs to be an odd number. Increase evenly to 96 sts becomes 96/18*15 = 80. |
MaterialsExample shown is knitted in 2x 50g balls of vintage Richard Poppleton Emmerdale Chunky Tweed (an acrylic and wool blend). Size 6 (5mm) and size 4 (6mm) circular needles - short length suitable
for a hat. TensionApprox. 9st to 2 inches on No 6 needles. Size mattersThis hat worked out to about 22 inches head circumference. My estimate
is that "to fit an average sized head" means 22/23 inches for
a man's size and 20-22 inches for a woman's size. A word on the wool.Original pattern called for Patons Husky Chunky, which was, I think a
pure wool chunky, somewhat bulkier than the one I used. Disclaimer
|
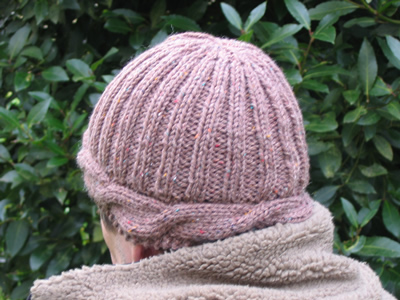
This 1970s style hat is constructed by knitting a cabled band and then picking up stitches to knit the rest of the hat - which in this example is ribbed. This version is is not intended to have a turned back brim; if you want one, then you must knit the rib section longer; you will not have to reverse any workings as the rib section is reversible, so could be worn either way out. The single layer construction is very economic on yarn; For my wool/acrylic blend, I used 58g.
InstructionsWith No. 5 (5½mm) needles cast on 11 stitches, and work in cable
pattern as follows: 1st row: (wrong side) K3, p6, k2. 9th - 14th rows: Repeat 1st and second rows 3 times. Repeat 1st - 14th rows 8 times more (9 patterns in all) ending with row 13. Graft the sts to the cast-on edge to form a circular band, [or cast off the 11 sts and sew the cast-on to the cast-off edge]. [Editor's note: If you want to alter the size (circumference) of your hat, now is the time to do it. Lengthen or shorten this band to the circumference you want to achieve. See "altering the size" below.] One edge of the band has a neat "finished" garter st edging
and the other has a reverse stocking stitch edge, which you will use to
continue knitting the hat in the round. Work in rounds of k2, p2 rib for 5 inches (about 28) rows. Shape Crown as follows: 1st round: *K2tog,
p2. Repeat from * to end of round. Repeat rounds 2 five times more. 8th round: *K1,
p2tog. Repeat from * to end of round. Break yarn, thread through remaining sts; draw up and fasten off securely. Making up: Changing the hat size, or substituting the wool.You may want to alter the size (circumference) of your hat, or compensate for a different gauge. This pattern relies on making an even number of cables around the hat, so to lengthen or shorten the band, you can either add in whole or partial pattern repeats, or, if you feel up to it, you could alter the number of rows in the pattern repeat of the cable. Test your gauge before you start and work out how many rows you need to make your chosen head circumference size. Start by dividing the number of rows you calculate by 14, and then try some other numbers, eg 12, 16, 13, or 15, until you are close to getting an exact number of patterns. [Note that if you choose to work to an uneven number of rows in the repeat, then you will end up doing your cable operations on purl rows, which is quite feasible, but approach with caution if your are a beginner in this field!] If the above all sounds hopeless to you, then just knit until the band is the length you require, and just sew the ends of the band together rather than trying to graft it. You could even work the hat on two needles instead of in the round, by picking up the stitches from the band before you sew it up, - and then, when you have finished, you sew a side seam into the hat, including the band. Finally if you are altering the size, or compensating for a different
gauge, you will probably need to pick up a different number of stitches
from the band. I usually pick up a number of stitches equal to three quarters
of the number of rows I have knitted. |
MaterialsExample shown is knitted in 2x 50g balls of vintage Richard Poppleton Emmerdale Chunky Tweed (an acrylic and wool blend). Two size 5 (5½mm) needles and a size 6 (5mm) circular needle - short
length suitable for a hat. TensionApprox. 9st to 2 inches on No 6 needles. Size mattersThis hat worked out to about 22 inches head circumference. My estimate
is that "to fit an average sized head" means 22/23 inches for
a man's size and 20-22 inches for a woman's size. A word on the wool.Original pattern called for Patons Double plus, which was a double knitting
wool, and the instructions were to knit the yarn double, producing a tension
of 7.5sts and 10 rows to 2 inches. Disclaimer
|
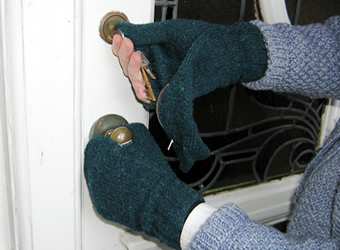
These are double layered mittens which have suddenly become popular again (probably more the height of fashion a year or so ago - as well as half a century ago). This pattern is from February 1940. Here the thumb is left free; in some designs of this era, the thumb and forefinger are left free - your "trigger finger " I assume.
"The glove mitts are a sensible idea, ensuring both warmth and freedom of movement. Instructions are given for both men's and women's sizes".
The different sizes are achieved by using different wool weights and needles.
Instructions (both hands alike)Using No. 14 (2mm) needles cast on 48 stitches, and work in k2, p2 rib in rounds for 2½ inches. Next row: Knit twice into every stitch. Now slip every alternate stitch (ie every "made" stitch) on to No 12(11) needles and leave the original 48 sts on the No14 needles on the outside of the work.
[Editor's note: The
original instructions expect you to continue to knit on the larger needles,
leaving the outer sts on the No 14 needles. I found this very awkward;
I thought it would improve as I got further up the glove but it did not. Continue on the No 12(11) needles, on the "made" sts, in rounds of plain knitting, and work 2 rows straight. 3rd round: Knit twice into first
st, knit to the last st, knit twice into it. 6th round: Knit twice into first
st, knit to the last 2sts, knit twice into next st, k1. 9th round: Knit twice into first
st, knit to the last 3sts, knit twice into next st, k2. Continue in this way, increasing on every 3rd row at either side of the
thuumb, until there are 66 sts on the needles. Divide for thumb Continue on these 20 sts for 22 rounds. Rejoin wool to continue with the main part of the mitten: Work 18 rounds straight on these 54 sts. Divide for fingers Work 3 rounds straight on these 20 sts, then work 4 rounds k1, p1 rib. Cast off loosely in rib. Next round (middle finger): Remove the waste wool and pick up 4 sts at the base forefinger. Knit first 6 sts from holder; cast on 4 sts in waste wool and knit them onto the working needle; slip the last 6 sts on holder onto a needle and knit them. [20sts] Complete as for forefinger. Next round (third finger): Work and complete as for middle finger. Next round (little finger): Remove the waste wool and pick up 4 sts at the base third finger, and knit the remaining 14 sts from holder. [18sts] Work as before over these 18 sts. Over-mitten Next row (right side facing): K2tog;
k21; k2tog; k21; k2tog. Continue in stocking stitch, decreasing as for 7th row on every 6th row
until 37 sts remain. Making up 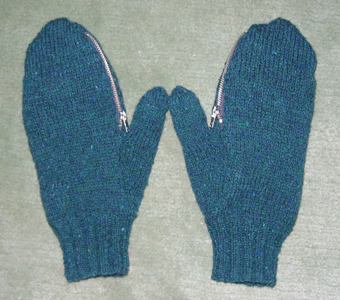
|
MaterialsExample shown is knitted in 3 x 25g balls Rowan 4ply Tweed. Set of 4 each of numbers 14, 12 and 11 (UK size) needles for the smaller
size, and 14, 11 and 10 for the larger size. Two 4-inch zip fasteners. TensionApprox. 8st to 1 inch Rowan 4ply tweed tension: 28st and 40rows to 4 inches (10cm) using No
11 (3mm) needles. Size mattersTo fit size 6¼-7, or 7½-8½ inch hand. A word on the wool.Original calls for 2oz 3 ply for girl's size [sic] and 3oz 4ply for man's
size. Disclaimer
|
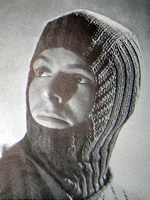
This 'good old Balaclava helmet' was included in the item "More Knitteds for the Forces".
I know - they are nice and warm - and they can be useful on the slopes - but I'm given to understand that beanies are more the thing currently, so I have spared you the details!
Let me know if, (your imagination no doubt fired by the hunk on the left), you want to knit it.
I'm afraid I also have to report that George says these are the silliest mittens he has ever had. Good thing he was not called upon to be in the Home Guard 50 or more years ago, eh?.
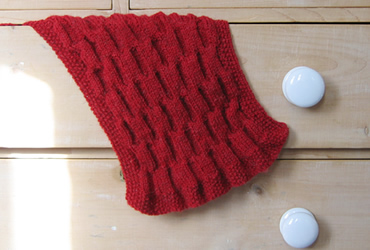
"Reversible scarf for the cold days ahead". This is a very pleasing pattern from October 1963, and is a suggestion for "pre-Christmas plans". The pattern is the same on both sides, so great for a scarf, and can be knitted in basically any wool weight; ensure you use needles a couple of sizes larger than normal for whichever weight you choose, and do a proportional calculation on the gauge, so your scarf is not too wide.
InstructionsCast on 73 stitches. First row: K1, * p1, k1; repeat from * to end. Repeat this row for the moss stitch border 8 times more. 10th (increase) row: Moss 8, (increase in the next st, moss 6) 8 times; increase in the next st, moss 8. [82 sts] Change to pattern rows as follows: 1st row: moss 5, p3, *k6,
p6; repeat from * to last 14sts; k6, p3,
moss 5. 11th row: moss 5; *slip
the next 3 sts on to a cable needle to the back of the work; k3, p3 from
cable needle; slip the next 3 sts on to a cable needle to the front of
the work; p3, then k3 from cable needle; repeat from *
to last 5sts; moss 5. 23rd row: moss 5; *slip
the next 3 sts on to a cable needle to the front of the work; p3, then
k3 from cable needle; slip the next 3 sts on to a cable needle to the
back of the work; k3, p3 from cable needle; repeat from *
to last 5sts; moss 5. These 24 rows form the pattern. Continue straight until the work measures 46 ins, ending with a 12th or 24th pattern row. Next (decrease) row: moss 8 *k2tog; (p1, k1) 3 times; p2tog, repeat from * 3 times more; k2tog; (p1, k1) 4 times. [73sts]. Work 9 rows moss stitch over all stitches. Finishing - Press work very lighty, taking care not to spoil th texture of the patttern. Cut the remainig wool into 7½ inch lengths; take 3 lengths of wool together each time, fold in half, and, with a crochet hook, knot through short ends to make a fringe. Trim fringe. Substituting the wool - I used a vintage wool,
Phildar Brisants. This is a fine double knitting, which is normally knitted
on no. 9 (3¾mm) needles. The cabling make for a tighter tension,
and the recommended needles (UK No 6) are 2 sizes larger than usual for
a DK. I went with no. 8 needles, instead of 9s, but should have gone larger
I think. If you want to use chunkier wool, then decrease the number of sts proportionally. The pattern is worked over 12sts. |
MaterialsOriginal call for 9oz of Patons Moorland Double Knitting Example shown is knitted in Phildar Brisants. One pair of No. 6 (5mm) needles. TensionEquivalent to 20st and 26rows to 4 inches (10cm) measured over stocking
stitch. Size mattersWidth: 12 inches A word on the wool.This pattern is for double knitting wool, and from memory Moorland DK
was slightly heavy-weight. Disclaimer
|
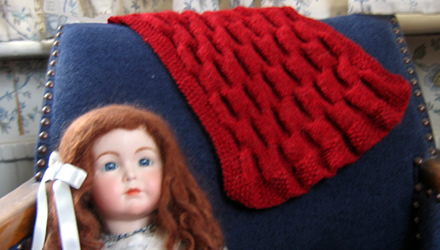
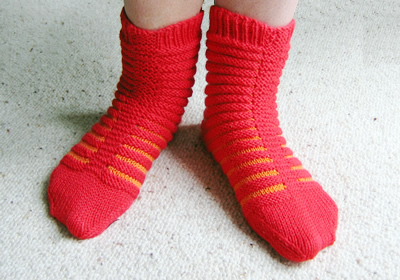
Three offerings this month: this first pattern from 1968 is very similar in design (and the principle of the stretchy fit) to the second offering, Boudoir Boots; however these socks are knitted in a different (more conventional) orientation. They particularly appeal to me, being very jolly, knitted in stripes, (although, as a general rule, I prefer my socks wide awake...).
InstructionsMake two socks alike. Main body - With main shade (M) cast on 56 stitches, and arrange across 3 needles (19 on each). Work as follows: Rib round: k5, * p1, k1; repeat from
* to last stitch, p1. Repeat this round 10 times more. ** Repeat from ** to ** 13 times more, and then work the 12th, 13th and 14th pattern rows again Break C. Work the toe - Continuing in M only, re-arrange the sts over the
3 double pointed needles as follows: You now have 56 sts in the round. Next round: knit to the last 3 sts on the first needle, sl1, k1,
psso, k1. Beginning the second needle, k1, k2tog, knit to the last 3 sts
on the second needle, sl1, k1, psso, k1. Beginning the third needle, k1,
k2tog, knit to end of round, [52 sts]. Continue to decrease on every alternate round in this way until 24 sts
remain. [8 on the first needle, 12 on the second needle, 4 on the third
needle]. Making up - slip the last 4sts of the round on to the first needle
and graft
the two sets of 12 sts together to make the toe. 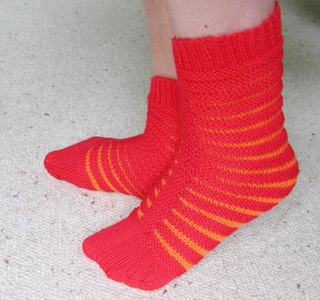 |
MaterialsOriginal pattern calls for a total of 2 (1oz) balls of 4ply - 1 ball in each colour. One set of 4 double pointed No 11 needles. Tension30st and 38 rows to 4 inches (10cm). Size mattersOne size fits all. A word on the wool.Original knitted in Patons 101 Courtelle Crepe in "Venus blue" and "Starlight white". Example knitted in Phildar Lambswool (51% wool, 49% acrylic), colours rouge and melon. |
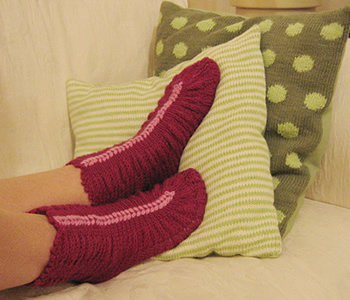
Second pattern this month from an "Oddments" leaflet for "using up old Scraps of Wool", dating anywhere between the 1930s and the 1950s. Described originally as Lady's Bedsocks*, I hope they will prove to be the perfect partner for Boudoir Bedjacket.
*One of the other patterns was called "Bedroom Boots" and I couldn't resist the alliteration; however, this pattern described here makes footwear that is much more elegant than either "bedsocks" or "boots" implies. They look at their best when on the feet, (as opposed to just after you have knitted them, when they look like a pair of unattractive caterpillars). It is hard for me to date the design, as many patterns were reproduced out of their true era; possibly an expert on publishing could be more accurate.
InstructionsEach sock is worked in one piece. Make two alike. Commence at the front edge. Using No. 12 needles, cast on 64 stitches,
and work 6 rows in k1, p1 rib. ** Change to No. 12 needles. Work 6 rows in k1, p1 rib. Making up - Press each piece lightly on the wrong side under
a damp cloth with a hot iron. Crochet edging - Using the main colour, work a picot edge all around the top of each of the socks, as follows: One slip st to secure the yarn to the top front edge. Embroidery |
MaterialsOriginal pattern calls for 2oz of 4ply, and a small quantity of contrast
for embroidery. One pair each of number 12, an No 6 needles. Tension20st to 4 inches (10cm) on No 6 (5mm) needles. Size mattersOne size fits all. A word on the wool.Baby Cashmerino is heavier than a 4ply, knitting to a tension of 25st and 34 rows to 4 inches. Thus I used more yarn than the original pattern. Each 50g is 125m, and I used 90g. |
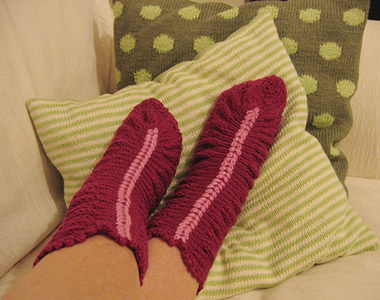
As a variation (or to "use up old scraps of wool") you might choose to make the picot edging in the contrast colour to match the embroidery - I believe this would work better if the contrast were darker than the main colour.
Alternatively, if you are not confident in your embroidery skills (I found it harder than I had imagined) you could stick with a single colour and embroider in the main yarn; this provides a more sophisticated look - if indeed a bedsock can be said in any way to contribute to a sophisticated look!
Third and final pattern is totally untested, from a magazine dated November 1968 [ "Ideas for Gifts"]. They really are called "boudoir slippers" which, apart from any other consideration, makes me feel that the pattern dates from longer ago than 1968. As a teenager, I would have found these indescribably awful; however, luckily, I did not have relatives who were handy with the old needles.
Likely to remain untested as a girl can have only so many bedsocks.
[Should any readers admit to making this pattern, please submit a photo of the result for me to display here!]
InstructionsEach sock is worked in one piece. Make two alike. Cast on 76 stitches, and work as follows: Row 1: k3, * p2, k2; repeat from
* to last stitch, k1. Repeat these rows for 6½ inches. Change to No. 12 needles. Work 6 rows in k1, p1 rib. Making up - Fold cast-on edge to cast-off edge and join side seams. (Seams form heel and toe). Crochet edging - Starting at the heel, crochet eyelets all around the edge as follows: - 3ch, * 1dc in next stitch, 1ch, miss next st; repeat from * all round. Join with slip stitch to 3ch at the beginning. Then work a row of picots thus: - * 3ch, 1 slip st into the first of these chain, 1 slip st into the 1ch space of the previous round; repeat from * all round. Fasten off With wool double, crochet a chain cord for each sock and thread through holes; make and sew a small tassel to each end. |
MaterialsOriginal pattern calls for 1 (1oz) ball of Patons Beehive Baby Wool in 3ply. One pair of number 11 needles. Tension32st and 40 rows to 4 inches (10cm). Size mattersOne size fits all. A word on the wool.It is fairly easy to acquire 3ply Baby wool to knit up to this tension. |
This is my modern version of a hot-water bottle cover. The cover is designed to fit a microwavable hot pad - link for this under "materials". The pads are conveniently small, and much safer (to lie on) than a hot-water bottle.
The pattern stitch from 1968 was used for a tea-cosy (colours Jade, Pink, and White), and a cushion cover (colours Brown, Amber, and White). I think the cushion cover, (style and colour scheme), is more authentically late 60s that the cosy. Although a tea cosy was de rigeur in our house, I think tea bags with and without the use of tea pots was becoming more prevalent by that time.
InstructionsWith No. 11 needles and main colour (red), cast on 58 stitches. **Change to number 10 needles and commence pattern as follows, using second colour (orange): Row 1: (right side) *K4, slip 2;
repeat from * to last 4 sts, K4. Rows 13-24: repeat rows 1-12. Change to number 11 needles and continue in garter stitch for 15 rows. Purl one row.** Repeat from ** to ** three times, then rows 1-30 again. Change to number 11 needles and work in garter stitch for 4 rows. Cast off.
Crochet edging - Using the main colour, (red), work a dc edge around the flap of the cover with ties as follows: With right side facing, starting at the side edge, work 6 dc up edge
of the garter st band, 15 dc up the honeycomb edge, 2dc up to corner,
3 dc into the corner st. Work 3 more ties by making 40 chain, then working 1 row of dc into each
chain. Sew the ties on to the cover to match the positions of the ties
on the flap. |
MaterialsOriginal pattern calls for three contrast colours, (red, orange and yellow). One pair each of number 10, an No 11 needles. One hot water bottle "replacement
core", (available to order on the web). TensionThe wool should knit to a basic tension over st st of 28st to 4 inches (10cm) on No 10 (3¼mm) needles. Size mattersOne size. A word on the wool.I used Phildar Lambswool (a 4 ply wool/acrylic mix) left over from another project. |
Here is a version adapted for a light worsted cotton yarn (Rowan Cotton Glace). For this version, cast on 52 sts.
This is a pattern from 1956 "reversible bottle-cover" (sic) - though why the quotes, why the hyphen, and why the description reversible, I really am not sure. Originally a cover for a hot-water bottle, I have adapted it to fit a microwavable pad. The knitting turned out to be an interesting shape, and in consequence made for an interesting pattern, (probably not as intended). I used a bright red and white combination, which reminded me of a 1950s accessory set. The original recommended colours were "powder blue and white".
In the days when pattern illustrations were not in colour, the colour names were much more vivid and descriptive; modern names tend to try and evoke an emotion rather than a colour. I do love reading these old patterns with the colours - "lipstick red" "primrose yellow" "mimosa" "frosty lime" - you could just eat them - a feast for the mind's eye.
InstructionsFirst piece - with No. 11 needles and first colour, cast on 4 stitches. Row 1: Inc in every st (8 sts) With the right side facing for row 7 place a row marker on this side of the work, to mark it as the right side of the work.
Then continue working as before, increasing at both ends of the row, and in the middle, on odd (right side) rows; increase only in the middle on even (wrong side) rows. After a while, the stitches will become crowded and the shape hard to manage on just 2 needles. At this point, spread the sts evenly across two needles, discarding the centre st marker; continue to work back and forth across the needles using a third needle.
The work will take on a triangular, or arrow shape. Continue working until you have 105 sts on each side of the centre. Second piece - work a second triangle (or arrow) in the contrast colour. Lay the pieces out with the point of one arrow to the base corner of the other arrow, (see picture below).
Continue working with one of the available colours (I used the red). Cast off the two rows of knitting together, using a "three-needle cast off"(see picture below), fairly tightly.
[Editor's note: You put your working needle into the first st on the front needle and the first st on the second needle behind; you pull your loop through and knit both sts off the needles together. You have one st on your working (usually right hand) needle. You repeat so there are two sts on your working needle. You pass the first st you knitted over the second; continue casting off in this way.] This is how it looks half way through; ideally the work should lie flat at the cast off edge:
Next you put the other two edges together - again the point of one arrow is next to the base corner of the other arrow, (see picture below):
Cast off the two rows together. You are left with a sort of tube; turn it so that the cast off edges are inside. The next picture shows a hot water bottle placed in the tube.  The arrow points are arranged centre front and back.
Crochet flower - begin by making a slip loop with your first colour as if you were starting a crochet chain, and crochet into this loop for your first round. Ensure that the loop "slips" (can be tightened) from the tail end of your work, not the working end. Round 1: using the first colour, crochet 8 dc into
your loop; adjust the slip loop until the stitches fit nicely. Make a second flower in the second colour. Round 1: using the second colour, crochet 8 dc into
your loop; adjust the slip loop until the sts fit nicely. Place second flower on top of first, and sew through both layers, onto the cover at the marked position for the button. |
MaterialsOriginal pattern calls for 2 oz each of two contrast colours in 3ply. One pair of number 11 needles, with a spare pair (or set or 4) to aid
in the construction. One hot water bottle "replacement
core", (available to order on the web). TensionGarter stitch is difficult to measure but the wool should knit to a basic tension over st st of 28st to 4 inches (10cm) on No 11 (3mm) needles. Size mattersOne size. A word on the wool.I used an acrylic 4ply; not ideal, but these covers can take some wear and tear. |
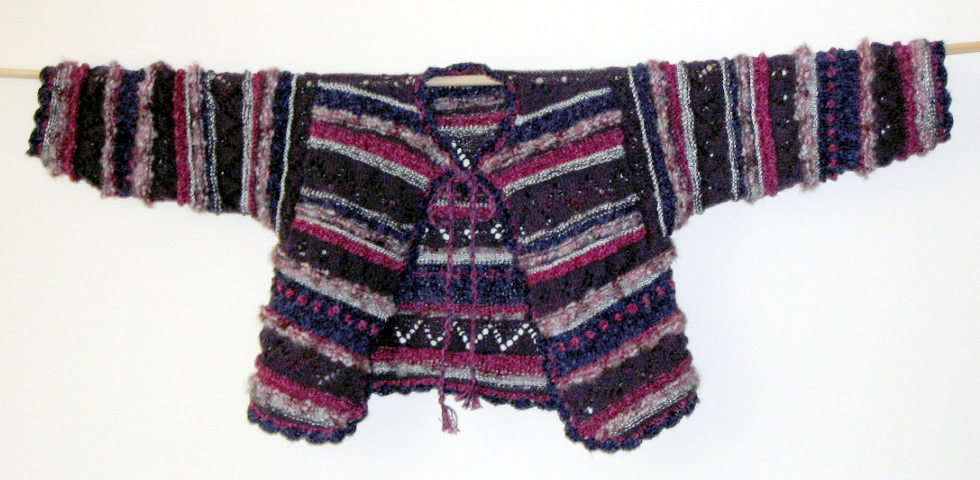
Knitted in a combination of wools, ribbon, and a linen yarn, of various weights using the basic shape of a double knitting pattern. The length is short to allow for sitting in bed.
InstructionsKnitted to a basic shape as follows: Back - cast
on 88 sts. Knit in your own pattern for 7 or 8 inches. Right front
- cast on 36 sts. Knit to pattern increasing 1st at the beginning of every
alternate row until there are 44 sts. (This forms a curved front edge).
Left front - work to match the right front, reversing all shapings. Sleeves - cast on 56 sts and work for 2 inches, then increase 1 st at each end of next and every following 6th row to 76 sts. Work straight to 15 inches from beginning. Cast off. Crochet border - a simple row of double crochet and then a crochet shell pattern (1 dc; miss 2; 5 tr into next stitch; miss 2; then repeat). Make up - sew
shoulders and side seams. Set sleeves into the armholes, placing 2 ins
at the sleeve top to the cast off sts at the underarm, and sewing up the
sleeve seams. |
MaterialsSelf-styled free form pattern, knitting a mixture of rows in plain and purl, using wools from 4ply through to a chunky boucle and including ribbon yarn. Tie made from twisted cord or ribbon. Size mattersTension (average over different yarn weights): |
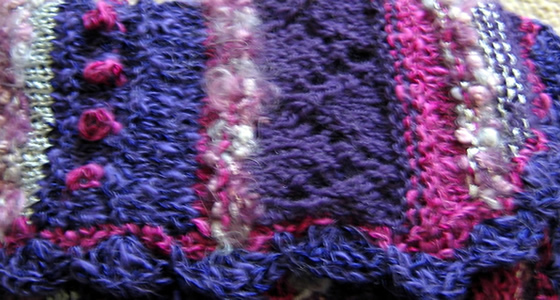
 Men's slippersocks in 2 colours. I have also knitted a 3 colour version to use up wool oddments. I did try to knit these completely in the round to avoid seams but found it almost impossibly complex to do the fair-isle over only half the round - so I would stick to the instructions as given |
InstructionsWith No. 12 needles and main shade (M) cast on 60 stitches loosely, and
arrange over 3 needles. Commence pattern as follows: Rnd 1: Change to contrast colour (C) and knit all sts. These 20 Rows form the pattern. Work top of foot as follows: Break off M and slip the first 16 sts of the round on to a spare dpn,
and slip the last 13 sts on to a second spare dpn. [Editor's
note: these can be your No. 12 needles if required]. Row 1: Using C knit all sts. Now work one more pattern set of 20 rows, and then the first 8 rows again,
decreasing 1st at the end of the last row, (30 sts). Shape toe: Using M only, continue in stocking stitch, (one row knit, one row purl), decreasing 1 st (k2 tog) at each end of the next, and every alternate row, until 14 sts remain. Leave these sts on a safety pin. Make the heel: Return to the remaining 29sts; place both sets together on one needle,
and continue to work on them in st st, using colour M. Continue in st st until the foot is the same length as the top. Making up. Graft
the two sets of 14 sts together. Make a second sock to match. |
Materials2 x 50g skeins of main shade and 1 x 50g contrast in double knitting wool. Two sets of 4 double pointed needles, Nos. 10 and 12. Tension24 sts to 4 inches measured over stocking stitch on No 10 (3¼mm) needles. Size mattersThe pattern as written should fit a foot of 11 inches in length. |
© Christina Coutts 2007
![]()
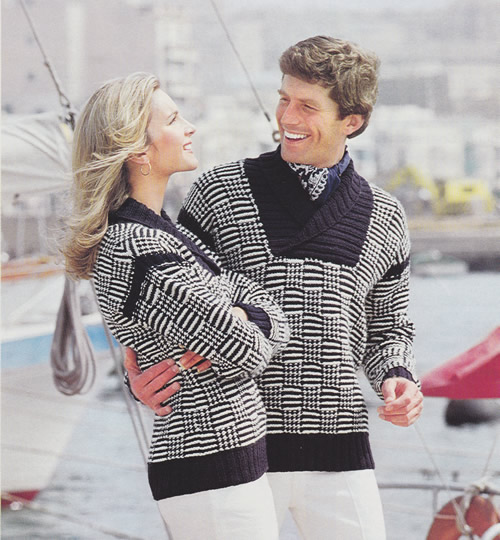
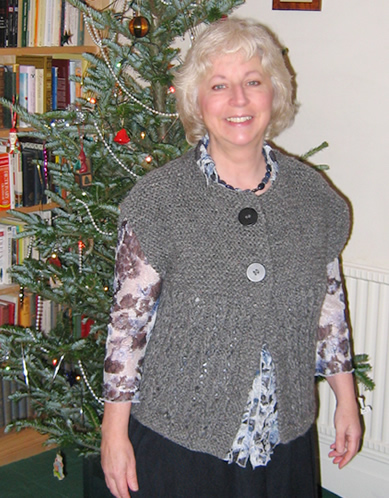
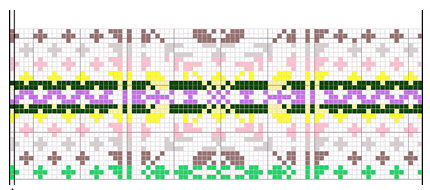
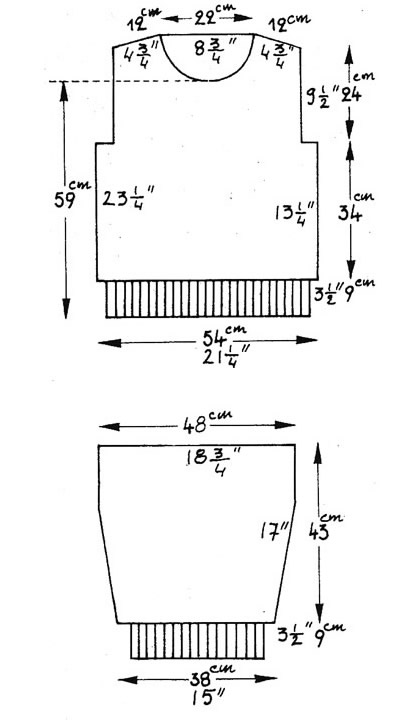
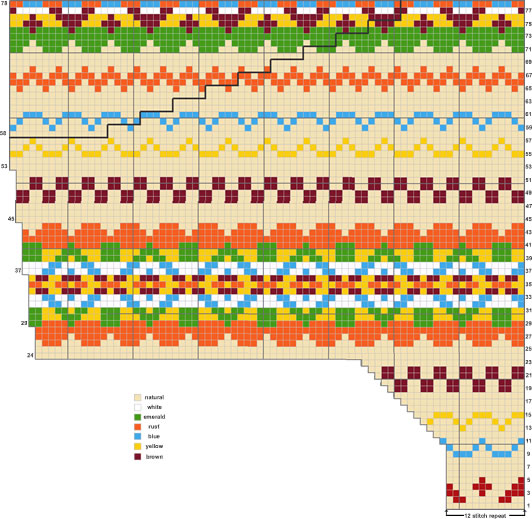
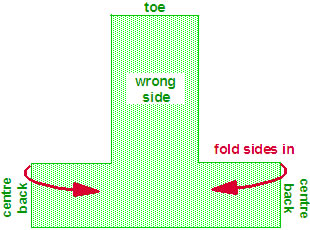
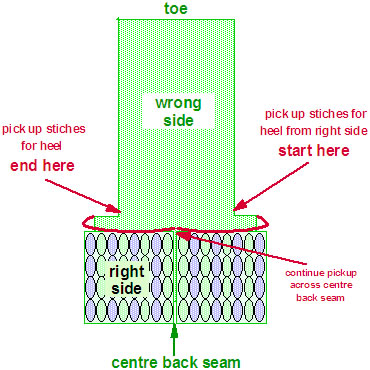
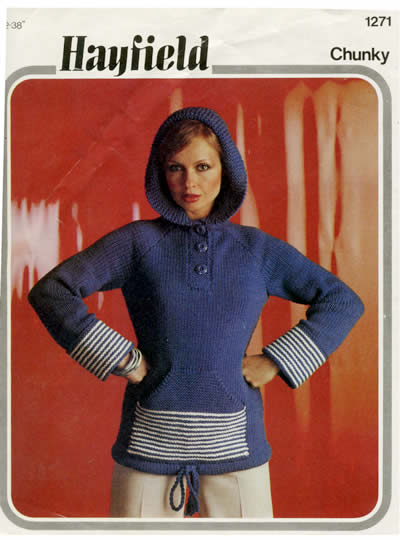
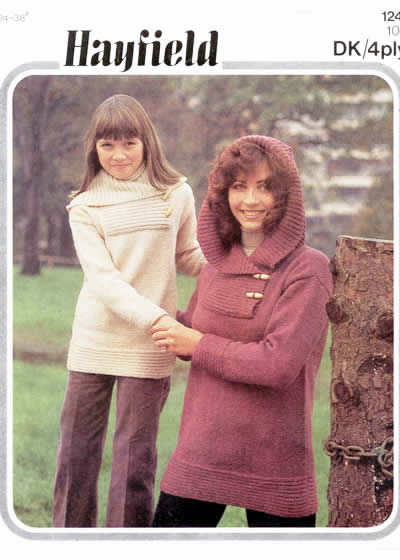
 The Spaelsau is a direct ancestor to
the Old Norwegian Sheep.They were tough sheep supplying their masters
with meat, milk, wool, skin - even the sails that carried the ships over
the oceans were made of their wool. Today, a thousand years later, the
wool of the Spaelsau still consists of a rough cover to protect against
the wind and the rain, and under this a much softer layer close to the
skin as protection against the cold.
The Spaelsau is a direct ancestor to
the Old Norwegian Sheep.They were tough sheep supplying their masters
with meat, milk, wool, skin - even the sails that carried the ships over
the oceans were made of their wool. Today, a thousand years later, the
wool of the Spaelsau still consists of a rough cover to protect against
the wind and the rain, and under this a much softer layer close to the
skin as protection against the cold. 
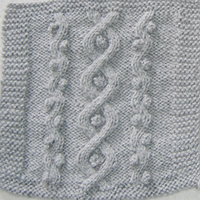
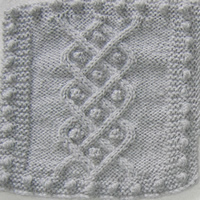
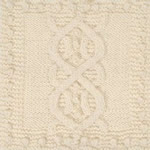
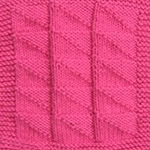
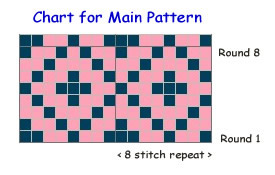
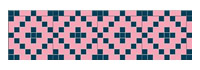
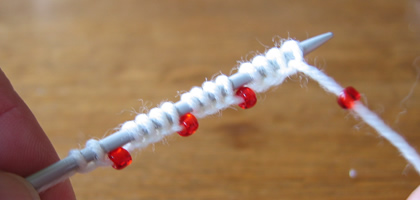
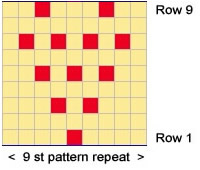
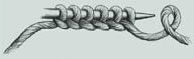
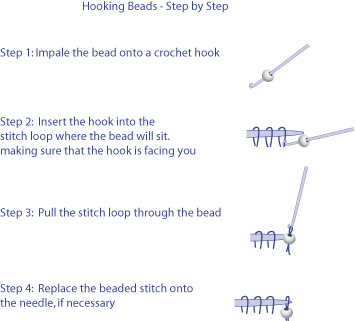
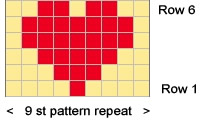


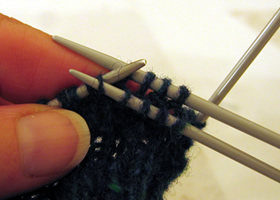

 Making up - Press the piece lightly on the wrong side under a
damp cloth with a hot iron.
Making up - Press the piece lightly on the wrong side under a
damp cloth with a hot iron.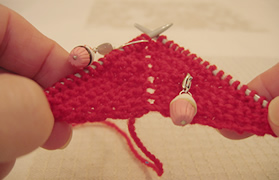
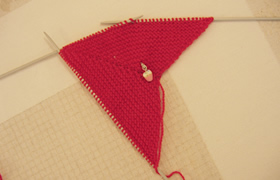

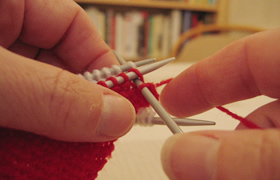
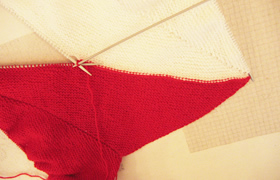
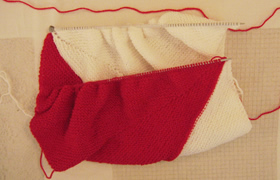
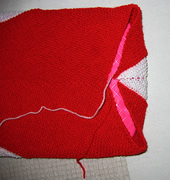 Fold up one of the ends and sew the diagonal seams in place from the wrong
side. (I sewed the tip of my white arrow for the closed end). At the other
end, make a chain using the crochet hook and sew in place as a loop for
the button at the (red) arrow tip.
Fold up one of the ends and sew the diagonal seams in place from the wrong
side. (I sewed the tip of my white arrow for the closed end). At the other
end, make a chain using the crochet hook and sew in place as a loop for
the button at the (red) arrow tip. 