Instructions:
Bunny is worked throughout on No 8 needles and garter stitch (ever row
knit). When making up, all seams are joined on the right side.
Body (work two pieces alike):
Cast on 11 sts using No 8 needles and chunky yarn.
1st row: Knit
2nd row: Knit twice in first stitch;
knit to last st, and knit twice in last st [13 sts]
3rd row: Knit
4th row: as second row [15 sts]
Knit the next 6 rows.
11th row: as second row [17 sts]
Knit the next 11 rows.
23rd row: K2 tog; knit to last 2 sts,
and k2tog. [15 sts]
Knit the next 3 rows.
27th-29th rows: Decrease 1 st at each
end of the next 3 rows [9 sts]
Cast off 9 sts. The cast off edge is the neck edge.
Base:
Cast on 5 sts.
1st row: Knit
2nd row: Knit twice in first stitch;
knit to last st, and knit twice in last st [7 sts]
3rd row: Knit
4th row: as second row [9 sts]
Knit the next 2 rows.
7th row:
K2 tog; knit to last 2 sts, and k2tog. [7 sts]
8th row: Knit
9th row: as 7th row. [5 sts]
10th row: Knit
Cast off 5 sts.
Making up the body:
Join the sides of the body, then insert the base, sewing it onto
the cast on edges of the two body pieces.
Stuff firmly and gather up neck opening. (Try and stuff the body more firmly than the head so it has more weight, to give the toy more stability).
Front Legs (work four pieces alike):
**
Cast on 11 sts. Knit the next 2 rows.
3rd row: Knit twice in first stitch;
knit to last st, and knit twice in last st [13 sts]
Knit the next 4 rows.
8th row: K2 tog; knit to last 2 sts,
and k2tog. [11 sts]
Knit the next 7 rows.
**
16th-17th rows: Decrease 1 st at each
end of the next 2 rows [7 sts]
Cast off 7sts. The cast off edge is where the leg joins the body.
Making up the front legs:
Join each pair, leaving the cast off edges open.
Stuff firmly and sew up opening, then join this end to the body.
Run a gathering thread around the wrists, and mark claws with black straight
stitches.
Back Legs (work four pieces alike):
Work as for front legs from ** to **.
Knit 5 more rows.
21st-22nd rows: Decrease 1 st at each
end of the next 2 rows [7 sts]
Cast off 7sts. The cast off edge is where the leg joins the body.
Making up the back legs:
Stuff and make up as for the front legs and sew to body.
Tail (work 2 pieces alike):
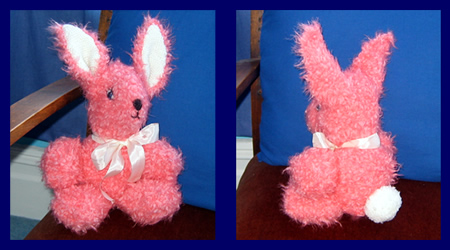
[Editor's note: I
did not use this tail. I made a tail with a white woollen pom-pom (see
the picture) - why wouldn't you? I thought that, in the fable that is childhood, rabbits were renowned for their powder-puff tails. However, I think my tail turned out a wee bit large].
Cast on 5 sts.
Knit one row.
Increase 1 st at each end of the next 3 rows.
Knit 6 rows.
Decrease 1 st at each end of the next 3 rows.
Cast off 5 sts.
Making up the tail:
Join the two halves together, leaving an opening for stuffing.
Stuff and sew up opening. Join to body.
Head (work 2 pieces alike):
Cast on 11 sts. Knit the next 6 rows.
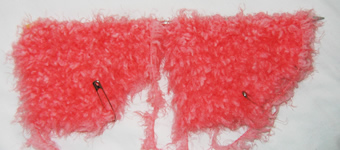
[Editor's note: The
head pieces are not symmetrical. Mark the side (just use a safety pin,
a stitch marker or a piece of coloured thread) where most of the increasing
and decreasing happens - this is the nose and will help you match it up
when you join the pieces. Also check that you are doing this shaping all
on the same side of the piece].
*
7th row: Knit twice in first stitch;
knit to end [12 sts]
8th row: Knit to last st, and knit
twice in last st [13 sts]
9th row: Knit twice in first stitch;
knit to last st, and knit twice in last st [15 sts]
10th row: Knit to last st, and knit
twice in last st [16 sts]
*
Repeat from from * to *
once more.
Knit the next 8 rows.
23rd row: K2tog; knit to end [15 sts]
24th row: Knit to last 2 sts; k2tog
[14 sts]
25th row: K2 tog; knit to last 2 sts,
and k2tog. [12 sts]
26th row: Knit to last 2 sts; k2tog
[11 sts]
27th row: K2tog; knit to end [10 sts]
28th row: Knit to last 2 sts; k2tog
[9 sts]
29th row: K2 tog; knit to last 2 sts,
and k2tog. [7 sts]
30th row: Knit to last 2 sts; k2tog
[6 sts]
31st row: K2tog; knit to end [5 sts]
32nd row: K2 tog; knit to last 2 sts,
and k2tog. [3 sts]
Cast off 3 sts.
Making up the head:
Join the two halves together, leaving the cast on edges open.
Stuff firmly, shaping the dome of the head to look like a bunny.
Features (embroidered):
Nose: black satin stitch.
Mouth: black vertical and horizontal straight stitches.
Whiskers: long black straight stitches.
Eyes: White, blue, and black satin stitch, and outlined in black straight
stitches.
Lashes: Four vertical straight stitches in black.
Eyebrows: black straight stitches.
Ears (work 2 alike):
[Editor's note: I
worked both ears at once using two balls of wool (as I did for the head).
This was because I found it easy to lose track of how many rows I had
knitted with this fluffy yarn. A row here or there makes little difference
to a toy, but you want the ears etc to be the same size.]
Cast on 3 sts in main colour on No 8 needles.
1st-3rd rows: Knit
4th row: Knit twice in first stitch;
knit to last st, and knit twice in last st [5 sts].
Repeat these 4 rows 5 times more until there are 15 sts.
Knit the next 12 rows.
37th row: K2 tog; knit to last 2
sts, and k2tog. [13 sts]
38th row: Knit
39th row: K2 tog; knit to last 2 sts,
and k2tog. [11 sts]
Cast off 11 (this is the edge sewn to the head).
Ears Linings (work 2 alike):
Cast on 4 sts in finer yarn contrast for ears on No 11 needles.
1st-3rd rows: Knit
4th row: Knit twice in first stitch;
knit to last st, and knit twice in last st [6 sts].
Repeat these 4 rows 7 times more until there are 20 sts.
Knit the next 20 rows.
[Editor's note:
As I worked the linings I kept comparing them to the ears to make sure
they were coming out the right size. The result was that for the wool
I had chosen I increased to 20 sts but then knitted 25 rows to match the
length of the ears. You may note the ears are pretty large - but the head
is also proportionally large, so I thought they looked right.]
53rd row: K2 tog; knit to last 2
sts, and k2tog. [18 sts]
Knit 3 rows.
54th row: K2 tog; knit to last 2 sts,
and k2tog. [16 sts]
Knit 3 rows.
55th row: K2 tog; knit to last 2 sts,
and k2tog. [14 sts]
Cast off tightly.
Making up the ears:
Join ears and linings together. Fold wide end of ears in half, with
lining inside, and sew to the head.
|