Set Up for the Cold
More....
Please note:
Patterns are for
Personal Use Only
You may freely circulate patterns with the Copyright Statement Preserved.
See terms of use.
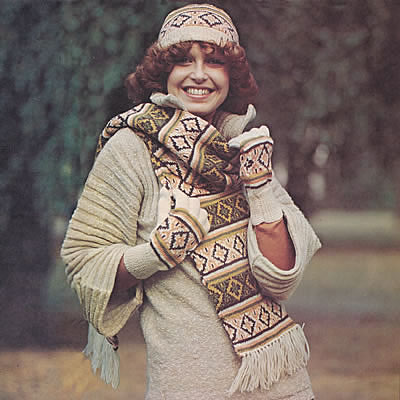
A "long, long" scarf worked in bands of stripes and jacquard pattern, with a matching pull-on hat and gloves to complete the set. These are all knitted in a lighter weight yarn, but the scarf is double thickness so will be very snug; it's also pretty long, so check that's what you want, as obviously you can make it to whatever length you like.
InstructionsThe scarf is worked on 4 needles in the round to make a tube, which is then flattened; the result is a flat scarf with two layers of knitted fabric, and means you don't have to worry about seeing the "wrong side" of the knitting. This is a standard way to make - especially commercial - scarves. Although often seen made in the round, both the hat and the gloves are worked flat on two needles, with a seam making them into the required round shape. It would be simple enough to adapt this pattern and make the hat in the round, especially as you have the method given for the scarf. If this is your first attempt at gloves, however, making them flat may be a good way to start. ScarfUsing the set of 4 No 10 (3¼mm) needles - or the circular needle
- cast on 112 sts in Main Shade (A). Pattern as follows: ** 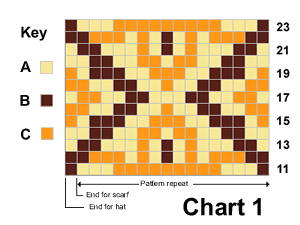 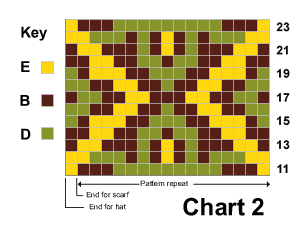 These 46 rounds form the pattern. Cast off using A. To make up the ScarfDarn in all ends on the wrong side. HatUsing No 12 (2¾mm) needles, and main shade A, cast on loosely 144
stitches. Work 20 rows K1/P1 rib, increasing 1 stitch at the end of the
last row. [145 sts] Continue in pattern until work measures 18cm (7 inches) from the beginning, ending with a purl row. Shape the crown Decrease for the crown, keeping the continuity of the striped pattern: To make up the HatPress as given for the scarf. GlovesNote: When working the gloves, use separate balls of yarn for the palm and thumb, twisting the yarns at the back of the work when changing colours. Right hand gloveUsing No 12 (2¾mm) needles and main shade A, cast on 56 stitches.
Start thumb shaping: 1st row: using first ball of B, k28;
using A, increase one stitch in each
of the next 2 stitches, k1; using a 2nd ball of B, k25. Continue in pattern as given for chart, increasing the thumb stitches
as before on the 3rd and then every foil 4th row until the 24th row has
been completed, decreasing one stitch at the end of the last row. 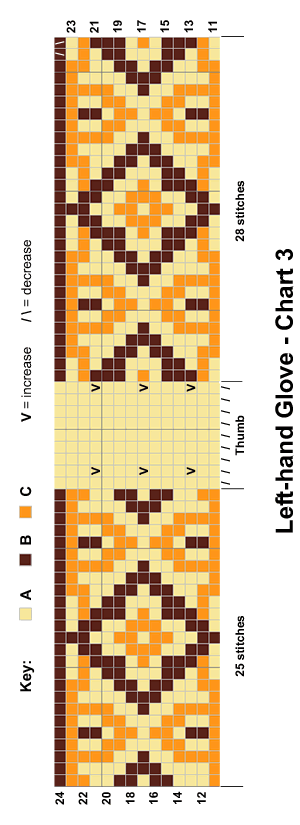 Thumb: Next row: using B, k28; using A,
k16 stitches; turn and cast on 2
stitches. [Editor's note: For this method you keep all the stitches on the needles as you work the thumb and each finger separately. At this point for the thumb, you keep 28 stitches unworked on the right hand needle, and 25 stitches unworked on the left hand needle, while you work on the centre 16 stitches (which you have increased to 20 by casting on 2 extra stitches on each side. You knit the thumb flat, back and forth up to the tip, then you fasten off and sew it up into the thumb shape.] Shape top: With right side of work facing and using B, knit up 4 stitches from the
base of the thumb, knit to end. [57 sts]
Divide for fingers: 1st finger Shape top: 2nd finger 3rd finger 4th finger Shape top Left hand gloveWork as given for right hand glove, reversing the pattern and the position of thumb as follows: 1st row: using 1st ball of B, k25;
using A, increase one stitch in each of Continue as given for right hand glove until 24th row of pattern has been completed. Thumb Next row: using B, k24; using A,
k16, turn and cast on 2 stitches. Complete as given for right hand glove working from *** to ***. To make upPress as given for scarf. |
Materials25g balls of 4 ply (fingering) yarn: Scarf: 4 balls in main shade A One set of 4 3¼mm (UK 10) double pointed needles (dpn), or a circular needle. Hat and gloves: One pair of 3mm (UK 11), and one pair of 2¾mm (UK 12) needles Tension28sts x 36 rows to 4 ins over stocking stitch on 3¼ mm needles. Size mattersScarf: 20½ cm (8 inches) wide, by 183cm (72 inches) long,
excluding the fringe Abbreviationsk2tog: knit 2 sts together. increase: by knitting into the front and back of the next stitch A word on the wool.The original yarn was standard 4 ply superwash wool; about 92 yards (84 m) per 25g ball. Disclaimer
|
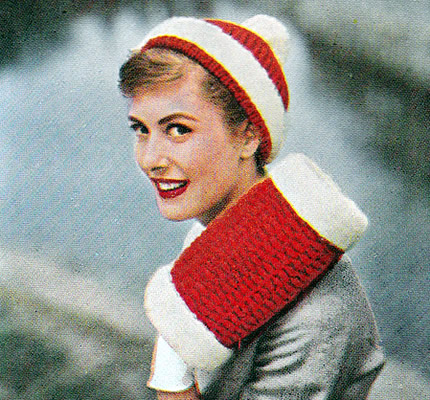
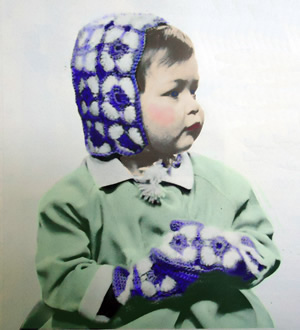
Charming offering from the mid-fifties - the era of the "set".
I'm not sure how much of a commonplace activity skating was or is. I guess the climate in the south of the UK and the constant dangers warned of in skating on lakes and ponds meant that in my youth at least it was not a general pursuit outside of ice rinks. I was very keen on roller skating - another 1950s and 60s popular sport - I even owned my own roller skates etc; however the only times I ever tried skating on ice, was at a rink with hired skates.
In the celluloid world, however, any wintry film would not have been complete without its skating scene, and this would have made the perfect accessory. Luckily you could also consider using it without the skating - though it does rather draw to mind US costume dramas.
InstructionsNote: Muff and all white borders are worked using yarn doubled. MuffPocket lining: Main Part: 1st row (right side facing): k1,
* k1tbl, p1; repeat from *
to last 2 stitches, k1tbl, k1. These 8 rows form the pattern. Next row: Pattern 9, cast off 31,
pattern to end. Continue straight in pattern until work measures 14 inches from start.
Borders: Making upPress work lightly on wrong side under a damp cloth. Join short sides of muff; insert pocket, joining top to 31 cast-off stitches,
then catch down pocket neatly all round. Turn muff inside out. Wrap 2 layers of wadding round muff and join ends.
Join short sides of lining material. Slip lining over wadding and hem
neatly to main work just inside ends of muff. I seem to remember from my youth that muffs generally had a string attached to hang them round your neck so that you could have both hands free if necessary. I'm not sure if this was just because I was a child and was the equivalent to having your gloves on a string (threaded through your coat sleeves!), but it certainly would make it more practical if you planned to use it for more than skating expeditions.] CapUsing single strand of red wool, cast on 108 stitches and work 4½ inches in k1/p1 rib. Change to twisted rib and shape crown as follows: 1st row: *
p1, k1 through back of loop; repeat from *
to end. Continue in twisted rib decreasing 6 stitches in the same way on every
Next row: purl. Break wool, draw through remaining stitches and fasten off. Border: Making upPress lightly on wrong side under a damp cloth. |
MaterialsDouble knitting yarn: 8 oz in Scarlet and 4 oz in white. One pair of No 7 (4½mm) needles. 6-inch zip fastener. White fabric to line muff, and 2 pieces of wadding for padding. TensionCap: 24 sts to 4 inches (10cm) over twisted rib pattern using
single strand of yarn. Size mattersCap to fit "an average head". Abbreviationsk2tog or p2tog: work 2 sts together to decrease. k1tbl/p1tbl: knit/purl 1 stitch through back loop. k2togtbl/p2togtbl: knit/purl 2 stitches together through back loops. stocking stitch: one row knit and one row purl, ("stockinette"). Disclaimer
|
This looks like a little Victorian cherub, though the pattern is much later. It uses a combination of smooth and fluffy 4 ply yarns in a relatively simple crochet motif.
I think the bonnet is particularly cute.
Instructions:The items are made by piecing together a basic motif: Using blue colour (B), make 8 chain and join into a ring with a slip
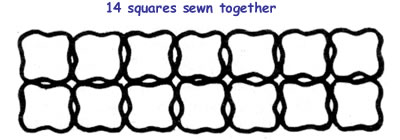
stitch. Bonnet:Make 14 motifs the same and join together as shown in diagram.
Back of bonnet: 1st row: 1 dc into 2nd ch from hook,
1 dc into each of next 27 ch Continue in dc increasing 1 stitch at each end of every 4th row until
there are 36 dc. Making up the Bonnet: Pin one edge of front piece up sides and all round top edge of back piece.
With right side of work facing and B, crochet the 2 pieces together but
working 4 dc into edge of back piece only between motifs Fasten off. Mitts:Starting with the front of the mitts: Using B, make 21 ch Now work the back of the mitts: Work 2 motifs as given for bonnet and join together as before. With right side of motifs facing, start in corner and work along one
long edge as follows:- Turn and work 9th and 10th rows as given for front of mitt. Thumb: Using B, make 2 ch. Join thumb seam from top down as far as marker. Making up the mitts: Make another mitt in the same way but inserting thumb on opposite side
to first mitt when making up. |
Materials2 ozs 4 ply, in Powder Blue and One No 12 (2¾mm) crochet hook. TensionEach motif measures about 2 inches square. 6½ dc to an inch over
plain dc. Size mattersBonnet: All round front edge measures 15½ inches. Crochet abbreviations:ch: chain [Editor's note: Remember these are English crochet instructions where dc is equivalent to US single crochet - see "Terminology" in the side bar.] A word on the wool.Original yarn was Patons Beehive 4ply and Fuzzy Wuzzy angora. Disclaimer
|
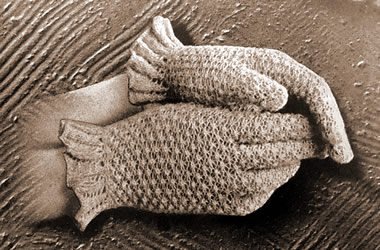
A very early pattern to make these charming light weight gloves using fine 2ply yarn. You could also use a mercerised cotton for summer gloves, but (as the pattern encourages) check your tension carefully.
Note that these glove patterns are very elderly and thus you have to make allowances in the instructions. They talk about "plain knitting" and they don't give a lot of explanation about how you turn the work and pick up the stitches. Generally they expect you to fend for yourself; I have not tested this pattern so if you would like to double check what I have written or if you want a second opinion I'm happy to try and help.
Instructions:The gloves are worked in blackberry stitch (also known as trinity stitch)
on 2 needles. The nature of this stitch means that the number of stitches
can vary from row to row; this can seem a little puzzling as it means
the instructions for the right and left hand gloves seem not to be symmetrical
- but they should work out OK. Right-hand Glove:Using two Needles, cast on 54 sts. 1st row: k1, purl to last stitch,
k1. These 4 rows form the basic pattern. Repeat from 1st to 4th row five times. The Thumb Next row: k1, p32, k1. Turn Then proceed as follows:- 1st row: k1, p20, k1. Repeat 1st to 4th row three times. Then proceed as follows:- 1st row: k1, (k1, k2togtbl, k4, k2tog,
k1) twice, k1. Break off wool and run end through remaining sts.
First Finger Next row: k1, p34, increase once
in next stitch. Turn. Then proceed as follows:- 1st row: k1, p17, k1. Repeat from 1st to 4th row four times, then 1st and 2nd rows once, decreasing one stitch in last row. Then proceed as follows:- 1st row: (k1, k2togtbl, k4, k2tog,
k1) twice. Finish off as given for Thumb. Second Finger With right side of work facing, join in wool and knit up 4 sts. from 2 cast-on sts. at base of First Finger, p5, k1. Turn. Next row: k1, (k1p1k1 in next stitch; p3tog) four times, cast on 4sts. Turn. Then proceed as follows:- 1st row: k1, p19, k1. Repeat from 1st to 4th row five times, then 1st and 2nd rows once, increasing
one stitch in last row. Third Finger With right side of work facing, join in wool and knit up 5sts. from 4 cast-on sts. at base of Second Finger, p5, increase in the next stitch. Turn. Next row: k1, (p3tog; k1p1k1 in next stitch) three times, p3tog, p1; cast on 4sts. Turn. Then work exactly as given for First Finger. Fourth Finger With right side of work facing, join in wool and knit up 4 sts. from 4 cast-on sts. at base of Third Finger, p5, k1. Then proceed as follows:- 1st row: k1; (k1p1k1 in next stitch;
p3tog) four times; k1. Repeat from 1st to 4th row three times, then 1st row once. Then proceed as follows:- 1st row: (k1, k2togtbl, k3, k2tog,
k1) twice. Finish off as given for First Finger. The Frill With wrong side of work facing, pick up 52 sts, from cast-on edge of glove. Join in wool. 1st row: k1, * k2tog; repeat from * to last st, k1. Work 3 rows in plain knitting. 5th row: k1, *
increase once in next st, repeat from *
to last st, k1. [There should now be 52 sts. on needle]. Continue in this manner until there are 164 sts. on needle. Next row: k1, * p2, k8, repeat from* to last 3 sts, p2, k1. Cast off knitways. Left-hand Glove:Using two Needles, cast on 54 sts. Work exactly as given for Right-hand Glove until Thumb is reached. The Thumb Next row: k1, p31, cast on 11 sts.
Turn. Then proceed as follows:- 1st row: k1, p20, k1. Repeat 1st to 4th row three times. Decrease and finish off as given for the Thumb of Right-hand Glove. Using needle containing 21 sts, join in wool and knit up 11 stitches
from 11 cast-on sts, at the base of the thumb; p21, k1 across remaining
stitches. First Finger Next row: k1, p35, cast on 5 sts.
Turn. Then work exactly is given for First Finger of of Right-hand Glove. Second Finger With right side of work facing, join in wool and knit up 4 sts. from 5 cast-on sts. at base of First Finger, p5, cast on 4sts. Turn. Next row: k1, (p3tog; k1p1k1 in next stitch) four times, p3tog; k1. Turn. Then proceed as follows:- 1st row: k1, p17, k1. Repeat from 1st to 4th row five times, then 1st and 2nd rows once, decreasing
one stitch at the end of the last row. Third Finger With right side of work facing, join in wool and knit up 5sts. from 4 cast-on sts. at base of Second Finger, p6, cast on 3sts. Turn. Next row: k1, (k1p1k1 in next stitch; p3tog) four times, k1p1k1 in next stitch; k1. Turn. Then proceed as follows:- 1st row: k1, p19, k1. Repeat from 1st to 4th row four times, then 1st and 2nd rows once, increasing
one stitch in last row. Fourth Finger With right side of work facing, join in wool and knit up 4 sts. from 3 cast-on sts. at base of Third Finger, p6, k1. Then work exactly as given for Fourth Finger of Right-hand Glove. Work the Frill as given for Right-hand Glove. Making Up:With a damp cloth and hot iron press very lightly. |
Materials1 oz Patons Beehive Fingering 2ply. One pair of No 12 (2¾ mm) needles. Tension3 patterns (12 sts) to 1 inch. Adjust your needle size to obtain the right tension. Approximately 36sts 4 inches on No 12 needles over stocking stitch. Size mattersWidth all round above thumb, 5½ ins. [Editor's note: 5½ins seems a bit small? You may find that despite my notes on the wool weight below that you could use a "4ply" yarn with a larger gauge and/or adjust the needles to get the fit you need. Measure your hand and do a swatch....always Good Advice!] Abbreviationswon: wool over needle. Makes an extra stitch which forms a small pattern hole when knitted on the next row. p3tog: purl 3 stitches together (decrease 2) k1p1k1: knit and purl into front, then knit into back of next stitch (increase 2) k2tog: knit 2 stitches together (decrease). k2togtbl: knit 2 stitches together through back loops or "ssk" (slip slip knit) is a method of knitting 2 stitches together but into the backs of the stitches rather than the usual "k2tog" which knits into the fronts. A word on the woolAlthough it may be a literal 2ply, I think the stated tension implies it is more like a 3 ply weight. Throughout this site I state that it's hard to get 3ply yarns these days - and now I find Jamieson's have a different web address (now corrected on my links I hope) and a range of yarns that is new to me. The yarns are properly described as to the number of strands plied together, (eg "2ply jumper weight"), but also helpfully tell you what the wool weight is equivalent to. So they have an excellent range of colours in "2ply laceweight" which states: This yarn can be used in vintage patterns which call for "3ply yarns". I really wish I had discovered this for some of my other projects. They also have a "cobweb lace" which might be a traditional 2 ply weight. I can't wait to experiment. Disclaimer
|
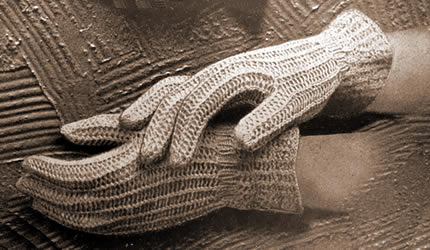
From the same early pattern source as Gloves for a Lady I - slightly less lacy but still an open-work light weight design using fine yarn.
Note that these glove patterns are very elderly and thus you have to make allowances in the instructions. They talk about "plain knitting" and they don't give a lot of explanation about how you turn the work and pick up the stitches. Generally they expect you to fend for yourself; I have not tested this pattern so if you would like to double check what I have written or if you want a second opinion I'm happy to try and help.
Instructions:The gloves are worked in an openwork ladder stitch created by working
"yarn over needle" or eyelets on every row. Right-hand Glove:Using two Needles, cast on 80 sts Work 2 rows in plain knitting. Repeat 30th row 6 times, increasing 2 sts in last row. Repeat 3rd row thirty-two times. The Thumb Next row: k1, (p1, won, k2tog) eleven
times; k1. Turn Working on these 20 sts, repeat 3rd row twenty-two times (length of Then proceed as follows:- 1st row: knit plain. Break off wool and run end through remaining stitches.
Working on these 50 sts, repeat 3rd row of main pattern twenty-five times. First Finger Next row: k1, (p1, won, k2tog) ten
times; k1. Turn Working on these 17 sts, repeat 3rd row of main pattern twenty-five times. Then proceed as follows:- 1st row: k14, k2tog, k1. Break off wool and run end through remaining stitches. Second Finger With right side of work facing, join in wool and knit up 3 sts from 3 cast-on sts at base of First Finger, k2tog, p1, won, k2tog, k1. Turn. Next row: k1, (p1, won, k2tog) four times, p1, cast on 3sts. Turn. Working on these 17 sts, repeat 3rd row of main pattern thirty times. Decrease and finish off as given for First Finger. Third Finger With right side of work facing, join in wool and knit up 3 sts from 3 cast-on sts at base of Second Finger, k2tog, p1, won, k2tog, k1. Turn. Next row: k1, (p1, won, k2tog) four times, p1, cast on 3sts. Turn. Working on these 17 sts, repeat 3rd row of main pattern twenty-eight times. Decrease and finish off as given for First Finger. Fourth Finger With right side of work facing, join in wool and knit up 3 sts from 3 cast-on sts at base of Third Finger, k2tog, p1, won, k2tog, k1. Turn. Next row: k1, (p1, won, k2tog) four
times, k1, cast on 3sts. Turn. Working on these 14 sts, repeat 3rd row of main pattern eighteen times.
Then proceed as follows:- 1st row: knit plain. Finish off as given for First Finger. Left-hand Glove:Cast on 80 sts and work exactly as given for Right-hand Glove until Thumb is reached. The Thumb Next row: k1, (p1, won, k2tog) eight
times, p1, cast on 9 sts. Turn. Work on these 20 sts exactly as given for Thumb of Right-hand Glove. Using needle containing 15sts, join in wool and knit up 11 stitches
from 9 cast-on sts, at the base of the thumb; wfwd, k2tog, (p1,won, k2tog)
7 times, k1, across remaining 24 sts. First Finger Next row: k1, (p1, won, k2tog) ten
times; p1, cast on 3 sts. Turn Then work on these 17 sts, exactly is given for First Finger of Right-hand Glove. Second Finger With right side of work facing, join in wool and knit up 3sts from 3
cast-on sts at base of First Finger; k2tog, p1, won, k2tog, p1, cast
on 3sts. Turn. Next row: k1, (p1, won, k2tog) five times; k1, Turn. Then work on these 17 sts, exactly is given for Second Finger of Right-hand Glove. Third Finger With right side of work facing, join in wool and knit up 3sts from 3
cast-on sts at base of Second Finger; k2tog, p1, won, k2tog, p1, cast
on 3sts. Turn. Next row: k1, (p1, won, k2tog) five times; k1, Turn. Then work on these 17 sts, exactly is given for Third Finger of Right-hand Glove. Fourth Finger With right side of work facing, join in wool and knit up 3sts from 3 cast-on sts at base of Third Finger; k2tog, p1, won, k2tog, k1. Turn. Next row: k1, (p1, won, k2tog) four times; k1, Turn. Then work on these 14 sts, exactly is given for Fourth Finger of Right-hand Glove. Work the Frill as given for Right-hand Glove. Making Up:With a damp cloth and hot iron press very lightly. |
Materials1 oz Patons Beehive Fingering 2ply. One pair of No 13 (2¼ mm) needles. Tension10 sts to 1 inch over pattern (not stretched). Approximately 36sts 4 inches on No 12 needles over stocking stitch. Size mattersWidth all round above thumb, 5 ins. [Editor's note: 5ins seems a bit small? You may find that despite my notes on the wool weight below that you could use a "4ply" yarn with a larger gauge and/or adjust the needles to get the fit you need. Measure your hand and do a swatch....always Good Advice!] Abbreviationswon/wfwd: wool over needle/wool forward. Makes an extra stitch which forms a small pattern hole when knitted on the next row. k2tog: knit 2 stitches together (decrease). k2togtbl: knit 2 stitches together through back loops or "ssk" (slip slip knit) is a method of knitting 2 stitches together but into the backs of the stitches rather than the usual "k2tog" which knits into the fronts. A word on the woolAlthough it may be a literal 2ply, I think the stated tension implies it is more like a 3 ply weight. Throughout this site I state that it's hard to get 3ply yarns these days - and now I find Jamieson's have a different web address (now corrected on my links I hope) and a range of yarns that is new to me. The yarns are properly described as to the number of strands plied together, (eg "2ply jumper weight"), but also helpfully tell you what the wool weight is equivalent to. So they have an excellent range of colours in "2ply laceweight" which states: This yarn can be used in vintage patterns which call for "3ply yarns". I really wish I had discovered this for some of my other projects. They also have a "cobweb lace" which might be a traditional 2 ply weight. I can't wait to experiment. Disclaimer
|
In need of an additional gift that you can speedily knit? - then this is for you. (Unless you live in the tropics, when it would probably never be for you).
I made these mittens to go with the beret Featherbed by Louisa Harding from her book Little Cake. I like Louisa's work, and yarns; however, I made her beret in Rowan Kid Classic as I needed a particular colour, and in consequence had sufficient left to make mittens, using a similar stitch pattern.
Using Kid Classic was fine but made for an even more lightweight beret - I think I would like to try the recommended yarn for a slightly bulkier feel as intended.
The mittens are lovely and warm and .... feathery.
Instructions:(Make two gloves alike) Cast on 36 stitches, arrange evenly over 3 needles. 1st round: *
K3, p1, k1, p1; repeat from * 6 times to
end of round. 5th round: *
Slip1, k2, then pass the slipped stitch over the 2 knitted sts; p1, k1,
p1; repeat from * 6 times to end of round.
[30sts] Repeat rounds 5 through 8 four times more times. 21st round: as 5th. 23rd round: *
K3, p1, k2, p1; repeat from * 6 times to
end of round. 39th round: *
K3, p1, k2, p1; repeat from * 5 times. 40th round: Begin the next round continuing with the waste yarn, and k5. Slip these 5 sts back onto the left needle and knit them again using working yarn. Then finish the round as follows: k1, yon, p1; * k3, p1, k2tog, yon, p1; repeat from * 5 times to end of round. [43sts] 41st round: Slip1, k2, then pass the slipped stitch over the 2 knitted sts; p1, k2tog, k1, p1; * slip1, k2, then pass the slipped stitch over the 2 knitted sts; p1, k2, p1; repeat from * 5 times to end of round. [36sts] 42nd round: * K1, yon, k1; p1, yon; slip1, k1, psso; p1; repeat from * 6 times to end of round. [42 sts] Repeat rounds 23 through 26 twice more. Cast off 42 sts (not too tightly). Work the thumb. Go back to the waste yarn and carefully remove it, placing the resulting
live sts on two double-point needles; there will be 7 Now set off working in a round; starting with the 7 sts below the opening, arrange the sts as follows: Place the first 2 sts on a needle and leave for the end of the round. Join in the yarn and using another needle, k3, p1, then k2tog (the last
of the 7 lower sts and the first of the 8 upper sts), yon, then purl the
second stitch from the upper needle. This is "needle one" and
has 7 sts. 1st round: *
Slip1, k2, then pass the slipped stitch over the 2 knitted sts;
p1, k2, p1; repeat from * once to end of
round. [12sts] Cast off 14 thumb sts loosely. Making up: |
Materials1 x 50g ball Rowan Kid Classic. Small length of waste yarn in contrasting colour, (something slippery like cotton preferably). One set of 4 No. 8 (4 mm) needles. TensionKid Classic knits to a tension of 18sts and 24 rows to 4 inches on 6mm
needles. Size mattersWidth all round above thumb, 7 ins. To alter the size use larger or smaller needles as required. Abbreviationsyon: yarn over needle - makes an extra stitch which forms a small pattern hole when knitted on the next row. psso: pass the slipped stitch over. Effectively you are "knitting
2 together through back loops" Disclaimer
|
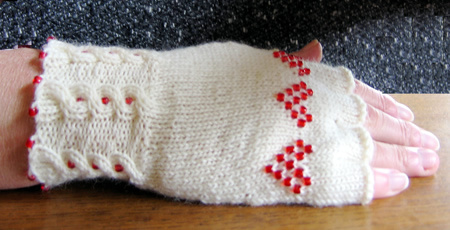
I was inspired to make these mitten patterns by brightly coloured offerings from 1975. This is the posh version, even cuter than the intarsia version I think.
They are a close fit on my hands, but though my hands are small, I tend to have short fingers only; the measurement around my hand is just over 7 inches.
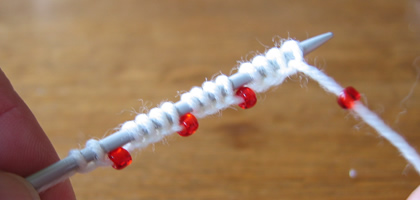
Instructions:Begin working the RIGHT GLOVE: Thread 12 beads on to the yarn. Cast on 48 stitches, using "backward loop method" as follows: loop 2, slide a bead up next to the loops; loop 4, slide next bead into place; slide next bead into place; and so on to the last bead and then end with loop 2 [48 loops].
Knit one row. Begin fancy rib as follows: 1st round: *
P1, k2, p1, k2, p2; repeat from * to end
of round. 6th (cable) round: *
P1, CB5 (cable over 5 sts "back" by slipping the next 3 sts
on to a cable needle and leaving at the back of the work; k2, then (p1,
k2) from cable needle), p2; repeat from *
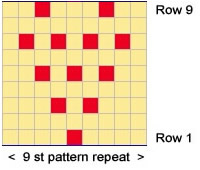
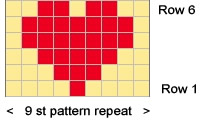
to end of round. Thumb gusset 1st round: K24, p1, k2, p1, k20. Now set aside the thumb stitches and continue with the main glove - at the same time work the first row of the pattern from the chart, setting the position of the beaded hearts as follows, repeating the 9 pattern sts 3 times: Row 1: K4; hook bead and slip this
beaded st, passing the yarn behind, and pulling it firmly as you go into
the next st; (k8, hook bead) twice; k5; slip the next 18 sts on to a safety
pin; cast on 2 sts, k24 to complete the round. [54 sts]
Continue straight, working from the chart for the 9 rows, and completing the three hearts. Row 10: K1, m1, k52, m1, k1. [56 sts] Work 4 rows straight. Divide for fingers Next round (forefinger): Knit
the first 20 sts of the round and place on a stitch holder; place the
last 20sts of the round on a second stitch holder; Knit 16; cast on 2
sts. [18 sts] Next round (middle finger):
Slip the last 7sts on the first stitch holder (the ones nearest to the
forefinger) onto a needle and knit them; pick up and knit 2 from the cast
on sts at the base of the forefinger; slip the first 7sts on the second
stitch holder (the ones nearest to the forefinger) onto a needle and knit
them; cast on 2 sts. [18 sts]. Next round (third finger): Work and complete as for middle finger. Next round (little finger):
Pick up 2 sts at the base third finger; slip the remaining 6 sts on the
second stitch holder onto a needle and knit them; slip the remaining 6
sts on the first stitch holder onto a needle and knit them. [14sts] Thumb: LEFT GLOVE: Thread 12 beads on to the yarn, cast on 48 stitches, and knit one row,
as for right glove. Begin fancy rib as follows: 1st round: *
P2, k2, p1, k2, p1; repeat from * to end
of round. 6th (cable) round: *
P2, CF5 (cable over 5 sts "forward" by slipping the next 2sts
on to a cable needle and leaving at the front of the work; k2, p1, then
k2 from cable needle), p1; repeat from *
to end of round. Thumb gusset You work the thumb gusset in the same way as you did for the right glove, but set the position of the thumb differently as follows: 1st round: K20, p1, k2, p1, k24. Continue in this way as for right glove, but following the stitch layout as set until you reach row 25. 25th and 26th rounds: K23, p1, k18, p1, k27. [70 sts] Now set aside the thumb stitches and continue with the main glove - at the same time work the first row of the pattern from the chart, setting the position of the beaded hearts as follows, repeating the 9 pattern sts 3 times: Row 1: K24; slip the next 18 sts
on to a safety pin; cast on 2 sts; k5; hook bead and slip this beaded
st, passing the yarn behind, and pulling it firmly as you go into the
next st; (k8, hook bead) twice; k4. [54 sts] Once you have set the position of the thumb and the bead hearts, you can work the rest of the left glove exactly as for the right glove. Making up: |
MaterialsExample shown is knitted in 1 x 50g ball Sunbeam St Ives 4 ply in cream 3103. One set of 4 No. 12 (2½ mm) needles. A tiny crochet hook for placing the beads. 66 beads size 6/0 TensionApprox. 32sts and 44 rows to 4 inches on No 12 needles. Size mattersWidth all round above thumb, 7 ins. To alter the size use larger or smaller
needles as required. A word on the woolThe wool I used was from my store room. BeadingFor those of you who think "Less is More" you might prefer to work a single bead heart, positioned on row 20, with the first bead on the 7th st from the edge. Disclaimer
|
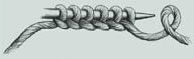
Cast on loop method |
|
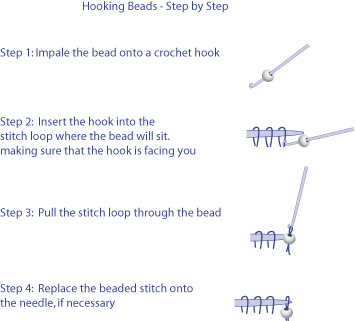
Hooking Beads.This method means you don't have to pre-string the beads on your yarn - I think it is good for placing a few beads amid a lot of knitting, when you don't want to carry just a few beads across miles of yarn before you use them, and you also don't want to break your thread. This information appeared in Knitty.com. (Spring 2006 edition) in an article by Sivia Harding.
|

I was inspired to make these mitten patterns by brightly coloured offerings from 1975. By the time I had tried out a number of versions - and had many more examples of right-hand gloves than I want or need - my final designs differ substantially from the original. But they are cute aren't they?
They are a close fit on my hands, but though my hands are small, I tend to have short fingers only; the measurement around my hand is just over 7 inches.
Instructions:Begin working the RIGHT GLOVE: Using contrast colour, cast on 48 stitches; purl one row, and join into a round. Change to main colour and knit one row. Thumb gusset 1st round: K24, p1, k2, p1, k20. Now set aside the thumb stitches and continue with the main glove as
follows: Work 2 rounds straight. Cut 6 lengths of contrast wool, about 28 inches in length, and 6 of main
shade; do not use bobbins, just the lengths of wool.
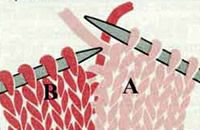
Row 1: K4 from the ball of main shade, k1 using first strand of contrast yarn, k8 using first strand of main shade, k1 contrast using second strand of contrast, k8 using second strand of main shade, and so on the the last 4 sts; k3 in last strand of main shade, slip the last st. Still using the last working needle, pick up the st below the first st of the round and knit into it, then pass the slipped st over this st. Turn the work.
[Editor's note: Use the pop-up from the above picture for more detailed photos of this technique.] Row 2: P3 in main shade, p3 in contrast,
p6 in main shade, and so on; use the intarsia method
and twist the two yarns together when you change colour. Continue in this
way until you get to the last stitch in the row, and slip this stitch.
Still using the first working needle, pick up the st below the last st
of the round and purl into it, then pass the slipped st over this st.
Turn the work. Now go back to working in the round, and continue in main shade only,
using the main ball of wool. Divide for fingers Next round (forefinger):
Knit the first 20 sts of the round and place on a stitch holder; place
the last 20sts of the round on a second stitch holder; Knit 16; cast on
2 sts. [18 sts] Next round (middle finger):
Slip the last 7sts on the first stitch holder (the ones nearest to the
forefinger) onto a needle and knit them; pick up and knit 2 from the cast
on sts at the base of the forefinger; slip the first 7sts on the second
stitch holder (the ones nearest to the forefinger) onto a needle and knit
them; cast on 2 sts. [18 sts]. Next round (third finger): Work and complete as for middle finger. Next round (little finger):
Pick up 2 sts at the base third finger; slip the remaining 6 sts on the
second stitch holder onto a needle and knit them; slip the remaining 6
sts on the first stitch holder onto a needle and knit them. [14sts] Thumb: LEFT GLOVE: 1st round: K20, p1, k2, p1, k24. Continue in this way as for right glove, but following the stitch layout as set until you reach row 25. 25th and 26th rounds: K23, p1, k18, p1, k27. [70 sts] Now set aside the thumb stitches and continue with the main glove as
follows: Once you have set the position of the thumb, you can work the rest of the left glove exactly as for the right glove. Making up: |
MaterialsExample shown is knitted in 1 x 50g ball 4 ply in main shade, and small amount of contast colour. One set of 4 No. 12 (2½ mm) needles. TensionApprox. 32sts and 44 rows to 4 inches on No 12 needles. Size mattersWidth all round above thumb, 7 ins. To alter the size use larger or smaller needles as required. A word on the woolThe wool I used was from my store room. IntarsiaHere is a nice little video clip about intarsia knitting. Don't be put off by her continental knitting method. Disclaimer
|
|
Intarsia.Text and Pictures taken from Ethknits "How to knit" page. Hold the working yarn in your right hand and the yarn to be woven in your left. |
|
 |
 |
|
Changing on a knit row: Knit with yarn A until you want to change. Pull yarn A over to the left and wrap yarn B across the back of A as you knit the next stitch. |
Changing on a purl row: Purl with yarn A until you want to change. Pull yarn A over to left and wrap yarn B under A as you bring it across to purl the next stitch. |
|
You can see from the purl row picture that the edge resembles a sideways knitted row as on each row you cross the yarns over. This way you should get no holes. Don't worry if you see holes where the yarn is loose in some places. When you finish your work you will have lots of ends to sew in and you can pull these tight and sew up any holes that still appear. |
|
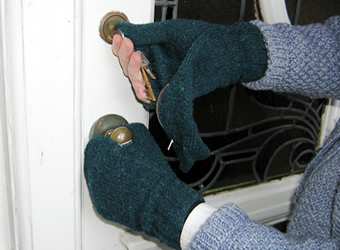
These are double layered mittens which have suddenly become popular again (probably more the height of fashion a year or so ago - as well as half a century ago). This pattern is from February 1940. Here the thumb is left free; in some designs of this era, the thumb and forefinger are left free - your "trigger finger " I assume.
"The glove mitts are a sensible idea, ensuring both warmth and freedom of movement. Instructions are given for both men's and women's sizes".
The different sizes are achieved by using different wool weights and needles.
Instructions (both hands alike)Using No. 14 (2mm) needles cast on 48 stitches, and work in k2, p2 rib in rounds for 2½ inches. Next row: Knit twice into every stitch. Now slip every alternate stitch (ie every "made" stitch) on to No 12(11) needles and leave the original 48 sts on the No14 needles on the outside of the work.
[Editor's note: The
original instructions expect you to continue to knit on the larger needles,
leaving the outer sts on the No 14 needles. I found this very awkward;
I thought it would improve as I got further up the glove but it did not. Continue on the No 12(11) needles, on the "made" sts, in rounds of plain knitting, and work 2 rows straight. 3rd round: Knit twice into first
st, knit to the last st, knit twice into it. 6th round: Knit twice into first
st, knit to the last 2sts, knit twice into next st, k1. 9th round: Knit twice into first
st, knit to the last 3sts, knit twice into next st, k2. Continue in this way, increasing on every 3rd row at either side of the
thuumb, until there are 66 sts on the needles. Divide for thumb Continue on these 20 sts for 22 rounds. Rejoin wool to continue with the main part of the mitten: Work 18 rounds straight on these 54 sts. Divide for fingers Work 3 rounds straight on these 20 sts, then work 4 rounds k1, p1 rib. Cast off loosely in rib. Next round (middle finger): Remove the waste wool and pick up 4 sts at the base forefinger. Knit first 6 sts from holder; cast on 4 sts in waste wool and knit them onto the working needle; slip the last 6 sts on holder onto a needle and knit them. [20sts] Complete as for forefinger. Next round (third finger): Work and complete as for middle finger. Next round (little finger): Remove the waste wool and pick up 4 sts at the base third finger, and knit the remaining 14 sts from holder. [18sts] Work as before over these 18 sts. Over-mitten Next row (right side facing): K2tog;
k21; k2tog; k21; k2tog. Continue in stocking stitch, decreasing as for 7th row on every 6th row
until 37 sts remain. Making up 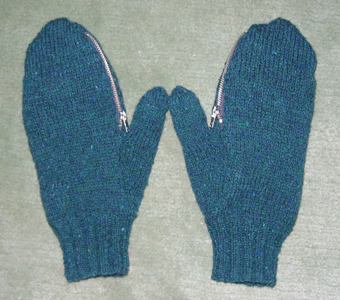
|
MaterialsExample shown is knitted in 3 x 25g balls Rowan 4ply Tweed. Set of 4 each of numbers 14, 12 and 11 (UK size) needles for the smaller
size, and 14, 11 and 10 for the larger size. Two 4-inch zip fasteners. TensionApprox. 8st to 1 inch Rowan 4ply tweed tension: 28st and 40rows to 4 inches (10cm) using No
11 (3mm) needles. Size mattersTo fit size 6¼-7, or 7½-8½ inch hand. A word on the wool.Original calls for 2oz 3 ply for girl's size [sic] and 3oz 4ply for man's
size. Disclaimer
|
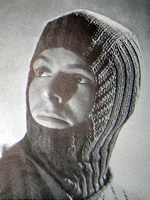
This 'good old Balaclava helmet' was included in the item "More Knitteds for the Forces".
I know - they are nice and warm - and they can be useful on the slopes - but I'm given to understand that beanies are more the thing currently, so I have spared you the details!
Let me know if, (your imagination no doubt fired by the hunk on the left), you want to knit it.
I'm afraid I also have to report that George says these are the silliest mittens he has ever had. Good thing he was not called upon to be in the Home Guard 50 or more years ago, eh?.
© Christina Coutts 2007
![]()