Yellow Blazer
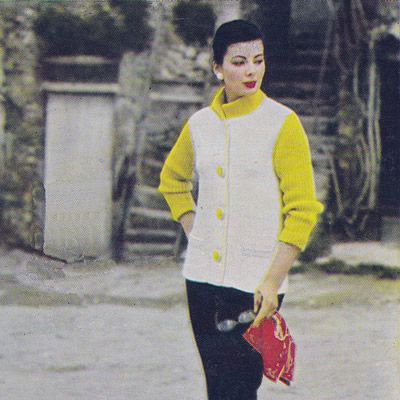
I was told last autumn that red was definitely THE colour of the season, and then - after my wardrobe became impossibly bold - I was told that it was all about neutrals! Similarly last Spring I was told that yellow was the colour - just a splash or dash - and now apparently it is definitely THE colour for Spring.
Whatever you believe, this is a staple 50s jacket which you can knit in a single colour - entirely in yellow - or entirely without yellow. Whatever colour scheme you go for, make sure of those wonderful coordinating giant buttons before you start.
So: "Use a clear sharp sulphur yellow -- vivid contrast with white."
Instructions.Instructions give for 2 sizes- larger size given in brackets thus ().
BackWith No 8 needles white yarn (W), cast on 104 (110) stitches and work 1½ inches in twisted stocking stitch [that is: knit into the back of every stitch on the knit rows throughout], ending with a purl row. Next row (right side facing): Purl,
working into the back of every stitch. With right side facing, continue straight in twisted stocking stitch until back measures 15 (15) inches from hemline ending with a purl row. Shape armholes by casting off 5 stitches at the beginning of the next 2 rows, then decrease 1 stitch at each end of following 6 (8) knit rows. [82 (84) sts] Work straight until back measures 23½ (23½) inches from hemline. With right side facing, shape shoulders by casting off 6 (6)
stitches at the beginning of the next 2 rows, then 5 (5)
stitches at the beginning of the next 8 rows. Pocket linings (make 2 the same)Begin by making pocket linings. Left Front: With No 8 needles and W, cast on 44 (48)
stitches and work 1½ inches in twisted stocking stitch, ending with
a purl row. Next row (right side facing): Purl,
working into the back of every stitch. Continue in twisted stocking stitch as follows: Introduce pocket as follows: Now continue straight in twisted stocking-stitch as before until front measures 15 (15) inches from hemline, ending with a purl row. Continue in pattern shaping armhole and increasing 6 stitches in the border after the slipstitch as follows: Next row: Cast off 5, knit to last
18 stitches, Slip 1 purlways, [increase 1 by picking up horizontal thread
before next stitch and knitting into back of it, k3] 5 times, increase
1 as before, k2. Next row (wrong side facing): join
in yarn Y, (k1, wool forward, slip 1 purlways, wool over needle] 11 times,
k1 in Y; rejoin W and purl to end in W. Repeat the last 2 rows 5 (7) times
more. Now continue straight until front measures 21½ inches from the hemline, keeping 23 stitches of border in twisted rib pattern in Y for revers as before. With wrong side facing, shape neck by casting off 23 stitches in Y. Continue in twisted stocking stitch in W decreasing 1 stitch at the neck
edge on the next 8 (8) rows. [26 sts].
With right side facing, shape shoulder by casting off 6 (6) stitches at the beginning of the next row, then 5 (5) stitches at the beginning of the following 4 alternate rows, at the armhole edge. Right Front: With No 8 needles and W, cast on 44 (48)
stitches and work 1½ inches in twisted stocking stitch, ending with
a purl row. Work to correspond with left front reversing shapings and with the addition of 3 double buttonholes. First to come 3½ inches up from lower edge and remaining 2 at 5-inch intervals. To make a buttonhole: Your pocket row will read: (right side facing), k17, slip 1 purlways, k22 (23), cast off 24 (26), k15 (16). The increase row before start of armhole will read: (right side facing), k2, increase 1 by picking up horizontal thread before next stitch and knitting into back of it, [k3, increase 1 as before] 5 times, slip 1 purlways, knit to end. On the next row start armhole shaping and introduce fancy rib
in Y. as follows: Sleeves:With Y yarn, cast on 53 stitches. 1st row (wrong side facing): *
k1, wfd., Slip 1 purlways,won; repeat from *
to last stitch, k1. Continue in fancy rib for 3 inches ending with 2nd pattern row. Continuing in pattern start to increase 1 stitch at each end of the next
and every following 6th row until there are 93 stitches Work straight in pattern until sleeve seam measures 18 (19) inches from start of fancy rib pattern, ending with 2nd pattern row. With wrong side facing, continue in pattern shaping top by casting
off 5 stitches at the beginning of the next 2 rows, then k2tog at each
end of the next and every alternate row until 59 stitches remain, then
at each end of every row until 19 stitches remain. CollarJoin shoulder seams. With right side facing and yarn Y, pick up and k. 93 stitches all round
neck, beginning and ending at the slipped-stitch of front borders. Next row: Purl, across all stitches,
picking up horizontal loops in the same way. To Make UpPress stocking stitch parts lightly on wrong side under a damp cloth.
Now make up double collar and double front borders as follows: Slip-hem front facing in position on wrong side [note that the slipped stitch in the knitting marks the edge of the fold up the front edges]. Oversew loosely around the double buttonholes. Join side and sleeve seams; insert sleeves. Turn under 1½ inches of stocking-stitch up to hemline all round lower Catch down pocket linings, then with yarn W and (right side facing), pick up and knit 24 (26) stitches along cast-off edge of each pocket opening. Work 2 inches twisted stocking-stitch; cast off loosely. Fold pocket tops in half to wrong side and slip-hem, then catch down sides of pocket tops to main work. Press all seams and hems. |
Materials
|
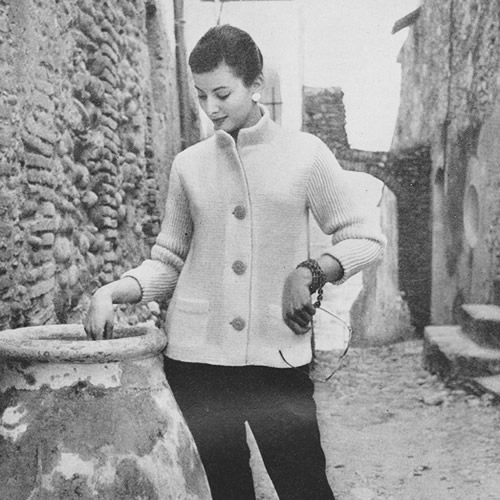
It is interesting to note that this jacket is referenced as being a revamp of a previous model (which I have yet to find). This picture above is obviously how it was made up for the photo shoot - ie in a single colour. You can peer at the detail in the colour photo and pretty easily see that the yellow colour has been painted in after the event. I am keen on trying out changes to the photos - lightly tinting black and white pictures etc - but these changes would have been made by skillful application using a real air brush technique rather than Photoshop.
