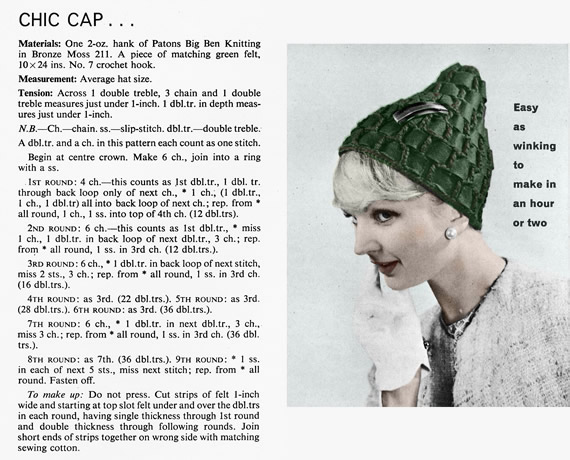
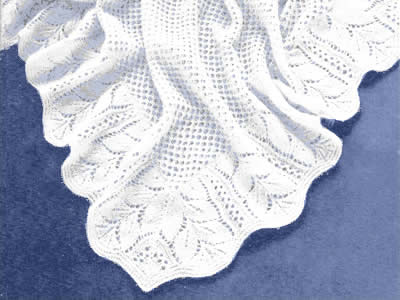
Home

Weblog

Pattern of
the Month

On the Needles
(...and Off the Needles)

Knitalong

Stitchcraft

Vintage Patterns

About the
Idle Hands


Archive entry for 2013

« 2012 | Main | 2014 »

December 2013

Fireside Slippers

FiresideSlippers.jpg

A lovely old-fashioned pair of knitted slippers. Make them using a luxury yarn in a striking colour for a quickly knitted Christmas gift.

Instructions

Instructions in 3 sizes, each size separated by forward slash (/).

Both slippers are worked alike.

Slipper (make 2)

With No 11 needles, cast on 90/95/100 stitches and work 12 rows in garter stitch (that is: every row knitted).

Change to pattern as follows:

1st row: k4, * p2, k3; repeat from * to last 6 stitches, p2, k4.
2nd row: k1, p3, * p3, k2; repeat from * to last 4 stitches, p3, k1.

3rd row: k1, * wfwd, slip 1, k2tog, psso, wrn, p2, * to last 4 stitches, wfwd, slip 1, k2tog, psso, wrn, k1.
4th row: as 2nd row.

Repeat these 4 rows 3 times more, then rows 1-3 inclusive again: 19 pattern rows.

Work 5 rows in garter stitch.

Cast off.

Make a second slipper in the same way.

To Make Up

Press parts lightly on wrong side under a damp cloth.

Fold foot pieces in half and join centre back and foot seams neatly with a flat seam.

Thread ties through holes made in 19th row of the patterning.
You can find information from Sirdar on making ties here.

Press seams.

Note:
You may like to cover the soles of the slippers with a non-slip material such as a washable non-slip liner available in limited colours from (for example) Wilkinsons in the UK.

Materials

3/3/3oz Double Knitting yarn.

One pair each No 8 (4mm) needles.

Tension

22 stitches by 30rows to 4 inches over stocking stitch on 4mm needles

Size matters

To fit 3 sizes
small/medium/large.

Abbreviations

wrn: wool round needle
wfwd: wool forward

Disclaimer
(well...almost)

In transposing any pattern it is always a risk that errors will be introduced, in spite of dedicated proof reading.
If you have any problems with this pattern, please and I will try and assist.


....so.... speaking of quickly knitted gifts....

An extra Christmas gift just for you. Don't bother to thank me - it's priceless I think you'll agree.
Perfect if you are thinking of elf-themed fancy dress this Christmas - and I can recommend that you use any left-over felt to make a matching elfish pointy collar.

FiresideSlippers.jpg

They miss out the key instruction at the end of the making up section .... "Do not wear".
Joking apart, this method of threading ribbon or fabric strips through a crocheted mesh base is a good technique for creating an interesting textured fabric to work with. I have seen it used to good effect making, for example, an evening clutch bag, using more luxurious starting materials.

November 2013

Traditional Cosy Set

TraditionalCosySet.jpg

The archetypal cosy design (maybe with a few too many pom-poms for historical verisimilitude but who's counting?). And - no idea why the British are quite so obsessed with hats for their eggs, but it does seem that there is always a matching egg cosy* to complete the set.

* I think with very fine wool and a bit of adaptation these could become knitted hats for the Big Knit - a campaign from Innocent Smoothies, who are again putting knitted hats on their bottles this year in aid of Age UK (helping older folk face the winter). The advertising says "knit a hat this November" however unfortunately the deadline for knitting is past as the campaign aims to have the hats in place during November - so maybe next year....
However, you can still join in by designing your own virtual hat and sharing on Facebook (10p donation from Innocent), or by buying a smoothie with a hat (25p donation by Innocent), or with a direct donation. Have a look on their website - there are free mini-hat patterns!

Instructions

The pleats are formed by each colour being drawn up across the back of the colour just used and keeping all the strands to the wrong side of the work throughout.

Tea Cosy (make 2 pieces)

With No 8 needles and light colour (L), cast on 98sts and knit 5 rows.

Join in Dark colour (D) and proceed in pattern as follows:

1st row: k1L, k6D; * k7L, k7D; repeat from * to last 7 stitches, k6L, k1D.
[Editor's note: Remember you are pulling the unused colour across the back of the knitting to draw up the pleats as you work - this is the reverse of the effect you are usually trying to achieve when you strand colours across the back.]
2nd row: k1D, k6L; * k7D, k7L; repeat from * to last 7 stitches, k6D, k1L.
3rd-6th rows: Repeat 1st and 2nd rows twice.
7th row: k1D, k6L; * k7D, k7L; repeat from * to last 7 stitches, k6D, k1L.
8th row: k1L, k6D; * k7L, k7D; repeat from * to last 7 stitches, k6L, k1D.
9th-12th rows: Repeat 7th and 8th rows twice.

Repeat 1st and 2nd rows until work measures 6 inches from beginning finishing at the end of 2nd row.

Shape top as follows:
1st row: k2togL, k3D, k2togD, * k2togL, k3L, k2togL, k2togD, k3D, k2tog.D; repeat from * to last 7 stitches, k2togL, k3L, k2togD

2nd row: k1D, k4L, * k5D, k5L; repeat from * to last 5 stitches, k4D, k1L.
3rd row: k2togL, k1D, k2togD, * k2togL, k1L, k2togL, k2tog.D, k1D, k2togD; repeat from * to last 5 stitches, k2togL, k1L, k2togD.
4th row: k1D, k2L, * k3D, k3L; repeat from * to last 3 stitches, k2D, k1L.
5th row: k2togL, k1D, * k2togL, k1L,k2tog.D, k1D; repeat from * to last 3 stitches, k2togL, k1D.
6th row: k1D, k1L, * k2D, k2L; repeat from * to last 2 stitches, k1D, k1L.
7th row: (k2togL) twice, * k2tog.D, k2togL; repeat from * to last 4 stitches, (k2togD) twice.

Break off wool, thread end of Light colour through the remaining stitches, draw up and fasten off securely.

Make another piece in same manner.

To Make Up the Tea Cosy

Stitch side and top seams leaving openings for handle and spout.
Using Light colour make make 3 pom-poms and attach to top of cosy. With 2 strands of Dark, crochet a chain and arrange loops on top of cosy as in photograph.


Egg Cosy (make 1 piece)

With No 10 needles and light colour (L) in 3 ply, cast on 72sts and knit 3 rows.

Join in Dark colour (D) and proceed in pattern as follows:

1st row: k1L, k5D; * k6L, k6D; repeat from * to last 6 stitches, k5L, k1D.
[Editor's note: Remember you are pulling the unused colour across the back of the knitting to draw up the pleats as you work - this is the reverse of the effect you are usually trying to achieve when you strand colours across the back.]
2nd row: k1D, k5L; * k6D, k6L; repeat from * to last 6 stitches, k5D, k1L.
3rd-4th rows: Repeat 1st and 2nd rows.
5th row: k1D, k56L; * k6D, k6L; repeat from * to last 6 stitches, k5D, k1L.
6th row: k1L, k5D; * k6L, k6D; repeat from * to last 6 stitches, k5L, k1D.
7th-8th rows: Repeat 5th and 6th rows.

Repeat 1st and 2nd rows until work measures 2¾ inches from beginning finishing at the end of 2nd row.

Shape top as follows:
1st row: k1L, k2togD, k3D, * k2togL, k4L, k2togD, k4D; repeat from * to last 6 stitches, k2togL, k3L, k1D

Work from to as on Tea Cosy.

To Make Up the Egg Cosy

Stitch side seam.
Using Light colour make a pom-pom and attach to top of cosy. With 2 strands of Dark, crochet a chain and arrange loops on top of cosy as in photograph.

Materials

Tea Cosy: 3oz light colour (L) and 2oz dark (D) Double Knitting Yarn

Egg Cosy: 1oz light colour (L) and 1oz dark (D) 3ply yarn

A pair of No 8 (4mm) needles for the tea cosy and No 10 (3¼mm) needles for the egg cosy plus crochet hook.

Tension

22sts x 30 rows to 4 ins for the tea cosy and
30sts x 38 rows to 4 ins for the egg cosy over stocking stitch.

Size matters

To fit "a large sized teapot".
[Editor's note: Egg cosy size not specified!]

Abbreviations

k2tog: decrease by knitting 2 sts together.

For information on making pom-poms
click here
to see a previous entry on this site.

Disclaimer
(well...almost)

In transposing any pattern it is always a risk that errors will be introduced, in spite of dedicated proof reading.
If you have any problems with this pattern, please and I will try and assist.

October 2013

Fancy Rib Jacket

FancyRibJacket.jpg

This is a lovely 1950s Autumn jacket which is defined as "chunky" though this means "not fine" in modern parlance, as the wool weight is a pretty standard double knitting.
I love this style and always meant to make for myself but have not yet done so - hence it is untested, and the original instructions are available in only one size. The instructions are not intended for a beginner - you need to keep your eye on right and wrong sides, and preserving the button band stitches - but having said that, I think it is fairly clearly explained.

Instructions.

Fancy rib pattern worked as follows:

1st row (wrong side facing): * k2, p3tog; repeat from * to last 2 sts, k2
2nd row (right side facing): * p2, wool round needle, p1, wool round needle; repeat from * to last 2 sts, p2.

These 2 rows form pattern.

Back

With No 8 (4mm) needles cast on 90 stitches loosely and work 4 inches in stocking stitch, ending with a purl row.
Make a hem on the next row by knitting 1 stitch from the needle together with 1 stitch from cast-on edge all along

[Editor's note: Though not clear in the photo, it seems the back of the jacket is knitted plain up to the armholes, whereas the fronts have the pattern over the pockets as well.]

Next row: Purl, increasing 3 sts, evenly across the row [93 sts]

Work straight in stocking stitch until back measures 7 inches from lower edge.

With right side facing continue in stocking-stitch, shaping waist as follows:
Next row: k2tog, k26, k2tog, k29; sl1, k1, psso; k26; k2tog.
Work 5 rows straight.

Next row: k2tog, k25, k2tog, k27; sl1, k1, psso; k25; k2tog. [81 sts]
Work 9 rows straight.

With right side facing continue shaping as follows:
Next row: Increase in 1st stitch, k25; increase 1 by picking up horizontal thread before next stitch and knitting into back of it; k29; increase 1 as before; k25; increase in last stitch [85 sts]
Work 5 rows straight.

Next row: Increase in 1st stitch, k26; increase 1 by picking up horizontal thread before next stitch and knitting into back of it; k31; increase 1 as before; k26; increase in last stitch [89 sts]
Work 5 rows straight.

Next row: Increase in 1st stitch, k27; increase 1 by picking up horizontal thread before next stitch and knitting into back of it; k33; increase 1 as before; k27; increase in last stitch [93 sts]
Work 5 rows straight.

Next row: Increase in 1st stitch, k28; increase 1 by picking up horizontal thread before next stitch and knitting into back of it; k35; increase 1 as before; k28; increase in last stitch [97 sts]
Work 5 rows straight.

Next row: Increase in 1st stitch, knit to last stitch, increase in last stitch [99 sts]
Work straight until back measures 15 inches down centre.

With right side facing, shape armholes by casting off 6 stitches at the beginning of the next 2 rows, then k2tog at each end of the next and the following 3 alternate rows. [79 sts]

Next row (wrong side facing): P9; * purl twice in next stitch, p6; repeat from * to end [89 sts]

Next row (right side facing): * p2, wrn, p1, wrn; repeat from * to last 2 sts, p2. [147 sts]

With wrong side facing. change to fancy rib pattern, starting with 1st pattern row and work straight until back measure 23½ inches down centre ending with 1st pattern row [89 sts]
With right side facing, continue in p2/k1 rib over all sts, and shape shoulders by casting off 9 sts at beginning of next 6 rows.
Cast off remaining 35 stitches.

Pocket Linings

With No 8 needles, cast on 26 sts and work 6 inches in stocking stitch ending with a knit row.
Leave these sts on a spare needle or stitch holder.

Make second pocket in the same way.

Left Front

With No 8 needles, cast on 95sts and work as follows:

Next row (right side facing): purl to last 23 sts; k11, sl1 purlways, k11.

Change to pattern with button border in stocking stitch and remainder in pattern as follows:

1st row (wrong side facing): p23; * k2, p3tog; repeat from * to last 2 sts, k2
2nd row (right side facing): * p2, wrn, p1, wrn; repeat from * to last 25 sts; p2, k11, sl1 purlways, k11.

Repeat these 2 rows until front measures 7 inches, ending with 1st pattern row [67 sts]
With right side facing, change to stocking stitch, inserting pocket as follows:

Next row: K5; increase 1, k4, cast off 26, k20 sl1 purlways, k11.

Next row: P32, pur1 across one set of 26 pocket stitches in place of those cast off; p10 [68 sts]


With right side facing, continue in stocking stitch slipping the centre stitch in border on right side rows throughout, and shape for waist as follows:

Next row: K2tog, k27. k2tog, knit to end.
Work 5 rows straight.

Next row: K2tog, k26. k2tog, knit to end.
Work 5 rows straight.

Next row: K2tog, k25. k2tog, knit to end. [62 sts]
Work 9 rows straight.

With right side facing, continue shaping as follows:

Next row: Increase in 1st stitch, k 25, increase 1, knit to end.
Work 5 rows straight.

Next row: Increase in 1st stitch, k 26, increase 1, knit to end.
Work 5 rows straight.

Next row: Increase in 1st stitch, k 27, increase 1, knit to end.
Work 5 rows straight.

Next row: Increase in 1st stitch, k 28, increase 1, knit to end.
Work 5 rows straight.

Next row: Increase in 1st stitch, knit to end [71 sts]

Work straight until front measures same as back at side edge.

With right side facing, shape armhole by casting off 6 sts at the beginning of the next row, then k2tog at this edge on the following 4 alternate rows [61 sts]

Next row: Purl.

Next row: * p2, wrn, p1, wrn; repeat from * to last to last 25 sts; p2, k11, sl1 purlways, k11. [85 sts]

With wrong side facing, continue in fancy rib pattern as follows:

1st row (wrong side facing): P23; * k2, p3tog; repeat from * to last 2 sts, k2
2nd row (right side facing): * p2, wool round needle, p1, wool round needle; repeat from * to last 25 sts; p2, k11, sl1 purlways, k11.

Repeat these 2 rows until front measures 20 inches, ending with 1st pattern row.

Shape neck as follows:

Next row: * p2, wool round needle, p1, wool round needle; repeat from * to last 25 sts; p2tog, k11, sl1 purlways, k11.

Continue decreasing thus inside the 23 border sts on the following 10 alternate rows. Pattern back (1st pattern row). [50sts]

Work a few rows straight in pattern, until back measures same as front ending with 1st pattern row.

With right side facing, continue in p2/k1 rib keeping stocking-stitch border as before, and shape shoulder by casting off 9 sts at the beginning of the next and following 2 alternate rows - armhole edge.

Leave remaining 23 sts on a spare needle or stitch holder.

Right Front

With No 8 needles, cast on 95sts and work as follows:

Next row (right side facing): K11, sl1 purlways, k11, purl to end.

Change to pattern as follows (button border in stocking stitch as before):

1st row (wrong side facing): * k2, p3tog; repeat from * to last 25sts; k2, p23.
2nd row (right side facing): K11, sl1 purlways, k11; * p2, wrn, p1, wrn; repeat from * to last 2sts; p2.

Repeat these 2 rows for 1½ inches, ending with 1st pattern row.

With right side facing, make double buttonhole in next 2 rows as follows: k4, cast off 3, k4, sl1, k4, cast off 3, k4, work to end and back, casting on 3 sts over those cast off

Finish as for left front reversing all shapings, making another 5 double buttonholes as above at 3-inch intervals.

Your pocket row will read:
k11, sl1, k20, cast off 26, k4, increase 1, k5.

Sleeves

With No 10 needles, cast on 48 sts loosely and work 5 inches in stocking stitch, ending with a purl row.

With right side facing, change to No 8 needles and continue in stocking-stitch, shaping sides by increasing 1 stitch at end of 3rd and every following 6th row until there are 78 sts.
Work straight until sleeve seam measures 19½ inches from start, (or required length).

With right side facing, shape top by casting off 4 sts at the beginning of the next 2 rows, then k2tog at the beginning of every row until 40 sts remain; then k2tog at each end of every row until 20 sts remain.

Cast off.

To Make Up

Press stocking-stitch parts only under a damp cloth.

Join shoulder, side and sleeve seams; insert sleeves.
Turn under 2½ inches round each sleeve and slip-hem loosely on wrong side.
Catch down pocket linings to main work.

Now with No 8 needles, k23 border sts. from spare needle at top of right front and work straight on these sts, slipping centre stitch as before until border fits to centre back of neck. Cast off.
Work left front 23 border sts in the same way; join borders at centre back and sew to neck edge.
Turn under half the border sts up to the slipped stitch all round and slip-hem on wrong side.

Oversew round double buttonholes.
Press seams.
Sew on buttons.

Materials

20 ozs Patons Moorland Double Knitting in Cinnamon.

A pair each of Nos
8 (4mm) and 10 (3¼mm) "Beehive" needles.

6 buttons.

Tension

This rib pattern is difficult to measure but it is equivalent to a basic tension of 22sts x 30 rows to 4 ins in stocking stitch on 4mm needles.

Size matters

The pattern is given in one size to fit bust: 35-36 inches;
length from top of shoulders, 23½ ins; sleeve seam 17 ins.

My only suggestion about adapting the size is to increase the yarn weight and needle size. Always knit a swatch and calculate the potential size increase.

Abbreviations

Increase 1: by picking up horizontal thread before next stitch and knitting into back of it, according to pattern instructions - or - Increase in next stitch: by knitting into front and back of the next stitch.

k2tog: (decrease) knit 2 sts together.
p2tog: (decrease) purl 2 sts together.
p3tog: (decrease) purl 3 sts together.

wrn: wool round needle

sl1: slip one stitch
psso: pass the slipped stitch over, (also known as "ssk"; effectively you are "knitting 2 together through back loops")

A word on the wool.

Patons Moorland is a double knitting weight yarn which knitted to a fairly standard DK tension.

Disclaimer
(well...almost)

In transposing any pattern it is always a risk that errors will be introduced, in spite of dedicated proof reading.
If you have any problems with this pattern, please and I will try and assist.

September 2013

Chic Beret and Outsize Bag

ChicBeretOutSizeBag.jpg

Elegantly modelled on location in the Boulevard des Capucines for Paris in Focus showing "hand knits from Paris: top fashion to knit in bulky wool"

Instructions

The bag is knitted in a variation on fisherman's rib, or brioche stitch, while the beret is plain.

Beret

Cast on 72 stitches and work 2½ ins. k1, p1 rib, working into the back of every stitch to give a twisted rib.

Shape crown as follows:

1st row: * k8, increase 1 by picking up horizontal thread lying before next stitch and knitting into back of it; repeat from * last 8 stitches, k8. [80 sts]
2nd row: (k1, p15) 5 times.
3rd row: (k15, p1) 5 times.
Repeat 2nd and 3rd rows twice more.

8th row: (k1, p1, increase 1 by picking up horizontal thread lying before next stitch and purling into back of it, p13, increase 1 as before, p1) 5 times: 90 stitches
9th row: (k17, p1) 5 times.
10th row: (K1, p17) 5 times.
Repeat the last 2 rows twice more.

15th row: (k2togtbl, k13, k2tog, p1) 5 times.
16th row: (k1, p15) 5 times.
17th row: (k15, p1) 5 times.
Repeat the last 2 rows once more.

20th row: (k1, p15) 5 times.
21st row: (k2togtbl, k11, k2tog, p1) 5 times.
22nd row: (k1, p13) 5 times.
23rd row: (k13, p1) 5 times.
24th row: (k1, p13) 5 times.
25th row: (k2togtbl, k9, k2tog, p1) 5 times.
26th row: (k1, p11) 5 times.
27th row: (k2togtbl, k7, k2tog, p1) 5 times.
28th row: (k1, p9) 5 times.
29th row: (k2togtbl, k5, k2tog, p1)5 times.
30th row: (k1, p7)5 times.

Continue decreasing 2 stitches thus in each stocking-stitch panel until 20 stitches remain.
Next Row: (k2tog) 10 times.
Next Row: (p2 tog.) 5 times.

Break wool, thread through remaining stitches, draw up and fasten off.

Stalk: Cast on 7 stitches and work 4 rows stocking-stitch; cast off.

Making up - beret

Press beret lightly on wrong side under a damp cloth, avoiding ribbing.
Roll stalk lengthways and stitch down, then sew firmly to top of beret.

Bag Sides (make two)

Starting at base edge, cast on 60 stitches and work 1 row k1, p1 rib.

Change to fancy rib pattern as follows:-

Next Row: slip 1 knitwise, * p1, knit into next stitch but through loop of row below at the same time slipping stitch above off needle; repeat from * to last stitch, p1.

Repeat this row until piece measures 10 ins.
Continue in pattern casting off 7 stitches at the beginning of the next 2 rows.
Work 4 rows straight.
Cast off in pattern.

Make another piece the same.

Base:

Cast on 14 stitches and work in rib pattern exactly as for main part until piece measures 12 ins, slightly stretched.
Cast off in pattern.

Making up - bag

Make a hem across each piece of main part by folding over narrow piece at top to wrong side.
Cut lining to match front, back and base allowing a little extra for seams.
Join side seams of main part of bag with a flat seam (cast off stitches between hems form sides of bag).
Cover one side of cardboard strip by sticking down lining material for inside of bag. Now cover other side of cardboard base with knitted strip and stitch firmly to lining material all round edge.
Join side edges of lining material but do not turn to right side. Now fold back ½ an inch to the wrong side all round one edge of lining; sew this edge in position to base lining, pleating it at corners, so that right side of lining will be facing when you look into bag.
Place lining inside main part of bag, then join main part to knitted part of base very firmly all round edge.
Stitch top of lining in position ¾ inch down from top edge.
Unscrew ends of bars on frame, then slip each bar through hems. Place ends of bars into holes on frame bringing sides of bag inside ends of frame; screw knobs into position.
[Editor's note: The instructions in italics refer to a specific sort of frame - you will need to fit the handle according to the type you purchase.]

Materials

Beret: 2 hanks Patons Big Ben Knitting.
Bag: 7 hanks.
(Original colour: Black Watch 6141)

One pair of number 4 (6mm) needles.

Lining material for bag approximately 21 inches square.

Cardboard or stiffening for base 12x3½ inches;

9½ inch bag frame.
[Editor's note: Since you will be using a substitute yarn, I would wait until you have finished the bag and measure the opening before buying the handle.]

Tension

Equivalent to a basic tension of 15 stitches to 4 inches in stocking-stitch on No 4 needles.

Size matters

Beret: average size.
Bag: width at widest part: 13 ins; depth: 10 ins; width of base: 4 ins.

Abbreviations

k2tog: decrease by knitting 2 sts together.

k2togtbl: decrease by knitting 2 sts together through back loops, sometimes called ssk (slip 1 knitwise, slip 1 knitwise, place 2 sts back on left needle and knit 2 slipped sts together through back loops).

A Word on the Wool

I don't know the size of the Big Ben hanks, but I am guessing they were at least 2oz (around 50g). My experience with chunky weight yarn bags leads me to guess that at least 6 50g balls might be required.

Disclaimer
(well...almost)

In transposing any pattern it is always a risk that errors will be introduced, in spite of dedicated proof reading.
If you have any problems with this pattern, please and I will try and assist.


ChicBeretOutSizeBag2.jpg

ChicBeretOutSizeBagSketch.jpg

August 2013

Pretty bolero for a toddler

PrettyBolero.jpg

The bolero as such a popular wardrobe accessory for women in the 1950s - it went with all those off-the-shoulder/strapless little numbers (see footnote **) which was the only way to make them respectable day-wear.
This toddler adaptation with its cute puffy sleeves was clearly intended for a little girl.

Instructions

The instructions are for two sizes - the larger size is given in bold blue in curly brackets thus: "Intended to fit 1{2} year old.".
Where one set of figures is given, this applies to both sizes.

Back

With No.10 needles and main shade (M), cast on 70 {76} sts and work straight in stocking stitch, starting with a knit row, until back measures 2¼ {} inches.

With right side facing, shape armholes by decreasing 1 stitch at each end of next and every following alternate row until 58{64} sts remain.

Work straight until back measures 5¾ {} inches. With right side facing, shape shoulders by casting off 8 {9} sts. at beginning of next 4 rows. Cast off remaining 26 {28} sts. loosely.

Left front

With No 10 needles and M, cast on 18 {21} sts and work 2 rows in stocking stitch, starting with a knit row.

Continue in stocking stitch, shaping the front edge by increasing 1 stitch at the end of the next row, then at this edge on every following row until there are 27 {30} sts.
Work straight until front matches back at side edge.
With right side facing, shape armhole by decreasing 1 stitch at the beginning of the next and every following alternate row until 21 {24} sts. remain.
Work 4 rows straight.
With wrong side facing, start to shape front edge by decreasing 1 stitch at the beginning of the next row, then at this edge on every following 3rd row until 16 {18} sts remain.
Work a few rows straight until front matches back, then with right side facing, shape shoulder by casting off 8 {9} sts at the beginning of the next and following alternate row, (the armhole edge).

Right front

Work to correspond with left front, reversing all shapings.

Sleeves

With No 12 needles and M, cast on 43 {43} sts and purl 1 row.
Change to No 10 needles and increase 21 sts on next row thus:
k1, * increase in next stitch, k1; repeat from * to end. [64 {64} sts].
Work straight until sleeve measures 1¾ inches.
With right side facing, shape top by decreasing 1 stitch at the beginning of every row until 38 sts remain.

Next row (right side facing): k2tog, across entire row.
Next row: p1, * p2tog; repeat from * to end.
Cast off remaining 10 sts.

Borders

Join shoulder seams.

Main border: With No. 12 needles and contrast yarn C, cast on 7 sts and work in pattern as follows:

1st row (wrong side facing): Using contrast C, * k1, p1; repeat from * to last st, k1.
2nd row: k1, p1, k3, p1, k1.
3rd row: as 1st row.
4th row: as 2nd row.
5th row: as 1st row.
6th row: k1, p1, k1; now join in M and make bobble by working (k1, p1, k1, p1) all into next stitch; now slip 2nd, 3rd and 4th sts over 1st and off needle; leave M yarn hanging, and pick up the contrast yarn C, k1, p1, k1.
Twist yarns at back of work when changing colour to avoid a hole and carry M loosely up back of work.

These 6 rows form the pattern.
Continue in pattern until strip fits all round bolero edge from centre back of neck. Cast off.

Pin in position as you go along

Sleeve Borders: In the same way work a strip in the pattern to fit all round each sleeve edge.
Cast off.

To Make Up

Press parts gently on the wrong side under a damp cloth.
Join side and sleeve seams; insert sleeves.
Sew main border in position, joining edges at back of neck.
Sew on sleeve borders, joining ends in line with sleeve seams.
Press seams.

Materials

Original materials called for: 2 {2} ozs Patons Beehive Fin-
gering 3-ply in main shade (Beau Blue) and 1{1} oz in white.

A pair each Nos 10 and 12 (3¼mm and 2¾mm) needles.

Tension

30sts and 38 rows to 4 ins over stocking stitch on No 10 needles.

Size matters

Width all round at underarm. 18 {20} inches; length from top of shoulders, 6½ {7} ins; sleeve seam, 2½ {} ins.

A word on the wool.

I used some vintage 3 ply yarn which had no label (but I believe is wool) for the main shade, and some Patons pure wool 3ply in white for the contrast.

Disclaimer
(well...almost)

In transposing any pattern it is always a risk that errors will be introduced, in spite of dedicated proof reading.
If you have any problems with this pattern, please and I will try and assist.


**Footnote: Have you seen Dana Wynter's outfit at the start of Invasion of the Body Snatchers (1956)?? Here - take a peek - it did have a bolero but she immediately removed it on entering the room.

BoleroDress.jpg

All this for a visit to the dentist - ok,ok, he was her old boyfriend whom she was trying to impress....

July 2013

Crochet Bootees for a Special Baby

CrochetBootees.jpg

Well - it's so much talked about I could not let it pass without a little commemoration could I?
Just make sure you make them for your own special baby - I am sure the Palace is exploding with little woolly items (and in one of the hottest month's on record...).

This crochet pattern is a staggered shell, which I found a little tricky to follow, so use the detail photo at the end for guidance as to what it should look like.

Instructions.

Special pattern stitch:
Picot: make 5 ch, then work 1 dc into 2nd of these 5 ch

And a reminder of English crochet stitches:

Double crochet: draw a loop through next stitch, draw a loop through both loops on hook. [American single].
Half treble: pass yarn round hook, draw a loop through next stitch, draw a loop through all 3 loops on hook. [American double]
Treble: pass yarn round hook, draw a loop through next stitch, draw a loop through first 2 loops on hook, then draw another loop through 2 remaining loops.
Double treble: pass yarn twice round hook, draw a loop through next stitch, draw a loop through first 2 loops on hook, draw a loop through next 2 loops, then another through last 2 loops.
Triple treble: (not used in this pattern) pass yarn three times round hook, draw a loop through next stitch, draw a loopthrough first 2 loops on hook, draw a loop through next 2 loops, another through next 2 loops, then another through last 2 loops.

Bootees (make 2)

Beginning at the sole: make 15(17;20;23)ch loosely.

1st round: Miss 3 ch, 3 tr in next ch, 1 tr in each of next 1(1;2;2) ch, 1 htr in next ch, 1 dc in each of next 2 ch, 1 htr in next ch, 1 tr in each of next 2(3;3;4) ch, 1 d tr in each of next 3(4;6;8) ch, 9 dtr in last ch.
Now, work along other side of ch, working 1 dtr in each of next 3(4;6;8) ch, 1 tr in each of next 2(3;3;4) ch, 1 htr in next ch, 1 dc in each of next 2 ch, 1 htr in next ch, 1 tr in each of next 1(1;2;2) ch, 4 tr in same place as first 3 tr; sl st into 3rd ch at beginning to join the round.

2nd round: 3 ch, "inc", 1 tr in next st, "inc", 1 tr in each of next 10(12;15;18) sts, ("inc", 1 tr in next st) 4 times, "inc", 1 tr in each of next 10(12;15;18) sts, ("inc", 1 tr in next st) twice, sl st in 3rd ch at beginning. You now have 46(50;56;62) tr, counting the initial 3 ch as 1 tr.

3rd round: Working into the back loops only (leaves a ridge to mark sole): 3 ch, 1 tr in each tr to end; sl st in 3rd ch at beginning.

4th round: 3 ch, 1 tr in each tr to end; sl st in 3rd ch at beg.

Repeat the 4th round 0(0;1;1) time(s).

Shape Instep

You are now going to work back and forth across the instep in rows.

1st row: 3 ch, 1 tr in each of next 28(30;33;36) tr, miss next tr, sl st across next 2 tr. Turn.
2nd row: Miss 2 sl sts, 1 tr in each of next 10 tr, miss next tr, sl st across next 2 tr. Turn.

Repeat the 2nd row 4(4;4;6) times.

Next row: Miss 2 sl st, 1 tr in each of next 10 tr, 1 tr in each tr to end; sl st in 3rd ch at beg of 1st row to rejoin the round. You now have 28(32;38;38) tr.

Next round: 4 ch, miss 1(1;2;2) tr, 1 tr in next tr, * 1 ch, miss 1 tr, 1 tr in next tr, repeat from * to last 1(1;2;2) sts, miss last 1(1;2;2) sts, sl st in 3rd of 4 ch to join the round. You now have 14(16;18;18) holes.

Next round: 1 ch, 1 dc in same place as sl st, * 1 dc in next 1 ch sp, 1 dc in next tr, repeat from * to last ch sp, 1 dc in 1 ch sp, 1 dc in same place as first dc, DO NOT JOIN the round.
You now have 29(33;37;37) dc.

Turn, and work in rows as follows:

First size only:

1st row (wrong side): 1 ch, 2 dc in first dc, * 3 ch, miss 3 dc, (1 dc, 3 ch, 3 tr) in next dc, miss 2 dc, (1 dc, 1 ch, 1 dc) in next dc, repeat from * ending last repeat with 2 dc in last dc instead of (1 dc, 1 ch, 1 dc).

2nd, 3rd and 4th sizes:

1st row (wrong side): 1 ch, 2 dc in first dc, * 3 ch, miss 3 dc, (1 dc, 3 ch, 3 tr) in next dc, miss 2 dc, (1 dc, 1 ch, 1 dc) in next dc *; repeat from * to * (0;1;1) times; 3ch, miss (2;3;3) dc, (1 dc, 3 ch, 3 tr) in next dc, miss (2;3;3) dc, (1 dc, 1 ch, 1 dc) in next dc (3;1;1) times; repeat from * to * (1;2;2) times, ending last repeat with 2 dc in last dc instead of (1 dc, 1 ch, 1 dc).

All sizes: You now have 4(5;5;5) patterns.

2nd row: (3 ch, 1 tr) in first dc, * 3 ch, (1 dc, 3 ch, 3 tr) in next 3 ch sp, miss next 3 ch sp, (1 tr, 1 ch, 1 tr) in next 1 ch sp, repeat from * ending last repeat with 2 tr in last dc instead of (1 tr, 1 ch, 1 tr).

3rd row: (3 ch, 1 tr) in first tr, * 3 ch, (1 dc, 3 ch, 3 tr) in next 3 ch sp, miss next 3 ch sp, (1 tr, 1 ch, 1 tr) in next 1 ch sp, repeat from * ending last repeat with 2 tr in top of turning ch instead of (1 tr, 1 ch, 1 tr).

Repeat the 3rd row 1(1;3;3) times.

Next row: (3 ch, 1 tr) in first tr, * 3 ch, 1 dc in next 3 ch sp, 3 ch, miss 1 sp, (1 tr, 1 ch, 1 tr) in next 1 ch sp, repeat from * ending last repeat with 2 tr in top of turning ch instead of (1 tr, 1 ch, 1 tr).

Next row: (3 ch, 2 tr) in first tr, * miss 1 sp, (3 tr, "Picot", 3 tr) in next dc, miss 1 sp, (3 tr, "Picot", 3 tr) in next 1 ch sp, repeat from * to last pattern, miss 1 sp, (3 tr, "Picot", 3 tr) in next dc, miss 1 sp, 3 tr in top of turning ch, "Picot". Fasten off.

Make Up

Using a flat seam, join back seam.
Thread ribbon through holes at ankle.
It is recommended not to press these bootees, owing to the crochet texture.

Materials

1 ball 3ply.

3mm crochet hook.

1m of ribbon

Tension

24.5 tr and 14 rows = 10cm using 3mm hook

Size matters

The pattern is given in 4 sizes: length of sole 7(8;9;11) cm

Crochet abbreviations:

ch: chain
dc: double crochet
tr: treble crochet
htr: half treble
dtr: double treble

sl st: slip stitch
yoh: yarn over hook;
inc: increase - work 2 tr in next tr
dec: decrease - (yoh, draw up a loop in next st, yoh and draw through first 2 loops on hook) twice, yoh and draw through all 3 loops on hook

Remember these are English crochet instructions where dc is equivalent to US single crochet - see "Terminology" in the side bar.

Disclaimer
(well...almost)

In transposing any pattern it is always a risk that errors will be introduced, in spite of dedicated proof reading.
If you have any problems with this pattern, please and I will try and assist.

Picture of pattern detail:

CrochetBootees.jpg

Knitted Bootees for a Special Baby

KnittedBootees.jpg

Well - it's so much talked about I could not let it pass without a little commemoration could I?
Just make sure you make them for your own special baby - I am sure the Palace is exploding with little woolly items (and in one of the hottest month's on record...).

This is the knitted set which is fairly plain with a discreet eyelet pattern, and should be quite simple to make.

Bootees (make 2)

With No 10 needles, cast on 33 sts. and knit 1 row.

1st - 4th rows: Knit.
5th row (eyelet row): K1; (yfwd., k2tog) 16 times.
6th - 8th rows: Knit.
9th row: Knit.
10th row (eyelet row): K1; (yfwd., k2tog) 16 times.
11th - 20th rows: as 1st to 10th rows inclusive.

Repeat the last 2 rows 4 times more.

Next row: as 5th row.
Next row: as 10th row.
Next row: K23. Turn.
Next row: K1; p11; k1.

Work 14 rows in stocking stitch on these 13 sts.
Break off yarn.

Rejoin yarn to inside edge of 10 sts, then knit up 10 sts along side of foot; knit across 13 sts on needle, knit up 10 sts from other side of foot, finally knit across remaining 10 sts. [53 sts]
Knit 9 rows (garter stitch - every row knit).

Shape toe:

1st row: (k1, k2tog, k21, k2tog) twice; k1.
2nd row: K1, k2tog, knit to the last 3 sts; k2tog; k1.
3rd row: (k1, k2tog, k18, k2tog) twice; k1.
4th row: as 2nd row.

Cast off.

Make Up

Press lightly on wrong side. Join seam.
Using 2 lengths of twisted yarn 40 in. long, make a cord and thread through holes at ankle.
Sew a tassel to each end of cord.
Press seams.

Materials

1 25g ball Quickerknit - for example Debbie Bliss Baby Cashmerino

Pair of No 10 (3¼mm) needles.

Tension

26sts x 34 rows to 4 inches on No 9 (3¾mm) needles

Size matters

The pattern is given in one size.

Abbreviations:

yfwd: yarn forward; makes an extra stitch which forms a small pattern hole when knitted on the next row.
k2tog: knit 2 sts together to decrease a stitch

Disclaimer
(well...almost)

In transposing any pattern it is always a risk that errors will be introduced, in spite of dedicated proof reading.
If you have any problems with this pattern, please and I will try and assist.

July 2013

Cool summer lacy dress ...or...

CrochetDress.jpg

This is a lovely - and typical - dress from the burgeoning decade of the 1970s. Crafts and bohemian dress was the thing that defined the start of the era, (while Punk defined the end of it). Back to nature - self sufficiency - flowing maxi dresses and floppy hats - Golden Hands and all that followed (... quite a lot of macramé if I remember rightly).
Elaine made this version and Kate models it layered as a tunic - but with the weather we are being promised for the next few days** as Wimbledon comes to its climax, it might be just as appropriate to wear as originally designed - Grecian goddess style...

Instructions.

Special pattern stitches as follows:
[Editor's note: You will probably find these stitches easier to execute if you try them as opposed to how they appear on paper.]

Bar-st front (worked on right side rows): yarn over, then starting with hook at front of work insert hook from right to left behind stem of next st and through to front again, yarn over and draw loop through up to same height as shells, then complete tr in usual way.
Bar-st back (worked on wrong side rows): yarn over, then with hook at back of work insert hook from right to left in front of stem of next st and through to back again, yo and draw ioop through up to same height as shells, then complete tr in usual way.
Long bar-st: work as bar-st front or back but starting with yarn over twice and working a double tr instead of a tr.
Bodice shell: work 2 tr, 1 ch, 2 tr into same chain or space.
Skirt shell (small): work 3 tr, 1 ch, 3 tr into same chain or space.
Skirt shell (large): work 3 dtr, 1 ch, 3 dtr into same chain or space.

[Editor's note: Elaine made this dress more than once, and she made a small adjustment to the pattern which worked well. Instead of making the skirt back and front separately, she joined the bodice back and front together at the side seams, and then worked the skirt in the round. Just make the appropriate amount of chains (3 or 4) at the start of each round and join at the end with a slip stitch. It saves having to make a join all the way down the side of the skirt.]

Bodice Back

Using size 5 (5½mm) hook make 57(63:69) ch.

1st row (right side facing): Work a shell of [2 tr, 1 ch, 2 tr] into 6th ch from hook, * miss 2 ch, 2 ch, 1 tr into next ch, miss 2 ch, work 1 shell into next ch; repeat from * to last 3 ch, miss 2 ch, 1 tr into last ch. 9(10:11) shells.
2nd row: 3 ch, * 1 shell into space at centre of shell in row below, 1 bar-st back into tr; repeat from * to last shell, 1 shell into space, 1 tr into top ch at beginning of previous row.
3rd row: 3 ch, * 1 shell into space, 1 bar-st front into the bar-st back of row below; repeat from * to last shell, 1 shell into space, 1 tr into last tr.

Repeat the last 2 rows until work measures 3½ ins.

Shape Armholes

1st row (right side facing): Sl st across to space of first shell, 3 ch, 1 bar-st into bar-st, * 1 shell, 1 bar-st; repeat from * to last shell, 1 tr into space of last shell, turn.
2nd row: Sl st into top of bar-st, 3 ch, *1 shell, 1 bar-st; repeat from * to end, replacing last bar-st with a tr into bar-st at beginning of previous row. 7(8:9) shells remain.

Continue in pattern until armholes measure 3½(:4) inches.

Shape Neck

1st row (right side facing): Work in pattern until 2 shells have been worked. 1 bar-st, 1 tr into space of next shell, turn.
2nd row: 1 ch. work 1 shell into space of shell, work in pattern to end.
3rd row: Work 3 ch, 1 shell, 1 bar-st, 1 tr into space of next shell. Turn.
4th row: 3 ch, 1 shell, 1 tr into 3rd ch at beginning of row below. 1 shell remains.

Repeat the last row until armhole measures 6½(:7) ins measured straight. Fasten off.

Leave 1(2:3) shells at centre unworked and rejoin yarn to centre of next shell.
1st row (right side facing): 3 ch, 1 bar-st into bar-st, work in pattern to end. 2 shells worked.
Complete to match first side reversing shapings.

Bodice Front

Work as given for Back to . Continue in pattern until armholes measure 2½(:3) inches, ending with a right side row.
Complete as given for Back from to end.

Skirt Back

With right side of back facing rejoin yarn to lower edge and work across starting ch as follows:-
3 ch, 1 shell into same ch as first shell of bodice, * 1 bar-st front, 1 shell into same ch as next shell in bodice; repeat from * 7(8:9) times more, 1 tr into last ch. 9(10:11) shells.
Next row: 3 ch, * 1 shell into space, 1 bar-st front; repeat from * to last shell, 1 shell into space, 1 tr into 3rd ch at beginning of previous row.
Continue in pattern until skirt measures 6 ins.
Next row: 3 ch, * work a shell of [3 tr, 1 ch, 3 tr] into space, 1 ch, 1 bar-st, 1 ch; repeat from * to last shell, [3 tr, 1 ch, 3 tr] into space, 1 tr into 3rd ch at beginning of previous row.
Repeat the last row until skirt measures 12 ins.
Next row: 4 ch, * work a shell of [3 dtr, 2 ch, 3 dtr] into space, 1 ch, 1 long bar-st, 1 ch; repeat from * ending with 1 dtr into top ch at beginning of previous row.
Continue in pattern as on last row until skirt measures 181½ inches or required length, finishing with a wrong side row.
Next row: 4 ch, * work a shell of 9 dtr into space, 1 ch, 1 long bar-st, 1 ch; repeat from * replacing last long bar-st with 1 dtr into 4th ch at beginning of previous row.

Fasten off.

Skirt Front

Work as given for Skirt Back.

Finishing and Edging

Press pieces very gently with a damp cloth, (or just dampen and pin out to block).
Join side and shoulder seams.

Edgings:
With right side of work facing and using size 7 (4½mm) hook, work 120(136:152) dc evenly round neck edge, sl st to join.
Next round: 1 dc into first dc, * miss 3 dc, work a shell of 9 tr into next dc, miss 3 dc, 1 dc into next dc; repeat from * to last 7 dc, miss 3 dc, 1 shell into next dc, miss 3 dc, sl st into dc at beginning of round. Fasten off. 15(17:19) shells.
Using size 7 (4½mm) hook work 1 row of firm dc round each armhole.

Press seams and edgings.

Optional Belt:
Using size 5 (5½mm) hook and 3 strands of yarn make a chain 50 inches long for belt, fasten off. Thread through the holes formed along the starting ch of bodice.

Materials

14-17ozs. Winfield Trycel DK (see A Word on the Wool)

Crochet hook Nos
5 (5½mm) and 7 (4½mm).

Tension

One bar-st and one shell are 11 inches over pattern on size 5 hook.

Size matters

The pattern is given in 3 sizes to fit bust:
32 (34 : 37) inches;
length from top of shoulders, 25½ (25¾ : 26) inches.

Crochet abbreviations:

ch: chain
tr: treble crochet
dtr: double treble
dc: double crochet
sl st: slip stitch

Remember these are English crochet instructions where dc is equivalent to US single crochet - see "Terminology" in the side bar.

Disclaimer
(well...almost)

In transposing any pattern it is always a risk that errors will be introduced, in spite of dedicated proof reading.
If you have any problems with this pattern, please and I will try and assist.

A word on the wool.

Potentially any double knitting quality can be used (knitting tension would be about 22sts x 30 rows to 4 inches or 10 cm).

The recommended quantity of 13-17 ozs (1oz = 28g) is for a synthetic/nylon type yarn and the yardage on these tends to be 30-50% longer than pure wools or cottons, so be prepared to use up to twice as much weight in yarn as stated.

This would be good made in cotton as a summer dress (can't imagine it in nylon... or rather I probably can - though here are some good synthetics these days). If choosing cotton, a blend or soft cotton would probably be better to give it more drape.

Elaine used a pure lambswool double knitting yarn from Kingcraig, who have an eBay store, and Kate wears this version as a tunic.

1970 and 2012


** These idyllic 70s scenes of a beautiful natural life in the country, were usually shot abroad to ensure success in good weather. However, in 1976 we had the hot summer to end all summers - even Parisians had abandoned fashion with everyone in my sister's words "looking as though they were pregnant" wearing cheesecloth tents attached over the shoulder with ribbon straps.

"The temperature reached 26.7°C (80°F) every day between 22 June and 16 July. For 15 consecutive days from 23 June to 7 July inclusive, temperatures reached 32.2°C (90°F) somewhere in England. Furthermore, five days saw temperatures exceed 35°C (95°F). On 28 June, temperatures reached 35.6°C (96.1°F) in Southampton, the highest June temperature recorded in the UK. The hottest day of all was 3 July, with temperatures reaching 35.9°C (96.6°F) in Cheltenham, one of the hottest July days on record in the UK." - Wikipedia

June 2013

French Poodle

FrenchPoodle.jpg

How very 1950s! How very French!.
How could I resist?
At first glance I assumed this was the more usual toilet roll cover (because nobody wants their spare toilet rolls exposed to the world do they?) - but no! It is a "bottle" cover. How much better to have a knitted poodle gracing the dining table rather than leaving your Castle Lafite Rothschild labels tastelessly speaking for themselves. [Actually I think it looks like it's designed for the sherry bottle - perhaps to hide the little nip you need to get through the housework.]

Alternatively you can wimp out and knit it as a toy - provided your child is also into retro 1950s toys, (did I mention that as a kid my favourite toy was a poodle ? ... he wasn't knitted though ..... Pom Pom .... ‹closes eyes in reminiscence›)

[Please note: This has not been knitted up to test the pattern but is provided as per the original. The shapes are very simple and the main effort is in the making up.]

Instructions.

The poodle is knitted mainly in garter stitch with some eyelet rows to carry elastic and drawstring. I think the two methods of assembly have not been quite thought through in the original pattern, so you need to use your common sense and refer to the picture when sewing it together.

Body

With No 8 needles cast on 49 stitches, and knit 2 rows.

Next row: * k1, wf, k2tog; repeat from * to last stitch, k1.

Continue in garter stitch (every row knit) until work measures 7½ inches from the beginning.

Next row: * k5, k2tog; repeat from * to end. [42 sts]
Knit 3 rows.

Next row: * k4, k2tog; repeat from * to end. [35 sts]
Knit 3 rows.

Next row: * k3, k2tog; repeat from * to end. [28 sts]
Knit 3 rows.

Next row: * k2, k2tog; repeat from * to end. [21 sts]
Knit 1 rows.

Next row: K1; * k2tog; repeat from * to end. [11 sts]

Thread wool through remaining stitches, draw up and fasten off securely. [Editor's note: I think there is a bit of an implied error here - this is the neck, so only draw up to the degree that the neck of the bottle will fit...]

Head

Cast on 49 stitches, and knit 3 rows.

Next row: * k5, k2tog; repeat from * to end. [42 sts]
Knit 3 rows.
Next row: * k4, k2tog; repeat from * to end. [35 sts]
Knit 3 rows.
Next row: * k3, k2tog; repeat from * to end. [28 sts]

Next row: * k1, wf, k2tog; repeat from * to last stitch, k1.

Continue without any shaping for 3 inches.

Next row: * k2tog; repeat from * to end. [14 sts]
Next row: Knit.
Next row: * k2tog; repeat from * to end. [7 sts]

Thread wool through remaining stitches, draw up and fasten off securely.

Nose

Cast on 12 stitches, and work 1½ inches in garter stitch.

Next row: * k1, k2tog; repeat from * to end. [8 sts]
Next row: Knit.
Next row: * k2tog; repeat from * to end. [4 sts]

Thread wool through remaining stitches, draw up and fasten off securely.

Pom-Poms

Make 8 pom-poms, 2½ inches in diameter.
Make 2 pom-poms, 1¾ inches in diameter.

Cut 2 pieces of cardboard the diameter of the finished pom-pom; cut a ½ inch diameter hole in the centre. Wind wool over the rings until the centre hole is filled. With a sharp pair of scissors, cut through the wool at the outer edge. With double wool, bind round the centre of the pom-pom between the two pieces of cardboard; tie a knot and fasten off securely. Remove the cardboard. Fluff out and trim.

To Make Up

Join back seam.
Thread elastic through the holes in the bottle cover base and join securely.
Sew one large pom-pom to the back seam at the bottom edge (tail), and sew 4 large pom-poms on the front to represent the legs.
Using small pieces of cotton wool, stuff the nose and sew securely to the front of the head, ½ inch from the holes.
[Editor's note: I think there is a bit of nose-sewing here that is not fully described; so extemporise.]
Embroider the mouth and sew on the 2 buttons to represent the eyes.
Sew a large pom-pom to each side of the face, and on on top of the head. Sew the 2 smaller pom-poms between these (see photo).

Take 4 strands of light coloured wool and thread through holes at neck and secure with a small knot. Tie in a bow.
[Editor's note: This seems to be pictured as being covered with a ribbon tied in a bow - so again I am guessing a little something missing where you need to extemporise. When you draw up the neck remember it has to be able to fit round the neck of the bottle. The head is not stuffed - it is tubular and filled by the neck of the bottle.]

To Make Up the Poodle as a Toy

Follow the instructions for the Bottle Cover.

[Editor's note: After this there are a few inconsistencies which you need to work out as you go.]

Assemble as the bottle cover.

Insert a circle of cardboard 3 inches in diameter into the bottom of the body.
[Editor's note: As far as I can tell, the cardboard will be exposed at the bottom of the toy; you might want to knit a piece of use fabric to cover it before putting in place.]

Make a roll of stuffing 13 inches long and insert this into the base firmly, leaving excess sticking out for the head to fit over.
Run a strong thread through the top edge of the body (neck) and pull up tightly around the excess stuffing, and tie off.

Fluff out the stuffing slightly and fit head over it; pull down and stitch over body.
[Editor's note: As far as I can tell, this excess stuffing sticking out of the neck is pushed up into the head, where the neck of the bottle would have been in the bottle-cover version.]

Materials

4 ozs. Bri-Nylon Double Knitting, plus a short length of contrast wool.

6 inches (15cm) of narrow elastic.

A pair each of No
8 (4mm) "Aero" needles.

2 buttons.

For the toy: cardboard for the base and toy stuffing.

Tension

No tension is given but a normal tension for standard DK on No 8 needles is 22sts x 30 rows to 4 inches over stocking stitch.

Size matters

No size is given but presumably it fits "a bottle".

Abbreviations

wf: "wool forward": make a stitch by bringing the wool to the front of the work and then passing the yarn over the needle when you make the next stitch.

k2tog: (decrease) knit 2 sts together.

Disclaimer
(well...almost)

In transposing any pattern it is always a risk that errors will be introduced, in spite of dedicated proof reading.
If you have any problems with this pattern, please and I will try and assist.


How to make pom-poms.


This is a different method which I ran across while looking for the simple tutorial above. It's less relevent for making our Poodle maybe but good if you want to make a load of these for a scarf or a necklace (ok - bit dated perhaps - think of your own project!)

May 2013

Mock Cable Cardigan

MockCableMay1957.jpg

Doesn't this picture have a wonderful fresh spring feel? As if summer is just around the corner. It looks just right with a summer dress, to fling casually over the shoulders for those cooler English summer breezes - or for a more formal look - buttoned up with a scarf plus a narrow tweed skirt (and possibly gloves!) to complete the outfit (see photo at the end).
This design has been calling to me for quite some time but as usual I have yet to find the time to try it out. So here it is untested.
"raglan armholes and and firm ribbed bands for this useful cardigan in white to go with everything"

Instructions.

Figures in bold blue given in brackets, refer to the larger size; where only one figure is given, this refers to all sizes.

Back

With No 13 needles cast on 123 (133) stitches and work 10 rows in k1/p1 rib, starting the first row, k1.
Change to No 9 needles and pattern thus:

1st row (right side facing): * p3, k2; repeat from * to last 3 sts, p3.
2nd row: * k3, p2; repeat from * to last stitch 3 sts, k3.
3rd row: * p3, k2tog, but do not slip these stitches off the needle, now knit into 1st stitch and slip both stitches off needle together; repeat from * to last 3 sts, p3.
4th row: as 2nd row

These 4 rows form the pattern.

Continue straight in pattern until back measures 12½ (13) inches at centre.
Then with right side facing, shape armholes by casting off 5 (5) stitches at the beginning of the next 2 rows, then k2tog at each end of next and every following alternate row until 103 (113) stitches remain. Work straight until back measures 20 (20½) inches, ending with a wrong side row.

Now with right side facing, shape shoulders as follows:
Cast off 3 (4) stitches at the beginning of the next 10 rows, and 3 (3) stitches at the beginning of the next 10 rows.
Cast off remaining 43 stitches.

Left Front

Left. With No 13 needles, cast on 58 (63) sts and work 10 rows in k1/p1 rib as before.

Change to No 9 needles and pattern as for back. Work straight until front matches back at side edge up to the armholes.

With right side facing, shape armholes by casting off 5 (5) stitches at the beginning of the next row, then k2tog at this edge on every following alternate row until 48 (53) stitches remain. Work straight until back measures 20 (20½)inches, ending with a wrong side row.

Now with right side facing, shape shoulder and neck edge as follows:

Next row (armhole edge): cast off 3 (4) stitches; pattern to end.
Next row (neck edge): cast off 3 (3) stitches; pattern to end.

Continue in pattern, decreasing 1 stitch at the neck edge on the next 15 (15) rows, and at the same time shape at the shoulder edge by casting off 3 (4) stitches; at the beginning of the next and following 3 alternate rows, then 3 (3) stitches at the beginning of the following 5 alternate rows.
Fasten off.

Right Front

Work as for left front reversing all shapings.

Sleeves

With No 13 needles, cast on 59 (59) sts, and work 2½ inches k1/p1 rib, increasing 4sts evenly across on last row. [63 (63) sts]

Change to No 8 needles and work pattern as for back, shaping sides by increasing 1 stitch at each end of the 7th and every following 6th row, until there are 97 (97) sts, taking the eextra stitches into the pattern as they are made.

Work straight until sleeve measures 16 inches or required length.

With right side facing, shape top by casting off 2 sts at the beginning of the next 2 rows.

**
Next row: p3 slip1, k1, psso; pattern to the last 5 sts, k2tog, p3.
Next row: k3, p1, pattern to the last 4 sts, p1, k3.
Next row: p3, k1, pattern to the last 4 sts, k1, p3.
Next row: k3, p1, pattern to the last 4 sts, p1, k3.
**

Repeat from ** to ** 3(5) times more: [85 (81) sts]
Now continue to decrease 1 stitch inside the 3 border stitches, as before, at each end of the next and every following alternate row until 5(5) stitches remain.
Knit back.

Next row(right side facing): p2, p2tog, p1.
Next row: Knit.
Next row: p1, p2tog, p1.
Next row: Knit.
Next row: p3tog.
Fasten off.

Front Borders and Neckband

Pin sleeves into armholes - top of sleeve fits right across shoulders to neck edge. Sew carefully in position.

Front Borders: With No 13 needles, cast on 13 stitches and work a strip in k1/p1 rib to go up right front, round back of neck, and down left front.
Make 8 buttonholes up right front - first one to come ½ inch from lower edge, 8th about ½ inch below neck shaping, and remainder to be evenly spaced between.
To make a buttonhole: With right side facing, rib 5, cast off 3, rib 5, turn; rib 5. cast on 3, rib 5.

Sew border strip in position as you go along.
To turn corner at start of neck shaping on right front, work as follows: with right side facing, rib to last 3 sts., turn, rib back;
rib to last 6 stitches, turn, rib back;
rib to last 9 stitches, turn, rib back.
[Editor's note: You are working short rows to curve the knitting.]
Continue straight in rib over all stitches to start of neck shaping on left front, and then, with right side facing, turn corner in the same way.
Continue in rib until strip fits down left front.

Cast off.

To Make Up

Press parts only very lightly on wrong side under a damp cloth.
Sew on buttons.
Press all side seams.

Materials

14 (15) ozs. Patons Quickerknit Botany Patonised in white.

A pair each of Nos
13 (2¼mm) and 9 (3¾mm) "Beehive" needles.

8 white pearl buttons.

Tension

This cable pattern is difficult to measure but it is equivalent to a basic tension of 26sts x 34 rows to 4 ins in stocking stitch on 3¾mm needles.

Size matters

The pattern is given in 2 sizes to fit bust:
33-35 (36-37) inches;
length from top of shoulders, 22 (22½) ins; and sleeve seam, 16 (16) inches.

My only suggestion about adapting the size is to increase the yarn weight and needle size. Always knit a swatch and calculate the potential size increase. Using a DK yarn with 4mm needles might increase the size to a range of 39-44 inches.

Abbreviations

Increase: increase by knitting into front and back of the next stitch.

k2tog: (decrease) knit 2 sts together.

p2tog: (decrease) purl 2 sts together.

psso: pass the slipped stitch over, (also known as "ssk"; effectively you are "knitting 2 together through back loops")

Disclaimer
(well...almost)

In transposing any pattern it is always a risk that errors will be introduced, in spite of dedicated proof reading.
If you have any problems with this pattern, please and I will try and assist.

A word on the wool.

Yarns called "quick knit" "quickerknit" and such variations evolved as a compromise for baby designs. They were half way between traditional DK and 4 ply.

These days, there are quite a few yarns that might have a suitably similar tension as "light weight" double knits.

Debbie Bliss Baby Cashmerino ( 125m per 50g ball) is one such yarn being of superb quality, highly practical, and knitting to this convenient gauge. If I were going to knit this cardigan, this is what I would use.

BUT - how much you might need is open to question. Most of the baby quick-knits were blended or completely synthetic and thus probably had a better yardage than pure wools. The name of the original yarn "Botany" implies it might have been a pure wool but who knows what "Patonised" implied and I have no idea of the yardage.
15oz is about 420g - so 9 x 50g balls sounds plausible for a medium sized cardigan with a textured stitch - but better to buy too much than too little.

The French manufacturer Phildar has traditionally offered ranges in this kind of yarn weight, but in practical wool/synthetic blends, currently for example: Laine Merino Alpaga, Phildar Partner 3.5, Fil Oxygene - all coming in at around 110-130m per 50g equivalent.

Bergere de France is a manufacturer whose yarns I know little of but they seem to have at least two suitable offerings eg: Annecy, Coton Fifty.

It was a bit of a surprise to me to find that I can't find much in the way of baby yarns with this designation any more.
Patons Quickerknit Baby is no more - though they currently produce Patons Beehive Baby Sport, which seems to be a kind of equivalent; Sirdar Snuggly Quick Knit is discontinued - relatively recently it seems. Both the above are acrylic and nylon mixes with a yardage of about 180m to 50g.

MockCable-2a.jpg

April 2013

Easter Baby Bonnet

EasterBonnetAndMitts.jpg

This looks like a little Victorian cherub, though the pattern is much later. It uses a combination of smooth and fluffy 4 ply yarns in a relatively simple crochet motif.
I think the bonnet is particularly cute.

Instructions:

The items are made by piecing together a basic motif:

Using blue colour (B), make 8 chain and join into a ring with a slip stitch.
1st round: 3 ch, 15 tr into ring; join to top of 3 ch with ss.
Fasten off B.
2nd round: Join in white (W); (1 dc into top of tr, 1 ch, miss 1 tr, 8 tr into next tr, 1ch, miss 1 tr) 4 times, join to 1 dc with ss.
Fasten off W.
3rd round: Join in B, and work 1 row dc all round.
Fasten off B.

Bonnet:

Make 14 motifs the same and join together as shown in diagram.


Back of bonnet:
Using colour B, make 29 ch.

1st row: 1 dc into 2nd ch from hook, 1 dc into each of next 27 ch
[28dc]

Continue in dc increasing 1 stitch at each end of every 4th row until there are 36 dc.
Continue straight until work measures 4 inches from the start.
Shape top of back piece by decreasing 1 stitch at each end of the next and every alternate row until 20 dc remain. Fasten off.

Making up the Bonnet:

Pin one edge of front piece up sides and all round top edge of back piece. With right side of work facing and B, crochet the 2 pieces together but working 4 dc into edge of back piece only between motifs Fasten off.
Using B, l work 2 rows dc along front edge of motifs.
Make 2 twisted cords in B about 8½ inches long, and sew one to each corner. Make 2 small tassels in W and sew to ends of cords.

Mitts:

Starting with the front of the mitts:

Using B, make 21 ch
1st row: 1 dc into 2nd ch from hook, 1 dc into next 18 ch, 3 dc into last ch, then 19 dc along other side of ch, turn.
2nd row: 18 dc in 18 dc, 2 dc in 1 dc, 3dc in 3 dc, 2 dc in 1 dc, 18 dc in 18 dc. [43 stitches]
3rd row: 18 dc in 18 dc, 2 dc in 1 dc, 5 dc in 5 dc, 2 dc in 1 dc, 18 dc in 18 dc.
4th row: 22 dc in 22 dc, 3 dc in 1 dc, 22 dc in 22 dc.
5th row: 21 dc in 21 dc, 2 dc in 1 dc, 3 dc in 3 dc, 2 dc in 1 dc, 21 dc in 21 dc.
6th row: 21 dc in 21 dc, 2 dc in 1 dc, 5 dc in 5 dc, 2 dc in 1 dc, 21 dc in 21 dc.
7th row: 25 dc in 25 dc, 3 dc in 1 dc,.25 dc in 25 dc.
8th row: 24 dc in 24 dc, 2 dc in 1 dc, 3 dc in 3 dc, 2 dc in 1 dc, 24 dc in 24 dc.
9th row: 23 dc in 23 dc, 2 dc in 1 dc, 7 dc in 7 dc, 2 dc in 1 dc, 23 dc in 23 dc.
10th row: 23 dc in 23 dc, 2 dc in 1 dc, 9 dc in 9 dc, 2 dc in 1 dc, 23 dc in 23 dc.
Fasten off.

Now work the back of the mitts:

Work 2 motifs as given for bonnet and join together as before.

With right side of motifs facing, start in corner and work along one long edge as follows:-
9 dc across 1st motif, 3 ch across space, 9 dc across 2nd motif.
Now work along top (short edge) work 5 dc, 3 dc into centre stitch, 5 dc
Continue down other side with 9 dc, 3 ch, 9 dc. [55 stitches]

Turn and work 9th and 10th rows as given for front of mitt.
Fasten off.

Thumb: Using B, make 2 ch.
1st row: 1 dc into 1st ch, 1 ch, turn.
2nd row: 1 dc into 1st dc, 2 dc into turning ch, 1 ch, turn. (3 dc)
Continue in dc increasing 1 stitch at each end of every alternate row until there are 11 dc.
Work 2 rows in dc.
Mark last row with a coloured thread.
Continue straight in dc for a further 1 inch.
Shape top.
Next row: miss 1 dc, 1 dc in 1 dc all along. [5 dc]
Fasten off.

Join thumb seam from top down as far as marker.
Starting at cuff edge, stitch thumb gusset in position between front and back, then join rest of mitt together.

Cuff.
Using B, work 40 dc all round lower edge of mitt.
Next round: 1 dc in 1 dc all round.
Next row (make holes for cord): (2 dc in 2 dc, 2 ch, miss 2 dc) 10 times, join with ss. to 1st dc.
Work a further 6 rounds dc.
Fasten off.

Making up the mitts:

Make another mitt in the same way but inserting thumb on opposite side to first mitt when making up.
Using W, make 2 twisted cords; thread through holes round wrists to tie at back.

Materials

2 ozs 4 ply, in Powder Blue and
1 oz angora 4 ply in White

One No 12 (2¾mm) crochet hook.

Tension

Each motif measures about 2 inches square. 6½ dc to an inch over plain dc.

Size matters

Bonnet: All round front edge measures 15½ inches.
Mitts: Length 5½ inches.

Crochet abbreviations:

ch: chain
dc: double crochet
tr: treble
ss: slip stitch

[Editor's note: Remember these are English crochet instructions where dc is equivalent to US single crochet - see "Terminology" in the side bar.]

A word on the wool.

Original yarn was Patons Beehive 4ply and Fuzzy Wuzzy angora.

Disclaimer
(well...almost)

In transposing any pattern it is always a risk that errors will be introduced, in spite of dedicated proof reading.
If you have any problems with this pattern, please and I will try and assist.

March 2013

Fair Isle for Spring to wear out when the sun shines

KnitForSpring.jpg

"Carefree and colourful sweater for him uses sparkling motif designs to wear out and about over the week-end when the sun shines" Carefree it may be.. but a double knitting fair-isle for Spring? That's a novel idea. However, I'm sure "a thick sweater to wear on a wet Spring weekend" is also a suitable maxim, so here we are.
[Editor's note: Here we are indeed.... I wrote this at the end of February - and now on March 11th we have sub-zero temperatures and blizzards raging in the South of England (and the Channel Islands). So this sweater choice.... "just perfick" for March.]

The main picture is a low resolution photo that does not quite show the pattern detail to the full; this is because I just had to include the wonderful backdrop to the sweater with record player and vinyl albums. These cool cats are from the early sixties but are listening to 1950s American jazz. You can see more clearly how the pattern looks in the chart at the end.

Instructions

Two sizes are given, with the larger size created by using a larger sized needle. Do check your tension with whatever yarn type you use, as the fair-isle patterning will tend to make the knitted fabric tighter than normal.

Back:

**
Using main colour Charcoal (C), and No 10 (3¼mm) needles - for both sizes - cast on 126 stitches and work 3 inches in k1, p1 rib, increasing 1 stitch at the end of the last row: [127 stitches]
Next row: knit.
Next row: purl.

[Editor's note: The original instructions are written out line by line as reproduced below. I have created a chart which you can see at the end of the pattern.]

Change to No 8 (4mm) [7 (4½mm)] needles, join in white (W), and star pattern as follows:

1st row (right side facing): knit: 1W; * 5C, 1W; repeat from * to end.
2nd row: purl: * 2W, 4C, 2W, 3C, 2W, 4C, 1W; repeat from * to last stitch, 1W.
3rd row: knit: * 1W, 5C, 3W, 1C, 3W, 5C; repeat from * to last stitch, 1W.
4th row: purl: * 6C, 7W, 5C; rep, from * to last stitch, 1C
5th row: knit: * 2C, 4W, 3C, 1W, 3C, 4W, 1C; repeat from * to last stitch, 1C.
6th row:: purl: * 3C, (3W, 2C) 3 times; repeat from * to last stitch, 1C.
7th row: knit: * 4C, (2W, 1C) 3 times; 2W, 3C; repeat from * to last stitch, 1C.

Break C and join in Nasturtium Red (N).

8th row: purl: * 5N, 3W, 3N, 3W, 4N; repeat from * to last stitch, 1N.
Break N and rejoin C.

Repeat rows 7 through to 1 inclusive, in that order. (That is, the reverse of what you just knitted).
Break W.
Work 3 rows stocking-stitch in colour C.

Rejoin W and continue as follows:-

19th row: knit: , * 3C, 1W, 2C, repeat from * to last stitch, 1C
20th row: purl: * 2C, 2W, 4C, 3W, 4C, 2W, 1C; repeat from * to last stitch, 1C
21st row: knit: 1C, 3W, 5C, 1W, 5C, 3 W; repeat from * to last stitch, 1C.
22nd row: purl: * 4W, 11C, 3 W; repeat from * to last stitch, 1W.
23rd row: , * 1W, (3C, 4W) twice, 3C; repeat from * to last stitch, 1W.
24th row: purl: * 2W, 2C, 3W, 5C, 3W, 2C, 1 W; repeat from * to last stitch, 1W
25th row: knit: , * (1C, 2W.) twice, 7C, 2W, 1C, 2W.; repeat from * to last stitch, 1C.

Break C and join in N
26th row: purl: * 2 N, 3W, 9 N, 3W, 1N; repeat from * to last stitch, 1N.

Break N and rejoin C repeat rows 26 - 19 inclusive in that order (that is, reversed as in previous sequence)
Break W.

Continue in snowflake pattern as follows:-

1st row: purl.
2nd row: knit.
3rd row: purl.

Rejoin W
4th row: knit: 1W, * 5C, 1W; repeat from * to end.
Break W
5th row:purl.
6th row: knit
7th row: purl.

Rejoin W
8th row: knit: *3C, 1W, 2C; repeat from * to last stitch, 1C.
Break W

Repeat the last 8 rows 5 [4 or 5] times more, then rows 1-5 inclusive again.

Shape armholes:

Cast off 8 sts. at the beginning of the next 2 rows. Rejoin W.

1st row: k2tog W; knit: 5C, * 1W, 5C; repeat from * to last 2 stitches, k2tog W.
2nd row: purl: * 2W, 4C, 2W, 3C, 2W, 4C, 1W; repeat from * to last stitch, 1W.
3rd row: k2tog; knit: 4C, * 3W,1C, 3W, 5C, 1W, 5C; repeat from * to last l3 stitches, 3W, 1C, 3W, 4C, k2tog.
4th row: purl:, 5C, * 7W, 11C; repeat from * to last 12 stitches, 7W, 5C.
5th row: k2tog, knit: 3W, * 3C, 1W, (3C, 4W) twice; repeat from * to last 12 stitches, 3C, 1W, 3C, 3W, k2tog.
6th row: purl:, 1C, * 3W, (2C, 3W) twice, 5C; repeat from * to last 14 stitches, 3W, (2C, 3W) twice, 1C.
7th row: k2tog C, knit: * 2W, (1C, 2W) 3 times, 7C; repeat from * to last 13 stitches, 2W, (1C, 2W) 3 times, 1C, k2tog C.
Break C and rejoin N.

8th row: purl: 2N, * 3W, 3N, 3W, 9N; repeat from * to last 11 stitches, 3W, 3N, 3W, 2N.
Break N and rejoin C.

9th row: k2tog, knit: 1W, * (1C, 2W) 3 times, 7C, 2W; repeat from * to last 10 stitches, (1C, 2W) twice, 1C, 1W, k2tog.
10th row: purl:, 2W, * (2C, 3W) twice, 5C, 3W; repeat from * to last 9 stitches, 2C, 3W, 2C, 2W
11th row: k2tog W, knit: * 3C, 1W, (3C, 4W) twice; repeat from
* to last 9 stitches, 3C, 1W, 3C, k2tog W.
12th row: purl:, 1C, * 7W, 11C; repeat from * to last 8 stitches,7W, 1C.
13th row: k2tog, knit: 2W, * 1C, 3W, 5C, 1W, 5C, 3W; repeat from * to last 5 stitches, 1C, 2W, k2tog.
14th row: purl:, 2W, * 3C, 2W, 4C, 3W, 4C, 2W; repeat from * to last 5 stitches, 3C, 2W.
15th row: k2tog, knit: * 4C, 1W, 1C; repeat from * to last 5 stitches, 3C, k2tog.
Break W

16th row: purl.
17th row: k2tog, knit to last 2 stitches, k2tog.
18th row: purl.
Rejoin W
Repeat the last 18 rows once more.

Next row: k2tog W, knit: 5C, * 1W, 5C; repeat from * to last 2 stitches, k2tog W.
Break W.

Next row: purl.
Next row: k2tog, knit to last 2 stitches, k2tog.
Next row: purl.
Next row: k2tog C, knit: 1W, * 5 C, 1W; repeat from * to last 2 stitches, k2tog C.
Break W

Next row: purl.
Next row: k2tog , knit to last 2 stitches, k2tog.
Next row: purl.
Rejoin W
Next row: k2tog, knit: 1C, * 1W, 5C; repeat from * to last 4 stitches,
1W, 1C, k2tog.
**

Keeping continuity of pattern continue decreasing 1 stitch at each end of every alternate row until 47 stitches remain. Pattern back and leave stitches on a spare needle.

Front:

Work as for back from ** to **.
Pattern back.

Shape neck:

Next row: k2tog, k16, k2tog, turn and leave remaining stitches on a spare needle.

Continue in pattern on first 18 stitches, decreasing 1 stitch at each end of every knit row until 2 stitches remain.

K2tog and fasten off.

With right side facing, return to remaining stitches, slip centre 25 stitches, on a spare needle, rejoin wool to last 20 stitches, k2tog., pattern to last 2 stitches, k2tog.

Finish to correspond with first side.

Sleeves:

With No 10 needles and C, cast on 56 stitches and work 3 inches k1, p1 rib.

Next row: * k2, knit twice in next stitch, repeat from * to last 2 stitches, k1, knit twice in last stitch. [75 sts]
Next row: purl.

Change to No. 8 [7] needles, join in W and continue in snowflake pattern as follows:-

1st row: knit: 1C, 1W, * 5C, 1W; repeat from * to last stitch, 1C.
Break W

2nd row: purl.
3rd row: knit twice in 1st stitch, knit to last stitch, knit twice in last stitch.
4th row: purl.
Join in W

5th row: knit: 5C, * 1W, 5C; repeat from * to end.
Break W

6th row: purl.
7th row: knit.
8th row: purl.

Keeping continuity of pattern increase 1 stitch at each end of the next and every following 6th row until there are 109 stitches. Work straight until 13 complete patterns and 2 rows of 14th have been done from start.

Now shape top working as for back from to : 55 stitches remain.

Next row: purl.
Next row: k2tog, knit to last 2 stitches, k2tog.
Next row: purl.
Join In W
Next row: k2tog C, knit: * 1W, 5C; repeat from * to last 3 stitches,
1W, k2tog C.

Keeping continuity of snowflake pattern decrease 1 stitch at each end of every row until 5 stitches remain. Leave these stitches on a spare needle.

To Make Up

Press parts on wrong side under a damp cloth, avoiding ribbing.
Join raglan seams on right sleeve, matching patterns carefully.
Join left sleeve raglan at front.
Neck Ribbing: With No 10 needles and main colour C, start at top of left sleeve and with right side facing. Knit 5 sleeve stitches, pick up and Knit 18 stitches down left side of neck, knit centre 25 stitches from spare needle, pick up and knit 18 stitches up right side of neck, knit 5 sleeve stitches, then knit 47 stitches from back: 118 stitches.
Work 15 rows k1, p1 rib.
Cast off very loosely in rib using a bigger needle.

Join remaining raglan seam.
Join side and sleeve seams.
Join neck ribbing neatly, then fold in half to wrong side and slip-hem in position.

Press all seams, avoiding ribbing.

Materials


18[21]ozs Patons Double Quick Knitting in Charcoal; 5 [5] ozs in White and 1[1] oz Nasturtium.
[Editor's note: You really need very little of this red colour - enough for about 12 rows.]

Pair each No 8 [7] (4mm []), and No 10 [10] (3¼mm []).

Tension

24sts to 4 ins using No 8 needles for the smaller size, and 22½ sts to 4 ins using No 7 needles for the larger size, over stocking stitch.

Size matters

To fit chest: 38-40 (41-43)inches.

Length from top of shoulders, 25 (28 or 25½) ins;
sleeve seam, 18½(19½) ins.

Instructions for larger size given in brackets [bold blue]. Where one set of figures is given this applies to both sizes.

A word on the wool.

The tension and needle size indicate that any standard UK double knitting would work; in the US this yarn weight is probably considered a light worsted.
It's worth checking your tension as, even in the UK, the term double knitting covers a multitude of subtle variations.

Disclaimer
(well...almost)

In transposing any pattern it is always a risk that errors will be introduced, in spite of dedicated proof reading.
If you have any problems with this pattern, please and I will try and assist.


Snowflake Pattern Chart

Chart of the first pattern section as given for the Back. This shows the pattern detail not fully visible in the main photo.

SnowflakeChart.jpg


Cool Cats and their American Jazz

From the original photo I can just make out the records in the foreground - the ones on the sofa behind the models defeat me...

DukeJordanTrio.jpg KrupaAndRich.jpg

The Duke Jordan Trio look like they are on the turntable (if not our model's companion is bending the vinyl in the sleeve to an ill-advised angle). The album was recorded on January 28th 1954. Tracks are: Jordu, Scotch Blues, Wait And See, Darn That Dream, Embraceable You, Just One Of Those Things, They Can't Take That Away From Me, and, Confirmation.
Next up for consideration (our model is reading the sleeve notes) is "Krupa and Rich" - both drummers - with an eponymous recording from 1956.
Examples of the music can be found on You Tube.


The record player

It has to be a Dansette doesn't it?
I have to admit I was totally ignorant about this famous brand until very recently. I can't exactly say they were before my time, as they were manufactured between 1952 and 1969, and we did have a record player in that era which was likely to have been a Dansette, but I cannot remember it well enough to say one way or the other.
As to the model in the picture - it looks a bit like the "Bermuda" shown on this fabulous site, though there are some differences. It seems likely as Julie says: "The Dansette Bermuda is by far the model we have the most of in all colours".

February 2013

Heirloom shawl

HeirloomShawlC.jpg

A lace baby shawl made in a 3 ply fingering weight, which makes it a bit more feasible to contemplate as a viable project than the traditional 2 ply, while yet remaining fine and lacey. Added to that, it is made up in sections, rather than a single piece which makes it easier to handle, with all the decreasing lace stitches.

Note added September 2018: since I first transposed this pattern I have had a number of queries so I have recently checked the pattern by knitting it myself from the instructions, and as a consequence corrected some scripting errors (random capital letters and typos), plus I have added the number of stitches after each alternate pattern row on the border pieces. I hope this will help, because despite the fact that the stitches overall are gradually decreasing, on some rows the stitch count increases.
I hope I have caught all the remaining issues, but, as ever, I always welcome anyone sharing any problems they may encounter while knitting it.

Instructions

The shawl is made in 5 pieces: first a centre square, and then 4 mitred borders that are sewn on each side of the centre.

Centre Square

With No 8 needles, cast on 162 stitches.

1st row: knit.
2nd row: k1, * (k1, p1, k1 all into next stitch), sl1, k2tog, psso; repeat from * to last stitch, k1.
3rd row: knit.
4th row: k1, * sl1, k2tog, psso, (k1, p1, k1 all into next stitch); repeat from * to last stitch, k1.

Repeat the last 4 rows until work measures 21 inches.
Cast off.

Borders (make 4)

With No 9 needles, cast on 206 stitches.

1st row: knit.
2nd row: k2tog, knit to last 2 stitches, k2tog.
3rd row: knit.

Repeat 2nd and 3rd rows twice more [200 sts].

Change to pattern as follows:-

1st row: p2tog, p4, k2tog, wrn, p2, * (k1, wfd) twice, k2, k2tog, p1, sl1, k1, psso, k1, k2tog, p1, sl1, k1, psso, k1, k2tog, p1, sl1, k1, psso, k2, (wfd, k1) twice, p2, k2tog, wrn, p2; repeat from * 5 times more, p2, p2tog. [186 sts]
2nd row: k5, p2, k2, * p7, (k1, p3)twice, k1, p7, k2, p2, k2; repeat from * 5 times more, k3.
3rd row: p2tog, p3, wfd, sl1, k1, psso, p2, * k1, wfd, k3, wfd, k1, k2tog, p1, sl1, k1, psso, k1, p1, k1, k2tog, p1, sl1, k1, psso, k1, wfd, k3, wfd, k1, p2, wfd, sl1, k1, psso, p2; repeat from * 5 times more, p1, p2tog. [184 sts]
4th row: k4, p2, k2, * p8, k1, (p2, k1) twice, p8, k2, p2, k2; repeat from * 5 times more, k2.
5th row: p2tog, p2, k2tog, wrn, p2, * k1, wfd, k5, wfd, k2tog, p1, sl1, k1, psso, p1, k2tog, p1, sl1, k1, psso, wfd, k5, wfd, k1, p2, k2tog, wrn, p2; rep, from * 5 times more, p2tog. [182 sts]
6th row: k3, p2, k2, * p9, k1, (p1, k1) twice, p9, k2, p2, k2; repeat from * 5 times more, k1.
7th row: p2tog, p1, * wfd, sl1, k1, psso, p2, k1, wfd, k7, wfd, sl1, k2tog, psso, p1, sl1, k2tog, psso, wfd, k7, wfd, k1, p2; repeat from * 5 times more, wfd, sl1, k1, psso, p1, p2tog. [180 sts]
8th row: k2, p2, k2, * p11, k1, p11, k2, p2, k2; repeat from * to end.
9th row:
p2tog, k2tog, wrn, * p2, k1, wfd, k9, wfd, sl1, k2tog, psso, wfd, k9, wfd, k1, p2, k2tog, wrn; repeat from * 5 times more, p2tog. [178 sts]
10th row: k1, p2, * k2, p25, k2, p2; repeat from * 5 times more, k1.
11th row: k2tog, k1, * p2, k1, wfd, k3, k2tog, p1, sl1, k1, psso, k3, wfd, k1, wfd, k3, k2tog, p1, sl1, k1, psso, k3, wfd, k1, p2, wfd, sl1, k1, psso; repeat from * 4 times more, p2, k1, wfd, k3, k2tog, p1, sl1, k1, psso, k3, wfd, k1, wfd, k3, k2tog, p1, sl1, k1, psso, k3, wfd, k1, p2, k1, k2tog. [176 sts]
12th row: * p2, k2, p6, k1, p11, k1, p6, k2; repeat from * 5 times more, p2.
13th row: k2tog, * p2, (k1, wfd) twice, k2, k2tog, (p1, sl1, k1, psso, k1, k2tog) twice, p1, sl1, k1, psso, k2, (wfd, k1) twice, p2, k2tog, wrn; repeat from * 4 times more, p2, (k1, wfd) twice, k2, k2tog, (p1, sl1, k1, psso, k1, k2tog) twice, p1, sl1, k1, psso, k2, (wfd, k1) twice, p2, k2tog. [174 sts]
14th row: * p1, k2, p7, k1, (p3, k1) twice, p7, k2, p1; repeat from * to end.
15th row: p2tog, p1, * k1, wfd, k3, wfd, k1, k2tog, p1, sl1, k1, psso, k1, p1, k1, k2tog, p1, sl1, k1, psso, k1, wfd, k3, wfd, k1, p2, wfd, sl1, k1, psso, p2; repeat from * 4 times more, k1, wfd, k3, wfd, k1, k2tog, pl, sl1, k1, psso, k1, p1, k1, k2tog, p1, sl1, k1, psso, k1, wfd, k3, wfd, k1, p1, p2tog. [172 sts]
16th row: * k2, p8, k1, (p2, k1) twice, p8, k2, p2; repeat from * 4 times more, k2, p8, k1,(p2, k1) twice, p8, k2.
17th row: p2tog, * k1, wfd, k5, wfd, k2tog, p1, sl1, k1, psso, p1, k2tog, p1, sl1, k1, psso, wfd, k5, wfd, k1, p2, k2tog, wrn, p2; repeat from * 4 times more, k1, wfd, k5, wfd, k2tog, p1, sl1, k1, psso, p1, k2tog, p1, sl1, k1, psso, wfd, k5, wfd, k1, p2tog. [170 sts]
18th row: k1, * p9, k1,(p1, k1) twice, p9, k2, p2, k2; repeat from * 4 times more, p9, k1, (p1, k1) twice, p9, k1.
19th row: k2tog, wfd., k7, wfd, sl1, k2tog, psso, * p1, sl1, k2tog, psso, wfd, k7, wfd, k1, p2, wfd, sl1, k1, psso, p2, k1, wfd, k7, wfd, sl1, k2tog, psso; repeat from * 4 times more, p1, sl1, k2tog, psso, wfd, k7, wfd, k2tog. [168 sts]
20th row: p11, * k1, p11, k2, p2, k2, p11; repeat from * 4 times more, k1, p11.
21st row: k2tog, k8, * wfd, sl1, k2tog, psso, wfd, k9, wfd, k1, p2, k2tog, wrn, p2, k1, wfd, k9; repeat from * 4 times more, wfd, sl1, k2tog, psso, wfd, k8, k2tog. [176 sts]
22nd row: p10, * p13, k2, p2, k2, p12; repeat from * 4 times more, p11.
23rd row: k2tog, k3, sl1, k1, psso, k3, wfd, * k1, wfd, k3, k2tog, p1, sl1, k1, psso, k3, wfd, k1, p2, wfd, sl1, k1, psso, p2, k1, wfd, k3, k2tog, p1, sl1, k1, psso, k3, wfd; repeat from * 4 times more, k1, wfd., k3, k2tog, k3, k2tog. [174 sts]
24th row: p15, * k1, p6, k2, p2, k2, p6, k1, p11; repeat from * 4 times more, p4.
25th row: k2tog, k7, p1, * sl1, k1, psso, k1, k2tog, p1, sl1, k1, psso, k2, (wfd, k1) twice, p2, k2tog, wrn, p2, (k1, wfd) twice, k2, k2tog, p1, sl1, k1, psso, k1, k2tog, p1; repeat from * 4 times more, k7, k2tog. [162 sts]
26th row: p8, k1, * p3, k1, p7, k2, p2, k2, p7, k1, p3, k1; repeat from * 4 times more, p8.
27th row: k2tog, k6, p1, * k1, k2tog, p1, sl1, k1, psso, k1, wfd, k3, wfd, k1, p2, wfd, sl1, k1, psso, p2, k1, wfd, k3, wfd, k1, k2tog, p1, sl1, k1, psso, k1, p1; repeat from * 4 times more, k6, k2tog. [160 sts]
28th row: p7, k1, * p2, k1, p8, k2, p2, k2, p8, k1, p2, k1; repeat from * ending p7.
29th row: k2tog, k5, p1, * k2tog, p1, sl1, k1, psso, wfd, k5, wfd, k1, p2, k2tog, wrn, p2, k1, wfd, k5, wfd, k2tog, p1, sl1, k1, psso, p1; repeat from * 4 times more, k5, k2tog. [158 sts]
30th row: p6, k1, * p1, k1, p9, k2, p2, k2, p9, k1, p1, k1; repeat from * 4 times more, p6.
31st row: k2tog, k4, p1, * sl1, k2tog, psso, wfd, k7, wfd, k1, p2, wfd, sl1, k1, psso, p2, k1, wfd, k7, wfd, s1, k2tog, psso, p1; repeat from * 4 times more, k4, k2tog. [156 sts]
32nd row: p5, k1, * p11, k2, p2, k2, p11, k1; repeat from * 4 times more, p5.
33rd row: k2tog, k3, sl1, k1, psso, wfd, k9, wfd, k1, p2, k2tog, wrn, * p2, k1, wfd, k9, wfd., sl1, k2tog, psso, wfd, k9, wfd, k1, p2, k2tog, wrn; repeat from * 3 times more, p2, k1, wfd, k9, wfd, sl1, k1, psso, k3, k2tog. [164 sts]
34th row: p17, * k2, p2, k2, p25; repeat from * 3 times more, k2, p2, k2, p17.
35th row: k2tog, k3, * wfd, k3, k2tog, p1, sl1, k1, psso, k3, wfd, k1, p2, wfd, sl1, k1, psso, p2, k1, wfd, k3, k2tog, p1, sl1, k1, psso, k3, wfd, k1; repeat from * 4 times more, k2, k2tog. [162 sts]
36th row: p4, * p5, k1, p6, k2, p2, k2, p6 k1, p6; repeat from * 4 times more, p3.

Cast off 162 stitches.

Make 3 more pieces the same.

To Make Up

Pin parts out and press very lightly under a damp cloth (so not to flatten the pattern stitches too much).
Join borders very neatly to centre square, then join corners of border.
Press all seams.

Materials

5 ozs 3 ply Patons Baby Wool.

A pair each No 8 (4mm) and No 9 (3¾mm) needles.

Tension

In stocking stitch: 26 stitches. and 34 rows to 4 inches on No 8 needles.
28 sts x 36 rows to 4 inches on No 9 needles.

Size matters

32 inches square.

Abbreviations

wrn: "wool round needle"; make an extra stitch by winding the wool around the needle (which forms a small pattern hole when worked on the next row).
wfd: "wool forward": make a stitch by bringing the wool to the front of the work and then passing the yarn over the needle when you make the next stitch.


sl1: slip 1 stitch.
psso: pass the slipped stitch over.
s1,k1,psso: slip 1, knit 1, pass the slipped stitch over; also known as "ssk" (slip, slip, knit).


k2tog or p2tog: knit or purl 2 sts together (decrease one stitch).

A word on the wool.

The original pattern calls for Patons "Beehive" which is no longer available but Patons do a range of 3 ply baby wools.

Patons Dreamtime Fairytale is 100% wool available in 6 pastel shades; wash at 30°; 50g ball, 230m/252 yards.

They also make Fairytale 3 ply (not "Dreamtime"), which is a mix of acrylic and nylon in white only. Maybe not so perfect for an heirloom shawl.

Disclaimer
(well...almost)

In transposing any pattern it is always a risk that errors will be introduced, in spite of dedicated proof reading.
If you have any problems with this pattern, please and I will try and assist.

January 2013

Fair-Isle Hooded Scarf

HoodedScarf3.jpg

A lovely warm idea that has never lost its popularity: a scarf/hood combination. This has an interesting construction with the scarf being double sided, and the hood being more a like a pocket with the intention that it should form soft folds when worn. [I'm more used to a pixie hood type design with a centre back seam].

Hood Scarf:

Using the main colour wool (MC) cast on 108 sts.

1st row: Slip 1, knit to end of row.
2nd row: Slip 1, purl to the last stitch k1.

Repeat the 1st and 2nd rows 9 times more.

** Join in the first contrast (B) and working the 1st and 2nd rows as shown on the chart proceed as follows:

1st row: * Knit 2MC, 3B, 3MC, 3B, 1MC, repeat from * to end of row. Break off first contrast (B) and join in the second contrast (Y).
2nd row: * Purl lY, 3MC, 3Y, 3MC, 2Y, repeat from * to end of row. Break off second contrast (Y).


Commencing with the 3rd, row proceed as shown on the chart, changing the colours when necessary, until the 15th row has been worked.
Break off contrast B.

1st row: Slip 1, purl to the last stitch k1.
2nd row: Slip 1, knit to end of row.
3rd row: Slip 1, purl to the last stitch k1.
**

Repeat from ** to ** twice.

Continue in stocking stitch until the work measures 40 inches
from the beginning, ending on the wrong side of the work.
Repeat from ** to ** 3 times.

Work 18 rows in stocking stitch.
Cast off.
Press on the wrong side under a damp cloth.
Fold the scarf in half lengthways. Sew up the seam for 16 inches, leave 16 inches open to form the hood, sew up the remainder of the seam.
[Editor's note: The scarf is a tube which you press flat to make a double thickness scarf, and the hood is formed by leaving the tube open, so the hood is single thickness.]

Hood Border:

Work a border along one 16 inch side of the hood opening as follows:
With the wrong side of the work facing, using the Main Colour wool and commencing 2 inches from the seam, pick up and knit 108 sts. evenly along the next 12 inches (ending 2 inches from the other seam).
[Editor's note: I know - it seems like you are knitting on the wrong side - but the border is folded back - so it's all OK.]

Next row (right side): Slip 1, purl to the last stitch k1.

Join in the second contrast B and working the 1st and 2nd rows as shown on the chart, proceed as follows:

1st row: * Knit 2MC, 3B, 3MC, 3B, 1MC, repeat from * to end of row. Break off first contrast (B) and join in the second contrast (Y).
2nd row: * Purl lY, 3MC, 3Y, 3MC, 2Y, repeat from * to end of row. Break off second contrast (Y).

Commencing with the 3rd row, proceed as shown on the chart, changing the colours when necessary, until the 15th row has been worked.
Break off first contrast (B)
Next row: Slip 1, purl to the last stitch k1.

Proceed as follows:
Next row: Slip 1, k1, * pl, k.l, repeat from * to end of row.
Repeat the this row once.
Cast off loosely in rib.

To Make Up the Scarf.

Sew the ends of the scarf together on the wrong side.
Place the corners of the border to the seam and sew the edges of the border to the 2-inch openings.
Turn back the border and catch-stitch in the centre to hold the border in position.
Using a No 12 Crochet Hook and main shade with the right side of the work facing, work 1 row of double crochet evenly along the other 16 inch side of the hood opening. Using the coloured wools make a mixed fringe at the ends of the scarf.
Press all seams.

Materials

5 ozs 3ply in main shade plus "medium-sized" balls in each of four contrast colours eg blue, yellow, green and pink.

One pair No 9 (3¾ mm) knitting needles.
One No. 12 (2½ mm) crochet hook.

Tension

Approx. 30sts to 4 inches on No 9 needles.

Size matters

Width round face edge is 16 inches.
Length of scarf (excluding fringe) is 48 inches.

A word on the wool

Original knitted in Sirdar Majestic 3-ply Wool

Disclaimer
(well...almost)

In transposing any patterns it is always a risk that errors will be introduced, in spite of dedicated proof reading.
If you have any problems with this pattern, please and I will try and assist.


© Christina Coutts 2007

Helpful Stuff

Pattern Archive

Categories

Yarn Links

Fabric etc

Stuff to do

  • Little rabbits
  • V&A 1940s Patterns
  • Monkey Socks
  • Necktie Bag
  • Posh Gloves
  • Criss-cross coasters