Perfectly Suited
More....
Please note:
Patterns are for
Personal Use Only
You may freely circulate patterns with the Copyright Statement Preserved.
See terms of use.
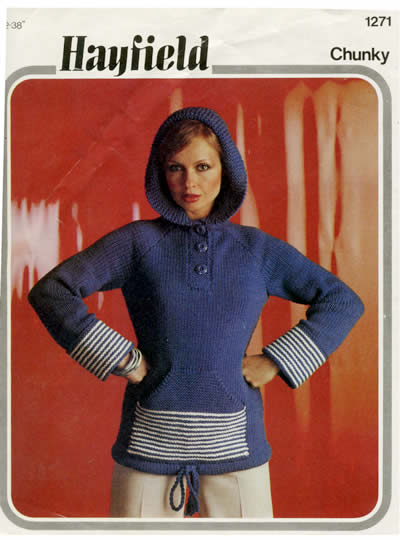
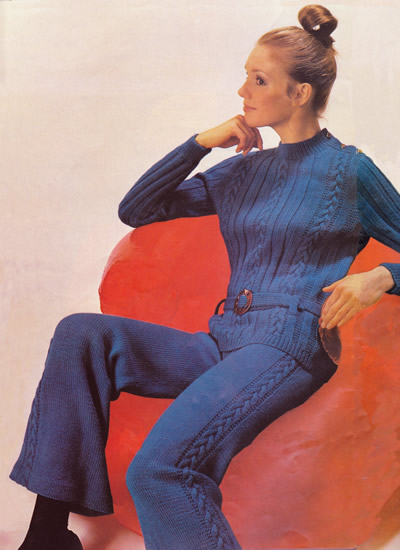
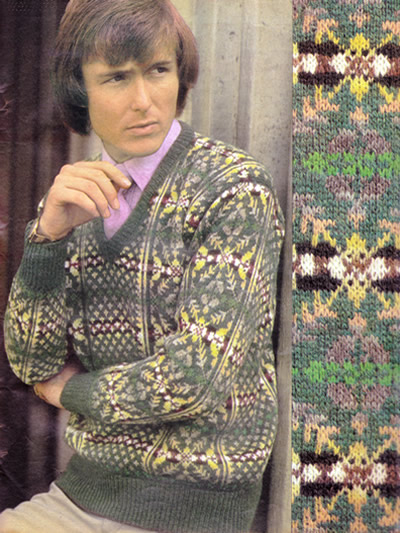
Eye-catching (to say the least...) outfit in colours typical for the 1970s (although other colour palette suggestions are provided in the original pattern).
Very much of its time - but the plain roll-neck sweater (with its light textured detail), and the sleeveless cardigan (maybe without the buttons?) might translate to a pleasing contemporary combination.
"Smart three-piece suit: polo sweater in twisted stocking stitch, skirt and sleeveless cardigan in 4-colour tweed-effect. "
Instructions. 3 sizes - larger sizes are given between brackets - Jumper BackUsing No 11 (3mm) needles, cast on 108 (114, 120) stitches and work 2½ inches in k1/p1 rib. Change to No 9 (3¾mm) needles and work in twisted stocking stitch
thus: Armhole Shaping: Continue straight until work measures 23 (23½, 24) inches. Shoulder Shaping: Jumper FrontWork as for the back up to ★★. Neck Shaping: Shoulder Shaping: With right side facing, slip the centre 22 (24, 26) stitches on to a stitch-holder. Complete the other side of the neck to match. Jumper SleevesUsing No 11 needles, cast on 44 (46,
48) stitches. To shape the top cast off 5 (6,
7) stitches at the beginning of the next
2 rows. Decrease 1 stitch at the beginning of every row until 38 stitches
remain; then, decrease 1 stitch at each end of the next 10 rows. Jumper Polo Collar Join the right shoulder. Work 3 inches in k1/p1 rib. Sleeveless Cardigan BackUsing No 11 needles and main shade, cast on 115 (123, 131) stitches. Moss Stitch row: k1, (p1, k1) to end. Editors note: Moss
stitch - or "seed stitch" - is worked by alternating knit and
purl stitches on every row - like ribbing. However, unlike ribbing, you
do not align the knit and purl stitches vertically above each other but
do the exact opposite; so, as you view the stitches, you will knit a stitch
showing a purl "bump" from the previous row, and purl into a
knit stitch. Repeat the Moss Stitch row row 9 times. Change to No 8 (4mm) needles and pattern: 1st Row: with main shade M, k1, (sl1
purlwise, k3) to the last 2 stitches, sl1 purlwise, k1. Pattern until work measures 21 inches. Armhole Shaping: Shoulder Shaping: Sleeveless Cardigan Right Front Using No. 11 needles and M cast on 59 (63,
67) stitches. Armhole and Front Shaping: Shoulder Shaping : Sleeveless Cardigan Left FrontWork as for the right front, reversing shapings. Sleeveless Cardigan BandsJoin shoulders. Next Row (make buttonhole): moss
stitch 3, cast off 3, moss stitch 3. Work the armbands in the same way, omitting the buttonholes. Skirt (Back and Front Alike)Using No 11 needles and colour M, cast on 147 (155,
163) stitches. Change to No 11 needles, and using M, work 1 inch in k1/p1 rib, beginning
the 2nd row with "p1". Making UpPress or block work according to yarn type. Sweater: Sleeveless Cardigan: Skirt: |
Materials
|
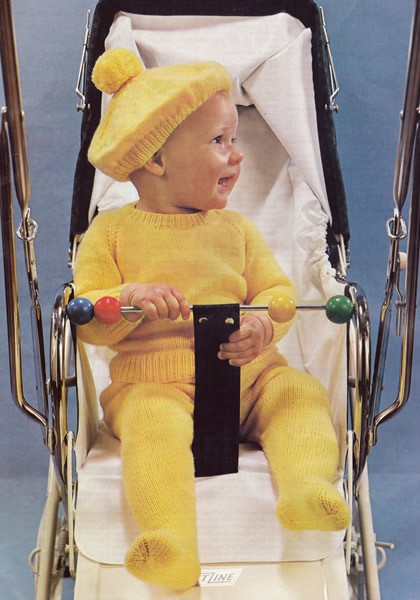
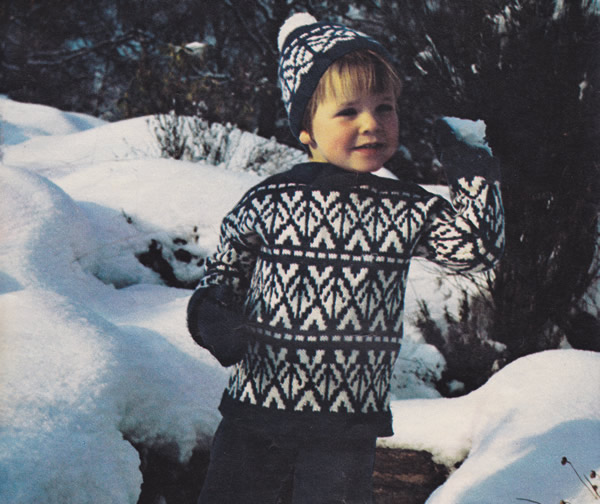
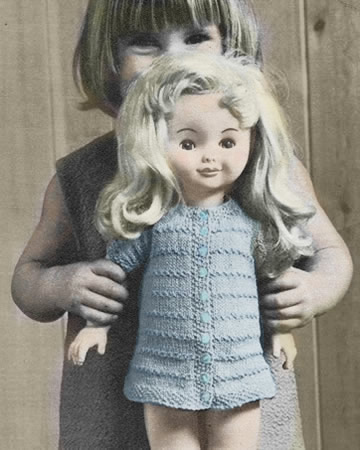
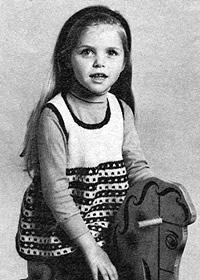
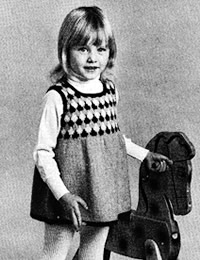
Another delightfully plain and practical pram set for a little one, including leggings, a jumper, and a jaunty beret!
InstructionsJumper Back★ Using size 12 (2¾mm) needles, cast on 72 (76, 80, 84) stitches, and work in k1/p1 rib for 1½ inches ending with a wrong side row. Change to size 10 (3¼mm) needles and stocking stitch (1 row knit,
1 row purl). Shape Raglan Armholes by casting off 3 stitches at the beginning
of the next 2 rows. Jumper FrontFollow instructions for Back from ★ to ★, until 42 (44, 44, 46) stitches remain, ending with a wrong side row. Next row: k2, p2tog , k10 stitches and turn, leaving remaining stitches on a spare needle. Still decreasing at the armhole edge as before, at the same time, decrease
1 stitch at the neck edge on every following alternate row until 5 stitches
remain. Work 1 row; k2tog, and fasten off. Slip the centre 14 (16, 16,
18) stitches onto a spare needle.
Jumper Sleeves Using size 12 needles, cast on 36 (38,
40, 42)
stitches and work in k1/ p1 rib for 1½ inches, ending with a wrong
side row. Shape Raglan Top by casting off 3 stitches at the beginning of
the next 2 rows. Jumper NeckbandUsing a flat stitch, join raglan seams, leaving left back raglan seam
open. With the right side of the work facing and using size 12 needles,
knit across the 6 (8, 8,
10) stitches on the top of the Left
Sleeve;
pick up and knit 12 stitches down the left side of the neck; knit across
the 14 (16, 16,
18) stitches at the centre; pick up
and knit 12 stitches up the right side of the neck; knit across the 6
(8, 8,
10) stitches on top of the Right Sleeve,
and the 26 (28, 28,
30) stitches on the back neck. Work in k1/p1 rib for ¾ inch. Leggings - right leg★ Using size 12 needles, cast on 72 (76,
80, 84)
stitches. Shape Back 1st row: knit 16 (18,
20, 22)
stitches and turn. ★★ Continue in stocking stitch, working across all stitches
for 28 (32, 32,
34) rows. Commence Leg Shaping by casting off 2 stitches at the beginning
of the next 2 rows. Continue on these stitches until work measures 16½ (17¼, 17¾, 18½) inches at the longest (back) edge, ending with a purl row. ★★ Shape Foot Next row: knit 31 (31,
34, 34)
stitches and turn. Work on the centre 13 (13, 14,
14) stitches for 1¾ (2,
2, 2¼)
inches, ending with a purl row. Break off yarn and join it to the inner
edge of the 18 (18, 20,
20) stitches already knitted, pick
up and knit 13 (15, 15,
17) stitches along the first side
of the instep; knit across the 13 (13,
14, 14)
toe stitches, and then knit 13 (15,
15, 17)
stitches along the other side of the instep; then knit the remaining 7
(7, 8,
8) stitches. Commencing with a purl row, work 7 rows in stocking stitch. 1st row: k3, sl1, k1, psso, k1 (1,
2, 2),
k2tog, k27 (29, 30,
32), sl1, k1, psso, k1 (1,
2, 2)
k2tog, k24 (26, 27,
29). Leggings - left legWork as for Right Leg from ★ to ★ . Shape Back 1st row: purl 16 (18,
20, 22)
stitches and turn. Commencing with a purl row, follow the instructions for the Right Leg from ★★ to ★★. Shape Foot Next row: knit 20 (20,
22, 22)
stitches and turn. Work on the centre 13 (13, 14,
14) stitches for 1¾ (2,
2, 2¼)
inches, ending with a purl row. Break off yarn and join it to the inner
edge of the 7 (7, 8,
8) stitches already knitted, pick
up and knit 13 (15, 15,
17) stitches along the first side
of the instep; knit across the 13 (13,
14, 14)
toe stitches, and then pick up and knit 13 (15,
15, 17)
stitches along the other side of the instep; then knit the remaining 18
(18, 20,
20) stitches. Commencing with a purl row, work 7 rows in stocking stitch. 1st row: k24 (26,
27, 29);
sl1, k1, psso, k1 (1, 2,
2), k2tog, k27 (29,
30, 32),
sl1, k1, psso, k1 (1, 2,
2) k2tog, k3. BeretUsing size 12 needles, cast on 132 (132, 136, 136) stitches and work 9 rows in k1/p1 rib. Next row (increase row): rib 7 (7,
9, 9).
* work twice into the next stitch,
rib 2; repeat from * to the last 8
(8, 10,
10) stitches; work twice into the
next stitch, rib 7 (7, 9,
9). Change to size 10 needles and stocking stitch. Shape Crown Break off yarn, thread through remaining stitches, draw up and fasten off securely. To Make UpJumper Leggings Beret |
Materials4 ply yarn 25g balls: Pair each of No 12 (2¾mm) and No 10 (3¼mm) needles. 4 inch zip fastener for jumper Tension30sts and 38 rows to 4 inches Size mattersFinished chest measurement: Abbreviations k: knit A word on the wool.Original yarn was a superwash wool. It appeared as 1 oz balls, then as per this pattern in 25g balls, and finally in 50g balls. Possible yardage based on the 50g ball information is 93 yards (85 metres) to 25g. Disclaimer
|
InstructionsSweater Back and Front alike:With No 10 (3¼mm) needles and MC, cast on 85 stitches. Work 10 rows stocking stitch, beginning with a knit row. *

Continue until 3 complete patterns have been worked (or until work measures
16 inches from hemline), ending with a purl row. Shoulder Shaping: Cast off 8 stitches at the beginning of the next 6 rows. Purl 1 row (hemline). Work 6 rows in stocking stitch, beginning with a purl row, increasing 1 stitch at the beginning of every row. Cast off. Sleeves:With No 10 needles and MC cast on 49 stitches. Trousers Right Leg:Beginning at the ankle, with No 10 needles, and MC cast on 76 stitches.
Work 7 rows in stocking stitch knit 1 row (hemline). Decrease 1 stitch at each end of the 5th and every following 6th row until 68 stitches remain. Continue until work measures 24½ inches from hemline *, ending with a knit row. ** Shape back by working short rows thus: Change to No 10 needles and work 1 inch in k1/p1 rib. Trousers Left Leg:Work as right leg to *, ending with
a purl row. Hat:With No 10 needles and MC cast on 97 stitches. Work 6 rows in stocking stitch, decreasing 1 stitch at the end of 1st row. [96 sts]. Shape top thus: Continue decreasing in this way on every alternate row until 24 stitches
remain. Purl 1 row. Mitts (make 2 alike):With No 10 needles and MC cast on 39 stitches. With right side facing and 32 stitches on right hand needle, rejoin
yarn at the base of the thumb; pick up and knit 2 stitches at the base
of thumb, knit the 6 stitches to the end of the row end. [40 sts]. To Make Up Press or block work. Sweater: Join shoulder and neck facing seams. Trousers: Join front and back seams. Hat: Join seam. Mitts: Join seam. |
MaterialsWorked in a standard double knitting yarn (swatch as per tension given). Sweater: Hat: Trousers: Mitts: Pair each of No 9 (3¾mm), and Waist length of elastic. Tension26sts to 4 inches over fair-isle, 24sts over stocking stitch on 3¾mm needles. Size mattersSweater: Trousers: Abbreviations k: knit MC = main colour Disclaimer
|
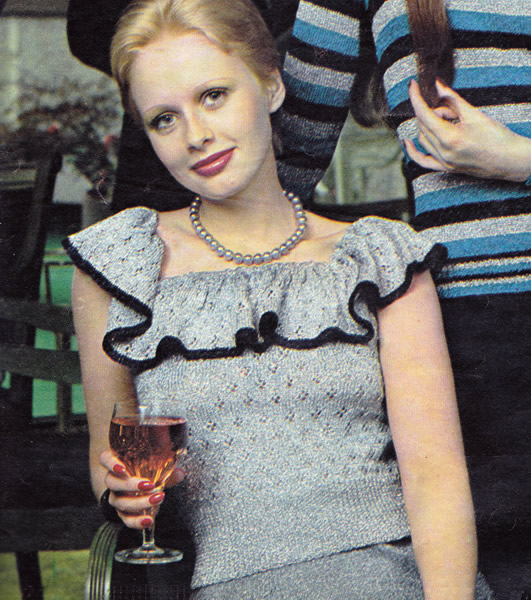
A fun top intended for a metallic yarn, and perfect for the party season. I find metallics a bit scratchy, but there are now quite a lot of sparkly fingering weight yarns for you to choose from. [Always check your tension... I know you do...]
Beautifully shaped sleeveless silver jumper with frill gathered on to deep round neckline.
InstructionsNote: instructions are given for 3 sizes. Back and Front alike:With No 13 (2¼mm) needles cast on 112 / 120
/ 128 stitches, and work 3 inches in k1/p1
rib. Change to No 12 (2¾mm) needles and pattern: 1st row: knit. Armhole Shaping: Cast off 4 / 5
/ 6 stitches at the beginning of the next
4 rows. With right side facing, cast off the centre 28/ 32
/ 36 stitches. Frill (two pieces alike)With No 12 needles and contrast edge colour, cast 168/ 184
/ 200 stitches.
Making UpPress lightly. Join side edges of frill. Fold cast-on edge to wrong side at hemline
and sew down, leaving an opening to insert elastic. |
MaterialsFingering 3 ply weight metallic yarn: Pair each of No 12 (2¾mm), and No 13 (2¼mm) needles. Tension32sts to four inches Size mattersTo fit chest: Abbreviations k: knit Disclaimer
|
A Word on the Wool.The original yarn was Twilleys Goldfingering - available in 25g balls
with a yardage of 100m (109yds), 80% Viscose 20% Metallised Polyester. |
|
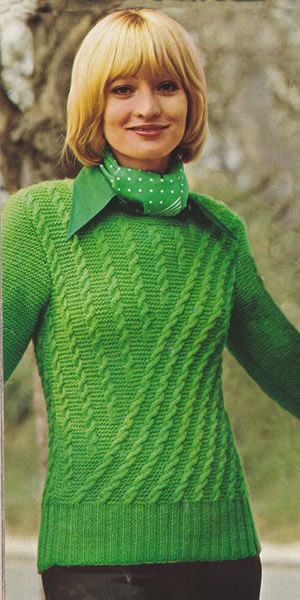
Celebrate St Patrick's Day in style in this emerald sweater with unusual cable pattern.
Instructions.Instructions are (unusually for this era) given for only one medium/small
size. Vertical cable stitch:Editors note: You begin working the diagonal pattern, and then gradually move to this vertical cable. So these instructions are incorporated into the diagonal pattern below. Made over 4 stitches in stocking stitch: Diagonal pattern stitch:1st row: Cast on 1 stitch, (edge
stitch) then, * p6, k1, increase 1 *; repeat from * to *, ending row with
p6. Front:With No 9 (3¾mm) needles, cast on 94 stitches and work in k2, p2
rib (beginning first row p2), for 4 inches . Continue to work in pattern until the work measures 15½ inches
from the top of the ribbing, then Shape the Neck by casting off
the centre 21 stitches, and then finish each side separately. Back:With No 9 (3¾mm) needles, cast on 94 stitches and work in k2, p2
rib (beginning first row p2), for 4 inches . Continue the pattern, working 2 stitches fewer at the beginning and end of rows. When the work measures 11½ inches from the top of the ribbing, When the work measures 18 inches from the top of the ribbing, Sleeves:With No 11 (3mm) needles, cast on 48 stitches and work in k2, p2 rib for 4½ inches. Change to No 8 (4mm) needles and work in garter stitch (every row knitted), increasing 1 stitch at each end of every 16th row 6 times. When the work measures 13 inches from the top of the ribbing, 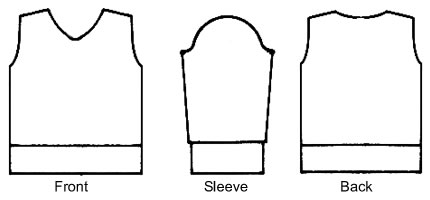
Neckband:With the No 11 (3mm) needles, cast on 110 stitches, and work in garter
stitch for 3 rows. Cast off. To Make Up: Sew up the side and shoulder seams. |
Materials
|
 |
A fairly timeless design for a man's Fair-Isle sweater in lovely muted shades of Shetland wool. As I love this kind of colourwork, and I love men's fashions, it's definitely a hit with me - a lovely gift for a (very) deserving man...
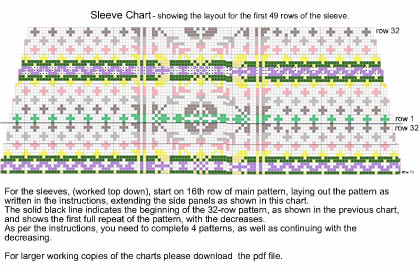
Instructions:The pullover is given in one (medium man's) size and is worked using the Fair-Isle technique, with colours not in use stranded loosely across back of work. ChartsThe charts are included with the pattern instructions below, but for a larger version of the charts you can right click on the icon below and choose "save link as" or "save target as" (browser dependent options) to download and save a pdf file.
BackUsing No 12 (2¾mm) needles and main shade yarn cast on 175 stitches, and work 3 inches in k1/p1 rib. Change to No 11 (3mm) needles, and work 2 rows in stocking stitch. Continue in stocking stitch, working the pattern from the chart thus: reading knit rows from right to left and purl rows from left to right. Work the 87 pattern stitch repeat twice across.
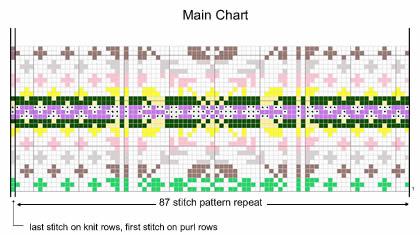
Continue working rows from the chart until the 12th row of the 4th pattern repeat has been completed. ** Armhole shaping: cast off 13 stitches at the beginning of the
next 2 rows. FrontWork as for the back until **. Armhole and neck Shaping: Repeat the last 2 rows until 61 stitches remain, then decrease in the
same way at the neck edge on every 4th row until 52 stitches remain. Join wool to inner (neck) edge of the remaining stitches. SleevesBegin at the top of the sleeve. Using No 11 (3mm) needles and main shade yarn cast on 135 stitches. Knit one row. Beginning with the 16th row of the chart (a purl row worked from left
to right), work thus:
Continue in pattern as set, decreasing 1 stitch at each end of every
5th row until 87 stitches remain. Continue with main shade only and work 3 rows in stocking stitch. Change to No 12 (2¾mm) needles and work 3 inches in rib as for the back. Cast off ribwise. NeckbandJoin right shoulder seam. Using No 12 (2¾mm) needles and main shade, pick up and knit 54 stitches down left front neck, 1 stitch from centre front, 54 stitches up right front neck, and 50 stitches across back neck. [159 sts] Work 10 rows k1/p1 rib, decreasing 1 stitch each side of the centre front
stitch on every row, then work 10 rows k1/p1 rib, increasing 1 stitch
each side of the centre front stitch on every row. To Make UpPress parts lightly under a damp cloth. |
|
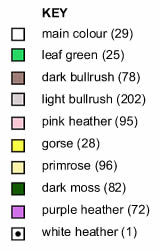
Materials Shetland 2 ply jumper weight (fingering yarn): A pair each No 11 (3mm) and No 12 (2¾mm) needles. Tension32sts x 32 rows to 4 inches over Fair Isle stitch. Size mattersChest to fit one size: 40-42 inches. Abbreviationsk2tog/p2tog: decrease by knitting/purling 2 sts together. stocking stitch: one row knit and one row purl, ("stockinette"). A word on the woolOriginal yarn "Real Shetland Knitting Wool 2 ply jumper weight"
stated as available from a supplier in Edinburgh is likely to be the 2
ply jumper weight from Jamieson
and Smith. It's a 4 ply equivalent specifically designed for Fair
Isle knitting, and is available in 25g balls from a number of different
suppliers in an extensive range of colours. Disclaimer
|
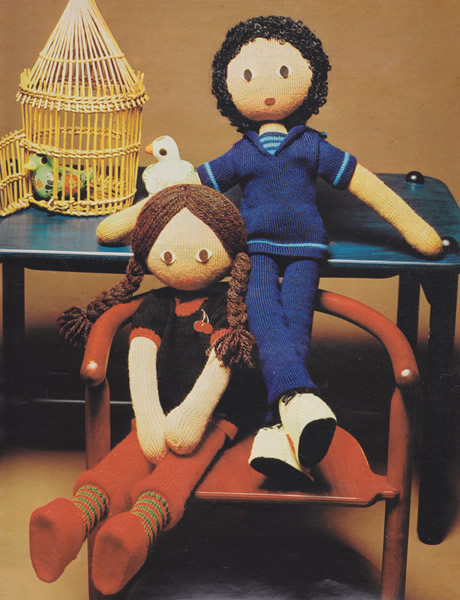
Lovable leggy dolls in their fashionable trouser suits - knitted with sewn-on felt features.
Instructions.The basic dolls are identical, differing only in hair and clothing. Girl Doll - head (2 pieces alike): With No 11 needles and flesh colour, cast on 12 stitches. Now decrease 1 stitch at each end of the next and every 3rd row Make a second piece the same and join together, leaving cast-on edges
open.
Girl Doll - body (2 pieces alike): With No 11 needles and flesh colour, cast on 24 stitches. Make a second piece the same and join together, leaving cast-off edges
open. Girl Doll - legs (make 2): With No 11 needles and flesh colour, cast on 38 stitches. Next Row: k14, k2tog, k6, k2togtbl,
k14. Continue straight until work measures 12 inches. Join back and foot seams. Girl Doll - arms (make 2): With No 11 needles and flesh colour, cast on 25 stitches. Next Row: k1, (m1, k11, m1, k1) twice.
Work 11 rows straight. Continue to decrease as set on the next 4 rows. Join side and hand seams. Girl Doll - hair: Cut brown yarn in 36 inch lengths. With centre of strands of yarn at
centre of head, arrange evenly over head from front hairline to nape of
neck, backstitching securely over centre for parting. Girl Doll - features:Cut oval sections, as given in the diagram, for eyes, (white felt); centres
(black), mouth (red); sew on as shown in picture. Girl Doll - jumper:BACK: With No 9 needles and Red yarn, cast on 48 stitches. ** Continue in stocking-stitch until work measures 3¼ inches, ending with a purl row. Next Row (make back opening): k26;
turn. Shape the armhole by casting off 3 stitches at the armhole edge
on the next 3 rows. Rejoin yarn to the inner edge of the remaining stitches, cast on 4 stitches, and complete to match the other side. FRONT: Work exactly as for BACK as far as *. Shape armholes by casting off 3 stitches at the beginning of
the next 2 rows, then k2tog at each end of the next 3 rows. Neck shaping: Slip the centre 12 stitches on to a stitch holder and work the other side of the neck to match. SLEEVES: With No 9 needles and Red yarn, cast on 40 stitches, and work as for the BACK up to *. Continue in stocking stitch, until work measures 2 inches, ending with
a purl row. NECKBAND: Join the shoulder seams. Set in the sleeves. CHERRIES: Cut two circles in red felt - about the size of a 1p piece. Sew on and embroider stems with white yarn as shown in the photo. Girl Doll - trousers:LEGS (2 pieces alike): With No 9 needles and Red yarn, cast on 42 stitches. Work in stocking stitch, until work measures 8 inches, ending with a purl row. Increase 1 stitch at each end of the next and following 4th row. Make a second leg the same. Join front and back seams. Girl Doll - socks:With No 9 needles and Green yarn, cast on 46 stitches. Next Row: k17, k2tog, k8, k2togtbl,
k17. Working in stripes of 2 rows Red, and and 2 rows Green, continue decreasing
as set until 32 stitches remain. Girl Doll - shoes:Cut out 4 upper sections and 2 soles from red felt, using the pattern
given in the diagram. Boy Doll - head, body, legs, and arms:Work exactly as for GIRL doll. Boy Doll - hair: Using a darning needle and 2 strands of dark brown yarn, work around
hair line, then then fill centre thus: Boy Doll - features:Exactly as the GIRL doll. Boy Doll - jumper:BACK: With No 9 needles and Blue yarn, cast on 48 stitches. Complete the back as for the GIRL doll's jumper, starting from **. FRONT: Work exactly as for BACK (above) as far as ***. Shape armholes by casting off 3 stitches at the beginning of
the next 2 rows, then k2tog at each end of the next 3 rows. Neck shaping: Rejoin the yarn to the inner edge of the remaining stitches, and work the other side to match, working k2togtbl, instead of k2tog. SLEEVES: With No 9 needles and Blue yarn, cast on 40 stitches, and work as for the (Boy's) BACK up to ***. Continue in stocking stitch, until work measures 2½ inches, ending
with a purl row. NECK INSET: COLLAR: Continue on these stitches only. With right side facing, rejoin yarn to inner edge of remaining stitches,
and work other side to match. Join shoulders. Boy Doll - trousers:Work as for the GIRL doll's trousers but using Blue yarn, and turning all the hems to the wrong side. Boy Doll - boots:Cut out 4 upper sections and 2 soles from white felt, using the pattern
given in the diagram. |
MaterialsDouble knitting yarn in 20g balls: Girl Doll: Boy Doll:. • A pair each of Nos 11 (3mm) and 9 (3¾mm) knitting needles Tension28sts x 36 rows to 4 inches on No 11 needles. Size mattersHeight 24 inches. Abbreviationsm1: make 1 stitch by picking up the strand of yarn before the
next stitch and knit into the back of it
A Word
|
Pattern DiagramThis is the pattern for the felt pieces used for the features, shoes,
and boots. 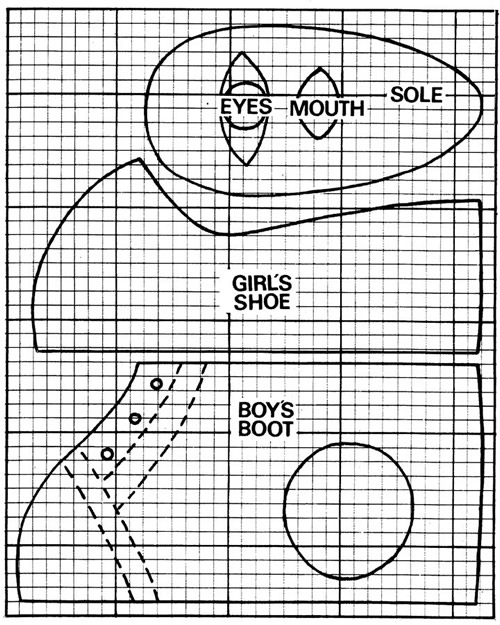 |
|
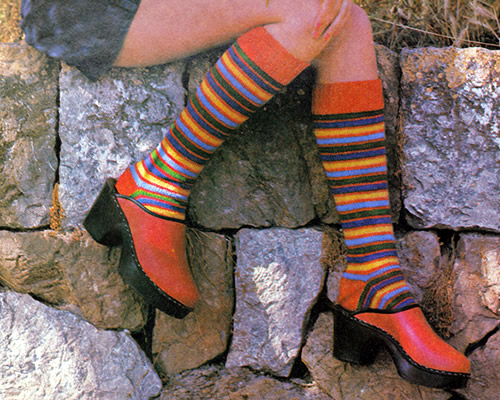
These socks are made using 2 needles, with one main colour and 4 contrasts. Of course, you can have as many contrasts as you like, and it would be good for using up lots of bright leftovers yarns; however it's always good to have a consistent main colour to tie it all together.
Alternatively you could easily substitute a suitably cheerful self-striping yarn either for the contrast stripes, or used plain throughout, allowing it to do its thing.
whatever you choose, complete the look with clogs*.
Just the thing to jazz up your jeans. Make them with or without toes — and the brighter the better!
* note: if you knit separate toes, it might be a bit overcrowded in clogs...
Instructions.The socks are worked on two needles. Right Leg** Using No 11 needles and colour A, cast on 80 stitches. Join in colour B. Beginning with a knit row, continue in stocking stitch,
(1 row knit, 1 row purl), working in striped sequence of 4 rows B, 2 rows
A, 4 rows C, 2 rows A, 4 rows D, 2 rows A, 4 rows E and 2 rows A throughout.
Shape leg:Next row: k1, sl1, k1, psso; knit to the last 3 stitches k2tog, k1. Keeping striped sequence correct. Continue in this way, decreasing 1
stitch at each end of every following 6th row until 60 stitches remain. Divide for heel and instep With right side of work facing, slip the first 15 stitches on to a stitch
holder for the heel. InstepWork 6½ inches (16½cm) in the striped sequence for the instep, ending with 2 rows in colour A (wrong side row). Editor's note: Now you need to decide if you want "normal" socks, or socks with separate toes - useful for bar-toe sandals! - and if you are knitting toes then you leave the stitches on a stitch holder at this point while you continue to knit the heel. Shape instep top without toes ("normal" sock) Next row: Using colour A throughout,
k1,sl1, psso; knit to the last 3 stitches, k2tog, k1. Version including toesBreak off yarn and leave the stitches on a holder while you continue with the instructions to shape the heel. Shape heelEditor's note: heel shaping instructions for both versions of sock, with or without toes. Slip the 30 stitches you previously left on holders on to the needle,
placing the outside edges together in the middle. Using colour A and with right side of work facing, shape the heel, working short rows as follows: 1st row (right side facing): sl1
knitwise, k28. Turn. Continue in this way, working one stitch less on every row until you have worked the row: "sl1 purlwise, p13. Turn." has been completed, leaving 8 stitches unworked at each side. Next row: sl1 knitwise, k13. Pick
up the loop lying between Shape sole top without toes ("normal" sock)Shape the top by working exactly the same as for the instep shaping. ** Version including toesHaving completed the heel, return to the instep stitches that you left on a holder. Big toe:
Next row: Using colour A, knit across
instep stitches, then knit 10 stitches from the sole. Turn, and cast on
2 stitches. Using A throughout, and working on these 24 stitches, work 16 rows in stocking stitch. Shape top: Second toeWith right side of work facing, using the right hand needle and colour
B, pick up 3 stitches at the base of the big toe. K5 stitches. Turn, and
cast on 2 stitches. Using B throughout, and working on these 17 stitches, work 14 rows in stocking stitch. Shape top: Third toeWith right side of work facing, using the right hand needle and colour
C, pick up 3 stitches at the base of the second toe. Using C throughout, and working on these 17 stitches, work 12 rows in
stocking stitch. Fourth toeWith right side of work facing, using the right hand needle and colour
D, pick up 3 stitches at the base of the third toe. K4 stitches. Turn,
and cast on 2 stitches. Using D throughout, and working on these 15 stitches, work 12 rows in stocking stitch. Shape top: Little toeWith right side of work facing, using the right hand needle and colour
E, pick up 3 stitches at the base of the fourth toe. Knit to end. Turn. Using E throughout, and working on these 15 stitches, work 10 rows in
stocking stitch. Left LegWork as for right leg from ** to
**. Version including toesSet the position of the toes for the left foot as follows: Big toe: Next row: Using colour A, knit across
the sole stitches, then knit 10 stitches from the instep. Turn, and cast
on 2 stitches. Complete the big, second, third, fourth, and little toes, as given for
the right leg. Making upOmitting ribbing, press parts lightly under a damp cloth with |
Materials3 x 25g balls of 4 ply yarn in main shade (A) and 1 ball in each of 4 contrast colours (B, C, D, and E). One pair of No 11 (3mm) needles. Tension30 sts x 40 rows to 4 inches over stocking stitch on No 11 (3mm) needles. Size mattersTo fit and "average" adult foot: 9/9½ inches (23/24cm).
Length from top of heel: 13½ inches (34½ cm). Abbreviationssl1: slip the next stitch k2tog or p2tog: work 2 sts together to decrease. A Word on the Wool.Original yarn was a superwash 4ply. These days there is a huge choice of wool for socks, but I would recommend some nylon content. Disclaimer (well...almost)In transposing any pattern it is always a risk that errors will be introduced, in spite of dedicated proof reading. If you have any problems with this pattern, please and I will try and assist. |
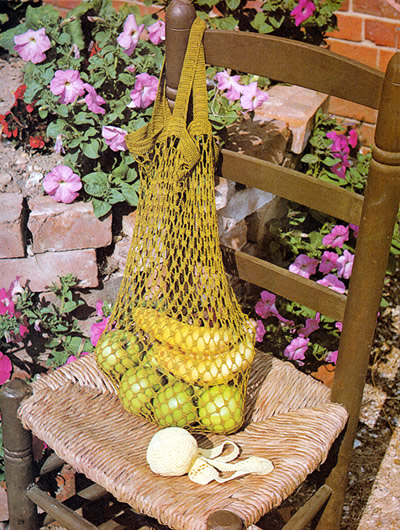
Fun to make, this was a common type of reusable shopping bag before the days of the ubiquitous little nylon fold-up bags. It easily rolls up to keep in a handbag or purse, and is more useful than ever now in eliminating single-use plastics.
Instructions.The bag can be made in either of 2 sizes. Both designs are worked from
the same instructions and the figures in brackets [ ] refer to the
smaller bag where applicable.
Base - first section:Using 1¾mm [1¼mm] hook make 5 chain and join with a ss to
the first ch to form ring. Base - second section:Using 1¾mm [1¼mm] hook, rejoin yarn through elastic band,
3ch to form first tr, work 48 tr over band. Main section 1st round: Place both sections together
and join by working through both sections at the same time, 1dc into sp
before next tr, * 1dc into each of
next 2 sps, 9ch, 1dc into each of next 4 sps, 9ch, 1dc into next sp; repeat
from * to end, omitting 9ch and 1dc at the end of the last repeat, 3ch,
1trtr into first dc. Top band 1st round: 4dc into loop just made,
* 4ch, 4dc into next loop, repeat
from * ending with 4ch, ss into first
dc. Handle (make 2) Using 1¾mm [1¼mm] hook, make 9ch. To make up Damp and pin out to size. |
MaterialsLarge bag: 4 x 20g balls No 10 crochet cotton. Small bag: 2 x 25g balls No 20 crochet cotton. Elastic band or shirring elastic in a circle. TensionLarge bag: 8sts and 4 rows to 1 inch over trebles worked on 1¾ mm crochet hook. Small bag: 11sts and 5 rows to 1 inch over trebles worked on 1¼ mm crochet hook. Size mattersLarge bag: will carry 15lb (7 kilo) Small bag: will carry 6½lb (3 kilo) Abbreviations:ch: chain Remember these are English crochet instructions where dc is equivalent to US single crochet - see "Terminology" in the side bar. A Word on the WoolNos 10 and 20 crochet cotton are fairly standard and easy to obtain. Disclaimer
|
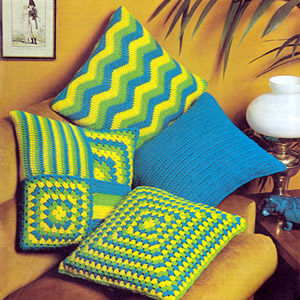
These crochet cushion covers are really easy (and quick) to make in double knitting yarn, and would be good for a beginner if you fancy them. They are so simple that an experienced crocheter could no doubt make them without a pattern. However, although simple, they are a good example of creating an effect purely through the use of colour - if you want them to really pop, use opposites on the colour wheel (turquoise/tangerine, purple/yellow] - or you can dial it right down and use natural sheep colours. As the size and therefore tension for cushion covers is pretty adaptable, it could provide a useful project for handspun, - or you could use up any bright knitting oddments for a colourful designer effect, (as controversially favoured by our current colourful prime minister).
Instructions.Basic instructions for 4 cushions as illustrated.
Chevron cushionUsing B, make 68 chain. Foundation row: using B, 1 tr in 4th ch from hook, 1 tr in each of next 6 ch, (decrease 2, 1 tr in each of next 6 ch, 3 tr in next ch, 1 tr in each of next 6 ch) 3 times, decrease 2, 1 tr in each of next 6 ch, 2 tr in last ch. [65 sts - 3 ch at start of row counts as 1 stitch] Joining in colours as required, work in pattern as follows: 1st row: using B, 3 ch, 1 tr in first
stitch, 1 tr in each of the next 6 stitches, (decrease 2, 1 tr in each
of the next 6 stitches, 3 tr in the next stitch, 1 tr in each of next
6 stitches) 3 times, decrease 2, 1 tr in each of the next 6 stitches,
2 tr in top of 3 ch These 6 rows form the pattern. Making up the chevron cushionJoin starting and finishing edges using a flat seam. Patchwork cushionMake 2 of each of the following squares: First Square (wide stripes):
Using B, make 33 chain. Continue repeating last row, working 1 row more in B, then 3 rows G,
3 rows Y, 3 rows B, 3 rows G, 3 rows Y: 18 rows in all. Second Square (mitred corner): Work 18 rows as for first square, but working 1 row B, 1 row G, 1 row Y. Third Square (wide stripes):
Using Y, make 4 chain. 1st row: Using Y, 3 ch, (3 tr, 1 ch 3 tr) all chain space, 1 tr in top of 3 starting chain. [3 ch counts as 1 stitch, 3 tr forms a group] 2nd row: Using G, 3 ch, 1 tr in space
between first stitch and next group, (1 group, 1 ch, 1 group) in chain
space, 2 tr in space between last group and 3 ch. 3rd row: Using G, 3 ch, 1 group in
space between half group and next group, (1 group, 1 ch, 1 group) in chain
space, 1 group in space between group and half group, 1 tr in top of 3
chain. 4th row: Using B, 3 ch, 1 tr in space
between first stitch and group, 1 group in next space between 2 groups,
(1 group, 1 ch, 1 group) in chain space, 1 group in next space between
2 groups, 2 tr in space between last group and 3 ch. 5th row: Using B, 3 ch, 1 group in
space between half group and group, 1 group in next space between 2 groups,
(1 group, 1 ch, 1 group) in chain space, 1 group in next space between
2 groups, 1 group in space between group and half group, 1 tr in top of
3 chain. 6th row: Using Y, 3 ch, 1 tr in space between first stitch and group, 1 group in each space between 2 groups, (1 group, 1 ch, 1 group) in chain space, 1 group in each space between 2 groups, 2 tr in space between last group and 3 ch. 7th row: Using Y, 3 ch, 1 group in space between half group and group, 1 group in each space between 2 groups, (1 group, 1 ch, 1 group) in chain space, 1 group in each space between 2 groups, 1 group in space between last group and half group, 1 tr in top of 3 chain. 8th and 9th rows: Using G, as 6th
and 7th rows. Fasten off. Fourth Square (squared circle):
** worked in rounds as follows: 1st round: Using Y, 4 ch, (3 tr, 1 ch) 3 times into the ring, join with a slip stitch in the 3rd of the 4 starting chain. 2nd round: Using G, slip stitch into
first ch space (formed by top of starting chain of previous round), then
4 ch, 3 tr into that same ch space, (3 tr, 1 ch, 3 tr in next ch space)
3 times, 2 tr in first chain space again, join with a slip stitch in the
3rd of the 4 starting chain. 3rd round: Using B, slip stitch into first ch space, then 4 ch, 1 group into that same ch space, (1 group in next space between 2 groups, 1 group, 1 ch , 1 group in next ch space) 3 times, 1 group in next space between 2 groups, 2 tr in first ch space, join with a slip stitch in the 3rd of the 4 starting chain. 4th round: Using Y, slip stitch into first ch space, then 4 ch, 1 group into that same ch space, * 1 group in each space between 2 groups,1 group, 1 ch, 1 group in ch space; repeat from * but ending with 2 tr in first ch space, join with a slip stitch in the 3rd of the 4 starting chain, as on previous rounds. 5th round: Using G, work as 4th round. Making up the patchwork cushionUsing a flat seam piece together the squares, to make two large squares
each made up of 4 smaller squares, for the front and back of the cushion
(see photograph). Block cushionThe fourth square of the patchwork cushion is a squared-off circle -
a form of the traditional "granny" square. The block cushion
is a giant version of this square. Make a second piece in the same way. Making up the block cushionJoin 3 sides, slip in pad, and join remaining side. Plain cushionUsing a single colour throughout, make 62 chain. Next row: 3 ch, miss first stitch, 1 tr in each remaining stitch. Repeat the last row until cushion measures 16 inches (or to make the
size you require). Make a second piece in the same way. Making up the plain cushionJoin 3 sides, slip in pad, and join remaining side. |
Materials
|
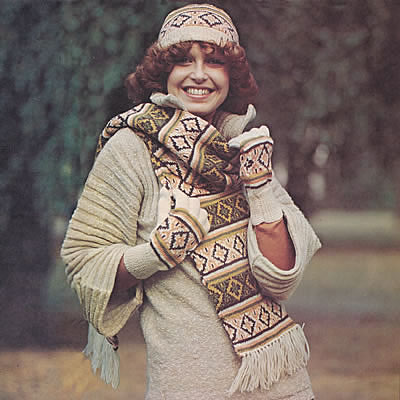
A "long, long" scarf worked in bands of stripes and jacquard pattern, with a matching pull-on hat and gloves to complete the set. These are all knitted in a lighter weight yarn, but the scarf is double thickness so will be very snug; it's also pretty long, so check that's what you want, as obviously you can make it to whatever length you like.
InstructionsThe scarf is worked on 4 needles in the round to make a tube, which is then flattened; the result is a flat scarf with two layers of knitted fabric, and means you don't have to worry about seeing the "wrong side" of the knitting. This is a standard way to make - especially commercial - scarves. Although often seen made in the round, both the hat and the gloves are worked flat on two needles, with a seam making them into the required round shape. It would be simple enough to adapt this pattern and make the hat in the round, especially as you have the method given for the scarf. If this is your first attempt at gloves, however, making them flat may be a good way to start. ScarfUsing the set of 4 No 10 (3¼mm) needles - or the circular needle
- cast on 112 sts in Main Shade (A). Pattern as follows: ** 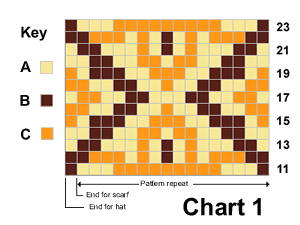 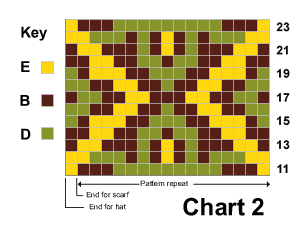 These 46 rounds form the pattern. Cast off using A. To make up the ScarfDarn in all ends on the wrong side. HatUsing No 12 (2¾mm) needles, and main shade A, cast on loosely 144
stitches. Work 20 rows K1/P1 rib, increasing 1 stitch at the end of the
last row. [145 sts] Continue in pattern until work measures 18cm (7 inches) from the beginning, ending with a purl row. Shape the crown Decrease for the crown, keeping the continuity of the striped pattern: To make up the HatPress as given for the scarf. GlovesNote: When working the gloves, use separate balls of yarn for the palm and thumb, twisting the yarns at the back of the work when changing colours. Right hand gloveUsing No 12 (2¾mm) needles and main shade A, cast on 56 stitches.
Start thumb shaping: 1st row: using first ball of B, k28;
using A, increase one stitch in each
of the next 2 stitches, k1; using a 2nd ball of B, k25. Continue in pattern as given for chart, increasing the thumb stitches
as before on the 3rd and then every foil 4th row until the 24th row has
been completed, decreasing one stitch at the end of the last row. 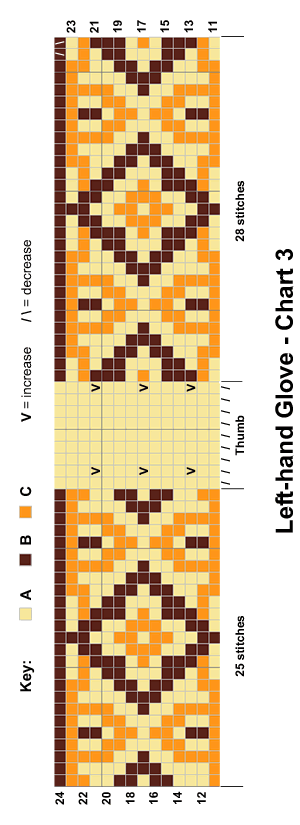 Thumb: Next row: using B, k28; using A,
k16 stitches; turn and cast on 2
stitches. [Editor's note: For this method you keep all the stitches on the needles as you work the thumb and each finger separately. At this point for the thumb, you keep 28 stitches unworked on the right hand needle, and 25 stitches unworked on the left hand needle, while you work on the centre 16 stitches (which you have increased to 20 by casting on 2 extra stitches on each side. You knit the thumb flat, back and forth up to the tip, then you fasten off and sew it up into the thumb shape.] Shape top: With right side of work facing and using B, knit up 4 stitches from the
base of the thumb, knit to end. [57 sts]
Divide for fingers: 1st finger Shape top: 2nd finger 3rd finger 4th finger Shape top Left hand gloveWork as given for right hand glove, reversing the pattern and the position of thumb as follows: 1st row: using 1st ball of B, k25;
using A, increase one stitch in each of Continue as given for right hand glove until 24th row of pattern has been completed. Thumb Next row: using B, k24; using A,
k16, turn and cast on 2 stitches. Complete as given for right hand glove working from *** to ***. To make upPress as given for scarf. |
Materials25g balls of 4 ply (fingering) yarn: Scarf: 4 balls in main shade A One set of 4 3¼mm (UK 10) double pointed needles (dpn), or a circular needle. Hat and gloves: One pair of 3mm (UK 11), and one pair of 2¾mm (UK 12) needles Tension28sts x 36 rows to 4 ins over stocking stitch on 3¼ mm needles. Size mattersScarf: 20½ cm (8 inches) wide, by 183cm (72 inches) long,
excluding the fringe Abbreviationsk2tog: knit 2 sts together. increase: by knitting into the front and back of the next stitch A word on the wool.The original yarn was standard 4 ply superwash wool; about 92 yards (84 m) per 25g ball. Disclaimer
|
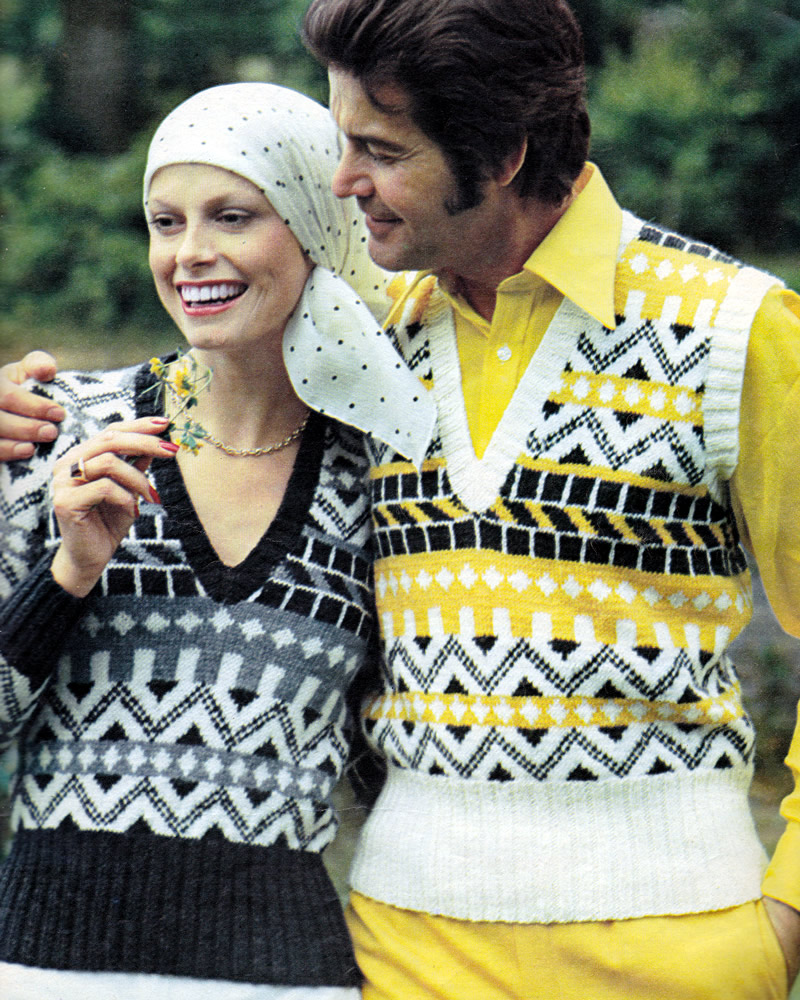
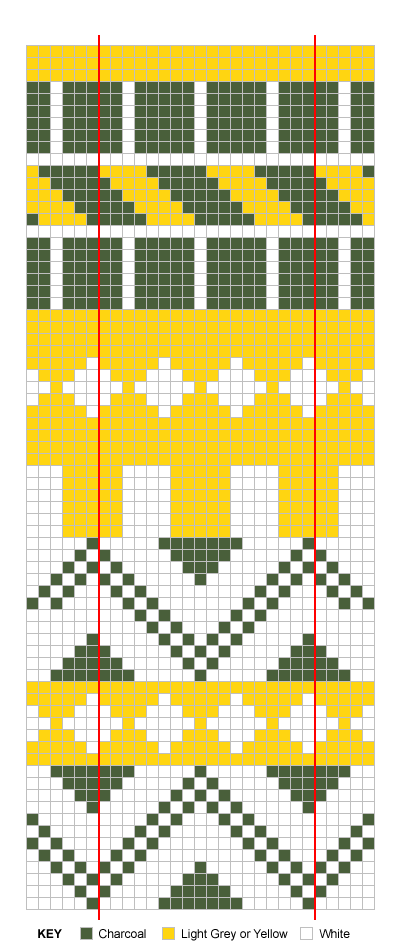
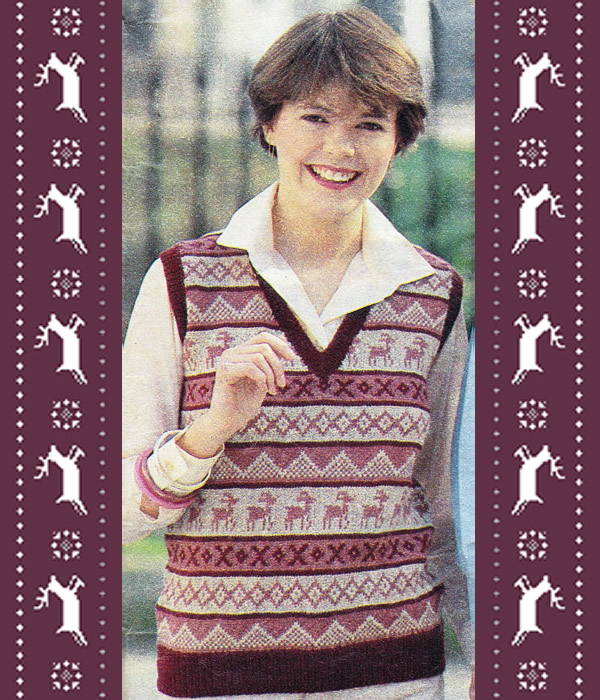
Sweater in Spring colours with sleeveless option suitable for the changing season.
Currently for me, the appeal of this combination is the yellow and grey colour scheme in which they have illustrated it - although I would be disinclined to set it off with a bright all-yellow ensemble, and would probably use a more muted shade of yellow.
Instructions.Instructions are given for 3 sizes - larger sizes given in brackets up
to a 40 inch chest. The design is intended for women or men (albeit men
of presumably modest proportions). BackWith No 11 needles, and main shade (M) cast on 108 (118
: 126) stitches, and work 5 inches in k2/p2
rib, beginning the second row "p2" for second and third sizes,
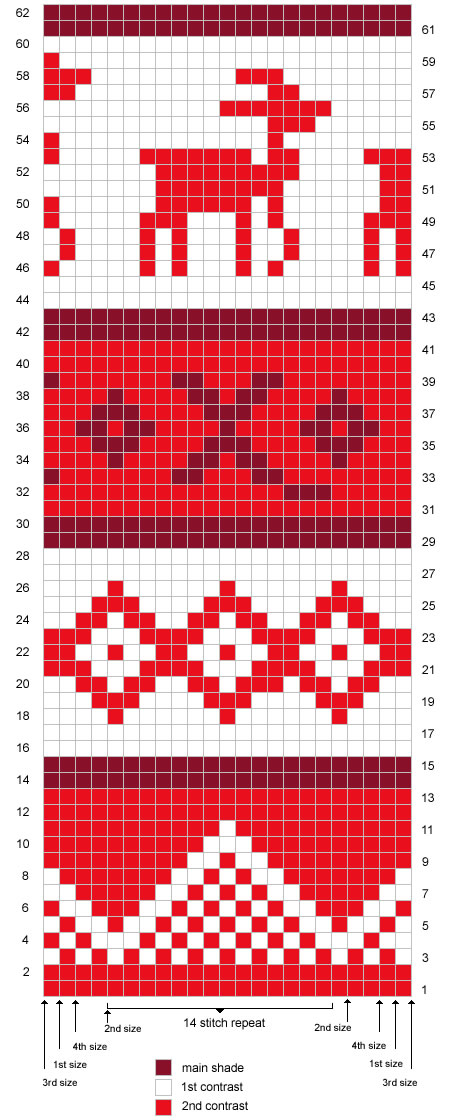
and increasing 1 stitch at the end of the last row for all sizes. Change to No 9 needles and work Fair-Isle from Chart thus: For 1st and 3rd sizes, repeat the 18 stitches between the red lines to the last the last stitch then work the 1st stitch beyond the line. For 2nd size, work 5 stitches before the red line, then
repeat the 18 Continue until work measures 12 (13
: 14) inches for the sweater with sleeves,
or 13 (14 : 15)
inches for the sleeveless slipover, ending with a Armholes shaping: Cast off 4 stitches at the beginning of the next 2 rows, and then 3 stitches at the beginning of the following 2 rows. Decrease 1 stitch at each end of the next 4 rows, then decrease 1 stitch at the beginning of every row until 77 (85 : 91) stitches remain. Continue straight until work measures 21 (22½ : 24) inches. Shoulder shaping: Cast off 5 stitches at the beginning of the next 6 rows, and then 5 (7 : 9) stitches at the beginning of the following 2 rows. Cast off 37 (41 : 43)
stitches. FrontWork as for the Back until work measures 11 (11¾ : 12) inches for the sweater with sleeves or 12 (12¾ : 13½) inches for the slipover. Front shaping: Continue on these stitches only. Decrease 1 stitch at the beginning of the next and ever following 4th row until work measures 12 (13 : 14) inches for the sweater with sleeves or 13 (14 : 15) inches for the slipover, ending at the side edge. Armholes shaping: Decrease 1 stitch at the armhole edge on the next 4 rows, then decrease 1 stitch at the beginning of the next 5 (6 : 7) alternate rows. Continue with centre front edge shaping until until 20 (22 : 24) stitches remain. Continue straight until work measures 21 (22½ : 24) inches, ending at the side edge. Shoulder shaping: Cast off 5 stitches at the beginning of the next, and following 2 alternate rows. Work 1 row. Cast off 5 (7 : 9) stitches and break yarn. With right side facing, slip the centre front stitch on to a safety pin.
SleevesWith No 11 needles and main shade, cast on 56 (66
: 74) stitches and work 3½ inches in
k2/p2 rib, as for the Back,and decreasing 1 stitch at the beginning of
the last row for all sizes. Change to No 9 needles and working from the Chart as for the Back, increase
1 stitch at each end of every 10th row until there are 75 (83
: 89),stitches. To shape the top cast off 4 stitches at the beginning of the next
2 rows. Neckband:Join right shoulder seam. With right side facing, using No 12 needles and main shade, pick up and
knit 64 (68 : 72)
stitches down left side of neck, increase in the stitch from the safety
pin, pick up and knit 64 (68 : 72)
stitches up right side of neck, and then knit 36 (40
: 44) stitches from the Back neck. 1st row wrong side facing): * p2, k2; repeat from * to last 2 stitches, p2. Decreasing 1 stitch each side of the centre front 2 stitches on every
row, rib 9 more rows as set. Join left shoulder and neckband seam. Armbands for Slipover:With right side facing, using No 11 needles and main shade, pick up and
knit 118 (130 : 142)
stitches round each armhole. Cast off ribwise. Making UpPress work lightly on wrong side, omitting welts. Sweater with sleeves: Set in sleeves. Join side and sleeve seams. |
Materials
|
Note: When working the colour pattern from the chart, strand the yarns loosely across the back of the work over not more than 3 stitches at a time, to keep the fabric elastic.
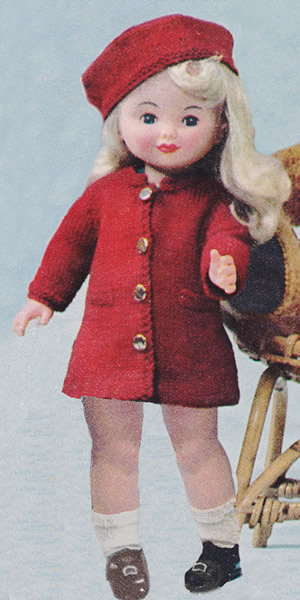
A sweet little old-fashioned set for a dolly.
Instructions.Outfit includes coat and beret in double knitting wool; dress in 3 ply; and vest, pants and socks in 3 ply. Coat - backCast on 48 stitches work 4 rows in stocking stitch. Next Row: purl (this marks the hem- line). Continue in stocking stitch beginning with a purl row, and decreasing 1 stitch at each end of every 6th row until 38 stitches remain. Continue straight until work measures 5½ inches from hemline. Raglan Shaping: Cast off 2 stitches at the beginning of the next
2 rows, then decrease 1 stitch at each end of every alternate row until
16 stitches remain. Coat - right frontCast on 28 stitches. Work 4 rows in stocking stitch. Next Row: purl (this marks the hem-
line). Next Row: k2, cast off 2, knit to
end. Make 2 more buttonholes at the front edge, 1½ inches apart. Raglan Shaping: Making 4th buttonhole 1½ inches from 3rd, cast off 2 stitches at beginning of the next row. Decrease 1 stitch at the beginning with of every alternate row until 16 stitches remain, ending with a purl row. Neck Shaping: Coat - left frontAs right front, reversing shaping and omitting buttonholes. Coat - sleevesCast on 26 stitches and knit 4 rows. Coat - collar Join raglan seams. Coat - mock pocketsCast on 10 stitches and knit 2 rows. Coat - making upPress work. BeretCast on 68 stitches and knit 4 rows. Next Row: (k3, increase in next stitch),
repeat to end. Beret - making upThread wool through remaining stitches and secure.
Dress - backCast on 49 stitches and work 6 rows in moss stitch. Continue straight until work measures 5½ ins. Sleeve Shaping. Cast on 9 stitches at the beginning of the next
2 rows. Then continue until work measures 8 ins. Dress - right frontCast on 27 stitches. Sleeve Shaping. Neck Shaping. Dress - left frontAs right front, reversing shaping and omitting buttonholes. Dress - neckbandJoin shoulder seams. Dress - sleeve borderPick up and k. 33 stitches along sleeve edge. Dress - making upPress work. Vest - back and front alikeWith No 10 needles cast on 36 stitches. Armhole Shaping. Neck Shaping. Vest - making upJoin side and shoulder seams. Pants - back and front alikeWith No 10 needles cast on 34 stitches and knit 2 rows. Leg Shaping. Pants - making upPress work. SocksWith No 11 needles, cast on 28 stitches 1st row: increase in first stitch,
k12, (increase in next stitch) twice, k12, increase in last stitch. Socks - making upPress work. |
MaterialsCoat and Beret:
3ozs Double Knitting Dress:
1oz 3 ply Vest, Pants and Socks:
2ozs 3 ply Tension24 sts to 4 inches on No 9 needles. Size mattersDesigned to fit a 20-inch doll. Abbreviationsch: chain k2tog: knit 2 sts together A Word on the Wool.The pattern is sized for a 20 inch doll which may suit "Our Generation", "American Girl" or vintage Pedigree dolls. 3 ply yarn can be easily found as baby wool in white which would be fine for the vest/pants/socks but for the dress you may be challenged to find more interesting colours. 1 ounce (oz) is approximately 28g. Disclaimer (well...almost)In transposing any pattern it is always a risk that errors will be introduced, in spite of dedicated proof reading. If you have any problems with this pattern, please and I will try and assist. |
A cute seasonal sleeveless sweater.
Co-incidentally I see that Wardrobe Icons have featured "knitted vests" as an "unexpected hero" this week, having "fallen in love with how versatile it is as a layering piece". They illustrate it with 3 shapes including fair-isle patterns with a closer fit and plain with a relaxed fit.
You could replace the Nordic style pattern given here with any fair-isle pattern of your choosing, just repeating it across the width of the sweater, making sure to centre the pattern - for example the Shetland Folklore pattern which is worked over a 10 stitch repeat.
I have a "relaxed fit" example in polka dots, which could easily be knitted plain.
Instructions Note: When working the colour pattern from the chart, strand
the yarns loosely across the back of the work over not more than 3 stitches
at a time, to keep the fabric elastic. BackWith No 12 (2¾mm) needles and main shade (MS), cast on 106 [114, 120, 128] stitches and work in K1/P1 for 2½ inches, ending with a right side row. Next row: Rib 1 [5,
4, 4] *
m1, rib 4; repeat from * to last 1
[5, 4,
4] stitches, m1, rib 1 [5,
4, 4]. Change to No 10 (3¼mm) needles and work in pattern from the chart, joining in and breaking off colours as required, working the first 4 [1, 5, 3] and last 3 [0, 4, 2] stitches on knit rows, and the first 3 [0, 4, 2], and the last 4 [1, 5, 3] stitches on purl row as indicated, and working the 14 stitch repeat pattern 9 [10, 19, 11] times across in between. Continue until back measures 14½ inches, ending with a wrong side row. ** Shape Armholes: Work without further shaping until back measures 22½ [23, 23, 23½] inches, ending with a wrong side row. Shape Shoulders: Leave stitches on a spare needle or stitch holder. FrontWork as for Back up to **. Shape Armholes and Neck: Next row: keeping pattern correct, cast off 6 stitches, and pattern until 60 [64, 68, 73] stitches are on the right hand needle; turn and leave remaining stitches on a spare needle or stitch holder. Continue on first set of stitches only. Decrease 1 stitch at the armhole edge on the next 9 [11, 11, 15] rows, and then on every alternate row, at the same time, decrease 1 stitches at the neck edge on the next row, and every alternate row until 38 [39, 41, 42] stitches remain. Then continue to decrease 1 stitch at the neck edge only on every alternate row until 32 [34, 37, 39] stitches remain. Then decrease 1 stitch at the neck edge only on every following 3rd row until 25 [26, 28, 29] stitches remain. Work without further shaping until front matches back to start of shoulder shaping, ending with a wrong side row. Shape Shoulder: Work one row, and then cast off. With right side facing, slip centre stitch on to a safety pin, and rejoin yarn to the remaining 66 [70, 74, 79], and pattern to end. Work to match the first side, reversing the shaping. Making UpPress lightly using a cool iron and dry cloth - or as instructed on the ball band - omitting the ribbing. Join right shoulder seam. Neckband: With right side facing, No 12 needles and MS, pick up
and knit 72 [76, 78,
82], stitches down left neck, knit stitch from safety pin (mark
this stitch with a coloured thread), pick up and knit 72 [76,
78, 82], stitches up right neck, then
knit 45 [47, 49,
51] stitches from Back, decreasing 3 stitches evenly. 1st row wrong side facing): * p1, k1; repeat from * to last 2 stitches before the marked stitch, p2tog, p1, p2togtbl; ** k1, p1; repeat from ** to end. 2nd row: k1, * k1, p1; repeat from * to last 2 stitches before the marked stitch, p2tog, p1, p2togtbl, k1; ** p1, k1; repeat from ** to end. Repeat the last 2 rows 3 times more, then the 1st row again. Armhole Borders: With right side facing, No 12 needles and MS, pick up and knit 118 [124, 132, 138], stitches round each armhole. Work in k1/p1 rib for 9 rows. Join side seams and armhole borders. |
Materials2 x 50g balls 4 ply in each of the three colours (all sizes). Pair each No 12 (2¾mm), and No 10 (3¼mm) needles. Tension32 stitches x 32 rows to 4 ins (10cm) measured over pattern using 2¾mm needles. Size mattersTo fit chest 32 [34, 36,
38] inches; Abbreviationsk2tog or p2tog: knit or purl 2 stitches together (decrease one stitch). m1: make 1 stitch by picking up horizontal p2togtbl: purl 2 stitches together through back loops. A word on the woolThe original design was in Patons Clansman 4ply. Disclaimer
|
 |
|
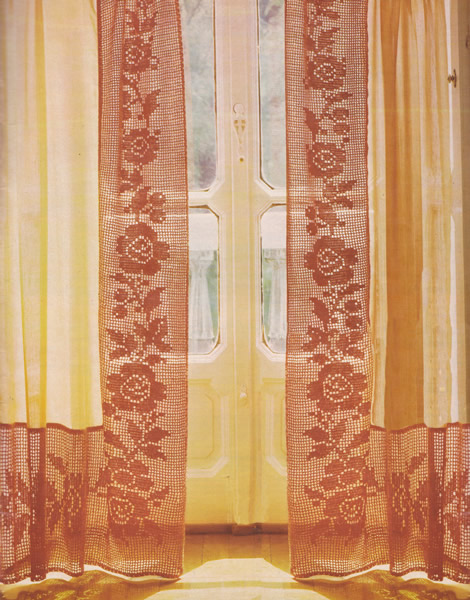
"A lovely idea for enhancing plain curtains is to make this floral pattern filet crochet border."
— again very true, but still quite a commitment if you are to make them looking as splendid as in the photo; as noted in the other posts this month, filet crochet is not technically difficult, but quite laborious.
This border is worked in No 20 cotton on a 2mm hook - still fairly fine but not quite so taxing as lace. Note that it could be adapted for an edging for a table cloth or table runner.
If you want to crochet a little something, and the mere thought of this gives you a headache, then try the little bonus pattern for a flower spray.
Filet CrochetThe crochet stitches used in filet crochet are very simple, consisting of "tall" stitches which in this patter are trebles, and chain stitches combined together to create a mesh of "spaces"; some of these spaces are filled in with "blocks" of the tall stitches, hence the pattern can be represented with a chart, that shows you how the spaces and blocks are arranged. You will see how this works as I explain below. In these examples the "tall" stitches are shown as trebles. Spaces (sp)Spaces are made by making 2 chain, missing 2 (or the same as the number
of chain) stitches, then "tall" stitch into the next stitch.
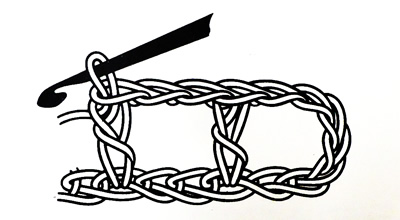
Blocks (blk)To make a block you fill in the space with tall stitches. The picture shows making 1 treble into each of the next 4 stitches (starting 3 chain counts as 1 treble), 2 chain, miss 2 stitches, 1 treble into the next stitch, 1 treble into the next 3 stitches (makes a block of 4).

As you continue in a pattern, you should ensure that your basic mesh
is preserved, so that the trebles that make the framework of the spaces
all sit evenly above one another, not offset like brickwork (unless of
course that is part of the pattern!). In general the pattern is created
by the blocks, rather like giant pixels making an overall picture. InstructionsThe vertical (side) edging is worked first, from the bottom, starting with shaping the mitred corner as shown in the chart; then work on upwards to the required length, after which you fasten off. Next, you pick up at the mitred corner at the bottom of the side panel and work short rows across the mitre until al the stitches are incorporated, and you are working the horizontal (bottom) panel at 90 degrees to the side edging - also as shown in the chart. Work to the require width of your curtain, then fasten off. Vertical Side PanelBegin at lower outer corner, make 11 chain, work 1 tr in 8th chain from hook, 1 tr in 3 chain, turn. 1st row (right side): 3 chain, miss 1 tr, 1 tr in 3 tr, 2 chain, 1 tr in 3rd chain, turn. 2nd row: 10 chain, 1 tr in 8th chain from hook; (2 chain, 1 tr in next tr) twice, 1 tr in 2 tr, 1 tr in top of 3 chain. 3rd row: 3 chain, miss 1 tr, 1 tr in 3 tr; (2 chain, 1 tr in next tr), twice, 2 chain, 1 tr in 3rd chain. Working bracketed instructions twice more on every repeat, repeat 2nd and 3rd rows 3 times more. Begin filet pattern thus: 10th row: 10 chain, 1 tr in 8th chain from hook, 2 chain, 1 tr in next tr, 2 tr in chain space, 1 tr in next tr, (2 chain, 1 tr in next tr) 8 times, 1 tr in 2 tr, 1 tr in top of 3 chain. 11th row:—3 chain, miss 1 tr, 1 tr in 3 tr, (2 chain, 1 tr in next tr) 8 times, 1 tr in next 2 tr, (l tr in next tr, 2 chain) twice, 1 tr in 3rd chain. 12th row: 8 chain, 1 tr in 4th chain from hook, 1 tr in next 2 chain, (2 chain, 1 tr in next tr) twice, 2 tr in chain space, 1 tr in next 4 tr, (2 chain, 1 tr in next tr) 8 times, 1 tr in 2 tr, 1 tr in 3rd chain. Beginning with 13th row, continue working from chart (each square marked
in blue worked by 2 tr in 2-chain space or previous trs as given on 10th, 11th
and 12th rows) until 40th row is worked, and the mitre shaping is complete. Horizontal Lower PanelWith wrong side of vertical panel facing, join cotton to outer corner.
1st row (right side): 2 chain, miss
2 tr, 1 tr in 3 tr, 1 tr in top of 3 chain, turn. Working bracketed instructions twice more on every repeat, repeat 3rd and 4th rows 4 times, then repeat 3rd row again. 14th row: 3 chain, miss 1 tr, 1 tr in 3 tr, (2 chain, 1 tr in next tr) 12 times, 2 chain, 1 tr in top of slip stitch, 2 tr in chain space, 1 tr in same chain as tr, 2 tr around bar of tr, slip stitch in base of tr, turn. Turn chart sideways and continue working from chart, beginning with 15th row, still shaping corner as set until 41st row is completed. 42nd row: Pattern to 1 tr in top of slip stitch, 3 tr in end tr of 40th row of side panel, turn. Continue working from chart until 94th row is completed. Making Up: Pin out work a section at a time and block. |
|
MaterialsOne ball of Twilleys Twenty will make approximately 26½cm or 10½
inches of border. 2mm crochet hook. Ready-made curtains, or a length of voile or appropriate fabric to make your own. Tension8 holes (spaces) to 2 inches or 5cm. Size mattersLength as required. Crochet abbreviations:ch: chain Remember these are English crochet instructions where dc is equivalent to US single crochet; htr is equivalent to US double crochet - see "Terminology" in the side bar. Disclaimer (well...almost)In transposing any pattern it is always a risk that errors will be introduced, in spite of dedicated proof reading. If you have any problems with this pattern, please and I will try and assist. |
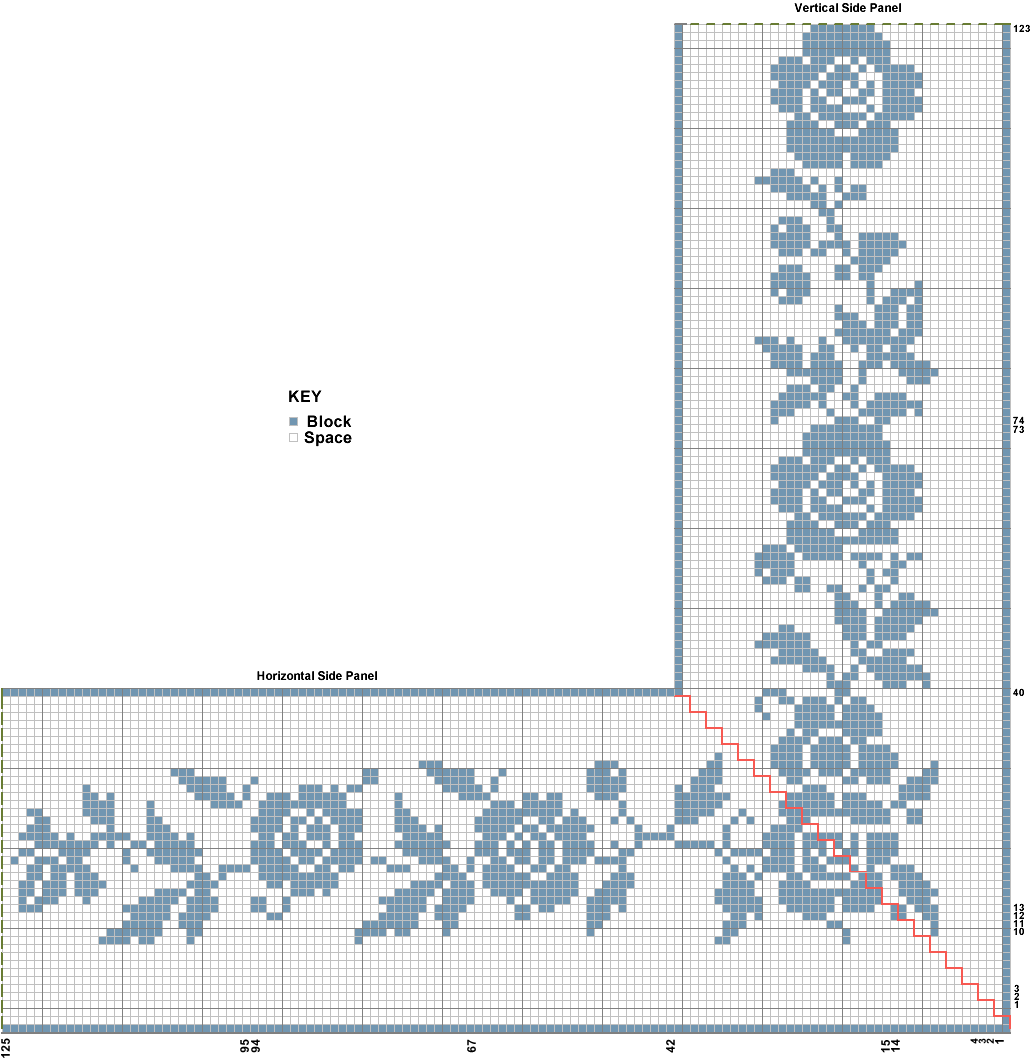
You can access a larger version of the chart - right click on the icon below and choose "save link as" or "save target as" (browser dependent options) to download and save a pdf file.
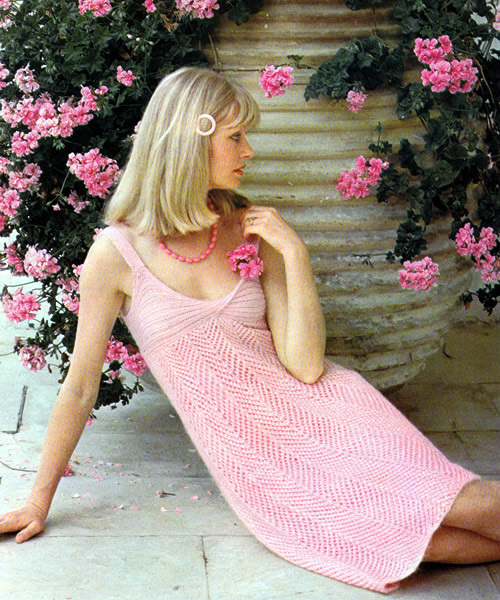
A very pretty strappy knitted dress which is styled for the summer, but, as usual, would work well for the winter, perhaps with a sparkly yarn, and worn with a bolero, tippet, or stole - if we are ever allowed to go out in public any time soon....
InstructionsThe pattern panel for the dress is worked over 5 stitches as follows: 1st row: yfwd, k2togtbl, k1, k2tog,
yfwd. Back** Work in Pattern A as follows: 1st row (right side facing): k1, (k2tog, yfwd) 5 times, k3, * (yfwd, k2togtbl) 4 times, yfwd, sl1, k2tog, psso, yfwd, (k2tog, yfwd) 4 times, k3; repeat from * to last 11 stitches; (yfwd, k2togtbl) 5 times, k1. 2nd row: k1, purl to last stitch, k1 3rd row: k2, * (k2tog, yfwd) 5 times, k1, (yfwd, k2togtbl) 5 times, k1; repeat from * to last stitch, k1. 4th row: as 2nd. These 4 rows form Pattern A. Repeat them until back measures 15 inches, ending with 4th pattern row. Shape as follows: Next row: k1, (k2tog) twice, (yfwd, k2tog) 3 times, yfwd, sl1, k2tog, psso, * (yfwd, k2togtbl) 4 times, sl1, k2tog, psso, (k2tog, yfwd) 4 times, sl1, k2tog, psso repeat from * to last 11 stitches, (yfwd, k2togtbl) 4 times, k2togtbl, k1. [111 sts] Continue in Pattern B as follows: 1st row (wrong side facing): k1, purl to the last stitch, k1. 2nd row: k1, (k2tog, yfwd) 4 times, k3, *(yfwd. k2togtbl) 3 times, yfwd, sl1, k2tog, psso, yfwd, (k2tog, yfwd) 3 times, k3; repeat from * to last 9 stitches, (yfwd, k2togtbl) 4 times, k1. 3rd row: as 1st row. 4th row: k2, * (k2tog. yfwd) 4 times. k1, (yfwd, k2togtbl) 4 times, k1; repeat from * to last stitch, k1. These 4 rows form Pattern B. Repeat them until back measures 20 inches, ending with 1st pattern row. Shape as follows: Next row: k1, (k2tog) twice, (yfwd, k2tog) twice, yfwd, sl1, k2tog, psso, * (yfwd, k2togtbl) 3 times, sl1, k2tog, psso, (k2tog, yfwd) 3 times, sl1, k2tog, psso; repeat from * to last 9 stitches , (yfwd, k2togtbl) 3 times, k2togtbl, k1. [87 sts] Continue in Pattern C as follows: 1st row (wrong side facing): k1, purl to last stitch, k1. 2nd row: k1, (k2tog , yfwd) 3 times, k3, * (yfwd, k2togtbl) twice, yfwd, sl1, k2tog, psso, yfwd, (k2tog, yfwd) twice, k3; repeat from * to last 7 stitches; (yfwd, k2togtbl) 3 times, k1 3rd row: as 1st row. 4th row: k2, * (k2tog, yfwd) 3 times, k1, (yfwd, k2togtbl) 3 times, k1; repeat from * to last stitch, k1. These 4 rows form Pattern C. Repeat them until back measures 22 inches. Place a marker at each end of last row. Change to No 10 (3¼mm) needles and continue in Pattern C until back measures 4 inches from markers, ending with right side facing. Next row: cast off 21, k8 (this includes the stitch on the needle from casting off), slip these 8 stitches on a safety-pin, cast off 29, k8, slip these 8 stitches on a safety-pin, cast off remaining 21 stitches. Work shoulder strap as follows: FrontWork as for back from ** to **. Next row: cast off 44, place a marker in the last of these stitches, cast off remaining stitches. Join side seams of skirt. BodiceWith No. 10 needles, cast on 34 stitches and work in rib as follows: Next row: k1, * p2, k2; repeat from * to last stitch, k1. This row forms rib pattern. Repeat it until strip, when slightly stretched,
fits along upper edge of skirt from outer side of shoulder straps to marker
at centre front. Now continue in rib until length from 2nd marker matches length from
cast-on edge to 1 st marker. To Make UpStarting at outer side of shoulder strap, sew first half of bodice strip
in position, first marker matching centre marker of front. Cut lining the full width of skirt but 2 inches longer than skirt when
lying flat. Allow ½ inches for seams and 1 inch for hem. Pin hem in position, then try dress on before stitching, to be certain lining is the correct length. |
MaterialsDress: 6 x 50g balls of a light weight double knitting. (See"a word on the wool"). Pair each No 10 (3¼mm) and No 7 (4½mm) needles. 1¼ yards (about 1.2m) of 1 inch (2.5cm) wide facing ribbon. 1¾ yards (about 1.6m) of 36 inch (90cm) wide lining material in a matching shade. Tension25 sts and 32 rows to 4 inches measured over pattern on No 7 needles. Size mattersThe pattern is given in one size to fit bust 34 - 36 inches. Length (excluding shoulder strap) measured flat is 30 inches. (The dress drops to 32 inches when worn) Abbreviations:k2tog or p2tog: knit or purl 2 stitches together (decrease one
stitch). A Word on the Wool:Original knitted in Patons Kismet which which was 80% acrylic and 20% mohair; it was a fairly light weight yarn, and it was the fluffiness that caused it to knit to something like a DK equivalent (on the right needles). This pattern emphasises the light weight nature of the yarn with an open-work pattern knitted on large needles. The other thing to note is that it had an exceptional yardage - about 225m to 50g which is about double that of a normal DK, so you need to take all that into account when considering substituting. Disclaimer (well...almost)In transposing any pattern it is always a risk that errors will be introduced, in spite of dedicated proof reading. If you have any problems with this pattern, please and I will try and assist. |
Unusually for this era, we have only the one size - perhaps they think those more well-endowed would not suit this style - and maybe they are right - certainly I don't think I could make it work for me.
However, if you did want to make it larger, I really think the only option is to work out the repeats in the pattern and add some extra width in the skirt - then knit the bodice section (it's knitted sideways) longer, and workout where to reposition the straps.
On top of that, if were knitting this, I would try using a delicate lace-weight yarn (there are some lovely ones around), swatching the pattern, and experimenting with different needles to get the right tension.
But then I never did like an easy life.
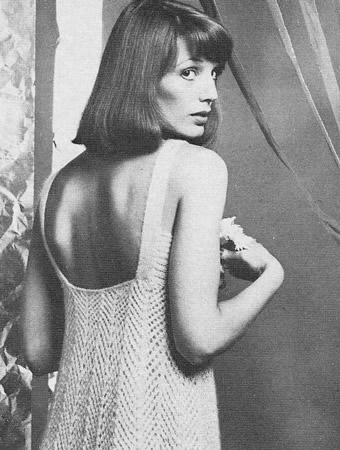
I'm putting this photo in to show you the back of the dress, but I can't let it pass without commenting that to me it's very vaguely sleazy - I think "come to bed eyes" would be the description. It's almost as if the photographer were more used to using his skills for a different kind of audience altogether...

This looks like a very wearable crochet cardigan (for those who prefer crochet to knitting). Bands of two-row stripes in double crochet are arranged to form a flattering chevron down the centre back, giving the illusion of shaping. You could make it in a single shade, or go totally wild as shown in the photo - or you could choose more muted contrasts in naturals, perhaps greys and taupes with ecru. If you choose brights you could be guided more by Kaffe Fassett's favourite combinations, introducing turquoises with fuschia and poppy.
So .... "Make it plain and simple or bright and stunning"
Instructions. Instructions for larger sizes are given in brackets. Main Part1st Band:
With 4mm hook and main shade (A) make 8 chain. 2nd Band:
Make as the 1st band , but beginning and ending with contrast colour B
and with centre back stripe of E [A
: C : E]. 3rd Band:
As 1st, but beginning and ending with contrast colour C and with centre
back stripe of F [B : D
: F]. Continue in this way, beginning and ending with next stripe of colour sequence, until the 9th band is complete. Right FrontNext Band: Begin with contrast colour E and work 16 [17 : 18 : 19] stripes. Omit the first stripe of the previous band; join. Next Band: Begin with A and work 14 [15 : 16 : 17] stripes. Omit one stripe at each end of the previous band; join. Next Band: Begin with contrast colour C and work 12 [13 : 14 : 15] stripes. Join as previous band. Next Band: Begin with contrast colour E and work 11 [12 : 13 : 14] stripes. Omit the first stripe of the previous band; join. Shape shoulders: Next Band:
With A make 7 [8 : 10
: 11] chain. Work the foundation row and the 1st row as you did
in the first band. {6 [7 : 9
: 10] dc}. Continue in stripes, decreasing 1 stitch at eh beginning of every 4th
row until 2 dc remain. Work 1 row. Fasten off. BackReversing stripes at centre as given for main part continue thus: Next Band: Beginning and ending B [C : D : E] work 35 [37 : 39 : 41] stripes. Omit 5 stripes of 9th band of main part for armhole; join. Next Band: Beginning and ending D [E : F : A] work 33 [35 : 37 : 39] stripes. Omit 1 stripe at each end of previous band ; join. Next Band: Beginning and ending F [A : B : C] work 31 [33 : 35 : 37] stripes. Join on as last band. Next Band: As last but beginning and ending A [B : C : D]; join. Shape shoulders: With B [C : D : E] ** make 3 [3 : 5 : 5] chain. Work the foundation row and the 1st row as you did in the first band. {2 [2 : 4 : 4] dc}. Next Row:
l ch, 2 dc in next dc - increase worked - 1 dc in each dc to end. Left FrontAs right front to shoulder shaping, reversing stripes and shapings, and missing 5 stripes of last band of main part for armhole. Shape shoulders: Beginning D [E : F : A], work as shoulder shaping of back from ** to ** . Work 2 [1 : 2 : 1] stripes. Fasten off. Sew on. Sleeves1st Band: beginning with A, work as for 1st band of main part, repeating 6 stripes of A, B, C, D, E and F until there are 22 [22 : 24 : 24] stripes. 2nd Band:
beginning with B, work as 1st band. 3rd Band: beginning with B, work 24 [24 : 26 : 26] stripes. Omitting 1 stripe each end sew on to 2nd band. 4th Band: beginning with C, work as for 3rd band. Sew on. 5th Band: beginning with C, work 26 [26 : 28 : 28] stripes. Omitting 1 stripe each end, sew on. 6th Band: beginning with D, work as for 5th band. Sew on. 7th Band: beginning with D, work 28 [28 : 30 : 30] stripes. Omitting 1 stripe each end, sew on. 8th Band: beginning with E, work as 7th band. Sew on. 9th Band: beginning with E, work 30 [30 : 32 : 32] stripes. Omitting 1 stripe at each end, sew on. 10th Band: beginning with F, work as 9th band. Now shape top: 12th Band: beginning with F, work 22 [22 : 24 : 24] stripes. Omitting 1 stripe each end of previous band and sew on. 13th Band: beginning with B, work 20 [20 : 22 : 22] stripes. Sew on as last band. Making UpPress work lightly. Edging: 1st Round: l ch, 1 dc in end of each
row or dc around entire outer edge, working 3 dc in the corners; slip
stitch to 1st ch at the beginning of the round. With main shade A work around sleeve edges to match. |
Materials 5 [6 : 7
: 8] (25 gram) balls double knitting yarn in the main colour, plus,
4mm and 3½mm crochet hooks. TensionPattern strip is 1¾ inches wide and 18 rows to 4 inches. Size mattersTo fit chest 32 [34 : 36
: 38] inches; Crochet abbreviations:ch: chain Remember these are English crochet instructions where dc is equivalent to US single crochet - see "Terminology" in the side bar. Disclaimer
|
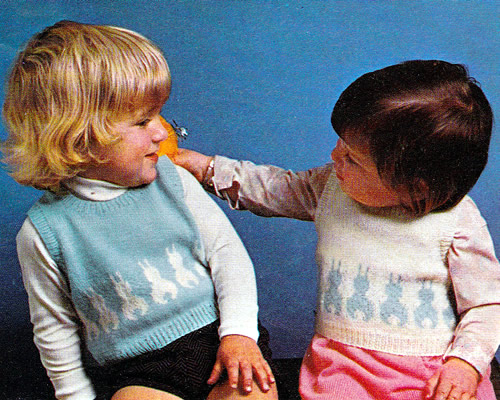
Sweet little sleeveless jumpers for toddlers with Easter bunny motifs.
Instructions.When working the colour pattern from the chart, strand yarn not in use
loosely across the wrong side of the work over not more than 3 stitches
at a time in order to keep the fabric elastic. If you want to view chart image full size in the browser then right click on the image below and choose "view image". Back** Next row: rib 3 [7,
10] (m1, rib 10) 7 times, m1, rib 3 [7,
10]: Change to No 11 needles and starting with a knit row, work straight in stocking-stitch until back measures 1½ [2, 2] inches, ending with right side facing. Change to No 10 needles and joining in contrast colour (C) as required, work rows 1-20 inclusive from chart A [B, A]
Work the first 0 [1, 1]
stitch on knit rows and last 0 [1,
1] stitch on purl rows as indicated, repeating
the 12 [13, 12]
pattern stitches 7 [7, 8]
times across - and the last 0 [0,
1] stitch on knit rows, and first 0 [0,
1] stitch on purl rows as indicated. Change to No 11 needles and continue in M and stocking stitch until back measures 4½ [5, 5½]inches, ending with right side facing. Shape armholes by casting off 6 stitches at the beginning of the next 2 rows, then decrease 1 stitch at each end of every row until 54 [58, 64] stitches remain. Work 1 row straight. Now decrease 1 stitch at each end of the next and every alternate row until 48 [52, 56] stitches remain. ** Continue straight until back measures 9 [10, 11] inches, ending with right side facing. Shape shoulders by casting off 5 stitches at the beginning of the next 2 rows, then 4 [5, 6] stitches at the beginning of the following 2 rows. Leave the remaining 30 [32, 34] stitches on a spare needle. FrontWork as for Back from ** to **
. Shape neck as follows: Knit 18 [19, 20],
turn, and leave remaining stitches on a spare needle. Work straight until front matches back at armhole edge, ending with right side facing. Shape shoulder by casting off 5 stitches at the beginning of the
next row. With right side facing, leave centre 12 [14, 16] stitches on a spare needle, rejoin yarn to the remaining stitches and knit to end. Finish to correspond with first side, reversing shapings. Making UpUsing a cool iron and a damp cloth for Baby Wool, press parts lightly
on the wrong side, omitting ribbing. Neckband: With right side facing, No 13 needles and M, start at
the top of the left shoulder and work as follows: Work 6 rows k1/p1 rib. Join left shoulder seam, then join neckband with a flat seam Armhole Borders: With right side facing, No 13 needles and M, pick up and knit 86 [94, 102] stitches round each armhole and work 6 rows k1/p1 rib. Cast off evenly in rib. |
MaterialsBaby 3 ply 25g balls: 2 in main colour and 1 contrast colour (all sizes). Pair each No 13 (2¼mm), No 11 (3mm), and No 10 (3¼mm) needles.
Tension32 stitches x 40 rows to 4 ins (10cm) in stocking stitch on No 11 (3mm) needles. Size mattersTo fit chest 20 [22, 24]
inches; Abbreviationsk2tog or p2tog: knit or purl 2 stitches together (decrease one stitch). m1: make 1 stitch by picking up horizontal sl1: slip one stitch by passing it between the needles without knitting it. A word on the woolThe original design was in Patons Baby 3ply - a version of which is still available today. Disclaimer
|
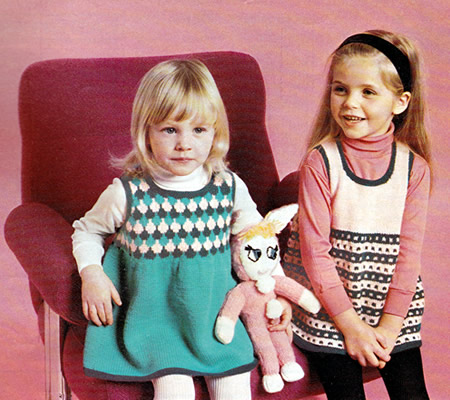
Pretty and easy to make knitted pinafores, providing a practical alternative to full knitted dresses which may be too warm for most centrally heated homes in this era.
Instructions.This is the plain bodice, striped skirt, design in two colours. Back** Next row (increase row): knit 7/9/8/10
stitches; (m1, k14/14/16/16)
5 times; m1, knit 7/9/8/10. Change to No 8 needles and join in main shade (L); work in pattern as follows: 1st row (right side facing): Knit
in L These 12 rows form the pattern. Next row: Using D: purl 13/2/0/5
stitches; (p2tog, p0/1/1/1)
31/29/33/31
times; p2tog, purl 13/3/1/6 Starting with a knit row, continue straight in stocking-stitch (one row knit, one row purl) until back measures 8/9½/11/12½ inches, ending with a purl row. Shape armholes by casting off 3 stitches at the beginning of the
next 2 rows, then decrease 1 stitch at each end of every row until 42/48/52/58
stitches remain. Now decrease 1 stitch at each end of the next and every alternate row
until 36/40/44/48
stitches remain. Work straight until back measures 12½/14½/16½/18½
inches ending with a purl row. Front Work as for back from ** to **
. Divide for neck as follows: Next row: knit 10/11/12/13;
k2tog, turn, and leave the remaining stitches on a spare needle. With right side facing, leave the centre 12/14/16/18 stitches on a spare needle, and rejoin yarn to the remaining stitches k2tog, knit to end. Finish to correspond with the first side, reversing shapings. To Make UpPress parts lightly under a damp cloth on wrong side, omitting garter Neckband: With right side facing, using No 10 needles and colour
D, starting at the left front shoulder, work as follows: Join left shoulder seam and neckband. Join side seams. |
MaterialsDouble Knitting yarn: Pair each of No 8 (4mm) and No 10 (3¼mm) needles. Spare needles or stitch holders. Tension22sts and 30 rows to four inches on 4mm needles over stocking stitch.
Size mattersTo fit chest: Abbreviations L: main shade (light) k: knit m1: make a stitch by picking up the horizontal loop lying before next stitch and working into the back of it. sl1: slip one stitch by passing it between the needles without
knitting it. A word on the wool.Original yarn was Patons Totem double crepe. Disclaimer
|
Instructions.This is the pinafore with the patterned bodice design in three colours. Note: When working colour pattern from the chart, strand yarns
loosely across the back of the work over not more than 3 stitches at a
time, to keep the fabric elastic. Back** Next row (increase row): knit 7/9/8/10
stitches; (m1, k14/14/16/16)
5 times; m1, knit 7/9/8/10. Break off colour D Change to No 8 needles and join in main shade (M), and starting with a knit row, work straight in stocking stitch until back measures 7/8½/9½/11 inches ending with a knit row. Next row: purl 4/10/10/7
stitches; (p2tog, p2/2/2/3)
20/18/20/18
times; p2tog, purl 4/10/10/7 Joining in and breaking off colours as required, work in pattern from chart until back measures 8/9½/11/12½ inches, ending with a purl row. Note: Repeat the 6 pattern stitches 11/12/13/14 times across and last 3 stitches on knit rows and first 3 stitches on purl rows as indicated.
Keeping continuity of pattern, shape armholes by casting off 4
stitches at the beginning of the next 2 rows, then decrease 1 stitch at
each end of every row until 47/53/59/65
stitches remain. Now decrease 1 stitch at each end of the next and every alternate row
until 43/47/51/55
stitches remain. Work straight in pattern until back measures 12½/14½/16½/18½ inches ending with a purl row. Shape shoulders by casting off 4/4/5/5
stitches at the beginning of the next 2 rows, then 4/5/5/6
stitches at the beginning of the following 2 rows. Front Work as for back from ** to **
. Divide for neck as follows: Next row: pattern 12/13/14/15;
k2tog, turn, and leave the remaining stitches on a spare needle. With right side facing, leave the centre 15/17/19/21 stitches on a spare needle, and rejoin appropriate colour yarn to the remaining stitches k2tog, pattern to end. Finish to correspond with the first side, reversing shapings. To Make UpPress parts lightly under a damp cloth on wrong side, omitting garter Neckband: With right side facing, using No 10 needles and colour
D, starting at the left front shoulder, work as follows: Join left shoulder seams and neckband. Join side seams. |
MaterialsDouble Knitting yarn: Pair each of No 8 (4mm) and No 10 (3¼mm) needles. Spare needles or stitch holders. Tension22sts and 30 rows to four inches on 4mm needles over stocking stitch.
Size mattersTo fit chest: Abbreviations M: main (aqua) k: knit m1: make a stitch by picking up the horizontal loop lying before next stitch and working into the back of it. sl1: slip one stitch by passing it between the needles without
knitting it. A word on the wool.Original yarn was Patons Totem double crepe. Disclaimer
|
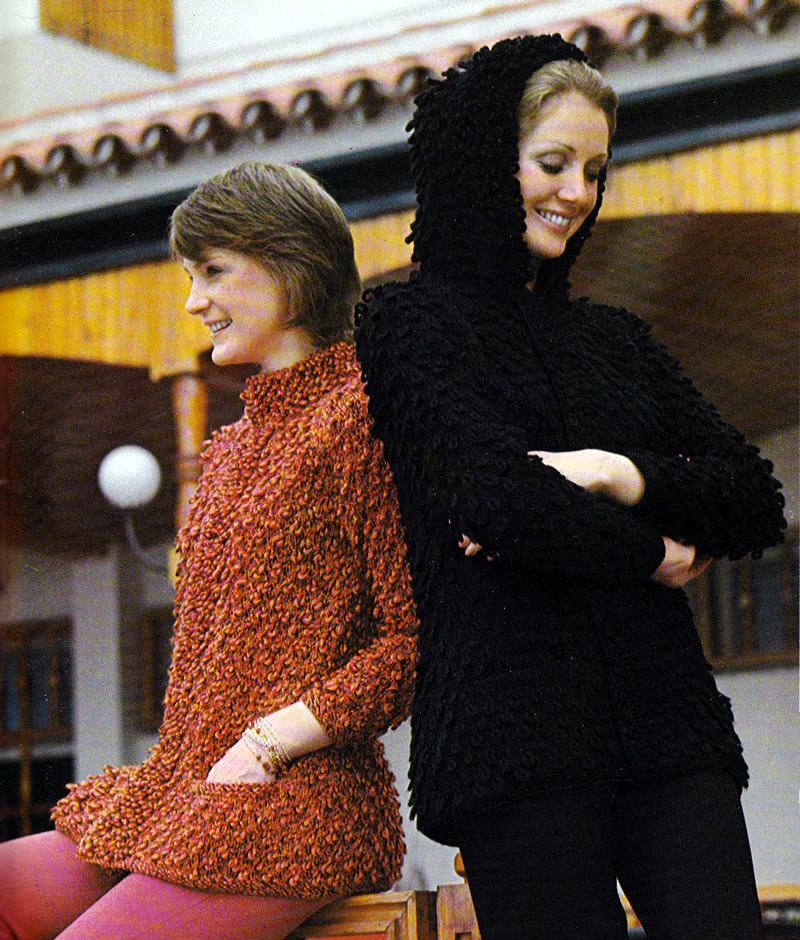
I like hooded jackets and textured fabrics. The benefit of this texturing is that it's all in the stitch, and you don't have to worry about sourcing a replacement for a unique vintage yarn. I can't say how effective the pattern is other than from the photo - so may be best to try a sample swatch first (always a Good Idea - no?!). I'm sure the jacket would work just as well plain.
...attractive loop-stitch texture gives extra warmth to this eyecatching week-end jacket - and a hood can be added for a colder-day version...
InstructionsInstructions are for 4 sizes. BackUsing No 8 (4mm) needles, cast on 79/83/87/91 stitches and work 7 rows in garter stitch, (ie every row knit). Change to No 5 (5½mm) needles and pattern as follows: 1st row (right side facing): knit. These 8 rows form the pattern for the back. Work a further 8 rows straight in pattern. Continue in pattern, shaping sides by decreasing 1 stitch at each end of the next and every following 6th row until 71/75/79/83 stitches remain, then on every following 4th row until 67/71/75/79 stitches remain. Work straight until back measures 18½ inches (47 cm) at centre, ending with right side facing. Shape raglans as follows: Now repeat 1st and 2nd rows until 23/23/25/25
stitches remain, ending with right side facing. Pocket linings (make 2)Using No 5 needles, cast on 21 stitches and work 23 rows stocking stitch,
starting with a purl row. Left Front**Using No 8 needles, cast on 35/37/39/41 stitches and work 7 rows garter-stitch. ** Change to No 5 needles and pattern as follows: 1st and 3rd sizes: 2nd and 4th sizes: All sizes: Continue in pattern, shaping side edge by decreasing
1 stitch at the beginning of the next and following 6th row. [33/35/37/39
sts]. Place pocket lining as follows: Keeping continuity of pattern, work straight until front matches back at the side edge, ending with right side facing. Shape raglan as follows: Now repeat 1st and 2nd rows until 13/13/14/14 stitches remain, ending with right side facing. Continue decreasing at raglan edge as before on the next and every alternate row, and at the same time decrease 1 stitch at the neck edge on every row until 8/8/6/6 stitches remain, then on every following alternate row until 4 stitches remain, all sizes. Now keep the neck edge straight and work 1 more raglan decrease as before.
[3 sts].. Right FrontWork as for left front from ** to
**. 1st and 3rd sizes: 2nd and 4th sizes: All sizes: Finish to correspond with left front, reversing shapings and working 'k2tog' when shaping raglan instead of 'k2togtbl'. SleevesUsing No 8 needles, cast on 35/35/39/39 stitches and work 7 rows garter stitch. Change to No 5 needles and pattern as for back, shaping sides as follows: 3rd and 4th sizes: Now increase 1 stitch at each end of every following 10th/8th row until there are 55/59 stitches. All sizes: Work a few rows straight until sleeve seam measures 16 inches (41 cm), ending with the right side facing. Shape raglans as for back until 7 stitches remain all sizes. Front BordersLeft: With No 8 needles, cast on 11 stitches and work a strip
in garter stitch to fit up left front to start of neck shaping, when slightly
stretched, ending with right side facing. Right: With No 8 needles, cast on 11 stitches and work 6 rows
garter stitch. Work in loop pattern as follows: Neck Border for version without hood Join raglan seams. 1st row: k11, keeping continuity
of loop pattern as for right border work to end. HoodJoin raglan seams. With right side facing and No 8 needles, start at the centre of the right border and pick up and knit 5 stitches, pick up and knit 9 stitches up right side of neck, k5 from right sleeve, knit 23/23/25/25 from back, k5 from left sleeve, pick up and knit 9 down left side of neck, then k5 from left border to centre. [61/61/63/63 sts] Work 5 rows k1/p1 rib, rows on right side having a k1 at each end. 1st row: rib 4/4/1/1, m1, * rib 4, m1; repeat from * last 5/5/2/2 stitches, rib 5/5/2/2. [75/75/79/79 sts] Change to No 5 needles. Keeping 12 stitches at each end in stocking stitch, continue in loop pattern until work measures 11 inches (28 cm) from start of ribbing, ending with right side facing. Cast off 24 stitches at the beginning of the next 2 rows. Hood BorderWith No. 8 needles, cast on 103/103/107/107
stitches, and knit 2 rows, then work 16 rows in loop pattern as for right
border, starting with 1st row. To Make UpUsing a warm iron and damp cloth, press parts lightly on wrong side, omitting loop and garter stitch borders and taking care not to spoil the pattern. Join side and sleeve seams. Pocket Tops: With right side facing and No 8 needles, knit across
each set of 21 pocket stitches decreasing 1 stitch in centre. [20 sts]. Cut petersham the same length as right border plus 1 inch (2 cm) for
turnings. Hooded Version: Join sides to top of hood. |
Materials
25/26/27/28
x 50g balls of chunky yarn. Pair each No 5 (5½mm) and No 8 (4mm) needles. 2 stitch-holders. 2½ inch wide petersham for buttonhole border. Tension17 sts and 21 rows to 4 inches measured over stocking stitch on No 5 (5½mm) needles. Size mattersThe pattern is given in 4 sizes to fit bust: Abbreviations:k2tog or p2tog: knit or purl 2 stitches together (decrease one stitch). stocking stitch: one row knit and one row purl, ("stockinette"). tbl: through back loops. [k2tog tbl also known as "ssk" or slip, slip, knit] m1: make 1 stitch by picking up horizontal loop lying before next stitch and working into the back of it. L1: knit next stitch, winding yarn over needle and first finger
of left hand once, then over
needle again, then place the 2 loops back on the left needle and knit
them together with the stitch through back of loops. A Word on the Wool:Original knitted in Patons Doublet. Disclaimer
|
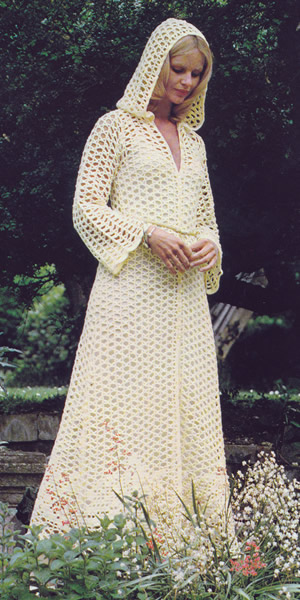
"....prima donna opera coat - so boldly dramatic...."
I think this could be appropriate as an evening coat or for a wedding - but again, even though it looks very summery, it's 4ply crochet which, even in a cotton weight, could prove to be quite warm.
InstructionsThe coat is worked in a number of repeated "patterns". To make 1 pattern: Motif Panel Pattern
|
Materials
|
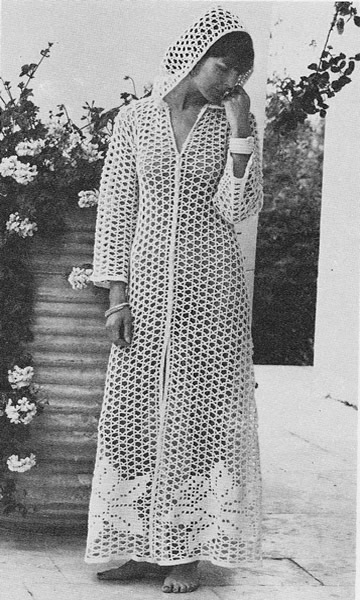
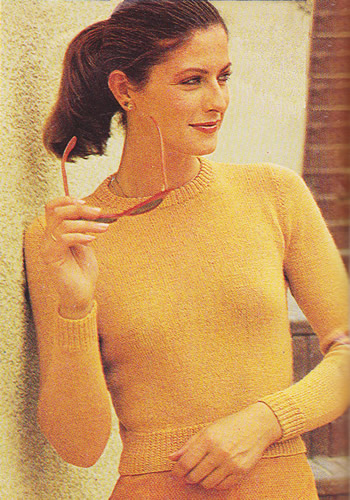
Although I always hesitate to say this, I do think the design of this particular classic plain sweater in a fine (4 ply fingering) yarn, is pretty timeless. It is knitted in one colour, but could be a good basic pattern to be used for colour work: stripes or fairisle; do remember though that stranded colour work does tend to pull in the stitiches somewhat, so do check your tension before you start adapting.
The sweater is titled a "short length classic sweater". Of course, you can knit it to the length you want - but - it is designed to fit to the waist and so there is some shaping in the form of increases up to the armhole. If you want it longer or do not see yourself with a neat waist, you could cast on the full number of stitches at the start, and just knit straight up to the armhole omitting the increasing.
Instructions. Instructions for larger sizes are given in brackets. Back‡‡ Change to No 10 (3¼mm) needles, and starting with a knit row, work in stocking stitch, shaping sides by increasing 1 stitch at each end of the 5th and every following 6th row until there are 114 [120, 128, 134, 142] stitches. Work straight until Back measures 11 inches, (28 cm), ending with a purl row. Shape armholes by casting off 3 stitches at the beginning of the next 2 rows, then decrease 1 stitch at each end of every row until 100 [102, 102, 108, 104] stitches remain. Now decrease 1 stitch at each end of the next and every following alternate
row until 86 [90, 92,
98, 100] stitches remain. Work straight until Back measures 18½ [19, 19¼, 19¾, 20] inches, (47 [48, 49, 50, 51] cm), ending with a purl row. Shape shoulders by casting off 11 [12, 12, 13, 13] stitches at the beginning of the next 2 rows, then cast off 12 [13, 13, 14, 13] stitches at the beginning of the next 2 rows. Leave the remaining 40 [40, 42, 44, 48] stitches on a length of yarn, or stitch holder. FrontWork as for Back from ‡‡ to ‡‡. Work straight until Front measures 16 [16½, 17, 17½, 17½] inches, (41 [42, 43, 44, 44] cm), ending with a purl row. Shape neck as follows: Continue on these stitches for the first side, decreasing 1 stitch at the neck edge on the next 3 rows, and then on every alternate row until 23 [25, 25, 27, 26] stitches remain. Work straight until Front matches Back to start of shoulder shaping, ending with a purl row. Shape shoulders by casting off 11 [12,
12, 13, 13]
stitches at the beginning of the next row. With right side facing, leave centre 26 [26, 28, 30, 30] stitches on a spare needle or stitch holder, rejoin yarn to remaining stitches and complete to correspond with the first side, reversing shapings. SleevesWith No 12 needles, cast on 50 [50, 54, 56, 56] stitches and work in k1/p1 rib for 2 inches (5 cm). Next row: rib 7, (m1, rib 12
[12, 13,
14, 14]) 3 times, m1, rib 7 [7,
8, 7, 7]. Change to No 10 needles and starting with a knit row, work in stocking stitch, shaping sides by increasing 1 stitch at each end of the next and every following 9th [7th, 8th, 7th, 6th] row until there are 82 [88, 90, 94, 100] stitches. Work straight until sleeve seam measures 17½ inches, (44 cm), ending with a purl row. Shape top by casting off 3 stitches at the beginning of the next
2 rows, then decrease 1 stitch at each end of the next and every following
alternate row until 28 [32, 30,
30, 34] stitches remain. Now decrease 1 stitch at each end of every row until 20 [20,
22, 22, 22]
stitches remain. Making UpOmitting ribbing, press parts lightly on wrong side following instructions
(if any) on the ball band. Neckband: With right side facing and No 12 needles, knit up 18
[18, 18,
18, 19] stitches down left side of
neck, knit 26 [26, 28,
30, 30] stitches from front, knit
up 18 [18, 18,
18, 19] stitches up right side of
neck, knit 40 [40, 42,
44, 48] stitches from back. Join left shoulder seam and Neckband. Join side and sleeve seams; insert Sleeves. |
Materials
|
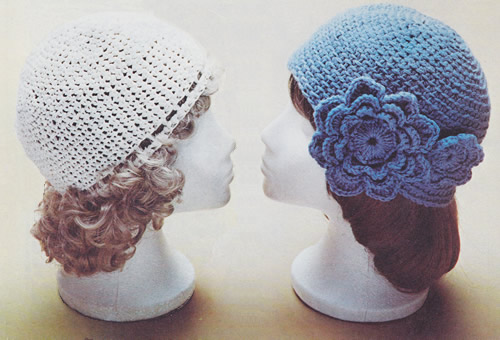
InstructionsNote: Yarn is used double throughout, and the hats are made using
a variation of double crochet: Basic HatMake 3 chain, join in a ring with slip stitch (ss) in 1st chain. Do not join after this round, but carry on working in continuous rounds,
making a spiral. This will be easy if you mark the begninning of the next
Continue in pattern, increasing 6 stitches in every round in this way
until there are 66 stitches. Continue working in rounds of double crochet without shaping for a further 3½ inches (9cm). For the basic hat - fasten off at this point. You can then decorate as required. DaisiesMake one small and one large daisy to sew on the basic hat. You should use a smaller crochet hook (2½ -3mm) and a single strand of the 4ply yarn. Small daisy: Fasten off. Large daisy: Make 11ch. [Editor's note: If you want to create a medium sized flower you can stop here and fasten off - otherwise continue with 2 more rounds.] 6th round: *
5ch, 1ss into back of st on 4th round between next 2 petals, repeat from
* 7 times more, joining last ss into
first of first 5ch. White hatThis hat was made using raffia, using thread single throughout with a
Granny squares hatUsing a No 6 (5mm) crochet hook and double yarn, work crown as given
for basic hat in double crochet pattern until there are 72 stitches. Fasten
off. Make 6 chain. Insert hook from front to back into first chain, yarn round hook and draw loop through chain and loop on hook in one movement. One slip stitch (ss) ss has been worked to join ch into a circle or ring. 1st round: 3ch to count as first
tr, 2tr into circle working under ch, 2ch, work (3tr into circle, 2ch)
3 times. Join with ss to third of first 3ch. 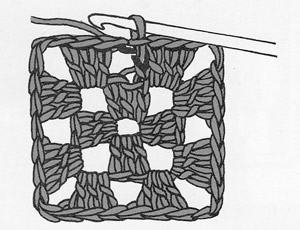
3rd round: 3ch, 2tr into first ch
space to the left of ss join of previous round, 1ch, *
work (3tr, 2ch, 3tr) into 2ch space, 1ch, 3tr into 1ch space, 1ch, repeat
from * twice more, (3tr, 2ch, 3tr)
into last 2ch space, 1ch. Join with ss to third of first 3ch. You can work the square in a single colour or in multiple different colours, fastening off one colour and starting another at the end of each round. Join the 6 squares into a circle. With main colour work 72 dc along To Make UpSew in ends and embellish as desired referring to the photos: - sew daisies to hat, or, |
Materials
|
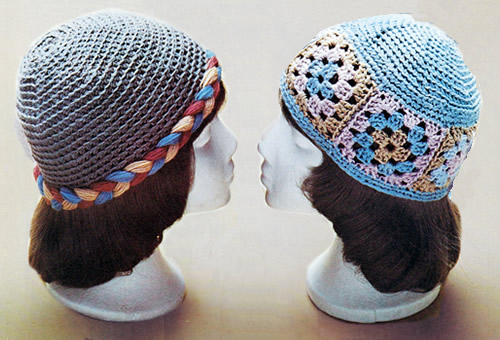
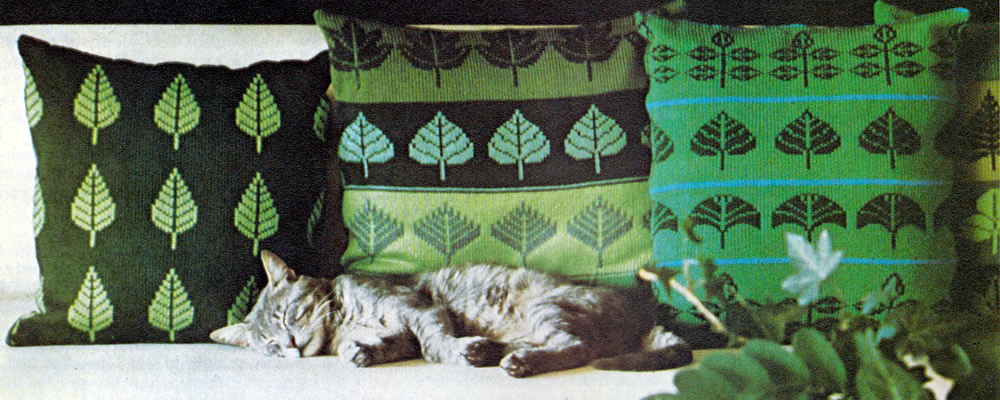
Simple yet effective cushions using stylised leaf motifs.
Cushions can be an opportunity to really give full rein to your creative side with little investment risk - in either time or materials. If (like me) you feel you lack a natural artistic streak of your own, you can find inspiration almost anywhere. Any small motifs from embroidery sources can be used for knitting - but make sure you check the tension you need to aim at as it will dictate the resulting size of the cushion.
Instructions.These cushions are created using a limited colour palette and an intarsia technique. Only two colours are used where the motifs are worked, which is a good idea to start with - both stylistically and technically. Assuming you are familiar with the idea of working from charts, as usual, the charts show the right, or knitted, side of the work, reading knit rows from right to left; every alternate row worked in purl and read from left to right. The yarn not in use is carried loosely across the back of the fabric all the time, so it will be taken behind the stitches on a knitted row and in front of them on a purled row. Ideally you need to keep within a maximum of about five or six stitches
in each colour so that you don't have to carry the yarn not in use across
too many stitches at the back of the work. It is feasible to carry the
yarn across a greater number of stitches as long as you don't pull the
yarn so tightly that it puckers your work. The completed size of a motif, (and the entire design), will depend on the tension at which you are working. For example: with a tension of 20 stitches and 28 rows to 4 inches (10 cm), a motif worked over 15 stitches and 21 rows will form a square measuring 3 inches (7.5cm) by 3 inches (7.5cm). So you can do some simple working out to adapt any motifs to a design measuring the size you want. If you are not so familiar with working from charts, this might be a good project to start out with. For consistency, the charts show each motif on a 23 stitch grid; the actual pattern repeat across the cushion is 24 stitches: each set of stitches on the chart is separated by one background stitch. The overall spacing or layout of the motifs is given by a written set-up row for each cushion, which is the first row on the charts.
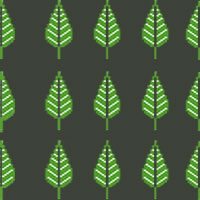 Cushion 1Worked in two colours with the same motif repeated evenly all over the cushion. Using No 9 (3¾mm) needles and main shade (A), cast on 99 stitches, and work in stocking stitch throughout. Work 4 rows in main shade (A). Next row: k1 stitch in A, k1 stitch in B, (k23 stitches in A, k1 stitch in B) 4 times finishing the row with k1 stitch in A. 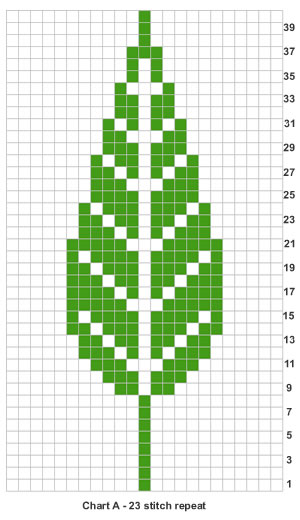 There is half a leaf at each end of the row, plus an extra stitch at each end of the work which will be used for seaming. So now continue in pattern from the chart, starting with the seam stitch followed by the centre stitch of the leaf. The overall pattern repeat is 24 stitches, 13 stitches for the leaf and 11 stitches between the leaves at the widest point. Work the 40 pattern rows, followed by 8 rows in A only, twice, then work
the 40 row pattern again followed by 4 rows in A.
 Cushion 2Worked in 8 colours with stripes of colour and repeated motifs in 8 colours (A-H). Using No 9 (3¾mm) needles and main shade (A), cast on 121 stitches, and work in stocking stitch throughout. Work 2 rows using A, 1 row using B and 4 rows using A. Motif stripe 1: Next row: p12 stitches in A, (p1 stitch in B, p23 stitches in A) 4 times finishing the row with p1 stitch in B, p12 stiches in A. 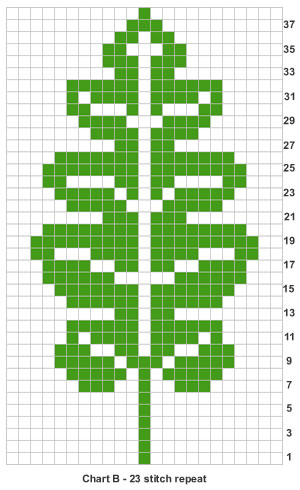 Continue working from the Chart B until 38 rows have been completed. Work plain stripes of 4 rows in A, 1 row in C, 1 row in D, and 4 rows in C. Motif stripe 2: Next row: p12 stitches in C, (p1 stitch in D, p23 stitches in C) 4 times finishing the row with p1 stitch in D, p12 stiches in C. 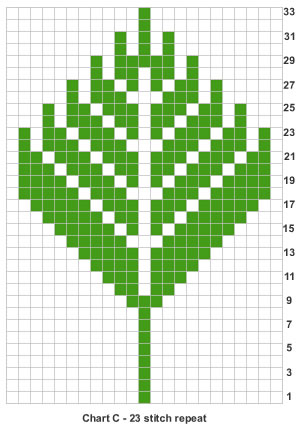 Continue working from Chart C until 33 rows have been completed. Work plain stripes of 4 rows in C, 1 row in E, 1 row in F, and 4 rows in E. Motif stripe 3: Next row: k12 stitches in E, (k1 stitch in F, k23 stitches in E) 4 times finishing the row with k1 stitch in F, k12 stiches in E. 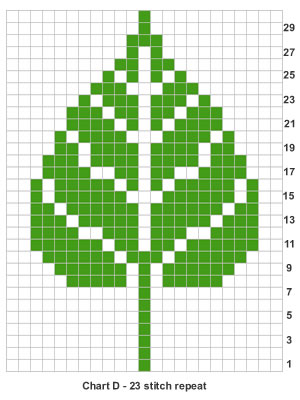 Continue working from Chart D until 30 rows have been completed. Work plain stripes of 4 rows in E, 1 row in H, 1 row in E, and 4 rows in G. Motif stripe 4: Next row: k12 stitches in G, (k1 stitch in H, k23 stitches in G) 4 times finishing the row with k1 stitch in H, k12 stiches in G. 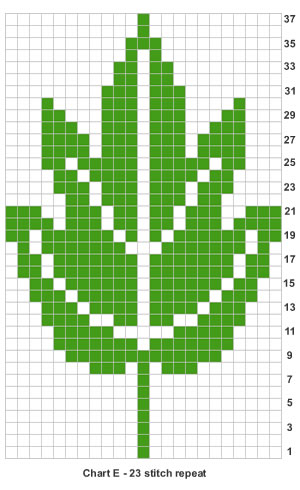 Continue working from Chart E until 37 rows have been completed. Finally, work plain stripes of 4 rows in G, 1 row in H, 2 rows G.
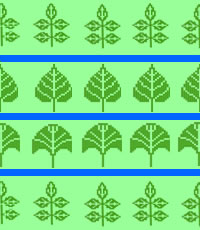 Cushion 3Worked in three colours (A-C) with different motifs repeated in bands across the cushion; the background and motif colours are constant, and the motif bands are separated by thin stripes of the third colour. Using No 9 (3¾mm) needles and contrast colour C, cast on 99 stitches, and work in stocking stitch throughout. Work 2 rows in contrast C, 4 rows in main shade A. Motif stripe 1: Next row: k2 stitches in B, (k23 stitches in A, k1 stitch in B) 4 times finishing the row with k1 stitch in B.  Here again there is half a leaf at each end of the cushion, so the pattern has been set to start with the centre stitch of a leaf, plus the seaming stitch at each end of the row. Continue working from the Chart F until 38 rows have been completed. Work plain stripes of 4 rows in A, 2 rows in C, and 4 rows in A. Motif stripe 2: Next row: k2 stitches in B, (k23 stitches in A, k1 stitch in B) 4 times finishing the row with k1 stitch in B.  Again there is half a leaf at each end of the cushion, so the pattern has been set to start with the centre stitch of a leaf, plus the seaming stitch at each end of the row. Continue working from the Chart G until the 27 rows of the pattern have been completed. Work plain stripes of 4 rows in A, 2 rows in C, and 4 rows in A. Motif stripe 3: Next row: p2 stitches in B, (p23 stitches in A, p1 stitch in B) 4 times finishing the row with p1 stitch in B. Continue working from the Chart D until the 30 rows of the pattern have been completed. Work plain stripes of 4 rows in A, 2 rows in C, and 4 rows in A. Motif stripe 4: Next row: p2 stitches in B, (p23 stitches in A, p1 stitch in B) 4 times finishing the row with p1 stitch in B. Just as before, there is half a leaf at each end of the cushion, so the pattern has been set to start with the centre stitch of a leaf, plus the seaming stitch at each end of the row. Continue working from the Chart F until 38 rows have been completed. Work plain stripes of 4 rows in A, and 2 rows in C. Making upAll the cushions are made up of two identical pieces. |
Materials
|
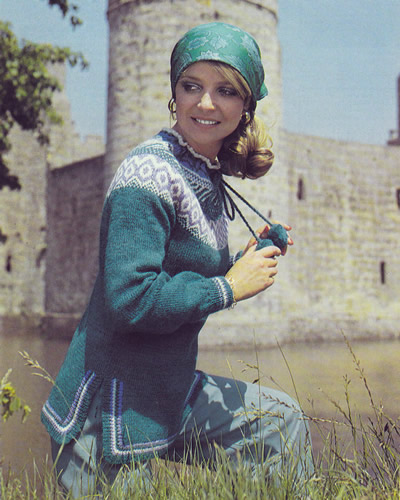
Lovely heathery shetland yarn tunic in a double knitting weight yarn.
Although this pattern is from the seventies, it evokes a much earlier era to me. I remember my friend Sara having a cardigan just like this, (in colour and pom-poms), knitted by her Mother in the 1960s. I have had cardigan envy ever since. However - I am sure a tunic would suit me even better!
Instructions.Instructions for larger sizes are given in brackets. When working the yoke pattern from the chart, strand yarns not in use
loosely across the wrong side of the work over not more than 3 stitches
at a time in order to keep the fabric elastic, joining in and breaking
off colours as required. Back‡‡ 1st row (wrong side facing): (k1,
p1) 23 times; k1, p2tog, p1 (mark this stitch with a coloured thread);
p2togtbl, k1; (p1, k1) 68 [72, 76,
80] times; p2tog, p1 (mark this stitch as before); p2togtbl, k1;
(p1. k1) 23 times. Next row: In D, cast off 38 stitches evenly in rib; in M, p9 [11, 12, 13] (including stitch on needle after cast off), p2tog, (p1, p2tog) 32 [34, 36, 38] times, p10 [10, 11, 12]; then in D, cast off remaining stitches in rib. [84 [90, 96, 102] sts]. Change to No 8 (4 mm) needles and with M, work in stocking stitch starting
with a knit row until back measures 6 inches, ending with a purl row. Shape sides as follows: Shape armholes by casting off 1 [2,
3, 4] stitches at the beginning of
the next 2 rows. Decrease 1 stitch at each end of the next row. Now decrease 1 stitch at each end of the next and every alternate row
until 86 stitches remain, ending with right side facing. FrontWork as for Back from ‡‡ to ‡‡. Next row: k2tog, knit to the last
2 stitches, k2tog. Repeat the last 2 rows 0 [2, 4, 6] times more. [92 sts]. Shape neck by working short rows as follows: Decrease 1 stitch at the beginning of the next and following alternate
row and at the same time decrease 1 stitch at the neck edge
on the next 3 rows. [2 sts]. Finish to correspond with first side, reversing shapings. SleevesWith No 10 (3¼mm) needles and M, cast on 42 [44, 46, 48] stitches and work in k1/p1 rib and stripes of 4 rows M, 2 rows D, 2 rows L, 2 rows M, 2 rows D. [12 rows] Continue in M until rib measures 3 inches, increasing across last row as follows : (rib 2, m1) 7 times; (rib 1, m1) 16 [18, 20, 22] times; (rib 2, m1) 5 times; rib 2. [70, 74, 78, 82 sts]. Change to No 8 (4 mm) needles and work straight until sleeve measures 18½ [18½, 19, 19] inches measured at centre, ending with right side facing for next row. Shape top by casting off 1 [2,
3, 4] stitches at the beginning of
the next 2 rows. Repeat the last 4 rows 1 [2, 3, 4] times more. [64 sts] Now decrease 1 stitch at each end of the next and following alternate
row. [60 sts] YokeWith right side facing, slip first 43 stitches of back on a length of yarn. With circular or set of No 8 (4 mm) needles and M, knit the remaining 43 stitches from back, marking first of these stitches as the start of the rounds; knit 60 from sleeve, knit up 31 down left side of neck, knit 32 from front, knit up 31 up right side of neck, knit 60 from second sleeve, then finally knit 43 from length of yarn (or stitch holder). [300 sts] Divide these stitches evenly on 3 of the set of needles. Joining in D and L as required work the 50 rounds from the chart, repeating
the 20 pattern stitches 15 times in each round and decreasing where indicated.
On completion of the above rounds the number of stitches remaining will
be: Next round: in M, decrease 8 [8, 4, 4] stitches evenly. [112, 112, 116, 116 sts] Make holes as follows: Change to set of No 10 (3¼ mm) needles and in L, work 3 rounds.
Making UpOmitting cuffs, press parts lightly on wrong side following instructions
on the ball band. In M, make 2 pompons. Make Cord: Using 6 strands of M, make a twisted cord 45 in long. Thread through row of holes at neck. Sew a pompon to each end of cord. |
Materials 6 [7, 7,
8] 50g balls Shetland DK in main shade (M) "Ocean Deep",
plus 1 ball each in 2 contrasts: Pair each No 8 (4mm) and No 10 (3¼mm) needles. Sets of 4 each No 8 (4mm) and No 10 (3¼mm) needles - or circulars. Tension23 stitches x 30 rows to 4 ins (10cm) in stocking stitch on No 8 (4mm) needles. Size mattersTo fit chest 32 [34, 36,
38] inches, (81 [86, 91,
97] cm); Abbreviationsk2tog or p2tog: knit or purl 2 stitches together (decrease one stitch). k2togtbl or p2togtbl: knit or purl 2 stitches together through
back loops. sl1: slip one stitch by passing it between the needles without knitting it. psso: pass the slipped stitch over. sl1, k1, psso: slip 1, knit 1, pass the slipped stitch over; also known as "ssk" (slip, slip, knit). m1: make 1 stitch by picking up horizontal yfwd: yarn forward - bring the yarn to the front of the work and when you knit the following stitch, you will have created an extra stitch, in a way that makes a decorative eyelet hole. A word on the woolThe original design was in Patons Fiona - a yarn I was very fond of both in quality and rich colour range. It was a standard DK; some information given on the web implies it was slightly thicker than that but the tension given here suggests slightly thinner! In the 1970s it was sold in 50g balls: 175 yds/160m meters); 51% wool, 49% acrylic. In my opinion a similar substitute would be Rowan Felted Tweed DK. "Always check your tension" [Good Advice]. Disclaimer
|
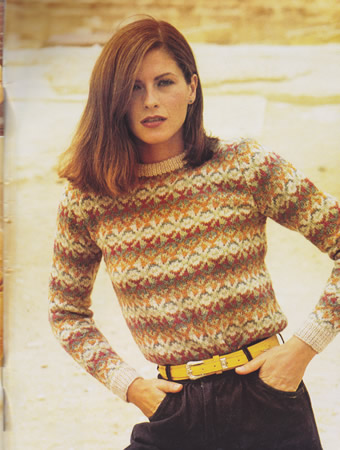
Lovely heathery shetland yarn sweater in a double knitting weight yarn. This is an example of early eighties "folklore style" but retaining classic shaping. [You can see the late seventies / eighties styling in the photo with the sweater worn tucked into pleated/gathered trousers].
Instructions.Instructions for larger sizes are given in brackets. When working the colour pattern from the chart, strand yarn not in use
loosely across the wrong side of the work over not more than 3 stitches
at a time in order to keep the fabric elastic. Back‡‡ Next row: Rib 8 [9, 9, 11, 11] m1; (rib 18 [19, 20, 21, 22], m1) 5 times, rib to end. (113 [119, 125, 133, 139] sts). Change to No 8 (4mm) needles and joining in and breaking off colours
as required, work in pattern from chart A, repeating the 10 pattern stitches
11 [11, 12,
13, 13] times across, and working
the first
Keeping the continuity of the pattern, shape armholes, by casting
off 3 stitches at the beginning of the next 2 rows. Decrease 1 stitch
at each end of the next 5 rows, then on every alternate row until 89 [95,
101, 107, 113]
stitches remain. Work straight in pattern until Back measures 22½ [23,
23½, 23½, 24]
inches, (57 [58, 60,
60, 61]cm), ending with right side
Shape shoulders by casting off 9 [9,
10, 11, 11]
stitches at the beginning of the next 4 rows, then 8 [10,
10, 10, 12]
stitches at the beginning of the following 2 rows. FrontWork as for Back from ‡‡ to ‡‡. Work straight in pattern until 14 [14,
14, 16, 16]
rows fewer than on Back have been worked before start of shoulder shaping,
thus ending Keeping the continuity of the pattern, shape neck as follows: Continue on these 35 [37, 39,
41, 43] stitches for the first side,
decreasing 1 stitch at the neck edge on the next 9 rows. Work 4 [4, 4, 6, 6] rows. Shape shoulder by casting off 9 [9,
10, 11, 11]
stitches at the beginning of the next and following alternate row. With right side facing, slip centre 17 [19, 21, 23, 25] stitches on a length of yarn, or stitch holder, and rejoin appropriate colour to remaining stitches: k2tog, pattern to end. Complete to correspond with first side, reversing shapings. SleevesWith No 10 (3¼mm) needles and MS, cast on 49 [51,
53, 55, 57]
stitches and work in k1/p1 rib for 2 inches, (5cm), rows on right side
having a k1 at each end, and ending with wrong side facing for next Next row: Rib 6 [6, 7, 6, 7] m1; (rib 12 [13, 13, 14, 14], m1) 3 times; rib to end. (53 [55, 57, 59, 61] sts). Change to No 8 (4mm) needles and joining in and breaking off colours as required, work in pattern from chart B repeating the 10 pattern stitches 5 [5, 5, 5, 6] times across, and working first 1 [2, 3, 4, 0] stitches, and last 2 [3, 4, 5, 1] stitches on knit rows, and first 2 [3, 4, 5, 1] stitches and last 1 [2, 3, 4, 0] stitches on purl rows as indicated, shaping sides by increasing 1 stitch at each end of the 13th and every following 7th [7th, 7th, 7th, 6th] row until there are 75 [77, 81, 83, 87] stitches, taking the increased stitches into the pattern.
Work straight until sleeve seam measures approximately 17½ inches, (44cm), ending with the same pattern row as on Back before the start of the armhole shaping, thus ending with right side facing for next row. Keeping the continuity of the pattern, shape top by casting off
3 stitches at the beginning of the next 2 rows. Now decrease 1 stitch at each end of every row until 27 stitches remain. Cast off. Making UpOmitting ribbing, press parts lightly on wrong side following instructions (if any) on the ball band. Join right shoulder seam. Work in k1/p1 rib for 2 inches, (5cm). Join left shoulder seam and Neck Border. |
Materials50g balls Shetland DK in 6 colours: main shade plus 5 contrasts: Pair each No 8 (4mm) and No 10 (3¼mm) needles. Tension23 stitches x 30 rows to 4 ins (10cm) in stocking stitch on No 8 (4mm) needles. Size mattersTo fit chest 32 [34, 36,
38, 40] inches, (81 [86,
91, 97,
102]cm); Abbreviationsk2tog or p2tog: knit or purl 2 stitches together (decrease one
stitch). A word on the woolThe original design was in Patons Fiona - a yarn I was very fond of both in quality and rich colour range. It was a standard DK; some information given on the web implies it was slightly thicker than that but the tension given here suggests slightly thinner! In the 1970s it was sold in 50g balls: 175 yds/160m meters); 51% wool, 49% acrylic. In my opinion a similar substitute would be Rowan Felted Tweed DK. "Always check your tension" [Good Advice]. Disclaimer
|
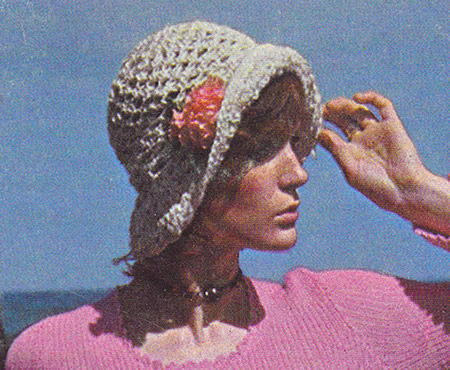
Instructions.Note: Yarn is used double throughout. Make 5 chain, join in a ring with slip stitch (ss) in 1st chain. Repeat the last round 13 times more. Make row of holes for cord as follows: Brim23rd round: ss in next st, 1 dc in
this st, * 2 ch, 1 dc in next ch sp,
2 ch, 1 dc in 2nd htr of previous round; repeat from *
ending last repeat, 2 ch, ss in 1st dc. To Make UpTo prevent heavy pressing and use of an iron, either
of which could be injurious to fabric, some yarns state that they should
not be pressed. Light pressing is suitable as follows:
|
Materials
|
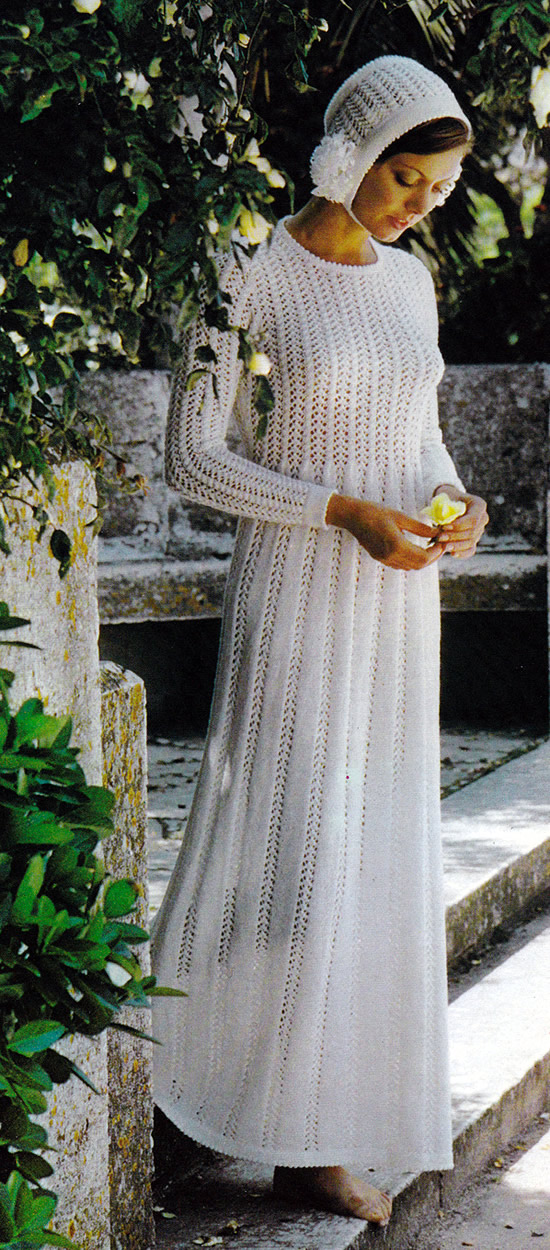
"Roses All the Way"
The copy says "cool beauty with openwork patterning", and, lovely though she looks in a shady garden, I cannot help thinking that a June bride would be a bit hot and bothered dressed head to toe in knitwear.
It might be lovely for a winter wedding however, and given the time it would take to tackle such a project, you definitely need to plan ahead!.
InstructionsThe pattern panel for the dress is worked over 5 stitches as follows: 1st row: yfwd, k2togtbl., k1, k2tog,
yfwd. Front‡‡ Next row: k2,
* yfwd, k2tog; repeat from * to
last stitch, k1. Change to No 10 (3¼mm) needles and continue in stocking stitch, placing panel patterns as follows: 1st row (right side facing): k6,
pattern 5 as 1st row of panel pattern, * k12,
pattern 5 as 1st row of panel pattern; repeat from *
to last Keeping continuity of panel patterns, work thus until front measures 24 inches from row of holes at hemline, ending with right side facing. 1st decrease row: k2, k2tog, k2,
pattern 5; * k5, k2tog , k5, pattern
5; repeat from * to last 6 stitches;
k2, k2tog, k2. [175 (191 : 207)
sts] 2nd decrease row: k2, k2tog , k1,
pattern 5; * k5, k2tog , k4, pattern
5; repeat from * to last 5 stitches,
k1, k2tog, k2. [163 (178 : 193)
sts] 3rd decrease row: k1 , k2tog , k1,
pattern 5; * k4, k2tog , k4, pattern
5; repeat from * to last 4 stitches;
k1, k2tog, k1. [151 (165 : 179)
sts] 4th decrease row: k1, k2tog, pattern 5; * k4, k2tog, k3, pattern 5; repeat from * to last 3 stitches; k2tog, k1. [139 (152 : 165) sts] Work a few rows straight until front measures 39 inches from row of holes at hemline, ending with 1st pattern row. Next row: p2, pattern 5, * (p2tog) twice, (p2togtbl) twice, pattern 5; repeat from * to last 2 stitches; p2. [99 (108 : 117) sts] Now work in lace pattern as follows: Continue in lace pattern, shaping sides by increasing 1 stitch at each end of the next and every following 6th row until there are 115 (124 : 133) stitches, taking the increased stitches into the pattern. Work a few rows straight until front measures 45 inches from row of holes
at hemline, ending with right side facing. Keeping continuity of pattern, shape armholes by casting off 4
stitches at the beginning of the of next 2 rows. Continue straight in pattern until front measures approximately 49½ (50 : 50½) inches from row of holes at hemline, ending with 2nd pattern row. Keeping continuity of pattern, divide for neck as follows: Next row: pattern 30 (31 : 32), turn, and leave remaining stitches on a stitch holder. Continue on these stitches for the first side, shaping neck by decreasing 1 stitch at the neck edge on every row until 22 (23 : 24) stitches remain. Continue straight in pattern until front measures 52 (52½ : 53) inches from row of holes at hemline, ending with right side facing. Shape shoulder by casting off 5 (6
: 6) stitches at the beginning of the next
and following 2 alternate rows. With right side facing, leave the centre 23 (26
: 27) stitches on a stitch holder, and rejoin
yarn to remaining stitches. Finish to correspond with BackWork as for front from ‡‡ to ‡‡. Keeping continuity of pattern, shape armholes and divide for back opening as follows: Next row: cast off 4, pattern 53
(58 : 62),
turn and leave remaining stitches on a length of yarn or a stitch holder.
Continue straight in pattern on these stitches until back matches front at armhole edge, ending with right side facing. Shape shoulder by casting off 5 (6
: 6) stitches at the beginning of the next
and following 2 alternate rows, then 7 (5
: 6) stitches at the beginning of the following
alternate row. With right side facing, rejoin yarn to remaining stitches, casting off
1 stitch at the centre on the 1st and 3rd sizes
only. Finish to correspond SleevesWith No 12 needles, cast on 53 stitches and work 1½ inches in stocking
stitch, starting with a knit row, and ending with right side facing. Now work a further 1½ inches stocking stitch, starting with a purl row, increasing 1 stitch at the centre on the last row and ending with right side facing. [54 sts] Change to No 10 needles, and starting with 3rd row, work in lace pattern as for bodice on front, shaping as follows: Increase 1 stitch at each end of the 11th (3rd : 3rd), and every following 15th (13th : 11th) row until there are 74 (78 : 82) stitches , taking increased stitches into pattern. Work a few rows straight until sleeve seam measures 17 inches from row of holes at wrist, ending with right side facing. Keeping continuity of pattern, shape top by casting off 4 stitches
at the beginning of the of next 2 rows. BonnetMain part: With No 12 needles, cast on 125 stitches and work 1½
inches in stocking stitch, starting with a knit row, and ending with right
side facing. Starting with a purl row, work a further 1½ inches in stocking stitch, increasing 1 stitch at the centre on the last row and ending with right side facing. [126 sts] Change to No 10 needles and starting with 3rd row, continue in lace pattern as on bodice of dress, until work measures approximately 5 inches from row of holes, ending with 2nd pattern row. Change to No 12 needles and work 6 rows in stocking stitch, starting
with a knit row, and decreasing 1 stitch at the centre on the last row.
[125 sts] Work a further 7 rows in stocking stitch, starting with a purl row. Bonnet back part: With No. 10 needles, cast on 30 stitches and
Continue straight until bonnet back measures 5½ inches, then decrease
1 stitch at each end of every row until 20 stitches remain. To Make UpPress parts lightly on wrong side, following instructions (if any) on the ball band, taking care not to spoil the lace pattern on bodice, sleeves and bonnet by over-pressing. Dress: Join shoulder seams. Dress Back Borders: Bonnet: Next row: rib 2, cast off 2, rib
to end and back, casting on 2 over those cast off. |
Materials
|
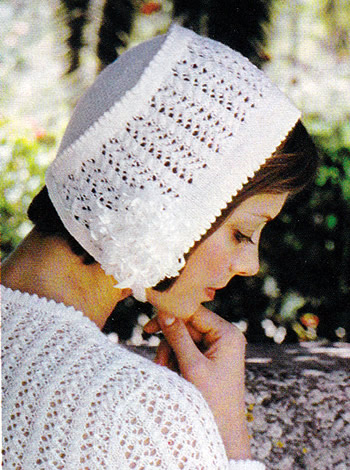
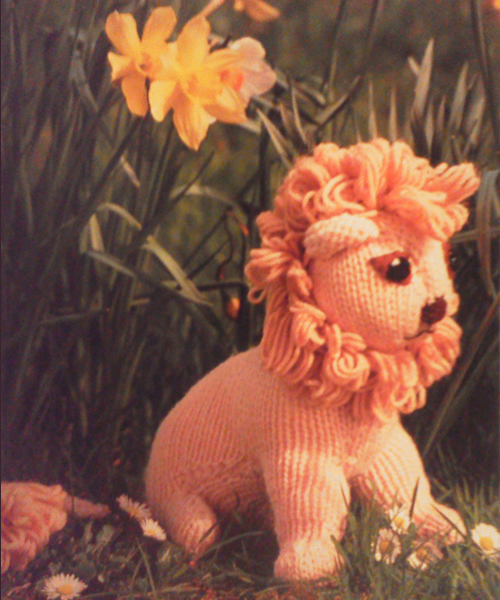
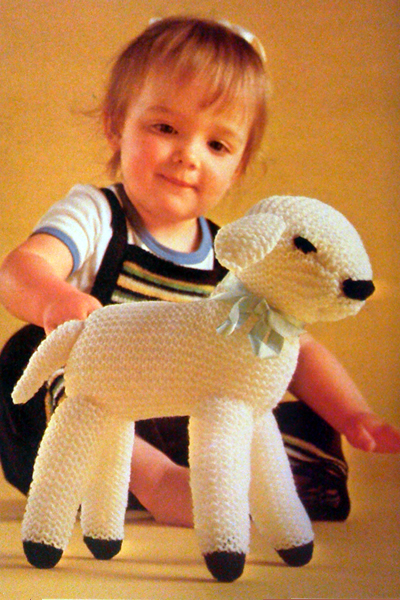
So says 17th century weather-watching folklore in respect of March. So here are a couple of delightful toy patterns to herald the change of season.
LION INSTRUCTIONS.Note that: the lion is knitted with the yarn doubled (2 strands held together). Front Legs (make 2 mirror image)Using 2 strands of main colour (M), and 5½mm needles, cast on 19
stitches. 5th row: k4, (k2tog) twice, k3, (sl1,
k1, psso) twice, k4. 13th row: k1, m1, k4, m1, k1, m1,
k4, m1, k1. [15 sts] 19th row: k1, m1, knit to last stitch,
m1, k1. 23rd row: k1, m1, knit to last stitch,
m1, k1. Cast off 9 stitches, knit to end of row, and leave remaining 10 stitches on a stitch holder. Work a second leg the same way, omitting the last purl row and working the cast off row on a purl row to reverse the shaping. Body Using 2 strands of main colour (M), and 5½mm needles, cast on 44
stitches. Cast off 12 stitches at the beginning of the next 2 rows for back legs. Increase 1 stitch at each end of the next and following 2 alternate rows. Repeat the last 2 rows twice. Cut yarn. Join in Front Legs: Next row: k18, (k2tog) twice, k2,
(sl1, k1, psso) twice, k18. [42 sts]. Next row: k1, m1, k17, k2tog, k2,
(sl1, k1, psso), k17, m1, k1. Next row: k18, k2tog, k2, (sl1, k1,
psso), k18. [40 sts]. Next row: k1, m1, k16, k2tog, k2,
(sl1, k1, psso), k16, m1, k1. Next row: k15, (k2tog) twice, k2,
(sl1, k1, psso) twice, k15. [36 sts]. Next row: k1, (sl1, k1, psso), k10,
(k2tog) twice, k2, (sl1, k1, psso) twice, k10, k2tog, k1. [30 sts]. Next row: k1, (sl1, k1, psso), k7,
(k2tog) twice, k2, (sl1, k1, psso) twice, k7, k2tog, k1. [24 sts]. Next row: k7, (k2tog) twice, k2,
(sl1, k1, psso) twice, k7. [20 sts]. Divide for head and face1st row: k1, m1, k6, k2tog, k1. Turn. 5th row: (k1, m1) 6 times, k5, k2tog,
k1. 7th row: k4, (m1, k1) twice, k10,
k2tog, k1. 9th row: k17, k2tog, k1. 11th row: k1, (sl1, k1, psso), knit
to last 3 stitches, k2tog,k1. Repeat the last 2 rows twice more. Cast off 3 stitches at the beginning of the next 2 rows. With right side of work facing, rejoin yarn to remaining 10 stitches on the stitch holder, and work the other side of the head to correspond with the first side, reversing shaping. To reverse shaping, read rows from end to beginning, or, rejoin yarn with wrong side of work facing and then read knit for purl, and purl for knit. Front GussetUsing 2 strands of main colour (M) and 5½mm needles, cast on 6 stitches. Place marker threads and the end of the last row. Next row: k3, (k2tog) twice, k2,
(sl1, k1, psso) twice, k3. [12 sts]. Next row: k3, k2tog, k2, sl1, k1,
psso, k3. [10 sts]. Next row: k2, (k2tog) 3 times, k2.
[7 sts]. Next row: k2, k3tog, k2. [5 sts]. Next row: k1, k3tog, k1. [3 sts].
Last row: k3tog, and finish off by drawing yarn through last stitch. Head GussetUsing 2 strands of main colour (M) and 5½mm needles, cast on 4 stitches
for base of nose. 9th row: k1, m1, knit to the last
2 stitches, m1, k1. 15th row: (k1, m1) twice, knit to
the last 2 stitches, (m1, k1) twice. Decrease 1 stitch at each end of the next and every following 4th row until 2 stitches remain. Work 3 rows. Last row: k2tog, and draw end of yarn through last stitch. Mane Using 2 strands of contrast colour (C) and 5½mm needles, cast on
33 stitches. 1st row: knit. Ears (make 2)Using 2 strands of main colour (M) and 5½mm needles, cast on 9 stitches. TailUsing 2 strands of main colour (M) and 5½mm needles, cast on 30
stitches. Tail tipUsing 2 strands of contrast colour (C) and 5½mm needles, cast on
9 stitches. To make upFold front legs in half and seam along cast-on edges and up leg to cast-off
edge. Stuff each section as it is seamed. |
Materials
|
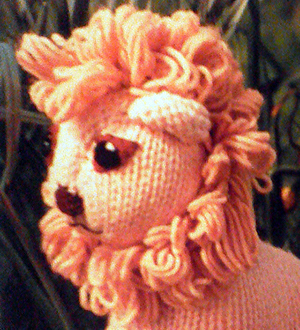
LAMB INSTRUCTIONS.This pretty toy is simply knitted in garter stitch (every row knitted). You use only the basic increasing and decreasing stitches to shape the body. This shows the shape of the pieces:
Body (make 2)With white yarn cast on 28 stitches. 1st row: k1, increase in next stitch,
knit to the last 2 stitches, increase in next stitch, k1. Divide for neck: Rejoin yarn for back to neck edge of remaining 19 stitches from stitch
holder, an knit 4 rows. Head GussetWith white cast on 3 stitches. Knit 9 rows. Ears (make 2)With white cast on 9 stitches. Legs (make 4)With white cast on 17 stitches.
TailWith white, cast on 12 stitches. Next row: k1, k2tog, knit to the
last 3 stitches, k2tog, k1. Thread yarn through remaining 8 stitches and draw up tight. To make upSeam or graft body pieces together along back. |
Materials
|
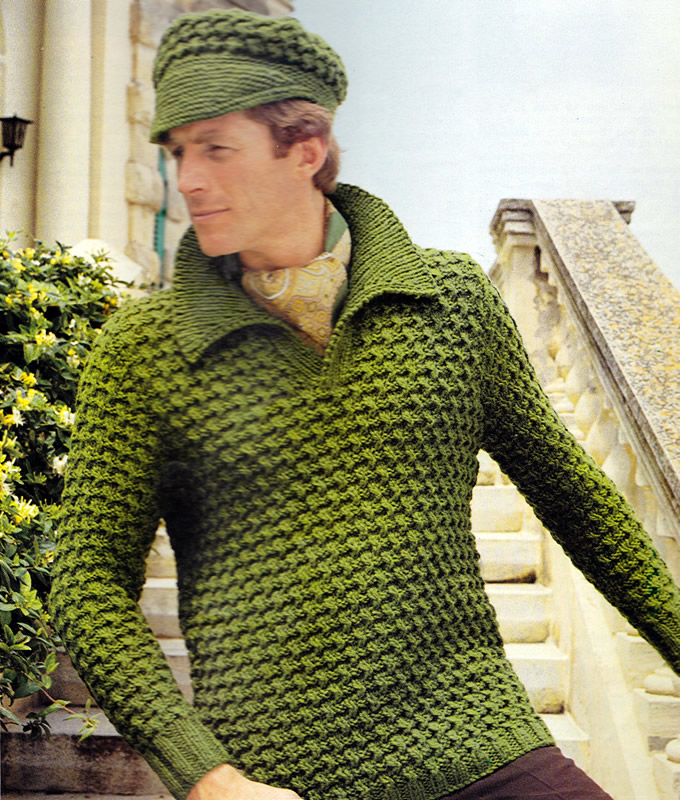
An expression of the era of safari suits and cravats* heralding a new "casual look" - where you could be smart without a lounge suit - like Brett Sinclair. [Having said that I can only find pictures of Brett with his safari jacket open necked or worn over a polo-neck, and his cravats worn conventionally with his suits; perhaps this was an expression of the character he was playing rather than fashion.]
If you overlook the styling - and maybe the colour - this is quite a nice sweater - and maybe cap if not all worn as an outfit. A shorter button-through neck would improve it for me.
* See gratuitous picture of Roger at the end of the instructions.
Sweater Instructions.Back** 1st row: p1, k2, *
p2, k2; repeat from * to last stitch,
p1. Change to No 4 needles and pattern as follows: 1st row (right side facing): *
Tw2R, k1 ; repeat from * to end. Shape sides by increasing 1 stitch at each end of the next and every following 24th row until there are 78/82/86/90 stitches, taking increased stitches into pattern. Work straight until back measures 17 inches, ending with right side facing. Keeping continuity of pattern, shape armholes by casting off 4
stitches at the beginning of the next 2 rows, then decrease 1 stitch at
each end of every row until 58/60/62/64
stitches remain. Work straight until back measures 26/26½/27/27½ inches, ending with right side facing. Shape shoulders by casting off 5/6/6/6 stitches at the beginning of the next 4 rows, then 6/5/5/6 stitches at the beginning of the following 2 rows. Leave the remaining 26/26/28/28 stitches on a spare needle. Front Work as for back from ** to **. Divide for front opening as follows: Next row: pattern 26/27/28/29.
Turn. Work straight in pattern on these 26/27/28/29 stitches for first side until front measures 23/23/23½/23½ inches, ending with right side facing. Shape neck by decreasing 1 stitch at the neck edge on the next 7 rows, then on every alternate row until 16/17/17/18 stitches remain. Work a few rows straight until front matches back at armhole edge, ending
with right side facing. With right side facing, leave centre 6 stitches on a safety-pin; rejoin yarn to remaining stitches and pattern to end. Finish to correspond with first side, reversing shapings. SleevesWith No 7 needles, cast on 32/32/36/36 stitches and work 3 inches in rib as on lower edge of back increasing 4 stitches evenly across last row: 36/36/40/40 stitches. Change to No 4 needles and pattern as on back, shaping sides by increasing
1 stitch at each end of the 9th and every following 6th row until there
are 48/44/52/50
stitches. Work straight until sleeve seam measures 18/18/18½/18½ inches, ending with right side facing. Keeping continuity of pattern, shape top by casting off 4 stitches at the beginning of the next 2 rows, then decrease 1 stitch at each end of the next and every alternate row until 38/38/42/42 38/38/42/42 stitches remain. Now decrease 1 stitch at each end of every row until 16 stitches remain.
Left Front BorderWith right side facing and No 7 needles, work across 6 centre stitches on front as follows: 1st row: k2, p1, m1, p1, k2 {7 sts} Repeat the last 2 rows until border, when slightly stretched, fits up
left side of front to start of neck shaping, ending with right side facing. Right Front BorderWith No 7 needles, cast on 7 stitches and work in rib as for left front until border fits up right side of front to start of neck shaping, ending with right side facing. Do not break yarn. Leave stitches on a safety pin. To Make UpOmitting ribbing, press lightly under a damp cloth or following the instructions
on the ball band. CollarWith right side facing and No 7 needles, rib 7 stitches from right front
border, pick up and knit 16/18/20/22
up right side of neck, knit 26/26/28/28
from back, increase 1 stitch at centre, pick and knit 16/18/20/22
down left side, then rib 7 border stitches. Shape collar as follows: 1st row: k1, *
p1, k1, repeat from * to end. Now repeat rows 2 - 5 until collar measures 4 inches at centre back,
ending with 2nd or 4th row. Use a tapestry needle and 12 inch lengths of yarn for making up, noting that yarn must be twisted from time to time during make up so that it does not break. Join side and sleeve seams; insert sleeves. |
Materials17/18/19/20 x 50g balls chunky wool. Pair each of No 4 (6mm) No 7 (4½mm) needles. Tension15st and 20 rows to four inches on No 4 needles over stocking stitch.
Size mattersTo fit chest: 17/18/19/20
inches; AbbreviationsTw2R: k2tog, but do not slip stitches off needle; then knit first
stitch again, A word on the wool.Original yarn was Patons Husky Chunky, which as I recall was a pure wool
chunky, and a fairly dense tough yarn as the name implies. Disclaimer
|
Cap Instructions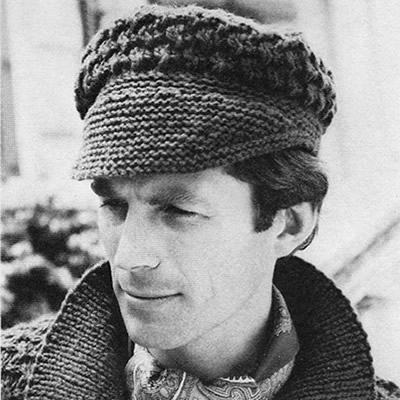 CrownWith No, 4 needles, cast on 14 stitches and purl 1 row. Shape as follows: Keeping continuity of pattern, increase 1 stitch as before at each end
of next and following 2 alternate rows: {34 sts} Now decrease 1 stitch at each end of every row until 14 stitches remain.
Work 1 row straight. BrimWith No 7 needles, cast on 84 stitches. 1st row: (p2, increase in next stitch) 3 times, * p1, increase in next stitch, p2, increase in next stitch; repeat from * to last 5 stitches, p2, increase in next stitch p2. {116 sts} Change to No 4 needles and work rows 1 - 8 of pattern as on back of sweater, then repeat rows 1 - 3 again. Cast off knitwise. PeakWith right side facing and No 7 needles, pick up and knit 76 stitches
along cast-on edge on the brim. Shape as follows: Continue working short rows in this manner, working 2 stitches fewer on every 2 rows until the rows "knit to last 33 stitches. Turn" have been worked. Next 2 rows: knit to last 36 stitches.
Turn. Making UpBlock crown to a 9 inch circle by pinning out round edges, and press
lightly under a damp cloth. Using a flat seam, join ends of brim. |
Materials3x 50g balls chunky wool. Pair each of No 4 (6mm) No 7 (4½mm) needles. Tension24st and 32 rows to four inches on No 9 needles. Size matters"Average hat size". A word on the wool.Original yarn was Patons Husky Chunky, which as I recall was a pure wool
chunky, and a fairly dense tough yarn as the name implies. Disclaimer
|
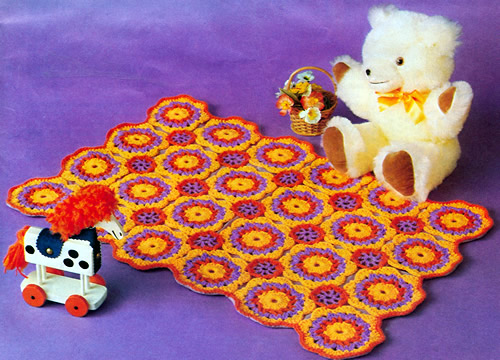
There maybe just enough time to crochet a simple cover if you can get over the lurid sixties colour schemes. [I'm sure you can choose your own combinations which would be less traumatic for a baby].
InstructionsThe crochet blanket is made up of a number of large motifs sewn together and then joined with smaller motifs which are integrated as you work. Large Motif (make 24)Using No 7 (4½mm) hook and DK in Light colour (L) make 6ch loosely and join in a ring using a slip stitch. 1st round: 3 chain, work 23tr into
the ring and join with a slip stitch to top of 3ch. [24 sts]. This completes the motif. To Make UpUsing L, join motifs by stitching centre stitches of each motif together,
and making 6 rows of 4 motifs. Work 15 small motifs to fill the spaces formed by the larger motifs and join together as follows: Small Motif (make 15 - joining as you work)The smaller motifs are worked in 4 ply. 1st round: 6 chain, work (1tr, 3ch)
7 times into the ring and join with a slip stitch to 3rd of 6 ch. This completes the motif - work the other 14 in the same way. FinishingWith right side facing, Using No 7 (4½mm) hook and M in DK, work
1 round of dc around scalloped edge of cover. Block the blanket by pinning it out and dampening; leave to dry. You can press very lightly with a damp cloth - just hold the iron above the cloth so it heats it but do not press down. You want to leave the texture of the stitches in place, so do not press heavily. Cut the lining material to fit around the scalloped edges. Turn in the edges and catch down all around the scallops inside the dc border. |
Materials
|
The original yarn was bri-nylon - famous for its hard wearing properties and luminous colour ranges. Although "bri-nylon" is not very marketable now, modern acrylic yarns are a worthy replacement being soft yet robust with a wide choice of colours.
Stylecraft have a good range of acrylics with equivalent colours available in DK and 4ply.
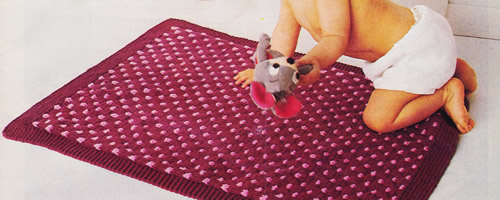
There maybe just enough time to knit a simple cover if you can get over the dramatic sixties colour scheme. [I'm sure you can choose your own combinations].
InstructionsThe pattern uses DK weight yarn with 2 strands held together. Motif (make 12)Using main shade (M) cast on 96 stitches and work 11 rows in garter stitch (every row knit but slip the first stitch of every row). Next row: Sl1, k7, slip these 8 stitches on to a thread; k4, increase in the next stitch, (k9, increase in next stitch) 7 times; k5; slip the next 8 stitches on to a thread (88 sts). Joining in contrast (C) as required and work in pattern as follows: 1st row: Sl1, k2C, *
k4M, k2C, repeat from * to last stitch,
k1M. These 8 rows form the pattern. Continue in pattern until main part measures approximately 26½ inches
ending with a 2nd pattern row. Borders and finishingWith wrong side facing, rejoin M to the 8 border stitches on left
side and work in garter stitch until Border measures 26 inches from cast-on
edge, ending with wrong side facing. Sew remaining Border in position. |
Materials
|
The original yarn was bri-nylon - famous for its hard wearing properties and luminous colour ranges. Although "bri-nylon" is not very marketable now, modern acrylic yarns are a worthy replacement being soft yet robust with a wide choice of colours.
You could also consider knitting a single strand in a heavier weight yarn - Aran, worsted, even chunky. However you would need to knit a tension square in the pattern stitches.
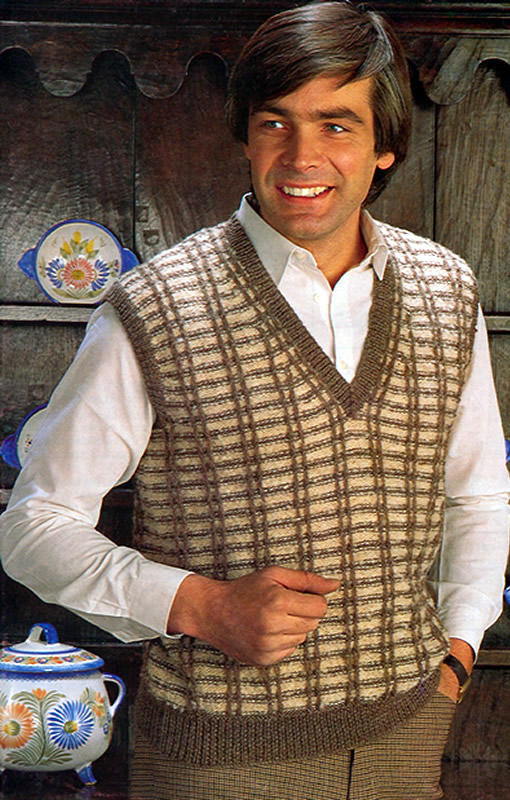
Pullover in a range of sizes, with an interesting plaid effect made by slipping stitches.
Joy first knitted it 35 years ago for her husband and he liked it so much he was always asking her to redo it. It took a while but she finally managed it - see her satisfied hubby at the end....
Instructions:The instructions are given in 9 sizes with smallest size given first
and the larger sizes in brackets. Back† 1st row (right side): K1, *
p1, k1; repeat from * to end. Change to No 8 (4mm) needles and commence pattern. 1st, 2nd, 4th, 5th, 6th, 8th, and 9th sizes only 1st row: Purl 3rd and 7th sizes only 1st row: Purl Continue in pattern ... † ....until work measures 14 [14½; 14½; 15; 15; 15½; 15½; 16; 16] inches from the beginning , ending with a wrong side row. Shape Armholes: Continue without further shaping until work measures 8¼ [8½; 8¾; 9; 9¼; 9½; 9¾; 10; 10¼] inches from the commencement of the armhole shaping, ending with a wrong side row. Shape Shoulders: FrontWork as given for back from † to † until work measures 8 rows less than the Back to armhole shapings ending with a wrong side row. Shape First side of neck Shape Armhole: †† Shape Shoulder: Return to the stitches on the spare needle on the other half of the front. Slip the centre stitch onto a safety pin. Shape second side of neck: Shape Armhole: Complete to match the first side, working from †† to ††. NeckbandUsing a back stitch and matching yarn, join right shoulder seam. With right side of work facing, using No 10 (3¼ mm) needles and yarn B, pick up and knit 68 [70; 72; 74; 76; 78; 80; 82; 84] stitches down left side of neck, knit centre from safety pin (mark this stitch with a coloured thread or stitch marker), pick up and knit 68 [70; 72; 74; 76; 78; 80; 82; 84] stitches up right side of neck, knit across the 29 [31; 33; 33; 35; 35; 37; 39; 41] stitches of back neck, increasing into last stitch: 167 [173; 179; 183; 189; 193; 199; 205; 211] stitches. 1st row: Work in k1/p1 rib to 1 stitch
before centre stitch; slip next stitch onto right hand needle, slip next
stitch onto cable needle and leave at back of work, place stitch on right
hand needle back onto Repeat these 2 rows twice more, then the first row once. ArmbandsUsing a back stitch and matching yarn, join left shoulder seam and Neckband.
With right side of work facing, using No 10 (3¼ mm) needles and yarn
B, pick up and knit 90 [94; 96;
100; 102;
104;
108; 110;
112] stitches evenly along armhole edge. For each armhole, with right side facing and using No 11 needles pick
up and knit 90 [96; 102;
108] stitches evenly round armhole.
Cast off ribwise. To Make UpPin out to correct measurements and steam very gently, using a warm iron
over a damp cloth. |
Materials Yarn A - bouclé double knitting: 3 [3;
4; 4;
4; 4;
5; 5;
5] x 50g balls A pair each No 10 (3¼mm), No 9 (3¾mm) and No 8 (4mm) needles. Tension22sts to 4 inches Size mattersChest to fit: 32 [34; 36; 38; 40; 42; 44; 46; 48] inches. Chest actual: 34 [36; 38; 40; 42; 44; 46; 48; 50] inches. Length: 23-27 ins. Abbreviationsk2tog/p2tog: decrease by knitting/purling 2 sts together. sl: slip yb: yarn back A word on the woolYou can see in the picture this is knitted in two different colours and textures of double knitting yarn. Finding a substitute will not be impossible as DK yarns are fairly standard, though it might be trickier to find the bouclé. The example shown, used Stylecraft double knitting yarn in just the one
texture (no bouclé). It took 125g of the maroon colour and just
under 100g of the grey (or silver). Disclaimer
|
Summer season bags in crochet this time - for beach - or for festivals if you want the full seventies vibe. Easy to make using a single basic granny square motif.
Instructions.The bags are made up by joining a number of the same basic "granny square" motif. If you are feeling adventurous you could make up your own version of the squares to approximately the same size or you could use a variety of colours (in the "granny square" tradition) to use up wool oddments. MotifWith Gold (G) make 4 ch, join into ring with slip stitch (ss). 1st round: in G, 3 ch, 11 tr into
ring. [12 sts]
 HandbagMake 10 motifs. Join remaining motifs in the same way, thus having 5 strips made of 2 motifs each Now make a square by joining 2 strips together using the slip stitch
technique as before. Make another square the same. Handbag - main part[Editor's note: In this section you make diagonal edgings for each side of the square sections of the bag. You end up with another square with the original 4 motifs set "on point" as you can see in the photo.] With right side facing and Gold (G), join yarn to corner ch sp of one
of the squares, and work along first side edge as follows : 2nd row: in Red (R), 3 ch, 2 tr in
1st sp between first 2 groups, 3 tr in 3rd row: in Cream (C), as 2nd row [5 groups]. Alternating colours as before, work 4 more rows, thus ending 3 ch 2 tr
in G worked in sp between 2 groups. [1 group]. Joining yarn to corner ch sp already used, work along 2nd and 3rd sides
of square in the same way, then work along 4th side starting Work the other main part in the same way on the second 4-motif square. Handbag - flap[Editor's note: At this point you might think "flap" is an instruction - but it isn't - it' just the description of the piece you are making next. The instruction is "just keep calm and carry on". Crochet is always more difficult to read from a pattern than it is to actually do it.] With right side facing and G, join yarn to corner ch sp at long side of remaining oblong strip and work as follows: 1st round: in G, 3 ch 2 tr in corner
ch sp, (3 tr in sp between next 2 groups) twice; 3 tr in centre of joining
row; (3 tr in sp between Handbag - gussetWith G, make 10 ch 1st row: 1 tr in 4th ch from hook,
1 tr in each following ch Repeat 2nd row until strip measures 24 inches (61 cm). Handbag - to make upUsing a warm iron and damp cloth, press parts lightly on wrong side.
Make twisted cord from 18 strands of remaining yarn, each strand 100 inches (254 cm) long (or however long you want the shoulder strap to be), and attach to top of gusset at each side of bag. Join lining and place inside bag with seams to inside, turn in raw edges at top and inside flap, and slip hem neatly in position. Sew on buttons.
 Beach bagMake 55 motifs. Beach bag - backJoin 6 strips together, thus having an oblong. 1st row: in G, 3 ch 2 tr in corner
ch sp, * (3 tr in sp between next
2 groups) twice, 3 tr in centre of joining row; repeat from *
ending 3 tr in corner ch sp [16 groups]. Alternating colours as before, work 13 more rows, thus ending 3 ch 2
tr in G, worked in sp between 2 groups. [1 group]. Beach bag - flapWorking along opposite edge of oblong, work as for point. Beach bag - frontJoin 5 strips together, thus making a square. Beach bag - to make upPress as for handbag. Cut lining as for front and back, allowing ½ inch (1 cm) extra for
turnings. Using a flat-stitch seam, join points by catching together tips of each group. Make twisted cord as for handbag and attach to sides. Using 18 strands of remaining yarn, each strand 12 inches (30 cm) long, make tassel and attach to point. Sew on button to match loop. |
Materials
|

Fringes appeared everywhere last year so this may still have a place this summer. The seventies photo is delightful - a sophisticated peasant style making you long for an adventurous getaway to foreign climes - you can feel that heat.
However the editors haven't quite caught up in the ways of modern copy to match...
"... a dashing little crochet vest to wear in many ways."
Instructions.The pattern is given in one size. Back and FrontsUsing 2 balls of yarn and working with yarn doubled, make 128 ch Foundation row: 1 dtr in 6th ch from hook, * miss 1 ch, 1 ch, 1 dtr in next ch; repeat from * to end. 1st row: 1 dc in 1st stitch, *
miss next 3 stitches (that is: 1 ch, 1 dtr, 1 ch), 8 ch, 1 dc in next
stitch; repeat from * working last
dc in 4th of 5 turning ch, turn with 10 ch (work into 3rd of 4 turning
ch here on all following 1st pattern rows). These 4 rows form pattern.  Divide for armholes as follows: Next row: 1 dtr in next ch sp, 1 ch, 1 dtr in next dc, (1 ch, 1 dtr in next ch sp, 1 ch, 1 dtr in next dc) 6 times, turn. Continue for right front, shaping armhole and neck as follows : ** Continue for back as follows: Leaving 7 stitches unworked, rejoin double yarn to next dc, make 4 ch, 1 dtr in next ch sp, 1 ch, 1 dtr in next dc, (1 ch, 1 dtr in next ch sp, 1 ch, 1 dtr in next dc.) 12 times, turn. Work the 4 rows as for right front from **
to **
then repeat these 4 rows twice more: after which you have 29 stitches
= 4 ch, 1 dtr, (1 ch, 1 dtr) 13 times. Continue for left front as follows: Leaving 7 stitches unworked, rejoin double yarn to next dc, make 4 ch, 1 dtr in next ch sp, 1 ch, 1 dtr in next dc, * 1 ch, 1 dtr in next ch sp, 1 ch, 1 dtr in next dc; repeat from * to end. Finish to correspond with right front, reversing shapings. To Make UpTo prevent heavy pressing and use of a hot iron, either of which could be injurious to the fabric, light pressing may be suitable as follows: Block each piece by pinning out round edges and press using a warm iron and slightly damp cloth. Join shoulder seams. With double yarn, work 1 row dc along front and neck edges. For the front ties: Make two lengths of ch. 20 inches (51 cm) long and sew one to each side of front, level with armhole division. Fringes: Cut remaining yarn into 12 inch (30 cm) strips and taking 6
strands together each time, knot through lower edge, placing |
Materials
|
A word on the wool.Patons marketed two different yarns called Promise in different eras
both DK equivalents. This pattern, being crocheted and from the 1970s,
is the earlier manifestation - a smooth yarn "with Tricel" sold
in 50g balls. [The later yarn marketed in the 1980s was a fluffy acrylic
with a good yardage, thus sold in 40g balls]. |
|
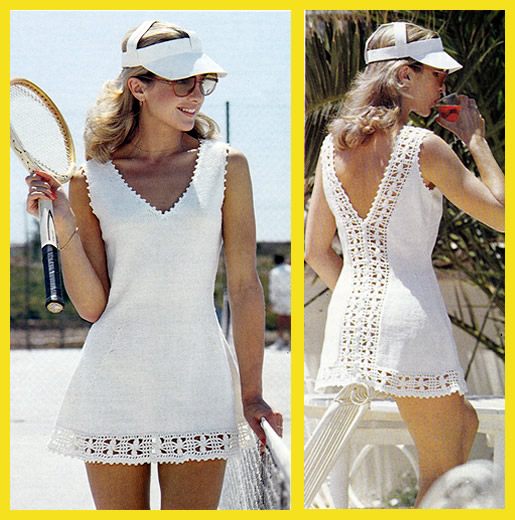
This is a knitted dress with crochet insets.....
"... to line up the prettiest back view".
No denying the charm of this dress (and model) though sadly I need them to be a little less revealing these days. But in the words of my 82 year old aunt - at the height of the mini skirt fashion when I was 13 - "well if I had legs like yours I'd bloomin' well show 'em off!".
Instructions.Special cluster stitch as follows:
Make Cluster: FrontUsing size 10 (3¼mm) needles, cast on 156 (164 : 172 : 180) stitches and starting with a knit row, work in stocking stitch until front measures 1½ inches, ending with a purl row. Shape as follows: Next row: {k 10 (11
: 13 :
14) k2togtbl} twice,
knit to last 24 (26 :
30 : 32)
stitches, {k2tog, k 10 (11:
13 : 14)}
twice. Repeat the last 6 rows 5 (4 : 4 : 4) times more. [132 (144 : 152 : 160) stitches ] Next row: {k 10 (11
: 13 :
14), k2togtbl} twice,
knit to last 24 (26 :
30 : 32)
stitches, {k2tog, k 10 (11
: 13 :
14)} twice. Repeat the last 4 rows until 84 (92 : 100 : 104) stitches remain, ending with a decrease row. 2nd and 3rd sizes only : ALL SIZES: Shape as follows: Next row: k 10 (11
: 13 :
14), m1, knit to last
10 (11 :
13 : 14)
stitches, m1, k 10 (11
: 13 :
14). Repeat the last 4 rows until there are 114 (120
: 128 :
134) stitches, ending
with an increase row. Next row: cast off 4, k 51 (54 : 58 : 61), k2tog, turn and leave remaining stitches on a spare needle or needle holder. Continue on these 52 (55
: 59 :
62) 52/55/59/62 stitches
for the first side as follows: Now decrease 1 stitch at the armhole edge on every row and at the
same time decrease 1 stitch at the neck edge on the next and every
alternate row until 37 (40
: 41 :
44) stitches remain.
Now decrease 1 stitch at each end of the next and every alternate row until 25 (26 : 27 : 28) stitches remain. Keeping armhole edge straight, continue decreasing at neck edge on every
alternate row until 21 (22
: 22 : 23)
stitches remain. Now decrease at the neck edge on the next and every following 4th row until 16 stitches remain. Work straight until armhole measures 7 (7½ : 8 : 8½) inches, ending with a purl row. Shape shoulder by casting off 5 stitches at the beginning of the next
and following alternate row. Work 1 row straight. With right side facing, rejoin yarn to the remaining stitches, k2tog,
knit to end. Left BackWith No 10 needles, cast on 61 (65 : 69 : 73) stitches, and starting with a knit row, work in stocking stitch until back measures 1½ inches ending with a purl row. Shape as follows: Next row: knit to last 24 (26 : 30 : 32) stitches, {k2tog, k 10 (11 : 13 : 14)} twice. Work 5 rows straight. Repeat the last 6 rows 5 (4 : 4 : 4) times more. [49 (55 : 59 : 63) sts] Next row: knit to last 24 (26 : 30 : 32) stitches, {k2tog, k 10 (11 : 13 : 14)} twice. Work 3 rows straight. Repeat the last 4 rows until 25 (29 : 33 : 35) stitches remain, ending with an decrease row. 2nd and 3rd sizes only: Work 3 rows straight. ALL SIZES: Shape as follows: Next row: knit to last 10 (11
: 13 :
14) stitches, ml, k
10 (11 : 13
: 14).
Work 3 rows straight. Repeat the last 4 rows until there are 35 (38
: 42 : 45)
stitches. Continue shaping bodice and at the same time shape back slope as follows: Next row: k2tog, knit to the last
10 (11 : 13
: 14)
stitches, m1, k 10 (11
: 13 :
14). Next row: knit to the last 10 (11
: 13 :
14) stitches, m1, k.10
(11 : 13
: 14).
Next row: purl to the last 2 stitches,
p2tog. Now decrease 1 stitch at back slope on the next and every following Continue shaping back slope and shape armhole as follows: Next row: knit. Continue decreasing at back slope on next and every following 3rd row, and at the same time decrease 1 stitch at the armhole edge on every row until 14 (17 : 18 : 21) stitches remain. Now decrease at the armhole edge on every alternate row and continue decreasing at back slope as before until 4 (5 : 6 : 8) stitches remain. Keeping armhole edge straight, continue decreasing at back slope as before
until 2 stitches remain. Right BackWork to correspond with the left back, reversing shapings. Your increase row on bodice will read: Crochet borderWith No 11 (3mm) hook, make 340 (356 : 372 : 388) chain. 1st row (right side facing): 1 tr
in 6th ch from hook, * 1 ch, miss
next ch, 1 tr in next ch; repeat from *
to end. This completes lower edge border, do not break yarn. Sewing in position as you go along, work left back border as follows: 1st row: 4 ch, miss first tr, 1
tr in next tr, 5 ch, miss 2 tr, 1 CL in next tr, 5 ch, miss 2 tr, 1 tr
in next tr, 1 ch, 1 tr in next tr, turn. Rows 2 to 6 inclusive, form border pattern. Continue in pattern until border fits up left back edge to top of slope,
when slightly stretched. Work right back border as follows: With right side facing, rejoin yarn to 9th stitch in from left-hand edge of bottom border and make 4 ch, 1 tr in next tr, 5 ch, miss 2 tr, 1 CL in next tr, 5 ch, miss 2 tr, 1 tr in next tr, 1 ch, 1 tr in 3rd of 4 ch. Finish to correspond with left border. To Make UpPress parts lightly on wrong side. Join shoulder and side seams, then join border to lower edge. Armhole Borders: With right side facing and No 12 (2½mm) hook, work 1 round dc all round armhole. Work picot edging as follows: Neck, Back and Lower Edge Border: With right side facing and No
12 (2½mm) hook, start at left back lower edge and work 1 row dc up
Next round: Work in dc to a point level with the start of the back slope shaping, then work picot edging up to shoulder, all round neck and down right back to point level with the start of back slope shaping. Then finish by working in dc to lower edge, working 16 button loops. To make a button loop: Work 3 ch, miss 2 dc. Now work picot edging along lower edge, join with ss in first dc. Press seams. Sew on buttons. |
Materials
|
This is styled reminiscent of the astonishingly popular seventies photo depicting the back view of a female tennis player (or more accurately "a student in tennis whites").

And not forgetting, the year after this photo was taken, we were all inspired by British tennis as Virginia Wade won the 1977 ladies singles at Wimbledon (without having to reveal her bottom).

I was unable to watch the match as I was working during my student summer break - but in the evening at Victoria railway station - where they had only just installed the new electronic announcement boards - I read "Wade wins Wimbledon 4-6, 6-3, 6-1" demonstrating the sense of elation felt by all since this was a pretty unusual departure from the norm for good old British Rail at that time...
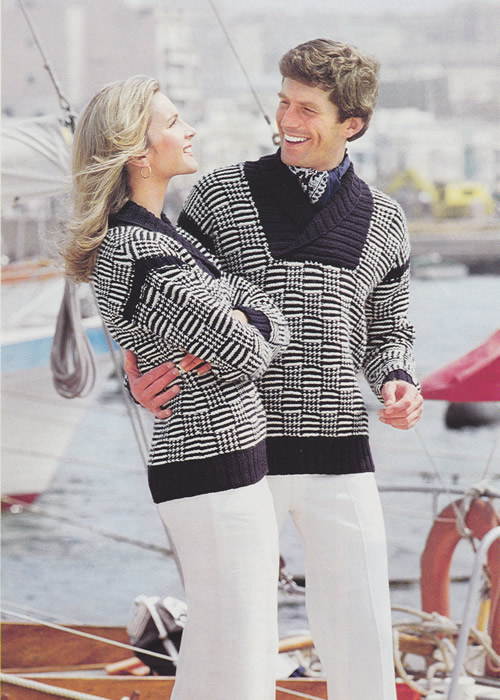
This has to be a favourite for me, combining a boating theme with navy and white.
It is a pattern from the seventies but was quite a new idea - a forerunner of those drop shoulders and cowl neck designs which were so ubiquitous in the eighties - and seemingly popular now.
Instructions.Instructions for six sizes with larger sizes given in brackets. The pattern is in two colours (dark and light) - Navy is represented by D (dark) and Cream represented by L (light). BackWith No 9 needles and yarn D, cast on 84 (92
: 97 : 100 : 108
: 112) stitches and work in rib as
follows: Repeat these 2 rows until rib measures 3 inches, ending with wrong side facing for next row. Change to No 5 needles and knit 1 row, increasing 1 stitch at centre:. [85 (93 : 97 : 101 : 109 : 113) sts] Join in yarn L, and work in pattern as follows: 1st row: right side facing,
in L, k6 (2 : 4
: 6 : 2 : 4),
sl1, {k1, sl1} 4 times, * k7, sl1, {k1, sl1} 4 times; repeat from * to
last 6 (2 : 4
: 6 : 2 : 4)
stitches, k6 (2 : 4
: 6 : 2 : 4).
17th row: in L, sl1, {k1,
sl1} 3 (1 : 2
: 3 : 1 : 2)
times, k7, * sl1, {k1, sl1} 4 times, k 7 ; repeat from * to last 7 (3
: 5 : 7 : 3
: 5) stitches , sl1, {k1, sl1} 3 (1
: 2 : 3 : 1
: 2) times. These 32 rows form pattern. Repeat them until back measures 15 (15 : 15 : 16 : 16 : 16) inches, ending with right side facing. Shape armholes by casting off 5 stitches at the beginning of the next 2 rows. [75 (83 : 87 : 91 : 99 : 103) sts]. Keeping continuity of pattern, work straight until back measures 23 (23 : 24 : 25 : 26 : 26) inches, ending with right side facing Shape shoulders by decreasing 1 stitch at each end of every row
until 51 (59 : 63
: 67 : 75 : 79)
stitches remain. FrontWork as for back to start of armhole shapings. Shape armholes by casting off 5 stitches at the beginning of the
next 2 rows. Next row: pattern 23 (25 : 26 : 28 : 31 : 33), slip these stitches on a spare needle, cast off 29 (33 : 35 : 35 : 37 : 37) stitches, pattern to end. Continue on these last 23 (25 : 26 : 28 : 31 : 33) stitches for the first side and work straight until front matches back at armhole edge, ending with right side facing. Shape shoulder by decreasing 1 stitch at end of next row, then at the same edge on every row until 11 (13 : 14 : 16 : 19 : 21) stitches remain. Work 1 row straight, then cast off 3 (4
: 5 : 5 : 6
: 7) stitches at the beginning of
the next and following alternate row. With wrong side facing, rejoin appropriate yarn colour to remaining stitches
and finish to correspond with first side, reversing shapings. SleevesWith No 9 needles and D, cast on 40 (40 : 44 : 44 : 48 : 48) stitches and work 3 inches in rib as for back, ending with wrong side facing. Change to No 5 needles. Join in L and pattern 4 rows as for 2nd (2nd : 3rd : 3rd : 4th : 4th), size of back. Shape sides by increasing 1 stitch at each end of the next and every following 8th row until there are 73 (73 : 81 : 81 : 89 : 89) stitches, taking increased stitches into pattern. Work straight until sleeve measures 17½ (17½ : 18½ : 19 : 20 : 20) inches down centre, ending with right side facing. Now increase 1 stitch at each end of the next and every alternate row until there are 83 (83 : 91 : 91 : 99 : 99) stitches. Break L. Change to No 9 needles. Work 7 rows rib as for back. To Make UpPress parts on wrong side following instructions on the ball band and
omitting ribbing. Collar: With right side facing, using the set of four (or circular) No 9 needles
and D, work as follows: Divide stitches evenly on 3 needles to facilitate working. Join side seams and sleeve seams up to rib. |
MaterialsAran weight yarn: 10 (11 : 12 : 13 : 14 : 15) 50g balls in Navy and 6 (7 : 7 : 8 : 8 : 9) in Cream. A pair each of Nos
9 (3¾mm) and 5 (5½mm) needles. TensionThis cable pattern is difficult to measure but it is equivalent to a basic tension of 19 sts x 36 rows to 4 ins measured over pattern on No 5 (5½mm) needles. Size mattersTo fit chest 34 (36 : 38
: 40 : 42 : 44)
inches, 86 (91 : 97
: 102 : 107 : 112)
cm. Abbreviationssl1: slip one stitch purlwise with yarn at back. m1: make 1. Increase 1 stitch by picking up horizontal loop lying before next stitch and working into the back of it k2tog or p2tog: work 2 sts together to decrease. A Word on the WoolThe original yarn was Patons Capstan - an Aran weight yarn knitting to a tension of 18 sts to 4 inches over stocking stitch. No clues as to the yardage but it was a fairly dense pure wool so I would not expect it to have a long yardage Disclaimer
|
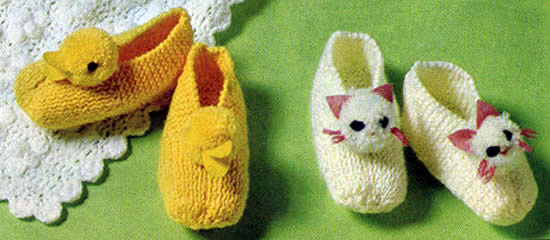
Cute little slippers with ducklings, or kittens.
Easy and quick to knit, with their very effective little pom-pom heads.
[I'm guessing that with a little adaptation you could close in the top of the slippers and stuff them to make tiny duckling toys - if you are feeling adventurous....?!]
InstructionsThere are two sizes with instructions for the second size given in brackets. Both versions:Using either yellow (for duckling) or white (for kitten) and No 9 needles, cast on 20 (26) stitches and work as follows: 1st row (wrong side facing): sl1,
k8(11), p2, k9(12) 2nd size only Both sizes - continue as follows: 1st row: sl1, knit to end. Repeat the last 2 rows until work measures 2½ (3) inches ending with a 1st row. Next row: sl1, {m1, k3}, 2(3)
times, m1, k2, p1, {k2, m1} 3(4) times,
k 2(3), p1, k2, {m1, k3} 2(3)
times, m1, k1. [37(49) sts] Repeat the last 2 rows until work measures 4½ (5½) inches ending with right side facing. Next row: k1, {k2tog} 5(7) times, p1, k1 p1, {k2tog} 1(2) times,rib 5, {k2tog} 1(2) times, p1, k1 p1, {k2tog} 5(7) times, k1. Next row: rib 1(2), {p2tog} 3(4) times, rib 1, {p2tog} twice, rib 1, {p2tog} twice, p1, {p2tog} 3(4) times, rib 1(2). Next row: {k2tog} 3(2) times, {k3tog} 1(3) times, {k2tog} 3 times. [7(8) sts] Break yarn and thread through remaining stitches; draw up tightly and
fasten off securely. Completing the Duckling version:Make 2 pom-poms with remaining yellow yarn, each 1½ inches in diameter.
Trim to neaten and sew one to the front of each slipper. Completing the Kitten version:Make 2 pom-poms with remaining white yarn each 1½ inches in diameter.
Trim to neaten and sew one to the front of each slipper.  |
Materials
|
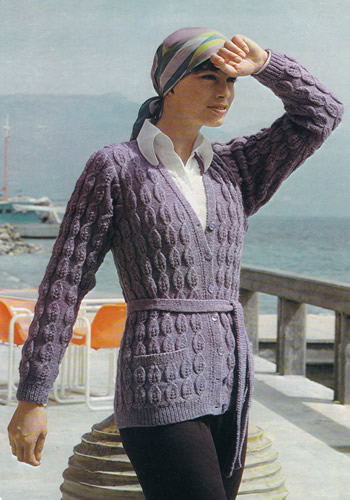
Cosy and snug wrap cardigan with a sash belt. I would probably knit it for myself as shown, but it may be more stylish if worn longer or over-sized and perhaps without pockets.
The original yarn was a soft heathered and slightly fluffy Shetland type. I think this would be lovely knitted in the hand-dyed yarn available from the Little Grey Sheep.
Instructions.Instructions are given for 4 sizes - larger sizes given in brackets. [Editor's note: I have copied the note above from the original pattern - it will make more sense when you start knitting as the the number of stitches you end up with at the end of each row increases and decreases as part of the pattern stitch.] BackWith No 11 needles, cast on 112 (120 : 126 : 132) stitches, and work 2 inches in k1/p1 rib. Next row: rib 14 (15 : 15 : 15), {ml, rib 14 (15 : 15 : 15)} 6 (5 : 6 : 6) times, ml, rib to end. [119 (126 : 133 : 139) sts] Change to No 9 needles and work as follows: Next row (right side facing):
k1, p3 (2 : 1
: 4), * k3, p6; repeat from
* to last 7 (6
: 5 : 8) stitches, k3, p3 (2
: 1 : 4), k1. 1st row (wrong side facing):
k4 (3 : 2
: 5), * p3, k6; repeat from
*
to last 7 (6 : 5
: 8) stitches, p3, k4 (3 :
2 : 5). These 14 rows form pattern for back. Keeping continuity of pattern shape armholes as follows: Next row: cast off 17 (19
: 21 : 21), k4 (1
: 7 : 1), *
p3, k6 repeat from * to last 7 (6
: 5 : 8) stitches, p3, k4 (3
: 2 : 5). Continue straight in pattern until back measures 25½ (26 : 26½ : 27) inches, ending with right side facing. Shape shoulders by casting off 8 (8 : 8 : 9) stitches at the beginning of the next 4 rows, then 7 (8 : 9 : 9) stitches at the beginning of the following 2 rows. Cast off remaining 39 (40 : 41 : 43) stitches. Pocket LiningsWith No 9 needles, cast on 30 stitches and work 29 rows stocking stitch,
starting with a purl row Left Front** Next row: rib 9 (11
: 15 : 14), {ml, rib 12 (12
: 16 : 12)} 3 (3
: 2 : 3) times, ml, rib to end: [58
(62 : 65
: 68) stitches] Change to No 9 needles and place pattern panels as follows: Next row (right side facing): k1, p3 (2 : 1 : 4), * k3, p6; repeat from * to last 9 (5 : 9 : 9), stitches, k3, p5 (1 : 5 : 5), k1. Now continue in pattern as for back Your first 2 rows will read: 1st row (wrong side facing):
k6 (2 : 6
: 6), * p3, k6; repeat from
* to last 7 (6
: 5 : 8) stitches, p3, k4 (3
: 2 : 5). Keeping continuity of pattern, work a further 27 rows, thus ending with 1st pattern row. Place pocket lining as follows: Next row: pattern 11 (10 : 9 : 12), slip next 34 stitches on a stitch holder and in place of these, pattern across stitches of first pocket lining, pattern 13 (18 : 22 : 22). Continue straight in pattern until 14 rows less have been worked than on back to start of armhole shaping, thus ending with 14th pattern row. Shape front edge as follows: Next row: k2tog, k4 (9
: 4 : 4), pattern to end. Decrease 1 stitch at the front edge on the next and every following 4th row until 54 (58 : 61 : 64) stitches remain, keeping stitches at front edge in reverse stocking stitch as placed. Work 1 row straight. Next row: k11 (7 : 11 : 11), pattern to end. Shape armhole as follows: Keep armhole edge straight and continue to decrease 1 stitch at front edge on next and every following 4th row until 23 (24 : 25 : 27) stitches remain. Note: When shaping at front edge do not continue panel pattern nearest this edge if there are insufficient stitches to work another complete pattern; instead take stitches into reversed stocking stitch. Work a few rows straight until front matches back at armhole edge, ending with right side facing. Shape shoulder by casting off 8 (8
: 8 : 9) stitches at the beginning
of the next and following alternate row. Right FrontWork as for left front from **
to **. Next row (right side facing): k1, p5 (1 : 5 : 5), * k3, p 6; repeat from * to last 7 (6 : 5 : 8) stitches, k3, p3 (2 : 1 : 4), k1. Next row (right side facing): k1, p3 (2 : 1 : 4), * k3, p6; repeat from * to last 9 (5 : 9 : 9), stitches, k3, p5 (1 : 5 : 5), k1. Now continue in pattern as for back Your first 2 rows will read: 1st row (wrong side facing):
k4 (3 : 2
: 5), * p3, k6; repeat from
* to last 9 (5
: 9 : 9) stitches, p3, k6 (2
: 6 : 6). Keeping continuity of pattern work a further 27 rows, thus ending after 1st pattern row, with right side facing for next row. Place pocket lining as follows: Next row: pattern 13 (18
: 22 : 22), slip next 34 stitches
on a stitch-holder and in place of these, pattern across stitches of second
pocket lining, pattern 11 (10 : 9
: 12). SleevesWith No 11 needles, cast on 46 (48 : 50 : 52) stitches and work 2 inches in k1/ p1 rib. Next row: rib 7 (7 : 7 : 6), {ml, rib 8 (5 : 4 : 5)} 4 (7 : 9 : 8) times, ml, rib to end. [51 (56 : 60 : 61) sts] Change to No 9 needles and place pattern panels as follows: Next row (right side facing):
k1, p5 (3 : 5
: 1), * k3, p6; repeat from
* to last 9 (7
: 9 : 5) stitches, k3, p5 (3
: 5 : 1), k1. 1st row: k6 (4
: 6 : 2), *
p3, k6; repeat from * to last 9 (7
: 9 : 5) stitches, p3, k6 (4
: 6 : 2). Continue in pattern, shaping sides by increasing 1 stitch at each end
of the 12th (10th : 8th
: 2nd), and then every following 4th row until there
are 101 (108 : 114
: 121),stitches , taking increased stitches into pattern. Cast off. To Make UpUsing a warm iron and slightly damp cloth, press parts lightly on wrong
side, omitting welts.
Front Borders
Left: With No 11 needles, cast on 9 stitches and work in rib
as follows: Repeat the last 2 rows until strip fits up left front and round to centre back of neck, when slightly stretched. Sew in position as you go along. Cast off in rib. Right: Work to correspond with left, with the addition of 7 buttonholes,
first to come ½ inches up from lower edge, 7th at start of neck shaping
and remainder spaced evenly. To make a buttonhole: with right side facing, rib 3, cast off 3, rib to end, then when knitting the next row back, cast on 3 over those cast off. [Editor's note: If you are making an over-sized cardigan, you may wish to omit the buttonholes and just have the tie belt for closure.] Pocket TopsWith right side facing and No 11 needles, k34 stitches from stitch holder,
increasing 1 stitch in centre. [35 sts] Catch down sides of pocket tops neatly on right side and pocket linings lightly on wrong side. BeltWith No 11 needles, cast on 13 stitches, and work 52 (54 : 56 : 58) inches in rib as for front borders. Cast off evenly in rib. Press seams. Sew on buttons. |
Materials
|
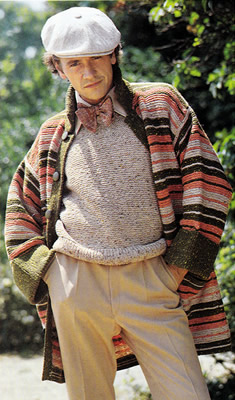
....or "coatigan" *.
Shown on a chap but I would like it for me... and let's face it - he looks pretty silly - even for 1976 as I remember it....
It's a very simple knit being made up of rectangles in garter stitch - if I had a loom wide enough I would actually like to have a go at weaving the fabric - but here is the knitted version - plus a man's vest or slipover which is illustrated with it.
[* I believe I am not the only one who hates this word - I am not sure it adds anything much to the meaning but .... it is the jargon of the moment]
Coat Instructions.Instructions for larger sizes given in brackets. Where one set of figures
is given this applies to all sizes. Left Front** Continue with double yarn and garter stitch and work 2 rows A; 6 rows C. Break off C and one strand of A. Change to No 6 (5mm) needles and continue in garter stitch with single
yarn, working in stripes as follows: These 42 rows form the striped pattern. Repeat them 4 times more, then rows 1-24 inclusive again. ** Continue in pattern but shaping neck as follows: Rejoin yarn at neck edge and keeping side edge straight, decrease 1 stitch at the neck edge the next 3 rows, then on the following 4 alternate rows, ending at side edge. Shape shoulder as follows: Now cast of 5 stitches at the beginning of the following 2 alternate
rows. Right FrontWork as for left front from ** to
**. Finish to correspond with left front reversing shapings. BackWith No 8 (4mm) needles and using yarn C double, cast on 95 (99
: 103) stitches. Continue with double yarn
and work 5 rows in C; 2 rows A; 6 rows C. Change to No 6 (5mm) needles and continue in garter stitch with single yarn, continue in garter stitch striped pattern as for left front. Work straight until back measures same as front to the start of the shoulder shaping, ending with same row as left front. Shape shoulders by casting off 4 (5
: 6) stitches at the beginning of the next
2 rows, 5 (5 : 5)
stitches at the beginning of the next 10 rows, then 4 (5
: 6) stitches at the beginning of the following
2 rows. SleevesWith No 8 (4mm) needles single yarn C, cast on 105 stitches. 1st row: *
k1, p1; repeat from * to last stitch,
k1. Repeat the 1st and 2nd rows until sleeve measures 7 inches, ending with a 1st row. Next row: k2 * k2tog, k5; repeat from * to last 5 stitches, k2tog, k3. [90 sts] Join in A and work in garter stitch striped pattern, as given for Left Front, repeating the 42 rows 3 times in all, and then rows 1-5 inclusive again. Cast off. Right Border (for a man - left border for a woman)With No 8 (4mm) needles single yarn C, cast on 15 stitches. 1st row (right side facing): k2 *
p1, k1; repeat from * to last stitch,
k1. Repeat the 1st and 2nd rows until border fits up the front - when slightly
stretched - to the start of the neck shaping, ending with a 2nd row. Left Border (for a man - right border for a woman)Work to correspond with right border, with the addition of 6 buttonholes, the first to come 6 inches up from the lower edge and the 6th to come ¾ inch below the start of the neck shaping and the rest spaced evenly in between. First mark the positions of the buttons on the opposite border, and work the holes to correspond. To make a buttonhole: Sew second border in position, taking care that the stripes are level with those on the opposite front. Pockets (make 2)With No 6 (5mm) needles and C, cast on 31 stitches and work in garter stitch stripes as follows: 5 rows C Break off B and A. Change to No 8 (4mm) needles and join in an extra strand of C - using
C yarn double, knit a further 5 rows. Make a second pocket in the same way. CollarWith No 8 (4mm) needles single yarn C, cast on 113 stitches. 1st row: *
k1, p1; repeat from * to last stitch,
k1. Repeat these 2 rows for 7 inches, ending with 2nd row, and cast off in rib. To Make UpPress parts lightly on wrong side following instructions on the ball
band. Join shoulder seams. Pin pockets on fronts, lower edge of pocket to come at start of 3rd broad
stripe in C, 1¼ inches from side seam. |
Materials
|
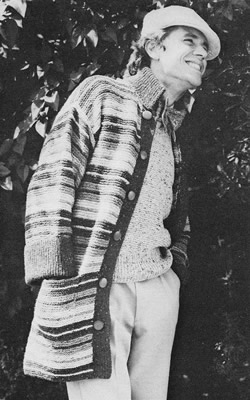
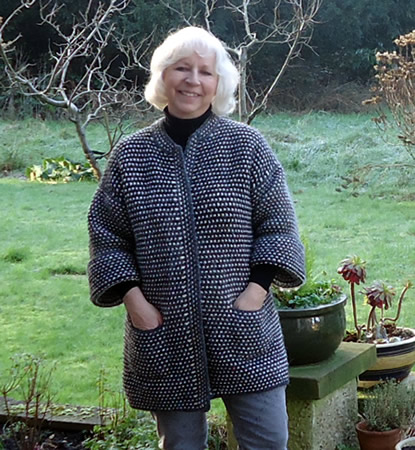
Here is a version of the coat that I made. I have written copious notes about its construction in a blog entry "The Age of Aquarius"!
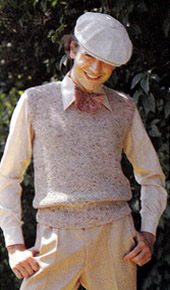
Slipover Instructions.Instructions for larger sizes given in brackets. Where one set of figures
is given this applies to both sizes. The slipover is worked in one colour. Front ** 1st row: k2 *
p1, k1; repeat from * to last stitch,
k1. Repeat the 1st and 2nd rows for 4 inches, ending with a 2nd row. Change to No 6 (5mm) needles. Next row (right side facing): knit 5 (7 : 4), k2tog, * k4, k2tog; repeat from * to last 6 (8 : 5) stitches, knit to end. [87 (91 : 95) sts] Continue in garter stitch and work straight until front measures 16 (16
: 16½) inches ending with right side
facing. Shape armholes by casting off 5 (6
: 7) stitches at the beginning of the next
2 rows, then decrease 1 stitch at each end of the next and every alternate
row until 69 (71 : 73)
stitches remain. Continue shaping armhole and shape neck as follows: Next row: k2tog, k32 (33 : 34). Turn and leave remaining stitches on a spare needle. Continue on these 33 (34 : 35) stitches only for the first side, and work 3 rows straight, then decrease 1 stitch at each end of the next and every following 4th row until 27 (28 : 29) stitches remain. Now keep armhole edge straight and continue decreasing 1 stitch at the neck edge on every 4th row until 16 (17 : 18) stitches remain. Work a few rows straight until front measures 25 (25 : 25½) inches, ending at the armhole edge. Shape shoulder by casting off 4 (5
: 5) stitches at the beginning of the next
row, then 4 (4 : 4)
stitches at the beginning of the following 2 alternate rows. Work 1 row
straight. With right side facing, slip centre stitch on to a safety pin, and rejoin yarn to remaining stitches; knit to the last 2 stitches, k2tog. Finish to correspond with first side, reversing shapings. BackWork as for front from ** to **.
Now decrease 1 stitch at each end of the next and every alternate row until 67 (69 : 71) stitches remain, and then on every following 4th row until 61 (63 : 65) stitches remain. Work straight until back matches front to shoulder at armhole edge. Shape shoulders and back neck as follows: 1st row: k2tog, knit to end. Cast off remaining 4 (5 : 5) stitches. With right side facing, leave centre 23 stitches on a spare needle, rejoin yarn to remaining stitches, knit to end. Finish to correspond with first side. To Make UpPress as for coat. Join right shoulder seam. Neck Border: 1st row (wrong side facing): *
p1, k1; repeat from * to within 2
stitches of centre marked stitch, p2tog, p1, p2tog tbl, **
k1, p1; repeat from **
to end. Repeat 1st and 2nd rows twice more, and then 1st row again. Join left shoulder seam and border. Armhole Borders: Join side seams and armhole borders. Press seams. |
Materials
|
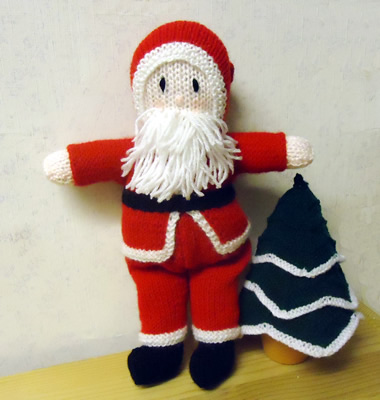
So is he a "Santa Claus" or is he a "Father Christmas"? I never thought much about this until my friend Louise (an American) suggested there was a difference; in the ensuing discussion, it seems my guess did not gel with her view. I think she told me that Father Christmas is the traditional old chap and that Santa Claus is one in red with the white trim.
Anyway - which ever he is, I'm sure he'll make a nice little seasonal knitted toy.
This example knitted by my friend Jennie, and if you live around Ewell in Surrey in the UK you can find her work for sale at local craft fares .
Instructions.Note that: the body is knitted with the yarn doubled (2 strands held together), and the clothes are single. BodyWith white yarn (W) and 3mm needles and yarn used double, cast on 20 stitches and work 3½ inches in stocking stitch (1 row knit, 1 row purl). Shape shoulders by casting Off 5 stitches at the beginning of
the next 2 rows. [10 sts]. Now increase 1 stitch at each end of every row until there are 18 stitches. Work 14 rows straight for back of head. Now decrease 1 stitch at each end of every row until 8 stitches remain. Join the two halves together and stuff firmly. Arms (Make 2)With yarn C, cast on 14 stitches, and work 1 inch in stocking stitch, ending with a purl row. Break off C. Join in W, and continue until work measures 2½ inches. Fold in half lengthways and join seam, leaving top open for stuffing. Stuff and sew to body. Legs (Make 2)With yarn B, cast on 24 stitches, and work 1 inch in stocking stitch, ending with a purl row. Next row: k8, cast off 8, k8 [16 sts] Work across these 16 stitches for 1 inch, leaving 8 cast-off stitches for toe of boot. Break off B. Join in yarn W, and continue straight until work measures 3½ in.
Coat (Fronts)For the left front: with yarn W, cast on 16 stitches, and knit 4 rows. Break off W. Continue in red (R) and white (W) thus: Cast on 10 stitches at the beginning of the next row for the sleeve,
then work 1 inch straight on these 26 stitches, ending at the neck edge.
Work the right front to correspond, reversing all shaping. Coat (Back)With yarn R, p19 stitches from the from right front, cast on 10 stitches, then p19 from left front. Continue in stocking stitch for l inch Cast off 10 stitches at the beginning of the next 2 rows, then work 2½ inches, finishing with 4 rows of garter stitch in white (W). Join side and sleeve seams of coat and fit on body, then join the front edges in white from neck to waist. Trousers (Make 2)With yarn W, cast on 30 stitches and k4 rows. Break off W. Join in yarn R, and work in stocking stitch until piece measures 2½
inches, then increase 1 stitch at each end of the next and every alternate
Continue straight until work measures 5 inches from the start. Join seams and fit on body. Attach garments to body stitching round neck, wrists, waist of trousers and top of boots. HoodWith yarn W, cast on 36 stitches, and knit 4 rows. Join in R, and work straight in stocking stitch until piece measures
3½ inches. Then k2tog at the beginning of every row until 4 stitches
remain. Fold in half lengthways and join seam from point to start of shaping.
Embroider featuresTaking photo as a guide use blue for eyes and black for eyebrows and nose. Make moustache and beard with loops of white, sewing in position. Belt With yarn B, cast on 4 stitches, and work 5 inches in garter stitch,
(every row knit). Cast Off. Sack (not shown in photo)With white (or any colour of your choosing), cast on 34 stitches and
work 3 inches in stocking stitch. Cast off. With double yarn (or make a 2-ply twisted rope) gather up sack and sling round shoulder and under arm. |
Materials
|
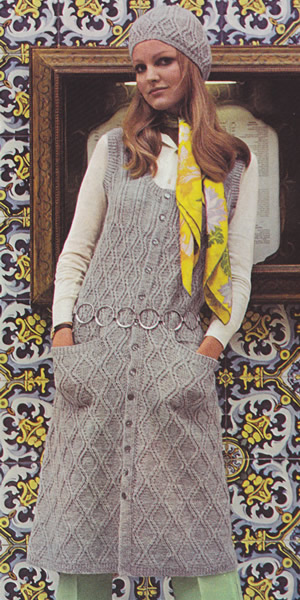
The trend for the winter is layers of knitwear, including long sleeveless cardigans, worn over knitted dresses, (which I would personally find too warm in this era of stifling central heating in most public spaces). However, there are other ways to wear it especially "between seasons" - and this is a nice example from the seventies, (but not too dissimilar to those around at the moment).
I have seen examples where front and back are split up the sides, which would give it a modern edge; this design is knitted "all in one" up to the armholes but if you are a more experienced knitter you could work out how to make fronts and backs separate up to about mid thigh.
Cardigan Instructions.Instructions for larger sizes given in brackets. Where one set of figures
is given this applies to all sizes. Pocket liningsWith No 8 needles, cast on 34 stitches and work 5½ inches in stocking stitch, ending with a knit row. Next row: p2, m1p, (p6, m1p) 5 times, p2. [40 sts] Leave stitches on a spare needle and make second pocket lining the same. Back and FrontsWith No 10 needles, cast on 290 (308
: 326 : 344) stitches and work 7 rows
k1/p1 rib. Change to No 8 needles. Repeat the last 24 rows twice more, then rows 1 to 22 inclusive again.
[Editor's note: If you have knitted fronts and back separate to this point, join them here - on the last or the following row.] Shape sides as follows: Next row: p1, *
k1, p2, k1, p2 tog, p6, p2tog, k1,p. 2, k1 ; repeat from *
to last last stitch, p1. [258 (274
: 290 : 306) sts] Continue in pattern as follows: 1st row: p1, *
(Tw2L, p1) twice, p4, (p1,Tw2R) twice; repeat from *
to last last stitch, p1. Repeat the last 20 rows once more, then rows 1 to 12 inclusive again. Place pocket linings as follows: Next row: pattern 17, * slip next 40 stitches on a stitch-holder, and in place of these, pattern across 40 stitches of one pocket lining *, pattern to last 57 stitches, repeat from * to *, pattern last 17 stitches. Work a further 7 rows straight in pattern, then work rows 1 to 18 inclusive again. Next row: p1, *
k1, p2, k1, p2tog, p4, p2tog, k1, p2, k1; repeat from *
to last stitch, p1. [226 (240 : 254
: 268) sts] **
Repeat the last 16 rows once more, then rows 1 to 14 inclusive again. Next row: as 15th. The last 2 rows form bodice pattern. Repeat them until work measures 35 inches at centre, ending with right side facing. Shape neck and at the same time divide for fronts as follows: Next row: cast off 7, pattern 49 (52 : 56 : 59), turn and leave remaining stitches on a spare needle. Continue on these stitches for RIGHT FRONT, shaping armhole
and neck as follows: Now decrease 1 stitch at each end of every row until 29 (32 : 32 : 35) stitches remain, then at each end of next and every alternate row until, 19 (22 : 22 : 25) stitches remain. Now keep neck edge straight and continue decreasing at armhole edge on following 1 (3 : 2 : 4) alternate rows. [18 (19 : 20 : 21) sts] Work straight until front measures 43 (43½ : 43½ : 44) inches at centre, ending with wrong side facing. Shape shoulder by casting off 6 (7 : 6 : 7) stitches at the beginning of the next row, then 6 (6 : 7 : 7) stitches at the beginning of the following 2 alternate rows. With right side facing, rejoin yarn to remaining stitches; cast off 8,
pattern 106 (114 : 120
: 128), turn, and leave remaining stitches on a Now decrease 1 stitch at each end of the next and every alternate row, until 74 (78 : 82 : 86) stitches remain. Work straight until back matches front at armhole edge, ending with right side facing. Shape shoulders by casting off 6 (7 : 6 : 7) stitches at the beginning of the next 2 rows, then 6 (6 : 7 : 7) stitches at the beginning of the next 4 rows. Leave remaining 38 (40 : 42 : 44) stitches on a spare needle. With right side facing, rejoin yarn to remaining stitches for LEFT FRONT, cast off 8, pattern to end. Next row: cast off 7, pattern to
end. Front Borders: Left: With No 10 needles, cast on 11 stitches. Leave stitches on a safety-pin at top and sew border neatly in position. Right: Work to correspond with left border with the addition of
12 buttonholes. 1st to come 7½ inches above lower edge, and 12th
to come 2¼ inches below start of neck shaping, with the remainder
To make a buttonhole: rib 4, cast off 3, rib to end; on the next row, cast on 3 stitches over those cast off. To Make UpUsing a warm iron and damp cloth, press parts very lightly on wrong side, omitting ribbing and taking care not to over-press and spoil the pattern. Armhole Borders: With right side facing and No 10 needles, pick
up and knit 116 (128 : 128
: 140) stitches round each armhole and work 7 rows k1/p1 rib. Join shoulder seams. Neck Border: With right side facing and No10 needles, work as
follows: Work 1 row k1/p1 rib as for border. Make 13th buttonhole in next 2 rows
as before, then work a further 4 rows in rib. Pocket Tops:With right side facing and No 10 needles, knit across each set of 40
pocket stitches, decreasing 1 stitch in centre. [39 sts] Press seams. Sew on buttons. |
Materials
|
|
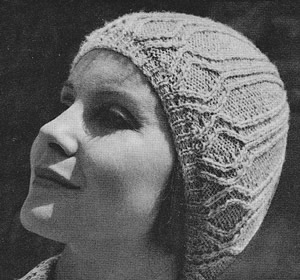 Hat Instructions.With No 10 needles, cast on 104 stitches, and work 6 rows k1/p1 rib. Change to No 8 needles. Work 16 rows in pattern as for main part from **
to **
as given in cardigan instructions to make one diamond pattern panel (see
photo). Shape crown as follows: Keeping continuity of pattern, work 1 row straight. Next row: p1, *
k1, p2, k1, p1, p2tog, p2, k1, p2, k1; repeat from *
to last stitch, Change to stocking stitch, starting with a knit row, and continue shaping as follows: Next row: k3, k2tog, *
k5, k2tog; repeat from * to last 4
stitches, k4 : 68 stitches Next row:
purl. Break yarn. Thread through remaining stitches, draw up tightly and fasten off. Press work very lightly on wrong side, omitting ribbing. |
Materials
|
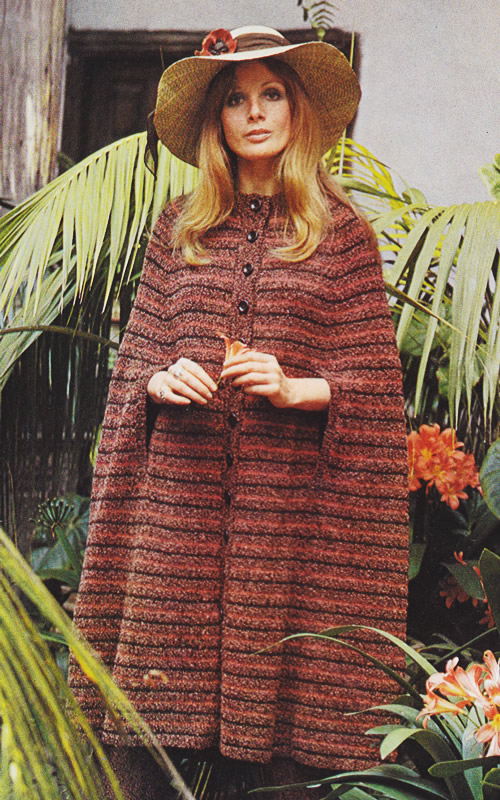
Capes being the thing of the moment (though maybe not quite like this one).
Styled "Edwardian" from the early 1970s - hence the floppy hat and slightly whimsical setting a la Laura Ashley - I might choose to make this somewhat shorter, plain rather than striped, and use a tweed or textured yarn of some sort.
So.... a midi cape - and if that were not wonderful enough... it comes with matching trousers! How great is that?!
Cape Instructions.Instructions for larger sizes given in brackets. Where one set of figures
is given this applies to all sizes. BackWith No 10 needles and M, cast on 92 (98 : 104) stitches and work 4 rows k1/p1 rib. Next row: rib 7 (3 : 6) m1, * rib 6 (7 : 7), m1 ; repeat from * to last 7 (4 : 7) stitches, rib 7 (4 : 7). [106 (112 : 118) sts] Join in D, change to No 8 needles and using stocking stitch, start with a knit row, and work in stripes as follows: 1st and 2nd rows: in D. These 12 rows form the striped pattern. [Note: Carry yarns loosely up side of work.] Continue in pattern and work a further 12 rows straight. Shape sides: Work a few rows straight until back measures 32 inches (81 cm) at centre,
ending with right side facing. Continue decreasing 2 stitches as before, but on the next and every following 4th row until 38 (44 : 50) stitches remain. Work 3 rows straight, then decrease 2 stitches as before on the next and every alternate row until 28 (30 : 32) stitches remain. Work 1 row straight, and leave stitches on a spare needle or stitch holder. Left FrontWith No 10 needles and M, cast on 46 (48 : 52) stitches and work 4 rows k1/p1 rib. Next row: rib 3 (3 : 3) m1, * rib 8 (7 : 9), m1 ; repeat from * to last 3 (3 : 4) stitches, rib 3 (3 : 4). [52 (55 : 58) sts] Join in D, change to No 8 needles and using stocking stitch, start with a knit row, and work 24 rows straight in striped pattern. Continue in striped pattern, shaping side edge as follows: Repeat the last 12 rows until 34 (37 : 40) stitches remain. Work a few rows straight until front matches back to marker, ending with right side facing. Place a marker at each end of the last row. Now decrease 1 stitch as before, but on the next and every following 4th row until 20 (22 : 24) stitches remain. With wrong side facing, shape neck by casting off 4 (5 : 5) stitches at the beginning of the next row. Continue decreasing at the side edge on every 4th row from previous decrease,
and at the same time decrease 1 stitch at the neck edge
on the next and every alternate row until 9 (13
: 16) stitches remain. Now decrease 1 stitch at the side edge as before, but on the next and every alternate row, and at the same time continue decreasing at neck edge on the next and following 1 (3 : 5) alternate rows. [5 (5 : 4) stitches remain]. Now keep neck edge straight and continue decreasing at side edge as before on following 2 (2 : 1) alternate rows. [3 sts] Next row: purl. Right FrontWork to correspond with left front, reversing shapings and working 'togtbl' when shaping side edge. Side Panels (make 2)With No 10 needles and M, cast on 80 (84 : 88) stitches and work 4 rows k1/p1 rib. Next row: rib 1 (3 : 5), m1, * rib 7, m1 ; repeat from * last 2 (4 : 6) stitches, rib 2 (4 : 6). [92 (96 : 100) sts] Join in D, change to No 8 needles, and stocking stitch, and starting with a knit row, work 24 rows straight in striped pattern. Continue in striped pattern, shaping sides as follows: Next row: k2, k2tog, knit to last
4 sts, k2togtbl, k2. Repeat the last 12 rows until 56 (60 : 64) stitches remain. Work a few rows straight until work matches back to markers, ending with right side facing. Place a marker at each end of the last row. Continue decreasing as before, but on the next and every following 4th row until 28 (32 : 36) stitches remain. Work 3 rows straight, then decrease 2 stitches as before on the next
and every alternate row until 10 stitches remain all sizes. Leave stitches on a safety-pin. Make a second side in the same way. Left Front BorderWith No 10 needles and M, cast on 9 sts. 1st rows (right side facing): k2,
(p1, k1) 3 times, k1. Repeat the last 2 rows until the strip fits up the left front to the
start of the neck shaping, when slightly stretched, ending with right
side facing. Right Front BorderWork to correspond with the left border with the addition of 13 buttonholes. The first buttonhole is to come 4 inches (10 cm) up from the lower edge, and the 13th is 2 inches (5 cm) below the start of the neck shaping; the remainder are spaced evenly between. First mark position of buttons on left front with pins to ensure even spacing, then work holes to correspond. To make a buttonhole: To Make Up Using a cool iron and dry cloth, press parts lightly on the wrong side,
omitting the ribbing. In the same way, join the front panels to side panels, leaving 9 inch
(23 cm) slits for hands, bottom of slit to come 18½ inches (47 cm)
up from the lower edge.
Right Slit Border: Left slit border: work to correspond. Neck Border: Rib 9 from right border, pick up and knit 15 (16 : 17) stitches up right side of neck, k10 from side panel decreasing 1 stitch in centre, 28 (30 : 32) stitches from back decreasing 3 stitches evenly, 10 stitches from side panel decreasing 1 stitch in centre, then pick up and knit 15 (16 : 17) down left side, and finally rib 9 from left border. [91 (95 : 99) stitches. Work 5 rows in k1/p1 rib. Fold neck border in half to the wrong side and slip-hem loosely in position all round. Oversew loosely round double buttonhole. Catch down short ends of slit borders neatly to main work. |
Materials
|
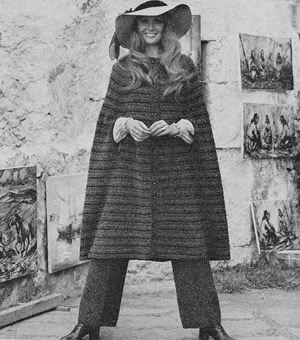
Trousers Instructions.Instructions for larger sizes given in brackets. Where one set of figures
is given this applies to both sizes. The trousers are worked in one colour. Left Leg ** Next row: rib 4 (6 : 6 : 8 : 8 : 6), m1, * rib 11 (11 : 12 : 12 : 13 : 14), m1; repeat from * to last 5 (7 : 6 : 8 : 7 : 6) stitches, rib 5 (7 : 6 : 8 : 7 : 6). [94 (98 : 104 : 108 : 114 : 118) sts] Change to No 8 needles and stocking stitch, starting with a knit row, and work straight until leg measures 25 (25 : 25½ : 25½ : 26 : 26) inches (63 (63 : 65 : 65 : 66 : 66) cm), ending with right side facing. Shape leg as follows: Next row: (k1, m1, knit 45 (47
: 50 : 52 : 55
: 57), m1, k1) twice. Next row: (k1, m1, knit 47 (49
: 52 : 54 : 57
: 59), m1, k1) twice. Next row: (k1, m1, knit 49 (51
: 54 : 56 : 59
: 61), m1, k1) twice. Place a marker at each end of the last row. Cast off 2 stitches at the beginning of the next 2 rows, then decrease
1 stitch at each end of the next and every alternate row until 96 (100
: 106 : 110 : 116
: 120) stitches remain. Work 1 row straight. *** Shape back as follows: 1st row: k29, turn. Change to No. 10 needles and work 1 inch (2 cm) k1/p1 rib. Right Leg Work as for left leg from ** to
**. To Make UpUsing a cool iron and dry cloth, press parts lightly on the wrong side, omitting the ribbing. Joint front, back and inside leg seams. Cut elastic to fit waist and join in a ring; sew to the inside of the waist ribbing using herringbone-stitch over the over the elastic to form a casing. |
Materials
|
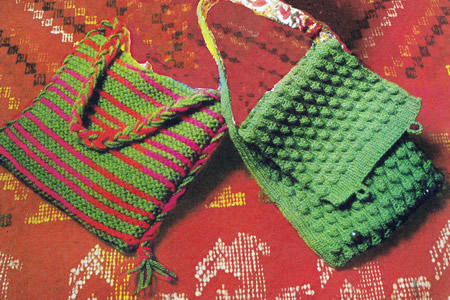
Festival season is well under way so I am posting this a little early - too late for Glastonbury but in time for WOMAD if you are a fast knitter (or knit while you are there..!).and Cropredy.
You can use any stitch for the bag that appeals, taking the pattern as a basic shape. You could try a multicoloured honeycomb pattern, or you could combine stripes of different pattern textures. The simplest shape (on the left) is the type I remember with the tasselled handle continuing all down the sides.
Instructions.Striped bag (left)Using No 3 needles and main colour A, cast on 36 stitches. To make up the striped bagIf you want to line the bag, cut the lining to the size of the bag, allowing
6mm (½ inch) turnings. Cut 6 strands each of A and B into 178cm (70 inch) lengths. Divide the strands into 3 groups and plait together to form a handle, making an overhand knot at each end and leaving the ends to form a tassel. Stitch the plait in position along the side seams of the bag, having a tassel at each lower edge and leaving the remainder to form the handle. Sew on one button or bead to the centre of each side of the top edge
of the bag. Shoulder bag (right)To make this bag you can experiment with any textured pattern. Cast on 62 stitches and start knitting in your chosen pattern.
Continue in pattern until the length is about 3 times the height you want the bag to be, allowing up to 2 inches additional for the bottom of the bag. The bag shown was knitted 76cm (30 inches) long. For the strap, cast on 11 stitches and work 106cm (42") in single rib. Finishing the shoulder bagSew together so that the strap makes a gusset at the sides of the bag. You can optionally line the bag and add a couple of buttons and loops as shown in the Picture. Textured Pattern stitches Bobble ribCast on a number of stitches divisible by 6 plus 2.  Cane basket stitchCast on a number of sts divisible by 6 plus 2. 1st row (right side): K2, *
P4, K2, repeat from * to end.  Tassel stitchCast on a number of sts divisible by 6 plus 2. You can find more textured stitches in these links: A different basket stitch and blackberry stitch.  Honeycomb stitch in two colours 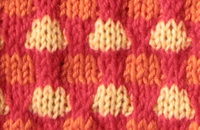 |
Materials
|
These types of bag were very popular in the 1970s - I used one instead of a school satchel. Probably the striped bag on the left above is the most stylistically similar to the ones I remember - I might choose different colours!
My own bag - now long lost - was woven in a mixture of dark red and blue. Below is a genuine "gap year" cloth bag from the 1970s which made its way backpacking to the far east and back. It is a mail bag style like the knitted version pictured on the right above.
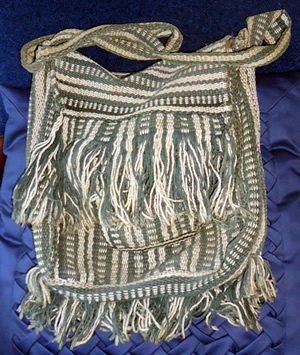
Below is a detail from the picture. The bag is woven of course but you could reproduce this pattern in knitting and easily add lots of tassels.
The main bag has the stripes running vertically, and the flap has them horizontal. If you want this effect, as it's not easy to knit vertical stripes while keeping the integrity of the fabric, you could use this chart as written for the flap, and then use it to knit the front and bag in one piece from side to side. If you were feeling really confident you could knit front and back (sideways rectangle) then pick up the stitches from the side of the knitting and knit the flap. So - to do this - before you start - work out your tension and then how large you want the bag to be. Lets say that it's 12 inches high and 10 inches wide. You need to cast on enough stitches to make 24 inches in the width of your knitting. Then knit stocking stitch in pattern for 10 inches and cast off. At the side of the knitting, pick up stitches for the flap. Usually this means picking up 2 stitches for every 3 rows to make a flat fabric without puckering. Then knit in the pattern for up to 12 inches to cover the front of the bag - if you are adding tassels you might want to knit as little as 4-6 inches.
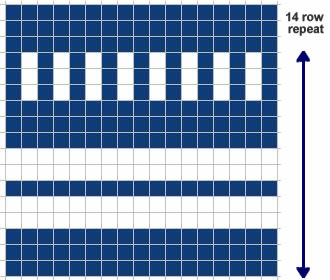
Finally I'll leave you to extemporise on the handle and tassels. You might want to knit a plain handle about 2 inches wide and back it with some kind of webbing - then you would use it as the sides of the bag as you can see our original was made. Or you could just fold the bag without sides and apply a plaited cord handle as for the first bag on the left in these instructions.
You would probably need to use a 4 ply / DK / worsted on a smaller than usual needle to give a solid fabric, and it would be a good idea to line it with something firm.
I'm sure you could also make a simple bag from two woven panels (three for a mail bag) - perhaps made using a fairly crude home-made loom. I am planning to experiment with this in the near future. Watch this space (!).
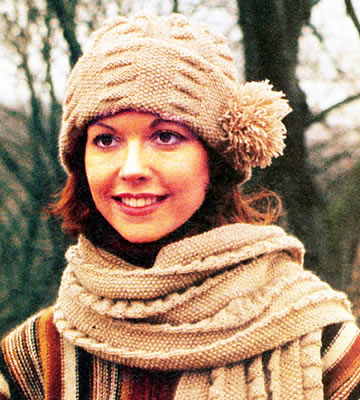
This is the month for the Sailor's Society** "woolly hat week" (8th-14th February 2015). So I thought I would post this hat and scarf combination - easy to knit in 4 ply fingering weight knitting yarn - perhaps suitable for a sailor if you omit the pom-pom decoration!
You can find other patterns as well as where to send your hats on their website link above. Also see my previous POM from 2008 with other chunky hat patterns - including my all time favourite appropriately knitted in Fisherman's rib.
Here's what Hannah says: "Our international network of port chaplains and ship visitors give your amazing hats out to seafarers visiting port, while others are wrapped and included in the Christmas welfare parcels that are taken on board ship for the festive season. The need for more hats is ever-increasing! Drew, our Port Chaplain in Invergordon, has been known to give out 500 in a day on occasion!"
InstructionsPanels of moss stitch and flag stitch are used for this cosy scarf and pull on hat. The scarf is fringed and the hat trimmed with a large pom-pom. ScarfCast on 72 sts These 8 rows form the pattern. Continue in pattern until scarf measures 167½ cm (66 inches) from beginning, (or however long you want the scarf to be) ending with an 8th pattern row. Cast off. To make up the ScarfDo not press. HatCast on 144 stitches. Work in pattern as given for scarf, but without the moss stitch border on both sides. So set out your rows as follows: 1st row (right side): *
(k1, p1) 4 times, k1, p7; repeat from *
end. Continue until work measures 25½ cm (10 inches) from beginning, ending with an 8th pattern row. Shape crownNext row: * Moss st 8, k1, p2, ybk, sl 1, yfwd, p2tog, psso, p2; repeat from * to end of row. [126 sts] Next row: * k4, p2, moss st 8; repeat from * to end of row. Next row: * Moss st 8, k2, sl 1, p2tog, psso, p1; repeat from * to end of row. [108 sts] Next row: * k1, p3, moss st 8; repeat from * to end of row. Next row: * Moss st 8, k1, sl 1, k2tog, psso; repeat from * to end of row. [90 sts] Next row: Moss st to end of row. Next row: * Moss st 7, sl 1, k2tog, psso; repeat from * to end of row. [72 sts] Next row: Moss st to end of row. Next row: * Moss st 5, sl 1, k2tog, psso; repeat from * to end of row. [54 sts] Continue decreasing in this way on every alternate row until 18 sts remain.
Break off yarn, thread through sts, draw up and fasten off. To make up the HatDo not press. Trim with a large pom-pom. |
Materials
|
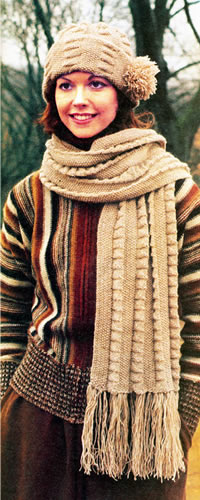
** Please note that the Sailors Society does seem to be a religious organisation, which I mention not through any disapproval on my part, but in case you would care to look at their website and ensure its aims do not go against anything you believe in.
Ponchos are being cited as a trend at the moment - and also apparently: fringes. So here you have the perfect combination. From the 1970s (of course) this is a rather good plain shape and very simple to knit all in garter stitch - if you like that kind of thing, or yearn to recreate a piece of history.
"See how cool I am with my striped poncho in natural earth tones..."
"Look! What's that over there?"
"Whatever you say, I'm not looking - you are merely trying to compensate for your lack of cool stripeyness."
Instructions.Instructions given for striped version with pattern rows as follows: 1st - 16th rows: knit in main shade. These 20 rows form the stripe pattern. The plain version is worked in exactly the same way but using only one
colour. Back and Front (alike)(Worked sideways, starting at left side for Back and right side for Front). With No 8 (4mm) needles and main shade (MS), cast on 58 stitches and joining in contrast (C) as required, work in garter stitch (every row knit) and stripe pattern throughout, starting with 2nd pattern row, shaping as follows: 1st and following alternate rows (wrong side):
Knit. Now increase 1 stitch at the beginning of the next row, and at the same edge on every row until there are 106 stitches. Work 1 row. Increase 1 stitch at the beginning of the next and every alternate row, until there are 112 stitches. Work 3 rows. Now increase 1 stitch at the beginning of the next and every 4th row, until there are 117 stitches, then at the beginning of every following 6th row until there are 123 stitches. Work 80 rows, thus ending with wrong side facing for next row. Shape neck by decreasing 1 stitch at the beginning of the next row and at the same edge on every row until 113 stitches remain. Now decrease 1 stitch at the end of the next and every alternate row until 108 stitches remain. Work 34 rows. Increase 1 stitch at the beginning of the next and every alternate row until there are 113 stitches. Work 1 row. Now increase 1 stitch at the beginning of the next row and at the same edge on every row until there are 123 stitches. Work 80 rows. Decrease 1 stitch at the end of the next and every 6th row until 116 stitches remain, then at the end of every following 4th row until 111 stitches remain. Work 1 row. Now decrease 1 stitch at the end of the next and every alternate row until 106 stitches remain. Work 1 row. Decrease 1 stitch at the end of the next row and at the same edge on every row until 90 stitches remain. Work 1 row. Cast off 2 stitches at the beginning of the next row, then 3 stitches at the beginning of the following alternate row. Work 1 row. Now cast off 4 stitches at the beginning of the next and following 2 alternate rows, then 5 stitches at the beginning of the following 3 alternate rows. Cast off the remaining 58 stitches.
Borders and Making UpDo not press. Back Neck Border: Front Neck Border: Using a flat seam, join shoulder seams leaving 3 inches open at each side of the neck. Back shoulder opening borders: Front shoulder opening borders: To make a button loop: 3 chain, miss 2 dc, dc into next dc. Neatly catch down the base of the borders, front over back. Cut remaining yarn into 10 inch lengths and taking 4 strands together
each time, knot all round outer edge, matching main shade to main shade
and contrast to contrast, (as in the photo), to form a fringe. Sew two sets of buttons in position as in photograph (1 button on back,
the other to correspond on front).
Sew remaining 6 buttons on shoulders to correspond with button loops. Press seams. |
Materials
|
 |
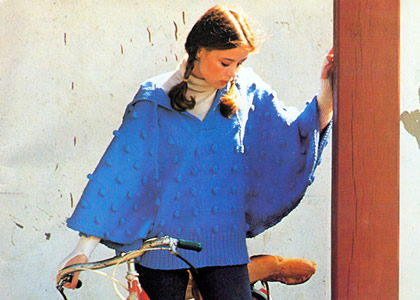
Maybe sad to say, I am very smitten with the idea of this "Poncho Sweater" from the seventies. Picturing on location with a bicycle clinches it. It's knitted in a chunky pure wool from the era of back to nature fibres (after the decade with all that courtelle crepe).
Instructions.Instructions for large size given in brackets. Where one set of figures
is given this applies to both sizes. BackCommence at top. 7th row: K8 (10),
MB, * k9, MB, repeat from * to These 12 rows form the pattern. Work 12 more rows and then conunence side shaping. 1st row: K2tog tbl; knit to the last
2 sts; k2tog. Next row: P2 (4), P2tog, * p6, p2tog, repeat from * to the last 3 (5) sts, purl to end. [69 (73) sts]. Change to 5½mm needles. Front - Left sideWith 6½mm needles cast on 70 (72) sts. 1st row: Knit. Commence side shaping. Front - Right sideWith 6½mm needles cast on 70 (72) sts. 1st row: Knit. Commence side shaping. Next row: Work to end of right side. Complete exactly as for back. HoodWith 5½ mm needles cast on 163 stitches. Next row: Cast off 28 stitches;
knit to the last 28 stitches; cast off these stitches. Turn and rejoin yarn to remaining 107 stitches. Next row: K8, MB, * k9, MB, repeat from * to the last 8 stitches; k8. Next row: P38 stitches, cast off
31 stitches, purl to end. Shape back. To Make UpPress each piece lightly with a warm iron and a damp cloth. Ties - make 2Using 2 strands of yarn 66cm (26 inches) long, make a twisted cord and knot the end. Thread the folded end of he cord through the edge of the knitting at the neck, open up the cord, thread knotted end through cord and draw up. |
Materials
|
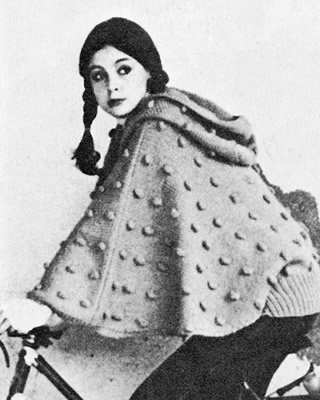 |
This is a lovely - and typical - dress from the burgeoning decade of the 1970s. Crafts and bohemian dress was the thing that defined the start of the era, (while Punk defined the end of it). Back to nature - self sufficiency - flowing maxi dresses and floppy hats - Golden Hands and all that followed (... quite a lot of macramé if I remember rightly).
Elaine made this version and Kate models it layered as a tunic - but with the weather we are being promised for the next few days** as Wimbledon comes to its climax, it might be just as appropriate to wear as originally designed - Grecian goddess style...
Instructions.Special pattern stitches as follows: Bar-st front (worked on right side rows): yarn over, then starting
with hook at front of work insert hook from right to left behind stem
of next st and through to front again, yarn over and draw loop through
up to same height as shells, then complete tr in usual way. [Editor's note: Elaine made this dress more than once, and she made a small adjustment to the pattern which worked well. Instead of making the skirt back and front separately, she joined the bodice back and front together at the side seams, and then worked the skirt in the round. Just make the appropriate amount of chains (3 or 4) at the start of each round and join at the end with a slip stitch. It saves having to make a join all the way down the side of the skirt.] Bodice BackUsing size 5 (5½mm) hook make 57(63:69) ch. 1st row (right side facing): Work
a shell of [2 tr, 1 ch, 2 tr] into 6th ch from hook, *
miss 2 ch, 2 ch, 1 tr into next ch, miss 2 ch, work 1 shell into next
ch; repeat from * to last 3 ch, miss 2 ch,
1 tr into last ch. 9(10:11)
shells. Repeat the last 2 rows until work measures 3½ ins. Shape Armholes 1st row (right side facing): Sl st
across to space of first shell, 3 ch, 1 bar-st into bar-st, *
1 shell, 1 bar-st; repeat from * to last shell, 1 tr into space of last
shell, turn. ‡ Continue in pattern until armholes measure 3½(3¾:4) inches. ‡‡Shape Neck 1st row (right side facing): Work
in pattern until 2 shells have been worked. 1 bar-st, 1 tr into space
of next shell, turn. Repeat the last row until armhole measures 6½(6¾:7) ins measured straight. Fasten off. Leave 1(2:3)
shells at centre unworked and rejoin yarn to centre of next shell. Bodice FrontWork as given for Back to ‡.
Continue in pattern until armholes measure 2½(2¾:3)
inches, ending with a right side row. Skirt BackWith right side of back facing rejoin yarn to lower edge and work across
starting ch as follows:- Fasten off. Skirt FrontWork as given for Skirt Back. Finishing and EdgingPress pieces very gently with a damp cloth, (or just dampen and pin out
to block). Edgings: Press seams and edgings. Optional Belt: |
Materials
|
A word on the wool.Potentially any double knitting quality can be used (knitting tension would be about 22sts x 30 rows to 4 inches or 10 cm). The recommended quantity of 13-17 ozs (1oz = 28g) is for a synthetic/nylon type yarn and the yardage on these tends to be 30-50% longer than pure wools or cottons, so be prepared to use up to twice as much weight in yarn as stated. This would be good made in cotton as a summer dress (can't imagine it in nylon... or rather I probably can - though here are some good synthetics these days). If choosing cotton, a blend or soft cotton would probably be better to give it more drape. Elaine used a pure lambswool double knitting yarn from Kingcraig, who have an eBay store, and Kate wears this version as a tunic. |
|
Another take on the zipped jacket from a later era. This design is easier than the Norwegian-style jacket in its construction, and uses a heavier (double knitting) weight yarn, which makes for a quicker knit. The patterning is simpler too - knitted straight, that is, without having to worry about incorporating increases and decreases into the design as you knit.
InstructionsInstructions are given for seven sizes - larger sizes indicated in brackets. Back:Using No 9 (3¾mm) needles and main shade A, cast on 73 [79
: 85 : 89 : 95 : 99 : 105] sts and work 14[14
: 14 : 18 : 18 : 18 : 18] rows in k1, p1 rib. ** Proceed as follows: 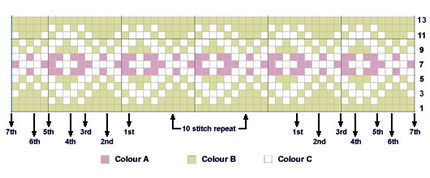 Break off yarn C, join in A. Next row: Using yarn A k1.
purl to last st, k1. Proceed as follows: Cont in stocking stitch until work measures 16½ [18½ : 20½ : 23 : 23 : 23 : 23] ins, ending on a wrong side. Shape Shoulders: Left Front:Using No 9 (3¾mm) needles and main shade A, cast on 36 [40 : 42 : 44 : 48 : 50 : 52] sts. 1st row: S1, k1, *
p1, k1, repeat from * to last 2 sts,
k2. repeat 1st and 2nd rows 6 [6 : 6 : 8 : 8 : 8 : 8] times increasing once at the end of the last row for sizes 26, 30, 32, and 38ins only. 37 [40 : 43 : 45 : 48 : 50 : 53] sts. Change to No 7 (4½mm) needles and and proceed as follows:- Keeping continuity of stocking stitch and garter stitch border throughout,
continue until work measures 11½ [13½ : 15½
: 17½ : 17½ : 17½ : 17½] ins,
(the same number of rows up to the same point on the Back must be worked
at this point), ending on right side, increasing once at the begining
of the last row for sizes 28, 34, and 36 ins only. 37 [41 : 43
: 45 : 49 : 51 : 53] sts. Break off main shade yarn A, and join in first contrast B. 5th row: For all 7 sizes Keeping the two front edge sts in garter stitch, and joining in and breaking off colours as required, work 1st to 13th row from Chart B, working size required as indicated. The odd numbered rows are knit, the even numbered rows are purl. 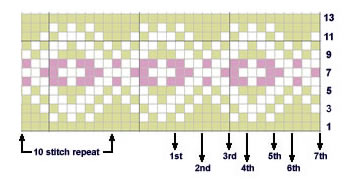
1st row: Using yarn A k2, purl to last stitch, k1. 2nd row: For all 7 sizes: Break off yarn A. Shape Neck 5th row: Shape Shoulder: Cast off remaining 9 [10 : 11 : 11 : 12 : 13 : 14] sts. Right Front:Using No 9 (3¾mm) needles and main shade A, cast on 36 [40 : 42 : 44 : 48 : 50 : 52] sts. 1st row: S1, k2, *
p1, k1, repeat from * to last st,
k1. repeat 1st and 2nd rows 6 [6 : 6 : 8 : 8 : 8 : 8] times increasing once at the beginning of the last row for sizes 26, 30, 32, and 38ins only. 37 [40 : 43 : 45 : 48 : 50 : 53] sts. Change to No 7 (4½mm) needles and and proceed as follows:- Keeping continuity of garter stitch border and stocking stitch throughout,
continue until work measures 11½ [13½ : 15½
: 17½ : 17½ : 17½ : 17½] ins,
(the same number of rows up to the same point on the Back must be worked
at this point), ending on right side, increasing once at the end of the
last row for sizes 28, 34, and 36 ins only. 37 [41 : 43 : 45
: 49 : 51 : 53] sts. Break off main shade yarn A, and join in first contrast B. 5th row: For all 7 sizes Keeping the two front edge stitches in garter stitch, joining in and
breaking off colours as required, work 1st to 13th rows from Chart C,
working size required as indicated. 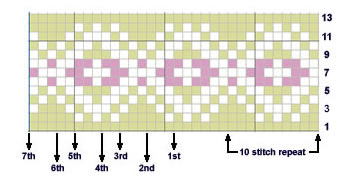
Next row: Using yarn A k1, purl to last 2 sts, k2. Shape Neck Next row: 1st row: Using yarn B, knit
to end. 5th row: Shape Shoulder: Cast off remaining 9 [10 : 11 : 11 : 12 : 13 : 14] sts purlwise. Sleeves (both alike): Using No 9 (3¾mm) needles, and main shade A, cast on 41 [41
: 41 : 43 : 43 : 43 : 43] sts, and work 16 [16 :
16 : 20 : 20 : 20 : 20] rows in k1, p1 rib. Shape Neck The Collar:Using No 7 (4½mm) needles and yam A cast on 26 [26 : 25 : 29 : 29 : 29 : 29] sts. 1st row: S1, k1, *
p1, k1, repeat from * to
the last stitch, k1 To Make UpOmitting ribbing, press each piece lightly using a warm iron and damp cloth. Sew up shoulder and sleeve seams. Sew up side seams leaving 6 [6
: 6½ : 7½ : 7½ : 8 : 8] ins free to form
the armholes. Press seams. |
Materials
|
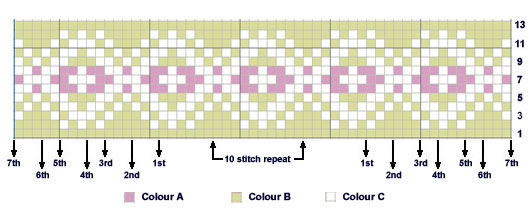 |
|
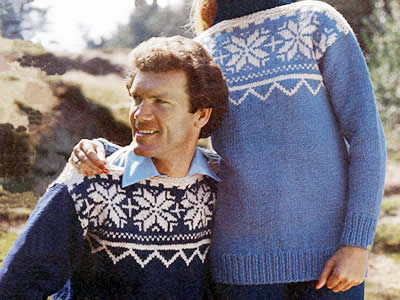
My title refers to the current season's fashion for nordic style sweaters - snowflake, as well as (astonishing to me) reindeer. This sweater's shape betrays its original design era, but that does make it simple to construct - and wear. Update to better reflect the current themes by choosing monochrome colour schemes, using black or greys with cream.
"Traditional motifs in cream make striking winter sweaters; simple easy styling, with straight necklines and drop shoulders, is easy to knit in thick soft yarn on big needles."
InstructionsT-shaped chunky sweater with simple snowflake pattern worked from the charts. Back and Front alike:With No 6 (5mm) needles and main shade, cast on 47 / 51 / 55 / 59 / 63 / 65 / 71 / 73 / 77 sts and work in K1/P1 rib for 2½ / 2½ / 2½ / 3 / 3 / 3 / 3½ / 3½ / 3½ inches, ending with wrong side facing for next row. Next row (wrong side): Rib 3 / 3 / 5 / 4 / 4 / 5 / 5 / 5 / 6; m1; * rib 8 / 9 / 9 / 10 / 11 / 11 / 12 / 9 / 13; m1; repeat from * to last 4 / 3 / 5 / 5 / 4 / 5 / 6 / 5 / 6 sts; rib to end. [53 / 57 / 61 / 65 / 69 / 71 / 77 / 81 / 83 sts]. Change to No 4 (6mm) needles and work in stocking stitch, starting with a knit row, until work measures 13½ / 14½ / 16 / 15 / 16 / 17 / 17½ / 18½ / 19½ inches, ending with a purl row. 1st to 3rd size: Join in contrast colour and work 2 rows. All sizes: 1st to 3rd size: Work rows 1 to 24 from chart A, repeating the 20 pattern sts 3 times across and working the first 0 / 2 / 4 sts and last 1 / 3 / 5 sts on knit rows and first 1 / 3 / 5 sts and last 0 / 2 / 4 sts on purl rows as indicated. 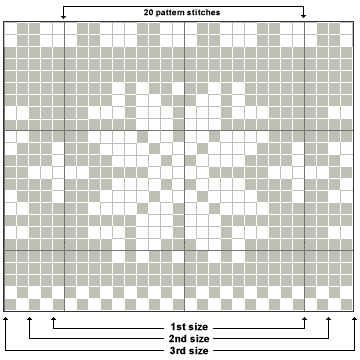 4th to 9th size: Work rows 1 to 36 from chart B, repeating the 20 pattern sts 3 / 3 / 4 / 4 / 4 / 4 times across and working first 6 / 8 / 0 / 3 / 5 / 7 sts and last 7 / 9 / 1 / 4 / 6 / 8 sts on knit rows and first 7 / 9 / 1 / 4 / 6 / 8 sts and last 6 / 8 / 0 / 3 / 5 / 7 sts on purl rows as indicated. 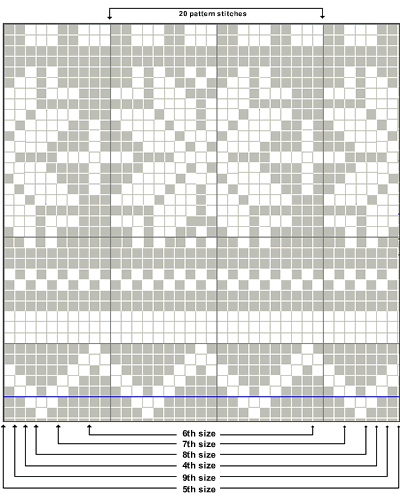 All sizes: Break main shade, and complete in contrast. Next 2 rows: Knit. Next row: K3 / 1 / 3 / 1 / 0 / 5 / 4 / 2 / 4, k2tog, * k2 / 2 / 2 / 2 / 3 / 2 / 2 / 2 / 2, k2tog; rep from * to last 4 / 2 / 4 / 2 / 0 / 6 / 5 / 3 / 6 sts, knit to end. [47 / 49 / 53 / 55 / 61 / 63 / 67 / 69 / 73 sts] Next row: Knit Cast off. Sleeves:With No 6 (5mm) needles and main shade cast on 25 / 27 / 27 / 29 / 29 / 31 / 31 / 33 / 33 sts and work in rib as on body sections for 2½ / 2½ / 2½ / 3 / 3 / 3 / 3½ / 3½ / 3½ ins, ending with right side facing for next row. Change to No 4 (6mm) needles and work in stocking stitch, starting with a knit row, shaping sides by inc 1 stitch at each end of 3rd / 3rd / next / 7th / next / 5th / 3rd / 9th / 5th and every following 4th / 5th / 5th / 5th / 5th / 5th / 4th / 4th / 4th row until there are 51 / 51 / 55 / 55 / 59 / 59 / 67 / 67 / 69 sts. Work straight until sleeve seam measures 14 / 15½ / 17 / 18½ / 19 / 19 / 19½ / 20 / 20 ins, ending with a purl row. Cast off. To Make UpOmitting garter stitch and ribbing, press parts lightly on wrong side with a damp cloth When making up a chunky garment it may be easier to use an oddment of
finer yarn in a toning shade for the sewing. Join shoulder seams leaving 7 / 7½ / 8 / 9 / 9½
/ 9½ / 10 / 10½ / 10½ ins open at centre
for neck opening. |
Materials
|
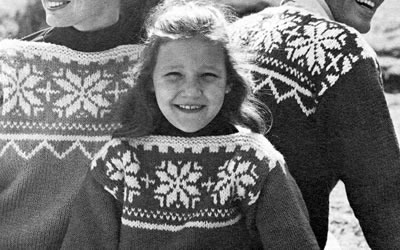

A pattern from the mid 1970s, knitted in a bouclé wool called Jaeger Catkin. As it was a speciality wool, I decided to splash out and buy the recommended stuff to get the right effect. Originally, I "improved" the pattern by making bell shaped sleeves, which, I seem to remember, were highly fashionable at the time. I wore it like this, day after day throughout my year in Southampton University in 1977.
In the 1980s, I unravelled the sleeves and reknitted them straight.... I can only assume I wore it again at that time.
Although I can still just squeeze into this sweater, it is really too small for me now - which some may consider a Good Thing - but I still love it.
Instructions.The sleeves and yoke of this tunic are knitted from cuff to cuff and the back and front (knitted in the usual vertical manner) are sewn onto it at the armhole. Back and Front alike.Work 2 pieces as follows: Using No 8 (4mm) needles and main shade (M), cast on 65 [69
: 73 : 77]
sts loosely and knit 7 rows in garter stitch (every row knit). Change
to No 5 needles, and beginning with a knit row work 6 inches in stocking
stitch, ending with a purl row. Next row: K12 [13
: 13 : 14],
k2tog tbl, knit to the last 14 [15
: 15 : 16];
k2tog; knit to end. Left Sleeve and Yoke** Using No 8 needles and main shade (M), cast on 57 [61 : 61 : 65] sts loosely and knit 7 rows in garter stitch. Break off M. Change to No 5 needles, and join in contrast colour (C). Beginning with a knit row continue in stocking stitch, until sleeve measures 19 [19 : 19½ : 19½] inches from the beginning, ending with a purl row. Place coloured marker at each end of last row. Work a further 8 [8 : 10 : 10] rows in stocking stitch.
Next row: K28 [30 : 30 : 32], pick up loop lying before next st and m1, k1, m1; k28 [30 : 30 : 32] Work 9 [9 : 11 : 11] rows in stocking stitch. Next row: K29 [31 : 31 : 33], pick up loop lying before next st and m1, k1, m1; k29 [31 : 31 : 33]. {61 [65 : 65 : 69] sts} Work 13 [15 : 15
: 17] rows in stocking stitch, ending
with a purl row. Divide for neck: Next row: K30 [32 : 32 : 34], and turn, leaving the remaining sts on a holder. Complete this side first. Work a further 15 [16 : 16 : 17] rows. Cast off. With right side of work facing, slip the first 10 sts on to a holder, and rejoin yarn to remaining 21 [23 : 23 : 25] sts. Work a further 12 [12 : 12 : 14] rows. Break off C. Change to No 8 needles, join in M and knit 7 rows. Right Sleeve and YokeWork as given for left sleeve and yoke from ** to **. Divide for neck: Next row: K21 [23 : 23 : 25], and turn, leaving the remaining sts on a holder. Complete this side first. Work a further 11 [11 : 11 : 13] rows. Break off C. Change to No 8 needles. Join in M and knit 7 rows. With right side of work facing, slip the first 10 sts on to a holder,
and work 16 [17
: 17 : 18]
rows. Cast off. To Make UpPress the sleeve pieces very lightly under a damp cloth with a warm iron on wrong side, omitting the 9 st borders. Join centre back yoke seam. Neck border: Hood: Next row: K9 [12 : 12 : 12]; (m1, k2 [2 : 2 : 3]) 5 [8 : 8 : 3] times; (m1, k1 [1 : 1 : 2]) 12 [2 : 2 : 10] times; (m1, k2 [2 : 2 : 3]) 5 [8 : 8 : 3] times; m1; k9 [12 : 12 : 12]. {73 [77 : 77 : 79] sts}. Change to No 5 needles. 1st row (right side): Knit to end.
Repeat the last 2 rows until hood measures 11½ ins from beginning, ending with a wrong side row. Next row: K4, slip these 4 sts on
to a holder, cast off next 20 [21
: 21 : 22]
sts; k25 [27
: 27 : 27]
sts, (including stitch on needle); k4 and slip these 4 sts on to a holder. With wrong side of work facing, rejoin yarn to rem 25 [27 : 27 : 27] sts and beg with a purl row, cont in stocking stitch until side edge fits along cast off edge of hood to within 4 sts on holder. Cast off. Sew cast off edges to side edge of centre piece. Left border: Right border: Join borders and sew in position around hood. [Editor's note: I used a duffle toggle and loop to fasten neck rather than a cord.] |
Materials
|
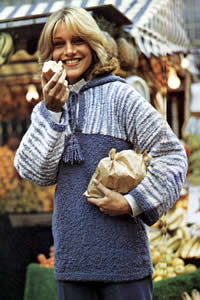
|
|
You can see similar patterns - some with front pockets - in the vintage patterns section: |
||
Sweater with hood and stripes
|
Mother and daughter tunics
|
|
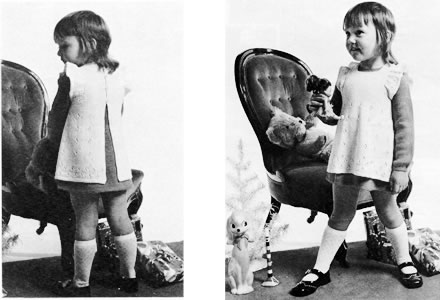
All dressed up in a charming pinafore, suitable for a spring or summer
celebration, perhaps, in a lighter cotton-blend 4ply. Alternatively, try an angora
or mohair blend for a more wintry festive feel.
The pattern for the dress underneath is also given, although, today, we seem to be fully equipped with central heating everywhere, so this combination may prove to be
too hot for most children.
InstructionsThe pinafore is worked in one piece up to the armhole shaping. Panel Pattern over 5 stitches: 1st row: k2, yfwd, k2tog tbl, k1 With No 12 (2¾mm) needles cast on cast on 223/239/255 sts. and work 5 rows garter-stitch, that is: every row knit. Change to No 10 (3¼mm) needles and pattern as follows : 1st row (right side facing): knit. Shape skirt and place panel pattern as follows: 1st decrease row: k5/13/5, (panel pattern 5 as 1st row, k5, k2tog, k4) 13/13/15 times, panel pattern 5 as 1 st row, k5/13/5. [210/226/240 sts] Keeping continuity of panel pattern, work 11/17/25 rows straight. 2nd decrease row: k5/13/5, (pattern 5, k4, k2tog, k4) 13/13/15 times, pattern 5, k5/13/5. [197/213/225 sts] Work 15/17/29 rows straight. 3rd decrease row: k5/13/5, (pattern 5, k4, k2tog, k3) 13/13/15 times, pattern 5, k5/13/5 [184/200/210 sts] Work 15/17/29 rows straight. 1st and 2nd sizes: Continue decreasing
13 sts thus on next and following 16th/18th
row [158/174 sts]. All sizes: Divide for front and backs: Continue straight on these 21/23/25 stitches for right back until work measures 14½/16½/18½ inches, ending with right side facing. Shape shoulder by casting off 3sts at the beginning of the next
and following alternate row. With wrong side facing, rejoin yarn to remaining stitches from holder; cast off 34/38/42, (for armhole), p43/47/51, turn and leave remaining stitches on a spare needle or stitch-holder. Continue straight on these 43/47/51 stitches for front until work measures 12/13½/15½ inches, ending with right side facing. Divide for neck: Work 1 row straight. Cast off remaining 2/3/4 sts. With right side facing, rejoin yarn to remainiing stitches, cast off centre 27/29/31, then finish to correspond with first side, reversing shapings. With wrong side facing, rejoin yarn to remaining stitches on holder, cast off 34/38/42, (for armhole) purl to end. Finish to correspond with right back, reversing shapings. Shoulder Frills:With No 12 needles, cast on 103/111/119
sts. and work 3 rows garter-stitch. To Make UpUsing a warm iron and a damp cloth. press parts lightly on wrong side. Join shoulder seams. Make borders: With right side facing and 3mm hook, work 2 rows
dc up left back, round neck and down right back. increasing and decreasing
at corners as required. Press seams. Sew on buttons. |
MaterialsOriginal materials called for: 3/3/4
50g balls 4 ply fingering. A pair each Nos 10 and 12 (3¼mm and 2¾mm) needles. 4 small buttons. Tension28 sts and 36 rows to 4 inches over stocking-stitch on No 10 needles. Size mattersThree sizes given for 22/24/26
inch chest; length from top of shoulders: 14½/16½/18½ inches. Abbreviationstbl: through back of loops ch: chain A word on the wool.The original colour combination is white for the apron with "Damask Rose" for the dress. Disclaimer
|
Eyelet pattern and sleeve frill detail:
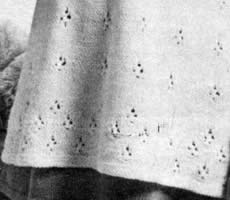
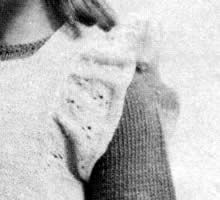
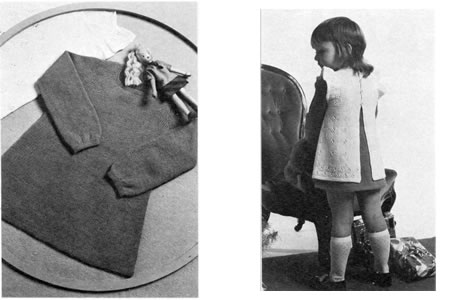
This is the plain and simple dress designed to go under Miss Muffet's pinafore.
InstructionsThis is an A-line dress, knitted completely plain, with a high round neck and long sleeves. Back** Change to No 10 needles and stocking-stitch, and, starting with a knit row, work 8 rows straight. 1st decrease row: k26/28/30, k2tog, k2tog tbl, k54/56/60, k2tog, k2tog tbl, k26/28/30. [110/116/124 sts] Work 11/13/15 rows straight. 2nd decrease row: k25/27/29, k2tog, k2tog tbl, k52/54/58, k2tog, k2tog tbl, k25/27/29. [106/112/120 sts] Work 11/13/15 rows straight. 3rd decrease row: k24/26/28, k2tog, k2tog tbl, k52/54/58, k2tog, k2tog tbl, k24/26/28. [102/108/116 sts] Work 11/13/15 rows straight. Continue decreasing 4 stitches thus on the next and every following 12th/14th/16th
row until 82/88/96
sts; remain. Work a few rows straight until back measures 12/13½/15 inches, ending with right side facing. Shape armholes by casting off 4 sts. at the beginning of the next
2 rows, then decrease 1 stitch at each end of every row until 62/68/72
stitches remain. Work a few rows straight until back measures 14/16/17½ inches, ending with right side facing. Divide for back opening: Continue straight on first set of stitches until back measures 16½/18½/20½ inches, ending with right side facing. Shape shoulder by casting off 4 stitches at the beginning of the
next and following 2 alternate rows, then 2/3/4
stitches at the beginning of the following alternate row. With right side facing, rejoin yarn to remaining stitches and finish to correspond with the first side, reversing shapings. FrontWork as for back from **
to **. Divide for neck: Shape shoulder by casting off 4 stitches at the beginning of the
next and following 2 alternate rows. With right side facing, leave centre 16/18/20
stitches on a stitch-holder, and rejoin yarn to remaining stitches and
finish to correspond with first side, reversing shapings. SleevesWith No 12 needles, cast on 40/44/46
sts. and work 7 rows garter-stitch. Shape top by casting off 4 stitches. at the beginning of the next
2 rows, then decrease 1 stitch at each end of the next and every alternate
row until 34 stitches remain. Cast off. To Make UpUsing a warm iron and a damp cloth. press parts lightly on wrong side. Join shoulder seams. Neckband: With right side facing and No 12 needles, start at top
of left back and work as follows:- Left Back Border: With 3mm hook, work 2 rows dc along left back
edge. Join side and sleeve seams; insert sleeves. |
MaterialsOriginal materials called for: 4/4/5
50g balls 4 ply fingering. A pair each Nos 10 and 12 (3¼mm and 2¾mm) needles. 3 small buttons. Shirring elastic for cuffs. Tension28 sts and 36 rows to 4 inches over stocking-stitch on No 10 needles. Size mattersThree sizes given for 22/24/26 inch chest; length from top of shoulders: 16½/18½/20½ inches; sleeve seam: 9½/10½/12 inches. Abbreviationstbl: through back of loops ch: chain A word on the wool.The original colour combination is white for the apron with "Damask Rose" for the dress. Disclaimer
|
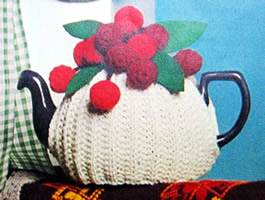
A jolly tea cosy to get you in the mood for the real cherry season.
I used brown for the main colour (more practical potential tea-stain colour for my partially sighted Aunt), and I used green for the stems and also crocheted the leaves. I did find making the little crochet bobbles slightly tedious and fiddly but they look so wonderful when you step back and admire the finished cosy.
InstructionsThis cosy is made as 2 flat pieces which are then sewn together to make
the hat-like shape. Although I prefer to avoid seaming wherever possible,
this is perfect for a cosy as you can tailor the openings to fit your
specific teapot. (I never realised this could be an issue until I made
a cosy which did not fit my 1930s pot as the spout was set very high).
The fancy rib fits snugly around most average pot sizes, making this an
excellent design. Main Cosy (make 2 pieces)‡ 1st row: k3, *
p2, k2; repeat from * to end. These 2 to rows form the pattern..
Work another piece from ‡ to ‡ Break yarn, leaving an end. Thread end through stitches on needle and
7sts from other piece left on holder; draw up tightly and fasten securely. Cherries (make 12 in all)With No. 8 crochet hook and red yarn (R), make 4 chain and join in a ring with a slip stitch. 1st round: 8dc into ring. Fasten off. StemsWith No. 8 crochet hook and brown yarn (B), make 24 chain. To Make UpJoin sides of cosy together leaving an opening at each side for handle
and spout. |
Materials
|
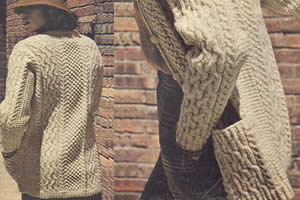
Well if you don't actually have the life of ease, this might help you attain it - firstly with the relaxation of knitting it, and then in the casual dress code it will encourage once completed.
This pattern is straight from the 1970s, but does seem to have that timeless quality* about it.
The Magpie Aran yarn is exactly the nutty brown tweed colour I always imagined for the cardigan, (yellow/cream Arans are not a good colour for me). However Magpie, though a very robust wool, soft it is not, and I think this design would be great in a lovely soft airy yarn; luckily there is plenty of choice these days in this kind of wool weight.
* I do admit that I hate that word "timeless"- it seems to be an unwritten rule that once said it will ensure the item to which it applies becomes dated and laughable even more quickly than other items of the same vintage. However, in this case I think it really does apply, and (if it's any comfort) I don't think it was high fashion even in the 1970s, which is probably why it took so long for me to be inspired to finally make it up.
Instructions.Figures in brackets refer to larger sizes; where only one figure is given,
this refers to all sizes. The BackWith No 9 needles cast on 98 (104 : 110: 116 : 122) sts. Repeat the last 2 rows 3 times more, then 1st row once, increasing 1st at both ends of last row on lst, 3rd and 5th sizes. Increase row: K8 (10 : 14: 16: 20), kfb *p7, (k2, pfb) 6 times, k2, p7 *; (k1, p1, then k1, p1 in next st) 4 times, k2; repeat from * to *, kfb, knit to end. [118 (122 : 130 : 134: 142) sts] Change to No 7 needles and pattern as follows: 1st row: (kb1, p1) 5 (6 : 8 : 9 :
11) times; * k7, (p2, k2) 6 times, p2. k7
*; p18; repeat from *
to *, (p1, kb1) to end. These 12 rows form the pattern. Continue in straight until work measures 20 ins, ending with right side facing for next row. Shape Armhole: Continue straight until armhole measures 7½ (7½ : 8: 8: 9) ins, ending after a wrong-side row.
Continue on the last set of stitches. Next row: Cast off 8, pattern to
end. Repeat the last 2 rows once more. Join yarn to neck edge of remaining sts and work to match lst side, reversing shapings. Pocket linings (make 2)[Editor's note: You may note from the photograph that I omitted pockets on my cardigan - actually I think it looks best with pockets, and I plan to add them in later, but if you don't want them, simply leave out these sections.] With No 9 needles cast on 38sts. 1st row: K2, (p2, k2) to end. Repeat the last 2 rows for 5 inches, ending after 1st row. Next row: P3, increase in the next stitch, rib to the last 4 sts, increase in the next stitch, p3. Leave the stitches on a spare needle or stitch holder. The Right FrontWith No 9 needles cast on 58 (61 : 64 : 67 : 70) sts. 1st row: K1, (kb1, p2) to end. Repeat the last 2 rows once more. Next row (buttonhole): Rib3, cast
off 3, rib to end. Work 3 more rows in rib, increasing 1st at the end of the last row on the 1st, 3rd and 5th sizes. [59 (61 : 65 : 67 : 71) sts] Increase row: K8 (10 : 14: 16: 20), kfb; repeat from * to * as increase row on back; (k1, p1, then k1, p1 in next st) twice, k2; turn, leaving the remaining 8 sts on a safety-pin to work the buttonhole band later. Change to No 7 needles and continue to work on 60 (62 : 66 : 68 : 72) sts as follows: 1st row: P10; repeat from *
to * as 1st row of back, then (p1, kb1) to
end. Keeping bramble stitch and cable pattern correct, decrease 1 stitch at
the end of the following 21st row, then the following 12th row. Next row (place pocket): P10, slip
the next 40 stitches on to a stitch holder or spare needle; Continue in pattern, decreasing 1 stitch at side edge on the following
10th row. Then continue straight on the remaining 57 (59 : 63 : 65 : 69)
stitches until work measures 13 inches. Shape Armhole: Shape Neck: Shape Shoulder: The Left FrontWith No 9 needles cast on 58 (61 : 64 : 67 : 70) stitches. Repeat the last 2 rows 3 times more, then 1st row once, increasing 1st at the beginning of the last row on the lst, 3rd, and 5th sizes. Increase row: Rib 8 stitches, and
leave these 8 stitches on a safety-pin to work the left front band later. Change to No 7 needles and pattern thus: 1st row: (Kb1, p1) 5 (6 : 8 : 9 :
11) times; repeat from * to *
as 1st row of back, then p10. Continue in pattern as now set, and complete to match right front, reversing
shapings and the position of the pocket. The SleevesWith No 9 needles cast on 44 (44 : 50 : 50 : 50) sts. Increase row: **
(k2, kfb) once (once : twice : twice : twice), Change to No 7 needles and pattern as follows: 1st row: (Kb1, p1) 3 (3 : 5 : 5 :
5) times; repeat from * to *
as for the 1st row of the back; (p1, kb1) to end. Continue in pattern as now set, increasing 1 stitch at both ends of following 5th row and every following 5th (5th : 6th : 6th : 5th) row until you have 80 (80 : 86 : 86 : 92) stitches, working the increased stitches into the pattern as end panels. Continue straight until work measures 17 (17 : 18 : 18 : 18) inches. For 1st, 2nd, and 3rd sizes, end with wrong side facing, and for 4th and 5th sizes end with right side facing to begin the next row. Mark the ends of the last row (with a piece of coloured thread or a stitch marker). Shape Top: The Pocket TopsWith right side facing, slip the 40 stitches on the stitch holder for the left front pocket on to No 9 needles. 1st row: K1, (k2tog tbl, p2) twice; (kb1, p2) 8 times; k2tog tbl, p2, k2tog tbl, k1. [36 sts] 2nd row: K1, pb1, (k2, pb1) to last
stitch, k1. Repeat the process for the stitches on the stitch holder for the right front pocket. The Front BandsWith wrong side facing, slip the 8 stitches of left front on the safety-pin back on to on to No 9 needles. Work in rib as set, increasing 1 stitch at the end of the 1st row. [9 sts]. Continue in rib until band will fit front edge. [Editor's note: I have found it difficult to judge the fit of front bands knitted in this way. My method now is that when I have knitted about the right length, I test the length against the main body by laying the work flat and totally relaxed with the front band laid in position up the front. When the front band is about ½ to 1 inch shorter than the main body it fits nicely into position very slightly stretched.] Leave the stitches on a spare needle. The Neck BandJoin shoulder seams. With No 9 needles and right side facing, rib across the 9sts of the right band, pick up and knit 29 sts up right front neck, 37 sts round back neck, 29 sts down left front neck, and finally rib across 9sts of left front band. Work 6 rows in rib matching in with the bands, making the last (top)
buttonhole on the 4th and 5th rows. To Make UpJoin side seams. |
Materials
|
|
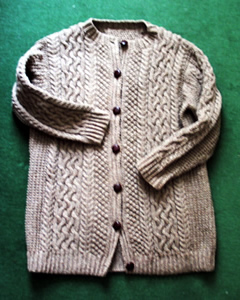
|
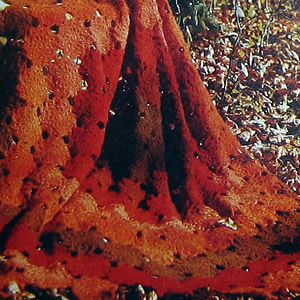
I love the rich autumn colours in this simple 1970s throw. Don't spurn the simple crochet motif; while not technically challenging, they do make an ideal handbag project for your holiday or your commute to work. You may think it's a bit early to think about autumn but there are just under 200 motifs make up the full size blanket... so maybe in time for Autumn 2011!
Crochet abbreviations:ss = slip stitch Remember the above are English crochet instructions where dc is equivalent to US single crochet - see "Terminology" in the side bar. Editor's note: While writing this I found a simply excellent free form crochet site from James Walters which reflects his own work alongside Sylvia Cosh and has - among other things - some great crochet information. As the author states - the information was originally intended as worksheets for their students - however I found they do offer useful guidance (available in both what I will call "English" as well as "US English"!) InstructionsMake 4 ch and join with a ss to make a ring. 1st round: 3ch; 11 tr into ring; ss to 3 ch. 2nd round: 3ch; 1 tr into same place as ss; * 2ch, 2tr into next tr, repeat from * to end, finishing with: 2ch, ss to 3rd of 3ch. 3rd round: 3ch; 2tr into first 2ch
space; * 2ch, 1tr into same space, work 2
tr tog (see abbreviations) with first leg in the same space and second
leg in the next space, 1tr into same space, repeat from *
to end, finishing with: 2ch 1tr into same space, ss to 3rd of 3ch. 4th round: * 1ch, 5tr in space, 1ch, 1dc into 2 tr tog, repeat from * to end, finishing with ss into ss of previous round. Fasten off. This completes your first motif. Make 7 for the centre and then 48, 44, 44, and 46 in the other colours. Here's a close-up picture of one of the motifs. Hopefully it will help you see how they should look.
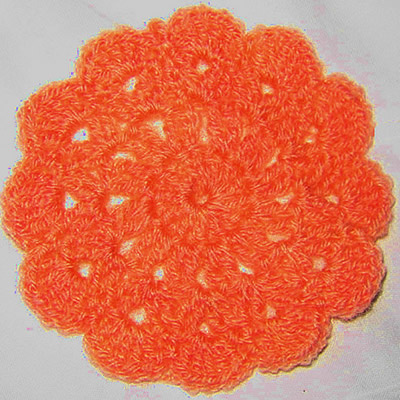
Making upJoin 2 shells to each adjacent motif, using the following pattern as a guide to placement. It is a good idea to sew this together gradually as you go along - you can stop any time you feel it's big enough, leave the throw as a circular shape, or continue with the pattern to make a rectangle.
Sew in all ends. |
Materials4ply/Fingering yarn in 5 autumnal colours. You will need about 1 ball for the centre and about 8 balls for each of the other 4 colours. One number 11 (3mm) crochet hook. TensionOne motif measures about 4 inches in diameter. Size mattersApproximately 52 by 60 inches. Disclaimer
|
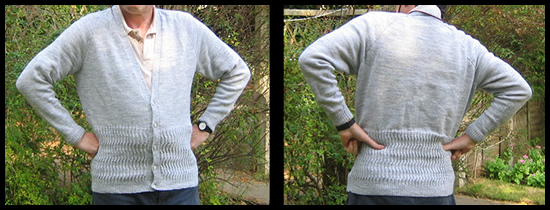
No - really - the boyfriend....
I say this as, had you seen the modelled photo from the 1970s, it may have led you to wonder. The orginal cerise colour in combination with the lacy pattern seems to be a bit feminine - but - hey! - we were looking at the beginnings of the "New Man" in the 1970s, right? (but it looks just perfect on my "old" man).
Sad to say, I think I possess the actual original yarn in the suggested (pink) colour for this pattern, but I chose to style it in an elegant pearl grey, using a practical superwash wool blend.
Obviously it could be made to suit a man or a woman.
Instructions.This is a raglan cardigan, designed for a man and given in 3 sizes. Main size is given for a 40 inch chest and other 2 sizes are given in brackets. Pattern:The twisted rib pattern is worked over 24 rows as follows: 1st Row: S1, k1, *
p2, k2; repeat from * to end. Back:Using No 12 needles, cast on 153 {161 : 169} sts. 1st Row: S1, k1, *
p1, k1; repeat from * to last stitch;
k1. Repeat the first and second rows 7 times more, then the first row once. 18th Row: S1, *
inc once in the next stitch purlwise; (k1, p1) 3 times; k1 *
; Change to No 10 needles. Next Row: S1, * k2tog, k7 *; repeat from * to * 8 times; k2tog, k2{6 : 10}; k2tog; k2{6 : 10}; repeat from * to * 8 times; k2tog, k6, k2tog, k2. [153 {161 : 169} sts] Next Row: S1, purl to the last st, k1. Continue in st-st until work measures 17 {17 : 18} inches, ending with a purl row. Shape Armholes: Right Front.Using No 12 needles cast on 83 {87 : 91} sts. 1st Row: S1, k1, *
p1, k1; repeat from * to last stitch;
k1. Repeat the first and second rows 7 times more, then the first row once Slip the last 12 sts of the row on to a stitch holder or safety pin to continue the front border later. Turn and continue knitting the right front on 78 {82 : 86} sts. Change to No 10 needles, and work the 24 rows of the pattern three times, then the first 6 rows again, as you did for the back. Next Row: S1, (k2tog, k10) twice;
k2tog, k11{13 : 15};
k2tog, k11{13 : 15};
k2tog, k10, k2tog, k9, k2tog, k2. Next Row: S1, purl to the last st,
k1. †† Continue in stocking stitch until work measures the same as the Back Shape Armhole: Work 82 {82 : 78}
rows decreasing once at the front edge on the next and every following
10th row - and at same time decrease once at the armhole edge on
the next and every alternate row. For the largest 44 inch size, work 4 more rows, decreasing once at the front edge on the 3rd row and at the same time decrease once at the armhole edge on every row. [19 sts] For the small (40 inch) and medium (42 inch) sizes, work 12 {4}
rows decreasing once at the armhole edge only on the next and every alternate
row. [7 {15}sts]. Then work a further 4 {12 : 16} rows decreasing once at the armhole edge only on every row. [ 3 {3 : 3} sts] Next Row: S1, k2tog. Left Front:Using No 12 needles cast on 83 {87 : 91} sts. 1st Row: S1, k1, *
p1, k1; repeat from * to last stitch;
k1. Repeat the first and second rows 4 times more. 17th Row: S1, k1, * p1, k1; repeat from * to last 12 sts. Slip the last 12 sts of the row on to a stitch holder or safety pin to continue the front border later. Turn and continue knitting the left front on 71 {75 : 79} sts. 18th Row: S1, *
inc once in the next stitch purlwise; (k1, p1) 5 times, *;
Change to No 10 needles, and work exactly as given for the Right Front until †† is reached. Continue in stocking stitch until work measures the same as the Back Shape Armhole: Complete as given for the right front, reversing all shapings.
Sleeves:Using No 12 needles cast on 63 {63 : 67} sts. 1st Row: S1, k1, *
p1, k1; repeat from * to last stitch;
k1. Change to No 10 needles, and proceed in stocking stitch, increasing one stitch at each end of the 5th and every following 6th row until there are 109 {109 : 113} sts on the needle. Continue without further shaping until the work measures 19 inches, ending with right side facing for the next row. Shape Top: Work 44 {44 : 36} rows, decreasing 1 st at each end of the next and every folowing 4th row. [ 71 {71 : 79} sts] Then work 56 {56 : 64} rows, decreasing 1 st at each end of the next and every alternate row. [ 15 {15 : 15} sts] Cast off. Making up:Press pieces gently under a damp cloth according to the instructions
on the yarn ball-band. Right front border:Place the 12 sts from the welt of the right front (kept on a safety pin) back on No 12 needles. With wrong side facing, rejoin the yarn and commence the rib as follows: Next Row: Inc in the next stitch purlwise, k1; (p1, k1) 5 times. Next Row: S1, k1, *
p1, k1; repeat from * to last stitch;
k1. Repeat the last two rows over the 13sts until border is of sufficient Left front border:Place the 12 sts from the welt of the left front (kept on a safety pin)
back on No 12 needles. With right side facing, rejoin the yarn and commence
the rib as follows: Next Row: S1, *
p1, k1; repeat from * to end. Repeat the last two rows over the 13sts placing buttonholes at desired
intervals as follows: Next Row (wrong side of work): S1,
(p1, k1) twice, p1; cast off 2 sts; (p1, k1) twice. Continue in rib until border is of sufficient length to go up front, across sleeve top and halfway across back of neck. Cast off in rib. Completion:Sew ends of borders together. Sew borders to front edges. Sew on buttons to correspond with button holes. |
Materials4 ply: 9 : 10 : 11 50g balls [Editor's note: I used ony 7 balls of Luxe - see "Word on the Wool" below] 1 pair of No 10 (3¼mm) and 1 pair of No 12 (2¾mm) knitting needles. 5 buttons. Tension30 stitches to 4 inches over stocking stitch. Size mattersTo fit 40:42:44
inch chest; actual size 41:43:45
inches. Abbreviationsinc: increase in the next stitch by knitting (or purling) twice into it. yrn/yon/yfwd: yarn round needle / yarn over needle / yarn forward. Makes an extra stitch which forms a small pattern hole when knitted on the next row. k1tbl: knit through back loop of the stitch. This has the effect of twisting the yrn or yon stitch that you made, making it tighter. s1: slip one stitch. psso: pass the slipped stitch over. Effectively you are "knitting
2 together through back loops" A Word
|
Here, George tries to emulate the original model's pose. Sadly, he is inhibited by the lack of a Hendrix hairstyle and droopy moustache.
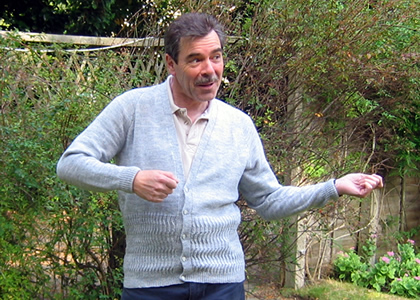

I was inspired to make these mitten patterns by brightly coloured offerings from 1975. By the time I had tried out a number of versions - and had many more examples of right-hand gloves than I want or need - my final designs differ substantially from the original. But they are cute aren't they?
They are a close fit on my hands, but though my hands are small, I tend to have short fingers only; the measurement around my hand is just over 7 inches.
Instructions:Begin working the RIGHT GLOVE: Using contrast colour, cast on 48 stitches; purl one row, and join into a round. Change to main colour and knit one row. Thumb gusset 1st round: K24, p1, k2, p1, k20. Now set aside the thumb stitches and continue with the main glove as
follows: Work 2 rounds straight. Cut 6 lengths of contrast wool, about 28 inches in length, and 6 of main
shade; do not use bobbins, just the lengths of wool.
Row 1: K4 from the ball of main shade, k1 using first strand of contrast yarn, k8 using first strand of main shade, k1 contrast using second strand of contrast, k8 using second strand of main shade, and so on the the last 4 sts; k3 in last strand of main shade, slip the last st. Still using the last working needle, pick up the st below the first st of the round and knit into it, then pass the slipped st over this st. Turn the work.
[Editor's note: Use the pop-up from the above picture for more detailed photos of this technique.] Row 2: P3 in main shade, p3 in contrast,
p6 in main shade, and so on; use the intarsia method
and twist the two yarns together when you change colour. Continue in this
way until you get to the last stitch in the row, and slip this stitch.
Still using the first working needle, pick up the st below the last st
of the round and purl into it, then pass the slipped st over this st.
Turn the work. Now go back to working in the round, and continue in main shade only,
using the main ball of wool. Divide for fingers Next round (forefinger):
Knit the first 20 sts of the round and place on a stitch holder; place
the last 20sts of the round on a second stitch holder; Knit 16; cast on
2 sts. [18 sts] Next round (middle finger):
Slip the last 7sts on the first stitch holder (the ones nearest to the
forefinger) onto a needle and knit them; pick up and knit 2 from the cast
on sts at the base of the forefinger; slip the first 7sts on the second
stitch holder (the ones nearest to the forefinger) onto a needle and knit
them; cast on 2 sts. [18 sts]. Next round (third finger): Work and complete as for middle finger. Next round (little finger):
Pick up 2 sts at the base third finger; slip the remaining 6 sts on the
second stitch holder onto a needle and knit them; slip the remaining 6
sts on the first stitch holder onto a needle and knit them. [14sts] Thumb: LEFT GLOVE: 1st round: K20, p1, k2, p1, k24. Continue in this way as for right glove, but following the stitch layout as set until you reach row 25. 25th and 26th rounds: K23, p1, k18, p1, k27. [70 sts] Now set aside the thumb stitches and continue with the main glove as
follows: Once you have set the position of the thumb, you can work the rest of the left glove exactly as for the right glove. Making up: |
MaterialsExample shown is knitted in 1 x 50g ball 4 ply in main shade, and small amount of contast colour. One set of 4 No. 12 (2½ mm) needles. TensionApprox. 32sts and 44 rows to 4 inches on No 12 needles. Size mattersWidth all round above thumb, 7 ins. To alter the size use larger or smaller needles as required. A word on the woolThe wool I used was from my store room. IntarsiaHere is a nice little video clip about intarsia knitting. Don't be put off by her continental knitting method. Disclaimer
|
|
Intarsia.Text and Pictures taken from Ethknits "How to knit" page. Hold the working yarn in your right hand and the yarn to be woven in your left. |
|
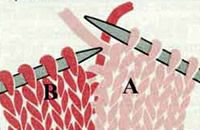 |
 |
|
Changing on a knit row: Knit with yarn A until you want to change. Pull yarn A over to the left and wrap yarn B across the back of A as you knit the next stitch. |
Changing on a purl row: Purl with yarn A until you want to change. Pull yarn A over to left and wrap yarn B under A as you bring it across to purl the next stitch. |
|
You can see from the purl row picture that the edge resembles a sideways knitted row as on each row you cross the yarns over. This way you should get no holes. Don't worry if you see holes where the yarn is loose in some places. When you finish your work you will have lots of ends to sew in and you can pull these tight and sew up any holes that still appear. |
|
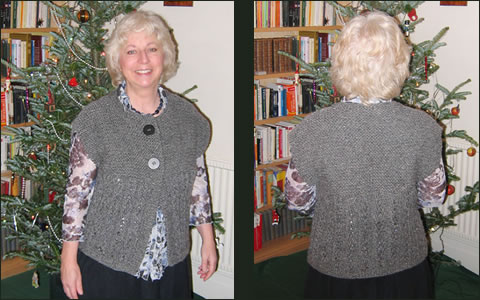
Speedy, speedy knitting from the 1970s. Flattering sleeveless top, warm and simple to knit.
Instructions.The pattern is worked back and forth on circular needles, in 5 stitch repeats over four basic rows: 1st Row: Wrong side facing, {p3,
k2}. Body:Note: The back and fronts are knitted as one piece up to the armholes. With smaller circular needles cast on {100/110}120 stitches and work 6 rows in garter stitch, noting that the first row is a wrong side row. Next Row: (Wrong side facing, 1st
pattern row), knit 4 and slip this 4 sts on to a safety pin or stitch
holder. Change to larger circular needles and commence pattern thus: k2,
*p3,k2; repeat from *
to the last 4 sts. Turn, slipping the last 4 sts onto a safety pin, without
knitting them. [{92/102}112 pattern sts] Next Row: (2nd pattern row), p2, *k1, yfwd, slip1, k1, psso, p2; repeat from * to end. Next Row: (3rd pattern row), as first pattern row. Next Row: (4th pattern row), p2, *k2tog, yfwd, k1, p2; repeat from * to end. Continue in pattern for 10 inches (or desired length), ending with a
4th row pattern, and wrong side facing to begin the next row. †† Leave the main work on the circular needles to one side now, still with wrong side facing - the row you have just knitted is not completed until after you make the front borders. Front Borders:At this point you need to go back to the 4sts you left on safety pins on each side of the work, to make the front borders. Using the pair of smaller needles, and working each set of 4sts separately, rejoin the wool and continue to knit the borders; it is important you join the wool and start knitting from the correct side of each border to continue in the right sequence for garter stitch. This means that, provided you have followed the instructions exactly
as above, for both borders, you need to join the wool at the edge which
will later be sewn to the main body. Work each border in garter stitch until, when very slightly stretched,
the border fits the length of the main body that you have just knitted,
finishing the left border on a wrong side row, and the right border on
a right side row. For both borders the yarn end will be at the edge next
to the main body. Break the yarn. Now return to your main work, on the circular needle. With wrong side facing, take up your last row of plain knitting (see the marker above ††) and complete the row by knitting the 4 sts of the right front border - make sure the border is not twisted. [{96/106}116sts]. Turn the work (right side facing) and knit across all {96/106}116 sts and then complete the row by knitting the 4 sts of the left front border - make sure the border is not twisted. [{100/110}120sts]. Now divide for front and back, with wrong side facing, knit the
first {25/29}32 sts (includes your extra
4 sts at front border) and place these sts on a stitch holder, to make
the left front, later. Continuing without turning, cast on 3 sts using the working yarn, knit
these 3 sts, knit {46/52}56 sts cast on 3
sts. Leave the remaining 32 sts on a stitch holder, to make the right
front, later. [{52/58}62 sts]. Back:With right side facing, work straight in garter stitch (every row plain)
for 8 inches (or the required length for the arm hole), ending with right
side facing. Shape shoulders by casting off {3/3}3 sts at the beginning of the next 4 rows, {3/4}4 sts at the beginning of the following 2 rows, {4/4}5 sts at the beginning of the following 2 rows, and {4/5}5 sts at the beginning of the following 2 rows, and leave the remaining {18/20}22 sts on a stitch holder. Left front:With right side facing return to the left front, slipping the {25/29}32 sts you left on the stitch holder back on to a left hand working needle. Rejoin the wool at the armhole edge to start your next row.
[Editor's note: it
is worth double checking here that:
If you have completed the steps as written, this should be how it works out.] Cast on 3 extra sts with the working wool; knit across these 3 sts followed
by the {25/29}32. [{28/32}35
sts]. Continue to work in garter stitch until 8 rows less than on back
have been worked to the start of the shoulder shaping, ending at the armhole
edge with right side facing to commence the next row. ** Shape shoulder by casting off {3/3}3
sts at the beginning of the next and following alternate row, {3/4}4
sts at the beginning of the following alternate row, {4/4}5
sts at the beginning of the following alternate row, then cast off the
remaining {4/5}5 sts. Right front:With wrong side facing return to the right front, slipping the {25/29}32 sts you left on the stitch holder back on to a left hand working needle. Rejoin the wool at the armhole edge to start your next row. [Editor's note:
it is worth double checking here that:
If you have completed the steps as written, this should be how it works out.] Cast on 3 extra sts with the working wool; knit across these 3 sts followed by the {25/29}32 sts, [{28/32}35 sts]. Commence working in garter stitch and make buttonholes on the following 6th and 28th (wrong side) rows as follows: Buttonhole row 1: (wrong side), knit
to the last 6 sts, cast off 2, knit to end. Continue to work in garter stitch until 8 rows less than on back have
been worked to the armhole edge, ending at the armhole edge with wrong
side facing to commence the next row. Work to complete the right front exactly as the left from ** to **. Neck Border:With right side facing and smaller needles, starting at the top of the
right front border, k{8/9}10 sts from stitch
holder, pick up and k9 sts up right side of neck, k{18/20}22
sts from back neck, pick up and k9 sts down left side of neck, then k{8/9}10
sts from stitch holder. [{52/56}60 sts].
To Make UpPress very lightly on wrong side under a damp cloth. Join shoulder seams,
using a flat seam, (or by grafting, working from the wrong side and making
a purl ridge on the right side). |
|
MaterialsAbout 7 x 100g balls of a chunky or "big" wool that knits to
the required tension on 7½mm needles. No 2 (7mm), and No 1 (7½mm) circular needles. Two 1½ inch buttons. Tension11sts x 16 rows to four inches measured over stocking stitch on 7½mm needles. Size mattersI made the main size shown in black text, which is a slightly large on me (UK size 12-14, maximum size 38 inches). The original pattern was multi-sized, so I have included {2 smaller size options}, in red ink with curly brackets, as shown. They are sized to fit {34/36}38 inches, and actual sizes more like {35/38}42 inches. Length from top of shoulder in my version is approximately 21 inches. See "adapting the size". A word on the wool.I used a pure wool Aran knitted double throughout, and this was about 450m as if knitted with a single strand of bulky wool. Original knitted in Patons Pablo. Abbreviations: yfwd: yarn forward - bring the yarn to the front of the work and when you knit the following stitch, you will have created an extra stitch, in a way that makes a decorative eyelet hole. "Yarn forward" or "yarn over needle" is often used in conjunction with knitting 2 sts together (so you avoid increasing the overall number of sts) in knitted lace patterns.
garter stitch: the simplest stitch pattern of all - every row is knittted, (when worked back and forth on two needles), and the back and the front of the work look the same. It makes a fabric that stretches vertically. Disclaimer
|
|
Adapting the size:Altering the size is fairly simple, as you are knitting a big rectangle, with the pattern being a 5 stitch repeat. Working to the required gauge, means that every addition of 5 sts gives you almost 2 inches extra room. Once you get to divide the work, you change to working garter stitch (no pattern), and can work it out so that half the sts go to make the back, leaving a quarter each for the two fronts. If you do not have stitches divisible exactly by four you can put the extra ones into the back, and incorporate them into the back neck. |
|
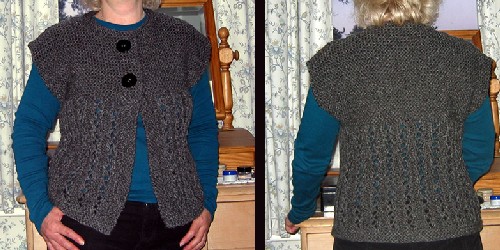

A 1970s hat using blackberry stitch, with a moss stitch brim. George did not think this was very "manly", but I leave that artistic decision to you, [George has also had experience of "life on the ocean wave" and says that as long as it's warm it will be welcome].
InstructionsWith No. 6 (5mm) circular needle cast on 89 stitches, and work in rounds of k1, p1, moss stitch for 3 inches. Increase 7sts evenly across the last row. [96 sts] Change to No. 4 (6mm) circular needle and work pattern as follows: [Editor's note: this pattern (blackberry stitch) is worked over groups of 4 sts, and the hat is knitted up from the wrong side throughout.] 1st round: (wrong side) Knit. These 4 rows form the pattern. Continue in pattern until work measures 8½ inches from the beginning, ending with round 4. Shape Top as follows, keeping continuity of the pattern: Next round: K1 *k2,
k2tog. Repeat from * to last st., k1. [72
sts] Next round: *K2tog,
k1. Repeat from * to end of round. [48 sts] Break yarn, thread through remaining sts; draw up and fasten off securely. Making up: Changing the hat size, or substituting the wool.You may want to alter the size (circumference) of your hat, or compensate for a different gauge. Simply work out how many sts you need to cast on according to your own
gauge eg divide the number of sts by 18 and multiply by the number of
sts you knit to 4 inches. Do the same calculation when increasing for the blackberry stitch, taking note that your number of sts needs to be divisible by 4. Example:
I have a gauge of 18 sts to 4 inches on no UK 6 (5mm) needles. Cast on 89 sts becomes 89/18*15 = 74, and you cast on 75, as it needs to be an odd number. Increase evenly to 96 sts becomes 96/18*15 = 80. |
MaterialsExample shown is knitted in 2x 50g balls of vintage Richard Poppleton Emmerdale Chunky Tweed (an acrylic and wool blend). Size 6 (5mm) and size 4 (6mm) circular needles - short length suitable
for a hat. TensionApprox. 9st to 2 inches on No 6 needles. Size mattersThis hat worked out to about 22 inches head circumference. My estimate
is that "to fit an average sized head" means 22/23 inches for
a man's size and 20-22 inches for a woman's size. A word on the wool.Original pattern called for Patons Husky Chunky, which was, I think a
pure wool chunky, somewhat bulkier than the one I used. Disclaimer
|
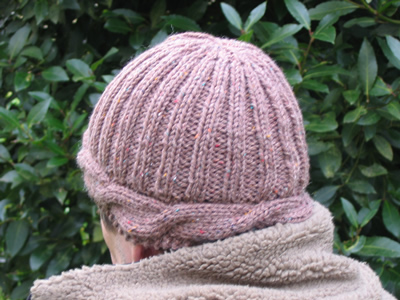
This 1970s style hat is constructed by knitting a cabled band and then picking up stitches to knit the rest of the hat - which in this example is ribbed. This version is is not intended to have a turned back brim; if you want one, then you must knit the rib section longer; you will not have to reverse any workings as the rib section is reversible, so could be worn either way out. The single layer construction is very economic on yarn; For my wool/acrylic blend, I used 58g.
InstructionsWith No. 5 (5½mm) needles cast on 11 stitches, and work in cable
pattern as follows: 1st row: (wrong side) K3, p6, k2. 9th - 14th rows: Repeat 1st and second rows 3 times. Repeat 1st - 14th rows 8 times more (9 patterns in all) ending with row 13. Graft the sts to the cast-on edge to form a circular band, [or cast off the 11 sts and sew the cast-on to the cast-off edge]. [Editor's note: If you want to alter the size (circumference) of your hat, now is the time to do it. Lengthen or shorten this band to the circumference you want to achieve. See "altering the size" below.] One edge of the band has a neat "finished" garter st edging
and the other has a reverse stocking stitch edge, which you will use to
continue knitting the hat in the round. Work in rounds of k2, p2 rib for 5 inches (about 28) rows. Shape Crown as follows: 1st round: *K2tog,
p2. Repeat from * to end of round. Repeat rounds 2 five times more. 8th round: *K1,
p2tog. Repeat from * to end of round. Break yarn, thread through remaining sts; draw up and fasten off securely. Making up: Changing the hat size, or substituting the wool.You may want to alter the size (circumference) of your hat, or compensate for a different gauge. This pattern relies on making an even number of cables around the hat, so to lengthen or shorten the band, you can either add in whole or partial pattern repeats, or, if you feel up to it, you could alter the number of rows in the pattern repeat of the cable. Test your gauge before you start and work out how many rows you need to make your chosen head circumference size. Start by dividing the number of rows you calculate by 14, and then try some other numbers, eg 12, 16, 13, or 15, until you are close to getting an exact number of patterns. [Note that if you choose to work to an uneven number of rows in the repeat, then you will end up doing your cable operations on purl rows, which is quite feasible, but approach with caution if your are a beginner in this field!] If the above all sounds hopeless to you, then just knit until the band is the length you require, and just sew the ends of the band together rather than trying to graft it. You could even work the hat on two needles instead of in the round, by picking up the stitches from the band before you sew it up, - and then, when you have finished, you sew a side seam into the hat, including the band. Finally if you are altering the size, or compensating for a different
gauge, you will probably need to pick up a different number of stitches
from the band. I usually pick up a number of stitches equal to three quarters
of the number of rows I have knitted. |
MaterialsExample shown is knitted in 2x 50g balls of vintage Richard Poppleton Emmerdale Chunky Tweed (an acrylic and wool blend). Two size 5 (5½mm) needles and a size 6 (5mm) circular needle - short
length suitable for a hat. TensionApprox. 9st to 2 inches on No 6 needles. Size mattersThis hat worked out to about 22 inches head circumference. My estimate
is that "to fit an average sized head" means 22/23 inches for
a man's size and 20-22 inches for a woman's size. A word on the wool.Original pattern called for Patons Double plus, which was a double knitting
wool, and the instructions were to knit the yarn double, producing a tension
of 7.5sts and 10 rows to 2 inches. Disclaimer
|
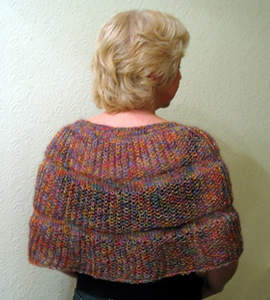
Adapted from an original idea for sleepwear, this has transformed itself into a glamorous stole.
Whether or not it sparkles obviously depends on the type of wool you choose. I used a fabulous Italian yarn, which was a bit brighter once knitted up, than I had imagined from the ball, but has made a lovely item. The original pattern (from the 1970s but probably revamped from a much earlier design) called for 4 ply wool - about 8 ounces - but my version is not only in much lighter weight man-made fibres with a consequent good yardage, but also designed to be shorter than the original.
I think you could feasibly wear this in the evening with a skimpy evening top or as a decorative addition over a plain black roll-neck sweater.
[Note: we noticed that this colourway works particularly well with dark brown].
InstructionsUsing No. 6 (5mm) needles cast on 72 stitches, and work 6 rows k1, p1 rib. Increase row: K5, * m1 (make one st by picking up the loop between the stitches and knitting into the back of it), k4; repeat from * to the last 6sts, m1, k5. [88 sts]. **
Right side of work facing, change to No. 3 (6½mm) needles and commence pattern. Next pattern row: *
K1, k1b; repeat from * to end. Work 25 rows in the pattern. Change to number 6 (5mm) needles and work 3 rows in stocking stitch,
starting with a purl row. Increase row: K6, * m1, k4; repeat from * to the last 6sts, m1, k6. [108 sts]. Make a second pattern band by repeating from ** to **. Increase row: K4, * m1, k4; repeat from * to the last 4sts, m1, k4. [134 sts]. Make a third pattern band by repeating from ** to **, but omit the final three st st rows, and, on this last segment, continue on the No. 3 needles and knit a further 5 pattern rows. Cast off very loosely using a large gauge needle. End panels - Using No. 7 (4½mm) needles, and wrong side of work facing, pick up and knit 56 sts purlwise. Next row: (right side facing) K6,
*k2tog, repeat from *
to last 6 sts, k6. [34 sts]. Continue to decrease at the centre in this way until 6 sts remain. Repeat for the other side. Finishing - Press the stocking-stitch end pieces lighty on the
wrong side, using a warm iron and a damp cloth. [Editor's notes: The original pattern had 5 segments. If you want to do that, work in the same way, with each pattern band at 25 rows and the following additional increase rows: Increase row for fourth pattern band:
K5, * m1, k5; repeat from
* to the last 4sts, m1, k4. [160 sts]. ..and for the side panels pick up and knit 80 sts instead of 56, and decrease to 50 sts in the first decrease row.] |
MaterialsExample shown is knitted in 2 x 50g balls of an S. Charles Collezione yarn "Ritratto" - shade 64 One pair each of numbers 3, 6 and 7 (UK size) needles. Fancy clasp available on the web from TextileGarden, or Purlescence, or Nordic Fiber Arts. TensionApprox. 16st and 32rows to 4 inches (10cm) measured over pattern using
No 3 (6½mm) needles. Size mattersWidth around lower edge: 60 inches A word on the wool."Ritratto" is a man-made fibre with 28% mohair; knits 22sts to 10cm on No 6 (5mm) needles; 50g ball is 198 yards and I used about 1½ balls for the project.
I think this would work out well using Rowan Kidsilk Haze (or Night or Splash), or in Rowan Damask, which has a slightly shiny silk thread running through the yarn. Disclaimer
|
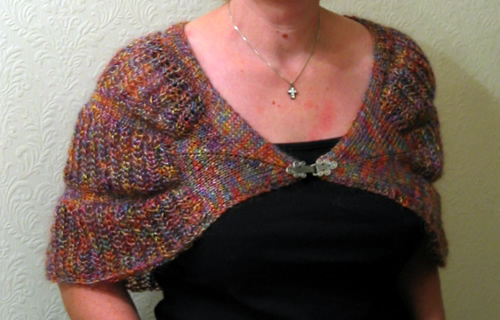
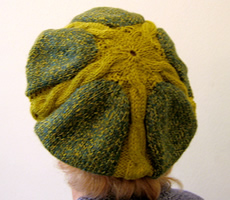
Hats are not my thing but I am fond of berets. Here is an irresistible 1970's two-tone design - the original in two glaring shades of gold and yellow. Consider also making it in orange with a strawberry or coffee contrast - I can vouch for this as a popular contemporary combination and you can view it as part of Southwest airlines hostess uniforms from the same period (although the colour of the uniforms is possibly not as striking as the hot pants and knee boots of the period...).
Alternatively just stick with more reserved single colour in traditional white Aran, understated and letting the pattern speak for itself.
Cable PatternRow 1: P3, k6, p3. These 10 rows form the pattern. Special note: Wind 5 small balls of yarn in each colour. Use a separate ball for each cable and panel, and twist the colours where they meet to avoid gaps in work ("intarsia method"). InstructionsUsing No. 10 needles and medium colour (M), cast on 106 stitches, and work 9 rows k1, p1 rib. [Editor's note: If you work the beret in 2 colours then work over 2 needles as described. If you work in a single colour, you could work this in the round, reversing knit and purl sts on wrong side rows.] Next row: (p1, p into front and back of next st) twice, * p2, p into front and back of next st, p1, p into front and back of next st; repeat from * to the last 7sts, (p1, p into front and back of next st) 3 times; p into front and back of last st. [150 sts]. Change to No 7 needles. Next row: (right side) *
k22 in M; join in light (L), k2, (k into front and back of next st) 4
time, k2; repeat from * to end. [170 sts]. Continue in stocking stitch and cable pattern, until work measures 5½ inches from beginning, finishing with right side facing for the next row. Shape crown as follows: Next row: *
(k2tog, k7, k2tog tbl) twice in M; pattern 12 L; repeat from *
to end. [150 sts]. Next row: K3, *
p6, k2, (p2tog) twice, k2; repeat from *
to last 11sts; p6, k2, p3tog. [60 sts]. Break off wool leaving end. Thread end through remaining sts and draw up tightly. Fasten off securely. Making up - Press lighty on the wrong side, using a warm iron and a damp cloth. Join seam, using a fine back stitch. Press seam. |
MaterialsOriginal pattern calls for 3oz of medium colour and 1oz light in an Aran
weight yarn. One pair each of numbers 10 and 7 needles. Tension20st and 25 rows to 4 inches (10cm) on No 7 (4½mm) needles. Size mattersInstructions to fit an "average" head (!). A word on the wool.I used Phildar yarns Oxygene (a DK) which knits 23st to 4 inches; and Frénésie (a heavy DK) which knits 19st to 4 inches. Disclaimer
|
Yet another object of my admiration is Southwest airlines. They don't really have any visibility outside the US, so I was suitably surprised on my first journey with them. (It was the night of October 31st flying to Tucson in 1994, and they sure had some fun with us passengers...). I have also been impressed at their impromptu organisation of party games to try and occupy a hot and fractious plane load of souls during an hours delay at LA. (See the wikipedia entry: "Southwest is known for colourful boarding announcements and crews that burst out in song. The singing is unusual, and is quite popular among customers, but has been noted by some travel critics as being offensive and intrusive." huh - what do they know?!)
They had their 25th anniversary in 1996, and had an exhibition that I must have caught somewhere (perhaps a magazine article) which showed their uniform designs over the years. Sadly I can't find any trace of this on the web now - just these photos:
A fun coverall that can be worn as a dressing robe or on the beach. This is a 1970s take on the Japanese design for happi coats, which originated as Japanese over coats traditionally worn by shop keepers. The family crest, shop name or emblem was printed on the back of the coat. Today, happi coats are still used by some shop keepers in Japan, but are also widely used elsewhere for festivals, parties and so on.
I realised while writing these instructions that they are not really for the novice seamstress. You will understand them better if you have used a paper pattern before. Having said that, this is a very simple shape; there is no real tailoring and if you are not a perfectionist, you can obtain a very pleasing result without much skill. If you are a perfectionist, then I expect you will make a high quality item in spite of my sketchy instructions....
InstructionsUsing the dressmakers paper, make a paper pattern from the graphs (Figs 1 and 2) and, using fabric scraps, or fat quarters, cut patches at least approximately 4 inches by 4 inches, according to the patch shapes you have chosen. Lay the patchwork pieces out on a table until there are enough to make a Back, two Fronts, two Sleeves and two Pockets. Remember to evenly distribute the colours so you don't run out of one particular fabric. Join the patches together by hand or (preferably) machine. Make the area of fabric required for each pattern piece.
For the sleeves, make two pieces of patchwork, each 22 inches by 15½ inches. For the back make one piece, 35½ inches by 26 inches, and, for the fronts, two pieces, each 36 inches by 12½ inches. For the pockets make two pieces, each 9 inches by 8½ inches. Pin the pattern pieces to the patchwork, and cut: one back on the fold; two sleeves; two fronts (remember these must be a left and right mirror image of each other); and two pockets. Pin the paper pattern pieces to the lining fabric and cut out the same pieces. Pockets: Place the pocket linings against right sides of pockets, and machine stitch around 3 sides, leaving the top open. Turn the pockets and press, (3 edges are enclosed in the lining). Cut two pocket facings from the facing fabric, each 9 inches by 4 inches. Turn in the short edges of the facings so that they are the same width as the pockets. Place one longer (raw) facing edge to the top raw edge of the pocket and sew in place. Turn facing to inside, tuck raw edge under and stitch. Repeat with the other pocket. Pin pockets to robe fronts in positions indicated on the graph, and top stitch in place. Sewing up: Tack the patchwork fronts to the lining fronts, wrong sides together. Tack and machine stitch the patchwork layer of the back only to the fronts along the shoulder seams and down the side seams, working on the wrong side. Machine the back lining to the shoulder seams, enclosing all the raw edges, and hem down the side seams. Sew the patchwork sleeve seams, with the raw edges on the wrong side, as usual, and then with right side to right side, ease the sleeves into the armholes; pin, tack and sew. Sew sleeve lining seams, wrong side to wrong side, and hem into place. Tack lining to patchwork all around the edges of the garment. Facings: From the facing fabric, cut one belt 78 inches by 5 inches, two belt slots, each 3 inches by 2½ inches, two front facings each 39 by 4 inches, one hem 52 inches by 5 inches, and two cuffs, each 21 inches by 5 inches. |
Materials2½m (112cm width) plain lining fabric. Fabric scraps, or about 10 fat quarters quilt fabric (usually 112cm or 44 inches wide). 2m cotton fabric for facings (or bias binding). Dressmaker's squared paper - 1 inch grid (I found only in centimetre grids on the web - 2ins=5cm) Size mattersOne size fits all. However for my version, I altered the pattern below to make it slightly smaller (to fit me); however, as a wrap, it can be worn over-size. A word on the designI used floral hexagons for my robe. The original was shown with rectangular patches. See "adaptations". |
You can make the robe by cutting the basic design from a plain fabric, which you can use as a conventional lining, or you can apply your patches directly to the lining as a backing, depending on how free form you want to be with your patchwork. You can use any patchwork techniques; I have used a conventional shape, but applied the patches directly on to the backing, overlapping them like roof tiles, and top stitching in place. This method allowed for minor inaccuracies in sizing the patches. I chose the shape of the patch to suit my floral fabric.
 The original robe was a rather pleasing design made of uneven rectangles in geometric and spotted fabrics in 1970s oranges, yellows, and browns. However, I was seduced by the lovely red poppy fabrics in my local quilt shop in Dorking (The Quilt Room) - in consequence I chose a hexagonal shape which I thought better suited the floral effect. I like the effect but also feel that it is a little reminiscent of a table cloth.
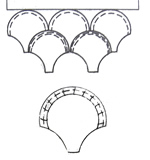 I would like to experiment with the fish-scale (or clam-shell) patch in beautiful pale blues and sea-greens to make a bath robe. There are some lovely "watery" batik fabrics available in packs. You could even introduce silvers, and gauzy effects. The fish-scale design can be used as patches, or as a quilting pattern, and is well-suited to the overlapping appliqué method (to better emulate scales).
Whatever you choose, remember to use big patches, otherwise it will be a 20 year project. You could even cheat and choose a fabric with a patchwork pattern, or indeed just decide to use some fabric that pleases you with no patchwork at all!
I wanted to keep the robe as light weight as possible, but you could put in an interlining and then quilt, for a heavier weight padded robe.
© Christina Coutts 2007
![]()

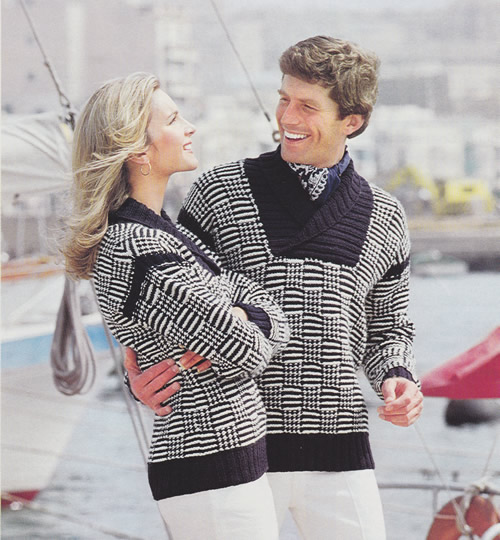
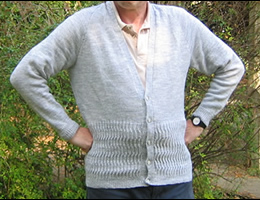
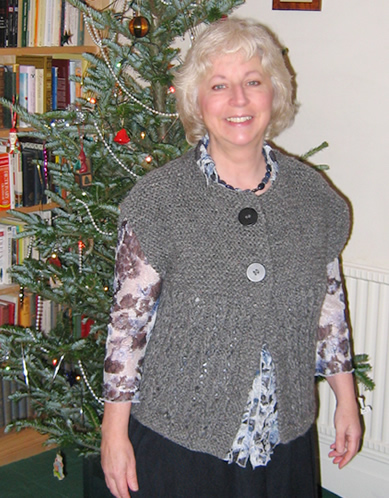
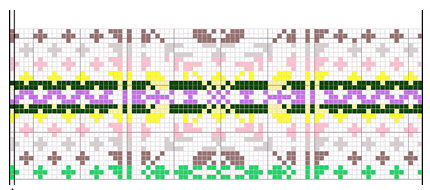
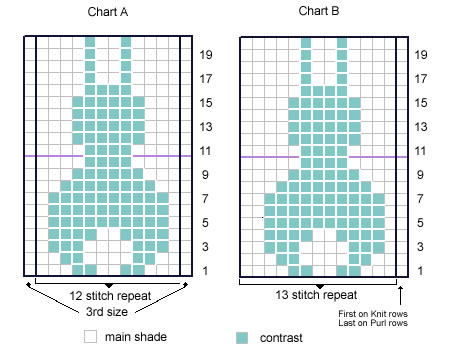 .
.