French Poodle
How very 1950s! How very French!.
How could I resist?
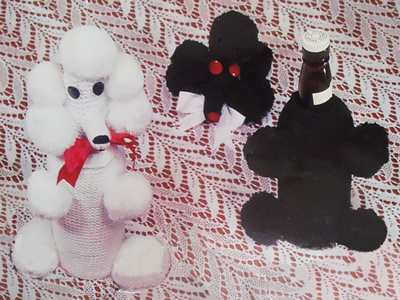
At first glance I assumed this was the more usual toilet roll cover (because nobody wants their spare toilet rolls exposed to the world do they?) - but no! It is a "bottle" cover. How much better to have a knitted poodle gracing the dining table rather than leaving your Castle Lafite Rothschild labels tastelessly speaking for themselves. [Actually I think it looks like it's designed for the sherry bottle - perhaps to hide the little nip you need to get through the housework.]
Alternatively you can wimp out and knit it as a toy - provided your child is also into retro 1950s toys, (did I mention that as a kid my favourite toy was a poodle ? ... he wasn't knitted though ..... Pom Pom .... ‹closes eyes in reminiscence›)
[Please note: This has not been knitted up to test the pattern but is provided as per the original. The shapes are very simple and the main effort is in the making up.]
Instructions.The poodle is knitted mainly in garter stitch with some eyelet rows to
carry elastic and drawstring. I think the two methods of assembly have
not been quite thought through in the original pattern, so you need to
use your common sense and refer to the picture when sewing it together. BodyWith No 8 needles cast on 49 stitches, and knit 2 rows. Next row: * k1, wf, k2tog; repeat from * to last stitch, k1. Continue in garter stitch (every row knit) until work measures 7½ inches from the beginning. Next row: *
k5, k2tog; repeat from * to end. [42 sts] Next row: *
k4, k2tog; repeat from * to end. [35 sts] Next row: *
k3, k2tog; repeat from * to end. [28 sts] Next row: *
k2, k2tog; repeat from * to end. [21 sts] Next row: K1; *
k2tog; repeat from * to end. [11 sts] Thread wool through remaining stitches, draw up and fasten off securely. [Editor's note: I think there is a bit of an implied error here - this is the neck, so only draw up to the degree that the neck of the bottle will fit...] HeadCast on 49 stitches, and knit 3 rows. Next row: *
k5, k2tog; repeat from * to end. [42 sts] Next row: * k1, wf, k2tog; repeat from * to last stitch, k1. Continue without any shaping for 3 inches. Next row: *
k2tog; repeat from * to end. [14 sts] Thread wool through remaining stitches, draw up and fasten off securely. NoseCast on 12 stitches, and work 1½ inches in garter stitch. Next row: *
k1, k2tog; repeat from * to end. [8 sts] Thread wool through remaining stitches, draw up and fasten off securely. Pom-PomsMake 8 pom-poms, 2½ inches in diameter. Cut 2 pieces of cardboard the diameter of the finished pom-pom; cut a ½ inch diameter hole in the centre. Wind wool over the rings until the centre hole is filled. With a sharp pair of scissors, cut through the wool at the outer edge. With double wool, bind round the centre of the pom-pom between the two pieces of cardboard; tie a knot and fasten off securely. Remove the cardboard. Fluff out and trim. To Make UpJoin back seam. Take 4 strands of light coloured wool and thread through holes at neck
and secure with a small knot. Tie in a bow. To Make Up the Poodle as a ToyFollow the instructions for the Bottle Cover. [Editor's note: After this there are a few inconsistencies which you need to work out as you go.] Assemble as the bottle cover. Insert a circle of cardboard 3 inches in diameter into the bottom of
the body. Make a roll of stuffing 13 inches long and insert this into
the base firmly, leaving excess sticking out for the head to fit over. Fluff out the stuffing slightly and fit head over it; pull down and stitch
over body. |
Materials
|
How to make pom-poms.
This is a different method which I ran across while looking for the simple tutorial above. It's less relevent for making our Poodle maybe but good if you want to make a load of these for a scarf or a necklace (ok - bit dated perhaps - think of your own project!)
|
|
