Colourful Kit Bag
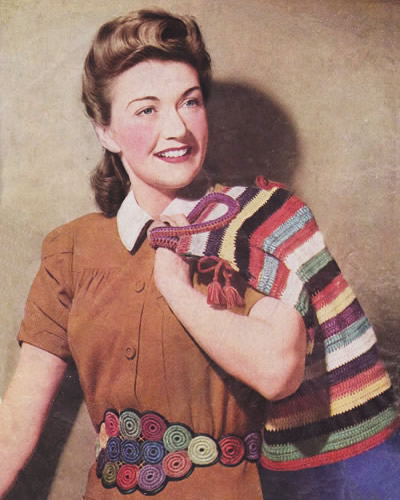
Kit bags are yet another thing I have a weakness for; I still have and use a floral one I bought from the Gap at its flagship store in Richmond in the 1980s. I think it stems from when I was a little girl finding my Father's military kit bag in the attic with "Delhi" and "Bombay" stenciled* on it - conjuring all kind of exotic ideas and possibilities. [All us kids also used this kit bag for camping with the Scouts and Guides in those days].
Kit bags are a bit impractical for any activity other than that for which they were designed, but smaller ones can be used more successfully as hand bags. This one seems to be of a more useful size, and you can really make it to any size you feel like. If you use "any thickness" of yarn as suggested then even the size of the base is really up to you. Designed towards the end of WW2, in an era of extreme shortages - where even the manufacture of yarn was restricted never mind the rationing - it is made from "oddments" or "pulled back" wool. The paper the pattern was printed on is flimsy in the extreme and there are sympathetic references everywhere to the inability to source the materials required.
* As well as the destinations, there was also my Father's name, army number, and unit stenciled on his kit bag, and I remember being amazed that he could just recite it without thinking - when in fact his army days were not so very far distant then and of course the only thing you were ever obliged to reveal were "name, rank, and number" - so not so surprising other than to a tiny child who suddenly had a glimmer of an idea that her Father had a life before she existed.
Instructions.The bag is really a free format design and quite simple to make. It's
the details that can make it rather splendid. Base:[Editor's note: Since you are working to a non-specified tension, you might want to do the crochet part first and make the base to fit accordingly.] Cut 2 circles of felt, one 8½ inches, the other 10 inches in diameter.
BorderCut a piece of felt 9 inches wide and 27 inches long; then a strip of
cardboard 26 inches long and 4 inches wide. Crochet topWith double wool, make 140 chain and close to form a ring. [Editor's note:
Or *not* with double wool - as you prefer and depending on the
thickness of the yarn you are using; in fact of you really are using scraps
of different thicknesses you might use some of them double and some not.
In the 1940s, sweaters were generally made in fingering (thin) yarn so
the assumption would have been that this is what you would have had to
work with. 1st round: Make 3 chain to form
first treble, then work 1 chain, 1 treble all round, and link up with
first treble. Repeat 2nd round for about 8 or 9 inches, changing colour as required. Now start decreasing by missing a tr 4 times evenly in round. Divide the work so that you have 36 trebles for back and front with 14
at each side. Work 12 rows of trebles on each of the 36 tr. Turn down each of these 2 (36 treble) top hems and slip a piece of cardboard into each to stiffen before finally stitching. HandlesWith double wool make 70 chain and join to form a circle. [Editor's note: You are essentially using the yarn as stuffing for the handles.] To Make UpStitch crochet top to edge of base on inside of it, making it very firm. Sew handles firmly to stiffened tops. Make a length of crochet chain with a small tassel at each end to thread through open sides at each side of handle. Adaptations
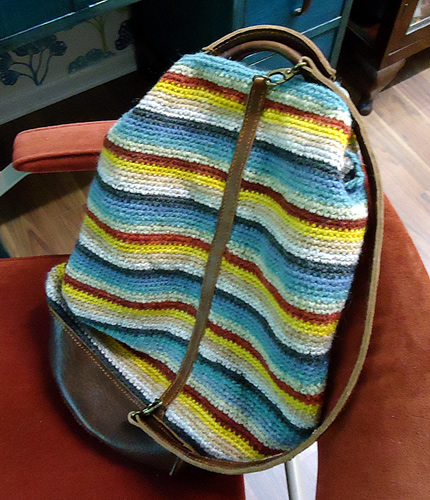
I was sufficiently smitten with this that I actually made one up for myself, with some adaptations of my own. Firstly I did stick with the idea of using oddments I already had, but I used mostly chunky yarns so I did not have to work with the yarn doubled - which can be a bit of a nuisance when doing crochet, even though many old and new patterns seem to suggest it. As I selected my yarns based on colour, some of them were used double to achieve the thickness I wanted. I also changed the stitch - I used a 4mm hook with my chunky yarn, and worked in double crochet (American single crochet) throughout instead of treble crochet in order to achieve a firmer fabric; trebles provide a moderately open fabric, which, even with a lining, was not the effect I wanted. If you want to do that yourself, bear in mind that working with dc is not as quick; however, I find crochet in general works up very quickly (as well as thicker) when compared with knitting. [Editor's note: Worth noting here that although I settled on using chunky yarn, in my opinion, the original fingering (or 4 ply) yarn is about equivalent to an Aran or worsted weight yarn when used double; I say "in my opinion" as opinions do differ on this.] For the base, I used a rather thick leather (about 2mm) which was tough to work but made up surprisingly well. I bought it from leather4craft's selection of offcuts on eBay - but it did prove fairly expensive for all that. You could use a thin leather, or PVC, or recycled leather (which I found very easy to work with in the past) in which case you can treat it much like the felt although easing it may not be quite so easy.
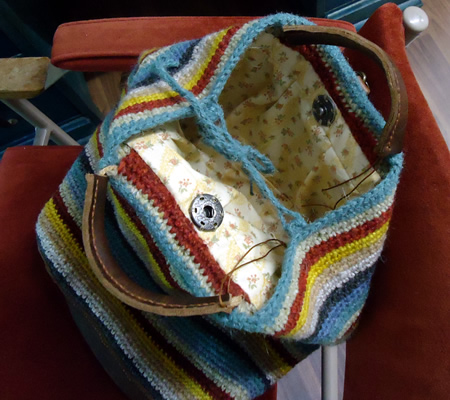

I made the base to be an oval shape to suit the offcut of leather I had. I just took a rectangle about 12 by 8½ inches and rounded the corners (using a dinner plate as a guide), then attached the border in that shape; about ½ inch was used all round for the overlapping seam which gave a circumference fairly close to the original 9 inch circular base. |
MaterialsOddments of wool, any shade or ply. A medium-sized crochet hook. Felt or leather
for the base. TensionDependent on the yarn and hook you use. Size mattersThe base of the bag is designed to be about 8½ inches. Crochet abbreviations:ch: chain Remember these are English crochet instructions where dc is equivalent to US single crochet - see "Terminology" in the side bar. A Word on the WoolI used some tough carpet wools in combination with any chunky yarns I could find in the right colours. I used a relatively smaller hook than usual for chunky in order to keep the fabric firm - and carpet-like. I have seen some crochet work for sale at Woolfest using Herdwick wool which I liked a lot. It was similarly firm, making self- supporting small boxes. [I was less keen to try that out myself as I felt it would be quite tough on the hands.] Disclaimer
|
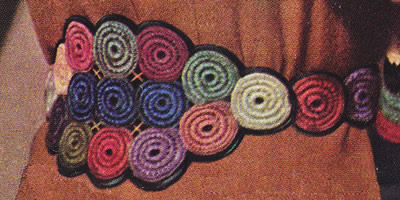
So by now I expect you are thinking "...but hey! - what about that extremely snazzy and attractive belt she is wearing? where can I buy that?".
Well - good news! it's not a purchased item at all - it's a one-of-a-kind hand-crafted item you can make yourself! Here's how:
Instructions. Again the materials are designed to be "make do and mend"
oddments of old pulled-back knitting wool in any ply and any shade, worked
with a medium-sized crochet hook. Each circle is made separately: Now make 6 chain and join into a circle closely. Break foundation and working wool and finish off neatly. [Editor's note: The intention here is to achieve a fairly solid roundel by working your stitches over a core of old yarn - as you might do in stumpwork embroidery or making a corded buttonhole. Obviously you can do as many rounds as you like to achieve the appropriate size.] Arrange the 15 circles for front of belt as shown in photograph, and stitch
to foundation material cut to shape. |
