Home

Weblog

Pattern of
the Month

On the Needles
(...and Off the Needles)

Knitalong

Stitchcraft

Vintage Patterns

About the
Idle Hands


Archive entry for May 2008

« April 2008 | Main | June 2008 »

May 2008

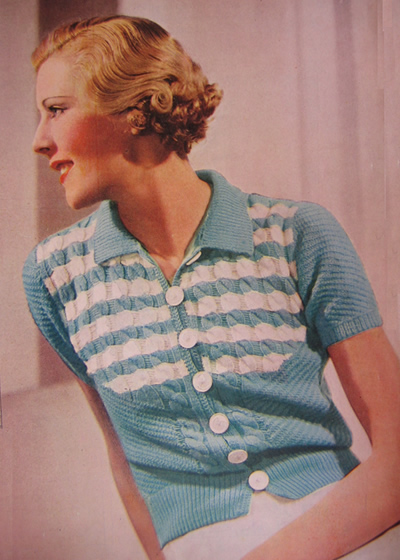
Pretty Summer Woolley

PrettyWoolley1.jpg PrettyWoolley2.jpg PrettyWoolley3.jpg

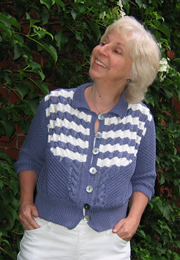
Summer jacket from 1935 has an unusual design that is quite fun to work. It was given only in one nominal size, but has some flexibility for your own alterations. I simply love the way this has turned out; the bamboo yarn is so soft and comfortable. On finishing, I immediately wore it all the next day.

Diagonal Rib Pattern

Sleeves and lower part of jumper are knitted in a k2, p2 rib, with the rib carried one stitch sideways on each row.

The following 4 rows form the pattern, worked over an odd number of stitches.

Row 1: (k2, p2) repeated to centre stitch; knit centre stitch; (p2, k2) repeated to end of row.
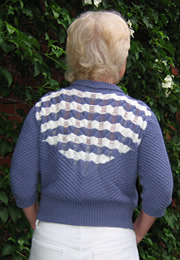
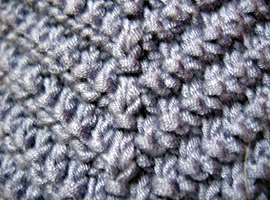
Row 2: p1, (k2, p2) repeated to centre 5 sts; k2, p1, purl centre stitch, p1, k2; (p2, k2) repeated to last st, p1.
Row 3: (p2, k2) repeated to centre stitch; purl centre stitch; (k2, p2) repeated to end of row.
Row 4: k1, (p2, k2) repeated to centre 7 sts; p2, k1, purl centre stitch, k1, p2; (k2, p2) repeated to last st, k1.

DiagonalRib.jpg

Cable Pattern

The yoke of the jumper is knitted in cable ribbing, where the stitch between the cables is subsequently dropped to form "ladders".
To work the 8-stitch cables twisting to the right, (cable "back" abbreviated to C4B), slip 4 sts on to a cable needle, and leave at back of work, k4, then k4 from cable needle.
To work the 8-stitch cables twisting to the left, (cable "front" abbreviated to C4F), slip 4 sts on to a cable needle, and leave at front of work, k4, then k4 from cable needle.

When the sts are dropped, pull them back to where you started the cables, above the diagonal rib, and secure the stitch by running a thread through and stitching on the inside.
[Editor's note: Be extra careful with the bamboo yarn; it is very slippery, the ladders run very easily, and the yarn splits, making it the devil to pick up a stitch dropped accidentally.]

Back

Using No. 12 needles and main colour (blue), cast on 104 stitches, and work 3 inches in k1, p1 rib, (approximately 25 rows), increasing one stitch at the end of the last row.
Change to No. 9 needles and purl one row. [105 sts]

Work the 4-row pattern 10 times, then the first two rows again, (42 rows).

[Editor's note: The origonal instructions were to work the 4-row pattern 14 times as it was intended for a thinner yarn. For my version, in the bamboo yarn, I worked 16 rows fewer up to the start of the cables, as well as 16 rows fewer in the armhole section (see notes below) which brought the welt up to sit on my hips as shown in the photo.]

Row 43: (p2, k2) repeated to centre stitch; knit centre stitch; (k2, p2) repeated to end of row. (ie pattern row 3 with 5 sts knitted in the middle).
Row 44: k1, (p2, k2) repeated to centre 7 sts; p7 centre sts; (k2, p2) repeated to last st, k1. (ie pattern row 4 with 5 sts knitted in the middle).
Row 45: (k2, p2) repeated to centre 9 sts; k9 centre sts; (p2, k2) repeated to end of row.
Row 46: p1, k2, (p2, k2) repeated to centre 11 sts; p11 centre sts; (k2, p2) repeated to last 3 sts, k2, p1.
Row 47: p2, (k2, p2) repeated to centre 13 sts; k13 centre sts; (p2, k2) repeated to last 2 sts, k2.
Row 48: k1, (p2, k2) repeated to centre 15 sts; p15 centre sts; (k2, p2) repeated to last st, k1.
Row 49: (k2, p2) repeated to centre 17 sts; k17 centre sts; (p2, k2) repeated to end of row.
Row 50: p1, k2, (p2, k2) repeated to centre 19 sts; p19 centre sts; (k2, p2) repeated to last 3 sts, k2, p1.
Row 51: p2, (k2, p2) repeated to centre 21 sts; k21 centre sts; (p2, k2) repeated to last 2 sts, k2.
Row 52: k1, (p2, k2) repeated to centre 23 sts; p23 centre sts; (k2, p2) repeated to last st, k1.
Row 53: (k2, p2) repeated to centre 25 sts; k25 centre sts; (p2, k2) repeated to end of row.
Row 54: p1, k2, (p2, k2) repeated to centre 27 sts; p27 centre sts; (k2, p2) repeated to last 3 sts, k2, p1.

Now start the striped pattern:

Row 55: K38 sts in pattern as set in blue; join on white: k6, cable C4B, k1, cable C4F, k6; join on another ball of blue and finish row in pattern.
Row 56: Pattern 37 sts blue; purl 31 white; pattern k37 sts blue.
Row 57: Pattern 36 sts blue; knit 33 white; pattern 36 sts blue.

Continue as on last 2 rows. increasing number of white stitches for 5 more rows (i.e.. finally 31 blue; 43 white; 31 blue).

Row 63: Work in blue right across row: 30 sts in pattern; k5, (C4B, k1) twice, (C4F, k1) twice, k4; 30 sts in pattern.
Row 64: Pattern 29 sts; p47; pattern 29 sts.

Continue thus for 6 more rows in blue, still taking 2 more into stocking stitch in each row (23 pattern sts on each side).

Row 71: Pattern 22 sts blue; join on white: k4, (C4B, k1) 3 times, (C4F, k1) 3 times, k3; join on blue pattern 22 sts.
Row 72: Pattern 21 sts blue; purl 33 white; pattern 21 sts blue.

Continue thus for 6 more rows.

Row 79: Work in blue right across row: 14 sts in pattern; k3, (C4B, k1) 4 times, (C4F, k1) 4 times, k2; 14 sts in pattern.
Row 80: Pattern 13 sts; p79; pattern 13 sts.

Shape armhole:
Rows 81 & 82: Still taking one stitch more at each side of centre piece, cast off 3 sts at beginning of next 2 rows.
Rows 83: k2tog at beginning and end of row.
Row 84-86: Work 3 rows in pattern without decreasing.
**
Row 87: Change to white: k4, (C4B, k1) 5 times, (C4F, k1) 5 times, k3.
Continue in stocking stitch for 7 rows.

Repeat from ** with alternate colours 4 times, then repeat row 87 row in blue.
[Editor's note: The original pattern on thinner yarn repeated the pattern 6 times here. I worked a shorter arm hole here which worked out for my own measurements - see section on sizing. You can work the armhole to a suitable length according to your size and your yarn; however, if you do make alterations, remember to work the same length on the fronts, and prepare to do some compensation on the sleeve decreasing.]

Work 3 rows in stocking stitch.

Row 131: Cast off 2, drop 1 st, leave big loop (to cover dropped st), and cast off 1 more; knit to end.
Row 132: Cast off 2 purlwise, drop 1 st, leave big loop (to cover dropped st), and cast off 1 more; purl to end.
Row 133: Cast off 7, drop 1 st, cast off 1 more very loosely as before; knit to end.
Row 134: As 149th row but purl.
Now cast off remaining sts, dropping stitches between cables.
[Editor's note: You may want to catch the all the dropped sts with safety pins at this point in the construction, until you are ready to sew up and secure the sts in the right place.]

Ladders.jpg

Right Front

Using No. 12 needles and main colour (blue), cast on 66 stitches, and work 3 inches in k1, p1 rib, (approximately 30 rows), increasing one stitch at the end of the last row. [67 sts].
Change to No. 9 needles and purl one row.

Row 1: k15; (p2, k2) repeated to end of row.
Row 2: p1; (k2, p2) repeated to last 14 sts; k1, p13..
Row 3: k. 13, p2; (k2, p2) repeated to end of row.
Row 4: k1; (p2, k2) repeated to last 14 sts; p14.
Row 5: k4; cable C4F; k3; (p2, k2) repeated to end of row.
Row 6: p1; (k2, p2) repeated to last 14 sts; k1, p13.
Row 7: k. 13, p2; (k2, p2) repeated to end of row.
Row 8: k1; (p2, k2) repeated to last 14 sts; p14.

Repeat these 8 rows 4 times.
[Editor's note: The original pattern on thinner yarn repeated the pattern 6 times here. I worked a shorter length here to match the back]

Row 41: k15; (p2, k2) repeated to end of row.
Row 42: As 2nd but purl last 16 stitches.
Row 43: k17; p2, (k2, p2) repeated to end of row.
Row 44: As 4th but purl last 18 stitches.
Row 45: k4; cable C4F; k7; (p2, k2) repeated to end of row.
Row 46: As 2nd but purl last 20 stitches.
Row 47: k. 21; p2; (k2, p2) repeated to end of row.
Row 48: As 4th but purl last 22 stitches.
Row 49: k.23; (p2, k2) repeated to end of row.
Row 50: As 2nd but purl last 24 stitches.
Row 51: k25; p2; (k2, p2) repeated to end of row.
Row 52: As 4th but purl last 26 stitches.
Row 53: Join in white: k4; cable C4F; k1; cable C4F; k6. Join in blue: (p2, k2) repeated to end of row.
Row 54: As 2nd. ending k. 2. Purl last 28 stitches in white.
Continue for 6 rows in pattern, working 1 more stitch in white on each row.

Row 61: All blue. K4, (C4F, k1) twice, C4F, k5; (p2, k2) repeated to end of row.
Continue for 7 more rows as before, working 1 more stitch into stocking-stitch border in front on each row.

Row 69: Join in white: k4; (C4F, k1) 4 times, k3. Join in blue: (p2, k2) repeated to end of row.
Continue for 7 more rows as before.

Row 77: All blue. K4, (C4F, k1) 5 times, k2; (p2, k2) repeated to end of row.
Continue as before for 4 more rows.

Shape armhole:
Row 82: Cast off 5, k1, p2. k2, purl to end.
Row 83: Knit to within 5 from end, p2, k1, k2tog.
Row 84: K2tog, k1, purl to end.

Row 85: Join on white: k4; (C4F, k1) 5 times; k9, k2tog.
Row 86: P2 tog, purl to end. [58 sts]
Row 87: Knit to last 2 stitches, k2tog. [57 sts]
Row 88: P2 tog, purl to end. [56 sts]
Repeat the last 2 rows twice more.
Row 93: All blue. K4; (C4F, k1) 5 times; k3. [52 sts]
Work 7 rows stocking stitch.

Work 2 more cable stripes alternately in white and blue, working only 3 rows in stocking stitch after the cable row on the second blue stripe.
[Editor's note: The original pattern on thinner yarn repeated the stripes 4 times here, working 3 rows on the 4th stripe. I worked a shorter armhole here to compensate for the heavier yarn weight as on the back - see sections on wool and sizing.]

Row 113: Cast off 2, break wool and pull through last stitch; drop 1. Join on again.
[Editor's note: You have effectively cast off 3 and dropped one stitch - so you are 4 sts fewer on the needle].
Continue pattern. decreasing 1 stitch every row at neck-edge, not forgetting to drop stitches between cable, until 33 stitches are left.
[Editor's note: You don't count the dropped sts as decreases]
Work 3 straight rows (i.e. you have done 4 rows of the 2nd blue cable after armhole decreasings).
[Editor's note: With the original pattern on thinner yarn you would have worked the 4th blue cable after the armhole decreasings]
Cast off shoulder to match back:
Row 129: Work 1 row straight to the armhole edge.
Row 130: Cast off 2 purlwise, drop 1 st, leave big loop (to cover dropped st), and cast off 1 more; purl to end.
Row 131: Knit
Row 132: Cast off 7 purlwise, drop 1 st, cast off 1 more very loosely as before; purl to end.
Row 133: Cast off remaining sts, dropping stitches between cables.

Left Front

Cast on and work in ribbing as for right front; change to No. 9 needles and purl one row on 67 sts.

Row 1: k2; (p2, k2) repeated to last 13 sts, k13.
Row 2: p13, k1; (p2, k2) repeat to last st, p1.
Row 3: p2; (k2, p2) repeated to last 13 sts, k13.
Row 4: p13, p1; (k2, p2) repeated to last st, k1.
Row 5: k2; (p2, k2) repeated to last 13 sts, k1, cable C4B, k4.
Row 6: p13, k1; (p2, k2) repeat to last st, p1.
Row 7: p2; (k2, p2) repeated to last 13 sts, k13.
Row 8: p13, p1; (k2, p2) repeated to last st, k1.

Continue with these rows in pattern as set, reversing the shapings and making the two fronts correspond.

Sleeves (work 2 alike).

Cast on 62 stitches on No.12 needles.
Rib 10 rows, k1, p1, increasing once at end of last row.
Purl 1row on No.9 needles.[63 sts]
Work in pattern for 4 rows.

Next row: Increase once at each end of needle.
Work 7 rows pattern.
Keep continuity of pattern and repeat last 8 rows 7 times.
Next row: Increase once at each end of needle.
Work 2 more rows. [81 sts]

Cast off 3 sts at the beginning of the next 2 rows.
Decrease at each end of every row for 5 rows, then on every alternate row until 31 sts remain.
Decrease at each end of every row until 15 sts remain; cast off remaining 15 sts.

[Editor's note: The instructions above are as I worked the sleeve but are completely different fom the original. Below are the original instructions in case you are working in the fine fingering weight wool.]

Here are the original instructions for the 3 ply weight yarn:
Cast on 80 stitches on No.12 needles.
Rib 10 rows, k1, p1, increasing once at end of last row.
Purl 1 row on No. 9 needles.

Work 7 rows in pattern.
Next row: Increase once at each end of needle.
Keep continuity of pattern and repeat last 8 rows 4 times.
Work 4 more rows.
Decrease once at each end of every row until 21 stitches remain.
Cast off.

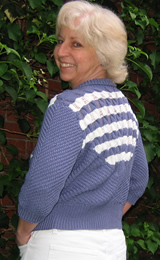
[My sleeve length is to the elbow. The original sleeve was made much shorter and a different shape.]

Collar

On No. 12 needles, pick up 104 stitches round neck: 33 sts from each front and side neck, and 38 sts across the
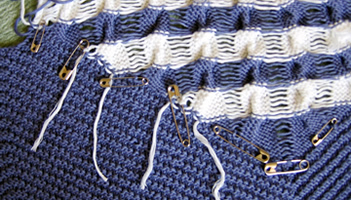
 back.
Work in k1, p1, ribbing for 10 rows, change to No. 9 needles and rib 10 more rows, (approximaterly 2½ inches).
Cast off loosely in rib, using a larger sized needle if necessary, (for example No. 8).
[Editor's note: Original instructions picked up 170 sts for the collar (50 each side, 70 across back).]

Making Up

Drop stitches between cables. Catch these stitches (and sew in) on the wrong side to prevent running into the diagonally ribbed pattern.
Press with damp cloth and hot iron.
Match cables at shoulder seams and darn ends across holes formed.
Join side seams and sew in sleeves.
Work 4 rows of double crochet down left front (work rather tightly and then stretch under iron, to prevent sagging in wear).
[Editor's note: I picked up two thirds of the row ends across the welt (approximately 20dc) and every alternate row end up the rest of the front (approximately 57dc) . I worked the crochet very loosely up the main body of the band, and more tightly when working the part across the side of the welt.
You have some flexibility here to increase the bust size slightly by working additional rows.]

Sew on 7 white buttons down front.
Work 3 rows of double crochet down right front, then a 4th row with loops of 8 chain opposite buttons.
[Editor's note: My loops were 8 chain positioned on the 11th dc with 10 dc between them. To work the loops: (1dc into next dc; chain 8; 1 slip st into same dc; 10 dc into next 10 dc) repeat. However it's a good idea to sew on the buttons evenly first, and work the loops to match the positions.]

Materials

Original pattern calls for 6oz of main and 1oz white in "3 ply".
Example shown is knitted in 12 x 50g balls Rowan Bamboo Soft in main shade (colour: Cambria 109) and 2 x 50g balls in white.

One pair each of numbers 12 (2¾mm) and 9 (3¾mm) needles. One cable needle. One No 9 (3½mm) crochet hook.

Seven buttons, approximately 1 inch. The original shows rather larger buttons as part of the styling.

Tension

Original states 32st to an inch over diagonal rib on No 9 needles.

Size matters

No size given originally - knitted example measured 36-38 inches. My version is knitted with fewer rows than stated in the original pattern (my deviations noted in red); this is - as intended - to keep the cardigan waist length like the original, but with longer sleeves. The result is a good fit for me (a chubby UK size 12), shaped to be fitted around the bust, under the arms, and into the waist, but with a good degree of ease.

See the section on sizing.

A word on the wool.

Rowan Bamboo Soft, is a light weight DK which knits to a tension of 25sts and 30 rows to 4 inches; 102m/112yds to 50g.
This is a dense yarn, and thicker than the vintage yarn, so requires a lot more yarn than specified in the original pattern.

Disclaimer
(well...almost)

In transposing any pattern it is always a risk that errors will be introduced, in spite of dedicated proof reading.
If you have any problems with this pattern, please and I will try and assist.


Sizing and yarn choices

The original pattern seems to be intended as a neat fitting jacket in a fine yarn, knitted on larger needles.

I calculated the chest size (one size only given) as working out to only 28 inches, which even for the era seemed a bit small, so I felt confident in moving to a thicker yarn, based on the needle size. What I had failed to take into account, is that when you drop the stitches between the cable, the chest size expands a lot. Purely guessing I would say the original size using fine yarn was intended for a 33 to 35 inch bust.

The design of the cables and ladders, means that the cardigan is in fact self-shaping. In my version, the measurement for the back just above the welt is about 16 inches, and this increases to about 18 inches by the time you get to armholes. This gives you a nominal 36-38 inch bust size as the fronts are slightly larger and you can choose, within limits, to have fewer or more rows of crochet to form the front closure bands.

To increase the length of the cardigan, you can follow the areas marked in red where I have altered the rows. Preferably stick with adding or subtracting in chunks of 8 for simplicity.

To make tweaks to the bust size you can add in crochet rows at the front. To make a significant alteration is slightly more difficult; in order to keep the symmetry of the cables you really need to add in two cables on the back and one each on the front, which would make a difference of 36 sts, and in the yarn I used this would be about 5½ inches.
But please note: This cardigan fits me well, and still looks as shown in the pictures; however the bamboo yarn has eased considerably with wear - I now think I could easily have removed an even 4 cable patterns (5½ inches) and still have a nicely fitting cardigan.

Finally, you can of course make overall size changes by using substitute yarns of other weights. This design is pretty tolerant of such changes, as I discovered, but you risk ending up with a different look - anything from the tiny figure-hugging waist length jacket of the original to a longer altogether looser cardigan style. If you are up to it, you can of course check your tension and work it all out beforehand, but remember the effect of the ladders is to much increase the finished size above that implied by the tension.

Here is a popup of the original picture for comparison with my version:


© Christina Coutts 2007

Helpful Stuff

Pattern Archive

Categories

Yarn Links

Fabric etc

Stuff to do

  • Little rabbits
  • V&A 1940s Patterns
  • Monkey Socks
  • Necktie Bag
  • Posh Gloves
  • Criss-cross coasters