Home

Weblog

Pattern of
the Month

On the Needles
(...and Off the Needles)

Knitalong

Stitchcraft

Vintage Patterns

About the
Idle Hands


Archive entry for September 2009

« August 2009 | Main | October 2009 »

September 2009

Macmillan Comfort Blanket

Blanket2.jpg

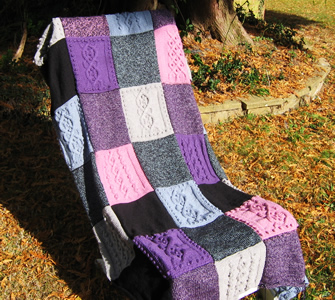
The Knitter magazine, supported by Rowan, have set up the Macmillan Comfort Blanket campaign. The idea is to knit blanket squares with your knitting group, and sew them all together at the fund-raising World's Biggest Coffee Morning* on September 25th. You can hand in your completed blankets either at a drop off point or at The Alexandra Palace show in October. Details all provided in the link.

*The coffee mornings are fund-raising events; you can register to hold one or join one. Again - details all provided in the link.

Blankets that are donated to Macmillan will be used to support and raise awareness of the charity's campaign to freeze out fuel poverty for cancer patients. I am an enthusiastic supporter of Macmillan and other cancer charities involved with care of cancer sufferers (like Maggie's). Cancer is (mainly) a disease of the old, and the unpalatable truth is that the longer we live, the more likely we all are to be affected. It is a great comfort to know that such professional and caring organisations exist to help us when we need them.

At the Macmillan website you can see that Rowan have gained the support of top international designers to create a square pattern for the campaign.
That is:- "top international designers" - and - the idle hands ....!
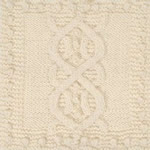
Abbreviations

MB: make bobble by knitting into the front, back, front, back, front and back of next stitch, then pass 2nd, 3rd, 4th, 5th and 6th sts
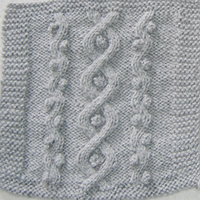
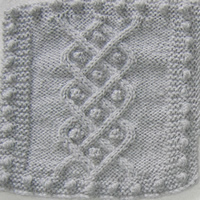
 over 1st stitch.
[Editor's note: I know - this sounds impossible - but it is achievable. This is how the bobbles are created in the original "Debbie Bliss Square"]

m1: make a stitch by picking up the loop between the sts and knitting into the back of it.

C4B: "cable 4 back"; slip the next 2sts onto a cable needle and leave at the back of the work, k2, then k2 from cable needle.

C4F: "cable 4 front"; slip the next 2sts onto a cable needle and leave at the front of the work, k2, then k2 from cable needle.

C6B: "cable 6 back"; slip the next 3sts onto a cable needle and leave at the back of the work, k3, then k3 from cable needle.

T3B: "transpose 3 back"; slip the next (purl) st onto a cable needle and leave at the back of the work, k2, then p1 from cable needle.

T3F: "transpose 3 front"; slip the next 2 (knit) sts onto a cable needle and leave at the front of the work, p1, then k2 from cable needle.

T4B: "transpose 4 back"; slip the next 2 (purl) sts onto a cable needle and leave at the back of the work, k2, then p2 from cable needle.

T4F: "transpose 4 front"; slip the next 2 (knit) sts onto a cable needle and leave at the front of the work, p2, then k2 from cable needle.

T5B: "transpose 5 back"; slip the next 2 (purl) sts onto a cable needle and leave at the back of the work, k3, then p2 from cable needle.

T5F: "transpose 5 front"; slip the next 3 (knit) sts onto a cable needle and leave at the front of the work, p2, then k3 from cable needle.

k2tog = decrease a stitch by knitting 2 sts together.

Chain and Vines Square

This square begins and ends with a simple garter stitch border.
The following are the pattern rows used in this square:

Row 1 (right side): K6, p7, T3B, p7, C6B, p7, T3F, p7, k6.
Row 2 (wrong side): K13, p2, k8, p6, k8, p2, k13.
Row 3: K6, p6, T3B, p6, T5B, T5F, p6, T3F, p6, k6.
Row 4: K12, p2, k7, p3, k4, p3, k7, p2, k12.
Row 5: K6, p5, T3B, p5, T5B, p4, T5F, p5, T3F, p5, k6.
Row 6: K11, p2, k1, MB, k4, p3, k8, p3, k4, MB, k1, p2, k11.
Row 7: K6, p5, T3F, p5, k3, p4; pick up loop lying between st just worked and next st and MB; p1, then pass bobble st over the p st just worked, p3; k3, p5, T3B, p5, k6.
Row 8: K12, p2, k5, p3, k8, p3, k5, p2, k12.
Row 9: K6, p6, T3F, p4, T5F, p4, T5B, p4, T3B, p6, k6.
Row 10: K13, p2, k6, p3, k4, p3, k6, p2, k13.
Row 11: K6, p7, T3F, p5, T5F, T5B, p5, T3B, p7, k6.
Row 12: K12, MB, k1, p2, k7, p6, k7, p2, k1, MB, k12.

Chain and Vines Square instructions:

Cast on 45 sts and knit 4 rows garter stitch (knit every row).
Next Row (increase row): K8; ( m1, k5) 7 times; k2. [52 sts]

Next Row (wrong side): work 10th row of the pattern.
Next Row: work 11th row of the pattern.
Next Row: work 12th row of the pattern.

Now work rows 1-12 four times, then rows 1 and 2 again.

Next Row (decrease row): K7; ( k2tog, k4) 7 times; k3. [47 sts]
Knit 4 more rows in garter stitch.

Cast off knitwise from the wrong side of the work.

Lattice Square:

This square begins and ends with a garter stitch bobble border, in the same design as the original Debbie Bliss Square.
The following are the pattern rows used in this square:

Row 1 (right side): K3, MB, k3; p7, k2, p8, C4B, p8, k2, p7; k3, MB, k3.
Row 2 (wrong side): K14, p2, k8, p4, k8, p2, k14.
Row 3: K7, p7, T4F, p4, T4B, T4F, p4, T4B, p7, k7.
Row 4: K16; (p2, k4) 3 times; p2, k16.
Row 5: K7, p9, T4F, T4B, p4, T4F, T4B, p9, k7.
Row 6: K18, p4, k8, p4, k18.
Row 7: K3, MB, k3; p11, C4B, p4; pick up loop lying between st just worked and next st and MB; p1, then pass bobble st over the p st just worked, p3; C4F, p11; k3, MB, k3.
Row 8: As row 6.
Row 9: K7, p9, T4B, T4F, p4, T4B, T4F, p9, k7.
Row 10: As row 4.
Row 11: K7, p7, T4B, p4, T4F, T4B, p4, T4F, p7, k7.
Row 12: As row 2.
Row 13: K7, p7, k2, p4; pick up loop lying between st just worked and next st and MB; p1, then pass bobble st over the p st just worked, p3; C4B, p4; pick up loop lying between st just worked and next st and MB; p1, then pass bobble st over the p st just worked, p3; k2, p7,k7.
Row 14: K14, p2, k8, p4, k8, p2, k14.

Lattice Square instructions:

Cast on 47 sts and knit 4 rows garter stitch (knit every row).
Next Row (right side): K3; (MB, k4) 8 times; MB, k3.
Knit 3 more rows in garter stitch.
Next Row (increase row): K11; ( m1, k6) 4 times; m1, k12. [52 sts]

Next Row (wrong side): work 2nd row of the pattern.

Now work the pattern rows as follows:

Rows 1-14: Work rows 1 to 14 inclusive.
Rows 15-38: Work rows 3 to 14 inclusive, twice.
Rows 39-48: Work rows 3 to 12 inclusive.
Rows 49: Work row 1.

Next Row (decrease row): K11; ( k2tog, k5) 4 times; k2tog, k11. [47 sts]
Knit 4 more rows in garter stitch.
Next Row (right side): K3; (MB, k4) 8 times; MB, k3.
Knit 2 more rows in garter stitch.

Cast off knitwise from the wrong side of the work.

Making up

Sew the squares together in 5 rows of 8 squares each, so the blanket measures approximately 40 inches by 64 inches.
Sew in all ends.
Work a crochet or knitted border around the whole thing - if you feel up to it after all that knitting!

Materials

One ball of double knitting yarn at about 100m or 108 yards in length makes about 2 squares.

Rowan are supporting this initiative but you are not compelled to use their wools - you are encouraged to use wool from your stash.

Size matters

8 inch squares making up a 40x64 inch blanket.

Tension

General DK tension: 22 stitches and 30 rows to 4 inches over stocking stitch. or gauge to make the 8 inch square.

These bobble squares: 23 sts to 4 inches using 3¾mm needles.

A Word
on the Wool.

Unfortunately my "stash" is not overflowing with left-over double knitting wools of the right type to use for this project.

In the end I used some Phildar yarns that I had intended for another long-abandoned project. These yarns are robust and high quality - about 25% wool and superwash. Therefore - both warm and practical.

The yarn used for the bobble squares is Oxygene which is apparently "anti-bacterial" (!) - 25% wool, 35% chlorofibre, 40% acrylic - and knits to a tension of 23stsand 30 rows to 4 inches on 3½mm needles.

Disclaimer
(well...almost)

In transposing any pattern there is always a risk that errors will be introduced, in spite of dedicated proof reading.
If you have any problems with this pattern, please and I will try and assist.


Pattern inspirations for the squares

Blanket1.jpg

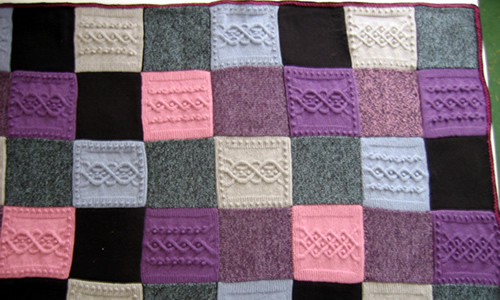
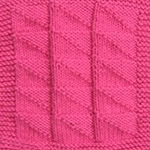
I used my squares in combination with the "Debbie Bliss Square" shown below.


My designs above are inspired by her other bobble pattern designs, which I have adapted to make a double knitting wool weight 8 inch patch for this blanket.
Every alternate square in my blanket is knitted plain. Above is (a section of) the completed blanket. I did a rather pleasing edging adapted from a stitch used as part of a sweater pattern.


Note that my "flag dishcloth" square (POM February 2007) could also be adapted to make an 8 inch square. Use a DK wool that knits to 22 or 23 sts to 4 inches. Use 3½mm needles and cast on 45 sts instead of 49, knitting a 3st garter stitch border instead of 5. Repeat the 10 row pattern 5 times in all, and knit a 6-8 row border to start and finish your square, making up the 8 inches in length.
You could knit other guernsey patterns for as a theme for different squares - like a sampler. But - remember to check your tension. Your squares need to be about 45 sts by 62 rows in st st.


Rather Pleasing Edging

The method for the basic stitch pattern is as follows, assuming using a combination of DK and extra-thick chunky type wool, and working back and forth across the rows on two needles:

Row 1 (right side): Using DK and suitable needles (eg 4mm), knit.
Row 2 (wrong side): Using DK, purl.
Row 3 (right side): Using chunky contrast, change to large needles, (eg 7mm or more), slip1, knit one to end of row (you are knitting alternate stitches - you need to ease the stitches in order to slip them).
Row 4 (wrong side): Using chunky contrast, knit the sts you knitted on the previous row, and slip the sts you slipped.
Row 5 (right side): Change back to DK and smaller needles and knit every st across row.
Row 6 (wrong side): Using DK, purl.

When edging the blanket, I picked up sts around the whole blanket, and I worked from the right side for all rows, so on row 4, I purled the chunky sts, and all all other rows were knitted. To achieve this with such a large number of sts round the whole blanket, I started every row with a new ball of yarn, and worked in sections, completing all rows and casting off for a section before picking up the next set of sts. I did not break the multiple yarn strands between sections.


Cabling without a Needle

It was while I was making the Estonian socks from the Interweave Knits Sock book that I first became aware that this was a bona fide knitting technique. Before that, I always thought it was just some dexterous manipulation that I was forced into when knitting on the train and found that I had forgotten to take my cable needle with me. Now it seems to be the technique of the moment, with a Beyond the Basics lesson on it in the 2009 autumn issue of Interweave Knits, plus a full explanation in Knitting Daily.

It works like this:- for example, when cabling over 4 stitches as in C4B above, work to just before the stitches to be cabled. With the yarn at the back of the work, slip all four stitches purlwise to the right-hand needle. Bring the left-hand needle to the back of the work and insert it into the backs the two sts further from the left hand needle.

Between the left thumb and forefinger, pinch the base of the four stitches firmly. Pull the right-hand needle completely free of all four stitches; half will be on the left-hand needle; half will be free for a moment. Maintaining the front/back positions as established, quickly reinsert the right-hand needle into the free stitches at the front of the work. Make sure all the stitches are seated correctly on the needle; if they are held firmly, the stitches won't have twisted or moved at all during the time that they were dropped.

Finally slip the two stitches on the right-hand needle back to the left-hand needle. The stitches are now crossed over. Knit all four sts as usual to complete the C4B.

This works well for cabling with smaller numbers of stitches (less than 6) and proved to be very useful for me while knitting these squares.

© Christina Coutts 2007

Helpful Stuff

Pattern Archive

Categories

Yarn Links

Fabric etc

Stuff to do

  • Little rabbits
  • V&A 1940s Patterns
  • Monkey Socks
  • Necktie Bag
  • Posh Gloves
  • Criss-cross coasters