Skating Set
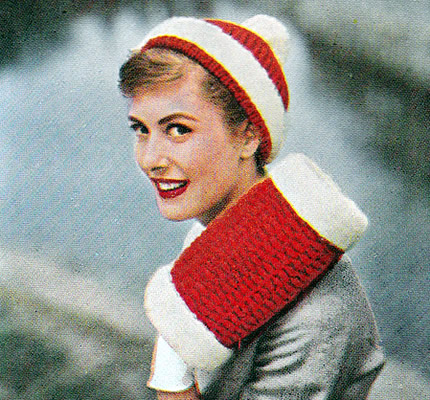
Charming offering from the mid-fifties - the era of the "set".
I'm not sure how much of a commonplace activity skating was or is. I guess the climate in the south of the UK and the constant dangers warned of in skating on lakes and ponds meant that in my youth at least it was not a general pursuit outside of ice rinks. I was very keen on roller skating - another 1950s and 60s popular sport - I even owned my own roller skates etc; however the only times I ever tried skating on ice, was at a rink with hired skates.
In the celluloid world, however, any wintry film would not have been complete without its skating scene, and this would have made the perfect accessory. Luckily you could also consider using it without the skating - though it does rather draw to mind US costume dramas.
InstructionsNote: Muff and all white borders are worked using yarn doubled. MuffPocket lining: Main Part: 1st row (right side facing): k1,
* k1tbl, p1; repeat from *
to last 2 stitches, k1tbl, k1. These 8 rows form the pattern. Next row: Pattern 9, cast off 31,
pattern to end. Continue straight in pattern until work measures 14 inches from start.
Borders: Making upPress work lightly on wrong side under a damp cloth. Join short sides of muff; insert pocket, joining top to 31 cast-off stitches,
then catch down pocket neatly all round. Turn muff inside out. Wrap 2 layers of wadding round muff and join ends.
Join short sides of lining material. Slip lining over wadding and hem
neatly to main work just inside ends of muff. I seem to remember from my youth that muffs generally had a string attached to hang them round your neck so that you could have both hands free if necessary. I'm not sure if this was just because I was a child and was the equivalent to having your gloves on a string (threaded through your coat sleeves!), but it certainly would make it more practical if you planned to use it for more than skating expeditions.] CapUsing single strand of red wool, cast on 108 stitches and work 4½ inches in k1/p1 rib. Change to twisted rib and shape crown as follows: 1st row: *
p1, k1 through back of loop; repeat from *
to end. Continue in twisted rib decreasing 6 stitches in the same way on every
Next row: purl. Break wool, draw through remaining stitches and fasten off. Border: Making upPress lightly on wrong side under a damp cloth. |
MaterialsDouble knitting yarn: 8 oz in Scarlet and 4 oz in white. One pair of No 7 (4½mm) needles. 6-inch zip fastener. White fabric to line muff, and 2 pieces of wadding for padding. TensionCap: 24 sts to 4 inches (10cm) over twisted rib pattern using
single strand of yarn. Size mattersCap to fit "an average head". Abbreviationsk2tog or p2tog: work 2 sts together to decrease. k1tbl/p1tbl: knit/purl 1 stitch through back loop. k2togtbl/p2togtbl: knit/purl 2 stitches together through back loops. stocking stitch: one row knit and one row purl, ("stockinette"). Disclaimer
|
