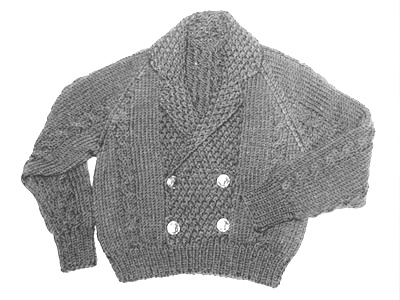
Home

Weblog

Pattern of
the Month

On the Needles
(...and Off the Needles)

Knitalong

Stitchcraft

Vintage Patterns

About the
Idle Hands


Archive entry for 2010

« 2009 | Main | 2011 »

December 2010

Winter Wonder Hat

WinterWonderHat6.jpg

This is a very flattering hat - speaking as one who has difficulty with hats, which always leads to sartorial dilemmas in weather such as we have in the UK at the moment. However, not only flattering and warm, but amazingly speedy to knit, which can be very useful at this time of year. I completed it in one afternoon.

Instructions.

The main part of the hat is a simple six-row pattern where you increase at the beginning and decrease at the end of every alternate row to create the diagonal effect. At the same time you alternate 3-row bands of stocking stitch and reverse sticking stitch.

Side

Cast on 20sts.
[Editor's note: I cast on in waste wool, and when I had completed the 12 patterns (see below) I grafted the sts together instead of seaming.]

1st row: Knit
2nd row: P2tog, purl to the last stitch, purl twice in the last stitch.
3rd row: Knit
4th row: K2tog, knit to the last stitch, knit twice in the last stitch.
5th row: Purl
6th row: K2tog, knit to the last stitch, knit twice in the last stitch.

These 6 rows form the pattern.
Continue until 12 complete patterns have been worked from the start. Cast off.
[Editor's note: I did not cast off but grafted the sts to the cast on row by removing the waste wool and unpicking my first knit row, using this yarn tail to graft. This makes a perfect join.]

Brim

With right side facing, pick up and knit 72sts along one edge of the side piece - that is 3 sts to each knit and purl stripe.
[Editor's note: As I had already seamed the side piece into a tube shape, I used a circular needle to pick up the 72sts and knit the brim.]

Work 10 rows in k1/p1 rib, and then cast off in rib.

Join side piece and brim neatly with a flat seam.
[Editor's note: If you have not already grafted the side together.....]

Press seam lightly.

Crown

Cast on 14sts, and work in stocking stitch, starting with a purl row (this is right side of work), and increasing at each end of the first and every alternate row until there are 28 sts.

Knit one row.

Then continue, decreasing at each end of next and every following alternate row until 14sts remain.

Cast off.

To Make Up

Pin crown in position to side of hat on wrong side, so that purl side of crown is on the outside. Back stitch in position very neatly on wrong side with a tailored seam
Press seam lightly on the right side using a damp cloth.

Fold ribbed brim in half to wrong side and slip stitch in position round lower edge.

Place on head.
Admire.

Wrap in Christmas paper. Put under tree.

Materials

Original materials called for: 2 (2 oz) hanks Patons Big Ben Knitting in white.
Sample shown uses some handspun yarn.

A pair of No 2 (7mm) needles.

Tension

12 sts to 4 inches.

Size matters

To fit an average sized head.

Abbreviations

Increase: increase by knitting into front and back of the next stitch.
k2tog: (decrease) knit 2 sts together.
p2tog: (decrease) purl 2 sts together.

A word on the wool.

Big Ben was quite a novelty bulky wool in its time. There were no substitutes short of knitting several strands of thinner yarn together to make the right tension (as I did with my handspun).
These days we have a number of bulky wools to try; the hat is fairly forgiving as the knit and purl stripes are stretchy like ribbing.

Disclaimer
(well...almost)

In transposing any pattern it is always a risk that errors will be introduced, in spite of dedicated proof reading.
If you have any problems with this pattern, please and I will try and assist.

WinterWonderHat5.jpg

Handspun Yarn

I bought some Spelsau fleece at Woolfest in 2009; there was a workshop on knitting direct from the fleece but I intended to spin my sample. I made a 2 ply yarn which was softer than I had expected, but kempy (as I had not attempted to remove the coarser fibres). There was only a small amount - I did not measure the yardage, but I started with 100g, the yarn was chunky weight, and I knitted 2 strands of yarn together by combining it with an aran-weight handspun merino/silk blend to achive the bulky weight required. As you can see, the fleece was a lovely combination of natural grey tones.
The 100g sample was sufficient to knit the side and brim of the hat, but not the crown - I spun some of the coarser fibre from my Leicester Longwool fleece and combined that with the merino/silk as before to get the right yarn weight and drape, (quite a firm knitted fabric).

The description of the Spelsau fleece is as follows (taken from the reference above):

The Spaelsau is a direct ancestor to the Old Norwegian Sheep.They were tough sheep supplying their masters with meat, milk, wool, skin - even the sails that carried the ships over the oceans were made of their wool. Today, a thousand years later, the wool of the Spaelsau still consists of a rough cover to protect against the wind and the rain, and under this a much softer layer close to the skin as protection against the cold.
The rocky Norwegian west coast is Spaelsau country. On a few isolated isles among the skerries off the coast you still find Old Norwegian Sheep living wild.

November 2010

Outfit for a saucy sailor

SailorDoll.jpg

A cute little 1940's outfit for sailor doll. Sized to fit a 16 inch doll and shown on a felt doll, (Lenci I think), with the characteristically modest expression. Quite delightful.

Instructions.

Patterns for the outfit as shown, plus the option of a skirt instead of trousers if preferred.

Beret:

With blue wool and crochet hook, make 4 ch, and join into ring with slip-stitch, then work 8 double crochet into ring.

1st Round: 2 ch, then 2 dc on each stitch (join with slip stitch to top of 2 ch at end of each round).
2nd Round: 2 ch, * 2 dc on first stitch, 1 dc on next, repeat from * to end.
3rd Round: 2 ch, * 2 dc on first stitch, 1 dc on each of next 2 stitches, repeat from * to end.
4th Round: 2 ch, * 2 dc on first stitch, 1 dc on each of next 3 stitches, repeat from * to end.
5th Round: 2 ch, * 2 dc on first ch, 1 dc on each of the next 4 stitches, repeat from * to end.

Continue in this manner, working an extra stitch between increasings each time until work measures 5½ inches across at widest part (17 rounds). Now decrease thus:-

1st Round: 2 ch, * miss 1 stitch, 17 dc, repeat from * to end.
2nd Round: 2 ch, * miss 1 stitch, 16 dc, repeat from * to end.
3rd Round: 2 ch, * miss 1 stitch, 15 dc, repeat from * to end. Continue thus, decreasing 1 stitch in each section in every row, until 7 stitches remain.
Next Round: 1 dc on each stitch all round. Fasten off.

Jumper:

FRONT: With white wool and No 12 needles, cast on 36 stitches and work ½ inch in k1, p1 rib. Change to No 10 needles and continue in stocking-stitch until work measures 2 inches. Shape armholes by casting off 2 stitches at beginning of next 2 rows, then k2tog at each end of the next 2 rows.
Work straight until piece measures 3½ inches, then shape neck.
Next Row: k11, cast off 6 loosely, knit to end. Continue on last 11 stitches only, decreasing at neck edge on every row until 7 remain.
Work 4 rows straight, then cast off.
Work the other 11 stitches to correspond reversing the shaping.

BACK: Work exactly as for front to completion of armhole shapings, then continue straight until length equals that of front to shoulders. Cast off straight across.

SLEEVES: With blue wool and No 12 needles, cast on 22 stitches and work ½ inch in k1, p1 rib. Change to No 10 needles and white wool, and continue in stocking stitch, increasing at each end of 5th and every following 6th row until there are 30 stitches on the needle. Work straight until sleeve measures 3½ inches, then shape the top by casting off 3 at the beginning of the next 2 rows, then k2tog at each end of every row until 16 remain. Cast off loosely.

COLLAR: With No 10 needles and blue wool, cast on 38 stitches and knit 8 rows garter stitch, (every row knit), slipping the first stitch of each row.
Now continue in stocking stitch with a border of 4 garter stitches at each side until work measures 2 inches.
Next Row: k12, cast off 14 stitches loosely, knit to end.
Work on the last 12 sts only, keeping the garter stitch border at the outer edge, and decreasing at the inside (neck) edge on every alternate row until 9 sts remain; now decrease on every 3rd row until 4sts remain. Continue in garter stitch for ½ inch, then cast off.

Work the remaining 12 stitches to correspond reversing the shaping.

Skirt

With No 10 needles and blue wool, cast on 183 stitches.

1st Row: k3, * p8, k5, repeat from * to last 11 stitches, p. 8, k. 3.
2nd Row: In rib, as set out in row 1, working k8, p5.

Repeat these 2 rows for 1 inch, then decrease as follows:-

Next Row: (right side facing): k3, * p2tog, p4, p2tog, k5, repeat from *, ending k3.
Next Row: Rib.
Continue in p6, k5 rib until work measures 2 inches from start, then decrease again.

Next Row: k3, * p2tog, p2, p2tog, k5, repeat from *, ending k3.
Next Row: Rib. Continue in p4, k5 rib until work measures 2¾ inches, then decrease again.

Next Row: k. 3, * (p2tog) twice, k5, repeat from *, ending k3.
Next Row:
Rib. Continue in p2, k5 rib until work measures 3½ inches.

Next Row: k. 3, * p2tog, k5, repeat from *, ending k3.
Next Row:
Rib. Work 3 more rows in p1, k5 rib.
Next Row:
p3, * p2tog, p4, repeat from *, ending p2.

Change to No 12 needles and work in k1, p1 rib until work measures 4½ inches, then cast off in rib.

Trousers (front and back alike)

With No 10 needles and blue wool, cast on 23 stitches for right leg, and work 6 rows garter stitch. Change to stocking stitch and decrease at beginning of every following 8th row (outside edge) until 18 stitches remain.
Work straight until piece measures 6 inches from start, ending with a purl row, then leave on a spare needle.
Make another piece to correspond for left leg, reversing shapings, then join the legs together by putting both sets of sts on one needle and working across all 36 stitches.

[ Editor's note: Make sure you have right side facing you for both legs and that they are arranged so that the shapings are on the outside edges.]

Continue in stocking stitch for another 2½ inches, then change to No 12 needles and work 3 rows in k1, p1 rib.

Next Row: (make holes for elastic): rib 2, * wfwd, k2tog, repeat from * to last 2 stitches, rib 2.
Rib 2 more rows, then cast off in rib.

Work a second piece in the same way.

To make up

Press all pieces lightly with a damp cloth.
Jumper: Catch shoulder seams together at armhole edges, then insert sleeves flat; join side and sleeve seams in one. Fasten each shoulder with a press-stud, then stitch centre of collar along back of neck. Make a blue crochet chain of 8 loops and stitch to front, then slip ends of collar through it.
Skirt: Join seam, then run 3 rounds of shirring elastic or similar through inside of waist ribbing.
Trousers: Join leg and side seams, then thread elastic through holes at waist.
Beret: Make a white pom-pom and stitch to centre of crown.

Sew in all ends.

Materials

Original yarn requirements:
3ozs Patons Rose, or White Heather, fingering 3 ply.
[2ozs bright blue and 1oz white shade, makes both skirt and trousers - if only one is required then 1 oz blue is sufficient.]

A pair each of No 10 (3¼mm) and No 12 (2¾mm) needles.
A No 13 (2¼mm) crochet hook.
Two press-studs.
Fine thread elastic for skirt, and narrow flat elastic for trousers.

Tension

30 sts to 4 inches on No 10 needles.

Size matters

Designed to fit a 16-inch doll.
Jumper
: Width all round, 9½ inches.
Skirt:
Length 4½ inches.
Trousers
:
Length, 9 inches.
Beret: All round inside edge, 11 inches.

Abbreviations

ch: chain
dc: double crochet remembering that this is UK notation, and in the US this stitch is referred to as single crochet.

k2tog: knit 2 sts together
p2tog: purl 2 sts together
wfwd: wool forward to making an extra stitch

A Word
on the Wool.

The pattern is sized for a 16 inch doll and needs a fine yarn that knits to a tension of 30 sts to 4 inches on 3¼mm needles.

You will have difficulty finding these fine yarns in a good range of colours. Some possibilities might be: you might look at machine knitting yarns on cones though these are usually sold in larger quantities; you might consider knitting in a crochet cotton to obtain the required gauge; you might consider trying a fine 4 ply and experimenting with finer needles to obtain the right gauge - or accept the outfit to fit a larger doll.

Be wary of the original quantities suggested - you will almost always need more than stated.

Disclaimer
(well...almost)

In transposing any pattern it is always a risk that errors will be introduced, in spite of dedicated proof reading.
If you have any problems with this pattern, please and I will try and assist.

October 2010

Time for Change (... or "Fall Back")

AranClock.jpg

Here is my second autumn version of the quirky clock, which I have refurbished in a similar way to that which I did in the spring. For the method used to disassemble and reassemble the clock - please see the "Spring Forward" entry for March 2010.
Read all those instructions first, then use the pattern here for the clock face.

Making the clock

As before it is important to remember that if you make a thicker clock face, it may interfere with the proper function of the clock hands. This pattern is for my original visualisation of a lovely thick Aran clock, but to achieve this I had to replace the clock mechanism in the IKEA clock with one with a higher loft. The clock face is thick all over not just towards the edges, so trimming the hands is not sufficient. If you do change the mechanism like this then you have to carefully check how high you can make the hands above the clock face while still being able to fit the plastic cover over the face.
[Editor's note: Failing all else you could leave the cover off altogether, exposing your knitted clock face to the elements.]

Materials

Clock movements and hands were purchased from eBay. I tried both the 15mm and the 20mm shaft sizes, and settled on the latter.

Original clock came from IKEA.

Aran yarn was two different makes of left-overs - one for the face section and one for the edging section. Take care to match the shades of cream - there is a lot of variation in tone as well as thickness. The latter is less important for this project, just make sure you don't change yarn in the middle of one of the sections.

The clock face

Using 3¾mm needles and waste yarn, cast on 24 stitches, then, leaving a 6 inch tail, start using the cream aran yarn, and knit one row. Join in a circle and begin pattern as follows:

Row 1: (Twist 2; p1) 8 times. [Twist 2 by knitting through the second stitch on the left hand needle and then knitting through the first stitch and slipping both stitches off the needle together - effectively you have cabled over 2 stitches].
Row 2: (K2; p1) 8 times.
Row 3: (K1, increase knitwise by picking up the loop before the next stitch and knitting into the back of it, k1; p1) 8 times. [32sts]
Row 4: (K3; p1) 8 times.
Row 5: (K3; increase purlwise by picking up the loop before the next stitch and purling into the back of it, p1, increase purlwise). [48sts]
Row 6: (K3, p3) 8 times.
Row 7: (Cable and increase by slipping one stitch onto a cable needle and leaving at back of work, k2, increase knitwise using the loop before the stitch on the cable needle, knit one stitch from cable needle; p3, increase purlwise) 8 times. [64sts]
Row 8: (K4; p4) 8 times.
Row 9: (K4; increase purlwise, p4, increase purlwise) 8 times. [80sts]
Row 10: (K4, p6) 8 times.
Row 11: (K4; increase purlwise, p6, increase purlwise) 8 times. [96sts]
Row 12: (K4, p8) 8 times.
Row 13: (Cable and increase by slipping 2 sts onto a cable needle and leaving at back of work, k2, increase knitwise using the loop before the stitches on the cable needle, knit 2 sts from cable needle; p8) 8 times. [104sts]
Row 14: (K5; increase purlwise, p8, increase purlwise) 8 times. [120sts]
Row 15: (K5, p10) 8 times.
Row 16: (K5, increase purlwise, p4, make bobble, p5; k5, increase purlwise, p10) 4 times. [128sts]
To make bobble: increase by (k1, p1, k1, p1, k1) into next stitch; turn the work and knit the 5 sts; turn the work, slip 4 sts, k1, pass the 4 slipped sts over.
Row 17: (K5, p11) 8 times.
Row 18: (K5, p11, increase purlwise) 8 times. [136sts]
Row 19: (Cable and increase by slipping 2sts onto a cable needle and leaving at back of work, k3, increase knitwise using the loop before the stitch on the cable needle, knit 2 sts from cable needle; p12) 8 times. [144sts]
Row 20: (K6, p12) 8 times.
Row 21(cast off): (K2tog; k2tog, pass first stitch on right hand needle over second st, k2tog, pass first stitch on right hand needle over second st; cast off next 12 sts purlwise); repeat across all 8 sections and fasten off.

Return to the centre. Carefully remove the waste yarn and pick up the free stitches.
Thread the tail through the stitches and pull up. Fasten off.

The face is not quite flat making the effect of the cables and bobbles more overt. Sew in the ends and press lightly with a damp cloth, taking care not to flatten the cables.

Using the plastic clock face cover as a guide, cut a circle from stiff cardboard. and make a hole in the centre. Sew the knitted face to the cardboard at the edge, which pulls it into shape.

Put the clock face into the body, keeping the bobbles at the 12, 3, 6 and 9 positions.

Remove original plastic mechanism (it is held in place at the back by plastic clips which are easily released) and push in the new mechanism; secure in place with the washer and small ring bolt. I had to trim a plastic loop from the back of my replacement mechanism to make it fit the housing in the IKEA clock.


Knitted frame for the clock

The clock frame consists of 12 ribbed cables each with a centre bobble. It is designed to fit tightly, (so slightly stretched), aided by keeping the edge stitches in garter stitch.
I cast on with waste yarn and then grafted the stitches together - this is quite tricky, so you may want to finish by simply sewing the ends together.
Note that the right side rows always start with a slipped stitch, and the alternate rows do not. This makes the right hand edge of the work slightly tighter.

Cable abbreviations:

C3Lk = cable 3 to the left and knit: slip 3 sts on cable needle and leave at front of work; k1, then k1, p1, k1 from cable needle.
C3Rp = cable 3 to the right and purl: slip 1 st on cable needle and leave at back of work; k1, p1, k1, then purl one stitch from cable needle.
C3Lp = cable 3 to the left and purl: slip 3 sts on cable needle and leave at front of work; p1, then k1, p1, k1 from cable needle.
C3Rk = cable 3 to the right and knit: slip 1 st on cable needle and leave at back of work; k1, p1, k1, then knit one stitch from cable needle.

C7 = cable over 7 stitches: slip next 4 sts on to a cable needle and leave at the back of the work; k1, p1, k1, then p1, k1, p1, k1, from cable needle.

Make bobble: increase 4 sts by (k1, p1, k1, p1, k1) into next stitch; turn the work and knit the 5 sts; turn the workand decrease the 4 sts just made by slipping 4 sts, k1, then pass the 4 slipped sts over.

Pattern:

Using 3¾mm needles, cast on 15 sts and begin the 16 row pattern:

Row 1: Slip1, k1; k1, p1, k1; p5; k1, p1, k1; k2
Row 2 (and alternate rows): Knit the knit stitches and purl the purl stitches.
Row 3: Slip1, k1; C3Lk; p3; C3Rk; k2
Row 5: Slip1, k2; k1, p1, k1; p3; k1, p1, k1; k3
Row 7: Slip1, k2; C3Lk; p1; C3Rk; k3
Row 9: Slip1, k3; C7; k4
Row 11: Slip1, k2; C3Rp; p1; C3Lp; k3
Row 13: Slip1, k2; k1, p1, k1; p3; k1, p1, k1; k3
Row 15: Slip1, k1; C3Rp; p3; C3Lp; k2
Row 17: Slip1, k1; k1, p1, k1; p2, make bobble, p2; k1, p1, k1; k2
Row 18: K2; p1, k1, p1; k5; p1, k1, p1; k2

Repeat rows 3-18 eleven times more. Cast off.
Join in a ring, either sewing or grafting.

Attach the knitted circle to the clock with the slipped stitch edge towards the clock face, and attach the other side to the rim of the clock; I drilled holes around the plastic clock surround, (as before), about ¼ inch from the edge.


September 2010

Bridge Jumper

BridgeJumper.jpg

This is a wonderful period jumper from 1940. I often thought I might try and adapt it but never made a decision as to how. Recently a friend on the internet borrowed the pattern to make it "as is" - quite an undertaking with all that patterning. She wanted to make it for a local Poker Club - but, as I explained, this is a Bridge Jumper - no playing poker in it mind!
So here is the pattern as it appeared originally - I will include any notes and advice from our test knitter if and when they are forthcoming.

Instructions

These are the instructions as they appear in the original pattern. They are untested with modern yarn and needles.
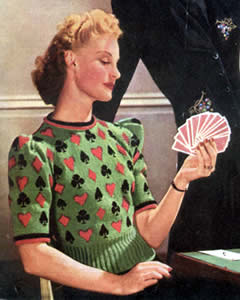
Front

With No 12 needles and main shade (G) cast on cast on 108 stitches and work 4½ inches in Knit 2, Purl 2 rib, increasing at the end of the last row. Change to No. 10 needles, and work 2 rows stocking stitch; then, still in stocking stitch, change to coloured pattern as follows:

1st row (right side facing): Knit 8 in main shade (G), * 3 in black (B), 13G, 1 in red (R), 13G, repeat from * to last 11 stitches, 3B, 8G.
2nd row: Purl 9G, * 1B, 14G, 1R, 14G, repeat from * to last 10 stitches, 1B, 9G.
3rd row: Knit 9G, * 1B, 13G, 3R, 13G, repeat from * to last 10 stitches, 1B, 9G.
4th row: Purl 6G, * 2B, 1G, 1B, 1G, 2B, 10G, 3R, 10G, repeat from * to last 13 stitches, 2B, 1G, 1B, 1G, 2B, 6G.
5th row: Knit 5G, * 3B, 1G, 1B, 1G, 3B, 8G, 5R, 8G, repeat from * to last 14 stitches, 3B, 1G, 1B, 1G, 3B, 5G.
6th row: Purl 5G, * 9 B, 8G, 5R, 8G, repeat from * to last 14 stitches, 9B, 5G.
7th row: Knit 5G, * 9B, 7G, 7R, 7G, repeat from * to last 14 stitches, 9B, 5G.
8th row: Purl 6G, * 7B, 7G, 9R, 7G, repeat from * to last 13 stitches, 7B, 6G.
9th row: Knit 6G, * 7B, 6G, 11R, 6G, repeat from * to last 13 stitches, 7B, 6G.
10th row: Purl 7G, * 5B, 7G, 11R, 7G, repeat from * to last 12 stitches, 5B, 7G.
11th row: Knit 7G, * 5B, 7G, 11R, 7G, repeat from * to last 12 stitches, 5B, 7G.
12th row: W: Purl 8G, * 3B, 8G, 4R, 3G, 4R, 8G, repeat from * to last 11 stitches, 3B, 8G.
13th row: Knit 8G, * 3B, 9G, 2R, 5G, 2R, 9G, repeat from * to last 11 stitches, 3B, 8G.
14th row: Purl 9G, * 1B, 29G, repeat from * to last 10 stitches, 1B, 9G.

15th-20th rows: Work in stocking stitch in main shade only.

21st row: Increase in first stitch; knit 8G, * 1R, 13G, 3B, 13G, repeat from * to last 10 stitches, 1R, 8G, increase in last stitch.
22nd row:
Purl 10G, * 1R, 14G, 1B, 14G, repeat from * to last 11 stitches, 1R, 10G.
23rd row: Knit 9G, * 3R,13G, 1B, 13G, repeat from * to last 12 stitches, 3R, 9G.
24th row: Purl 9G, * 3R, 9G, 2B, 2G, 1B, 2G, 2B, 9G, repeat from * to last 12 stitches, 3R, 9G.
25th row: Knit 8G, * 5R, 7G, 4B, 1G, 1B, 1G, 4B, 7G, repeat from * to last 13 stitches, 5R, 8G.
26th row: Purl 7G, * 7R, 6G, 11B, 6G, repeat from * to last 14 stitches, 7R, 7G.
27th row: Knit 6G, * 9R, 5G, 11B, 5G, repeat from * to last 15 stitches, 9R, 6G.
28th row: Purl 6G, * 9R, 5G, 4B, 1G, 1B, 1G, 4B, 5G, repeat from * to last 15 stitches, 9R, 6G.
29th row: Increase in first stitch; knit 6G, * 7R, 7G, 2B, 1G, 3B, 1G, 2B, 7G, repeat from * to last 14 stitches, 7R, 6G, increase in the last stitch.
30th row: Purl 9G, * 5R, 10G, 5B, 10G, repeat from * to last 14 stitches, 5R, 9 G.
31st row: Knit 10G, * 3R, 10G, 7B, 10G, repeat from * to last 13 stitches, 3R, 10 G.
32nd row: Purl 10G, * 3R, 10G, 1B, 10G, repeat from * to last 13 stitches, 3R, 10G.
33rd row: Knit 11G, * 1R, 12G, 5B, 12G, repeat from * to last 12 stitches, 1R, 11G.
34th row: Purl 11G, * 1R, 13G, 3B, 13G, repeat from * to last 12 stitches, 1R, 11G.
35th-40th rows: Work in stocking-stitch in G only, increasing at each end of the 37th row [115 stitches].

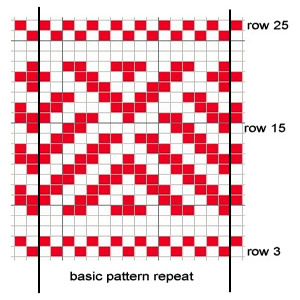
These 40 rows form the pattern.
The chart shows the 40 rows written out above.


Continue in pattern, increasing at each end of every 6th row, until there are 125 stitches on the needle, and the 32nd row of the second pattern has been worked.

Shape armhole as follows:

Continuing in pattern, cast off 5 stitches at the beginning of the next 2 rows, then decrease at each end of the next 5 rows (105 stitches).
Continue in pattern without shaping until 3rd pattern is completed.

Shape neck as follows:

1st row: Knit 6G, 3B, 13G, 1R, 59G, 1R, 13G, 3B, 6G.
2nd row: Purl 7G, 1B, 14G, 1R, 59G, 1R, 14G, 1B, 7G.
3rd row: Knit 7G, 1B, 13G, 3R, 18G, (slip these stitches on to spare needle); cast off 21; knit 18G, 3R, 13G, 1B, 7G.

Working on these last 42 stitches:-

4th row: Purl 4G, 2B, 1G, 1B, 1G, 2B, 10G, 3R, 18G.

Continue in pattern, decreasing at neck edge on next and every alternate row until 36 stitches remain and the 15th pattern row has been worked.

Shape shoulder as follows:

1st row (wrong side facing): Cast off 10 stitches at armhole edge, purl to end.
2nd row: K2tog, knit to end.

Repeat these last 2 rows once. Cast off.
Return to stitches on the spare needle; join main shade wool at centre and work left shoulder to match right, shaping at opposite edges.

Back

Work as for the front until 3rd pattern is completed, then
divide for back opening as follows:

Next row: Knit 6G, 3B, 13G, 1R, 13G, 3B, 14G, turn.

Work on these 53 stitches for the right shoulder (slip remaining stitches on to a spare needle or stitch holder).
Continue in pattern, omitting centre heart near back opening and keeping these stitches in main shade, until 4th row of 4th pattern has been worked.

Shape shoulder as follows: cast off 11 stitches at armhole edge on the next 3 alternate rows.

Cast off remaining 20 stitches.

Return to stitches left on spare needle or stitch holder. Join main shade wool at centre, cast on 4 stitches for under-lap and work to match the right shoulder, shaping at opposite edges.

Sleeves

With No 12 needles and main shade wool, cast on 73 stitches.
Work in stocking stitch for 19 rows (starting with a purl row). Change to No 10 needles and work in pattern as follows:-

1st row: Knit 6G, * 1R, 13G, 3B, 13G, repeat from * once, 1R, 6G.
2nd row: Purl 6G, * 1R, 14G, 1B, 14G, repeat from * once, 1R, 6G.
3rd row: Knit 5G, * 3R, 13G, 1B, 13G, repeat from * once, 3R, 5G.
4th row: Purl 5G, * 3R, 10G, 2B, 1G, 1B, 1G, 2B, 10G, repeat from * once, 3R, 5G.
5th row: Increase in the first stitch; knit 3G, * 5R, 8G, 3B, 1G, 1B, 1 G, 3B, 8G, repeat from * once, 5R, 3G; increase in the last stitch.
6th row: Purl 5G, * 5R, 8G, 9B, 8G, repeat from * once, 5R, 5G.
7th row: Knit 4G, * 7R, 7G, 9B, 7G, repeat from * once, 7R, 4G.
8th row: Purl 3G, * 9R, 7G, 7B, 7G, repeat from * once, 9R, 3G.
9th row: Increase in the first stitch; knit 1G, * 11R, 6G, 7B, 6G, repeat from * once, 11R, 1G; increase in the last stitch.
10th row: Purl 3G, * 11R, 7G, 5B, 7G, repeat from * once, 11R, 3G.
11th row: Knit 3G, * 11R, 7G, 5B, 7G, repeat from * once, 11R, 3G.
12th row: Purl 3G, * 4R, 3G, 4R, 8G, 3B, 8G, repeat from * once, 4R, 3G, 4R, 3G.
13th row: Increase in the first stitch; knit 3G, * 2R, 5G, 2R, 9G, 3B, 9G, repeat from * once, 2R, 5G, 2R, 3G; increase in the last stitch.
14th row: Purl 24G, 1B, 29G, 1B, 24G.
15th-20th rows: Work in stocking stitch in main colour G, increasing at each end of the 17th row.
21st row: Increase in the first stitch; knit 8G, * 3B, 13G, 1R, 13G, repeat from * once, 3B, 8G; increase in the last stitch.
22nd row: Purl 11G, * 1B, 14G, 1R, 14G, repeat from * once, 1B, 11G.
23rd row: Knit 11G, * 1B, 13G, 3R, 13G, repeat from * once, 1B, 11G.
24th row: Purl 7G, * 2B, 2G, 1B, 2G, 2B, 9G, 3R, 9G, repeat from * once, 2B, 2G, 1B, 2G, 2B, 7G.
25th row: Increase in the first stitch; knit 5G, * 4B, 1G, 1B, 1G, 4B, 7G, 5R, 7G, repeat from * once, 4B, 1G, 1B, 1G, 4B, 5G; increase in the last stitch.
26th row: Purl 7G, * 11B, 6G, 7R, 6G, repeat from * once, 11B, 7G.
27th row: Knit 7G, * 11B, 5G, 9R, 5G, repeat from * once, 11B, 7G.
28th row: Purl 7G, * 4B, 1G, 1B, 1G, 4B, 5G, 9R, 5G, repeat from * once, 4B, 1G, 1B, 1G, 4B, 7G.
29th row: Increase in the first stitch, Knit 7G, * 2B, 1G, 3B, 1G, 2B, 7G, 7R, 7G, repeat from * once, 2B, 1G, 3B, 1G, 2B, 7G; increase in the last stitch.
30th row: Purl 11G, * 5B, 10G, 5R, 10G, repeat from * once, 5B, 11G.
31st row: Knit 10G, * 7B, 10G, 3R, 10G, repeat from * once, 7B, 10G.
32nd row: Purl 10G, * 7B, 10G, 3R, 10G, repeat from * once, 7B, 10G.
33rd row: Increase in the first stitch; knit 10G, * 5B, 12G, 1R, 12G, repeat from * once, 5B, 10G; increase in the last stitch.
34th row: Purl 13G, * 3B, 13G, 1R, 13G, repeat from * once, 3B, 13 G.
35th and 36th rows: Work in stocking stitch in G [89 stitches].

Now shape top: work 4 rows in G stocking stitch, casting off 2 sts at the beginning of the first 2 rows, then decreasing at each end of the next 2 rows.
This completes one pattern. Repeat again from 1st row, being careful to place each "pip" directly over the one below (as shown in the chart), and at the same time shaping as follows:-

Work 2 rows straight, then decrease at the beginning of the next 4 rows. * Work 2 rows straight, then decrease at the beginning of the next 2 rows. Repeat from * once.
Work 16 rows straight, then decrease at each end of the next 2 alternate rows (69 stitches).
Work 2 rows straight; decrease at each end of the next row. Now decrease at each end of every following 4th row, but when commencing the 3rd pattern, omit the heart at either end and keep stitches in main shade; continue until 16th row has been worked (59 stitches). Continue in G stocking stitch, decreasing at each end of every alternate row until 49 stitches remain.
Next row: k2tog all along, ending k1.
Cast off.

Roll for neck and Sleeves

With No. 12 needles cast on 7 stitches in R and 7 stitches in B.
1st row: (p6, k1) in B, twist the threads, (k1, p6) in R.
2nd row: (k6, p1) R, twist the threads, (p1, k6) B.

Repeat these 2 rows until roll is required length. Cast off.

To Make Up

Press all parts except ribbing on the wrong side under a damp cloth.
Join side, shoulder, and sleeve seams. Set in sleeves, arranging fullness at shoulder. Sew stocking-stitch roll about 2 rows in from neck and sleeve edges, sewing along centre of roll, leaving the edges to roll under. Press all seams on wrong side.

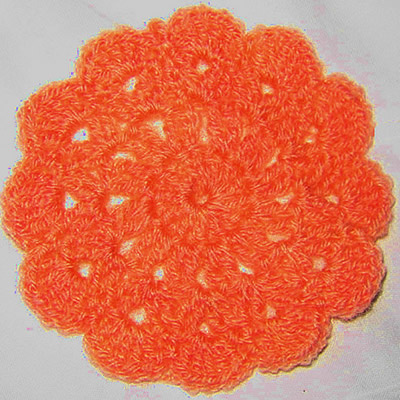
Make three crochet buttons thus:
Make 3 chain, join in a ring, work 6 dc into ring. Work 2 dc in each stitch of last row, work 2 rows without shaping. Work 1 dc in every alternate stitch of last row. Stuff button with wool. Fasten off. Work 1 row of dc round back opening, making three loop buttonholes on right side of opening. Sew the buttons in position. Sew press-stud at extreme top of opening.

Materials

Original materials called for: 12ozs Patons Super Bouclet.
[8ozs green (main colour) and 2 ozs each in black and red.]

A pair each Nos 10 and 12 (3¼mm and 2¾mm) needles.

A press-stud.

Editor's note: The closure for the back opening uses 3 buttons and loops that are self-made using crochet, so you will need an equivalent size crochet hook for finishing.

Tension

28sts to 4 inches on No 10 needles.

Size matters

To fit 33-35 inch bust; length from top of shoulder: 20 inches; sleeve seam: 6 inches.

Abbreviations

increase: by knitting into the front and back of the next stitch.

k2tog: decrease by knitting 2 sts together.

dc: double crochet - known as single crochet in the US.

A word on the wool.

The tension and needle size for this pattern imply a standard 4 ply yarn would work. Given that bouclé yarn tends to work up fairly firmly, it might be possible to substitute a double knitting yarn to make a larger size.

Editor's note: My experience of these vintage patterns leads me to suggest that you may need far more yarn than the quantities indicate. In some cases I have needed one 50g ball (which is actually 1¾ozs) to replace each 1oz ball.

Disclaimer
(well...almost)

In transposing any pattern it is always a risk that errors will be introduced, in spite of dedicated proof reading.
If you have any problems with this pattern, please and I will try and assist.

August 2010

Autumn Afghan

AutumnAfghan.jpg

I love the rich autumn colours in this simple 1970s throw. Don't spurn the simple crochet motif; while not technically challenging, they do make an ideal handbag project for your holiday or your commute to work. You may think it's a bit early to think about autumn but there are just under 200 motifs make up the full size blanket... so maybe in time for Autumn 2011!

Crochet abbreviations:

ss = slip stitch
ch = chain
dc =double crochet
tr = treble crochet
2 tr tog = two treble together - as follows:
Yarn round hook (yrh), insert hook in space and draw through a loop as you would for a normal treble - you have 3 loops on the hook;
yrh and draw through 2 loops continuing as for a normal treble - you have 2 loops on the hook.
Now it becomes a little different. You leave the 2 loops - do not finish the stitch but start a second treble: yrh, insert hook in next space and draw through a loop - you have 4 loops on the hook; yrh and draw through 2 loops - you have 3 loops on the hook; finish the stitch by yrh and draw through remaining 3 loops.
[Editor's note: This is a method of "decreasing" in crochet although that's not why we are doing it in this motif.]

Remember the above are English crochet instructions where dc is equivalent to US single crochet - see "Terminology" in the side bar.

Editor's note: While writing this I found a simply excellent free form crochet site from James Walters which reflects his own work alongside Sylvia Cosh and has - among other things - some great crochet information. As the author states - the information was originally intended as worksheets for their students - however I found they do offer useful guidance (available in both what I will call "English" as well as "US English"!)

Instructions

Make 4 ch and join with a ss to make a ring.

1st round: 3ch; 11 tr into ring; ss to 3 ch.

2nd round: 3ch; 1 tr into same place as ss; * 2ch, 2tr into next tr, repeat from * to end, finishing with: 2ch, ss to 3rd of 3ch.

3rd round: 3ch; 2tr into first 2ch space; * 2ch, 1tr into same space, work 2 tr tog (see abbreviations) with first leg in the same space and second leg in the next space, 1tr into same space, repeat from * to end, finishing with: 2ch 1tr into same space, ss to 3rd of 3ch.
[Editor's note: I found this a bit confusing. see if this helps you: in one individual space, you start with the 2nd leg of a "2 tr tog" followed by 1 tr, 2ch, 1 tr, then the 1st leg of a "2 tr tog" - the 2nd leg moves you into the next space.]

4th round: * 1ch, 5tr in space, 1ch, 1dc into 2 tr tog, repeat from * to end, finishing with ss into ss of previous round.

Fasten off.

This completes your first motif.

Make 7 for the centre and then 48, 44, 44, and 46 in the other colours.

Here's a close-up picture of one of the motifs. Hopefully it will help you see how they should look.

Motif.jpg

Making up

Join 2 shells to each adjacent motif, using the following pattern as a guide to placement. It is a good idea to sew this together gradually as you go along - you can stop any time you feel it's big enough, leave the throw as a circular shape, or continue with the pattern to make a rectangle.

Sew in all ends.
Press lightly on the wrong side with a warm iron and a damp cloth.

Materials

4ply/Fingering yarn in 5 autumnal colours. You will need about 1 ball for the centre and about 8 balls for each of the other 4 colours.

One number 11 (3mm) crochet hook.

Tension

One motif measures about 4 inches in diameter.

Size matters

Approximately 52 by 60 inches.

Disclaimer
(well...almost)

In transposing any pattern it is always a risk that errors will be introduced, in spite of dedicated proof reading.
If you have any problems with this pattern, please and I will try and assist.


July 2010

Simple Carry-All Tote

CarryAllTote.jpg

A minimalist 1960s design "carry-all" bag. The sides are meant to be rigid and incorporate cardboard (or plastic) supports. Yet another perfect project bag.

Instructions

Cast on 54 stitches. Work in bands of garter stitch (every row knit) and stocking stitch (knit one row, purl one row) as follows:

1st band: 3 inches in garter stitch (20 rows)
2nd band: 2 inches in stocking stitch (10 rows)
3rd band: 2 inches in garter stitch (14 rows)
4th band: 2 inches in stocking stitch (10 rows)
5th band: 2 inches in garter stitch (14 rows)

Place markers at each end of the last row.

[Editor's note: You are about to knit the base of the bag.]
Now work 6 inches in garter stitch, placing markers at each end of the last row.
[Editor's note: You have finished the base and are about to knit the other side of the bag.]

Now work back of bag to match front, ie as 5th to 1st band in this order. Cast off loosely.

Side panels

(Make two the same) cast on 22sts, and work in bands of garter stitch and stocking stitch as for front.

Cast off.

Handles

(Make two the same) cast on 8sts and work 13 inches in garter stitch.

Making up

Press pieces lightly on the wrong side.
Cut lining to fit inside bag allowing ½ inch extra for turnings. Cut 3 pieces of cardboard to fit side panels and base of bag.
Join short edge of side panels to base between markers then join side seams.
Stitch cardboard in position inside the bag.
[Editor's note: I used plastic canvas (7 count) for support when lining the bag. It seems ideal in that you can sew it together to make the boxy shape and also catch stitch it to the knitting without undue distortion. The picture also shows that I used a fabric base for my bag - see "adapting the bag".]

Join lining and place inside the bag with seams inside.

Back the handles with petersham ribbon, then sew to top of bag 2½ inches from side seams.

Turn in raw edges at top of lining and slip-stitch hem neatly in position.

A Word on the Wool.

I substituted 100g balls (each 75m/81yards) Debbie Bliss Cashmerino super chunky in Leaf green (colour 16022), knitted on number 5½mm needles, and this took double the stated requirement of the original yarn. I think you would require at least 5 balls of this wool to make the bag as written.

I favoured a plain colour but the simplicity of the pattern would probably suit wilder colours.

Debbie Bliss Cashmerino is a rather high quality smooth wool (it was on sale). As the size of a bag is not critical, substitute any superchunky with good results (checking your tension). It is suggested to support the sides with cardboard, but it may also be a good idea to use a smaller needle size than normally recommended for the yarn, so that the knitted fabric is firm - note that I did not do this.

Adapting the Bag.

As I used sale wool, I had only 4 x 100g balls, and in consequence I adapted the bag significantly to make it work.

I made fabric handles and a fabric base (6 inches in length and matching the width of the bag).

The handles are robust webbing covered in fabric. I sewed the handles firmly to the plastic canvas side supports - so the handles and the plastic canvas lining will take all the weight of the bag contents.
I used dental floss (very strong) for sewing the bag handles on to the canvas - and also for sewing the canvas sides and base together.

I made the base using plastic canvas (7 count) cut to size, and covered with some wadding plus the fabric, and then quilted through all layers, using the canvas as my guide.

I machine sewed the sides of the bag to the base before hand sewing the knitted pieces up the sides using mattress stitch from the outside of the bag.

Finally, in case you are tempted to try this as a felted bag - be warned: felting garter stitch produces different results from stocking stitch and your bag may end up a funny shape - or funnier than you intended....
Happy improvising!

Materials

Original pattern calls for 6 x 50g balls of Patons Camelot which was a bouclé yarn (in colour Corncob). See "a word on the wool".
I recommend planning on at least 400-500 yards.

One pair of number 7 (4½mm) needles.

Fabric for lining.
Petersham ribbon or webbing to line handles.

Cardboard or plastic canvas to support the sides.

Tension

Original tension 15sts x 21rows to 4 inches (10cm) on No 7 (4½mm) over stocking stitch.

[My tension using Debbie Bliss yarn and number 5 (5½mm) needles is 14sts x 20rows to 4 inches over stocking stitch.]

Size matters

Original bag is approximately 14in by 11in and 6in deep at the sides.


Disclaimer
(well...almost)

In transposing any pattern it is always a risk that errors will be introduced, in spite of dedicated proof reading.
If you have any problems with this pattern, please and I will try and assist.


June 2010

World Cup Fever

SportSocks.jpg

As the nail-biting tournament in South Africa dominates this month, here we have: 1940s sport socks.
I thought they were nicely in England's colours, but not exactly football socks -
I think they mean a nice decorous sport like tennis, don't you?
Red and white is the original colour scheme from the 1940s. (Possibly the original did not include quite such a Dayglo shade of red.) However, the pattern seems vaguely Scandinavian and wintery to me - I could see them perhaps in Christmas colours of a more muted red with green.

Meanwhile... Ingerland, Ingerland, Ingerland...

Instructions.

Starting at top with the cuff, using the main colour, cast on 64 stitches on three needles (21,22, 21).
[Editor's note: I recommend using one size larger needles than you use for the plain portion of the sock, as Fair Isle technique tends to pull the tension a little tighter.]
Join in a circle, being careful not to twist the stitches, and knit 2 rounds.
[Editor's note: To avoid the cuff curling up so much, I actually did one row purl then one row knit.]
Then work in the cuff pattern as follows (there is a chart at the end of the section):

3rd Round: * k1 contrast (C), k1 main (M); repeat from * to end of round.
4th Round: * k1 M, k1C; repeat from * to end of round.
5th and 6th Round: knit all round in M.
7th Round: * k1C, k2M, k2C, k2M, k3C, k2M, k2C, k2M; repeat from * to end of round.
8th Round: k2C, * k2M, k2C, k2M, k1C, k2M, k2C, k2M, k3C; repeat from * all round, ending k1C.
9th Round: * k1M, k2C, k2M, k2C, k3M, k2C, k2M, k2C; repeat from * to end of round.
10th Round: k2M, *k2C, k2M, k2C, k1M, k2C, k2M, k2C, k3M; repeat from * all round, ending k1M.
11th - 14th Rounds: Repeat 7th to 10th rounds.
15th Round: * k1C, k2M, k2C, k7M, k2C, k2M; repeat from * to end of round.
16th Round: as 8th round.
17th Round: * k1M, k2C, k4M, k3C, k4M, k2C; repeat from * to end of round.
18th Round: as10th round.
19th Round: * k1C, k4M, k2C, k3M, k2C, k4M; repeat from * to end of round.
20th Round: as 8th round.
21st Round: as 7th round.
22nd and 23rd Rounds: knit all round in M.
24th and 25th Rounds: repeat 3rd and 4th rounds.
26th and 27th Rounds: knit all round in M.

This completes the cuff.

Break colour C and continue in main colour only.
[Editor's note: Change to smaller needles here.]

Turn the work inside out to make a fold-over cuff and start to work the rounds in the opposite direction.

Work in k2, p2 rib for 3 inches [Editor's note: about 30 rows.], decreasing 8 stitches in the last round only, by knitting together every 7th and 8th stitch.

Next Round: k2tog, knit to last 2 stitches, k2tog. [54 stitches]

Now work in stocking-stitch (knit every round) for 2 inches.
[Editor's note: about 20 rows.]

Heel

Knit 13 stitches of first needle on to third needle (this is the heel needle), then turn and purl back 26 stitches; divide the remaining 28 stitches equally onto the other two needles. Work back and forth over heel needles as follows:

1st Row: slip 1 stitch knitwise, knit across remaining stitches.
2nd Row: slip 1 stitch purlwise, purl across remaining stitches.
Repeat these last 2 rows alternately until piece measures 2 inches.
[Editor's note: I recommend knitting 26 rows.]

Next Row (right side facing): knit across first 16 stitches, k2tog; turn.

Next Row: p7, p2tog; turn.
Next Row: k7, k2tog; turn.
Repeat the last 2 rows alternately until 8 stitches remain on heel needle.

Next Round: needle 1: knit across heel needle, then pick up 14 stitches down left side of heel; needle 2: knit across next two, needles (thus transferring these stitches on to one needle); needle 3: pick up 14 stitches across other side of heel and k4, from needle 1.

Hereafter, work in rounds of stocking stitch but, on every other round, k2tog at end of first needle, and (s1, k1, psso) at beginning of third needle until 54 stitches remain.

Work straight until piece measures 2 inches less than that required for overall foot length.

[Editor's note: This was about 50 rows for my UK size 4 foot. (EU 37, US 6½.]

Toe

There should be 13 stitches on first needle, 28 on the second needle, and 13 on the third needle. End of round is centre of sole. Work 1 round, decreasing at each end of second needle, then one round straight.

Now there are 13 stitches on first needle, 26 on the second needle, and 13 on the third needle.

Next Round: knit to within 3 stitches of the end of the first needle, k2tog, k1; on second needle, k1, (s1, k1, psso), knit to within last 3 stitches, then k2tog, k1; on third needle, k1, (s1, k1, psso), knit to end of round.
Work 1 round straight.

Repeat the last 2 rounds until 16 stitches remain.
Transfer the stitches on to two needles, having 8 stitches on each needle and divided so that sole lies flat.

Graft the stitches together.

Making up

Sew in all ends. Fold down cuff.

Materials

3ozs Patons Real Shetland Wool.
[2 ozs main shade and 1oz contrasting shade. Original uses white and scarlet].

A set of four No 11 needles, pointed at both ends.

Tension

30 stitches = 4ins

Size matters

Length of foot, 9 inches (adjustable).

Abbreviations

M is main shade (white).
C is contrast (red).

psso: pass the slipped stitch over, (also known as "ssk"; effectively you are "knitting 2 together through back loops").

A Word
on the Wool.

The recommended wool was Patons Real Shetland Wool.

I used Cygnet Wool-Rich 4ply. I chose this yarn as it seemed fine enough to achieve the required tension. I worked mainly on No 12 needles (one size smaller than specified) using No 11s for the Fair Isle section. However I think a conventional 4 ply at 28sts to 4 inches would make a better fabric.

Disclaimer
(well...almost)

In transposing any pattern it is always a risk that errors will be introduced, in spite of dedicated proof reading.
If you have any problems with this pattern, please and I will try and assist.

May 2010

All-year-round jumper

AllYearTop.jpg

Another beautifully crafted early 1950s recreation by Sara; a neat little design which so suits her figure. Instructions are for one size only, and Sara made hers using Posh Yarns Diana 2ply, which seems to match the tension of the original 3 ply yarn. You might achieve more flexibility in fit and yarn choice if you opt for a standard 4ply instead.

Front

With No 12 (2¾mm) needles and main shade cast on cast on 120 sts loosely and work 24 rows in stocking stitch, starting with a knit row.
[Editor's note: To aid the fold of a hem, (which is what this is), a garter stitch row is sometimes inserted half way. So - you could knit 11 rows in stocking stitch, and then knit one row on the wrong side - then continue with the stocking stitch to 24 rows.]

Make a hem on the next row by knitting 1 stitch from needle together with 1 stitch from cast-on edge.
Purl back.

Change to No.11 needles and work 4 rows stocking stitch, then shape basque as follows:

Next row: k33, k2togtbl, k50, k2tog, k33
Work 5 rows straight.
Next row: k32, k2togtbl, k50, k2tog, k32
Work 5 rows straight.
Next row: k31, k2togtbl, k50, k2tog, k31
Work 5 rows straight.

Continue decreasing thus on next and every following 6th row until 108 sts. remain.
Work 5 rows straight.

Shape waist as follows:

Next row: *k8, k2tog; repeat from * to last 8 sts, k8
Next row: *p8, increase in the next st; repeat from * to last 8 sts, p8. [108 sts]

Begin working the check pattern, introducing the two contrast colours C1 and C2.
[Editor's note: In the original pattern they plunge straight in with the 2 by 2 check, but I think Sara has framed her panel by starting and ending with a row of C1 (green), which I think looks rather smart.]

1st row (right side facing): * k2 C1, k2 C2; repeat from * to end.
2nd row: * p2 C2, p2 C1; repeat from * to end.
3rd row: * k2 C2, k2 C1; repeat from * to end.
4th row: * p2 C1, p2 C2; repeat from * to end.

Continue in pattern repeating the 4 rows as set above, increasing 1 stitch at each end of the next and every following 6th row. Incorporate the extra sts keeping the chack pattern correct.

When work measures 10 inches at centre....
[Editor's note: The check panel is approximately 50 rows, depending on your own tension.]
....change back to main shade and continue in stocking stitch, still increasing at side edge as before until there are 130 sts.
Work straight until front measures 13 inches at centre.

With right side facing, cast on 10 sts at the beginning of the next 2 rows for the sleeves, [150 sts].
Continue straight until sleeve measures 6 inches. With right side facing, shape shoulders and neck as follows:

Cast off 10, k50; turn and leave remaining sts on a stitch holder.

Now decrease 1 stitch at the neck edge on the next 10 rows; then, keep the neck edge straight, but at the same time cast off 5 sts on every alternate row at the armhole edge until all sts are gone.

Return to the remaining sts on the stitch holder; slip the centre 30 sts on to a stitch holder, and rejoin the wool to the remaining 60 sts.
Work to correspond with the first shoulder.

Back

Work as for the front to the end of the check pattern.

Work 2 rows in main shade, then divide for back opening.
Work on the first half of the stitches, leaving the remainder on a stitch holder.
Continue shaping side edge until there are 65 sts on needle, then work straight until side edge matches back to armhole.
With right side facing, cast on 10 sts at the beginning of the next row, then continue straight until sleeve measures 6 inches.
With right side facing, shape shoulder by casting off 10 sts at the beginning of the next row, then 5 sts on the following 8 alternate rows.

Cast off remaining stitches.

Rejoin the wool to the remaining stitches at the centre and work to correspond with the right half of the back.

To Make Up

Press work on wrong side under a damp cloth.
Join shoulder seams.

Neck: With right side facing, main shade, and No 12 needles, pick up and knit 90 sts all round the neck, including 30 sts from the stitch holder on the front.
Work 2½ inches stocking stitch, starting with a purl row.
Cast off very loosely using a bigger needle.
Fold neckband in half and catch down on wrong side; press.
[Editor's note: I have to say, I am not clear from these instructions whether you should work the neckband on 2 needles - hence the "starting with a purl row", or whether you are working on 4 needles, but in reverse stocking stitch - given that you are instructed to join (implies both) shoulder seams before you begin.
Sara's version uses conventional stocking stitch which matches the hem. If you work backwards and forewards on 2 needles, only join one shoulder seam, and join the second with the neckband when you have finished..]

Join side and under-arm seams; work 2 rows dc round each sleeve edge. Turn back 1 inch of sleeve to form a cuff and catch in position at shoulder and under-arm.

[Editor's note: Sara leaves the sleeves plain after this point - instructions below introduce additional trim.]
Make a chain to go round each sleeve edge, then work 1 row dc across this chain. Sew in position round sleeve just below crochet edgings.

Work 3 rows dc down left side of back opening, including neckband, then 3 rows down right side making 24 button loops in 3rd row.

Sew on buttons.
Press seams.

Materials

Original materials called for: 5 ozs Patons Beehive Fingering 3ply in main shade (lipstick red) and 1oz each of grey and white.

A pair each Nos 11 and 12 (3mm and 2¾mm) needles.

A No 12 (2¾mm) crochet hook.

24 small buttons.

Tension

8 sts and 10 rows to an inch.

Size matters

Original sized for bust 33-34 inch bust;
length from top of shoulders: 20½ ins.

See "adapting the size".

Abbreviations

k2tog: decrease by knitting 2 sts together.

k2togtbl: decrease by knitting 2 sts together through back loops, sometime called ssk (slip 1 knitwise, slip 1 knitwise, place 2 sts back on left needle and knit 2 slipped sts together through back loops)

Crochet abbreviations:

ch = chain
dc = double crochet

Remember these are English crochet instructions where dc is equivalent to US single crochet - see "Terminology" in the side bar.

A word on the wool.

Sara used Posh Yarn Diana 2 ply - about 600 yards for the main colour, and about 90 yards for the green contrast. For the white she used Capricorn Yarns brushed mohair 4 ply.

Disclaimer
(well...almost)

In transposing any pattern it is always a risk that errors will be introduced, in spite of dedicated proof reading.
If you have any problems with this pattern, please and I will try and assist.

Adapting the size:

As with many of these 50s patterns, only one size is given: 33-34 inch bust. The sweater is designed to fit snugly, but probably will not fit most of us.

It is designed to be knitted in 3 ply at about 30 sts to 4 inches. You can gain some leeway by changing the yarn - this is a simple shape so it should cope with that - you should check the length you want and adjust the inches you knit accordingly.

Sara cleverly converted the pattern to a top down knit on the fly, and this would be ideal to try that that if you are bold enough.

April 2010

Little Raglan Reefer

RaglanReefer.jpg

Here is a cute little knitted reefer for a small child (6-24months). It dates from pre 1960s where children's knitwear was not inspiring, but as soon as I saw this I wanted to make it - I am a sucker for any nautical theme, especially for kids (and dolls...)

Instructions.

This pattern is given for 2 size options - the instructions for the larger size are blue bold type in curly brackets.

Back

With No 10 (3¼mm) needles cast on cast on cast on 55{61} sts and work rib as follows:
1st rib row: K2; *p1, k1; repeat from * to last st, k1.
2nd rib row: *K1, p1; repeat from * to last st, k1.
Repeat these 2 rows 4 times, then 1st row once.

12th rib row: Rib 3{6}, (increase in next st, rib 6) 7 times, increase in next st, rib to end. [63{69}sts]

Change to No 8 (4mm) needles and proceed in cable pattern as follows:

1st row (right side facing): K9{10}; p1, k4, p1; k11{13}; (p1, k4, ) twice, p1; k11{13}; p1, k4, p1; k9{10}.
2nd row: K1, purl to the last st, k1.
3rd row: K9{10}; p1, C2F, p1; k11{13}; p1, C2F, p1; p1, C2B, p1; k11{13}; p1, C2B, p1; k9{10}.
4th row: as second row.
5th row: as first row.
6th row: as second row.
These 6 rows form the pattern.

Continue in pattern until you have completed row 28{32}.

Shape raglan: (keep continuity of pattern as you work these rows).

[Editor's note: you should be about to begin Row 5 of the pattern sequence for the smaller size and Row 3 (a cable row) for the larger size.]

Next row: Cast off 3sts, work to end.
Next row: K1, s1, k1, psso, work to last 3sts, k2tog, k1.
Next row: K1, purl to the last st, k1.

Repeat last 2 rows 18{20} times, [19{21}sts]
Cast off.

Front

With No 10 (3¼mm) needles cast on cast on cast on 55{61} sts and work rib for the first 11 rows as you did for the back.

12th rib row: Rib 3{6}, (increase in next st, rib 7) 6 times, increase in next st, rib to end. [62{68}sts]

Change to No 8 (4mm) needles and proceed as follows:

1st row (right side facing): K9{10}; p1, k4, p1; k8{9}; (p1, k1, ) 8{9} times; k1.

Turn and continue working on these 40{44}sts to make the left front (these instructions are intended for a boy - see editor's note below) and slip remaining 22{24} sts on to a stitch holder and leave to work later.

[Editor's note: If you want to make this for a girl - maybe in white? - then you will perhaps want to reverse these instructions by working the first 22{24} sts, casting on 20sts and working on these 40{44} sts as written, omitting the button holes. Pick up the rest of the sts to work the right front - and don't forget to work the buttonholes on the right front!]

2nd row: (K1, p1) 9{10} times; purl to the last st, k1.

[Editor's note: The centre panel on each of the front pieces is worked in double moss stitch, and I found it convenient to put a stitch marker after I had worked the first 18{20} sts of row 2, to show the limit of this section.]

3rd row: K9{10}; p1, C2B, p1; k7{8}; * p1, k1; repeat from * to end.
4th row: K2, (p1, k1) 8{9} times; purl to the last st, k1.
5th row (on which buttonholes are worked): K9{10}; p1, k4, p1; k8{9}; p2tog, yrn, * p1, k1; repeat from * to last 3 sts; yfwd, k2tog, k1.
6th row: as second row.
7th row: K9{10}; p1, k4, p1; k7{8}; * p1, k1; repeat from * to end.
8th row: as 4th row.
9th row: K9{10}; p1, C2B, p1; k8{9}; * p1, k1; repeat from * to last st, k1.
10th row: as second row.
11th row: as 7th row.
12th row: as 4th row.

Keeping cable and moss stitch panel correct throughout, work 16{20} rows, working buttonholes as before on the 9th of these rows (row 21 for both sizes).

Shape raglan: (keep continuity of pattern across the cables and the centre moss stitch panel as you work these rows).

Next row: Cast off 3sts, work to end.
Next row: Work across in pattern to the last st, k1.
Next row: K1, s1, k1, psso, work to end.
Next row: Work across in pattern to the last st, k1.

Repeat last 2 rows 10{11} times, [26{29}sts]
Next row: K1, s1, k1, psso, work to end.
Next row: Cast off 5sts, work across in pattern to the last st, k1.
Next row: K1, s1, k1, psso, work to end, and cast on 5 sts.
[Editor's note: This creates the jacket-style revere].

** Keeping continuity of the pattern, continue to decrease at the armhole edge as before until 18{20} sts remain of the moss stitch panel.
Work a further 16{18} rows straight in moss stitch as set.
Cast off.

Completing the other side to make the right front:

Slip the sts from the stitch holder on to a No 10 needle, point facing centre of work (right side facing you), and cast on 18{20}sts. [40{44}sts].
Change to No 8 needles and proceed as follows:

1st row (right side facing): K2; (p1, k1) 8{9} times; k7{8}; p1, k4, p1; k9{10}.
2nd row: K1, purl to the last 18{20} sts; (p1, k1) 9{10} times.
3rd row: (K1, p1 ) 9{10} times; k7{8}; p1, C2F, p1; k9{10}.
4th row: K1, purl to the last 18{20} sts; (k1, p1) 8{9} times; k2.
5th row: as first row.
6th row: as second row.
7th row: (K1, p1 ) 9{10} times; k7{8}; p1, k4, p1; k9{10}.
8th row: as 4th row.
9th row: K2; (p1, k1) 8{9} times; k7{8}; p1, C2F, p1; k9{10}.
10th row: as second row.
11th row: as 7th row.
12th row: as 4th row.

Keeping cable and moss stitch correct throughout, work 17{21} more rows, thus finishing at side edge.

Shape raglan: (keep continuity of pattern across the cables and the centre moss stitch panel as you work these rows).

Next row (wrong side facing): Cast off 3sts, work to end.
Next row: Work across in pattern to the last 3 sts, k2tog, k1.
Next row: K1, work to end.

Repeat the last 2 rows 10{11} times, [26{29}sts]

Next row: Cast off 5sts, work across in pattern to the last 3 sts, k2tog, k1.
Next row: K1, work to end, cast on 5 sts.

Complete to match the left side of front, working from ** to end.

Right sleeve:

Using No 10 needles, cast on 32{34}sts. Work 13{15} rows in k1, p1 rib.

Next row: Rib 3{4}; (increase in next st, rib 4) 5 times; increase in next st, rib to end. [38{40}sts]

Change to No 8 needles and proceed in stocking stitch with cable panels set as follows:

1st row (right side facing): K3{3}; (p1, k4, p1, k7{8}) twice; p1, k4, p1; k3{3}.
2nd row: K1, purl to the last st, k1.
3rd row: K3{3}; (p1, C2B, p1, k7{8}) twice; p1, C2B, p1; k3{3}.
4th row: as second row.
5th row: as first row.
6th row: as second row.
These 6 rows form the pattern.

Continue in pattern as on last 6 rows, increasing 1 st at both ends of next and every following 6th row, until there are 50{54}sts; work the extra sts in stocking stitch.
Then work 3{7} rows straight before starting the raglan decreases.

Shape raglan by working rows as you did for the back:

Next row: Cast off 3sts, work to end.
Next row: K1, s1, k1, psso, work to last 3sts, k2tog, k1.
Next row: K1, purl to the last st, k1.

Repeat last 2 rows 18{20} times, [6{6}sts]
Cast off.

Right sleeve:

Work as for the right sleeve, but working C2F instead of C2B.

[Editor's note: The sleeves are identical apart from the way the cables twist, and obviously you can choose to sew them into the Reefer in whatever orientation you prefer.]

To Make Up

Block each piece from the wrong side, pressing very lightly using a warm iron and a damp cloth, omitting the ribbing.

Join side, raglan, and sleeve seams using a flat seam.
Stitch the collar into position across the sleeve tops and back of the neck, joining the 20 cast-off sts together at the centre back.

Stitch down the 20 cast-on stitches at the waist on the inside.
Attach buttons to match buttonholes.
Press seams lightly.

Materials

Original materials called for: 3{4} ozs Patons Quickerknit Baby (wool or bri-nylon).
Sample shown (larger size) used 4 x 50g balls Debbie Bliss Baby Cashmerino in navy blue.

A pair each Nos 8 and 10 (4mm and 3¼mm) needles.

Four gold coloured buttons (mine are inexpensive plastic buttons with anchor design).

AnchorButton.jpg

Tension

24 sts and 32 rows to 4 inches on No 8 needles. You may need to use a smaller needle to get the right tension using the Baby Cashmerino.

Size matters

Chest 20{22} ins. Length, 9½{10½} ins. Sleeve seam, 6¾{} ins.

Abbreviations

C2F: "cable 2 front". Slip 2sts on to a cable needle, leave at front of work, knit 2sts, then knit 2sts from cable needle.

C2B: "cable 2 back". Slip 2sts on to a cable needle, leave at back of work, knit 2sts, then knit 2sts from cable needle.

Increase: increase by knitting into front and back of the next stitch.

k2tog: (decrease) knit 2 sts together.

s1,k1,psso: (decrease) slip 1, knit 1, pass the slipped stitch over, or "ssk", slip, slip, knit.

yrn/yfwd: yarn round needle / yarn forward.
Makes an extra stitch which forms a buttonhole when knitted on the next row.


A word on the wool.

I believe "quicknit" wools evolved as a compromise yarn for baby designs. They were half way between traditional DK and 4 ply; Phildar marketed Pronostic (a synthetic) which was much used for their baby patterns, being hard wearing and practical.
These days there are many yarn weight variations without rigid adherence to specific tension schemes, and so light worsted weights are much more common than when this pattern first appeared.

Debbie Bliss Baby Cashmerino is one such yarn being of superb quality, highly practical, and knitting to this convenient gauge for baby knitwear.
I used the No 8 needles as specified in the pattern, and produced a fairly loose fabric; I think the yarn is better suited to No 9 or 10 needles (3¾ mm - 3¼ mm).

Disclaimer
(well...almost)

In transposing any pattern it is always a risk that errors will be introduced, in spite of dedicated proof reading.
If you have any problems with this pattern, please and I will try and assist.

WilliaminReefer1.jpg

WilliaminReefer2.jpg

RaglanReeferB&W.jpg

March 2010

Time for Change (... or "Spring Forward")

PinkClock.jpg

The clocks changed for British Summer Time last night - so here's a Spring clock!

Last summer our kitchen clock stopped working - not simply the battery this time. I took the cheap plastic mechanism to pieces - which was very interesting for me, and very irritating for George - but my only conclusion was that it was broken. I discovered I could get a relatively inexpensive replacement module from a local electronics chain store.
At some point along the way, I had the idea to make a knitted clock face - not sure where it came from - but here are my ideas in case you too want to create this somewhat over-the-top quirky original.

Making the clock

If you want to make the whole body of the clock yourself from scratch then you can buy the mechanism and hands from Maplins (or elsewhere I suspect) either online or from one of their shops for about £5. However, having done this to refurbish my old clock, I found that IKEA sell the entire clock (including mechanism and hands) for under £2.
In the end I made a couple of these clocks - using my old IKEA clock and a new one. Here is what I did.

The clock face

First of all - it is very important that the clock face that you knit is not too thick - if it is then it will stop the hands going round. This is because we are using a supplied module where the height of the hands above the clock face is pre-defined. I have not thought of any clever way of increasing the height, so - make sure your knitting is as fine as possible. The hour hand is the one closest to the clock face, and it is also the shortest - so you can cope better with increased texture towards the rim of the clock, for example, to create the markers for the hours, which could be, for example, buttons, knitted bobbles, or embellishments such as rhinestones or silk roses.
[Editor's note: I actually trimmed the minutes and second hands as they were not high enough to pass over the silk rose embellishments.]

The clock face is knitted from the pattern for the smaller table mat (the pattern for the mats is given in its entirety below).

I stopped after row 47 of the smaller mat and continued working each section of the mat with short rows before casting off - this helped make the face rounder, minimising the pointed edges:
48th round: * P23; turn the work and work back: sl1, k22; turn the work again: slip the first stitch and pass the last stitch from the previous set on the right hand needle over the first stitch; continue loosely casting off the next 22sts purlwise; sl1, k1, psso; repeat from * to end.
Fasten off.

However, once I had finished, I found the whole thing was very slightly too big. So in the end I had to adapt it to make it even smaller, because I did not want to change to a finer yarn.


Carefully take the clock to pieces. The following relates specifically to the clocks I used.

The plastic front cover is secured to the outer rim by moulded plastic clips which should be released at the back - I managed to release them easily enough using my thumbnail. I then pushed the front face further upwards from the back using a small screwdriver or steel knitting needle - push at each clip in turn a few millimetres at a time until the front face comes free.
Remove the 3 hands by simply pulling (gently) away from the central shank attached to the mechanism. Note that shank is made up of concentric rings, with each hand attached to a different size of ring. The hour hand is the lowest, and sits on the largest ring.
Next, remove the clock face. In these budget clocks the face is simply robust paper, and I managed to peel the paper away from the securing sticky tape without damaging it. I turned the paper over to make a plain clock face, and glued my knitted face to it using tacky glue, and left it under weights to dry overnight.
[Editor's note: If you want to embroider the hour markers, then do so before you attach the backing.]

PinkClock-dismantled.jpg

Add any non-knitted embellishments to mark the hours, and reassemble the clock.
Push the clock face well down on the clock mechanism - add glue in the centre if necessary.
Make sure the hour markers are correctly oriented with respect to the way the clock will hang on the wall (ie 12 at the top!). Hour first, minutes next and finally the second hand. Point all the hands to 12 to start with.
[Editor's note: If you want you can paint the hands to match your colour scheme. I would leave the hour and minute hands in black (or white) as they need to be a sharp contrast to the face colour. I thought it might be fun to paint glue on the hands and dip in sparkles for my pink clock. Whatever you decide, do not add anything that will make the hands too heavy, otherwise it will disrupt the function of the clock mechanism.]
Push the plastic cover back into place, allowing the plastic clips to click into position.

Now you are ready to embellish the surrounding frame of your clock. Here is an opportunity for your own imagination - I knitted a fancy strip, which I tried to glue it (slightly stretched) around the rim edge with tacky glue, holding the surround in place with clothes pegs until the glue dried. However this did not work well and I ended by drilling tiny holes around the back edge of the plastic surround and securing the edge by sewing through them.

PinkClock-detail.jpg


Knitted frame for the clock

This is a simple knitted strip, using a technique I learned at a workshop with Fi Morris.
It is garter stitch, so the strip is fairly stretchy; it can snuggly form itself around a curved surface, and it has an elegant wavy edge to suit a round "romantic" styled clock.

Cast on 12 sts and knit 2 rows, then begin the short row pattern:

Row 1: K10; wrap the next stitch by bringing the yarn to the front of the work, slip the next stitch on to the right hand needle, take the yarn to the back of the work, slip the stitch back on to the left hand needle; turn the work.
Row 2 (and alternate rows): Knit to end of row.
Row 3: K9; wrap the next stitch; turn the work.
Row 5: K8; wrap the next stitch; turn the work.
Row 7: K7; wrap the next stitch; turn the work.
Row 9: K6; wrap the next stitch; turn the work.
Row 11: K5; wrap the next stitch; turn the work.
Row 13: K4; wrap the next stitch; turn the work.
Row 15: K3; wrap the next stitch; turn the work.
Row 17: K2; wrap the next stitch; turn the work.
Row 19: K1; wrap the next stitch; turn the work.
Row 20: Knit to end of row (that is knit 1 stitch).

Then knit across all 12 sts for 3 rows.
[Editor's note: The slipped stitches are elongated when knitted, and form part of the pattern.]

Repeat these 23 rows until the strip is as long as you need.

My clock was about 30 inches round and I did 40 repeats in 4ply yarn using 2½mm needles to fit around it. I cast on with waste yarn and grafted the sts together to make a ring before stretching it over the clock and glueing in place.


1950s Table Mats

Instructions

To make the pink clock face I worked the smaller mat using a vintage 4ply synthetic yarn. These are the full instructions for the table mats here (in case you want to make table mats).

Large place mat

Cast on 8 sts, (2 sts on one needle and 3 sts on each of 2 needles), and join in a round.

1st and 2nd round: Knit.
3rd round: * Yfd, k1; repeat from * to end. [16 sts]
4th and alternate rounds: Knit.
[Editor's note: Although these instructions say "alternate rounds" please note that SOME alternate (even numbered) rounds are not knitted plain. I have highlighted these exceptional rows in bold type.]
5th round: * Yfd, k2; repeat from * to end. [24 sts]
7th round: * Yfd, k3; repeat from * to end. [32 sts]

Continue to increase in this manner having one more knit stitch in each repeat until the round 'yfd, K25' has been worked.

52nd round: Knit. [208 sts]
53rd round: * Yfd, k1; yfd, k25; repeat from * to end. [224 sts]
54th and alternate rounds: Knit.
55th round: * Yfd, k3; yfd, sl1, k1, psso; k23; repeat from * to end. [232 sts]
57th round: * Yfd, k5; yfd, sl1, k1, psso; k22; repeat from * to end. [240 sts]
59th round: * Yfd, k7; yfd, sl1, k1, psso; k21; repeat from * to end. [248 sts]
61st round: * Yrn, p9; yon, sl1, k1, psso; k20; repeat from * to end. [256 sts]
62nd round: * P11, k21; repeat from * to end.
63rd round: * Yrn, p11; yon, sl1, k1, psso; k19; repeat from * to end. [264 sts]
64th round: * P13, k20; repeat from * to end.
65th round: * Yfd, k2; (yfd, k2tog) 5 times; k1, yfd, sl1, k1, psso; k18; repeat from * to end. [272 sts]
66th round: Knit.
67th round: * Yrn, p15; yon, sl1, k1, psso; k17; repeat from * to end. [280sts]
68th round: * P17, k18; repeat from * to end.
69th round: * Yrn, p17; yon, sl1, k1, psso; k16; repeat from * to end. [288sts]
70th and alternate rounds: Knit.
71st round: * Yfd, k19; yfd, sl1, k1, psso; k15; repeat from * to end. [296 sts]
73rd round: * Yfd, (k2tog, yfd, k1, yfd, k2tog, k3) twice; k2tog, yfd, k1, yfd, k2tog; yfd, sl1, k1, psso; k14; repeat from * to end. [304 sts]
75th round: * Yfd, (k2tog, yfd, k3, yfd, k2tog, k1) twice; k2tog, yfd, k3, yfd, k2tog; yfd, sl1, k1, psso; k13; repeat from * to end. [312 sts]
77th round: * Yfd, k2tog; (yfd, k5, yfd, sl1, k2tog, psso) twice; yfd, k5, yfd, k2tog; yfd, sl1, k1, psso; k12; repeat from * to end. [320 sts]
79th round: * (Yfd, k3, yfd, k2tog, k1, k2tog) 3 times; yfd, k3, yfd, sl1, k1, psso; k11; repeat from * to end. [328 sts]
81st round: * (Yfd, k5, yfd, sl1, k2tog, psso) 3 times; yfd, k5, yfd, sl1, k1, psso; k10; repeat from * to end. [336 sts]
83rd round: * Yfd, k31, yfd. sl1, k1, psso, k9; repeat from * to end. [344 sts]
85th round: * Yrn, p33, yon, sl1, k1. psso; k8; repeat from * to end. [352 sts]
86th round: * P35, k9; repeat from * to end.
87th round: * Yrn, p35, yon, sl1, k1. psso; k7; repeat from * to end. [360 sts]
88th round: Knit.
89th round: * Yfd, k2; (yfd, k2 tog) 17 times; k1, yfd, sl1, k1, psso, k6; repeat from * to end. [368 sts]
90th round: Knit.
91st round: * Yrn, p39; yon, sl1, k1, psso, k5; repeat from * to end. [376 sts]
92nd round: * P41, k6; repeat from * to end.
93rd round: * Yrn, p41; yon, sl1, k1, psso, k4; repeat from * to end. [384 sts]
94th round: Knit.
95th round: * Yrn, p43; yon, sl1, k1, psso, k3; repeat from * to end. [392 sts]
96th round: * P45, k4; repeat from * to end.
97th round: * Yrn, p45; yon, sl1, k1, psso, k2; repeat from * to end. [400 sts]
98th round: * P47, k3; repeat from * to end.
99th round: * Yfd, k2; (yfd, k2tog) 22 times; k1, yfd, sl1, k1, psso, k1; repeat from * to end. [408 sts]
100th round: Knit.
101st round: * Yrn, p49; yon, sl1, k1, psso; repeat from * to end. [416 sts]
102nd round: * P51, k1; repeat from * to end.
103rd round: * Yrn, p51, yon, k1; repeat from * to end. [432 sts]
104th round: Knit.

Cast off loosely.

Smaller side mat

Cast on 8 sts, (2 sts on one needle and 3 sts on each of 2 needles), and join in a round.

1st and 2nd round: Knit.
3rd round: * Yfd, k1; repeat from * to end. [16 sts]
4th and alternate rounds: Knit.
[Editor's note: Although these instructions say "alternate rounds" please note that SOME alternate (even numbered) rounds are not knitted plain. I have highlighted these exceptional rows in bold type.]
5th round: * Yfd, k2; repeat from * to end. [24 sts]
7th round: * Yfd, k3; repeat from * to end. [32 sts]

Continue to increase in this manner having one more knit stitch in each repeat until the round 'yfd, K12' has been worked.


26th round: Knit. [104 sts]
27th round: * Yfd, k1; yfd, k12; repeat from * to end. [120 sts]
28th and alternate rounds: Knit.
29th round: * Yfd, k3; yfd, sl1, k1, psso; k10; repeat from * to end. [128 sts]
31st round: * Yfd, k5; yfd, sl1, k1, psso; k9; repeat from * to end. [136 sts]
33rd round: * Yfd, k7; yfd, sl1, k1, psso; k8; repeat from * to end. [144 sts]
35th round: * Yfd, p9; yon, sl1, k1, psso; k7; repeat from * to end. [152 sts]
36th round: * P11, k8; repeat from * to end.
37th round: * Yfd, k2; (yfd, k2tog) 4 times; k1, yfd, s11, k1, psso; k6; repeat from * to end. [160 sts]
38th round: Knit.
39th round: * Yrn, p13; yon, s11, k1, psso; k5; repeat from * to end. [168 sts]
40th round: * P15, k6; repeat from * to end.
41st round: * (Yfd, k1, yfd, s11, k1, psso, k2, k2tog) twice; yfd, k1, yfd, s11, k1, psso; k4; repeat from * to end. [176 sts]
42nd round: Knit.
43rd round: * (Yfd, k3, yfd, s11, k1, psso, k2tog) twice; yfd, k3, yfd, s11, k1, psso; k3; repeat from * to end. [184 sts]
44th round: Knit.
45th round: * Yrn, p19, yon, sl1, k1, psso, k2; repeat from * to end. [192 sts]
46th round: * P21, k3; repeat from * to end.
47th round: *Yfd, k2; (yfd, k2tog) 9 times, k1, yfd, sl1, k1, psso, k1; repeat from * to end. [200 sts]

---------------->>>NOTE<<<-------------------
To make the clock face the right size for my clock - using my vintage yarn - I stopped knitting the table mat at this point. Please refer to the additional instructions telling you how I executed the finishing rows for the clock face.
-------------->>>End of Note<<<----------------

48th round: Knit.
49th round: * Yrn, p23; yon, s11, k1, psso; repeat from * to end. [208 sts]
50th round: * P25, k1; repeat from * to end.
51st round: * Yrn, p25; yon, k1, psso; repeat from * to end. [224 sts]
52nd round: Knit.

Cast off loosely.

To Make Up

Sew in all ends.
Damp and pin out to measurements.

Materials

2 x 20g balls Coats Chain Mercer-Crochet No 20 in selected colour to knit the table mats.
**

To knit the clock: one 50g ball of fine yarn (3 or 4ply or finer) in your chosen colour.

Set of 4 No 14 needles pointed both ends for the clock face or table mats.

A pair of No 12 (2¾mm) needles to knit the clock face surround.

Embellishments available from John Lewis branches or
knitandsew.co.uk.

Tension

Original cotton yarn knits 15 rows to one inch.**

Size matters

Largeer place mat: 14in diameter;
smaller side mat: 7in diameter

Abbreviations

yfwd/yrn/yon: "yarn forward"/"yarn round needle" /"yarn over needle"; make a stitch by passing the yarn over the needle.
sl1: slip one stitch.
psso: pass the slipped stitch(es) over.
k2tog: knit 2 stitches together.

**A word on the wool.

I used a vintage 4ply synthetic mix of "unknown origin" to knit the clock. The side mat worked up sligtly too large for my clock face, so I had to adpat the pattern (see instructions).

The recommended Coats crochet yarn would be suitable, and help ensure the clock face was not too thick.

Disclaimer
(well...almost)

In transposing any patterns it is always a risk that errors will be introduced, in spite of dedicated proof reading.
This can be very frustrating with lace patterns.
If you have any problems with this pattern, do not hesitate to and I will try and assist.


Footnote on knitted clocks

I did think that there would be nothing else like this - but as we know there is nothing new in this world. A while after I first discussed the project with Alison, she pointed me at this Clock Tam from Knitpicks.

February 2010

Fringed Yoke

Knitted in a light weight yarn and originally designed in the 1950s to wear under or over a sweater with a lower neckline. The original is a "fringed cable yoke" (in case you want to show it off over the sweater) but I have omitted the fringing; I wear it as a convenient alternative to a scarf. The yarn I used is more a 4ply than a 3ply weight so my version is very slightly bulkier and longer than the original.

Instructions.

Cables are worked as follows:

Cable 8: Slip next 4sts. onto a cable needle and leave at back of work; k4, then k4 from cable needle.
Cable 7: Slip next 4sts. onto a cable needle and leave at back of work; k3, then k4 from cable needle.
Cable 6: Slip next 3sts. onto a cable needle and leave at back of work; k3, then k3 from cable needle.
Cable 5: Slip next 3sts. onto a cable needle and leave at back of work; k2, then k3 from cable needle.
Cable 4: Slip next 2sts. onto a cable needle and leave at back of work; k2, then k2 from cable needle.
Cable 3: Slip next 2sts. onto a cable needle and leave at back of work; k1, then k2 from cable needle.

Now begin the yoke, which is worked in one piece.

Cast on 288 sts fairly loosely and work in cable pattern as follows:

1st row (right side facing): P4, * k8, p8; repeat from * to last 12 sts, k8, p4.
2nd row: K4, * p8, k8; repeat from * to last 12 sts, p8, k4.

Repeat the 1st and 2nd rows 3 times more.

9th row: P4, * cable8, p8; repeat from * to last 12 sts, cable8, p4.
10th row: as 2nd row.
11th row: as 1st row.
12th row (decrease row): K4, * p8, k3, k2tog, k3; repeat from * to last 12 sts, p8, k4. [271 sts]
13th row: P4, * k8, p7; repeat from * to last 12 sts, k8, p4.
14th row: K4, * p8, k7; repeat from * to last 12 sts, p8, k4.
15th and 16th rows: as 13th and 14th rows.
17th row: P4, * cable8, p7; repeat from * to last 12 sts, cable8, p4.
18th row (decrease row): K4, * p3, p2tog, p3, k7; repeat from * to last 12 sts, p3, k2tog, p3, k4. [253 sts]

Work 5 rows straight keeping the continuity of the cable rib pattern.

24th row (decrease row): K4, * p7, k3, k2tog, k2; repeat from * to last 11 sts, p7, k4. [236 sts]
25th row: P4, * cable7, p6; repeat from * to last 11 sts, cable7, p4.

Work 4 rows straight keeping the continuity of the cable rib pattern.

30th row (decrease row): K4, * p3, k2tog, p2, k6; repeat from * to last 11 sts, p3, p2tog, p2, k4. [218 sts]

Work 2 rows straight keeping the continuity of the cable rib pattern.

33rd row: P4, * cable6, p6; repeat from * to last 10 sts, cable6, p4.

Work a further 2 rows straight keeping pattern as before.

Continue thus, working a cable on every 8th row from previous cable, at the same time decreasing alternately in the knit and then in the purl panels, that is: decrease 1 stitch in each of the 15 knit panels on next row, then 1 stitch in each of the 17 purl panels on the following 6th row, omitting the 4 border stitches at each end.

Repeat these 2 decrease rows with 5 rows straight between each and always keeping continuity of cable rib pattern until you have worked 10 decrease rows in all, when 113 sts remain and 3 sts remain in each of the knit and purl panels with the 4 border stitches at each end.

Work a further 4 rows straight.

Next row: P4, * cable3; repeat from * to last 7 sts., cable 3, p. 4.

Work a further 5 rows straight in rib, then work another row cabling across the 3 knit stitches as before. Repeat last 6 rows until work measures 8 inches, then work a further 2 rows in rib.

Cast off.

To work the buttonholes:
With crochet hook, work 3 rows of double crochet down left side of opening, then 3 rows down right side, making 8 small button loops in 3rd row. Fasten off.

Optional fringing:
Cut 2 strands of wool each 3 inches long, fold in half and knot through every alternate stitch of cast-on edge. Now take last 2 strands from one knot together with first 2 from next knot and knot these 4 together to form trellis fringe as shown in photograph. Trim fringe evenly. Sew on buttons. Do not press cables but press crochet edging lightly.

To Make Up

Sew in all ends.
Do not press cables but press crochet edging lightly.
Sew on buttons.

Materials

Original materials called for: 2 ozs. Patons Beehive Fingering 3-ply. **

A pair of No 12 (2¾mm) needles.
[Editor's note: You can use a circular needle here but knit backwards and forwards.]
A cable needle.
A No 13 (2¼mm) crochet hook.
8 small buttons.

Tension

Original yarn knits 34sts x 42 rows to four inches over stocking stitch on No 12 needles.

Substitute yarn knits 27sts x 38 rows to four inches on 2½mm needles.

Size matters

One size. Depth: 8 inches, excluding fringe.

**A word on the wool.

I used a vintage Phildar yarn called Anouchka (80% acrylic 16%, mohair, 4% wool), in a bright red. It knits to a tension of 27sts x 38 rows on 2½mm needles, and I used No 13 (2¼mm) regardless of tension.

Crochet

Double crochet in the UK is equivalent to US single crochet - see "Terminology" in the side bar.

Disclaimer
(well...almost)

In transposing any patterns it is always a risk that errors will be introduced, in spite of dedicated proof reading.
If you have any problems with this pattern, please and I will try and assist.

January 2010

Elegant Yoked Sweater

CableYokeSweater.jpg

Fabulous sweater-girl look from the 1950s created by Sara.
This is a close-fitting design with some negative ease. Sara created hers from the top down translating the instructions as she went along; she did not write down her adaptation, but it is far from impossible to convert it dynamically, as Sara did, with this type of design.
Instructions are provided for one size only, but some modifications are possible.

Instructions.

The cable over 6 sts is worked as follows:

Cable: Slip next 3 sts. onto a cable needle to back of work; k3, then k3 from cable needle.

Back and front alike:

With No 11 (3mm) needles cast on 84 sts and work 3½ inches in k1, p1 rib. Change to No 10 (3¼ mm) needles and stocking-stitch, increasing 1 stitch at each end of 7th and every following 6th row until there are 102 sts.
Work straight until back measures 12 inches at centre.
With right side facing, shape armholes by decreasing 1 stitch at each end of next and every following knit row until 78 sts remain.
Purl back and leave stitches on a spare needle, or stitch holder.

Work a second identical piece for the front.

Sleeves (make 2):

You have the option of log or short sleeves - work one or other set of intructions.

Long sleeve: With No 11 needles cast on 48 sts and work 3 inches in k1, p1 rib. Change to No 10 needles and stocking-stitch, increasing 1 stitch at each end of 7th and every following 6th row until there are 76 sts.
Work straight until sleeve measures 17 inches.
With right side facing, shape top by decreasing 1 stitch at each end of next and every following knit row until 52 sts remain.
Purl back and leave stitches on spare needle, or stitch holder.

Short sleeve: With No 11 needles cast on 66 sts and work 1 inch in k1, p1 rib. Change to No 10 needles and stocking stitch, increasing 1 stitch at each end of 3rd and every following 4th row until there are 76 sts. Work straight until sleeve measures 4½ inches, then shape top as for long sleeve.

Yoke:

You should now have 2 identical pieces for the back and front, and two identical pieces for the sleeves, all on spare needles or stitch holders.

With right side facing and the set of No 10 needles.....
[Editor's note: The yoke is going to be pulled in by the cable pattern. Sara noticed that the yoke tends to ride up a little in her version, and this may be improved by increasing the needle size for the yoke section. Whatever needle size you chose for the main body, consider going up a size for the yoke.]
arrange stitches thus:-
place the 52 stitches of the left sleeve, and the first 40 stitches of the front on the first needle; the last 48 sts of the front and the 52 sts of the right sleeve on the second needle; and 78 stitches of the back onto the third needle. [260 sts].

[Editor's note: If you are using a circular needle, thread the stitches on in the order: sleeve, front, sleeve, back. Put a stitch marker to mark the beginning/end of the round, as front and back look the same. Also remember that the yoke decreases in size until it becomes the neck opening so you may wish to change between lengths of circular needle and finally move to 4 needles as the round becomes smaller.]

Work in rounds as follows:

1st round: K5, * k7, p2, k17; repeat from * ending last repeat k12 instead of k17.
2nd round: K5, * k6, p4, k16; repeat from * ending last repeat k11 instead of k16.
3rd round: K5, * k5, p6, k15; repeat from * ending last repeat k10.
4th round: K5, * k4, p8, k14; repeat from * ending last repeat k9.
5th round: K5, * k3, p10, k13; repeat from * ending last repeat k8.
6th round: K5, * k2, p12, k12; repeat from * ending last repeat k7.
7th round: K5, * k1, p14, k11; repeat from * ending last repeat k6.
8th round: K5, * p16, k10; repeat from * ending last repeat k5.
9th round: K4, * p18, k8; repeat from * ending last repeat k4.
10th round: K4, * p6, k6, p6, k8; repeat from * ending last repeat k4.
11th round: as 10th round.

12th round: K2tog, k2, * p6, cable, p6, k3, k2tog, k3; repeat from * to last 22sts, p6, cable, p6, k4. [250 sts]
13th round: K3, * p6, k6, p6, k7; repeat from * ending last repeat k4.
14th, 15th, 16th, and 17th rounds: As 13th round.

18th round: K3, * p6, cable, p6, k2, k2tog, k3; repeat from * to last 22sts, p6, cable, p6, k2, k2tog. [240 sts]
19th round: K3, * p6, k6, p6, k6; repeat from * ending last repeat k3.
20th, 21st, 22nd, and 23rd rounds: As 19th round.

24th round: K2tog, k1, * p6, cable, p6, k2, k2tog, k2; repeat from * to last 21sts, p6, cable, p6, k3. [230 sts]
25th round: K2, * p2tog, p4, k6, p4, p2togtbl, k5; repeat from * ending last repeat k3. [210 sts]
26th round: K2, * p5, k6, p5, k5; repeat from * ending last repeat k3.
27th, 28th, and 29th rounds: As 26th round.

30th round: K2, * p5, cable, p5, k2, k2tog, k1; repeat from * to last 19sts, p5, cable, p5, k1, k2tog. [200 sts]
31st round: K2, * p2tog, p3, k6, p3, p2togtbl, k4; repeat from * ending last repeat k2. [180sts]
32nd round: K2, * p4, k6, p4, k4; repeat from * ending last repeat k2.
33rd, 34th, and 35th rounds: As 32nd round.

36th round: K2tog, * p4, cable, p4, k1, k2tog, k1; repeat from * to last 16sts; p4, cable, p4, k2. [170sts]
37th round: K1, * p2tog, p2, k6, p2, p2togtbl, k3; repeat from * ending last repeat k2. [150 sts
38th round: K1, * p3, k6, p3, k3; repeat from * ending last repeat k2.
39th, 40th, and 41st rounds: As 38th round.

42nd round: K1, * p3, cable, p3, k2tog, k1; repeat from * to last 14 sts; p3, cable, p3, k2tog. [140 sts]
43rd round: K1, * p2tog, p1, k6, p1, p2togtbl, k2; repeat from * ending last repeat k1. [120 sts]
44th round: K1, * p2, k6, p2, k2; repeat from * ending last repeat k1.
45th, 46th, and 47th rounds: As 44th round.

48th round: P2tog, * p1, cable, p2, k2tog, p1; repeat from * to last 10sts, pl, cable, p2, k.l. [110 sts]
49th round: * P2tog, k6, p2, p2togtbl, k1; repeat from * to end. [90 sts]
50th round: * P1, k6, p1, k1; repeat from * to end.
51st, 52nd, and 53rd rounds: As 50th round.

Divide stitches onto No 11 needles, 45 across front and 45 across back. Work 7 rows k1, p1 rib across front of neck; cast off in rib. Work back of neck in the same way.

To Make Up

Press parts on wrong side under a damp cloth.
Join side and sleeve seams and right shoulder ribbing.
Sew 2 press-studs on left shoulder. Press seams.

Materials

Original materials called for: 14 ozs. for long sleeves, 11 ozs. for short sleeves of Patons Moorland Double Knitting**.

Example knitted in Twilleys Freedom Spirit DK - 8 x 50g balls - about 900m.

1 pair each of No 11 (3mm), and No 10 (3¼ mm) needles, and a set of 4 No 10 (3¼ mm) needles, or circular needle.[Editor's note: Please see the important notes about the wool used for the modern version, the consequent needle sizes used, and the sizing.]

A cable needle. Two press-fasteners.

Tension

Original yarn knits 24sts x 32 rows to four inches on No 10 needles.

Substitute yarn knits 22sts x 28 rows to four inches on No 8 (4mm) needles.

Size matters

Original sized for bust 33-35 inches; length from top of shoulders 20½ inches; sleeve seam: 17 or 4½ inches.

See "adapting the size".

**A word on the wool.

If you have some vintage Patons Moorland DK - you may like to note that I surmise they used this brand name for more than one version of this wool; I have some Moorland from the 1980s and I believe it is a relatively thick DK, which would be hard to contemplate knitting on No10 needles.

Sara used Twilleys Freedom Spirit DK, (120m per 50g ball), which knits as 22sts x 28 rows to 4ins on 4mm needles.
[Editor's note: This wool is ideal for felting, so be extra careful when washing it.]
If you use a needle size of No 8 (4mm) needles instead of the original needles, it will increase the nominal size of the sweater from 34 to 37 ins. This may be desirable.

See "adapting the size".

Disclaimer
(well...almost)

In transposing any patterns it is always a risk that errors will be introduced, in spite of dedicated proof reading.
If you have any problems with this pattern, please and I will try and assist.

Adapting the size:

The original pattern is for one size: 34-35 inch bust. The sweater is designed to be tightly fitting, and the nominal sweater size is just under 34 ins, so it intends there to be slight negative ease. The original wool and needle sizes indicate a "fine double knitting" wool with a tension of 24sts to 4 inches on 3¼mm (relatively fine) needles.

The sizing is a bit small for an average size these days, so moving to a conventional DK wool (22 sts to 4 ins on 4mm needles) makes a nominal size of about 36½ins, making the sweater suitable for up to a 37-38 ins bust. Also - whatever wool and needle size you opt for - note particularly the suggestion to move to a larger needle size when working the yoke.

If you increase the size by further gauge changes with thicker wool, you will find that the sweater may be less suited to the close fitting styling, and you lose the 50s "look".

CableYokeOriginal.jpg CableYokealaMode.jpg

© Christina Coutts 2007

Helpful Stuff

Pattern Archive

Categories

Yarn Links

Fabric etc

Stuff to do

  • Little rabbits
  • V&A 1940s Patterns
  • Monkey Socks
  • Necktie Bag
  • Posh Gloves
  • Criss-cross coasters