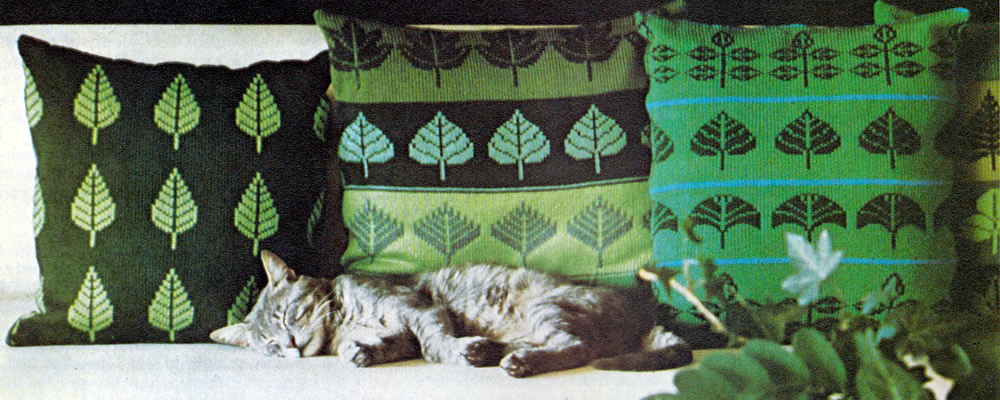
Instructions
The coat is worked in a number of repeated "patterns".
To make 1 pattern:
3 ch, 1 dc in next 5 ch sp, 3 ch, 1 tr in next tr, 5 ch, 1 tr in next
tr
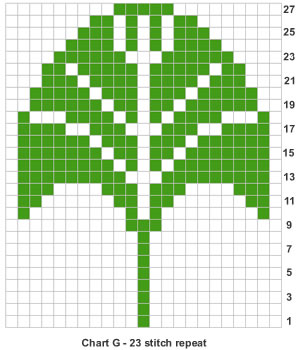
Motif Panel Pattern
(Worked over 6½ patterns)
1st row (wrong side facing): 5 ch,
1 tr in next tr, 1 pattern, 2 ch, 1 tr in next 5 ch sp, 2 ch, 1 tr in
next tr, 5 ch, 1 tr in next tr, 4 patterns.
2nd row: 4 patterns, 2 ch, 1 tr in next 5 ch sp, 2 ch, 1 tr
in next tr, 2 tr in next 2 ch sp, 1 tr in next tr, 2 ch, 1 tr in next
tr, 1 pattern, 3 ch, 1 dc in next 5 ch sp, 3 ch, 1 tr in next tr.
3rd row: 5 ch, 1 tr in next tr, 1
pattern, 2 ch, 1 tr in each of next 4 tr, 2 tr in next 2 ch sp, (1 tr
in next tr, 2 ch) twice, 1 tr in next 5 ch sp, 2 ch, 1 tr in next tr,
5 ch, 1 tr in next tr, 3 patterns.
4th row: 3 patterns, 3 ch, 1 dc in next 5 ch sp, 3 ch, 1 tr
in next tr, 2 ch, (1 tr in next tr, 2 tr in next 2 ch sp) twice, 1 tr
in each of next 7 tr, 2 ch, 1 tr in next tr, 1 pattern, 3 ch, 1 dc in
next 5 ch sp, 3 ch, 1 tr in next tr.
5th row: 5 ch, 1 tr in next tr, 1 pattern, 2 ch, 1 tr in each
of next 3 tr, 2 ch, miss 2 tr, 1 tr in each of next 8 tr, 2 tr in next
2 ch sp, 1 tr in next tr, 5 ch, 1 tr in next tr, 3 patterns.
6th row: 1 pattern, 2 ch, 1 tr in next 5 ch sp, 2 ch, 1 tr
in next tr, 5 ch, 1 tr in next tr, 1 pattern, 2 ch, 3 tr in next 5 ch
sp, 1 tr in each of next 11 tr, 2 ch, 1 tr in each of next 3 tr, 2 ch,
1 tr in next tr, 1 pattern, 3 ch, 1 dc in next 5 ch sp, 3 ch, 1 tr in
next tr.
7th row: 5 ch, 1 tr in next tr, 1
pattern, 2 ch, 1 tr in each of next
3 tr, 2 tr in next 2 ch sp, 1 tr in next tr, 2 ch, miss 2 tr, 1 tr in
each of next 11 tr, 2 ch, 1 tr in next tr, 1 pattern, 2 ch, 1 tr in next
5 ch sp, (2 ch, 1 tr in next tr) twice, 2 tr in next 2 ch sp, 1 tr in
next tr, 5 tr in next 5 ch sp, 1 tr in next tr, 5 ch, 1 tr in next tr.
8th row: 3 ch, 1 dc in next 5 ch sp,
3 ch, 1 tr in next tr, 2 ch, miss 2 tr, 1 tr in each of next 7 tr, (2
tr in next 2 ch sp, 1 tr in next tr) 3 times, 2 ch, 1 tr in next 5 ch
sp, 2 ch, 1 tr in next tr, 5 ch, 1 tr in next tr, 2 tr in next 2 ch sp,
1 tr in each of next 8 tr, 2 ch, miss 2 tr, 1 tr in next tr, 2 ch, 1 tr
in each of next 3 tr, 5 ch, miss 3 tr, 1 tr in next tr, 1 pattern, 3 ch,
1 dc in next 5 ch sp, 3 ch, 1 tr in next tr.
9th row: 5 ch, 1 tr in next tr, 2
ch, 1 tr in next 5 ch sp, 2 ch, 1 tr in next tr, 5 ch, 1 tr in next tr,
2 ch, 1 tr in next 5 ch sp, 2 ch, 1 tr in each of next 3 tr, 2 tr in next
2 ch sp, 1 tr in next tr, 2 ch, 1 tr in next tr, 2 ch, miss 2 tr, 1 tr
in each of next 8 tr, 3 ch, 1 dc in next 5 ch sp, 3 ch, 1 tr in next tr,
2 ch, 1 tr in next tr, 2 tr in next 2 ch sp, 1 tr in each of next 7 tr,
2 ch, miss 2 tr, 1 tr in each of next 7 tr, 2 ch, 1 tr in next tr, 5 ch,
1 tr in next tr.
10th row: 3 ch, 1 dc in next 5 ch
sp, 3 ch, 1 tr in next tr, 2 ch, 1 tr in each of next 7 tr, 2 tr in next
2 ch sp, 1 tr in next tr, 2 ch, miss 2 tr, 1 tr in each of next 7 tr,
2 tr in next 2 ch sp, 1 tr in next tr, 5 ch, 1 tr in each of next 5 tr,
2 ch, miss 2 tr, (1 tr in next tr, 2 tr in next 2 ch sp) twice, 1 tr in
each of next 3 tr, 2 ch, miss 2 tr, 1 tr in next tr, 2 ch, 1 tr in next
tr, 2 tr in next 2 ch sp, 1 tr in next tr, 5 tr in next 5 ch sp, 1 tr
in next tr, 2 tr in next 2 ch sp, 1 tr in next tr, 2 ch, 1 tr in next
tr, 2 ch, 1 tr in next 5 ch sp, 2 ch, 1 tr in next tr.
11th row: (2 tr in next 2 ch sp, 1
tr in next tr) 3 times, 1 tr in each of next 12 tr, (2 tr in next 2 ch
sp, 1 tr in next tr) twice, 2 ch, miss 2 tr, 1 tr in each of next 6 tr,
2 tr in next 2 ch sp, 1 tr in each of next 5 tr, 2 ch, 3 tr in next 5
ch sp, 1 tr in each of next 7 tr, 2 ch, miss 2 tr, 1 tr in next tr, 2
tr in next 2 ch sp, 1 tr in each of next 7 tr, 3 ch, miss 2 tr, 1 dc in
next tr, 3 ch, 1 tr in next tr, 5 ch, 1 tr in next tr.
12th row: 1 pattern, 1 tr in each
of next 9 tr, 2 tr in next 2 ch sp, 1 tr in next tr, (2 ch, miss 2 tr,
1 tr in next tr) twice, 1 tr in each of next 3 tr, 2 tr in next 2 ch sp,
1 tr in next tr, (2 ch, miss 2 tr, 1 tr in next tr) 3 times, 1 tr in each
of next 3 tr, 2 tr in next 2 ch sp, 1 tr in each of next 13 tr, (2 ch,
miss 2 tr, 1 tr in next tr) twice, 1 tr in each of next 6 tr, 2 ch, miss
2 tr, 1 tr in next tr.
13th row: 5 ch, miss 3 tr, 1 tr in
each of next 4 tr, (2 tr in next 2 ch sp, 1 tr in next tr) twice, (2 ch,
miss 2 tr, 1 tr in next tr) 3 times, 1 tr in each of next 6 tr, 2 ch,
miss 2 tr, 1 tr in next tr, (2 tr in next 2 ch sp, 1 tr in next tr) 3
times, (2 ch, miss 2 tr, 1 tr in next tr) twice, (2 tr, in next 2 ch sp,
1 tr in next tr) twice, 1 tr in each of next 12 tr, 1 pattern.
14th row: 1 pattern, 2 ch, miss 2
tr, 1 tr in each of next 16 tr, 2 ch, 1 tr in next tr, 2 tr in next 2
ch sp, 1 tr in each of next 10 tr, 2 tr in next 2 ch sp, 1 tr in next
tr, (2 ch, miss 2 tr, 1 tr in next tr) twice, (2 tr in next 2 ch sp, 1
tr in next tr) 3 times, 1 tr in each of next 6 tr, 2 ch, miss 2 tr, 1
tr in next tr, 3 ch, 1 dc in next 5 ch sp, 3 ch, 1 tr in next tr.
15th row: 5 ch, 1 tr in next tr, 3
ch, 1 dc in next tr, 3 ch, miss 2 tr, 1 tr in next tr, (2 ch, miss 2 tr,
1 tr in next tr) 4 times, (2 tr in next 2 ch sp, 1 tr in next tr) twice,
1 tr in each of next 15 tr, 2 ch, 1 tr in next tr, (2 ch, miss 2 tr, 1
tr in next tr) 5 times, 2 ch, 1 tr in next tr, 1 pattern.
16th row: 1 pattern, 2 ch, 1 tr in
next tr, (2 tr in next 2 ch sp, 1 tr in next tr) 5 times, 2 ch, 1 tr in
each of next 19 tr, 2 ch, miss 2 tr, 1 tr in next tr, 2 ch, 1 tr in next
tr, (2 tr in next 2 ch sp, 1 tr in next tr) 3 times, 5 ch, 1 tr in next
tr, 3 ch, 1 dc in next 5 ch sp, 3 ch, 1 tr in next tr.
17th row: 5 ch, 1 tr in next tr, 2
ch, 3 tr in next 5 ch sp, 1 tr in next tr, (2 ch, miss 2 tr, 1 tr in next
tr) 3 times, 2 tr in next 2 ch sp, (1 tr in next tr, 2 ch) twice, miss
2 tr, 1 tr in each of next 13 tr, 2 ch, miss 2 tr, 1 tr in next tr, 2
tr in next 2 ch sp, 1 tr in next tr, (2 ch:, miss 2 tr, 1 tr in next tr)
twice, 1 tr in each of next 9 tr, 2 tr in next 2 ch sp, 1 tr in next tr,
2 ch, 1 tr in next 5 ch sp, 2 ch, 1 tr in next tr, 5 ch, 1 tr in next
tr.
18th row: 3 ch, 1 dc in next 5 ch
sp, 3 ch, 1 tr in next tr, 2 ch, 1 tr in next tr, 2 tr in next 2 ch sp,
1 tr in each of next 7 tr, (2 ch, miss 2 tr, 1 tr in next tr) twice, (2
tr in next 2 ch sp, 1 tr in next tr) twice, 1 tr in each of next 3 tr,
2 tr in next 2 ch sp, 1 tr in next tr, 2 ch, miss 2 tr, 1 tr in each of
next 7 tr, 2 ch, miss 2 tr, 1 tr in next tr, 2 ch, 1 tr in next tr, 2
tr in next 2 ch sp, 1 tr in next tr, 2 ch, miss 2 tr, 1 tr in next tr,
(2 ch, 1 tr in next tr) twice, 2 tr in next 2 ch sp, 1 tr in each of next
4 tr, 2 ch, 1 tr in next tr, 3 ch, 1 dc in next 5 ch sp, 3 ch, 1 tr in
next tr.
19th row: 5 ch, 1 tr in next tr, 2
ch, 1 tr in each of next 4 tr, 2 ch, miss 2 tr, 1 tr in next tr, 2 ch,
1 tr in next tr, 2 tr in next 2 ch sp, 1 tr in next tr, 2 ch, 1 tr in
next tr, 2 ch, miss 2 tr, 1 tr in next tr, 2 tr in next 2 ch sp, 1 tr
in next tr, 2 ch, 1 tr in each of next 4 tr, 2 ch, miss 2 tr, 1 tr in
next tr, 2 ch, 1 tr in each of next 4 tr, 2 ch, miss 2 tr, 1 tr in each
of next 7 tr, (2 tr in next 2 ch sp, 1 tr in next tr) twice, 2 ch, miss
2 tr, 1 tr in each of next 7 tr, 2 tr in next 2 ch sp, 1 tr in next tr,
5 ch, 1 tr in next tr.
20th row: 3 ch, 1 dc in next 5 ch
sp, 3 ch, 1 tr in each of next 7 tr, 2 ch, miss 2 tr, 1 tr in next tr,
2 tr in next 2 ch sp, 1 tr in each of next 10 tr, 2 ch, miss 2 tr, 1 tr
in next tr, 2 tr in next 2 ch sp, 1 tr in each of next 4 tr, 2 tr in next
2 ch sp, 1 tr in next tr, 2 ch, 1 tr in next tr, 2 ch, miss 2 tr, 1 tr
in next tr, 2 tr in next 2 ch sp, 1 tr in each of next 4 tr, (2 ch, 1
tr in next tr) twice, 2 ch, miss 2 tr, 1 tr in next tr, (2 tr in next
2 ch sp, 1 tr in next tr) twice, 5 ch, miss 3 tr, 1 tr in next tr, 3 ch,
1 dc in next 5 ch sp, 3 ch, 1 tr in next tr.
21st row: 5 ch, 1 tr in next tr, 3
ch, 1 dc in next 5 ch sp, 3 ch, 1 tr in next tr, 2 ch, miss 2 tr, 1 tr
in each of next 4 tr, 2 ch, 1 tr in next tr, 2 tr in next 2 ch, sp, 1
tr in next tr, 2 ch, 1 tr in next tr, 2 ch, miss 2 tr, 1 tr in each of
next 4 tr, 2 ch, 1 tr in next tr, 2 tr in next 2 ch sp, 1 tr in each of
next 10 tr, 2 ch, 1 tr in each of next 13 tr, 2 tr in next 2 ch sp, 1
tr in next tr, 2 ch, miss 2 tr, 1 tr in each of next 4 tr, 5 ch, 1 tr
in next tr.
22nd row: 2 ch, 3 tr in next 5 ch
sp, 1 tr in each of next 4 tr, 2 tr in next 2 ch sp, 1 tr in each of next
13 tr, 2 ch, miss 2 tr, 1 tr in next tr, 2 tr in next 2 ch sp, 1 tr in
each of next 7 tr, 2 ch, miss 2 tr, 1 tr in each of next 4 tr, 2 ch, 1
tr in each of next 4 tr, 2 ch, 1 tr in next tr, 2 tr in next 2 ch sp,
1 tr in next tr, 2 ch, miss 2 tr, 1 tr in next tr, 2 tr in next 2 ch sp,
1 tr in next tr, 3 ch, miss 2 tr, 1 dc in next tr, 3 ch, 1 tr in next
tr, 5 ch, 1 tr in next tr, 3 ch, 1 dc in next 5 ch sp, 3 ch, 1 tr in next
tr.
23rd row: 5 ch, 1 tr in next tr, 1
pattern, 2 ch, miss 2 tr, 1 tr in next tr, 2 tr in next 2 ch sp, 1 tr
in each of next 4 tr, 2 tr in next 2 ch sp, 1 tr in next tr, 3 ch, miss
2 tr, 1 dc in next tr, 3 ch, 1 tr in each of next 4 tr, 2 ch, 1 tr in
each of next 10 tr, 2 ch, 1 tr in next tr, 3 ch, miss 2 tr, 1 dc in next
tr, 3 ch, miss 2 tr, 1 tr in next tr, 5 ch, miss 5 tr, 1 tr in each of
next 1 0 tr, 2 ch, 1 tr in next tr.
24th row: 3 ch, 1 dc in next tr, 3
ch, miss 2 tr, 1 tr in next tr, 5 ch, miss 5 tr, 1 tr in next tr, 1 pattern,
2 ch, 1 tr in each of next 10 tr, 2 ch, 1 tr in each of next 4 tr, 5 ch,
1 tr in next tr, 3 ch, miss 2 tr, 1 dc in next tr, 3 ch, miss 2 tr, 1
tr in next tr, 5 ch, miss 3 tr, 1 tr in next tr, 1 pattern, 3 ch, 1 dc
in next 5 ch sp, 3 ch, 1 tr in next tr.
25th row: 5 ch, 1 tr in next tr, 2
patterns, 3 ch, 1 dc in next 5 ch sp, 3 ch, 1 tr in next tr, 1 tr in each
of next 3 tr, 2 tr in next 2 ch sp, 1 tr in next tr, 2 ch, miss 2 tr,
1 tr in each of next 7 tr, 2 ch, 1 tr in next tr, 2 patterns.
26th row: 2 patterns, 3 ch, 1 dc in
next tr, 3 ch, miss 2 tr, 1 tr in each of next 4 tr, 2 ch, 1 tr in each
of next 7 tr, 5 ch, 1 tr in next tr, 2 patterns, 3 ch, 1 dc in next 5
ch sp, 3 ch, 1 tr in next tr.
27th row: 5 ch, 1 tr in next tr, 2
patterns, 3 ch, 1 dc in next 5 ch sp, 3 ch, 1 tr in next tr, 2 ch, miss
2 tr, 1 tr in each of next 4 tr, 2 tr in next 2 ch sp, 1 tr in each of
next 4 tr, 5 ch, 1 tr in next tr, 2 patterns.
28th row: 2 patterns, 3 ch, 1 dc in
next 5 ch sp, 3 ch, 1 tr in next tr, 2 ch, miss 2 tr, 1 tr in each of
next 7 tr, 2 ch, 1 tr in next tr, 5 ch, 1 tr in next tr, 2 patterns, 3
ch, 1 dc in next 5 ch sp, 3 ch, 1 tr in next tr.
29th row: 5 ch, 1 tr in next tr, 2
patterns, 3 ch, 1 dc in next 5 ch sp, 3 ch, 1 tr in next tr, 5 ch, miss
3 tr, 1 tr in each of next 4 tr, 2 ch, 1 tr in next tr, 5 ch, 1 tr in
next tr, 2 patterns.
30th row: 2 patterns, 3 ch, 1 dc in
next 5 ch sp, 3 ch, 1 tr in next tr, 5 ch, miss 3 tr, 1 tr in next tr,
3 patterns, 3 ch, 1 dc in next 5 ch sp, 3 ch, 1 tr in next tr.
These 30 rows form the panel pattern.
Back and Fronts
(worked in one piece to armhole)
Foundation row (wrong side facing):
1 dc in 2nd ch from hook, 1 dc in each remaining ch. [385/385/409/409
sts]
Next row: 1 ch, 1 dc in first stitch,
1 dc in each remaining stitch. Repeat the last row once more.
Change to No 9 (3½ mm) hook and work as follows:
Foundation row (right side facing):
1 dc in first stitch, 3 ch, miss 2 stitches, 1 tr in next stitch, 5 ch,
miss 5 stitches, 1 tr in next stitch, * 3 ch, miss 2 stitches, 1 dc in
next stitch, 3 ch, miss 2 stitches, 1 tr in next stitch, 5 ch, miss 5
stitches, 1 tr in next stitch; repeat from * to last 3 stitches, 3 ch,
miss 2 stitches, 1 dc in last stitch.
[31½/31½/33½/33½
patterns plus ¼ pattern at each end].
Place motif panel patterns as follows:
1st row: 6 ch, 1 tr in next
tr, * 3 ch, 1 dc in next 5 ch sp, 3 ch, 1
tr in next tr, work 1st row of motif panel pattern across next 6½
patterns, work 1/1/2/2
patterns, 3 ch, 1 dc in next 5 ch sp, 3 ch, 1 tr in next tr *
, work 1st row of motif panel pattern across next 6½ patterns, 1
pattern, repeat from * to *
once, work 1st row of motif panel pattern across next 6½ patterns,
3 ch, 1 dc in next 5 ch sp, 3 ch, 1 tr in next tr, 2 ch, 1 dtr in first
dc of previous row.
2nd row: 1 dc in first st, 3 ch, 1
tr in next tr, 5 ch, 1 tr in next tr, * work 2nd row of motif panel pattern,
5 ch, 1 tr in next tr, work 1/1/2/2
patterns, work 2nd row of motif panel pattern, 5 ch, 1 tr in next tr,
* work 1 pattern, repeat from * to * once, 3 ch, miss 2 ch, 1 dc in next
ch.
Continue working thus until 30 rows of motif panel pattern have been
worked.
Next row: 6 ch, 1 tr in next tr, work 31/31/33/33
patterns, 3 ch, 1 dc in next 5 ch sp, 3 ch, 1 tr in next tr, 2 ch,
1 dtr in first dc of previous row.
1st, 2nd and 4th
sizes:
Next row: 1 dc in first st, 3 ch, 1 tr in next tr, 5 ch, 1
tr in next tr, work 31 /31 /33
patterns, 3 ch, miss 2 ch, 1 dc in next ch
4th size:
Next row: 6 ch, 1 tr in next tr, work 33 patterns, 3 ch, 1
dc in next 5 ch sp, 3 ch, 1 tr in next tr, 2 ch, 1 dtr in first dc of
previous row.
All sizes: Keeping continuity of pattern, shape as follows:
lst row: pattern over ¼ pattern,
then pattern over 7½/7½/8/8
patterns, 3 ch, 1 tr in next tr, pattern over 15½/15½/16½/16½
patterns, 3 ch, 1 tr in next tr, pattern to end.
2nd row: pattern over ¼ pattern, then
pattern over 7½/7½/8/8
patterns, 1 ch, 1 tr in next tr, pattern over 15½/15½/16½/16½
patterns, 1 ch, 1 tr in next tr, pattern to end.
3rd row: pattern over ¼ pattern,
then pattern over 7/7/7½/7½
patterns, * 3 ch, 1 dc in next 5 ch
sp, 3 ch, 1 tr in next 1 ch sp, 3 ch, 1 dc in next 5 ch sp, 3 ch, 1 tr
in next tr * , pattern over 14½/14½/15½/15½
patterns repeat from * to *
once, pattern to end.
4th row:pattern over ¼ pattern,
then pattern over 7/7/7½/7½
patterns, (3 ch, 1 tr in next tr) twice, pattern over next 14½/14½/15½/15½
patterns, (3 ch, 1 tr in next tr) twice, pattern to end.
5th row:pattern over ¼ pattern,
then pattern over 7/7/7½/7½
patterns, 3 ch, 1 dc in next tr, 3 ch, 1 tr in next tr, pattern over 14½/14½/15½/15½
patterns, 3 ch, 1 dc in next tr, 3 ch, 1 tr in next tr, pattern to end.
6th-9th rows: in pattern.
10th row: pattern over ¼ pattern,
then pattern over 7/7/7½/7½
patterns, 3 ch, 1 tr in next tr, pattern over 14½/14½/15½/15½
patterns, 3 ch, 1 tr in next tr, pattern to end.
11th row: pattern over ¼ pattern,
then pattern over 7/7/7½/7½
patterns, 1 ch, 1 tr in next tr, pattern over 14½/14½/15½/15½
patterns, 1 ch, 1 tr in next tr, pattern to end.
12th row: pattern over ¼ pattern,
then pattern over 6½/6½/7/7
patterns, * 3 ch 1 dc in next 5 ch
sp, 3 ch, 1 tr in next 1 ch sp, 3 ch, 1 dc in next 5 ch sp, 3 ch, 1 tr
in next tr *, pattern over 13½/13½/14½/14½
patterns, repeat from * to *
once, pattern to end.
13th row: pattern over ¼ pattern,
then pattern over 6½/6½/7/7
patterns, (3 ch, 1 tr in next tr) twice, pattern over 13½/13½/14½/14½
patterns, (3 ch, 1 tr in next tr) twice, pattern to end.
14th row:pattern over ¼ pattern,
then pattern over 6½/6½/7/7
patterns, 3 ch, 1 dc in next tr, 3 ch, 1 tr in next tr, pattern over 13½/13½/14½/14½
patterns, 3 ch, 1 dc in next tr, 3 ch, 1 tr in next tr, pattern to end.
15th-18th rows: in pattern.
Continue decreasing thus until 72/63/72/63
shaping rows have been worked:
15½/17½/17½/19½
patterns plus ¼ pattern at
each end.
2nd and 4th
sizes:
Next row: pattern over ¼ pattern, then pattern over 4/4½
patterns,
3 ch, 1 tr in next tr, pattern over 8½/9½
patterns, 3 ch, 1 tr in next tr, pattern to end.
Next row: pattern over ¼ pattern,
then
pattern over 4/4½
patterns, 1 ch, 1 tr in next
stitch, pattern over 8½/9½
patterns, 1 ch, 1 tr in
next stitch, pattern to end.
Next row: pattern over ¼ pattern,
then pattern over 3½/4
patterns, * 3 ch, 1 dc in next 5 ch
sp, 3 ch, 1 tr in next 1 ch sp, 3 ch, 1 dc in next 5 ch sp, 3 ch, 1 tr
in in next tr *, pattern over 7½/8½
patterns, repeat from * to *
once, pattern to end.
[15½/17½
patterns, plus ¾ pattern at each end]
Next row: pattern over ¼ pattern,
then
pattern over 3½/4
patterns, (5 ch, 1 tr in next tr) twice, pattern over 7½/8½
patterns,
(5 ch, 1 tr in next tr) twice, pattern to end.
Next row: pattern over ¼ pattern,
then pattern over 3½/4
patterns, (3 ch, 1 dc in next 5 ch sp, 3 ch, 1 tr in next tr) twice, pattern
over 7½/8½
patterns, (3 ch, 1 dc in next 5 ch sp, 3 ch, 1 tr in next tr) twice, pattern
to end.
These last 2 rows form the pattern.
All sizes: Continue straight in pattern until work measures 39/40/40/41
inches, ending with right side facing.
Divide for right front as follows:
Next row: pattern over 1/4 pattern, then pattern over
2¾/3/3/3
patterns, turn.
2nd, 3rd
and 4th sizes:
Next row: 8 ch, 1 tr in next tr, pattern to end.
Next
row: in pattern, ending 3 ch, 1 dc in last ch sp, 3 ch, 1 tr
in 3rd ch.
All sizes: Continue in pattern on these
patterns for right front until work measures
5/6/6/6
inches from where work was divided,
ending with right side facing.
Fasten off.
Shape neck as follows:
With right side
facing leave ¼ pattern unworked, then leave
next 1¼/1½/1½/1½
patterns unworked,
rejoin yarn in next dc/tr/tr/tr
and pattern
to end. [1½ patterns].
Work a few rows straight until neck
measures 2 inches.
Fasten off.
With right side facing, leave 2/2/2½/3
patterns unworked from where work was turned, rejoin yarn in next 5 ch
sp/tr/tr/tr,
pattern over next 6/6½/6½/6½
patterns, turn. Continue on these patterns for back until back matches
front at armhole edge, ending with right side facing.
Fasten off.
With right side facing, leave 2/2/2½/3
patterns unworked from where work was turned, rejoin yarn in next 5 ch
sp/tr/tr/tr,
pattern to end.
Finish to correspond with right front reversing shapings.
Sleeves
With 2½ mm hook, make 98/98/110/110
ch.
Foundation row (wrong side facing):
1 dc in 2nd ch from hook, 1 dc in each remaining ch.
[97/97/109/109
sts]
Next row: 1 ch, 1 dc in first stitch,
1 dc in each remaining stitch. Repeat last row once more.
Change to No 3½ mm hook and pattern as follows:
Foundation row (right side facing):
1 dc in first stitch, 3 ch, miss 2 stitches, 1 tr in next stitch, 5 ch,
miss 5 stitches, 1 tr in next stitch, *
3 ch, miss 2 stitches, 1 dc in next stitch, 3 ch, miss 2 stitches, 1 tr
in next stitch, 5 ch, miss 5 stitches, 1 tr in next stitch, repeat from
* to last 3 stitches, 3 ch, 1 dc in
last stitch. [7½/7½/8½/8½
patterns plus ¼ pattern at each end].
1st row: 6 ch, 1 tr in next tr, work
7/7/8/8
patterns, 3 ch, 1 dc in next 5 ch sp, 3 ch, 1 tr in next tr, 2 ch, 1 dtr
in first dc of previous row.
2nd row: 1 dc in first stitch, 3 ch,
1 tr in next tr, 5 ch, 1 tr in next tr, work 7/7/8/8
patterns, 3 ch, miss 2 ch, 1 dc in next ch.
These 2 rows form the pattern.
Continue in pattern until sleeve measures 18½ in.
Place a marker at each end of last row.
Continue in pattern until extra rows from marker fit along ½ the
patterns left for armhole.
Fasten off.
Hood
Using 3½ mm hook, make 146 ch.
Foundation row (right side facing):
1 dc in 2nd ch from hook, 3 ch, miss 2 ch, 1 tr in next ch, 5 ch, miss
5 ch, 1 tr in next ch, * 3 ch, miss
2 ch, 1 dc in next ch, 3 ch, miss 2 ch, 1 tr in next ch, 5 ch, miss 5
ch, 1 tr in next ch; repeat from *
to last 3 ch, 3 ch, 1 dc in last ch.
[11½ patterns plus ¼ pattern at each end.]
1st row: 6 ch, 1 tr in next tr, 11
patterns, 3 ch, 1 dc in next 5 ch sp, 3 ch, 1 tr in next tr, 2 ch, 1 dtr
in first dc of previous row.
2nd row: 1 dc in first stitch, 3 ch,
1 tr in next
tr, 5 ch, 1 tr in next tr, 11 patterns, 3 ch,
miss 2 ch, 1 dc in next ch.
Repeat the last 2 rows once more.
Shape back of hood as follows:
1st row: pattern over ¼ pattern,
then pattern over 5½ patterns, 3 ch, 1 tr in next tr, pattern to
end.
2nd row: pattern over ¼ pattern,
then pattern over 5½ patterns, 1 ch, 1 tr in next tr, pattern to
end.
3rd row: pattern over ¼ pattern,
then pattern over 5 patterns, 3 ch, 1 dc in next 5 ch sp, 3 ch, 1 tr in
next 1 ch sp, 3 ch, 1 dc in next 5 ch sp, 3 ch, 1 tr in next tr, pattern
to end.
4th row: pattern over ¼ pattern,
then pattern over 5 patterns, (3 ch, 1 tr in next tr) twice, pattern to
end.
5th row: pattern over ¼ pattern,
then pattern over 5 patterns, 3 ch, 1 dc in next tr , 3 ch, 1 tr in next
tr, pattern to end.
6th and 7th rows: in pattern.
Continue decreasing thus, every 7 rows until 35 shaping rows have been
worked.
[6½ patterns plus ¼ pattern at each end.]
Fasten off.
To Make Up
Using a cool iron and dry cloth, press parts lightly on wrong side.
Join shoulder seams, then join sleeve seams to markers.
Sew straight top edge of sleeves into armholes, then sew edges left free
to base of armholes.
Front and Neck Border: With right side facing and 2½ mm hook,
start at lower right front edge and work 1 row dc up right front, all
round neck and down left front, increasing and decreasing at corners as
required.
Turn and work a 2nd row, working 24 button loops on the right front -
the first to come at the top of the front neck edge and the remainder
at 1 inch intervals.
Fasten off.
To make a button loop: 2 ch, miss 2 dc.
Fold hood in half at top and join last row
together.
With right side facing and using 2½ mm hook, work 2 rows dc round
front edge of hood.
Stitch lower edge of hood on to neck as
shown, gathering extra fullness in at back.
Press seams.
Sew on buttons.
|
Materials
10/11/12/13
x 50g balls of 4 ply crepe.
No 9 (3½mm) and No 12 (2½mm) hooks.
24 buttons.
Tension
1½ patterns and 8 rows to 3 inches.
Size matters
To fit chest:
32/34/36/38
inches,
length from top of shoulders: garment drops to a length of 51/52/53/54
inches when worn;
sleeve seam: 18½ inches all sizes.
Note: An allowance of 5 inches is given to allow for dropping
when worn (4 inches at under arm, and 1 inch at armhole).
Abbreviations:
ch: chain
dc: double crochet
tr: treble
dtr: double treble
ss: slip stitch
sp: space
Remember these are English crochet instructions where dc is equivalent
to US single crochet - see "Terminology" in the side bar.
A Word on the Wool:
Original in Patons Limelight Crepe - knits as 4 ply, which was
100% courtelle (synthetic - so a good yardage); stated on Ravelry to be
216 yards to 50g.
Disclaimer
(well...almost)
In transposing any pattern it is always a risk that errors will be introduced,
in spite of dedicated proof reading.
If you have any problems with this pattern, please
and I will try and assist.
|