Tennis Socks
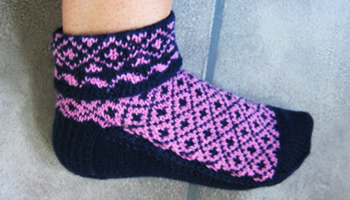
Early 1950s tennis socks originally knitted in crisp navy and white wool. I love cuffed socks but detect that some others (my sister) clearly do not. These have the design made specifically to fold down though - so there's no way out.
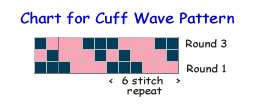
Instructions.The pattern works the instep and the sole separately on two needles to enable you to work the fair isle pattern across the instep only. It is not possible to achieve this in the round. However, you join the two together as you knit. Using No 12 needles with main shade (M), cast on 59 sts loosely and join in a round. Work 4 rounds in moss (also known as seed) stitch [every row k1 p1]. Next Round (increasing): K3; (m1, k8) 7 times. [66 sts] Cuff border:Change to No 11 needles and join in contrast (C) and work wave pattern border by repeating the 6 stitch pattern 10 times:
1st Round: *
k3 contrast (C), k3 navy (N); repeat from *
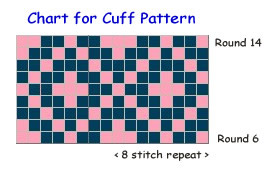
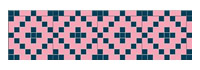
to end. Now continue with cuff diamond pattern, repeating the 8 stitch pattern 8 times across one round:
6th Round: *
k1(C), k2(N), k1(C), k2(N), k2(C); repeat from *
to end. Now break off C and continue with N only; change to No 12 needles and work 7 rounds knitting. Then turn the work so you are working the rounds in the other direction. This reverses the work to allow the cuff to fold over with the right side visible. Work 8 more rounds knitting; at the end of the first round knit into
the stitch below the first stitch of the round and knit it together with
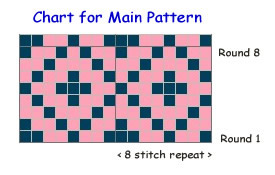
the last stitch of the round to avoid a small hole in the work. Join in C, working main diamond pattern, repeating the 8 stitch pattern 8 times:
1st Round: *
k1(N), k2(C), k1(N), k2(C), k2(N), ; repeat from *
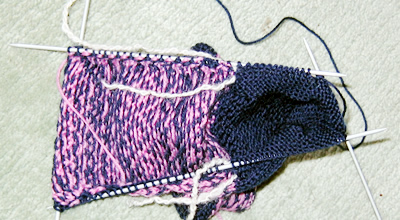
to end. These 8 rows form the pattern. Continue with N only and divide for the heel, however do not break off C. Divide for heelNext Row: Using navy wool only, knit the next 31 stitches on to one needle to work for the heel. Divide the remaining 33 sts across 2 needles, and leave to work the instep later. If you have worked the pattern correctly there will be a symmetrical set of complete patterns across the 33 instep sts. Make sure that it looks like this (you will have just completed row 5, the middle row in the picture):
[ Editor's note: If it doesn't look like this... you can compensate by knitting more or fewer sts for the heel flap until you get to the pattern boundary. Then when you purl back on the row below, follow the instructions as set to get your 30 sts. You should have your instep sts set correctly as above. If you still haven't then there is likely a mistake in your fair isle pattern.] Return to your heel sts, and turn the work so that you can work back and forth across the heel sts using 2 needles. Next Row: Purl back across 15 sts,
p2 together, purl remaining 14 sts. [30 sts]. Heel flapNext Row: *
Slip 1, knit 1; repeat from * across
all 30 sts. Repeat last 2 rows 13 times more. Turn heelTurn the heel by working short rows: Next Row: Slip the first stitch,
p16, p2tog, p1; turn. Continue in this way until all the sts have been incorporated in the row, ending with a knit row. [18 sts] Turn. Purl one row. Pick up and purl 16 sts down side of heel flap to bring the navy wool back to work the patterned instep. Leave these 16 sts along with the 18 heel sts, on a spare needle or stitch holder. Upper foot panelTake 33 sts left on needles 1 and 2, and slip them on to one needle. Continue to use the navy yarn and pick up the contrast C, which should
be waiting for you at the beginning of a purl side instep row (row 6 of
the pattern). Begin working back and forth across these 33 sts, keeping
the continuity of the pattern starting with a purl row and working from
row 6 of the chart where you left off; work alternate rows in knit and
purl. Continue for 5½ inches or 4 inches less than overall desired foot
length, ending with a knit row. Break contrast yarn, and continue in navy only. Turn the work and purl across 15 sts; p2tog; p16. Continue with wrong side facing, using another No 12 needle, pick up
and purl about 27sts from the slipped sts down the right side of the upper
foot panel, and from the edges of the first 5 rows you knitted. Using the same No 12 working needle, pick up and purl 17 sts from side of heel flap, then purl 9 sts from the heel. Using another No 12 working needle, purl the 9 remaining heel sts, and then purl the 16 sts you already picked up from the other side of the heel flap. Mark the stitch with a piece of waste wool, as before. Continuing with this needle, purl along the left side of the upper foot panel, picking up 27 sts from the edges of the first 6 rows you knitted and from the slipped edge sts.
The work is arranged on 3 needles. The picture shows the working needle
in the process of knitting across the sole,
and the waste wool markers in white. Purl across the 32 sts at the top of the panel. Then using one of the
spare needles, purl down the right side of the panel again, as far as
the stitch marker.] Do not turn the work. SoleUsing the No 12 working needles, you are going to knit back and forth across the sole (between the markers) in stocking stitch, knitting the last stitch from each row together with one stitch from the upper foot panel. 1st Row: (Wrong side facing) Slip1,
p24 from first needle, (16 sts up side of heel and 9 sts from heel flap),
then purl 24 sts from second needle, up to 1 stitch before the stitch
marker. Purl the last stitch of the sole section together with the first
of the instep sts. [50sts between the markers] 2nd Row: (Right side facing) Pass
the waste wool marker between the sts. Slip 1, ssk2tog; knit to the last
3 sts before the marker; k2tog, ssk the last stitch of the row together
with the next instep stitch as before. [48sts between the markers] Turn. Repeat 2nd and 3rd rows, shaping the sole by decreasing 2 sts on the knit rows, until 28 sole sts remain between the markers. Then continue without shaping as follows (continuing to weave in the markers as before): Next Row: Slip 1, purl to the last
stitch before the marker; purl together the last of the sole sts with
the first instep stitch as before. Repeat the last 2 rows until all the sts from the sides of the upper
foot have been joined to the sole. Do not join any of the sole sts to
the 32 sts left on the 4th needle at the end of the panel. ToeNow you continue to work the sole and upper foot sts together in a round, as follows: With right side facing, using your working needle (needle 1), knit across
32 sts from the upper foot. Knit the next 14 sts from the sole on to the
next needle (needle 2), and knit the final 14 sts from the sole on to
the next needle (needle 3). You have 60 sts arranged with 30 sts on needle 1, and 15 sts on each off needles 2 and 3. Continue to work in rounds as follows: [ Editor's note: This is where you can adjust the length of the foot if your feet have not grown to a multiple of half inches. Work a couple of extra plain rounds here before starting the decreasing.] 1st Round: Needle 1: k1, ssk2tog;
knit to the last 3 sts; k2tog, k1. Repeat rounds 1 and 2 until 24 sts remain. Slip the sts from needles 1 and 2 on to one needle and graft together with the sts on needle 3. Making upSew in all ends. Fold down cuff. |
Materials4 ply: 2 ozs navy, 1 oz contrast colour. One set each of 4 double pointed needles (dpns) size 11 (3mm) and 12
(2¾mm). Tension30 stitches and 32 rows to 4 inches over pattern. Size mattersLength from top to bottom of heel, top turned down, 5 inches; length of foot 9 inches (adjustable). AbbreviationsN is main shade (navy). m1: make one by picking up the loop between sts and knitting into the back of it ssk/ssk2tog: (slip, slip, knit) - or (slip1, knit 1, pass the slipped stitch over). Effectively you are "knitting 2 together through back loops".
A Word
|
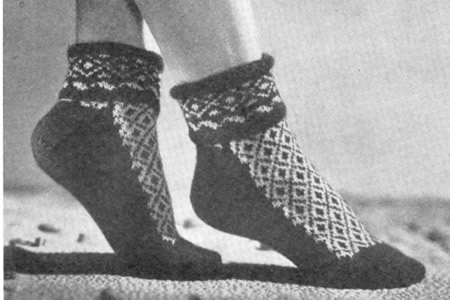
Original photo from Stitchcraft April 1950, constructed using a different pattern on 2 needles with seam under sole. Generally, seams in socks are avoided so they are more comfortable to wear; a seam right under the ball of the foot cannot be ideal as sportswear. I imagine these socks were for visual impact rather than practicality.
