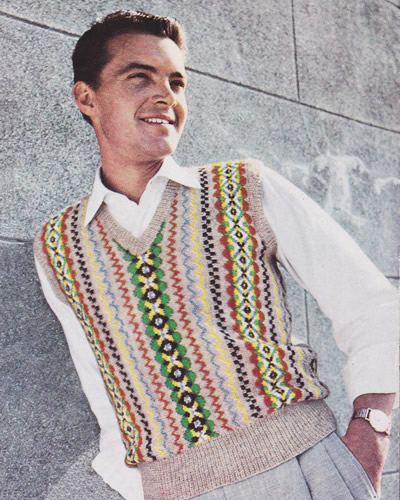
Country Wear Pullover
More....
Please note:
Patterns are for
Personal Use Only
You may freely circulate patterns with the Copyright Statement Preserved.
See terms of use.
Fair-Isle pullover or vest in bright colours, with the added interest in that it is knitted sideways.
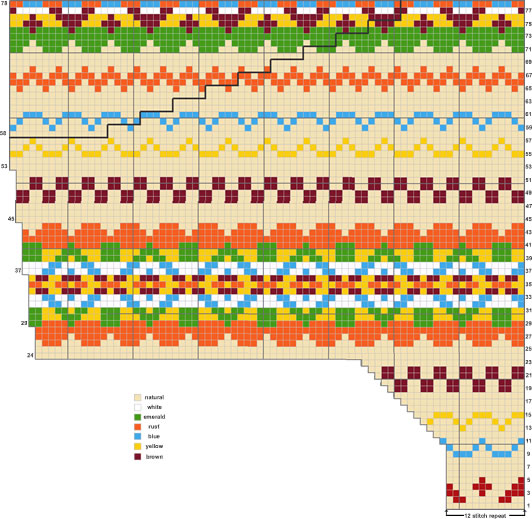
Instructions:The pullover is worked sideways using the Fair-Isle technique. Strand
the wools not in use loosely across the back of the work. BackBegin at the left side edge. Using No 9 (3¾mm) needles and main
shade natural yarn cast on 84 stitches. Continue in stocking stitch, working the pattern from the chart, reading knit rows from right to left and purl rows from left to right. Work the 12 pattern stitches 7 times across. When the 10th row of the chart has been completed, continue in pattern,
working armhole increasings as shown on the chart, and keeping
the extra stitches in pattern as indicated. Continue in pattern, increasing 1 stitch at the shoulder edge at the
end of the 29th, 37th, 45th, and 53rd rows as indicated. [151 sts] For the second half of the back, work down from top of chart, that is:
77th, 76th, 75th, 74th rows, etc, still reading from right to left on
knit rows and left to right on purl rows. Work straight to the end of the chart, then purl 1 row in natural. FrontBegin at the right side and work exactly as for the first half of the back until the 57th row has been completed. [151 sts]. Divide for neck opening: Continue in pattern, casting off 5 stitches at the beginning of the next
9 purl rows as indicated on the chart. [91 sts] For the second half of the front, work down from the top of the chart as before, casting on stitches at the neck edge to correspond with those cast off on the first half, and decreasing at the shoulder and armhole edges as indicated. When the chart is complete, purl 1 row in natural. Ribbed weltWith the right side of the work facing, using No 12 needles and main shade natural, pick
up and knit 140 stitches along the lower edge of the back. Work the front welt in the same way. NeckbandJoin shoulder seams. With the right side of the work facing, using No 12 needles and main shade natural, beginning at the centre back, pick up and knit 88 stitches to centre front. Work 10 rows k1/p1 rib, decreasing 1 stitch at the centre front on alternate rows; cast off in rib. Work the other half to correspond. Armhole bandsWith the right side of the work facing, using No 12 needles and main shade natural, pick up and knit 160 stitches round each armhole. Work 10 rows k1/p1 rib; cast off in rib. To Make UpPress parts well under a damp cloth. |
|
Materials4 x 1oz balls of 4 ply fingering in main shade (natural), plus 1 oz each in 6 contrast colours: brown, yellow, blue, rust, emerald, white. A pair each No 9 (3¾mm) and No 12 (2¾mm) needles. Tension30sts to 4 inches Size mattersChest to fit one size: 39-41 inches. Abbreviationsk2tog/p2tog: decrease by knitting/purling 2 sts together. stocking stitch: one row knit and one row purl, ("stockinette"). A word on the woolOriginal called for Patons Fair Isle Fingering about which there is some information available on Ravelry. This pattern is in ounces but it seems the yarn
stuck around for a while as some vintage stocks can be seen in 25g balls. Jamiesons are Kings (or Queens) of Fair Isle and Shetland knitting - their Spindrift yarn sounds a good substitute: equivalent to a traditional 4ply; ideal for Fair Isle knitting; extensive colour pallet of over 220 colours; supplied in 25g Balls (105m); tension: 30sts x 32 rows on 3¼mm needles. Disclaimer
|
|
For a pdf version of the chart you can right click >>here<< and choose "save link as" or "save target as" (browser dependent options) to download and save a pdf file. |
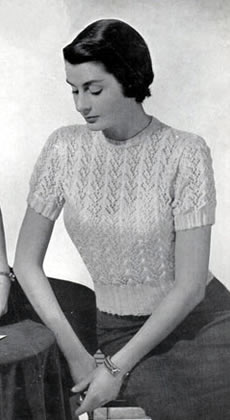
Very pretty lacy tops with the emphasis on wool economy.
The style of this pattern in conjunction with the price (3d), the emphasis on economy, and its pattern sequence number is giving me mixed messages as to the date; however general opinion seems to be that these patterns are from the late 1940s.
Instructions. Instructions for the larger size is given in brackets. Where one set
of figures is given this applies to both sizes. FrontWith No 13 (12) needles, cast on 123 stitches. 1st row: p3, *
k3, p3; repeat from * to end. Change to No 11 (10) needles and pattern as follows: 1st row: k1, *
k1, wo, k4, sl1, k2tog, psso, k4, wo; repeat from *
to last stitch, k1. Repeat the 10 pattern rows 7 times more. (80 rows). Shape Armhole: Cast off 5 stitches at the beginning of the next 2 rows; then 4 stitches at the beginning of the next 2 rows, and 3 stitches at the beginning of the next 2 rows. [98 sts] 7th row: As 7th pattern row. Shape Neck: Cast off 22 stitches, (1 stitch on the right-hand needle), pattern 37
stitches. 70th row: cast off 10 stitches; purl
to end. Left shoulder: BackWork to match the front until 5 complete patterns have been worked from the beginning of the armhole shaping. Divide for Back Opening: 51st row: work 49 stitches in pattern.
Turn. Shape Shoulder: Left Shoulder: Sleeves:With No. 13, (12) needles. cast on
87 stitches. 10th row: p3, * increase into next stitch, p8; repeat from to last 4 stitches, increase into next stitch, p3. [98 sts] Change to No 11 (10) needles and
pattern. Shape Top: Neck BandBack-stitch shoulder seams very neatly. Making UpSeam-stitch side and sleeve seams. Make 4 buttons follows: Lay on a blanket or well padded board and press lightly on wrong side
with a hot iron and damp cloth, omitting all ribbing. |
Materials
|
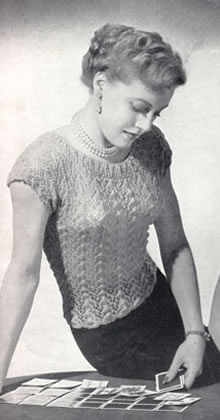
Very pretty lacy tops with the emphasis on wool economy.
The style of this pattern in conjunction with the price (3d), the emphasis on economy, and its pattern sequence number is giving me mixed messages as to the date; however general opinion seems to be that these patterns are from the late 1940s.
Instructions. This jumper with the low neck is given only in one size. FrontWith No. 10 needles, cast on 123 stitches. 1st row: p3, * k3, p3, repeat from
* to end. Change to pattern as follows:
1st row: k1, *
k1, wo, k4, sl1, k2tog, psso, k4, wo; repeat from *
to last stitch, k1. Repeat the 10 pattern rows twice more. (3 complete patterns of 10 rows each). Change to No 12 needles and work 20 rows.
Change back to No 10 needles and work 70 rows. Shape Armhole: Cast off 12 stitches. With 1 stitch on the right-hand needle, work as
1st pattern row to the last 12 stitches. Cast on 24 stitches. Join to work. Purl 98 stitches, and cast on 24 stitches
at the end of the row. Neck Shaping: Shape Shoulder: Left Side of Neck: Cast off 6 stitches at the beginning of this and the 2 following alternate
rows, then cast off 3 stitches at the beginning of the 2 following alternate
rows. Shape Shoulder as for right side of neck, beginning with a 7th pattern row. NeckWith No 10 needles and right side of work facing, pick up and knit 98 stitches all round neck. Purl 1 row. Change to No 12 needles. BackWork to match the front exactly. Making UpRun a thread along each of the cast on 24 stitches and gather to fit
the 12 cast off stitches. Sew together very neatly on the wrong side.
Lay on a blanket or well padded board and press lightly on wrong side
with a hot iron and damp cloth, omitting all ribbing. |
Materials
|

Printed towards the end of WW2, in an era of extreme shortages **, this is knitwear designed with a view to using left overs or even maybe "pulled back" wool.
Despite that I think it looks really attractive - and is a very interesting design being knitted sideways.
Instructions. Instructions for one size. Pattern:1st row (wrong side facing): Purl.
Repeat these 12 rows throughout. BackThe bolero is knitted sideways. With No 10 (3¼mm) needles, cast on 90 stitches and work 5 rows of the pattern. Now increase at the beginning of the next and end of every following
row at this side until there are 108 stitches, and 23 rows are done. Work straight until 2 more complete patterns are done, and then work
1 row of the next pattern, which brings you back to the top of the shoulder.
At the beginning of the 10th row cast on 16 stitches, and then finish the shoulder to correspond with first side, casting off 37 for the armhole and decreasing on every row thereafter until 90 stitches remain. Finish off with 5 rows straight. There are 15 patterns in total across the back, omitting the last 2-row white stripe. Left frontWork as for back, but cast off 26 instead of 16 stitches on the shoulder. Right frontWork to correspond with left front. [Editor's note: They
are assuming rather a lot here and expect you will work this out for yourself.
You could continue to work the in the same sideways direction: as you
have just cast off at the centre front, so you could cast on for the right
front at the centre front which would mean casting on 119 stitches - then
casting on 26 at the shoulder, and completing the shaping as you did for
the back. Neck RibbingJoin back and front shoulder seams. With No 10 (3¼mm) needles, and front of work facing, pick up and knit 80 stitches across the back of the neck. Work in k1/p1 rib, decreasing at each end of every alternate row 5 times. Change to No 12 (2¾mm) needles and continue in rib, decreasing as before until 48 stitches remain. Cast off fairly tightly in rib. For each front section pick up and knit 44 stitches in the same way,
and decrease 5 times on alternate rows at the side edge before changing
to No 12 needles. Then decrease as before until 22 stitches remain. For each shoulder piece pick up and knit 42 stitches across each shoulder and then shape as for back, casting off the remaining 10 stitches. [Editor's note: It may or may not be obvious here but you are knitting on the sides of a rectangle here and decreasing towards the middle; when you sew these together you will have mitred corners - you can just see this in the photograph.] Front BordersWith No 12 (2¾mm) needles, cast on 13 stitches and work a length
of k1/p1 rib long enough to go up the left front. To make a buttonhole: rib 5, cast off 3, rib 5; on the next row cast on 3 over those cast off in the previous row. Continue strip for the length required, then cast off in rib. SleevesWorked sideways in pattern. With No 10 (3¼mm) needles cast on 13. 1st row: Pattern to end. Repeat 2nd and 3rd rows 3 times more. 10th row: As 2nd. Repeat 12th and 13th rows 15 times more, then the 12th row again. 87th row: Pattern to the last 2 stitches,
k2tog. Repeat 87th and 88th rows 15 times more, then 87th row again. 120th row: k2tog, pattern to end.
Repeat 122nd and 123rd rows 3 times more, leaving 13 stitches on the
needle. This finishes the 11th coloured stripe. Making UpPress work lightly on wrong side under a damp cloth. |
Materials3 ply yarn: 1 oz in main shade (M) plus 1oz each in 5 different shades of the same wool, or odd balls of different colours to make up this amount. [Editor's note: Looking at the photo and instructions, presumably one of these colours needs to be white.] Pair each No 10 (3¼mm) and No 12 (2¾mm) needles. Tension32 stitches to 4 ins on No 10 (3¼mm) needles. Size mattersTo fit chest 33-35 inches; AbbreviationsTwist A: Knit into back of 2nd stitch on left-hand needle, then knit into front of 1st stitch, drop both stitches off needle together. Twist B: Knit into front of 2nd stitch on left needle, then knit into front of 1st stitch on left needle, slip both off together. k2tog or p2tog: work 2 sts together to decrease. A word on the woolSusan Crawford, who specialises in vintage knits, offers lovely Fenella wool which "knits up to that elusive vintage ‘3 ply’ tension". Jamiesons have an excellent range of colours in "2ply laceweight" which states: This yarn can be used in vintage patterns which call for "3ply yarns". John Arbon has some wonderful laceweight that looks suitable. Disclaimer
|
** The 'Make Do and Mend' campaign - which is currently quite a well known slogan from WW2 - was launched to encourage people to make their existing clothing last longer. Clothes care was a key part of the Make Do and Mend message. Shortages of basic materials and consequential clothing rationing necessitated imaginative use of materials; this included recycling and renovating old clothes, and the innovative use of home-made accessories, which could alter or smarten up an outfit. You see a lot of these ideas in magazines of that era appearing as little knitted collars and cuffs or just inexpensive embellishment ideas. This type of pattern continues from its humble beginnings well into the 1950s - and not surprising since although the war ended in 1945, clothes rationing did not end until 1949.
Rationing worked by allocating each item or category of clothing a 'points' value which varied according to how much material and labour went into its manufacture. Each person was allocated a fixed number of coupons to "spend" when they purchased clothing. In 1941, at the inception, adults receive 66 but this allocation shrank as the war progressed: to 48 in 1942, 36 in 1943 and 24 by 1945. As for knitwear specifically - a jumper, for example, used up 5 coupons and socks 1-3. Making your own knitwear did not help much since knitting wool was also rationed (almost pro rata) with two ounces of knitting yarn requiring one coupon; however, with essentials such as boots and overcoats requiring 7 coupons you can see why people were reluctant to spend any coupons at all on knitwear when they could reuse old "pulled back" yarn.
One interesting result of this evolved from the fact that "mending cards" of yarn were not rationed at all - presumably to encourage the make-do-and-mend mentality. They were traditionally dull buff or grey colours being intended to darn mens socks. [I have inherited many of these cards which sit at the bottom of my work basket - commercial socks are much tougher these days]. However during this period the commercial yarn companies started to produce "mending cards" in all kinds of wild colours which fitted perfectly with multicoloured designs such as this bolero, or the ubiquitous Fair Isle sweater patterns of the period. The influence of rationing some items and not others could be seen much wider than just in knitting yarn in that people would find ways of using many different or less usual materials for clothing if they happened to be "off the ration".
The popularity of multicoloured sweaters, and specifically Fair Isle, was very much to do with being able to use smaller amounts of yarn from different sources and make a garment that looked fresh and new, rather than the collection of oddments which it really was. Sewing patterns were also offered with this in mind - I have a lovely blouse pattern from the period with terrific square shoulders and nipped in waist that is designed to be made in 2 fabrics out of "2 of your husbands old shirts" with the pattern pieces shown laid out accordingly on the shirts, (noting that men's shirts of the period were positively voluminous).
This knitting pattern is not at all challenging (except maybe the 4 needles).
No - it's really all about the delightful picture - such a charming fresh-faced model with those decorous come-hither eyes - all combined with lovely bright colours designed to be cheering for the home makers during WW2.
This kind of quirky Wee Willy Winkie hat did become popular for a while, a few years ago but I haven't seen many around lately. Big pom poms are still the thing though....!
Materials4 ozs mixed shades fingering, 2-ply. [Editor's note: the "2ply" is probably literally two plies but in yarn weight perhaps more like a 3 ply going by the stated tension,] A set of four No 11 (3mm ) needles. Instructions.Cast on 120 stitches, 40 on each of 3 needles. When 6 inches are done start to decrease very gradually. When cap is desired length k2tog all round, then draw wool through remaining
stitches and fasten off. Finish off the end with a multicoloured wool pom-pom, but don't make
You may need to run thread elastic round cast-on edge to keep cap firm on the head. |
Tension8 stitches to an inch. Size matters
Original cap is 30 inches long but you could make one 18 inches long that
is perhaps more suitable for every day wear. Disclaimer
|
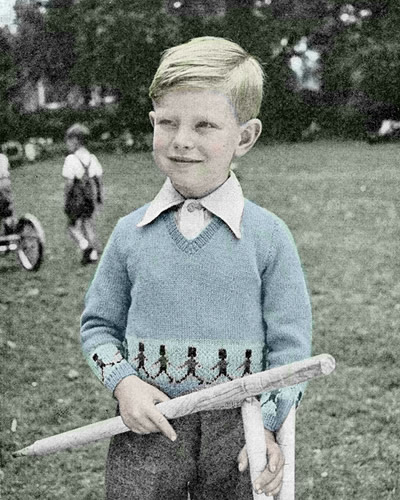
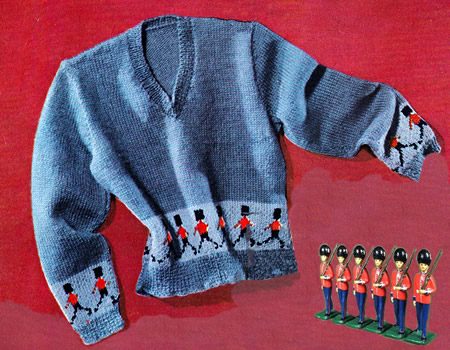
Suitable for all 5 year olds who aren't expecting an iphone, (and who like to play out of season cricket).
Instructions:The jersey is worked in one size - stated as a 5 year old but remembering that children now tend to be larger than they were in the early 1950s. BackUsing No 12 (2¾mm) needles and main shade (mid blue) cast on 84 stitches, and work 1½ inches in k1/p1 rib, increasing to 85 stitches on the last row. Change to No 10 (3¼mm) needles and stocking stitch, and changing from the main mid-blue wool to the pale blue as the background colour for the motifs, work the soldier pattern from chart, reading knit rows from right to left and purl rows from left to right.
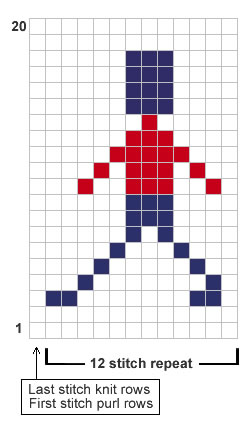
Work the 12 pattern stitches 7 times across with last stitch on knit
rows and first stitch on purl rows as indicated. When 20 rows have been completed, change back to the mid-blue main shade and work straight in stocking stitch until back measures 8 inches. Then, with right side facing, shape armholes by casting off 5 stitches
at the beginning of he next 2 rows. Then k2tog at each end of every knit
row until 65 stitches remain. With right side facing, shape shoulders by casting off 12 stitches
at the beginning of the next 4 rows. FrontWork exactly as for back until the first 2 rows of the armhole shaping have been done. [75 sts] Now divide for the neck: Continue on these 35 stitches for back, decreasing 1 stitch at the armhole edge on the next 4 rows, then keeping the armhole edge straight, and at the same time, decreasing at the neck edge on every following 3rd row until 24 stitches remain. Work straight until front matches back, then with right side facing, shape shoulders by casting off 12 stitches at the beginning of the next and following alternate row, armhole edge. Join the wool to the remaining stitches, at the neck edge; cast off 1,
then work to correspond with first half, reversing all shapings. SleevesUsing No 12 (2¾mm) needles and main shade (mid-blue) cast on 48 stitches and work 1 inch in k1/p1 rib, increasing to 49 stitches on the last row. Change to No 10 (3¼mm) needles and stocking stitch, and work the 20 rows from the chart as for the back. When these are done, change back to the main mid-blue wool and continue in stocking stitch, increasing 1 stitch at each end of the next and every following 6th row until there are 63 stitches. Work straight until sleeve measures 10½ inches. With right side facing, shape top by casting off 3 stitches at
the beginning of the next 2 rows, then k2tog at the beginning of every
row until 21 stitches remain. NeckbandJoin right shoulder seam. With right side facing, using No 12 (2¾mm) needles and mid-blue main shade, pick up and knit 48 stitches down left front, 1 stitch from centre, 48 stitches up right front, and 18 stitches across back of neck. Work ¾ inch k1/p1 rib; decreasing 1 stitch either side of centre
front stitch on alternate rows. Making UpOmitting ribbing, press each piece carefully on wrong side using a warm
iron and a damp cloth. |
Materials3 oz Fair Isle Fingering in main shade (mid blue) and 1 oz in paler blue. Small balls in red and navy for the soldier motifs. A pair each No 12 (2¾mm) and No 10 (3¼mm) needles. Tension30 sts and 38 rows to 4 inches over stocking stitch. Size mattersOne size - width all round chest 25 ins. Abbreviations:k1: knit 1. A word on the woolOriginal called for Patons Fair Isle Fingering about which there is some information available on Ravelry. This pattern is in ounces but it seems the yarn
stuck around for a while as some vintage stocks can be seen in 25g balls. Jamiesons are Kings (or Queens) of Fair Isle and Shetland knitting - their Spindrift yarn sounds a good substitute: equivalent to a traditional 4ply; ideal for Fair Isle knitting; extensive colour pallet of over 220 colours; supplied in 25g Balls (105m); tension: 30sts x 32 rows on 3¼mm needles. Disclaimer
|
Kit bags are yet another thing I have a weakness for; I still have and use a floral one I bought from the Gap at its flagship store in Richmond in the 1980s. I think it stems from when I was a little girl finding my Father's military kit bag in the attic with "Delhi" and "Bombay" stenciled* on it - conjuring all kind of exotic ideas and possibilities. [All us kids also used this kit bag for camping with the Scouts and Guides in those days].
Kit bags are a bit impractical for any activity other than that for which they were designed, but smaller ones can be used more successfully as hand bags. This one seems to be of a more useful size, and you can really make it to any size you feel like. If you use "any thickness" of yarn as suggested then even the size of the base is really up to you. Designed towards the end of WW2, in an era of extreme shortages - where even the manufacture of yarn was restricted never mind the rationing - it is made from "oddments" or "pulled back" wool. The paper the pattern was printed on is flimsy in the extreme and there are sympathetic references everywhere to the inability to source the materials required.
* As well as the destinations, there was also my Father's name, army number, and unit stenciled on his kit bag, and I remember being amazed that he could just recite it without thinking - when in fact his army days were not so very far distant then and of course the only thing you were ever obliged to reveal were "name, rank, and number" - so not so surprising other than to a tiny child who suddenly had a glimmer of an idea that her Father had a life before she existed.
Instructions.The bag is really a free format design and quite simple to make. It's
the details that can make it rather splendid. Base:[Editor's note: Since you are working to a non-specified tension, you might want to do the crochet part first and make the base to fit accordingly.] Cut 2 circles of felt, one 8½ inches, the other 10 inches in diameter.
BorderCut a piece of felt 9 inches wide and 27 inches long; then a strip of
cardboard 26 inches long and 4 inches wide. Crochet topWith double wool, make 140 chain and close to form a ring. [Editor's note:
Or *not* with double wool - as you prefer and depending on the
thickness of the yarn you are using; in fact of you really are using scraps
of different thicknesses you might use some of them double and some not.
In the 1940s, sweaters were generally made in fingering (thin) yarn so
the assumption would have been that this is what you would have had to
work with. 1st round: Make 3 chain to form
first treble, then work 1 chain, 1 treble all round, and link up with
first treble. Repeat 2nd round for about 8 or 9 inches, changing colour as required. Now start decreasing by missing a tr 4 times evenly in round. Divide the work so that you have 36 trebles for back and front with 14
at each side. Work 12 rows of trebles on each of the 36 tr. Turn down each of these 2 (36 treble) top hems and slip a piece of cardboard into each to stiffen before finally stitching. HandlesWith double wool make 70 chain and join to form a circle. [Editor's note: You are essentially using the yarn as stuffing for the handles.] To Make UpStitch crochet top to edge of base on inside of it, making it very firm. Sew handles firmly to stiffened tops. Make a length of crochet chain with a small tassel at each end to thread through open sides at each side of handle. Adaptations
I was sufficiently smitten with this that I actually made one up for myself, with some adaptations of my own. Firstly I did stick with the idea of using oddments I already had, but I used mostly chunky yarns so I did not have to work with the yarn doubled - which can be a bit of a nuisance when doing crochet, even though many old and new patterns seem to suggest it. As I selected my yarns based on colour, some of them were used double to achieve the thickness I wanted. I also changed the stitch - I used a 4mm hook with my chunky yarn, and worked in double crochet (American single crochet) throughout instead of treble crochet in order to achieve a firmer fabric; trebles provide a moderately open fabric, which, even with a lining, was not the effect I wanted. If you want to do that yourself, bear in mind that working with dc is not as quick; however, I find crochet in general works up very quickly (as well as thicker) when compared with knitting. [Editor's note: Worth noting here that although I settled on using chunky yarn, in my opinion, the original fingering (or 4 ply) yarn is about equivalent to an Aran or worsted weight yarn when used double; I say "in my opinion" as opinions do differ on this.] For the base, I used a rather thick leather (about 2mm) which was tough to work but made up surprisingly well. I bought it from leather4craft's selection of offcuts on eBay - but it did prove fairly expensive for all that. You could use a thin leather, or PVC, or recycled leather (which I found very easy to work with in the past) in which case you can treat it much like the felt although easing it may not be quite so easy.

I made the base to be an oval shape to suit the offcut of leather I had. I just took a rectangle about 12 by 8½ inches and rounded the corners (using a dinner plate as a guide), then attached the border in that shape; about ½ inch was used all round for the overlapping seam which gave a circumference fairly close to the original 9 inch circular base. |
MaterialsOddments of wool, any shade or ply. A medium-sized crochet hook. Felt or leather
for the base. TensionDependent on the yarn and hook you use. Size mattersThe base of the bag is designed to be about 8½ inches. Crochet abbreviations:ch: chain Remember these are English crochet instructions where dc is equivalent to US single crochet - see "Terminology" in the side bar. A Word on the WoolI used some tough carpet wools in combination with any chunky yarns I could find in the right colours. I used a relatively smaller hook than usual for chunky in order to keep the fabric firm - and carpet-like. I have seen some crochet work for sale at Woolfest using Herdwick wool which I liked a lot. It was similarly firm, making self- supporting small boxes. [I was less keen to try that out myself as I felt it would be quite tough on the hands.] Disclaimer
|
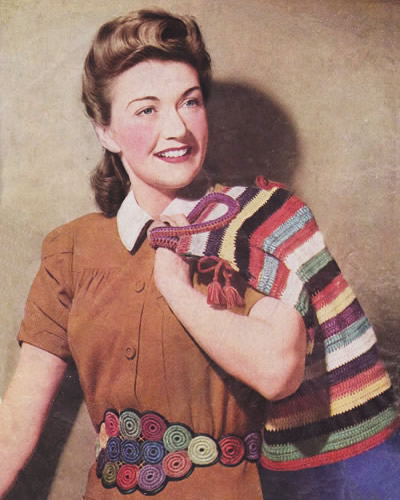
So by now I expect you are thinking "...but hey! - what about that extremely snazzy and attractive belt she is wearing? where can I buy that?".
Well - good news! it's not a purchased item at all - it's a one-of-a-kind hand-crafted item you can make yourself! Here's how:
Instructions. Again the materials are designed to be "make do and mend"
oddments of old pulled-back knitting wool in any ply and any shade, worked
with a medium-sized crochet hook. Each circle is made separately: Now make 6 chain and join into a circle closely. Break foundation and working wool and finish off neatly. [Editor's note: The intention here is to achieve a fairly solid roundel by working your stitches over a core of old yarn - as you might do in stumpwork embroidery or making a corded buttonhole. Obviously you can do as many rounds as you like to achieve the appropriate size.] Arrange the 15 circles for front of belt as shown in photograph, and stitch
to foundation material cut to shape. |
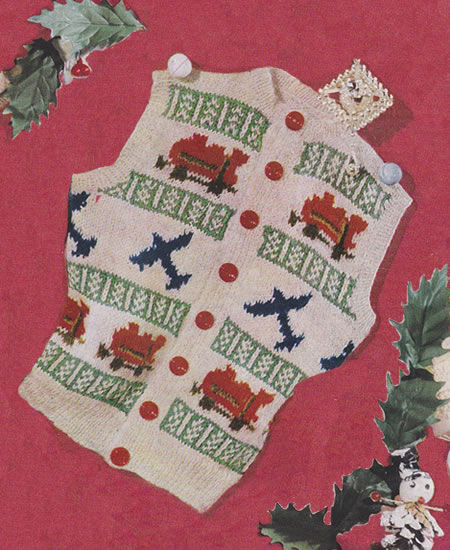
A jolly little waistcoat for the lucky 3 year old who is having a new toy engine or or aeroplane.
... what little boy wouldn't be thrilled to receive this attractive woolly on Christmas morning, teaming up with his new toys. Quickly knitted in tough Fair Isle Fingering, and you can use up your odds and ends for the various motifs.
How far away those days seem - or actually "are"! Even in my era - as attested by James May in Top Toys - boys (not girls of course!) were fixated by rockets and action men - though Airfix was as popular as ever.
Nonetheless - a "jolly little waistcoat" - for retro 3 years olds and their retro parents.
Instructions:The waistcoat is worked in one piece and in one size - stated as a 3 year old but remembering that children tend to be larger than they were in the early 1950s. As usual, you could probably increase the size successfully by using a heavier wool and larger needles. Back and Fronts in oneUsing No 12 (2¾mm) needles and main shade (MS) cast on 145 stitches, and work 1½ inches in k1/p1 rib - rows on the right side having k1 and each end. Change to No 10 (3¼mm) needles and stocking stitch, and work in pattern from chart, reading knit rows from right to left and purl rows from left to right.
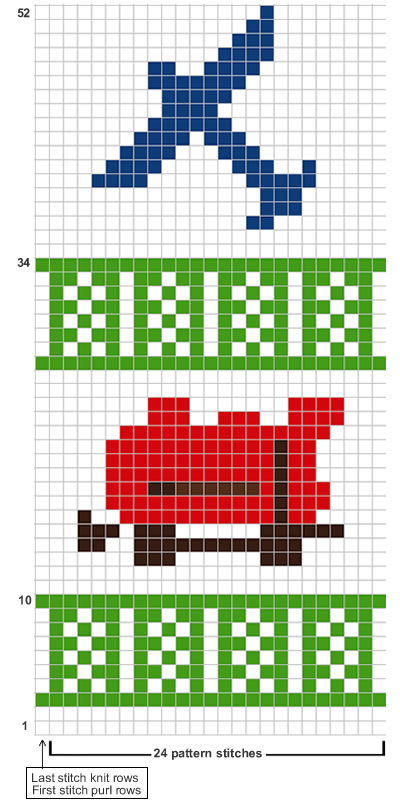
Work the 24 pattern stitches 6 times across with last stitch on knit rows
and first stitch on purl rows as indicated. Work the 52 rows once, then, continuing to work motifs from the chart, and with right side facing, divide for armholes thus: Next row: pattern 36, turn, and
leave remaining stitches on a spare needle or stitch holder. Continue in pattern on these 33 stitches for the right front, decreasing 1 stitch at the armhole edge on the next 6 rows. [27 sts] Work straight in pattern to the end of the 34th row of the chart. With right side facing, continue in MS only, shaping neck by casting
off 4 stitches at the beginning of the next row, then k2tog at the neck
edge on the next 5 rows. With wrong side facing, shape shoulder by casting off 9 stitches at the beginning of the next and following alternate row, (armhole edge). With right side facing, join wool to the remaining stitches. Continue on these 67 stitches for back, decreasing 1 stitch at each end of the next 6 rows. Work straight to end of the 34th row of the chart. Change to MS only and work 8 rows straight, then with right side facing, shape shoulders by casting off 9 stitches at the beginning of the next 4 rows; cast off remaining stitches loosely. With right side facing, join wool to last 36 stitches, armhole edge, and cast off 3, pattern to end, then work to correspond with right front. Ribbed Front BordersUsing No 12 (2¾mm) needles and main shade (MS) cast on 11 stitches
and working in k1/p1 rib, with rows on the right side having a k1 at each
end, make a strip to go up the right front when slightly stretched. Make a similar strip for left front with the addition of 7 buttonholes,
the first to come in the 3rd and 4th rows from the bottom edge, and the
7th about 1 inch from the top (allowing for 8th to be worked in the neckband
later), and the remaining 5 at equal intervals. To make a buttonhole: Neck BorderJoin shoulder seams. Using No 12 (2¾mm) needles and main shade (MS), rib the 11 stitches from the right front border, pick up and knit 43 stitches all round the neck, then rib the remaining 11 stitches from the left front border. [65 sts] Work ½ inch in k1/p1 rib making the 8th buttonhole after ¼ inch has been done. Cast off in rib. Armhole BordersWith right side facing, using No 12 (2¾mm) needles and main shade
(MS), pick up and knit 89 stitches round each armhole. Making UpOmitting ribbing, press each piece carefully on wrong side using a warm
iron and a damp cloth. |
Materials 2 oz Fair Isle Fingering in main shade and 1 oz each in emerald and
scarlet. A pair each No 12 (2¾mm) and No 10 (3¼mm) needles. Eight buttons. Tension32 sts to 4 inches on No 10 (3¼mm) needles over Fair Isle pattern. Size mattersOne size - width all round under arm 22 inches. Abbreviations:k1: knit 1. A word on the woolOriginal called for Patons Fair Isle Fingering about which there is some information available on Ravelry. This pattern is in ounces but it seems the yarn
stuck around for a while as some vintage stocks can be seen in 25g balls. Jamiesons are Kings (or Queens) of Fair Isle and Shetland knitting - their Spindrift yarn sounds a good substitute: equivalent to a traditional 4ply; ideal for Fair Isle knitting; extensive colour pallet of over 220 colours; supplied in 25g Balls (105m); tension: 30sts x 32 rows on 3¼mm needles. Disclaimer
|

Another scarf/hood combination from the 1940s that is the partner of last year's pattern. It has a firm headband to frame the face, and a pocket construction at the back (see photo below) to keep that forties hairdo in good shape. The scarf ties are double thickness.
The Back with elastic casing:Cast on 300 stitches Repeat the 3rd and 4th rows until 108sts remain. Repeat the 3rd row 4 times. 12th row: Slip 1, purl to the last
stitch k1. The Head Piece:Cast on 300 stitches Repeat the 3rd and 4th rows until 108sts remain. 1st row: K2tog, knit to the last
2sts k2tog. Repeat the 1st and 2nd rows until 68sts remain. The Border:Cast on 120sts. To Make Up the StormcheaterPress each piece separately on the wrong side under a damp cloth. 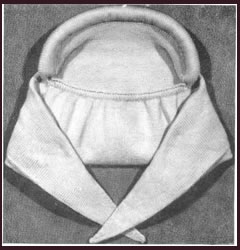 |
Materials4 ozs 3ply wool. One pair No 10 (3¼mm) knitting needles. 9½ inches elastic. TensionApprox. 32sts to 4 inches on No 10 needles. Size mattersTo fit an average sized head. Abbreviationsk2tog: (decrease) knit 2 sts together. A word on the woolOriginal knitted in Sirdar Majestic 3-ply Wool. Disclaimer
|
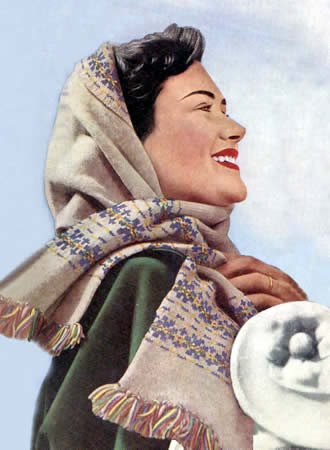
A lovely warm idea that has never lost its popularity: a scarf/hood combination. This has an interesting construction with the scarf being double sided, and the hood being more a like a pocket with the intention that it should form soft folds when worn. [I'm more used to a pixie hood type design with a centre back seam].
Hood Scarf:Using the main colour wool (MC) cast on 108 sts. 1st row: Slip 1, knit to end of row. ** Join in the first contrast (B) and working the 1st and 2nd rows as shown on the chart proceed as follows: 1st row: *
Knit 2MC, 3B, 3MC, 3B, 1MC, repeat from *
to end of row. Break off first contrast (B) and join in the second contrast
(Y).
Repeat from ** to ** twice. Continue in stocking stitch until the work measures 40 inches Work 18 rows in stocking stitch. Hood Border:Work a border along one 16 inch side of the hood opening as follows: Next row (right side): Slip 1, purl
to the last stitch k1. 1st row: *
Knit 2MC, 3B, 3MC, 3B, 1MC, repeat from *
to end of row. Break off first contrast (B) and join in the second contrast
(Y). Commencing with the 3rd row, proceed as shown on the chart, changing
the colours when necessary, until the 15th row has been worked. Proceed as follows: To Make Up the Scarf.Sew the ends of the scarf together on the wrong side. |
Materials5 ozs 3ply in main shade plus "medium-sized" balls in each of four contrast colours eg blue, yellow, green and pink. One pair No 9 (3¾ mm) knitting needles. TensionApprox. 30sts to 4 inches on No 9 needles. Size mattersWidth round face edge is 16 inches. A word on the woolOriginal knitted in Sirdar Majestic 3-ply Wool Disclaimer
|
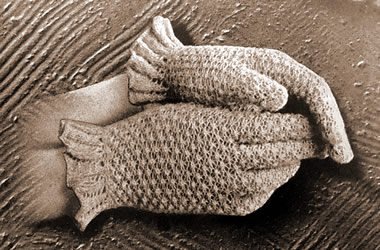
A very early pattern to make these charming light weight gloves using fine 2ply yarn. You could also use a mercerised cotton for summer gloves, but (as the pattern encourages) check your tension carefully.
Note that these glove patterns are very elderly and thus you have to make allowances in the instructions. They talk about "plain knitting" and they don't give a lot of explanation about how you turn the work and pick up the stitches. Generally they expect you to fend for yourself; I have not tested this pattern so if you would like to double check what I have written or if you want a second opinion I'm happy to try and help.
Instructions:The gloves are worked in blackberry stitch (also known as trinity stitch)
on 2 needles. The nature of this stitch means that the number of stitches
can vary from row to row; this can seem a little puzzling as it means
the instructions for the right and left hand gloves seem not to be symmetrical
- but they should work out OK. Right-hand Glove:Using two Needles, cast on 54 sts. 1st row: k1, purl to last stitch,
k1. These 4 rows form the basic pattern. Repeat from 1st to 4th row five times. The Thumb Next row: k1, p32, k1. Turn Then proceed as follows:- 1st row: k1, p20, k1. Repeat 1st to 4th row three times. Then proceed as follows:- 1st row: k1, (k1, k2togtbl, k4, k2tog,
k1) twice, k1. Break off wool and run end through remaining sts.
First Finger Next row: k1, p34, increase once
in next stitch. Turn. Then proceed as follows:- 1st row: k1, p17, k1. Repeat from 1st to 4th row four times, then 1st and 2nd rows once, decreasing one stitch in last row. Then proceed as follows:- 1st row: (k1, k2togtbl, k4, k2tog,
k1) twice. Finish off as given for Thumb. Second Finger With right side of work facing, join in wool and knit up 4 sts. from 2 cast-on sts. at base of First Finger, p5, k1. Turn. Next row: k1, (k1p1k1 in next stitch; p3tog) four times, cast on 4sts. Turn. Then proceed as follows:- 1st row: k1, p19, k1. Repeat from 1st to 4th row five times, then 1st and 2nd rows once, increasing
one stitch in last row. Third Finger With right side of work facing, join in wool and knit up 5sts. from 4 cast-on sts. at base of Second Finger, p5, increase in the next stitch. Turn. Next row: k1, (p3tog; k1p1k1 in next stitch) three times, p3tog, p1; cast on 4sts. Turn. Then work exactly as given for First Finger. Fourth Finger With right side of work facing, join in wool and knit up 4 sts. from 4 cast-on sts. at base of Third Finger, p5, k1. Then proceed as follows:- 1st row: k1; (k1p1k1 in next stitch;
p3tog) four times; k1. Repeat from 1st to 4th row three times, then 1st row once. Then proceed as follows:- 1st row: (k1, k2togtbl, k3, k2tog,
k1) twice. Finish off as given for First Finger. The Frill With wrong side of work facing, pick up 52 sts, from cast-on edge of glove. Join in wool. 1st row: k1, * k2tog; repeat from * to last st, k1. Work 3 rows in plain knitting. 5th row: k1, *
increase once in next st, repeat from *
to last st, k1. [There should now be 52 sts. on needle]. Continue in this manner until there are 164 sts. on needle. Next row: k1, * p2, k8, repeat from* to last 3 sts, p2, k1. Cast off knitways. Left-hand Glove:Using two Needles, cast on 54 sts. Work exactly as given for Right-hand Glove until Thumb is reached. The Thumb Next row: k1, p31, cast on 11 sts.
Turn. Then proceed as follows:- 1st row: k1, p20, k1. Repeat 1st to 4th row three times. Decrease and finish off as given for the Thumb of Right-hand Glove. Using needle containing 21 sts, join in wool and knit up 11 stitches
from 11 cast-on sts, at the base of the thumb; p21, k1 across remaining
stitches. First Finger Next row: k1, p35, cast on 5 sts.
Turn. Then work exactly is given for First Finger of of Right-hand Glove. Second Finger With right side of work facing, join in wool and knit up 4 sts. from 5 cast-on sts. at base of First Finger, p5, cast on 4sts. Turn. Next row: k1, (p3tog; k1p1k1 in next stitch) four times, p3tog; k1. Turn. Then proceed as follows:- 1st row: k1, p17, k1. Repeat from 1st to 4th row five times, then 1st and 2nd rows once, decreasing
one stitch at the end of the last row. Third Finger With right side of work facing, join in wool and knit up 5sts. from 4 cast-on sts. at base of Second Finger, p6, cast on 3sts. Turn. Next row: k1, (k1p1k1 in next stitch; p3tog) four times, k1p1k1 in next stitch; k1. Turn. Then proceed as follows:- 1st row: k1, p19, k1. Repeat from 1st to 4th row four times, then 1st and 2nd rows once, increasing
one stitch in last row. Fourth Finger With right side of work facing, join in wool and knit up 4 sts. from 3 cast-on sts. at base of Third Finger, p6, k1. Then work exactly as given for Fourth Finger of Right-hand Glove. Work the Frill as given for Right-hand Glove. Making Up:With a damp cloth and hot iron press very lightly. |
Materials1 oz Patons Beehive Fingering 2ply. One pair of No 12 (2¾ mm) needles. Tension3 patterns (12 sts) to 1 inch. Adjust your needle size to obtain the right tension. Approximately 36sts 4 inches on No 12 needles over stocking stitch. Size mattersWidth all round above thumb, 5½ ins. [Editor's note: 5½ins seems a bit small? You may find that despite my notes on the wool weight below that you could use a "4ply" yarn with a larger gauge and/or adjust the needles to get the fit you need. Measure your hand and do a swatch....always Good Advice!] Abbreviationswon: wool over needle. Makes an extra stitch which forms a small pattern hole when knitted on the next row. p3tog: purl 3 stitches together (decrease 2) k1p1k1: knit and purl into front, then knit into back of next stitch (increase 2) k2tog: knit 2 stitches together (decrease). k2togtbl: knit 2 stitches together through back loops or "ssk" (slip slip knit) is a method of knitting 2 stitches together but into the backs of the stitches rather than the usual "k2tog" which knits into the fronts. A word on the woolAlthough it may be a literal 2ply, I think the stated tension implies it is more like a 3 ply weight. Throughout this site I state that it's hard to get 3ply yarns these days - and now I find Jamieson's have a different web address (now corrected on my links I hope) and a range of yarns that is new to me. The yarns are properly described as to the number of strands plied together, (eg "2ply jumper weight"), but also helpfully tell you what the wool weight is equivalent to. So they have an excellent range of colours in "2ply laceweight" which states: This yarn can be used in vintage patterns which call for "3ply yarns". I really wish I had discovered this for some of my other projects. They also have a "cobweb lace" which might be a traditional 2 ply weight. I can't wait to experiment. Disclaimer
|
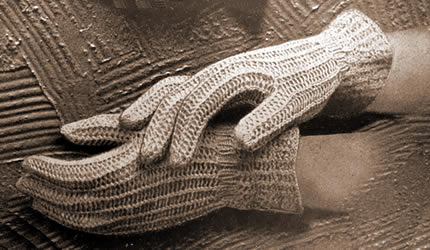
From the same early pattern source as Gloves for a Lady I - slightly less lacy but still an open-work light weight design using fine yarn.
Note that these glove patterns are very elderly and thus you have to make allowances in the instructions. They talk about "plain knitting" and they don't give a lot of explanation about how you turn the work and pick up the stitches. Generally they expect you to fend for yourself; I have not tested this pattern so if you would like to double check what I have written or if you want a second opinion I'm happy to try and help.
Instructions:The gloves are worked in an openwork ladder stitch created by working
"yarn over needle" or eyelets on every row. Right-hand Glove:Using two Needles, cast on 80 sts Work 2 rows in plain knitting. Repeat 30th row 6 times, increasing 2 sts in last row. Repeat 3rd row thirty-two times. The Thumb Next row: k1, (p1, won, k2tog) eleven
times; k1. Turn Working on these 20 sts, repeat 3rd row twenty-two times (length of Then proceed as follows:- 1st row: knit plain. Break off wool and run end through remaining stitches.
Working on these 50 sts, repeat 3rd row of main pattern twenty-five times. First Finger Next row: k1, (p1, won, k2tog) ten
times; k1. Turn Working on these 17 sts, repeat 3rd row of main pattern twenty-five times. Then proceed as follows:- 1st row: k14, k2tog, k1. Break off wool and run end through remaining stitches. Second Finger With right side of work facing, join in wool and knit up 3 sts from 3 cast-on sts at base of First Finger, k2tog, p1, won, k2tog, k1. Turn. Next row: k1, (p1, won, k2tog) four times, p1, cast on 3sts. Turn. Working on these 17 sts, repeat 3rd row of main pattern thirty times. Decrease and finish off as given for First Finger. Third Finger With right side of work facing, join in wool and knit up 3 sts from 3 cast-on sts at base of Second Finger, k2tog, p1, won, k2tog, k1. Turn. Next row: k1, (p1, won, k2tog) four times, p1, cast on 3sts. Turn. Working on these 17 sts, repeat 3rd row of main pattern twenty-eight times. Decrease and finish off as given for First Finger. Fourth Finger With right side of work facing, join in wool and knit up 3 sts from 3 cast-on sts at base of Third Finger, k2tog, p1, won, k2tog, k1. Turn. Next row: k1, (p1, won, k2tog) four
times, k1, cast on 3sts. Turn. Working on these 14 sts, repeat 3rd row of main pattern eighteen times.
Then proceed as follows:- 1st row: knit plain. Finish off as given for First Finger. Left-hand Glove:Cast on 80 sts and work exactly as given for Right-hand Glove until Thumb is reached. The Thumb Next row: k1, (p1, won, k2tog) eight
times, p1, cast on 9 sts. Turn. Work on these 20 sts exactly as given for Thumb of Right-hand Glove. Using needle containing 15sts, join in wool and knit up 11 stitches
from 9 cast-on sts, at the base of the thumb; wfwd, k2tog, (p1,won, k2tog)
7 times, k1, across remaining 24 sts. First Finger Next row: k1, (p1, won, k2tog) ten
times; p1, cast on 3 sts. Turn Then work on these 17 sts, exactly is given for First Finger of Right-hand Glove. Second Finger With right side of work facing, join in wool and knit up 3sts from 3
cast-on sts at base of First Finger; k2tog, p1, won, k2tog, p1, cast
on 3sts. Turn. Next row: k1, (p1, won, k2tog) five times; k1, Turn. Then work on these 17 sts, exactly is given for Second Finger of Right-hand Glove. Third Finger With right side of work facing, join in wool and knit up 3sts from 3
cast-on sts at base of Second Finger; k2tog, p1, won, k2tog, p1, cast
on 3sts. Turn. Next row: k1, (p1, won, k2tog) five times; k1, Turn. Then work on these 17 sts, exactly is given for Third Finger of Right-hand Glove. Fourth Finger With right side of work facing, join in wool and knit up 3sts from 3 cast-on sts at base of Third Finger; k2tog, p1, won, k2tog, k1. Turn. Next row: k1, (p1, won, k2tog) four times; k1, Turn. Then work on these 14 sts, exactly is given for Fourth Finger of Right-hand Glove. Work the Frill as given for Right-hand Glove. Making Up:With a damp cloth and hot iron press very lightly. |
Materials1 oz Patons Beehive Fingering 2ply. One pair of No 13 (2¼ mm) needles. Tension10 sts to 1 inch over pattern (not stretched). Approximately 36sts 4 inches on No 12 needles over stocking stitch. Size mattersWidth all round above thumb, 5 ins. [Editor's note: 5ins seems a bit small? You may find that despite my notes on the wool weight below that you could use a "4ply" yarn with a larger gauge and/or adjust the needles to get the fit you need. Measure your hand and do a swatch....always Good Advice!] Abbreviationswon/wfwd: wool over needle/wool forward. Makes an extra stitch which forms a small pattern hole when knitted on the next row. k2tog: knit 2 stitches together (decrease). k2togtbl: knit 2 stitches together through back loops or "ssk" (slip slip knit) is a method of knitting 2 stitches together but into the backs of the stitches rather than the usual "k2tog" which knits into the fronts. A word on the woolAlthough it may be a literal 2ply, I think the stated tension implies it is more like a 3 ply weight. Throughout this site I state that it's hard to get 3ply yarns these days - and now I find Jamieson's have a different web address (now corrected on my links I hope) and a range of yarns that is new to me. The yarns are properly described as to the number of strands plied together, (eg "2ply jumper weight"), but also helpfully tell you what the wool weight is equivalent to. So they have an excellent range of colours in "2ply laceweight" which states: This yarn can be used in vintage patterns which call for "3ply yarns". I really wish I had discovered this for some of my other projects. They also have a "cobweb lace" which might be a traditional 2 ply weight. I can't wait to experiment. Disclaimer
|
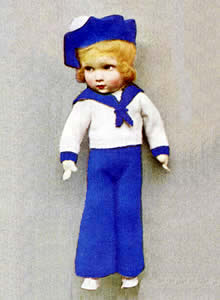
A cute little 1940's outfit for sailor doll. Sized to fit a 16 inch doll and shown on a felt doll, (Lenci I think), with the characteristically modest expression. Quite delightful.
Instructions.Patterns for the outfit as shown, plus the option of a skirt instead of trousers if preferred. Beret:With blue wool and crochet hook, make 4 ch, and join into ring with slip-stitch, then work 8 double crochet into ring. 1st Round: 2 ch, then 2 dc on each
stitch (join with slip stitch to top of 2 ch at end of each round). Continue in this manner, working an extra stitch between increasings each time until work measures 5½ inches across at widest part (17 rounds). Now decrease thus:- 1st Round: 2 ch, *
miss 1 stitch, 17 dc, repeat from *
to end. Jumper:FRONT: With white wool and No 12 needles, cast on 36 stitches
and work ½ inch in k1, p1 rib. Change to No 10 needles and continue
in stocking-stitch until work measures 2 inches. Shape armholes by casting
off 2 stitches at beginning of next 2 rows, then k2tog at each end of
the next 2 rows. BACK: Work exactly as for front to completion of armhole shapings, then continue straight until length equals that of front to shoulders. Cast off straight across. SLEEVES: With blue wool and No 12 needles, cast on 22 stitches and work ½ inch in k1, p1 rib. Change to No 10 needles and white wool, and continue in stocking stitch, increasing at each end of 5th and every following 6th row until there are 30 stitches on the needle. Work straight until sleeve measures 3½ inches, then shape the top by casting off 3 at the beginning of the next 2 rows, then k2tog at each end of every row until 16 remain. Cast off loosely. COLLAR: With No 10 needles and blue wool, cast on 38 stitches
and knit 8 rows garter stitch, (every row knit), slipping the first stitch
of each row. Work the remaining 12 stitches to correspond reversing the shaping. SkirtWith No 10 needles and blue wool, cast on 183 stitches. 1st Row:
k3, * p8, k5, repeat from *
to last 11 stitches, p. 8, k. 3. Repeat these 2 rows for 1 inch, then decrease as follows:- Next Row:
(right side facing): k3, * p2tog,
p4, p2tog, k5, repeat from *, ending
k3. Next Row: k3, *
p2tog, p2, p2tog, k5, repeat from *,
ending k3. Next Row: k. 3, *
(p2tog) twice, k5, repeat from *,
ending k3. Next Row: k. 3, *
p2tog, k5, repeat from *, ending k3.
Change to No 12 needles and work in k1, p1 rib until work measures 4½ inches, then cast off in rib. Trousers (front and back alike)With No 10 needles and blue wool, cast on 23 stitches for right leg,
and work 6 rows garter stitch. Change to stocking stitch and decrease
at beginning of every following 8th row (outside edge) until 18 stitches
remain. [ Editor's note: Make sure you have right side facing you for both legs and that they are arranged so that the shapings are on the outside edges.] Continue in stocking stitch for another 2½ inches, then change
to No 12 needles and work 3 rows in k1, p1 rib. Next Row: (make holes for elastic):
rib 2, * wfwd, k2tog, repeat from
* to last 2 stitches, rib 2. Work a second piece in the same way. To make upPress all pieces lightly with a damp cloth. Sew in all ends. |
MaterialsOriginal yarn requirements: A pair each of No 10 (3¼mm) and No 12 (2¾mm) needles. Tension30 sts to 4 inches on No 10 needles. Size mattersDesigned to fit a 16-inch doll. Abbreviationsch: chain k2tog: knit 2 sts together A Word
|
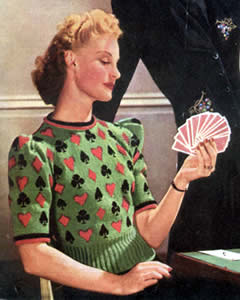
This is a wonderful period jumper from 1940. I often thought I might try and adapt it but never made a decision as to how. Recently a friend on the internet borrowed the pattern to make it "as is" - quite an undertaking with all that patterning. She wanted to make it for a local Poker Club - but, as I explained, this is a Bridge Jumper - no playing poker in it mind!
So here is the pattern as it appeared originally - I will include any notes and advice from our test knitter if and when they are forthcoming.
InstructionsThese are the instructions as they appear in the original pattern. They are untested with modern yarn and needles. FrontWith No 12 needles and main shade (G) cast on cast on 108 stitches and work 4½ inches in Knit 2, Purl 2 rib, increasing at the end of the last row. Change to No. 10 needles, and work 2 rows stocking stitch; then, still in stocking stitch, change to coloured pattern as follows: 1st row (right side facing): Knit
8 in main shade (G), * 3 in black
(B), 13G, 1 in red (R), 13G, repeat from *
to last 11 stitches, 3B, 8G. 15th-20th rows: Work in stocking stitch in main shade only. 21st row:
Increase in first stitch; knit 8G, *
1R, 13G, 3B, 13G, repeat from * to
last 10 stitches, 1R, 8G, increase in last stitch. These 40 rows form the pattern.
Shape armhole as follows: Continuing in pattern, cast off 5 stitches at the beginning of the next
2 rows, then decrease at each end of the next 5 rows (105 stitches). Shape neck as follows: 1st row: Knit 6G, 3B, 13G, 1R, 59G,
1R, 13G, 3B, 6G. Working on these last 42 stitches:- 4th row: Purl 4G, 2B, 1G, 1B, 1G, 2B, 10G, 3R, 18G. Continue in pattern, decreasing at neck edge on next and every alternate row until 36 stitches remain and the 15th pattern row has been worked. Shape shoulder as follows: 1st row (wrong side facing): Cast
off 10 stitches at armhole edge, purl to end. Repeat these last 2 rows once. Cast off. BackWork as for the front until 3rd pattern is completed, then Next row: Knit 6G, 3B, 13G, 1R, 13G, 3B, 14G, turn. Work on these 53 stitches for the right shoulder (slip remaining stitches
on to a spare needle or stitch holder). Shape shoulder as follows: cast off 11 stitches at armhole edge on the next 3 alternate rows. Cast off remaining 20 stitches. Return to stitches left on spare needle or stitch holder. Join main shade wool at centre, cast on 4 stitches for under-lap and work to match the right shoulder, shaping at opposite edges. SleevesWith No 12 needles and main shade wool, cast on 73 stitches. 1st row: Knit 6G, *
1R, 13G, 3B, 13G, repeat from * once,
1R, 6G. Now shape top: work 4 rows in G stocking stitch, casting off 2
sts at the beginning of the first 2 rows, then decreasing at each end
of the next 2 rows. Work 2 rows straight, then decrease at the beginning of the next 4 rows.
* Work 2 rows straight, then decrease
at the beginning of the next 2 rows. Repeat from *
once. Roll for neck and SleevesWith No. 12 needles cast on 7 stitches in R and 7 stitches in B. Repeat these 2 rows until roll is required length. Cast off. To Make UpPress all parts except ribbing on the wrong side under a damp cloth.
Make three crochet buttons thus: |
MaterialsOriginal materials called for: 12ozs Patons Super Bouclet. A pair each Nos 10 and 12 (3¼mm and 2¾mm) needles. A press-stud. Editor's note: The closure for the back opening uses 3 buttons and loops that are self-made using crochet, so you will need an equivalent size crochet hook for finishing. Tension 28sts to 4 inches on No 10 needles. Size mattersTo fit 33-35 inch bust; length from top of shoulder: 20 inches; sleeve
seam: 6 inches. Abbreviationsincrease: by knitting into the front and back of the next stitch. k2tog: decrease by knitting 2 sts together. dc: double crochet - known as single crochet in the US. A word on the wool.The tension and needle size for this pattern imply a standard 4 ply yarn would work. Given that bouclé yarn tends to work up fairly firmly, it might be possible to substitute a double knitting yarn to make a larger size. Editor's note: My experience of these vintage patterns leads me to suggest that you may need far more yarn than the quantities indicate. In some cases I have needed one 50g ball (which is actually 1¾ozs) to replace each 1oz ball. Disclaimer
|
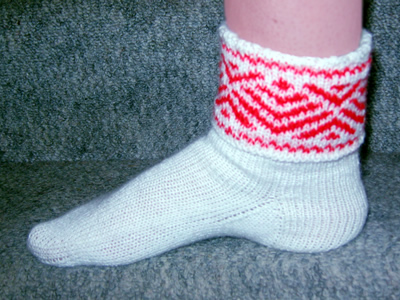
As the nail-biting tournament in South Africa dominates this month, here we have: 1940s sport socks.
I thought they were nicely in England's colours, but not exactly football socks -
I think they mean a nice decorous sport like tennis, don't you?
Red and white is the original colour scheme from the 1940s. (Possibly the original did not include quite such a Dayglo shade of red.) However, the pattern seems vaguely Scandinavian and wintery to me - I could see them perhaps in Christmas colours of a more muted red with green.
Meanwhile... Ingerland, Ingerland, Ingerland...
Instructions.Starting at top with the cuff, using the main colour, cast on
64 stitches on three needles (21,22, 21). 3rd Round: *
k1 contrast (C), k1 main (M); repeat from *
to end of round.
This completes the cuff. Break colour C and continue in main colour only.
Turn the work inside out to make a fold-over cuff and start to work the rounds in the opposite direction. Work in k2, p2 rib for 3 inches [Editor's note: about 30 rows.], decreasing 8 stitches in the last round only, by knitting together every 7th and 8th stitch. Next Round: k2tog, knit to last 2 stitches, k2tog. [54 stitches] Now work in stocking-stitch (knit every round) for 2 inches. HeelKnit 13 stitches of first needle on to third needle (this is the heel needle), then turn and purl back 26 stitches; divide the remaining 28 stitches equally onto the other two needles. Work back and forth over heel needles as follows: 1st Row: slip 1 stitch knitwise, knit
across remaining stitches. Next Row (right side facing): knit across first 16 stitches, k2tog; turn. Next Row: p7, p2tog; turn. Next Round: needle 1: knit across
heel needle, then pick up 14 stitches down left side of heel; needle 2:
knit across next two, needles (thus transferring these stitches on to
one needle); needle 3: pick up 14 stitches across other side of heel and
k4, from needle 1. Hereafter, work in rounds of stocking stitch but, on every other round, k2tog at end of first needle, and (s1, k1, psso) at beginning of third needle until 54 stitches remain. Work straight until piece measures 2 inches less than that required for overall foot length. [Editor's note: This was about 50 rows for my UK size 4 foot. (EU 37, US 6½.] ToeThere should be 13 stitches on first needle, 28 on the second needle, and 13 on the third needle. End of round is centre of sole. Work 1 round, decreasing at each end of second needle, then one round straight. Now there are 13 stitches on first needle, 26 on the second needle, and 13 on the third needle. Next Round: knit to within 3 stitches
of the end of the first needle, k2tog, k1; on second needle, k1, (s1,
k1, psso), knit to within last 3 stitches, then k2tog, k1; on third needle,
k1, (s1, k1, psso), knit to end of round. Repeat the last 2 rounds until 16 stitches remain. Graft the stitches together. Making upSew in all ends. Fold down cuff. |
Materials3ozs Patons Real Shetland Wool. A set of four No 11 needles, pointed at both ends. Tension30 stitches = 4ins Size mattersLength of foot, 9 inches (adjustable). AbbreviationsM is main shade (white). psso: pass the slipped stitch over, (also known as "ssk"; effectively you are "knitting 2 together through back loops"). A Word
|

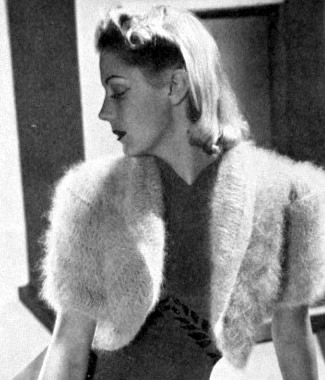
I cannot do better than quote the original introduction from the 1940s.
"The charm of this little bolero is that it makes either a dainty bed-jacket, or attractive Angora coatee, for day or evening wear. The pretty shape makes it fit beautifully and you will find the openwork sleeves and border simple and quick to do."
I will add that you should choose your colours and styling carefully, otherwise its roots as a bed-jacket may be too obvious. When I knitted Rowan's Carolina by Sharon Miller in pale blue/grey - which is lovely in my opinion - I find myself unable to wear it as day wear and feel it needs to be in a more striking colour for evening wear. (Matches my pyjamas nicely though...)
Note that this pattern is untested, and reproduced here as per the original.
Instructions.The body of the bolero is worked in fancy rib over 2 rows as follows: 1st Row: Knit. BackCast on 84 stitches and work in ribbed pattern as above. Now cast off 1 stitch at beginning of every row till 16 sts remain. Work 20 rows straight. Continue to work in pattern but increase 1 st at each end of the next
and every following 3rd row until there are 26 sts on the needle. Side PiecesUsing three needles, pick up and knit 110 stitches up right side of back
piece, then cast on 122 stitches. Arrange the sts as follows: Join into a round and work 20 rounds in pattern. Next Round: *
k2, k2tog; repeat from * to end. Work second side to correspond. BorderWith five needles, using 2 strands of wool together, and right side facing, pick up and knit 42 stitches across lower edge of back, 60 stitches round right side, 13 across back of neck and 60 stitches round left side. 1st Round: Knit. Repeat 12th and 13th rounds, then 12th round again. SleevesStarting at the top with two needles and double wool, cast on 36 stitches and knit 4 rows garter stitch (every row knitted). † Repeat from † once, then 5th row again. Next Row: Cast on 6 stitches, knit
to end, dropping all loop stitches. † Repeat from † once, and then
again omitting decreasings. Making upPress very lightly only. |
MaterialsOriginal quoted 5ozs Beehive Non-Shrink Baby Wool 3ply. Five No 7 (4½mm) double-pointed needles, or one pair of needles and a circular needle. No 8 (4mm) crochet hook. [Alternative 9 (½ oz) balls Patons Fuzzy-Wuzzy Angora and five No 8 (4mm) needles] Tension28 stitches to 4 inches over pattern rib in back; 40 stitches to 4 inches
over pattern rib in side pieces. Size mattersTo fit size 32-36 inch bust; length from top of shoulder to lower edge,
16 inches; sleeve seam, 4½ inches. Abbreviationsk2tog: knit 2 sts together (decrease). dc: double crochet remembering that this is UK notation, and in the US is referred to as single crochet. ch: chain A Word
|
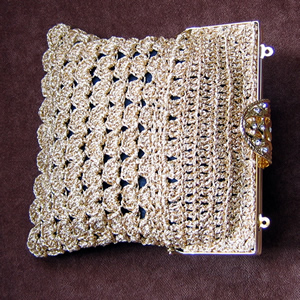
From November 1940:
"This pretty gold mesh bag will rejoice the hearts of those can still enjoy a little social life. Personally we are at this moment sitting in an air-raid shelter!"
One wonders if that was literally true - but I am sure the editorial team spent a lot of their time in shelters in this period of history in the UK.
InstructionsStarting at the top make 37 chain. 1st row: Miss 2 ch; 35tr; turn with
2ch. Now make a second piece exactly the same, and at the end of the final row, make 5ch, and then join the two pieces together by working across the first piece to end of 5ch in slipstitch, then slipstitch across 2nd piece, making a round. Now change to pattern and work backwards and forwards in rows,
1st row: 1ch; 3dc into 3rd of 5 ch; 3dc into first space * miss 2 spaces; 3 dc into next space; repeat from * across all trebles; then 3dc into 3rd of 5 ch; work across the other side as for the first [27 groups]. Slipstitch into the middle of 3dc made on the 5ch. Turn. 2nd row: (1dc, 1tr, 1dc) into middle of each group of 3dc. Turn with a slipstitch to the next treble. 3rd row: 1dc into same treble as
slipstitch, * (1dc, 3tr, 1dc) into next group,
1dc into centre of next group, * repeat from
* to * once. 4th row: (1dc, 5tr, 1dc) into the
middle of each group; turn with a slipstitch into second treble. 6th row: (1dc, 7tr, 1dc) into the
middle of each group; turn with a slipstitch into second treble. Now pinch the two sides of the bag together at the bottom edge and slipstitch
across from one side to the other, taking two outside scallops together,
to join. The scallops that were on the "side" of the bag are
twisted slightly to accomplish this, joining 9 full scallops and avoiding
a half-scallop at the sides of this edge. Making up:Sew in all ends. If your frame has fasteners designed for a cord handle, make a cord or buy a fine chain to form the handle. I made a kumihimo cord, as this is a current interest of mine. |
MaterialsExample shown is made from 2 balls of Twilleys Goldfingering. Bag handles from Bags
of Handles One No. 11 (3mm) crochet hook. Fabric remnant for lining. Crochet abbreviations:ch = chain Remember these are English crochet instructions where dc is equivalent to US single crochet - see "Terminology" in the side bar. TensionNo tension given - my 37 treble worked out to 5 inches when not eased
out on frame. Size mattersFits 5¼ inch width handle. Disclaimer
|
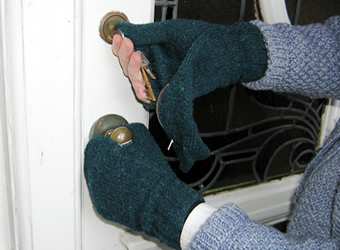
These are double layered mittens which have suddenly become popular again (probably more the height of fashion a year or so ago - as well as half a century ago). This pattern is from February 1940. Here the thumb is left free; in some designs of this era, the thumb and forefinger are left free - your "trigger finger " I assume.
"The glove mitts are a sensible idea, ensuring both warmth and freedom of movement. Instructions are given for both men's and women's sizes".
The different sizes are achieved by using different wool weights and needles.
Instructions (both hands alike)Using No. 14 (2mm) needles cast on 48 stitches, and work in k2, p2 rib in rounds for 2½ inches. Next row: Knit twice into every stitch. Now slip every alternate stitch (ie every "made" stitch) on to No 12(11) needles and leave the original 48 sts on the No14 needles on the outside of the work.
[Editor's note: The
original instructions expect you to continue to knit on the larger needles,
leaving the outer sts on the No 14 needles. I found this very awkward;
I thought it would improve as I got further up the glove but it did not. Continue on the No 12(11) needles, on the "made" sts, in rounds of plain knitting, and work 2 rows straight. 3rd round: Knit twice into first
st, knit to the last st, knit twice into it. 6th round: Knit twice into first
st, knit to the last 2sts, knit twice into next st, k1. 9th round: Knit twice into first
st, knit to the last 3sts, knit twice into next st, k2. Continue in this way, increasing on every 3rd row at either side of the
thuumb, until there are 66 sts on the needles. Divide for thumb Continue on these 20 sts for 22 rounds. Rejoin wool to continue with the main part of the mitten: Work 18 rounds straight on these 54 sts. Divide for fingers Work 3 rounds straight on these 20 sts, then work 4 rounds k1, p1 rib. Cast off loosely in rib. Next round (middle finger): Remove the waste wool and pick up 4 sts at the base forefinger. Knit first 6 sts from holder; cast on 4 sts in waste wool and knit them onto the working needle; slip the last 6 sts on holder onto a needle and knit them. [20sts] Complete as for forefinger. Next round (third finger): Work and complete as for middle finger. Next round (little finger): Remove the waste wool and pick up 4 sts at the base third finger, and knit the remaining 14 sts from holder. [18sts] Work as before over these 18 sts. Over-mitten Next row (right side facing): K2tog;
k21; k2tog; k21; k2tog. Continue in stocking stitch, decreasing as for 7th row on every 6th row
until 37 sts remain. Making up 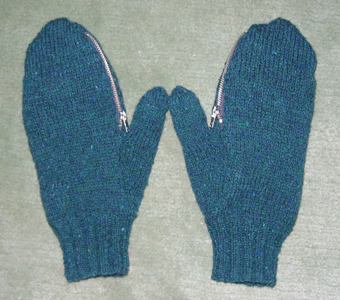
|
MaterialsExample shown is knitted in 3 x 25g balls Rowan 4ply Tweed. Set of 4 each of numbers 14, 12 and 11 (UK size) needles for the smaller
size, and 14, 11 and 10 for the larger size. Two 4-inch zip fasteners. TensionApprox. 8st to 1 inch Rowan 4ply tweed tension: 28st and 40rows to 4 inches (10cm) using No
11 (3mm) needles. Size mattersTo fit size 6¼-7, or 7½-8½ inch hand. A word on the wool.Original calls for 2oz 3 ply for girl's size [sic] and 3oz 4ply for man's
size. Disclaimer
|
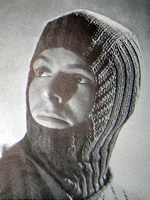
This 'good old Balaclava helmet' was included in the item "More Knitteds for the Forces".
I know - they are nice and warm - and they can be useful on the slopes - but I'm given to understand that beanies are more the thing currently, so I have spared you the details!
Let me know if, (your imagination no doubt fired by the hunk on the left), you want to knit it.
I'm afraid I also have to report that George says these are the silliest mittens he has ever had. Good thing he was not called upon to be in the Home Guard 50 or more years ago, eh?.
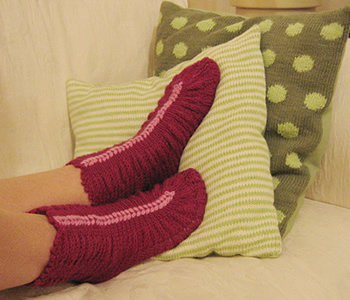
Second pattern this month from an "Oddments" leaflet for "using up old Scraps of Wool", dating anywhere between the 1930s and the 1950s. Described originally as Lady's Bedsocks*, I hope they will prove to be the perfect partner for Boudoir Bedjacket.
*One of the other patterns was called "Bedroom Boots" and I couldn't resist the alliteration; however, this pattern described here makes footwear that is much more elegant than either "bedsocks" or "boots" implies. They look at their best when on the feet, (as opposed to just after you have knitted them, when they look like a pair of unattractive caterpillars). It is hard for me to date the design, as many patterns were reproduced out of their true era; possibly an expert on publishing could be more accurate.
InstructionsEach sock is worked in one piece. Make two alike. Commence at the front edge. Using No. 12 needles, cast on 64 stitches,
and work 6 rows in k1, p1 rib. ** Change to No. 12 needles. Work 6 rows in k1, p1 rib. Making up - Press each piece lightly on the wrong side under
a damp cloth with a hot iron. Crochet edging - Using the main colour, work a picot edge all around the top of each of the socks, as follows: One slip st to secure the yarn to the top front edge. Embroidery |
MaterialsOriginal pattern calls for 2oz of 4ply, and a small quantity of contrast
for embroidery. One pair each of number 12, an No 6 needles. Tension20st to 4 inches (10cm) on No 6 (5mm) needles. Size mattersOne size fits all. A word on the wool.Baby Cashmerino is heavier than a 4ply, knitting to a tension of 25st and 34 rows to 4 inches. Thus I used more yarn than the original pattern. Each 50g is 125m, and I used 90g. |
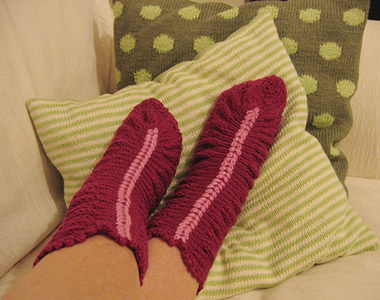
As a variation (or to "use up old scraps of wool") you might choose to make the picot edging in the contrast colour to match the embroidery - I believe this would work better if the contrast were darker than the main colour.
Alternatively, if you are not confident in your embroidery skills (I found it harder than I had imagined) you could stick with a single colour and embroider in the main yarn; this provides a more sophisticated look - if indeed a bedsock can be said in any way to contribute to a sophisticated look!
© Christina Coutts 2007
![]()