Time for Change (... or "Spring Forward")

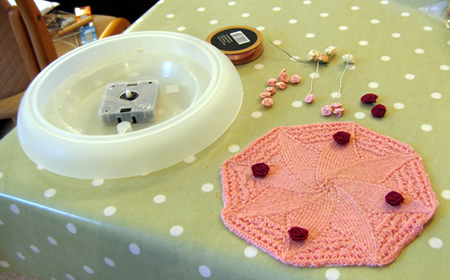
The clocks changed for British Summer Time last night - so here's a Spring clock!
Last summer our kitchen clock stopped working - not simply the battery this time. I took the cheap plastic mechanism to pieces - which was very interesting for me, and very irritating for George - but my only conclusion was that it was broken. I discovered I could get a relatively inexpensive replacement module from a local electronics chain store.
At some point along the way, I had the idea to make a knitted clock face - not sure where it came from - but here are my ideas in case you too want to create this somewhat over-the-top quirky original.
Making the clockIf you want to make the whole body of the clock yourself from scratch
then you can buy the mechanism
and hands
from Maplins (or elsewhere I suspect) either online or from one of their
shops for about £5. However, having done this to refurbish my old clock,
I found that IKEA sell the entire
clock (including mechanism and hands) for under £2. The clock face First of all - it is very important that the clock face that you knit
is not too thick - if it is then it will stop the hands going round. This
is because we are using a supplied module where the height of the hands
above the clock face is pre-defined. I have not thought of any clever
way of increasing the height, so - make sure your knitting is as fine
as possible. The hour hand is the one closest to the clock face, and it
is also the shortest - so you can cope better with increased texture towards
the rim of the clock, for example, to create the markers for the hours,
which could be, for example, buttons, knitted bobbles, or embellishments
such as rhinestones or silk roses. The clock face is knitted from the pattern for the smaller table mat (the pattern for the mats is given in its entirety below). I stopped after row 47 of the smaller mat and continued working each
section of the mat with short rows before casting off - this helped make
the face rounder, minimising the pointed edges: However, once I had finished, I found the whole thing was very slightly too big. So in the end I had to adapt it to make it even smaller, because I did not want to change to a finer yarn. Carefully take the clock to pieces. The following relates specifically to the clocks I used. The plastic front cover is secured to the outer rim by moulded plastic clips which should be released at the back - I managed to release them easily enough using my thumbnail. I then pushed the front face further upwards from the back using a small screwdriver or steel knitting needle - push at each clip in turn a few millimetres at a time until the front face comes free.
Add any non-knitted embellishments to mark the hours, and reassemble the clock.
Now you are ready to embellish the surrounding frame of your clock. Here is an opportunity for your own imagination - I knitted a fancy strip, which I tried to glue it (slightly stretched) around the rim edge with tacky glue, holding the surround in place with clothes pegs until the glue dried. However this did not work well and I ended by drilling tiny holes around the back edge of the plastic surround and securing the edge by sewing through them.
Knitted frame for the clock This is a simple knitted strip, using a technique I learned at a workshop
with Fi Morris. Cast on 12 sts and knit 2 rows, then begin the short row pattern: Row 1: K10; wrap the next stitch
by bringing the yarn to the front of the work, slip the next stitch on
to the right hand needle, take the yarn to the back of the work, slip
the stitch back on to the left hand needle; turn the work. Then knit across all 12 sts for 3 rows. Repeat these 23 rows until the strip is as long as you need. My clock was about 30 inches round and I did 40 repeats in 4ply yarn using 2½mm needles to fit around it. I cast on with waste yarn and grafted the sts together to make a ring before stretching it over the clock and glueing in place. |
1950s Table Mats

|
|
InstructionsTo make the pink clock face I worked the smaller mat using a vintage 4ply synthetic yarn. These are the full instructions for the table mats here (in case you want to make table mats). Large place mat
|
Materials2 x 20g balls Coats Chain Mercer-Crochet No 20 in selected colour to
knit the table mats. To knit the clock: one 50g ball of fine yarn (3 or 4ply or finer) in your chosen colour. Set of 4 No 14 needles pointed both ends for the clock face or table mats. A pair of No 12 (2¾mm) needles to knit the clock face surround. Embellishments available from John Lewis branches or TensionOriginal cotton yarn knits 15 rows to one inch.** Size mattersLargeer place mat: 14in diameter; Abbreviationsyfwd/yrn/yon: "yarn forward"/"yarn round needle"
/"yarn over needle"; make a stitch by passing the yarn over
the needle. **A word on the wool.I used a vintage 4ply synthetic mix of "unknown origin" to knit the clock. The side mat worked up sligtly too large for my clock face, so I had to adpat the pattern (see instructions). The recommended Coats crochet yarn would be suitable, and help ensure the clock face was not too thick. Disclaimer
|
Footnote on knitted clocks
I did think that there would be nothing else like this - but as we know there is nothing new in this world. A while after I first discussed the project with Alison, she pointed me at this Clock Tam from Knitpicks.
