Home

Weblog

Pattern of
the Month

On the Needles
(...and Off the Needles)

Knitalong

Stitchcraft

Vintage Patterns

About the
Idle Hands


Archive entry for April 2007

« March 2007 | Main | May 2007 »

April 2007

Pebbles bag

Pebbles_bag.jpg

I intended to knit this bag from a pattern where the designer confessed she had been forced to change her mind half way through knitting a hat, and call it a bag. I did not go ahead with my plan, and my pattern is now far removed from that original idea, (except for the handles!). The colours in this wool remind me of the stoney flint beaches on the south coast of England, where I was born and brought up.

Instructions

With No. 3 needles, cast on 51 stitches, and work 5 rows stocking stitch starting with a knit row.
Next row: wrong side facing, Knit to end.

With right side facing, commence pattern as follows:

Row 1: P4, K3, (P5, K3) 5 times, P4
Row 2: K4, P3, (K5, P3) 5 times, K4
Row 3: P4, K3, (P5, K3) 5 times, P4
Row 4: (P3, K5) 6 times, P3
Row 5: (P3, K5) 6 times, P3
Row 6: (P3, K5) 6 times, P3

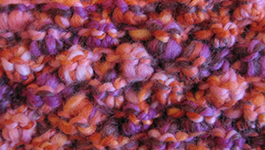
[Editor's note: I chose a textured stitch to best suit the random and nubbly texture of Chunky Print. The muted stone colourway works well, I think, with this basket-weave stitch. If you have a more 'romantic' colourway you may prefer a different pattern. See "blackberry stitch" section below for an alternative four-row pattern to substitute here if you like].

Repeat the six-row pattern 20 times or to desired length, and then the first 3 rows again.
[Editor's note: I tried to knit this very precisely to use up all the 3 balls of wool; you may wish to knit a few rows fewer in order to be sure you will have sufficient with your chosen wool. You can knit the sides before finishing off the body to try and gauge if you are running short].

Next row: wrong side facing, Knit to end.
With right side facing, work 4 rows stocking stitch starting with a knit row. Cast off.

Side panels (make 2 the same):
[Editor's note: you may wish to omit the sides altogether, either for simplicity, or to save on wool. See notes on "adapting the pattern" below.]

Cast on 10sts and work as follows in reverse stocking stitch throughout.

Row 1: P10
Row 2: Inc in the first st, (by knitting into the front and back of the st), K9, inc in next st, K1. [12 sts]
Row 3: P12.
Row 4: K12

Continue in reverse st st for 28 more rows.
Decrease one st at each end of the next row, [10 sts].
Work a further 11 rows.
Decrease one st at each end of the next row, [8 sts].
Work a further 5 rows.
Decrease one st at each end of the next row, [6 sts].
Work two more rows, and then cast off knitwise, decreasing one st at each end of the cast-off row.

Making up - Cut and construct the lining before sewing the bag sections together.
Attach the handles to each end of the main body section, as follows:
Sew a hem at each end of the bag, folding down the st st rows and using the purl row as your hem edge.
Starting about 2 inches from the edge of the bag, oversew the hem ends (using huge binding sts) to the circular bamboo handles. Ease the straight edge of the bag around the handle as you sew. Stop sewing about two inches from the other side of the bag.
[Editor's note: If you are knitting "to the wire", as I did, to use up all the wool, you need to remember to reserve some yarn to attach the handles; I used about 14 yards of the yarn for this binding.]

Construct the lining - do this before attaching the sides to the bag.
[Editor's note: I advise you to read the whole of this section before you start cutting anything].

Cut the fabric to the width of the bag, using the body section as a guide, and remembering to leave enough for the seams at the edges. Do not cut the fabric to length at this point, unless you are making a simple pocket style bag (see "adapting the pattern").

Press the side panels lightly using a damp cloth. Using the side panels as pattern pieces, cut two fabric side pieces from the fabric you have left over, not forgetting to leave a seam allowance. Fold over the top edge on each piece.

[Editor's note: A lining does not have to be too exact, (the knitting outside is stretchy); it should support the contents of the bag and protect the bag from distorting - I try and make it err just slightly larger than the knitted bag "at rest".]

Form the internal pocket section in the lining as follows:
Turn down the ends of the fabric that you will attaching to the mouth of the bag (where the handles are).
Lay the fabric over the knitting, placing the turned down edges roughly in position at the handle ends. Make the fabric fit the length of the main section of the bag by making a pleat as shown in the picture; this pleat forms the pocket. Pin the pleat into position at both sides, and mark the position for, and then make (by hand or machine), a button hole to fit your exotic button, through the top two layers of the pleat. Sew the button in place on the bottom layer of the pleat to meet the button hole.

Pin and sew the side panel lining pieces to the main body of the lining.

Inserting the side panels - and completing the bag.
Pin the knitted side panel sections into position, and crochet the two edges together with a single row of double crochet, to form an external "seam", as shown in the picture.

Sew the lining into the bag, slipstitching around the handles and bag mouth. Do not pull your stitches too tight.

Adapting the pattern

You may wish to adapt the bag by omitting the sides altogether, either for simplicity, or to save on wool.
To do this you simply fold the main body in half and join the sides to make a simple pocket; you can crochet up the sides (as above) or just sew them. Likewise the lining is formed by folding the fabric in half to fit the bag, sewing up the sides, and attaching to the mouth of the bag as above.
Note: If you choose to adapt the bag, it will not have a "base", so it will look proportionately longer than the knitted example with sides. So if you plan to do this you may want to knit the main body 2 inches shorter than instructed above. You can test how the bag looks by folding it in half every so often, as you are knitting.

Blackberry stitch

An alternative four-row pattern to use in place of the six-row basket weave pattern. [Editor's note: Because of its "one-from-three, three-from-one" nature, this stitch is also know in the Irish tradition as Trinity stitch.]

The four-row pattern is worked over 50 sts using number 2 needles:
Row 1 (right side facing): Purl.
Row 2: K1, (P3tog, inc 2 by K1,P1,K1 into next st) 12 times, K1
Row 3: Purl.
Row 4: K1, (inc 2 by K1,P1,K1 into next st, P3tog) 12 times, K1

To complete the main section of the bag, repeat the four-row pattern 26 times or to desired length, and then the first 3 rows again.
Next row: wrong side facing, Knit to end.
With right side facing, work 4 rows stocking stitch starting with a knit row. Cast off.
[Editor's note: If you use this pattern your bag will work out a slightly different proportion and shape than the basket-weave one due to the stitch making a different tension. You could compensate by working over 54 sts instead of 50 and knitting some rows fewer in length; whatever you choose, remember to keep an eye on your yarn quantity as you knit. Bags are very adaptable.

Materials

3 x 100g balls (each 100m/109yards) Rowan Chunky Print, colour 078, Pebble Dash, or 081 Shriek.

One pair of number 3 needles.
One crochet hook, number 5 (5½mm).

Two bamboo-style round handles.

Half a metre (or half a yard) of cotton fabric for lining.

1 exotic button oddment (about ¾-1 inch in size.)
[Ed: We all have them]

Tension

14sts x 18rows to 4 inches (10cm) on No 3 (6½mm) needles over basket-weave pattern.
16sts x 16rows to 4 inches (10cm) on No 2 (7mm) needles over blackberry pattern.

Crochet

Remember these instructions use UK terms. Double crochet is equivalent to US "single crochet".

Size matters

Bag is approximately 14in by 12in and 2in deep at the sides.
The dimensions of the bag were determined by eye in proportion with the chosen handles, and knitted in order to use the complete 3 balls of the chosen wool.

A word on the wool.

Chunky Print has been discontinued by Rowan (sadly, as it seemed to have a pleasing colour range, and knit up quickly and economically).
Chunky Print has a yardage of 100 metres (109 yards) per 100g ball, and knits to a tension of 11sts x 14 rows to 4 inches on No 0 needles (9mm).
A good substitute might be Debbie Bliss Soho (6 x 50g balls).
Rowan Biggy Print comes in similar colours but is a vastly different tension; it would be quite feasible to convert this pattern to a different tension yourself.

Quilting fabrics are ideal for the lining; they are inexpensive and come in a fabulous range of colours.
You can afford to be adventurous with linings; choose a lovely rich colour, probably one that you would not care for in an item of clothing!
The lining is important - don't skimp on it.

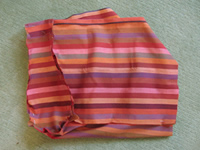
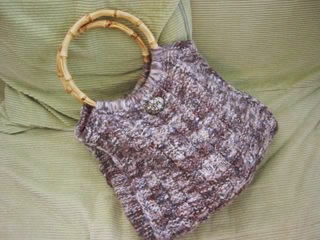
Here is my completed Pebbles bag, in the Shriek colourway with blackberry stitch. As a decoration I used a brooch that Alison gave me years ago - the idea being that it was a heart for me to "wear on my sleeve". The lining is an old Kaffe Fassett quilt fabric which turned out to be an improbably good match.

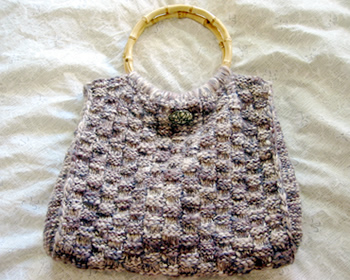
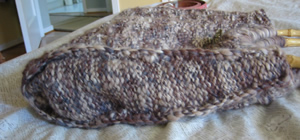
Here is the original Pebbles bag in the Pebble Beach colourway with basket weave stitch. The brooch decoration, like the heart above, tones so well with the wool that it provides a very subtle effect on the bag.


© Christina Coutts 2007

Helpful Stuff

Pattern Archive

Categories

Yarn Links

Fabric etc

Stuff to do

  • Little rabbits
  • V&A 1940s Patterns
  • Monkey Socks
  • Necktie Bag
  • Posh Gloves
  • Criss-cross coasters