Kimono Cardigan
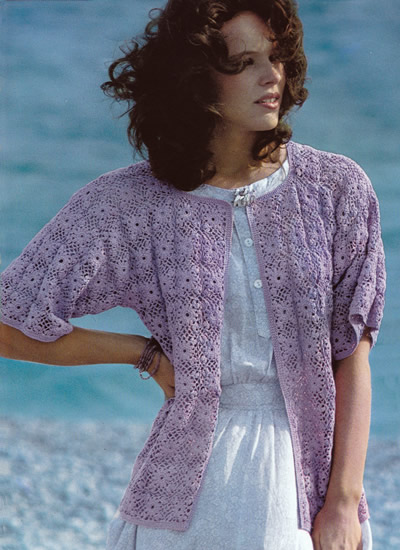
A very feminine coatlet to crochet in cotton for the summer. Its boxy shape gives it a little more edge for styling successfully with jeans and a tee, as well as more conventionally with a breezy summer frock.
The design is constructed from motifs made using in a fairly fine cotton on a 1.5 mm hook, so it might be more of an heirloom project - the month of June always brings weddings to mind.
Instructions. Instructions for 2 sizes, larger size in brackets Special instructions: make clusterThis is a 3 dtr cluster made by working 3 dtr together as follows: * yoh twice, insert hook into stitch
or ch space, yoh, pull 1 loop through, yoh, pull yarn through 2 loops,
yoh, pull yarn through 2 loops, repeat from *
twice more, still working into the same stitch. When working a cluster at the beginning of the round, work as follows: 3ch (counts as first dtr), * yoh
twice, insert hook into same stitch or ch space, yoh, pull 1 loop through,
yoh, pull yarn through 2 loops, yoh, pull yarn through 2 loops, repeat
from * once more, still working into
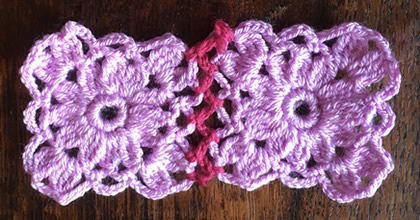
the same stitch. Basic MotifMake 6 ch, close circle with 1 slip stitch. Make 298 (332) identical motifs. These are then joined in strips of various lengths in order the build up the cardigan shape. Joining motifsMake sure the motifs are all the same side up when you start to join them. Work as follows: join to the corner of the second completed motif, then make 2 ch, then 1dc into the loop on the corner of previous motif. Continue thus, with 2 ch, 1 dc into each of the following loops, alternating between each of the two motifs. Below is an example of the motifs with the joining stitches shown in a different colour.
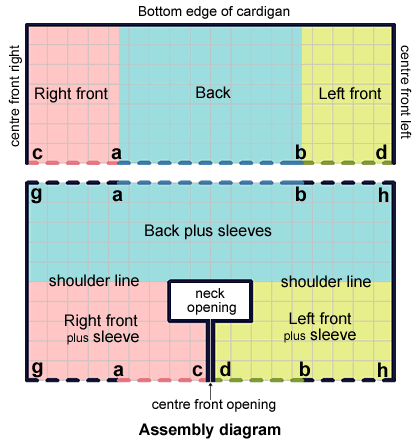
Lower edge of cardigan (back and fronts)Make 7 strips of 18 (20) motifs and then join the strips in same way as for joining motifs. (You have a rectangle 18 (20) by 7 motifs which is the back and fronts worked together up to the armholes). Back (top and sleeves)Make 5 strips of 18 (20) motifs and then join the strips in same way as for joining motifs. (You have a rectangle 18 (20) by 5 motifs which is the back and sleeves worked together from the armholes up to the shoulders). Right front (top and sleeves)Make 3 strips of 9 (10)
motifs and then join them. Left front (top and sleeves)Work in the same way,the opposite way round. Putting it all togetherThe assembly diagram below shows the smaller size, which requires you
to join the bottom of the cardigan to the top sections centred across
an uneven number of squares (9) - so involves joining a "half square".
The larger size has an even number (10).
Join the lower section to the top, joining the centre 9 (10)
motifs for the back - shown in the diagram as between points (a)
and (b) - Join the top of garment across the shoulders and tops of sleeves. (There are 7 (8) motifs each side.) Iron lightly on wrong side of work. Stitch the sleeve seams - shown in the diagram as between points (a) and (g) for the right sleeve and (b) and (h) for the left sleeve. Work 5 rows of dc all round the sweater, working a little tighter round
A Word on the WoolThis is made using cotton 8, which is fine but not that fine. You can find cotton 8 on line as rather expensive fine crochet cotton
by the likes of DMC, or in more budget versions from bulk distributors
such as Hobbii. If you want to make this in a fine wool then laceweights would probably suit (again be sure to try a motif). I implied above that the yardage could be used as an indication of suitable thickness when substituting, but not if you are substituting with wool because it has a different density to cotton. You can use the yardage as a guide to how much yarn to purchase to make this garment, but not for any indication of suitable thickness. |
Materials
|