Home

Weblog

Pattern of
the Month

On the Needles
(...and Off the Needles)

Knitalong

Stitchcraft

Vintage Patterns

About the
Idle Hands


Archive entry for 2011

« 2010 | Main | 2012 »
December 2011

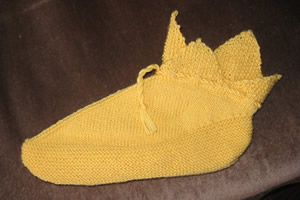
Sideways Stash Socks

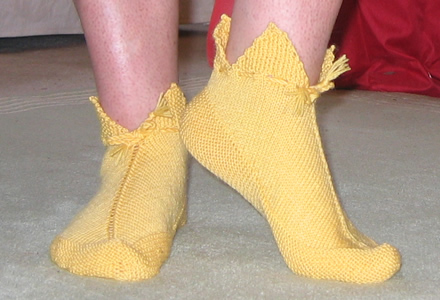
HoneycombBedsocks.jpg

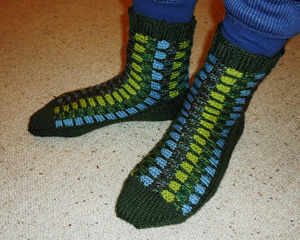
Father George: so fond of his bedsocks that they get worn out. [Since he is not bedridden I can only surmise he does not restrict their use to the bedroom!] Hence - by request - here are some more.

The patterned section of the sock is knitted sideways using a variation of a honeycomb stitch; it's an opportunity to use up really small amounts of double knitting yarn. I rotated 4 contrast colours but you could use a different colour for every set of rows; the key is to keep some consistency in the main colour.

Instructions.

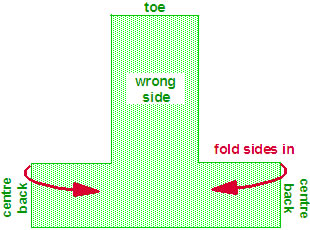
The first section of these socks is knitted sideways making a "T" shape where the upright of the "T" is the upper foot, and the cross bar curls around the leg to form the cuff, meeting at the back seam.
The second section knits the heel and then sole of the sock. These two sections are worked on 2 needles.
Then for the toe, you pick up the stitches from the first 2 sections, and knit in the round on 4 needles, and finally you pick up stitches at the top of the sock and knit the welt, also in the round.

First section (knit 2)

Starting at the back leg seam, with main shade (M) cast on 23 sts on 2 needles and knit one row. Commence pattern.

Join in contrasts (C1, C2 etc):
1st row: Using C1, p3 * sl1, p3; repeat from * to end of row
2nd row: Using C1, k3 * sl1, k3; repeat from * to end of row
3rd row: As first row.
4th row: As second row.
5th row: Using main shade (M) purl across all sts.
6th row: Using C2, k1, sl1, * k3, sl1; repeat from * to last st, k1.
7th row: Using C2, p1, sl1, * p3, sl1; repeat from * to last st, p1.
8th row: As 6th row.
9th row: As 7th row.
10th row: Using main shade (M) knit across all sts.

Repeat rows 1-10 using different contrasts, once more.

Next row(wrong side facing): Cast on 40 sts, and then work across them and all sts, as for 1st row of pattern. [63sts]
[Editor's note: If you want a shorter or longer foot length cast on more or fewer stitches here. Reduce or add sts in multiples of 4, which is about ¾ of an inch]

Continue to work the pattern on these 63 sts, working rows 1-10 three times, and then rows 1-4.

Next row(wrong side facing): Using main shade, cast off 40 sts, and purl across remainder. [23sts]

Continue to work the pattern on these 23 sts, working rows 6-10, then rows 1-10 once, times, and then rows 1-4.
Cast off purlwise using main shade (centre back seam).

Second section (heel and sole).

The remainder of the socks are worked entirely in the main shade.

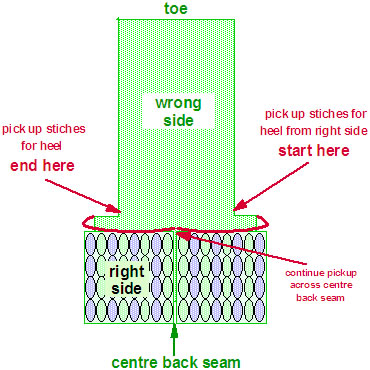
For the heel: with right side of the first section facing, oriented like an upside down "T" pick up 11 sts from each side of the instep:

Pick up and knit 11 sts from the left side first, ending at the cast on edge (which will be the centre back, and then turn the work over and bend round the second side, and pick up 11sts from the right side. The sock cuff now forms a circle with the back seams together, but not yet sewn.

Turn and purl 1 row across these 22 sts.

Next row(right side facing): * Sl1, k1, repeat from * to end.
Next row: Purl

Repeat the last 2 rows 10 times more.

Turn the heel:

Next row: Sl1, k12, k2tog, k1. Turn.
Next row: Sl1, p5, p2tog, p1. Turn.
Next row: Sl1, k6, k2tog, k1. Turn.
Next row: Sl1, p7, p2tog, p1. Turn.

Continue to work short rows and decrease in this way until all sts have been incorporated. [14sts].

Next row(right side facing): Sl1, k13, pick up and knit 13 sts down side of heel. Turn.
Next row: P27, pick up and purl 13 sts down other side of heel. Turn.

Now work the instep decreases and sole:

Next row: K1, sl1, k1, psso; knit to last 3 sts, k2tog k1. Turn.
Next row: Purl.

Repeat the last 2 rows until 22 sts remain.
[Editor's note: if you want to make the sock for a narrower foot circumference then decrease a few more sts here. About 6 sts for an inch.]

Continue to work a further 50 rows to make the sole - upper and lower foot sections should be about the same length.
[Editor's note: if you altered the sock length by casting on more of fewer than 40 sts, then adjust the number of rows you knit here. For every 4 sts different in the first section, allow 5 rows difference in the sole.]

Toe

Now we move to working in the round.

Knit 11 sts on first double-pointed needle, 11sts on second, then with right side facing, using third needle, pick up and knit 24 sts across the toe edge of the first section.
Complete the round, knitting 11 sts from first needle then 11 sts from second. Knit one more round.

Next round: K1, sl1, k1, psso; knit to last 3 sts on third needle, k2tog k1. Complete the round by knitting the 11 sts on each of the first and second needles. [44 sts]

Next round: K1, sl1, k1, psso; knit to last 3 sts on third needle, k2tog k1; on first needle, k1, sl1, k1 psso; knit to end; on second needle, knit to last 3 sts, k2tog k1.
Next round: Knit.

Repeat the last 2 rounds until 16sts remain.
Slip the sts from the second needle on to the first and graft the sts together with those on the third needle.

Making up

Sew seams on each side of the sole, using a flat seam technique (not mattress stitch for example).

Using double pointed needles and main shade, pick up 60-66 sts round top of sock and knit a k3/p3 rib for about 8 rows (or as long as you want), to form the welt. Cast off loosely.

Sew in all ends.

Materials

2 x 50g balls of double knitting yarn, and a variety of left over DK colours.

One pair and one set of four No 8 (4mm) needles, pointed at both ends.

Tension

22 stitches = 4ins

Size matters

Length of foot, 9 inches (adjustable).

Abbreviations

M is main shade (olive).
C are contrasts.

sl1: slip the next stitch

k2tog or p2tog: work 2 sts together to decrease.

psso: pass the slipped stitch over, (also known as "ssk"; effectively you are "knitting 2 together through back loops")

A Word
on the Wool.

I used Phildar Oxygene in olive for the main colour, and a 4 other colours for the contrast - you could have every colour change (15 colours) different if you wanted.

Disclaimer
(well...almost)

In transposing any pattern it is always a risk that errors will be introduced, in spite of dedicated proof reading.
If you have any problems with this pattern, please and I will try and assist.

November 2011

Fifties Fair-Isle

SkiSlopeFairIsle.jpg

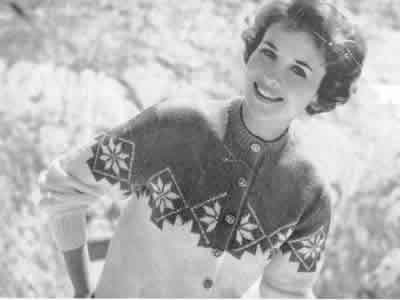
The third (and final) fair-isle design for November is a 1950s or early 60s cardigan in a double knitting weight yarn. No clues as to the original colour scheme here, and although for today it would seem appropriate to go with the grey palette, I am sure the original would have been more colourful.

Instructions

The Back and Fronts are worked in one piece up to the armhole shaping.

Back and Fronts:

Using No. 10 (3¼mm) needles and light colour, cast on 146 sts.
Work in k1/p1 rib for 3½ ins.
Next row (wrong side): Rib 9; (increase in next stitch, rib 15) 8 times; increase in next st, rib to end. [155 sts]

Change to No 7 (4½mm) needles and proceed as follows:

1st row: Knit
2nd row: Purl
3rd row: K39, m1, k1, m1, k75, m1, k1, m1, k39.
4th row: Purl
5th and 6th rows: As 1st and 2nd
7th row: K40, m1, k1, m1, k77, m1, k1, m1, k40.
8th row: Purl
9th and 10th rows: As 1st and 2nd
11th row: K41, m1, k1, m1, k79, m1, k1, m1, k41.
12th row: Purl
13th and 14th rows: As 1st and 2nd

Continue increasing in this manner on next and every following 4th row until there are 183 sts.
Continue on these sts. until work measures 11½ ins, from beginning, finishing at end of a knit row.

Next row: P7, (increase in next stitch p12) 13 times, increase in next stitch, purlto end. [197 sts]

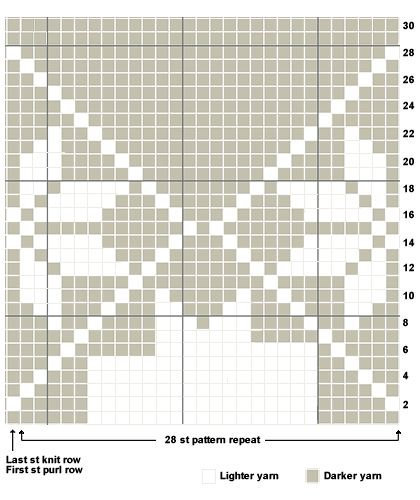
Work rows 1 to 16 from Chart (odd rows knit, even rows purl), working bracketed repeat 7 times across row and odd stitch at end of
knit row and beginning of purl row as marked on Chart throughout.

Divide for Back and Fronts:

Next row (17th row of chart): Pattern 44 cast, off 10, pattern 88 (there now being 89 sts. on needle after cast-off); cast off 10, pattern to end.
[Editor's note: So you have 3 groups of sts on the needle - 44 then 89 then 44]

Proceed on first group of 44 sts. for first front as follows:

Keeping pattern correct by working rows 18 to 30 inclusive of Chart, shape armhole by decreasing 1 st. at armhole edge on next and every alternate row until 39 sts. remain.
Work 4 rows, thus completing pattern from Chart.

Using darker colour for remainder of front, continue in stocking stitch until work measures 5 ins, from beginning of armhole shaping, finishing at front edge.

Shape neck: by casting off 4 sts. at beg. of next row.
Decrease 1 st. at neck edge on next and every alternate row until 30 sts. remain.
Continue on these sts. until work measures 7 ins, from beg. of armhole shaping, finishing at armhole edge.

Shape shoulder: by casting off 10 sts. at beg. of next and every alt, row until all sts. are cast off.

Rejoin wool to next group of 89 sts. and proceed for Back as follows:

Keeping pattern correct from Chart, shape armholes by decreasing 1 st at both ends of next and every alternate row until 81sts remain. Continue on these sts. until work matches first front up to shoulder shaping.
Shape shoulders by casting off 10 sts. at beg. of next 6 rows.
Cast off all remaining sts.

Rejoin wool to remaining group of 44 sts. and complete to match first front reversing all shapings.

Sleeves:

Using No. 10 needles and Light, cast on 50 sts.
Work in k1/p1 rib for 3 inches.
Next row: Rib 5; (increase in the next stitch, rib 9) 4 times; increase in the next stitch; rib to end. [55 sts]

Change to No. 7 needles and proceed in stocking stitch, increasing 1 st. at both ends of 5th and every following 9th row until there are 73 sts.
Continue on these sts until work measures 15½ ins, from beginning finishing at the end of a knit row.

Next row: P3; (increase in the next stitch, p5) 11times; increase in the next stitch; purl to end. [85 sts]

Work rows 1 to 16 inclusive from the chart, noting that bracketed repeat is worked 3 times across row, and odd st. at end of knit row and beginning of purl row as marked on chart throughout.

Keeping pattern correct from chart until 30th row of chart has been completed, and working remainder of sleeve in dark colour, shape top by casting off 4 sts at the beginning of the next 4 rows, 3 sts at the beginning of the next 4 rows, and then 2 sts at the beginning of the next 4 rows.
Decrease 1 st at both ends of every row until 43 sts remain, and then on every alternate row until 33 sts remain, and then on every following 3rd row until 29 sts remain.
Cast off 5 sts at the beginning of the next 4 rows.
Cast off.

Right Front Band:

Using No. 10 needles and light colour, cast on 11 stitches.

1st row: K2; (p1, k1) 4 times; k1.
2nd row: (k1, p1) 5 times; k1.
3rd and 4th rows: As 1st and 2nd.
5th row (make buttonhole): Rib 4, cast off 3, rib to end.
6th row: Rib 4, cast on 3, rib to end.

Continue in rib working a buttonhole as on 5th and 6th rows on every 23rd and 24th rows from previous buttonhole until 5 buttonholes in all have been completed.
Break off light colour and join in dark.
Still working buttonholes on every 23rd and 24th rows from previous buttonhole as before, continue in Dark until 7 buttonholes in all have been completed.
Work 16 more rows.
Slip stitches on to a stitch holder.

Left Front Band:

Omitting buttonholes, work to match Right Front Band.

Neckband:

Using a back-stitch seam join shoulders of Back and Fronts.
Slip stitches from top of Right Front Band on to No 10 needle, with right side of work facing, using dark colour, k2, (p1, k1) 4 times, p1 across these sts., using same needle, knit up 71 sts round neck, slip sts. from top of Left Front Band on to No 10 needle, (p1, k1) 5 times across these sts, k1. [93 sts]

Next row: * k1, p1, rep from * to last stitch, k1.
Next row: k2, * p1, k1, repeat, from * to last stitch k1.

Work 3 more rows in rib.
Make buttonhole on next 2 rows.
Work 3 rows in rib. Cast off.

To Make Up

Omitting k1/p1 rib, with wrong side of work facing, block each piece by pinning out round edges.
Omitting k1/p1 rib, press each piece very lightly using a warm iron and damp cloth.

"In order to preserve the lovely crepe appearance of Totem fabrics, these must be pressed very lightly as over-pressing will spoil the appearance of the finished fabric."

Using a flat seam for k1/p1 rib, and a back-stitch seam for remainder, join sleeve seams and stitch sleeves into position. Flat stitch front bands into position.
Attach buttons.
Press seams.

Materials

12 oz in light colour and 6 oz in dark colour in double knitting yarn.

[Editor's note: 1oz = 28g.
See "a word on the wool".]

Two No 10 (3¼mm) and two No 7 (4½mm) needles.

Eight buttons.

Tension

21sts x 28 rows to 4 ins on No 7 needles, measured over stocking stitch.

Size matters

The instructions are for one size only.

To fit 34-36 inch bust. Length from shoulder to lower edge, 21¼ ins. Sleeve seam, 18 ins.

Abbreviations

m1: make one st by picking up loop between sts and knit into back of it.
m1p: make one st by picking up loop between sts and purl into back of it.
kb: knit into back of stitch
pb: purl into back of stitch
tog: together
tbl: through back loops
inc: increase by working into front and back of stitch
dec:decrease by working 2 sts. together

"Stranding" in Fair Isle

In working designs using two or more colours, you strand the colours by carrying those not in use loosely across the back of the fabric.
Do not strand colours over more than 5 sts. When a loose thread must pass over more than 5 sts. weave it over and under the colour in use at centre point of the sts. it passes over.

A word on the wool.

Original yarn was Patons Totem, or Moorland which are
double knitting, yarns. When substituting with modern yarns you often need to allow more than a straight equivalence of metric to imperial.

12oz is about 7 x 50g balls and 6oz is about 4 x 50g balls. A rough guide would say that 10 balls of yarn is enough to make a woman's sweater in a small size.

Disclaimer
(well...almost)

In transposing any pattern it is always a risk that errors will be introduced, in spite of dedicated proof reading.
If you have any problems with this pattern, please and I will try and assist.

November 2011

Ski Slope Fair-Isle

SkiSlopeFairIsle.jpg

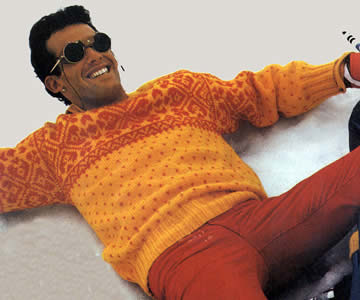
The second nordic-style sweater for November in a slightly lighter weight yarn. Like the previous design it has a straight inset sleeve, as well as the bright ("modern") colour combination of the 1980s. The pattern includes instructions for plain leg warmers.

Instructions

This pattern uses 3 familiar stitch types:

Double Rib: repeated sequence of k2, p2 rib.
Stocking stitch: knit one row, purl one row.
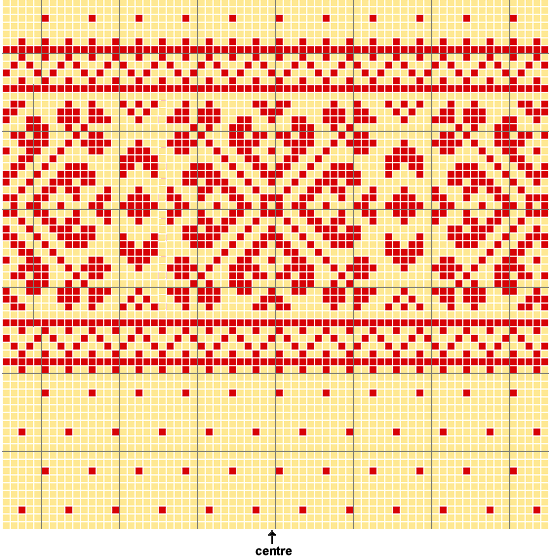
Fair-isle stocking stitch, following the chart.

Back:

Using No 9 (3¾mm) needles and main shade (O), cast on 86 / 90 / 94 sts work 3½ inches in double rib. Change to No 7 (4½mm), needles and stocking stitch, increasing 15 sts evenly across first row [101/ 105/ 109 sts]. Continue joining in contrast (R) for dotted fair-isle stocking stitch pattern as per the lower section of chart.
When work measures approximately 16¾ inches, change to No 6 (5mm) needles and beg the fair-isle motifs. When work measures 18 inches, shape the armholes by casting off 6 / 7 / 8 sts at beg of next 2 rows [89 / 91 / 93 sts].

When the fair-isle motif is complete, change back to No 7 needles and continue in dotted fair-isle until work measures 27½ / 28 / 28½ inches.

Shape shoulders:
Cast off 8 at the beginning of the next 2 rows (all sizes).

Then cast off 8 sts, (all sizes), knit 6 / 7 / 8 (7/8/9 sts on right hand needle), and turn leaving the remaining sts unworked but still on the needle to pick up in a moment, .
Purl back 1 row.
Then cast off remaining 7 / 8 / 9 sts.

Return to the sts still on the needle for the neck and left side. Place the centre 43 sts on a stitch holder for the back neck, and then rejoin yarn to the remaining sts and knit 1 row.

Then cast off 8 sts, (all sizes) purlwise, purl 6 / 7 / 8 (7/8/9 sts on right hand needle), and turn, knit back 1 row.
Then cast off remaining 7 / 8 / 9 sts purlwise.

Front:

Using No 9 (3¾mm) needles and main shade (O), cast on 90 / 94 / 98 sts work 3½ inches in double rib. Change to No 7 (4½mm), needles and continue in dotted fair-isle stocking stitch pattern as for the back, increasing 15 sts evenly across first row [105/ 109 / 113 sts].
Change to No 6 (5mm) needles when you work the fair-isle motifs just as you did on the back section.

When work measures 18 inches (same as back to armhole), shape the armholes by casting off 8 / 9 / 10 sts at beg of next 2 rows [89 / 91 / 93 sts].

When work measures 25½ / 26 / 26½ inches, shape neck:
leave centre 23 sts on spare needle and continue each side separately, casting off at neck edge on every alternate row as follows: 3 sts (once), 2 sts (twice) and 1 st (3 times) [23 / 24 / 25 sts].

When work measures 27½ / 28 / 28½ inches, work shoulder shaping as you did for the back, casting off at armhole edge on every alternate row as follows: 8 sts (twice), 7 / 8 / 9 sts (once).

Sleeves:

Using No 9 (3¾mm) needles and main shade (O), cast on 54 / 58 / 62 sts work 3½ inches in double rib.

Change to No 7 (4½mm), needles and continue in dotted fair-isle, increasing 17 sts evenly across first row [71 / 75 / 79 sts].

Increase 1 st at each end of every 8th row 9 times, [89 / 93 / 97 sts]. When work measures approximately 11½ / 12½ / 13½ inches, . (11 change to No 6 needles and work the fair-isle motifs.

Cast off when you have completed the second border pattern, before you start the dotted fair-isle.

To Make Up

Press parts lightly on wrong side with a damp cloth

Stitch one shoulder seam. Using No 9 needles and main shade, pick up and knit 98 / 102 / 106 sts evenly round neck. Work inches in double rib.
Cast off.

Stitch second shoulder seam and neck border seam.

Sew in sleeves.

Stitch side and sleeve seams.

Materials

13/14/15 x 50g balls in main shade (orange) and 4/5/6 balls contrast colour (red)/

Pair each No 9 (3¾mm), No 7 (4½mm), and No 6 (5mm) needles.

Tension

18½sts and 21 rows to 4 ins using No 7 needles over dotted fair-isle stocking stitch (lower section of chart).

Size matters

The sweater has instructions for 3 sizes, which are intended to be for men or women as follows: man's to fit chest: 40/42/44 inches; woman's to fit: 34/36/38 inches (size 12/14/16 UK size).

Actual size seems to be 43/45½/47 inches.

A word on the wool.

Original yarn was Pingouin Monsieur, or Sport yarn.

It was a synthetic Aran-type yarn knitting to a tension of 17sts and 23 rows to 4 inches over stocking stitch using 4½mm needles.

Disclaimer
(well...almost)

In transposing any pattern it is always a risk that errors will be introduced, in spite of dedicated proof reading.
If you have any problems with this pattern, please and I will try and assist.

Charts:

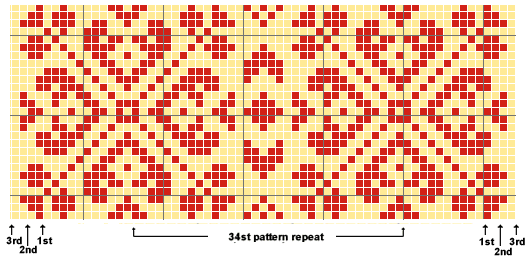
This is the main chart showing the fair-isle design described in the pattern. It leaves a lot to work out yourself, showing the centre point and allowing you to work our where to start your row for each of the sizes.

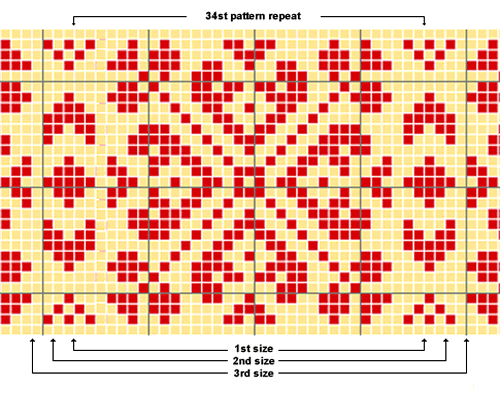
Working it out yourself is made more difficult since the main panel pattern is a 34 stitch repeat, while the border above and below is a 6 stitch pattern repeat like the dotted body pattern. You can match up your first border with the dots, and use the chart below to see where to start and end your main panel pattern. Then match your second border spacing it the same as the first one.
This is the chart marked with start and end points for the back showing the 3 sizes, and the 34 stitch repeat. The front has 4 extra stitches up to the amhholes, so start 2 sts further out for the front.

This is a similar chart for the sleeve marking with start and end points for the 3 sizes.

[Editor's note: I worked out and drew the charts myself, and made lots of trivial errors before I was satisfied that they were right. So if you are having difficulty with the charts, or if you think there may be a mistake, please do let me know.]


Legwarmers

The legwarmers are worked in rib throughout.

Instructions

Using No 11 (3mm) needles and main shade, cast on 62sts, and work in double rib for 4¾ inches.
Change to No 8 (4mm) needles and continue until work measures 16½ inches.
Change back to No 11 needles and contrast colour, and work a further 2 inches.

Cast off loosely.

[Editor's note: You are working from the ankle upwards; you cast on for the bottom of the item and cast off at the top, so it needs to be loose.]

Stitch the seam using a flat seam technique.

Work a second legwarmer in the same way.

Materials

4 x 50g balls in main shade (orange) and 1 ball contrast colour (red)

Pair each No 11 (3mm), and No 8 (4mm) needles.

Size matters

One size.

November 2011

Fashionable Fair-Isle

FamilyFairIsle.jpg

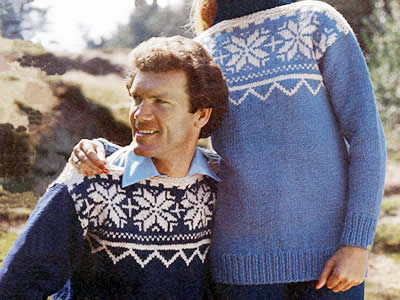
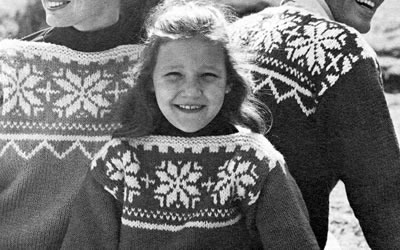
My title refers to the current season's fashion for nordic style sweaters - snowflake, as well as (astonishing to me) reindeer. This sweater's shape betrays its original design era, but that does make it simple to construct - and wear. Update to better reflect the current themes by choosing monochrome colour schemes, using black or greys with cream.
"Traditional motifs in cream make striking winter sweaters; simple easy styling, with straight necklines and drop shoulders, is easy to knit in thick soft yarn on big needles."

Instructions

T-shaped chunky sweater with simple snowflake pattern worked from the charts.

Back and Front alike:

With No 6 (5mm) needles and main shade, cast on 47 / 51 / 55 / 59 / 63 / 65 / 71 / 73 / 77 sts and work in K1/P1 rib for 2½ / / 2½ / 3 / 3 / 3 / 3½ / / 3½ inches, ending with wrong side facing for next row.

Next row (wrong side): Rib 3 / 3 / 5 / 4 / 4 / 5 / 5 / 5 / 6; m1; * rib 8 / 9 / 9 / 10 / 11 / 11 / 12 / 9 / 13; m1; repeat from * to last 4 / 3 / 5 / 5 / 4 / 5 / 6 / 5 / 6 sts; rib to end. [53 / 57 / 61 / 65 / 69 / 71 / 77 / 81 / 83 sts].

Change to No 4 (6mm) needles and work in stocking stitch, starting with a knit row, until work measures 13½ / 14½ / 16 / 15 / 16 / 17 / 17½ / 18½ / 19½ inches, ending with a purl row.

1st to 3rd size: Join in contrast colour and work 2 rows.

All sizes:
Next row: Using main shade, knit.
Next row: Using main shade, purl 2 / 4 / 2 / 4 / 3 / 4 / 2 / 4 / 3, ml; * purl 7 / 7 / 8 / 8 / 9 / 7 / 8 / 8 / 7, ml; rep from * to last 2 / 4 / 3 / 5 / 3 / 4 / 3 / 5 / 3 sts, purl to end. [61 / 65 / 69 / 73 / 77 / 81 / 87 / 91 / 95 sts]

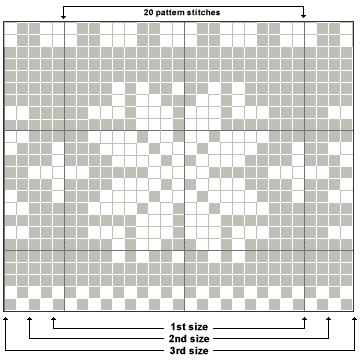
1st to 3rd size: Work rows 1 to 24 from chart A, repeating the 20 pattern sts 3 times across and working the first 0 / 2 / 4 sts and last 1 / 3 / 5 sts on knit rows and first 1 / 3 / 5 sts and last 0 / 2 / 4 sts on purl rows as indicated.

Chart A

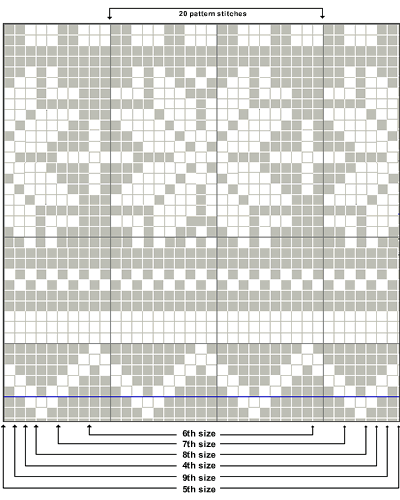
4th to 9th size: Work rows 1 to 36 from chart B, repeating the 20 pattern sts 3 / 3 / 4 / 4 / 4 / 4 times across and working first 6 / 8 / 0 / 3 / 5 / 7 sts and last 7 / 9 / 1 / 4 / 6 / 8 sts on knit rows and first 7 / 9 / 1 / 4 / 6 / 8 sts and last 6 / 8 / 0 / 3 / 5 / 7 sts on purl rows as indicated.

Chart B

All sizes: Break main shade, and complete in contrast.

Next 2 rows: Knit.

Next row: K3 / 1 / 3 / 1 / 0 / 5 / 4 / 2 / 4, k2tog, * k2 / 2 / 2 / 2 / 3 / 2 / 2 / 2 / 2, k2tog; rep from * to last 4 / 2 / 4 / 2 / 0 / 6 / 5 / 3 / 6 sts, knit to end. [47 / 49 / 53 / 55 / 61 / 63 / 67 / 69 / 73 sts]

Next row: Knit

Cast off.

Sleeves:

With No 6 (5mm) needles and main shade cast on 25 / 27 / 27 / 29 / 29 / 31 / 31 / 33 / 33 sts and work in rib as on body sections for 2½ / 2½ / 2½ / 3 / 3 / 3 / 3½ / 3½ / 3½ ins, ending with right side facing for next row.

Change to No 4 (6mm) needles and work in stocking stitch, starting with a knit row, shaping sides by inc 1 stitch at each end of 3rd / 3rd / next / 7th / next / 5th / 3rd / 9th / 5th and every following 4th / 5th / 5th / 5th / 5th / 5th / 4th / 4th / 4th row until there are 51 / 51 / 55 / 55 / 59 / 59 / 67 / 67 / 69 sts.

Work straight until sleeve seam measures 14 / 15½ / 17 / 18½ / 19 / 19 / 19½ / 20 / 20 ins, ending with a purl row.

Cast off.

To Make Up

Omitting garter stitch and ribbing, press parts lightly on wrong side with a damp cloth

When making up a chunky garment it may be easier to use an oddment of finer yarn in a toning shade for the sewing.
If you prefer to make up with the original yarn, use 30 inch lengths and a large needle, making sure yarn keeps its original twist by turning needle clockwise between fingers and thumb after every few stitches.

Join shoulder seams leaving 7 / / 8 / 9 / 9½ / / 10 / 10½ / 10½ ins open at centre for neck opening.
Join side seams leaving 7 / 7 / 7½ / / 8 / 8 / 9 / 9 / 9½ inches free for armholes.
Join sleeve seams; insert sleeves.
Press seams.

Materials

8 / 8 / 9 / 11 / 11 / 13 / 13 / 14 / 14 x 50g balls in main shade and 2 / 2 / 2 / 2 / 2 / 3 / 3 / 3 / 3 balls contrast colour.

Pair each No 6 (5mm) and No 4 (6mm) needles.

Tension

15sts x 20 rows to 4 ins in over stocking stitch.

Size matters

To fit chest: 26 / 28 / 30 / 32 / 34 / 36 / 38 / 40 / 42 inches; (66 / 71 / 76 / 81 / 86 / 91 / 97 / 102 / 107 cm).
Length from top of shoulders: 20½ / 21½ / 23 / 24 / 25 / 26 / 26½ / 27½ / 28½ ins; (52 / 54 / 58 / 61 / 63 / 66 / 67 / 70 / 72 cm).
Sleeve seam, 14 / 15½ / 17 / 18½ / 19 / 19 / 19½ / 20 / 20 ins; (36 / 39 / 43 / 47 / 48 / 48 / 49 / 51 / 51 cm).

Abbreviations

m1: make one st by picking up loop between sts and knit into back of it.

A word on the wool.

Original yarn was Patons Husky Chunky, which was a fairly dense tough yarn as the name implies.

A good substitute in texture and general ethos, might be Rowan's British sheep breeds chunky, which is specified as knitting to a tension of 13sts x 18 rows but on 7mm needles; it is available in a good range of monochrome colours which suit the fashion for the current take on fair-isle. Try a swatch with 6mm.

Disclaimer
(well...almost)

In transposing any pattern it is always a risk that errors will be introduced, in spite of dedicated proof reading.
If you have any problems with this pattern, please and I will try and assist.

FamilyFairIsle2.jpg

October 2011

Jacob's Sleeping Bag of Many Colours

JacobsBag.jpg

This is a vintage baby-bag pattern probably intended for babies up to 3 months in age. It's very simple to knit and fastened around the edge with easy poppers. It's tempting to knit this in beautiful, soft, lofty yarns - however, it does need to be washable, if not so very hard wearing.
OK - maybe not so many colours - but so cute!

Instructions

The striped pattern is worked as follows:

1st row: Knit in main shade
2nd - 11th rows: Knit in first contrast
12th row:
Knit in main shade
13th - 22nd rows: Knit in second contrast

These 22 rows are repeated to form the striped pattern.

Body

The body is worked in one piece; you start off knitting short, shaped pieces for the back and front separately then join them both onto one needle. The pattern as written should work out that the stripes match up when you join them together - make sure they do - and you may want to use a circular needle for the 86 stitches in chunky yarn.

Back:

With No 4 (6mm) needles and second contrast (Pink), cast on 25 sts and purl one row.
Then work in striped pattern as above, beginning with 4 rows in pink, 1 row in main (White), 9 rows in first contrast (Sky Blue) and at the same time, shape rows as follows:-

1st row(right side): Cast on 3, knit to end.
2nd row: Cast on 3, purl to end.
3rd row: Cast on 2, knit to end.
4th row: Cast on 2, purl to end.

Change to white yarn for 1 row:
5th row: Cast on 2, knit to end.

Change to blue yarn for 9 rows:
6th row: Cast on 2, purl to end.
7th row: Inc in first st, knit to end.
8th row: Inc in first st, purl to end.
9th row: Inc in first st, knit to end.
10th row: Inc in first st, purl to end.
11th row: Knit
12th row: Inc in first st, purl to end.
13th row: Knit
14th row: Inc in first st, purl to end. [45 sts]

Change to white yarn for 1 row:
15th row: Knit.

Change to pink yarn and work in sts for 5 rows starting with a purl row.
Leave the sts on a stitch holder or spare needle.
[Editor's note: You have ended with right side facing about to start your 6th row in pink yarn.]

Front:

With No 4 (6mm) needles and first contrast (Sky Blue), cast on 23 sts and purl one row.
Then work in striped pattern as above, beginning with 6 rows in blue contrast, 1 row in main (White), and at the same time, shape rows as follows:-

1st row(right side): Cast on 3, knit to end.
2nd row: Cast on 3, purl to end.
3rd row: Cast on 2, knit to end.
4th row: Cast on 2, purl to end.
5th row: Cast on 2, knit to end.
6th row: Cast on 2, purl to end.

Change to white yarn for 1 row:
7th row: Inc in first st, knit to end.

Change to pink yarn:
8th row: Inc in first st, purl to end.
9th row: Knit
10th row: Inc in first st, purl to end.
11th row: Knit
12th row: Inc in first st, purl to end. [41 sts]

[Editor's note: You have ended with right side facing about to start your 6th row in pink yarn.]

Right side facing, continuing in pink yarn, knit 41sts from front, and then 45 sts from back (stitches on holder). [86 sts]

Continue straight until work measures 20 inches (51cm) - (measure the back segment), ending with a wrong side row.
[Editor's note: This is approximately 96-98 rows from start of back. End after 5 rows in colour blue with right side facing to begin 6th row in blue.]

Right side facing, tie coloured thread or place marker, between the 41st and 42nd sts and between the 84th and 85th sts.

Next row (right side facing): Cast off 4sts, work to end, and increase (cast on) 3 sts. [85sts]
Next row: Purl.

[Editor's note: You are now about to start the raglan shaping on the front, having completed 7 rows in colour blue with right side facing to begin 8th row in blue.]

Next row(right side facing and keeping striped sequence correct): Cast off 3 sts, k 33 (34sts on needle). Turn, leaving remaining 48sts on a spare needle.

2nd row: Cast off 2 sts, purl to end. [32sts]
3rd row: Cast off 3sts, knit to end. [29sts]

Change to white yarn for 1 row:
4th row: Cast off 2 sts, purl to end. [27sts]

Change to pink yarn for 10 rows:
5th row(and every following knit row up to and including row 13): Cast off 2 sts, knit to end.
6th row(and every following purl row, up to and including row 14): Decrease 1 stitch, purl to end. [12sts]

Change to white yarn for 1 row:
15th: Decrease 1 stitch, work to end. [11sts]

Change to blue yarn for rest of front:
16th -23rd rows (every row): Decrease 1 stitch, work to end. [3sts]
24th row (wrong side facing): Purl (no shaping).
25th row: Decrease 1 stitch, knit to end. [2sts]

The front should now measure 4¾ins (12cm) from beginning of raglan shaping, and 2 sts remain.
Cast off.

Back raglan shaping:

With right side facing, take up 43sts of the back and leave the remaing 5 sts at the end of the row on a holder.
[Editor's note: You are now about to start the raglan shaping on the back, having completed 7 rows in colour blue with right side facing to begin 8th row in blue.]

Keeping striped sequence correct work as follows: cast off 2 sts at the beginning of the next 6 rows, and one stitch at the beginning of the next 16 rows.
Cast off remaining 15 sts.

With right side facing, take up the remaining 5 sts on the holder, and keeping striped sequence correct work as follows:
[Editor's note: right side facing to begin 8th row of pattern in blue.]

1st row (right side facing): Cast off 2 sts, knit to end.
2nd row: Increase (cast on) 3sts, purl to end.
3rd row: Cast off 2 sts, knit to end.

Change to white yarn for 1 row:
4th row: Increase (cast on) 3sts, purl to end.

Change to pink yarn for 10 rows:
5th and every alternate row until row 13: Decrease 1 st, knit to end.
6th and every alternate row until row 12: Increase (cast on) 3sts, purl to end.
14th row: Cast off 2 sts, purl to end.

Change to blue yarn to complete:
15th - 22nd row (every row): Decrease 1 st, work to end.
23rd row: Knit
24th row:
Decrease 1 st, purl to end.
25th row: Knit
26th row: Decrease 1 st, purl to end.

The work should now measure 4¾ins (12cm) from beginning of raglan shaping, and 2 sts remain.
Cast off.

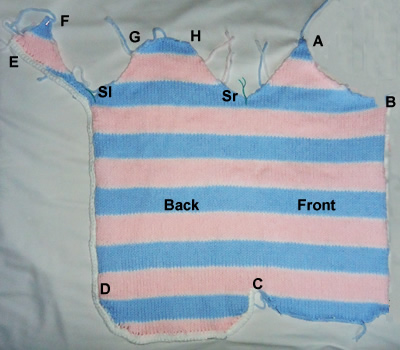
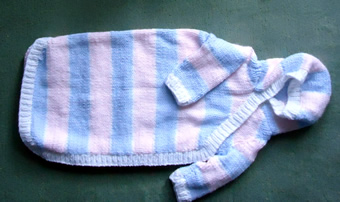
Here's a photo of what it looks like (Figure 1):


Sleeves:

With No 6 (5mm) needles and main shade, cast on 26sts. and work 4 rows in k1/p1 rib, ending with a wrong side row.

Change to No 4 (6mm) needles and striped stocking stitch starting with 1 row of main shade (White). Then work in blue as follows:

2nd - 10th row: Stocking stitch in blue yarn
11th row: Knit in blue increasing 1 stitch at each end of the row. [28sts]

12th row: Purl one row in white.

13th - 20th row: Stocking stitch in blue yarn
21st row: Knit in blue increasing 1 stitch at each end of the row. [30sts]
22nd row: Purl one row in blue.

23rd row: Knit one row in white.

Work 7 rows straight in blue. Work measures 7ins (18cm), ending with right side facing to start raglan shaping.
[Editor's note: Make sure that the pattern sequence matches that of back and front at start of raglan shaping.]

Shape raglan by casting off 3sts at the beginning of the next 2 rows, 1st at each end of every following 3rd row, twice, 6 sts remain.

Cast off.

Hood

With No 4 (6mm) needles and first contrast, cast on 17 sts and work in striped pattern starting with 3 rows of the first contrast.
Continue following the striped sequence until work measures until work measures 6¾ins (17cm), ending with wrong side row, and 6 rows of second contrast.

Cast on 22sts at the beginning of the next right side row. [39 sts]

Continue straight until work measures until work measures 11½ins (29cm), ending with wrong side row, and 2 rows of second contrast.

Cast off 22sts at the beginning of the next right side row. [17 sts]

Continue straight until work measures until work measures 18ins (46cm), ending with wrong side row, and 2 rows of first contrast.

Cast off.

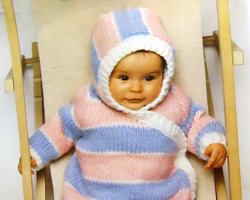
Here's a photo showing how the hood looks (Figure 2):


Front and Hood Band:

With No 6 (5mm) needles and main shade, cast on 211sts and work 4 rows in k1/p1 rib, arranged as follows:

1st row: K2 * p1, k1, repeat from * to last stitch; k1.
2nd row: P2 * k1, p1, repeat from * to last stitch; p1.

End with a wrong side row.

Next row: Knit and leave sts on a holder.

To Make Up

Sew up sleeve seams, and sew raglan seams together.
The left sleeve front seam is from F to Sl and the back seam is from G to Sl; the 6 cast-off sts of the sleeve head sits between F and G (refer back to Figure 1); likewise the right sleeve is set in H-Sr and A-Sr, and the right sleeve head sits between H and A.

Sew up hood seams, bringing together points G and H to make the hood shape as shown in Figure 2 and then sew the back of the hood to the back neck of the body between points G and H in Figure 1.
Sew the left side of the hood from G to F across top of sleeve head and then across to E ending about an inch away from the point E.
Sew the right side of the hood from H to A across top of sleeve head and then a further 2 inches or so down towards B.

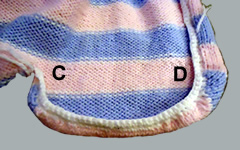
With No 6 (5mm) hook and main shade work 2 rows dc along edge of sleeping bag back from E to D and all around to C (refer back to Figure 1), working tightly across the bottom of the back section so that it is slightly gathered and curls up to form the bottom of the bag.
[Editor's note: You also need to work tightly and gather up the corner between E and D near Sl in figure 1.]

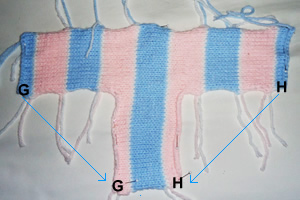
Here's a photo of the bottom section of the back of the bag (Figure 3):

Sew on front and hood band stitch by stitch from C all around to A and then around edge of hood from A to E fitting the edge of the band into the corner by the edge of the hood, at point E.

Sew on snap fasteners evenly from C to D to E on right side of work and from A to B to C on wrong side edge of front.

Press all seams heartily. (That is: carefully with a damp cloth).

Sew on decorative buttons if required.

Materials

3 x 50g balls chunky yarn in main colour, (this is the colour of the edging and narrow stripes), and 4 balls each in 2 contrast collours.

A pair each of No 6 (5mm) and a No 4 (6mm) needles.
One No 6 (5mm) crochet hook.

10-12 x 17mm snap fasteners

9 optional decorative buttons.

Tension

13sts x 19 rows to 4 ins in over stocking stitch.

Size matters

Width all round: 25 ins, (64cm); Length from back neck: 25½ ins (65cm).

Abbreviations

dc: double crochet.
[Editor's note: Remember this is English double crochet where dc is equivalent to US single crochet - see "Terminology" in the side bar.]

A word on the wool.

The chunky yarn knits to a tension of tension 13sts x 19 rows to 4 ins over stocking stitch.
You can substitute an Aran weight yarn knitted double throughout, (check your tension with a swatch).

I used King Cole Comfort Chunky (100g balls) - 2 balls of each in colours: soft pink, ice, and white.

Disclaimer
(well...almost)

In transposing any pattern it is always a risk that errors will be introduced, in spite of dedicated proof reading.
If you have any problems with this pattern, please and I will try and assist.


September 2011

Catkin Hoodie

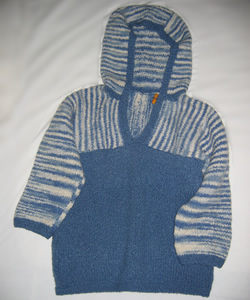
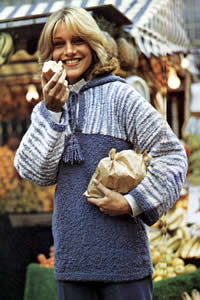
A pattern from the mid 1970s, knitted in a bouclé wool called Jaeger Catkin. As it was a speciality wool, I decided to splash out and buy the recommended stuff to get the right effect. Originally, I "improved" the pattern by making bell shaped sleeves, which, I seem to remember, were highly fashionable at the time. I wore it like this, day after day throughout my year in Southampton University in 1977. In the 1980s, I unravelled the sleeves and reknitted them straight.... I can only assume I wore it again at that time.
Although I can still just squeeze into this sweater, it is really too small for me now - which some may consider a Good Thing - but I still love it.

Instructions.

The sleeves and yoke of this tunic are knitted from cuff to cuff and the back and front (knitted in the usual vertical manner) are sewn onto it at the armhole.

Back and Front alike.

Work 2 pieces as follows:

Using No 8 (4mm) needles and main shade (M), cast on 65 [69 : 73 : 77] sts loosely and knit 7 rows in garter stitch (every row knit). Change to No 5 needles, and beginning with a knit row work 6 inches in stocking stitch, ending with a purl row.
Shaping:

Next row: K12 [13 : 13 : 14], k2tog tbl, knit to the last 14 [15 : 15 : 16]; k2tog; knit to end.
Work 17 rows in stocking stitch.
Rep the last 18 rows once more. 61 [65 : 69 : 73] sts.
Cont in stocking stitch without shaping until work measures 18½ inches, ending with a purl row.
Cast off.

Left Sleeve and Yoke

** Using No 8 needles and main shade (M), cast on 57 [61 : 61 : 65] sts loosely and knit 7 rows in garter stitch. Break off M. Change to No 5 needles, and join in contrast colour (C). Beginning with a knit row continue in stocking stitch, until sleeve measures 19 [19 : 19½ : 19½] inches from the beginning, ending with a purl row.

Place coloured marker at each end of last row.

Work a further 8 [8 : 10 : 10] rows in stocking stitch.


Shape shoulder:

Next row: K28 [30 : 30 : 32], pick up loop lying before next st and m1, k1, m1; k28 [30 : 30 : 32]

Work 9 [9 : 11 : 11] rows in stocking stitch.

Next row: K29 [31 : 31 : 33], pick up loop lying before next st and m1, k1, m1; k29 [31 : 31 : 33]. {61 [65 : 65 : 69] sts}

Work 13 [15 : 15 : 17] rows in stocking stitch, ending with a purl row.
**

Divide for neck:

Next row: K30 [32 : 32 : 34], and turn, leaving the remaining sts on a holder.

Complete this side first. Work a further 15 [16 : 16 : 17] rows. Cast off.

With right side of work facing, slip the first 10 sts on to a holder, and rejoin yarn to remaining 21 [23 : 23 : 25] sts. Work a further 12 [12 : 12 : 14] rows. Break off C.

Change to No 8 needles, join in M and knit 7 rows.
Cast off.

Right Sleeve and Yoke

Work as given for left sleeve and yoke from ** to **.

Divide for neck:

Next row: K21 [23 : 23 : 25], and turn, leaving the remaining sts on a holder.

Complete this side first. Work a further 11 [11 : 11 : 13] rows. Break off C.

Change to No 8 needles. Join in M and knit 7 rows.
Cast off.

With right side of work facing, slip the first 10 sts on to a holder, and work 16 [17 : 17 : 18] rows. Cast off.

To Make Up

Press the sleeve pieces very lightly under a damp cloth with a warm iron on wrong side, omitting the 9 st borders. Join centre back yoke seam.

Neck border:
Using No 8 needles and M, with right side of work facing, beginning at the right front border, knit up 9 [11 : 11 : 12] sts along right front, knit up one st from corner, (marking this stitch with coloured thread), knit across 10 sts from holder up right side, knit 18 [22 : 22 : 24] sts along back, knit across 10 sts from holder down left side, knit up one st from corner, (mark ing this stitch with coloured thread), then knit up 9 [11 : 11 : 12] sts along left front. {58 [66 : 66 : 70] sts}
Work 4 rows in garter stitch, decreasing one stitch at each side of the marked sts on next and foil alternate row. {50 [58 : 58 : 62] sts}.

Hood:

Next row: K9 [12 : 12 : 12]; (m1, k2 [2 : 2 : 3]) 5 [8 : 8 : 3] times; (m1, k1 [1 : 1 : 2]) 12 [2 : 2 : 10] times; (m1, k2 [2 : 2 : 3]) 5 [8 : 8 : 3] times; m1; k9 [12 : 12 : 12]. {73 [77 : 77 : 79] sts}.

Change to No 5 needles.

1st row (right side): Knit to end.
2nd row: K4; purl to last 4 sts, k4.

Repeat the last 2 rows until hood measures 11½ ins from beginning, ending with a wrong side row.

Next row: K4, slip these 4 sts on to a holder, cast off next 20 [21 : 21 : 22] sts; k25 [27 : 27 : 27] sts, (including stitch on needle); k4 and slip these 4 sts on to a holder.
Break off yarn.

With wrong side of work facing, rejoin yarn to rem 25 [27 : 27 : 27] sts and beg with a purl row, cont in stocking stitch until side edge fits along cast off edge of hood to within 4 sts on holder. Cast off.

Sew cast off edges to side edge of centre piece.

Left border:
Using No 5 needles, and M, with wrong side of work facing, rejoin yarn to 4 sts on holder on left side of hood. Cont in g st until extra rows, when slightly stretched, fit across to centre of cast off sts at centre of hood.
Cast off.

Right border:
Work as given for left border.

Join borders and sew in position around hood.
Join side seams.
Join sleeve seams to markers.
Sew yoke edges to cast off edges of back and front.
Press seams.
Using M, make 2 twisted cords with a tassel at each end and sew in position to fasten at neck.

[Editor's note: I used a duffle toggle and loop to fasten neck rather than a cord.]

Materials

10 [11 : 11 : 12] x 50g balls Jaeger Catkin in main shade (M) and
8 [9 : 9 : 10] balls of contrast colour, (C)

[Editor's note: I have knitted the hood in the contrast yarn rather than as the instructions given here, where the hood is in the main shade. If you want to do this, it will alter the required amount of yarn.
Also, I used a duffle toggle and loop to fasten neck rather than a cord.]

A pair each of No 8 (4 mm) and No 5 (5½ mm) needles.

Tension

14 sts and 22 rows to 4 inches.

Size matters

To fit 32 [34 : 36 : 38] inch bust.
Length to shoulder: 27 [27½ : 27½ : 28] inches.
Sleeve seam: 19 [19 : 19½ : 19½] inches.

The figures in square brackets refer to the 34, 36 and 38 inch sizes respectively.

Abbreviations

m1: increase by picking up the loop lying before next st and knitting into the back of it.
k2tog: (decrease) knit 2 sts together.
k2tog tbl: (decrease) knit 2 sts together through back loops - also known as "ssk" (slip, slip, knit).

A word on the wool.

Jaeger Catkin was a lovely quality soft bouclé wool. There are a number of good choices for a substitute chunky bouclé these days, including options from Rowan. However, you might have to go with a single colour - which might be more sophisticated - unless you are into dying your own matching colour combination.

Disclaimer
(well...almost)

In transposing any pattern it is always a risk that errors will be introduced, in spite of dedicated proof reading.
If you have any problems with this pattern, please and I will try and assist.


You can see similar patterns - some with front pockets - in the vintage patterns section:


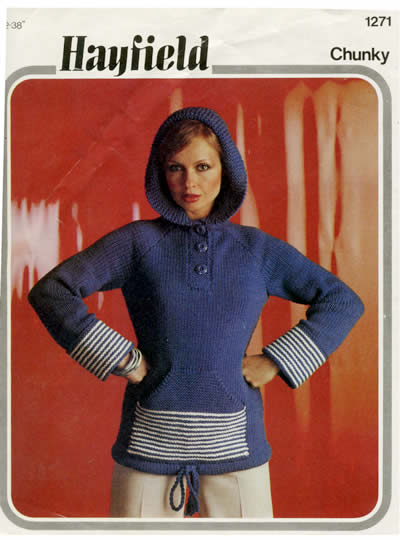
Sweater with hood and stripes


Pattern ID: Hayfield 1271

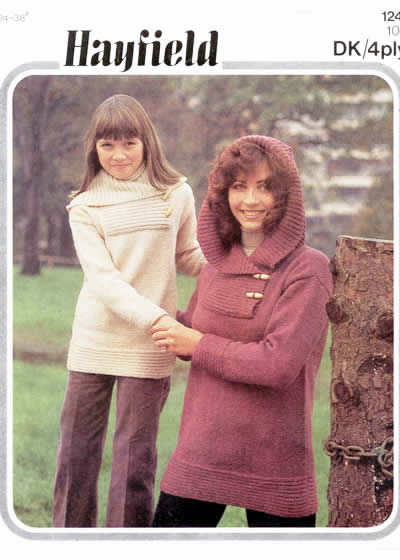
Mother and daughter tunics


Pattern ID: Hayfield 1241

August 2011

Buckets of Pegs

PegBag1.jpg

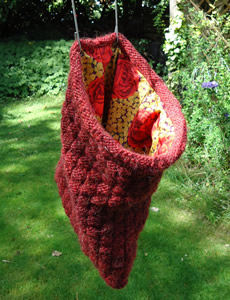
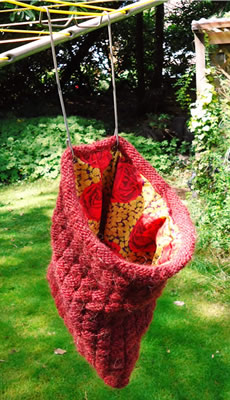
My peg bag finally wore out. It's such a good design that I had a fun time reconstructing the bag using knitting and fabric. You could easily just use a quilted fabric, and while looking on the web I found lots of lovely ideas to make other bag designs. Try this one, or this "clothes-pin bag" which has a tutorial and pattern here - I think it needs a carabiner instead of the loop! (see more below...)

Instructions

With No 7 needles, cast on 107 stitches (more if felting), and work 4 rows in reverse stocking stitch starting with a purl row.

With right side facing, commence pattern as follows:

1st row: (P3, K5) to end
2nd row: (P3, K5) to end
3rd row: (P3, K5) to end
4th row: P4, K3, (P5, K3) to end
5th row: K4, P3, (K5, P3) to end
6th row: P4, K3, (P5, K3) to end

These six rows form the pattern; repeat for desired length of about 13-14 inches (more if felting).

Cast off.
[Editor's note: If you want to graft the bottom edges together then knit to the centre of the row and cut the yarn leaving a long tail. Fold the knitting in half lengthways so the two needles are side by side and graft the stitches together, forming the bottom of the bag.]

Making up

Fold the bag in half lengthways and sew together the cast off edge (if you did not graft the edge) to form the bottom edge of the bag.

Now prepare the support for the top edge which helps hold the neck of the bag open. Glue or overstitch the supporting paper rope to the length of cotton tape, centring it along the length of the tape. This does not need to be very firm, it just holds it in place while you insert it in the casing. Note that glue may help keep the rope stiffer without being too rigid.

Before sewing the side seam, fold the top edge of reverse stocking stitch over to form a casing. This is to hold the supporting rope/tape that you just created. You may need to fold it over with your supporting stiff rope already inside - arrange so that the rope is in the centre of the casing and the tape emerges at each end. There should be about 2 inches at each end of the casing that is unsupported by the rope.

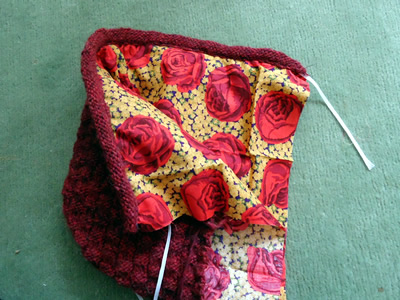
Here is a picture showing the tape inside the casing. The lining is already in place although I describe making the lining differently here, in a separate step, below.
Both side seams (lining and bag) are left open.

Sew up the side seam, and attach the tape ends together (tie them) so that the neck of the bag will not stretch too much when in use. Cut the ties neatly to about 1 inch - they will be hidden when you sew in the lining.

Construct the lining:

Cut the lining fabric in one or two pieces, and sew up into a bag with one of the shorter edges left open. The bag need to be about 11 inches by about 15 inches when finished so cut out your pieces allowing for the seams.

Insert the lining into the knitted bag with wrong sides together; turn over the a hem at the top edge and sew into place around the knitted casing on the inside.

Attach the lining to the knitting at the bottom corners, (a couple of invisible stitches using sewing cotton).

Construct the hanger:

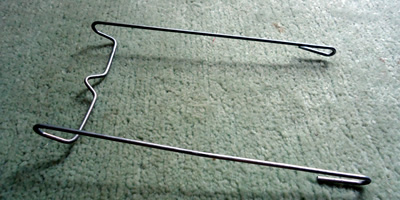
Using the strong wire from a coat hanger, make the shape you need for the peg bag using rounded pliers. Make open hooks at each end. This photo shows the shape you are aiming at:

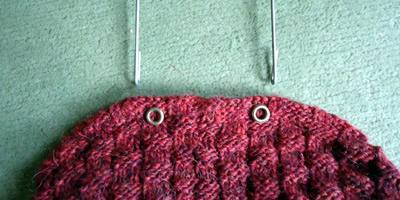
Insert metal eyelets into the top of the bag equally either side of the bag's side seam, matching the position of your constructed wire hanger hooks.

Put the hanger-hook ends through the eyelets and pinch together.

Try out the bag.

If you don't want to make a hanger:

I was reconstructing an old bag, so I already had the hanger. If you don't feel up to messing about with heavy wire and pliers to make your own, you can make a tab on the back of the peg bag and attach an inexpensive carabiner (clip type not locking version) - large ones are fairly easily available on Amazon or eBay. Look at the Brabantia design for inspiration.

If you use a carabiner then you should probably use paper rope (22inches) through the entire length of the casing, not leaving any of the top of the bag unsupported.

Materials

3 x 50g balls chunky yarn to required tension.

One pair of number 7 (4½mm) needles.

Wire or wire coat hanger to make peg- bag hanger (or carabiner).

About 18 inches of paper rope for support.

1 metre or yard of cotton tape.

Half a metre (or half a yard) of cotton fabric for lining.

Tension

20sts x 28 rows to 4 inches (10cm) on 4½mm needles over basket-weave pattern.

Chunky yarn used is quoted as 14sts x 19 rows to 4 inches using 6mm needles.

Size matters

Bag is approximately 14inches by 11inches wide, when sewn into shape.

A word on the wool.

I used Sirdar Peru (now discontinued) for this project.

I used a floral quilting fabric for the lining; I always think linings are fun in bright wild prints.

Paper Rope

This is a very useful material used by prop makers as a stiffener or support. It is flexible but holds its shape. I had some difficulty finding it on the web in anything other than industrial quantities.

Flints Theatrical Chandlers appear to sell it by the metre, and there seems to be some available at a site devoted to making toys for parrots...


Felting

I used smaller needles to create as denser knitted fabric as I could without too much strain on my fingers. I would have preferred a stiffer felted fabric for the bag, but I tested Sirdar Peru previously and it does not felt well (too much synthetic content).

If you do want to felt the bag then from the given tension and needles, work out how many stitches to cast on with your chosen yarn to make a width of 22 inches and work out how many rows to knit for 14 inches. Then increase the stitches and rows according to the shrinkage factor of 85% in width and 75% in length.
[Editor's note: This shrinkage factor is a general estimate - if you want to know for sure, then knit a swatch and measure it before and after machine wash for felting. Substitue your own factors in the calculations.]

Here is an example with a standard double knitting wool:

Quoted tension is 22sts to 4 inches: -

    22 inches wide = 22sts ÷ 4 × 22 ins = 121sts
    Then increase by felting factor:-
    121sts ÷ 85% × 100% = 142sts (discard decimal)

To work the basket stitch as written, you need your stitches to be divisible by 8 plus 3. So calculate how many:-

    142sts ÷ 8 = 17 (discard decimal), then,
    8 × 17 + 3 = 139.

So cast on 139 sts and knit for 14 inches finished length after shrinkage of 75%, which is:-

    14ins ÷ 75% × 100% = about 18½ inches.

If you do make a felted bag and have some fabulous coloured wools - or you decide to knit a "bag of many colours" with left over Noro - or... anything that inspires you, then you may find you don't need the patterning for texture and just want to go with stocking stitch.
So in the above example you could cast on 142sts and knit for about 18½ inches.

Just make sure your yarn will felt before you start.

July 2011

Miss Muffet Pinny

MuffetPinny.jpg

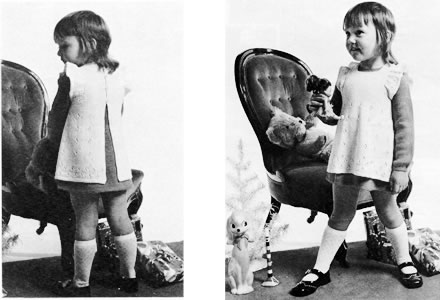
All dressed up in a charming pinafore, suitable for a spring or summer celebration, perhaps, in a lighter cotton-blend 4ply. Alternatively, try an angora or mohair blend for a more wintry festive feel.
The pattern for the dress underneath is also given, although, today, we seem to be fully equipped with central heating everywhere, so this combination may prove to be too hot for most children.

Instructions

The pinafore is worked in one piece up to the armhole shaping.

Panel Pattern over 5 stitches:

1st row: k2, yfwd, k2tog tbl, k1
2nd and every alternate row: purl
3rd row: k1, yfwd, s1k, k2tog, psso, yfwd, k1
5th row: as first row
7th, 9th, 11th, 13th, and 15th rows: knit
16th row:as second row
These 16 rows form panel pattern.

With No 12 (2¾mm) needles cast on cast on 223/239/255 sts. and work 5 rows garter-stitch, that is: every row knit.

Change to No 10 (3¼mm) needles and pattern as follows :

1st row (right side facing): knit.
2nd and every alternate row: purl.
3rd row: k7, * yfwd, k2tog tbl, k6; repeat from * to end.
5th row: k6, * yfwd, s1k, k2tog, psso, yfwd, k5; repeat from * to last stitch, k1.
7th row: k7, * yfwd, k2tog tbl, k6; repeat from * to end.
9th row: knit.
11th row: k3, * yfwd, k2tog tbl, k6; repeat from * to last 4 stitches, yfwd, k2tog tbl, k2.
13th row: k2, * yfwd, s1k, k2tog , psso, yfwd, k5; repeat from * to last 5 stitches, yfwd, s1k, k2tog, psso, yfwd, k2.
15th row: k3, * yfwd, k2tog tbl, k6; repeat from * to last 4 stitches, yfwd, k2tog tbl, k2.
16th row: as second row

Shape skirt and place panel pattern as follows:

1st decrease row: k5/13/5, (panel pattern 5 as 1st row, k5, k2tog, k4) 13/13/15 times, panel pattern 5 as 1 st row, k5/13/5. [210/226/240 sts]

Keeping continuity of panel pattern, work 11/17/25 rows straight.

2nd decrease row: k5/13/5, (pattern 5, k4, k2tog, k4) 13/13/15 times, pattern 5, k5/13/5. [197/213/225 sts]

Work 15/17/29 rows straight.

3rd decrease row: k5/13/5, (pattern 5, k4, k2tog, k3) 13/13/15 times, pattern 5, k5/13/5 [184/200/210 sts]

Work 15/17/29 rows straight.

1st and 2nd sizes: Continue decreasing 13 sts thus on next and following 16th/18th row [158/174 sts].
3rd size: Continue decreasing 15sts thus on next row [195 sts].

All sizes:
Next row (wrong side facing): p18/14/6, p2tog, (p28/34/18, p2tog) 4/4/9 times, purl to end [153/169/185 sts].
Work a few rows straight in stocking-stitch until skirt measures 9½/11/12½ inches, ending with wrong side facing.

Divide for front and backs:
Next row: p21/23/25, turn and leave remaining stitches on a spare needle or stitch-holder.

Continue straight on these 21/23/25 stitches for right back until work measures 14½/16½/18½ inches, ending with right side facing.

Shape shoulder by casting off 3sts at the beginning of the next and following alternate row.
Work 1 row straight.
Cast off remaining 15/17/19 sts.

With wrong side facing, rejoin yarn to remaining stitches from holder; cast off 34/38/42, (for armhole), p43/47/51, turn and leave remaining stitches on a spare needle or stitch-holder.

Continue straight on these 43/47/51 stitches for front until work measures 12/13½/15½ inches, ending with right side facing.

Divide for neck:
Next row: k8/9/10, turn and leave remaining stitches on stitch-holder .
Continue straight until left front measures 14½/16½/18½ inches, ending with right side facing.
Shape shoulder by casting off 3sts at the beginning of the next and following alternate row.

Work 1 row straight.

Cast off remaining 2/3/4 sts.

With right side facing, rejoin yarn to remainiing stitches, cast off centre 27/29/31, then finish to correspond with first side, reversing shapings.

With wrong side facing, rejoin yarn to remaining stitches on holder, cast off 34/38/42, (for armhole) purl to end.

Finish to correspond with right back, reversing shapings.

Shoulder Frills:

With No 12 needles, cast on 103/111/119 sts. and work 3 rows garter-stitch.
Change to No 10 needles and work rows 1-15 of pattern as for main part.
1st size: Next row: p5, p2tog, (p1, p2tog) 30 times, p6 [72sts].
2nd and 3rd sizes: Next row: p8/8, (p1, p2tog) 32/34 times, p7/9 [79/85 sts].
All sizes: Cast off.

To Make Up

Using a warm iron and a damp cloth. press parts lightly on wrong side.

Join shoulder seams.
Sew cast-off edge of shoulder frill along armhole edge, and sides of frill along cast-off edge at beginning of armhole shaping.

Make borders: With right side facing and 3mm hook, work 2 rows dc up left back, round neck and down right back. increasing and decreasing at corners as required.
Make 4 buttonloops on right back on 2nd row, first to come level with cast-off edge at armhole, 4th to come at neck edge, and remainder spaced evenly.
First mark position of buttons on left back with pins to ensure even spacing, then work loops to correspond.
To make a buttonloop: 2 ch, miss 1 dc.

Press seams. Sew on buttons.

Materials

Original materials called for: 3/3/4 50g balls 4 ply fingering.

A pair each Nos 10 and 12 (3¼mm and 2¾mm) needles.
A No 11 (3mm) crochet hook

4 small buttons.

Tension

28 sts and 36 rows to 4 inches over stocking-stitch on No 10 needles.

Size matters

Three sizes given for 22/24/26 inch chest; length from top of shoulders: 14½/16½/18½ inches.

Abbreviations

tbl: through back of loops
yfwd: yarn forward
s1k: slip one stitch knitwise
psso: pass the slipped stitch over
m1: pick up loop lying before next stitch and knit into back of it

ch: chain
dc: double crochet
[Editor's note:Remember these are English crochet instructions where dc is equivalent to US single crochet, and so on - see "Terminology" in the side bar.]

A word on the wool.

The original colour combination is white for the apron with "Damask Rose" for the dress.

Disclaimer
(well...almost)

In transposing any pattern it is always a risk that errors will be introduced, in spite of dedicated proof reading.
If you have any problems with this pattern, please and I will try and assist.

Eyelet pattern and sleeve frill detail:

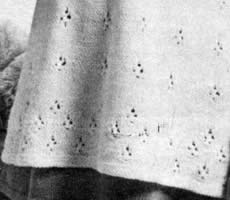
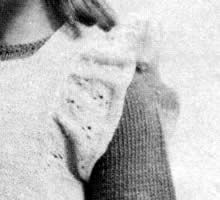
MuffetPinnyDetail.jpg MuffetPinnyDetail2.jpg

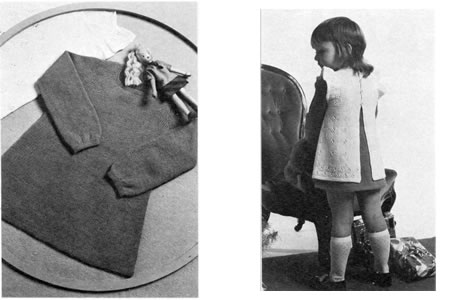
... and the little dress

MuffetDress.jpg

This is the plain and simple dress designed to go under Miss Muffet's pinafore.

Instructions

This is an A-line dress, knitted completely plain, with a high round neck and long sleeves.

Back

**
With No 12 needles, cast on 114/120/128 stitches and work 5 rows in garter-stitch, that is, every row knit

Change to No 10 needles and stocking-stitch, and, starting with a knit row, work 8 rows straight.

1st decrease row: k26/28/30, k2tog, k2tog tbl, k54/56/60, k2tog, k2tog tbl, k26/28/30. [110/116/124 sts]

Work 11/13/15 rows straight.

2nd decrease row: k25/27/29, k2tog, k2tog tbl, k52/54/58, k2tog, k2tog tbl, k25/27/29. [106/112/120 sts]

Work 11/13/15 rows straight.

3rd decrease row: k24/26/28, k2tog, k2tog tbl, k52/54/58, k2tog, k2tog tbl, k24/26/28. [102/108/116 sts]

Work 11/13/15 rows straight.

Continue decreasing 4 stitches thus on the next and every following 12th/14th/16th row until 82/88/96 sts; remain.
Now decrease 1 stitch at each end of the next row.

Work a few rows straight until back measures 12/13½/15 inches, ending with right side facing.

Shape armholes by casting off 4 sts. at the beginning of the next 2 rows, then decrease 1 stitch at each end of every row until 62/68/72 stitches remain.
Now decrease 1 stitch at each end of every alternate row until 56/60/64 stitches remain.
**

Work a few rows straight until back measures 14/16/17½ inches, ending with right side facing.

Divide for back opening:
Next row: k28/30/32, turn and leave remaining stitches on stitch-holder.

Continue straight on first set of stitches until back measures 16½/18½/20½ inches, ending with right side facing.

Shape shoulder by casting off 4 stitches at the beginning of the next and following 2 alternate rows, then 2/3/4 stitches at the beginning of the following alternate row.
Work 1 row straight.
Leaving remaining 14/15/16 stitches on a spare needle or stitch holder.

With right side facing, rejoin yarn to remaining stitches and finish to correspond with the first side, reversing shapings.

Front

Work as for back from ** to **.
Work straight until front measures 15/16½/18½ inches, ending with right side facing.

Divide for neck:
Next row: k20/21/22, turn and leave remaining stitches on a stitch-holder.
Continue on these stitches for first side, decreasing 1 stitch at the neck edge on every row until 14/15/16 stitches remain.
Work a few rows straight until front matches back at armhole edge, ending with right side facing.

Shape shoulder by casting off 4 stitches at the beginning of the next and following 2 alternate rows.
Work 1 row straight. Cast off remaining 2/3/4 stitches.

With right side facing, leave centre 16/18/20 stitches on a stitch-holder, and rejoin yarn to remaining stitches and finish to correspond with first side, reversing shapings.

Sleeves

With No 12 needles, cast on 40/44/46 sts. and work 7 rows garter-stitch.
Change to No 10 needles.
Next row: k1/3/2, m1 , (k2, m1 ) 19/19/21 times, k1/3/2: [60/64/68 sts].
Continue straight in stocking-stitch until sleeve measures 9½/10½/12 inches, ending with right side facing,

Shape top by casting off 4 stitches. at the beginning of the next 2 rows, then decrease 1 stitch at each end of the next and every alternate row until 34 stitches remain.
Now decrease 1 stitch at each end of every row until 20 stitches remain.

Cast off.

To Make Up

Using a warm iron and a damp cloth. press parts lightly on wrong side.

Join shoulder seams.

Neckband: With right side facing and No 12 needles, start at top of left back and work as follows:-
Knit 14/15/16 from left back, pick up and k12/14/14 down left side of neck, k16/18/20 from centre front. pick up and k12/14/14 up right side, knit across 14/15/16 stitches from right back [68/76/80 sts].
Work 4 rows garter-stitch.
Cast off.

Left Back Border: With 3mm hook, work 2 rows dc along left back edge.
Right Back Border: Work as for left with the addition of 3 button loops, first to come ½ inch above start of opening, third to come at centre of neckband, and 2nd spaced evenly between.
Mark positions and work loops: 2 ch, miss 1 dc.
Sew on buttons.

Join side and sleeve seams; insert sleeves.
Run 1 row shirring elastic directly above garter-stitch cuff. Press seams.

Materials

Original materials called for: 4/4/5 50g balls 4 ply fingering.

A pair each Nos 10 and 12 (3¼mm and 2¾mm) needles.
A No 11 (3mm) crochet hook

3 small buttons.

Shirring elastic for cuffs.

Tension

28 sts and 36 rows to 4 inches over stocking-stitch on No 10 needles.

Size matters

Three sizes given for 22/24/26 inch chest; length from top of shoulders: 16½/18½/20½ inches; sleeve seam: 9½/10½/12 inches.

Abbreviations

tbl: through back of loops
yfwd: yarn forward
s1k: slip one stitch knitwise
psso: pass the slipped stitch over
m1: pick up loop lying before next stitch and knit into back of it

ch: chain
dc: double crochet
[Editor's note:Remember these are English crochet instructions where dc is equivalent to US single crochet, and so on - see "Terminology" in the side bar.]

A word on the wool.

The original colour combination is white for the apron with "Damask Rose" for the dress.

Disclaimer
(well...almost)

In transposing any pattern it is always a risk that errors will be introduced, in spite of dedicated proof reading.
If you have any problems with this pattern, please and I will try and assist.

June 2011

Cherry Ripe

CherryCosy.jpg

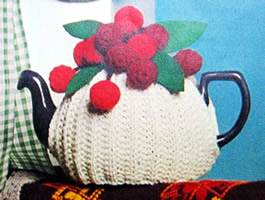
A jolly tea cosy to get you in the mood for the real cherry season.
I used brown for the main colour (more practical potential tea-stain colour for my partially sighted Aunt), and I used green for the stems and also crocheted the leaves. I did find making the little crochet bobbles slightly tedious and fiddly but they look so wonderful when you step back and admire the finished cosy.

Instructions

This cosy is made as 2 flat pieces which are then sewn together to make the hat-like shape. Although I prefer to avoid seaming wherever possible, this is perfect for a cosy as you can tailor the openings to fit your specific teapot. (I never realised this could be an issue until I made a cosy which did not fit my 1930s pot as the spout was set very high). The fancy rib fits snugly around most average pot sizes, making this an excellent design.

Main Cosy (make 2 pieces)


With No 8 needles and main colour M, cast on 47sts and work in pattern as follows:

1st row: k3, * p2, k2; repeat from * to end.
2nd row: k1, * p2, k2; repeat from * to last 2 stitches, p1, k1.

These 2 to rows form the pattern..
Continue in pattern until work measures 5ins ending with a 2nd row.


Shape top as follows:-
1st row: * k2tog, k1, p1; repeat from * to last 3 stitches, k2tog, k1. [35 sts].
2nd row: k1, * p1, k2; repeat from * to last stitch, k1.
3rd row: k2, * p1, k2; repeat from * to end.
4th row: as 2nd row
5th row: * k1, p2tog; repeat from * to last 2sts, k2. [24sts]
6th - 8th rows: * k1, p1; repeat from * to last 2sts, k2.
9th row: k1, * k2tog; repeat from * to last stitch, k1.[13sts]
10th row: k1, purl to the last stitch, k1.
11th row: (k2tog) 6 times, k1. [7sts]

Break yarn and leave is on a spare needle or stitch holder.

Work another piece from to

Break yarn, leaving an end. Thread end through stitches on needle and 7sts from other piece left on holder; draw up tightly and fasten securely.

Cherries (make 12 in all)

With No. 8 crochet hook and red yarn (R), make 4 chain and join in a ring with a slip stitch.

1st round: 8dc into ring.
2nd round: 2 dc into each dc of previous round. [16sts]
3rd and 4th rounds: 1dc into each dc of previous round.
5th round: dec1, 8 times [8sts]

Fasten off.
Make 7 more in red (R) and 4 more in wine (W).

Stems

With No. 8 crochet hook and brown yarn (B), make 24 chain.
Fasten off.
Make 5 more stems the same.

To Make Up

Join sides of cosy together leaving an opening at each side for handle and spout.
Using same coloured yarn as cherries make small balls (for stuffing) and place inside each cherry.
Sew end of one stem to top of small ball in one cherry and other end to top of small ball in another cherry.
Draw up top of cherries and fasten securely.
Cut 4 felt leaves as illustrated.
Arrange cherries and leaves round top of cosy as in photograph and sew firmly in position.

Materials

1 x 50g ball double knitting yarn each in main cream colour (M), red (R), and wine (W) plus an oddment of brown (B).

A pair of No 8 (4mm) needles, and a No 8 (4mm) crochet hook.

Green felt for the leaves, or green yarn to crochet leaves.

Tension

24sts x 34 rows to 4 ins over pattern.

Size matters

Width all round: 16ins, (41cm); height: 6ins (15cm).

Abbreviations

dec 1: crochet decrease one:- (insert hook in next st and draw loop through) twice, yarn round hook and draw through 3 loops on hook.

dc: double crochet.
[Editor's note: Remember this is English double crochet where dc is equivalent to US single crochet - see "Terminology" in the side bar.]

A word on the wool.

Any standard double knit is suitable, knitting to a tension 22sts x 30rows to 4 ins over stocking stitch.

Disclaimer
(well...almost)

In transposing any pattern it is always a risk that errors will be introduced, in spite of dedicated proof reading.
If you have any problems with this pattern, please and I will try and assist.

May 2011

Nautical top with buttoned vestee

NauticalTop2.jpg

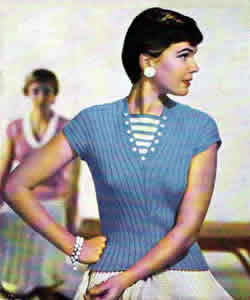
Mid-fifities fashion in fresh blue and white summer colours. The stripes and buttoning give the design a slightly off-kilter nautical look. My version used a stronger blue than the original.
If you are tantalised by the ghostly image of the other sweater in the background then look at these instructions - it is not actually that very knitted top (the one in the background of the photo above has beads - you'll have to trust me on that), but it is very similar, and also dates from the summer of 1956.

My own version is now complete so the pattern is "checked out", and I hope to add a photo soon.

Instructions

Knitted in 2 pieces with a V-neck, and detachable vestee.
Since the vestee is detachable and the buttons are attached to it, you could have more than one colour scheme, by knitting alternative vestees.
[Editor's note: "Ringing the changes" is a common theme for vintage homemade clothes, which seems like it stems from the 1940s "make do and mend" era, though personally I think the concept of avoiding waste (and sweating your assets!) is a much older set of values - Victorian or earlier.]

Back

With No 12 (2¾mm) needles cast on cast on 138sts and work as follows:

1st row (right side facing): k2; (p2, k4) 22 times; p2, k2.
2nd row: p2; (k2, p4) 22 times; k2, p2.
Repeat these 2 rows for 4 inches.
[Editor's note: Because I lengthened the pattern at the shoulders by about 2 inches, I compensated by shortened the pattern here - please see "adaptations" at the end of the instructions.]
Change to No 11 (3mm) needles and continue for a further 2 inches.

Start centre shaping:
1st row (right side facing): k2; (p2, k4) 11 times; m1p, p2, m1p; (k4, p2) 11 times; k2.
2nd row: p2; (k2, p4) 11 times; k4; (p4, k2) 11 times; p2.
3rd row: k2; (p2, k4) 11 times; p4; (k4, p2) 11 times; k2.
4th row: as second row.
5th row: k2; (p2, k4) 11 times; p1, m1p, p2, m1p, p1, (k4, p2) 11 times; k2.
6th row: p2; (k2, p4) 11 times; k6; (p4, k2) 11 times; p2.
7th row: k2; (p2, k4) 11 times; p6; (k4, p2) 11 times; k2.
8th row: as 6th.
9th row: k2; (p2, k4) 11 times; p2, m1k, p2, m1k, p2; (k4, p2) 11 times; k2.
10th row: p2; (k2, p4) 11 times; k2, p1, k2, p1, k2; (p4, k2) 11 times; p2.
11th row: k2; (p2, k4) 11 times; p2, k1, p2, k1, p2; (k4, p2) 11 times; k2.
12th row: as 10th.
13th row: k2; (p2, k4) 11 times; p2, k1, m1k, p2, m1k, k1, p2, (k4, p2) 11 times; k2.
14th row: p2; (k2, p4) 11 times; k2, p2, k2, p2, k2; (p4, k2) 11 times; p2.
15th row: k2; (p2, k4) 11 times; p2, k2, p2, k2, p2; (k4, p2) 11 times; k2.
16th row: as 14th.
17th row: k2; (p2, k4) 11 times; p2, k2, m1k, p2, m1k, k2, p2; (k4, p2) 11 times; k2.
18th row: p2; (k2, p4) 11 times; k2, p3, k2, p3, k2; (p4, k2) 11 times; p2.
19th row: k2; (p2, k4) 11 times; p2, k3, p2, k3, p2; (k4, p2) 11 times; k2.
20th row: as 18th.
21st row: k2; (p2, k4) 11 times; p2, k3, m1k, p2, m1k, k3, p2; (k4, p2) 11 times; k2.
22nd row: p2; (k2, p4) 12 times; k2; (p4, k2) 12 times; p2.
23rd row: k2; (p2, k4) 12 times; p2; (k4, p2) 12 times; k2.
24th row: as 22nd.

Continue thus, keeping continuity of rib and increasing 1 stitch at each side of centre 2 purl sts on next and every following 4th row until there are 180 sts, remembering that when increasing for purl sts to purl into back of loop and when increasing for knit sts to knit into back of loop,that is: the next 2 sets of increasings will be purl and the following 4 sets of increasings knit.
Continue the increasings in this way until 21 sets of increasings have been done in all and there are 180 sts on needle.
Work 3 rows straight.
Tie a contrast thread at each end of the row at this point to mark the start of the armholes.
Now continue centre increasings as before on next and every following 4th row, and at the same time shape armholes by k2tog at each end of next and every following 4th row, 15 times in all (you will still have 180 sts on needle).
Work 3 rows straight.

With right side facing, change to garter stitch, (that is, every row knit),
[Editor's note: I made an adaptation here - please see "adaptations" at the end of the instructions.]
and work 2 rows straight.
[Editor's note: I lengthened the pattern at this point to match the fronts where I created a deeper V - please see "adaptations" at the end of the instructions.]

Then, continuing in garter stitch, shape shoulders by casting off 4 sts at beginning of next 10 rows, then 12 sts at beginning of following 4 rows.
Cast off remaining stitches.

Front

Work exactly as for back until there are 172 sts.

Work 3 rows straight, then start to introduce the garter stitch at the centre as follows:

1st row (right side facing): Rib 82, k3, m1k, k2, m1k, k3, rib 82.
2nd row: Rib 80, k14, rib 80.
3rd row: Rib 80, m1k, k5; k2tog, wind yarn twice round needle, k2tog; k5, m1k, rib 80.
4th row: Rib 80, k7; (knit and purl into the two twists of wool to make a buttonhole), k7, rib 80.
5th row: Rib 80, k16, rib 80.
6th row: as 5th row.
7th row: Rib 80, m1k, k16, m1k, rib 80.
8th row: Rib 80, k18, rib 80.

Divide for neck:
Next row (right side facing): Rib 80, k9.
Turn, leaving remaining sts on a spare needle or stitch holder.

Next row: K9, rib 80.
Next row: Rib 80, m1p, k9.
Next row: K9, rib 81
Next row: Rib 81, k9.

Repeat the last 2 rows once more.
Next row: K9, rib 81

Put a coloured marker at the end of the row to mark the start of the armhole.

Continue in rib and garter stitch, shaping the armhole edge only by k2tog at the beginning of the next and every following 4th row, and at the same time make a buttonhole in the garter stitch border on the 2nd and every following 12th row until 5 in all are done, excluding first buttonhole at the centre front.

To make a buttonhole:- With wrong side facing, k2, k2tog, wind wool twice round needle, k2tog, k3, rib to end. On the next row: knit and purl into the two twists as before.

When the 5 buttonholes are done, continue in rib and garter stitch, still continue to decrease at the armhole edge on every 4th row until 15 sts have been decreased at this edge, and 75sts remain.

Work 3 rows straight.

Change to garter stitch over all sts,
[Editor's note: I made an adaptation here - please see "adaptations" at the end of the instructions.]
and work 2 rows straight.
[Editor's note: I lengthened the pattern at this point to create a deeper V neck - please see "adaptations" at the end of the instructions.]

With right side facing, continue in garter stitch and shape the shoulder by casting off 4sts at the beginning of next and following 4 alternate rows, then 14sts at the beginning of following 3 alternate rows.

Cast off remaining 13 stitches.

With side facing, rejoin wool to remaining sts, and work, to correspond with first shoulder, reversing the shaping.

Vestee

With white wool and No 11 needles, cast on 10 sts and knit 4 rows.

5th row: Knit, increasing 1 stitch at each end.
6th row: K4, p4, k4.
7th row: Knit.
8th row: as 6th.
9th row: K3, increase in next stitch, knit to last 4 sts, increase in next stitch, k3.

Work 3 rows straight in stocking stitch, keeping the 4sts at each end in garter-stitch throughout.

Repeat last 4 rows once more. Join in blue.

Next row (in blue, right side facing): K3, increase in next stitch, knit to last 4sts, increase in next stitch, k3.

Work 3 rows straight in blue with border as before.
Rejoin white.
Now continue in stocking-stitch in stripes of 6 rows white and 4 rows blue with border as before and increasing 1 stitch inside the border on next and every following 4th row until there are 42 stitches.

Next row (in white): K4, p34, k4.

This completes the 5th white stripe.

Break white, join in blue and knit 5 rows.
Cast off.

To Make Up

Press work very lightly taking care not to spoil rib.
Join shoulders with a backstitch seam.

Sleeve Edgings: With right side facing, No 11 needles and contrast yarn, pick up and knit 92 sts between markers on back and front.
[Editor's note: The number of stitches you pick up depends on how large you want to make the armhole; I advise you to pin the side seams together and try on the top before finally deciding where the markers should be.
Once decided, a
s a general rule, pick up sts on 2 out of every 3 row ends on rib section and pick up every alternate row end on the garter stitch section.]

Knit 8 rows; cast off.

Join side seams.
Neaten buttonholes with matching sewing cotton.
Press vestee, then sew on buttons to match buttonholes.
Press seams.

Materials

Original materials called for: 7 ozs Patons Beehive Fingering 3-ply in main shade (powder blue) and a small ball (less than 1oz) in white.

A pair each Nos 11 and 12 (3mm and 2¾mm) needles.

11 small white buttons.

My version is knitted in 5 x 50g balls of Adriafil Avantgarde 3 ply using Nos 13 and 12 needles.

Tension

Ribbing is difficult to measure, but it is equivalent to a basic tension of 8 sts and 10 rows to an inch over stocking-stitch on No 11 needles.

Size matters

Original sized for bust 34-36 inches;
length from top of shoulders: 21 inches.

See "adapting the size".

Abbreviations

m1p: pick up loop lying before next stitch and purl into back of it.

m1k: pick up loop lying before next stitch and knit into back of it.

A word on the wool.

I have so many words on the wool I am not sure where to begin.
I started to knit this sweater using the Adriafil Avantgarde 3 ply. I bought 4 x 50g balls at 220 metres each but the back took more than 2 balls and so the project was on hold; I finally acquired another ball in a different dye lot, hence the huge delay in publishing as I had to make adaptations to blend it in. Luckily this will not be the case for you.

Jamiesons have an excellent range of colours in "2ply laceweight" which states: This yarn can be used in vintage patterns which call for "3ply yarns".

I can suggest looking at Susan Crawford's new Excelana range from John Arbon textiles. I have great hopes of this venture solving my knitting issues in the future: 4 ply available now and hopefully 3 ply in the future.

I have not yet experimented with either of these two latter yarns.

Disclaimer
(well...almost)

In transposing any pattern it is always a risk that errors will be introduced, in spite of dedicated proof reading.
If you have any problems with this pattern, please and I will try and assist.

Adaptations:

I made quite a few casual adaptations to "improve" the design for my figure - but as usual this had a knock-on effect in some other areas - so I describe what happened here.

Adaptation 1: When changing to garter stitch the ribbing pulls at the garter stitch section and causes puckering. You can see this happening slightly in the original photo. To compensate for this, on the first knit row of the garter stitch (right side facing) I knitted across the 4 knit sts and and the k2tog for the 2 purl sts. This changed the number of sts for the casting off.

So for the Front sections I worked k2tog 10 times on the p2 sections of the rib; I then shaped the shoulder by casting off 3sts at the beginning of next and following 4 alternate rows, then 13sts at the beginning of the following 2 alternate rows, then 12sts at the beginning the final 2 alternate rows.

For the Back, I worked it slightly differently without decreasing across the back of the neck. So I worked k2tog across the first 11 p2 sections of the rib, but incorporated the centre 7 p2 sections into the garter stitch as k2, then k2tog across the last 11 p2 sections of the rib.
For the shoulder shaping I cast off 3 sts at beginning of next 10 rows, then 12 sts at beginning of following 4 rows.

Adaptation 2: I lengthened the garter stitch sections by about 2 inches to make the V neck lower. This was to avoid "waist boobz" (please see Kate's blog, "needled" ** on the subject).

Adding 2 inches at the shoulder, lengthens the whole sweater, so I knitted 2 inches less at the start of the sweater - as it is not overly short in the first place.

Having done this, you may find the armhole markers are (up to 2 inches) too low, so check this before you do the sleeve edging and sewing up the side seams. In my case, I have chubby little arms so wanted the armhole slightly larger in any case.

** Unlike Kate I have a large bosom with a low bust point, so need no assistance in producing waist boobz - in fact I seek to reverse the effect.
Plunging V necks are very flattering for large busts - and this pattern has the advantage that the vestee ensures that the plunge does not lack the appropriate level of decorum for daywear - not that large and revealing bosoms ever seemed a problem in the 1950s - though thinking again I am probably way past the age when women were allowed out to flaunt their figures.

See Kate's lovely design "by-the-sea-shore" where she reverses the "waist boob" effect. It is also an off-kilter nautical design in a way so sits nicely with this entry.

Adapting the size:

The original pattern is for one size: 34-36 inch bust. The sweater is designed to fit snugly, but is ribbed which allows some leeway on the exact fit.

It is designed to be knitted in 3 ply at about 30 sts to 4 inches. I have used a 4 ply at about 28 sts to 4 inches, and the size would have been acceptable for me - a UK size 12 or "medium".

I think this may be suitable for using a thicker yarn with larger needles and getting a larger result.

April 2011

Gloves for a Lady I

LadyGloves1.jpg

A very early pattern to make these charming light weight gloves using fine 2ply yarn. You could also use a mercerised cotton for summer gloves, but (as the pattern encourages) check your tension carefully.
Note that these glove patterns are very elderly and thus you have to make allowances in the instructions. They talk about "plain knitting" and they don't give a lot of explanation about how you turn the work and pick up the stitches. Generally they expect you to fend for yourself; I have not tested this pattern so if you would like to double check what I have written or if you want a second opinion I'm happy to try and help.

Instructions:

The gloves are worked in blackberry stitch (also known as trinity stitch) on 2 needles. The nature of this stitch means that the number of stitches can vary from row to row; this can seem a little puzzling as it means the instructions for the right and left hand gloves seem not to be symmetrical - but they should work out OK.

Right-hand Glove:

Using two Needles, cast on 54 sts.

1st row: k1, purl to last stitch, k1.
2nd row: k1, * p3tog; k1p1k1 in next stitch; repeat from * to last st, k1.
3rd row: k1, purl to last stitch, k1.
4th row: k1, * k1p1k1 in next stitch; p3tog; repeat from * to last st, k1.

These 4 rows form the basic pattern.

Repeat from 1st to 4th row five times.

The Thumb

Next row: k1, p32, k1. Turn
Next row: k1, (p3tog; k1p1k1 in next stitch) twice, p3tog, cast on 12 sts, turn.

Then proceed as follows:-

1st row: k1, p20, k1.
2nd row: k1; (k1p1k1 in next stitch; p3tog) five times; k1.
3rd row: k1, p20, k1.
4th row: k1; (p3tog; k1p1k1 in next stitch) five times; k1.

Repeat 1st to 4th row three times.

Then proceed as follows:-

1st row: k1, (k1, k2togtbl, k4, k2tog, k1) twice, k1.
2nd row: k1, p16, k1.
3rd row: k1, (k1, k2togtbl, k2, k2tog, k1) twice, k1.

Break off wool and run end through remaining sts.
Draw up and fasten off securely.


With wrong side facing, using the needle containing the remaining 22 sts, join in wool and knit up 12 sts from 12 cast-on sts at the base of the thumb; p19, k1 across remaining sts.
Commencing at 2nd row, repeat pattern on these 54 sts., until work measures 4 ins, from commencement, ending with 2nd row of pattern.

First Finger

Next row: k1, p34, increase once in next stitch. Turn.
Next row: k1, (p3tog; k1p1k1 in next stitch) four times, cast on 2sts. Turn.

Then proceed as follows:-

1st row: k1, p17, k1.
2nd row: k1; (k1p1k1 in next stitch; p3tog) four times; k1p1k1 in next stitch; k1.
3rd row: k1, p19, k1.
4th row: k1; (p3tog; k1p1k1 in next stitch) four times; p3tog; k1.

Repeat from 1st to 4th row four times, then 1st and 2nd rows once, decreasing one stitch in last row.

Then proceed as follows:-

1st row: (k1, k2togtbl, k4, k2tog, k1) twice.
2nd row: k1, p14, k1.
3rd row: (k1, k2togtbl, k2, k2tog, k1) twice,

Finish off as given for Thumb.

Second Finger

With right side of work facing, join in wool and knit up 4 sts. from 2 cast-on sts. at base of First Finger, p5, k1. Turn.

Next row: k1, (k1p1k1 in next stitch; p3tog) four times, cast on 4sts. Turn.

Then proceed as follows:-

1st row: k1, p19, k1.
2nd row: k1; (p3tog; k1p1k1 in next stitch) four times; p3tog; k1.
3rd row: k1, p17, k1.
4th row: k1; (k1p1k1 in next stitch; p3tog) four times; k1p1k1 in next stitch; k1.

Repeat from 1st to 4th row five times, then 1st and 2nd rows once, increasing one stitch in last row.
Decrease and finish off as given for First Finger.

Third Finger

With right side of work facing, join in wool and knit up 5sts. from 4 cast-on sts. at base of Second Finger, p5, increase in the next stitch. Turn.

Next row: k1, (p3tog; k1p1k1 in next stitch) three times, p3tog, p1; cast on 4sts. Turn.

Then work exactly as given for First Finger.

Fourth Finger

With right side of work facing, join in wool and knit up 4 sts. from 4 cast-on sts. at base of Third Finger, p5, k1.

Then proceed as follows:-

1st row: k1; (k1p1k1 in next stitch; p3tog) four times; k1.
2nd row: k1, p16, k1.
3rd row: k1; (p3tog; k1p1k1 in next stitch) four times; k1.
4th row: k1, p16, k1.

Repeat from 1st to 4th row three times, then 1st row once.

Then proceed as follows:-

1st row: (k1, k2togtbl, k3, k2tog, k1) twice.
2nd row: k1, p12, k1.
3rd row: (k1, k2togtbl, k1, k2tog, k1) twice.

Finish off as given for First Finger.

The Frill

With wrong side of work facing, pick up 52 sts, from cast-on edge of glove. Join in wool.

1st row: k1, * k2tog; repeat from * to last st, k1.

Work 3 rows in plain knitting.
[Editor's note: I think they may mean garter stitch here - every row knitted.]

5th row: k1, * increase once in next st, repeat from * to last st, k1. [There should now be 52 sts. on needle].
6th row: k1, * k2, p1, won, repeat from * to last 3 sts, k3.
7th row: k1, * p2, k2, repeat from* to last 3 sts, p2, k1.
8th row: k1, * k2, p2, won, repeat from * to last 3 sts, k3.
9th row: k1, * p2, k3, repeat from* to last 3 sts, p2, k1.
10th row: k1, * k2, p3, won, repeat from * to last 3 sts, k3.
11th row: k1, * p2, k4, repeat from* to last 3 sts, p2, k1.
12th row: k1, * k2, p4, won, repeat from * to last 3 sts, k3.

Continue in this manner until there are 164 sts. on needle.

Next row: k1, * p2, k8, repeat from* to last 3 sts, p2, k1.

Cast off knitways.

Left-hand Glove:

Using two Needles, cast on 54 sts.

Work exactly as given for Right-hand Glove until Thumb is reached.

The Thumb

Next row: k1, p31, cast on 11 sts. Turn.
Next row: k1; (k1p1k1 in next stitch; p3tog) five times; k1. Turn

Then proceed as follows:-

1st row: k1, p20, k1.
2nd row: k1; (p3tog; k1p1k1 in next stitch) five times; k1.
3rd row: k1, p20, k1.
4th row: k1; (k1p1k1 in next stitch; p3tog) five times; k1.

Repeat 1st to 4th row three times.

Decrease and finish off as given for the Thumb of Right-hand Glove.

Using needle containing 21 sts, join in wool and knit up 11 stitches from 11 cast-on sts, at the base of the thumb; p21, k1 across remaining stitches.

Continue in pattern on these 54 sts until wont measures 4 ins from commencement, ending with 2nd row of pattern.

First Finger

Next row: k1, p35, cast on 5 sts. Turn.
Next row: k1, (p3tog; k1p1k1 in next stitch) four times, p3tog, k1. Turn.

Then work exactly is given for First Finger of of Right-hand Glove.

Second Finger

With right side of work facing, join in wool and knit up 4 sts. from 5 cast-on sts. at base of First Finger, p5, cast on 4sts. Turn.

Next row: k1, (p3tog; k1p1k1 in next stitch) four times, p3tog; k1. Turn.

Then proceed as follows:-

1st row: k1, p17, k1.
2nd row: k1; (k1p1k1 in next stitch; p3tog) four times; k1p1k1 in next stitch; k1.
3rd row: k1, p19, k1.
4th row: k1; (p3tog; k1p1k1 in next stitch) four times; p3tog; k1.

Repeat from 1st to 4th row five times, then 1st and 2nd rows once, decreasing one stitch at the end of the last row.
Decrease and finish off as given for First Finger of Right-hand Glove.

Third Finger

With right side of work facing, join in wool and knit up 5sts. from 4 cast-on sts. at base of Second Finger, p6, cast on 3sts. Turn.

Next row: k1, (k1p1k1 in next stitch; p3tog) four times, k1p1k1 in next stitch; k1. Turn.

Then proceed as follows:-

1st row: k1, p19, k1.
2nd row: k1; (p3tog; k1p1k1 in next stitch) four times; p3tog; k1.
3rd row: k1, p17, k1.
4th row: k1; (k1p1k1 in next stitch; p3tog) four times; k1p1k1 in next stitch; k1.

Repeat from 1st to 4th row four times, then 1st and 2nd rows once, increasing one stitch in last row.
Decrease and finish off as given for First Finger of Right-hand Glove.

Fourth Finger

With right side of work facing, join in wool and knit up 4 sts. from 3 cast-on sts. at base of Third Finger, p6, k1.

Then work exactly as given for Fourth Finger of Right-hand Glove.

Work the Frill as given for Right-hand Glove.

Making Up:

With a damp cloth and hot iron press very lightly.
Sew up Thumb, Finger and Side seams, by sewing together corresponding ridges (formed by the stitch knitted at each end of every row).

Materials

1 oz Patons Beehive Fingering 2ply.

One pair of No 12 (2¾ mm) needles.

Tension

3 patterns (12 sts) to 1 inch. Adjust your needle size to obtain the right tension.

Approximately 36sts 4 inches on No 12 needles over stocking stitch.

Size matters

Width all round above thumb, 5½ ins.
Length from frill to tip of middle finger 8½ ins.

[Editor's note: 5½ins seems a bit small? You may find that despite my notes on the wool weight below that you could use a "4ply" yarn with a larger gauge and/or adjust the needles to get the fit you need. Measure your hand and do a swatch....always Good Advice!]

Abbreviations

won: wool over needle. Makes an extra stitch which forms a small pattern hole when knitted on the next row.

p3tog: purl 3 stitches together (decrease 2)

k1p1k1: knit and purl into front, then knit into back of next stitch (increase 2)

k2tog: knit 2 stitches together (decrease).

k2togtbl: knit 2 stitches together through back loops or "ssk" (slip slip knit) is a method of knitting 2 stitches together but into the backs of the stitches rather than the usual "k2tog" which knits into the fronts.

A word on the wool

Although it may be a literal 2ply, I think the stated tension implies it is more like a 3 ply weight.

Throughout this site I state that it's hard to get 3ply yarns these days - and now I find Jamieson's have a different web address (now corrected on my links I hope) and a range of yarns that is new to me.

The yarns are properly described as to the number of strands plied together, (eg "2ply jumper weight"), but also helpfully tell you what the wool weight is equivalent to.

So they have an excellent range of colours in "2ply laceweight" which states: This yarn can be used in vintage patterns which call for "3ply yarns". I really wish I had discovered this for some of my other projects.

They also have a "cobweb lace" which might be a traditional 2 ply weight.

I can't wait to experiment.

Disclaimer
(well...almost)

In transposing any patterns it is always a risk that errors will be introduced, in spite of dedicated proof reading.
If you have any problems with this pattern, please and I will try and assist

Gloves for a Lady II

LadyGloves2.jpg

From the same early pattern source as Gloves for a Lady I - slightly less lacy but still an open-work light weight design using fine yarn.
Note that these glove patterns are very elderly and thus you have to make allowances in the instructions. They talk about "plain knitting" and they don't give a lot of explanation about how you turn the work and pick up the stitches. Generally they expect you to fend for yourself; I have not tested this pattern so if you would like to double check what I have written or if you want a second opinion I'm happy to try and help.

Instructions:

The gloves are worked in an openwork ladder stitch created by working "yarn over needle" or eyelets on every row.
It reminds me of string-vest patterns from the 1960s (very healthy) - but don't let that put you off...

Right-hand Glove:

Using two Needles, cast on 80 sts

Work 2 rows in plain knitting.
3rd row: k1, * p1, won, k2tog; repeat from * to last st, k1.
Repeat this row five times.
9th row: * k15, k2tog, k3tog; repeat from * to end of row.
Work 3 rows in plain knitting.
Repeat 3rd row six times.
19th row: * k12, k2tog, k3tog; repeat from * to end of row.
Work 3 rows in plain knitting.
Repeat 3rd row six times.
29th row: k2, p1, k1, p1, k2tog, * (p1, k1) twice, p1, k2tog; repeat from * to end of row.
30th row: k2, * p1, k1; repeat from * to end of row.

Repeat 30th row 6 times, increasing 2 sts in last row.

Repeat 3rd row thirty-two times.

The Thumb

Next row: k1, (p1, won, k2tog) eleven times; k1. Turn
Next row: k1, (p1, won, k2tog) three times; k1; cast on 10 sts loosely. Turn.

Working on these 20 sts, repeat 3rd row twenty-two times (length of
Thumb and Fingers may be varied to suit individual requirements).

Then proceed as follows:-

1st row: knit plain.
2nd row: k1, purl to the last stitch, k1.
3rd row: (k3, k2tog, k2togtbl, k3) twice.
4th row: as second row.
5th row: (k2, k2tog, k2togtbl, k2) twice.

Break off wool and run end through remaining stitches.
Draw up and fasten off securely.


With right side facing, using the needle containing the remaining 25 sts, join in wool and knit up 10 sts from 10 cast-on sts at the base of the Thumb; wfwd, k2tog, (p1, won, k2 tog) four times, k1, across remaining 15 stitches.

Working on these 50 sts, repeat 3rd row of main pattern twenty-five times.

First Finger

Next row: k1, (p1, won, k2tog) ten times; k1. Turn
Next row: k1, (p1, won, k2tog) four times; p1, cast on 3 sts. Turn.

Working on these 17 sts, repeat 3rd row of main pattern twenty-five times.

Then proceed as follows:-

1st row: k14, k2tog, k1.
2nd row: k1, purl to the last stitch, k1.
3rd row: (k1, k2togtbl, k3, k2tog) twice.
4th row: as second row.
5th row: (k1, k2togtbl, k1, k2tog) twice.

Break off wool and run end through remaining stitches.
Draw up and fasten off securely.

Second Finger

With right side of work facing, join in wool and knit up 3 sts from 3 cast-on sts at base of First Finger, k2tog, p1, won, k2tog, k1. Turn.

Next row: k1, (p1, won, k2tog) four times, p1, cast on 3sts. Turn.

Working on these 17 sts, repeat 3rd row of main pattern thirty times. Decrease and finish off as given for First Finger.

Third Finger

With right side of work facing, join in wool and knit up 3 sts from 3 cast-on sts at base of Second Finger, k2tog, p1, won, k2tog, k1. Turn.

Next row: k1, (p1, won, k2tog) four times, p1, cast on 3sts. Turn.

Working on these 17 sts, repeat 3rd row of main pattern twenty-eight times. Decrease and finish off as given for First Finger.

Fourth Finger

With right side of work facing, join in wool and knit up 3 sts from 3 cast-on sts at base of Third Finger, k2tog, p1, won, k2tog, k1. Turn.

Next row: k1, (p1, won, k2tog) four times, k1, cast on 3sts. Turn.

Working on these 14 sts, repeat 3rd row of main pattern eighteen times.

Then proceed as follows:-

1st row: knit plain.
2nd row: k1, purl to the last stitch, k1.
3rd row: (k1, k2togtbl, k2, k2tog) twice.
4th row: as second row.
5th row: (k1, k2togtbl, k2tog) twice.

Finish off as given for First Finger.

Left-hand Glove:

Cast on 80 sts and work exactly as given for Right-hand Glove until Thumb is reached.

The Thumb

Next row: k1, (p1, won, k2tog) eight times, p1, cast on 9 sts. Turn.
Next row: k1, (p1, won, k2tog) six times, k1. Turn.

Work on these 20 sts exactly as given for Thumb of Right-hand Glove.

Using needle containing 15sts, join in wool and knit up 11 stitches from 9 cast-on sts, at the base of the thumb; wfwd, k2tog, (p1,won, k2tog) 7 times, k1, across remaining 24 sts.

Working on these 50 sts, repeat 3rd row of main pattern twenty-five times.

First Finger

Next row: k1, (p1, won, k2tog) ten times; p1, cast on 3 sts. Turn
Next row: k1, (p1, won, k2tog) five times; k1, Turn.

Then work on these 17 sts, exactly is given for First Finger of Right-hand Glove.

Second Finger

With right side of work facing, join in wool and knit up 3sts from 3 cast-on sts at base of First Finger; k2tog, p1, won, k2tog, p1, cast on 3sts. Turn.

Next row: k1, (p1, won, k2tog) five times; k1, Turn.

Then work on these 17 sts, exactly is given for Second Finger of Right-hand Glove.

Third Finger

With right side of work facing, join in wool and knit up 3sts from 3 cast-on sts at base of Second Finger; k2tog, p1, won, k2tog, p1, cast on 3sts. Turn.

Next row: k1, (p1, won, k2tog) five times; k1, Turn.

Then work on these 17 sts, exactly is given for Third Finger of Right-hand Glove.

Fourth Finger

With right side of work facing, join in wool and knit up 3sts from 3 cast-on sts at base of Third Finger; k2tog, p1, won, k2tog, k1. Turn.

Next row: k1, (p1, won, k2tog) four times; k1, Turn.

Then work on these 14 sts, exactly is given for Fourth Finger of Right-hand Glove.

Work the Frill as given for Right-hand Glove.

Making Up:

With a damp cloth and hot iron press very lightly.
Sew up Thumb, Finger and Side seams, by sewing together corresponding ridges (formed by the stitch knitted at each end of every row).

Materials

1 oz Patons Beehive Fingering 2ply.

One pair of No 13 (2¼ mm) needles.

Tension

10 sts to 1 inch over pattern (not stretched).
Adjust your needle size to obtain the right tension.

Approximately 36sts 4 inches on No 12 needles over stocking stitch.

Size matters

Width all round above thumb, 5 ins.
Length from frill to tip of middle finger 9 ins.

[Editor's note: 5ins seems a bit small? You may find that despite my notes on the wool weight below that you could use a "4ply" yarn with a larger gauge and/or adjust the needles to get the fit you need. Measure your hand and do a swatch....always Good Advice!]

Abbreviations

won/wfwd: wool over needle/wool forward. Makes an extra stitch which forms a small pattern hole when knitted on the next row.

k2tog: knit 2 stitches together (decrease).

k2togtbl: knit 2 stitches together through back loops or "ssk" (slip slip knit) is a method of knitting 2 stitches together but into the backs of the stitches rather than the usual "k2tog" which knits into the fronts.

A word on the wool

Although it may be a literal 2ply, I think the stated tension implies it is more like a 3 ply weight.

Throughout this site I state that it's hard to get 3ply yarns these days - and now I find Jamieson's have a different web address (now corrected on my links I hope) and a range of yarns that is new to me.

The yarns are properly described as to the number of strands plied together, (eg "2ply jumper weight"), but also helpfully tell you what the wool weight is equivalent to.

So they have an excellent range of colours in "2ply laceweight" which states: This yarn can be used in vintage patterns which call for "3ply yarns". I really wish I had discovered this for some of my other projects.

They also have a "cobweb lace" which might be a traditional 2 ply weight.

I can't wait to experiment.

Disclaimer
(well...almost)

In transposing any patterns it is always a risk that errors will be introduced, in spite of dedicated proof reading.
If you have any problems with this pattern, please and I will try and assist

March 2011

Paris Line Cardigan

ParisLine1.jpg

Here we have Jill modeling her charming version of the Paris Line Cardigan from January 1955. It is so successful and comfortable to wear she is planning a second version for the summer.

Instructions.

Figures in brackets refer to larger sizes; where only one figure is given, this refers to all sizes.

The Back

With No 9 needles cast on 106 (118) {126} stitches and work 10 rows in k2/p2 rib, starting and ending k2 on the first row, and increasing 7 (7) {11} stitches evenly across on last row by working twice into every 14th (16th) {11th} stitch. [113 (125) {137} sts]
Change to No 8 needles and pattern.

1st row (right side facing): k1, * p3, k1; repeat from * to end.
2nd row: k4, * p1, k3; repeat from * to last stitch, k1.
3rd row: as 1st row
4th row: as 2nd row
5th row: k1, p1, * k1. p3; repeat from * to last 3 sts., k1, p1, k1.
6th row: k2, * p1, k3; repeat from * to last 3 sts.. p1, k2.
7th row: as 5th row
8th row: as 6th row

These 8 rows form the pattern.
Continue straight in pattern until back measures 14½ (15) {15} inches at centre.
Then with right side facing, shape armholes by casting off 6 (8) {8} stitches at the beginning of the next 2 rows, then k2tog at each end of next and every following alternate row until 89 (97) {105} stitches remain. Work straight until back measures 17 (17½) {17½} inches, increasing 5 (5) {5} sts. evenly across on last row: [94 (102) {110} sts]

Next row (right side facing): * k2, p2; repeat from * to last 2 sts., k2.
Next row: * p2, k2; repeat from * to last 2 sts., p2.

Continue straight in rib until back measures 23 (23½) {23½} inches.
With right side facing, shape shoulders by casting off 10 (11) {11} sts. at beginning of next 6 rows; cast off remaining stitches loosely.

Pocket Linings (make 2)

With No. 8 needles, cast on 26 (26) {30} sts. and work 4½ () {} inches stocking stitch ending with a purl row; leave stitches on a spare needle or stitch holder.
Work another piece the same.

Left Front

Left. With No. 9 needles, cast on 63 (71) {79} sts. and work in rib as follows:
1st row: * k2, p2; repeat from * to last 3 sts, k3.
2nd row: k1, p2, * k2, p2; repeat from * to end.

Repeat these 2 rows 4 times more, and on last row increase 2 sts. as follows:
Increase row: k1, (p2, k2) 7 times, increase in next stitch, rib to last 4 sts, increase in next stitch, rib 3: [65 (73) {81} sts]

Change to No. 8 needles and work as follows:

1st row (right side facing): k1; (p3, k1) 10 (12) {14} times; p1; (k2, p2) 5 times; k3.
2nd row: k1; (p2, k2) 5 times; p2, k1; (p1, k3) 10 (12) {14} times; k1.
3rd row: as 1st row
4th row: as 2nd row
5th row: k1, p1; (k1, p3) 10 (12) {14} times; (k2, p2) 5 times; k3.
6th row: k1; (p2, k2) 5 times; p2; (k3, p1) 10 (12) {14} times; k2.
7th row: as 5th row
8th row: as 6th row

Repeat these 8 rows until work measures 5 (5) {5} inches from start.

Next row (insert pocket): Pattern 8 (12) {14}; (k2, p2) 6 (6) {7}times; k2; pattern 8 (12) {14}; rib 23.
Next row: rib 23; pattern 8 (12) {14}; (p2, k2) 6 (6) {7} times; p2; pattern 8 (12) {14}.
Repeat last 2 rows twice more, then 1st row once.

Next row (wrong side facing): rib 23; pattern 8 (12) {14}; cast off 26 (26) {30} in rib; pattern 8 (12) {14}.

Next row: pattern 8 (12) {14}; pattern across 26 (26) {30} stitches of one of the pocket linings, in place of those cast off; pattern 8 (12) {14}; rib 23.

Continue in pattern with 23 sts. at front edge in rib until front measures same as back at side edge and ending with same pattern row.

Then with right side facing, shape armholes by casting off 6 (8) {8} stitches at the beginning of the next row, then k2tog at armhole edge on alternate rows until 53 (59) {65} stitches remain. Work straight until back measures 17 (17½) {17½} inches, increasing 6 (4) {2} sts. evenly across on patterned part of last row: [59 (63) {67} sts]

Now continue in rib over all stitches until front matches back, then with right side facing, shape shoulder by casting off 10 (11) {11} stitches at the beginning of the next and following 2 alternate rows, armhole edge; leave remaining stitches on a spare needle for the time being.
[Editor's note: You continue on these stitches later when you make the collar.]

Right Front

With No. 9 needles, cast on 63 (71) {79} sts. and work in rib as follows:
1st row (right side facing): k3, * p2, k2; repeat from * to end.
2nd row: * p2, k2; repeat from * to last 3 sts; p2, k1.

Repeat these 2 rows once more.
Make buttonhole over the next two rows thus: Rib 5, cast off 3, rib to end and back, casting on 3 over those cast off.
Work a further 4 rows in rib, increasing 2 sts on last row as follows:

Increase row: rib 3, increase in next stitch, rib to last 28sts, increase in next stitch, rib to end: [65 (73) {81} sts]

Change to No. 8 needles and work as follows:

Next row: k3, (p2, k2) 5 times; p1; (k1, p3) 10 (12) {14} times; k1.
Next row: k1, (k3, p1) 10 (12) {14} times; k1, p2; (k2, p2) 5 times; k1.

Finish to correspond with left front, reversing all shapings and making 4 more buttonholes as before up front edge, the last one to come about 1 inch below start of yoke ribbing, and the remaining 3 evenly spaced between. Mark position of buttons on left front with pins, then work holes to correspond.

The first row of pocket top will read:
With right side facing, rib 23, pattern 8 (12) {14}; (k2, p2) 6 (6) {7} times; k2; pattern 8 (12) {14}.

Sleeves

With No. 10 needles, cast on 54 (54) {54} sts. and work 3 inches k2/p2 rib, having a k2 at each end on the right side, and increasing 3 sts. evenly across on last row: 57 (57) {57} sts.

Change to No 8 needles and work 8 rows in pattern as for back.

Continue in pattern and shape sides by increasing 1 stitch at each end of 7th and every following 8th row until there are 73 (73) {73}sts, then on every following 4th row until there are 83 (83) {83}stitches, taking the extra stitches into pattern as they are made.

Work straight until sleeve measures 18 inches or required length.

With right side facing, shape top by casting off 4 sts. at beginning of next 2 rows, then k2tog at the beginning of every row until 45 (45) {45} sts. remain, then at each end of every row until 25 (25) {25} sts. remain.

Cast off.

To Make Up

Press parts lightly on wrong side under a damp cloth.
Join shoulder seams.

Roll Collar: On the left front, continue in rib on the remaining 29 (30) {34} sts. working short rows to provide shaping thus:

** Work ½ (½) {1} inch in rib, ending at the front edge.
Next row (wrong side facing): rib to last 9 sts; turn; rib to end.
Repeat from ** twice more.
Continue straight in rib until piece fits round to centre back of neck; cast off in rib.
Then on the rightfront. Work as for left but with right instead of wrong side facing when shaping.

Join side and sleeve seams; insert sleeves.
Join collar very neatly, matching ribs carefully; sew along back of neck.

Catch down pocket linings.
Sew on buttons.
Work a row of double crochet, then a row of slip-stitches up front edge and round back of neck.
Press seams.

Materials

Original uses Patons Double Quick Knitting,
in Jade Green.
21 (22) {23} ozs

[Jill used 11 x 50g balls Phildar Partner 3.5]

A pair each of Nos
10 (3¼mm), 9 (3¾mm) and 8 (4mm) needles.
One No 11 (3mm) crochet hook

5 buttons.

Tension

22sts x 30 rows to 4 ins in stocking stitch on 4mm needles.

Size matters

The pattern is given in 3 sizes to fit bust:
33-34 (35-36) {37-38} inches;
length from top of shoulders, 23 (23½) {23½} inches; and
sleeve seam, 18 (18) {18} inches.

Abbreviations

Increase: increase by knitting into front and back of the next stitch.
k2tog: (decrease) knit 2 sts together.
p2tog: (decrease) purl 2 sts together.

dc: double crochet.
[Editor's note: Remember this is English double crochet where dc is equivalent to US single crochet - see "Terminology" in the side bar.]

A word on the wool.

The original cardigan was knitted in a vintage Bainin yarn.

Jill used Phildar Partner 3.5 (50% Nylon / 25% Wool / 25% Acrylic: 111m per 50g ball).

Jill's plan for the summer version: Phildar Cabotine (55% Cotton / 45% Acrylic: 124 metres per 50g ball)

Disclaimer
(well...almost)

In transposing any pattern it is always a risk that errors will be introduced, in spite of dedicated proof reading.
If you have any problems with this pattern, please and I will try and assist.

Stitch Detail

February 2011

Jester Socks

JesterSocks1.jpg

These socks were adapted from a wonderful elderly pattern, and were lots of fun to knit, (and wear!). They make me think of those dusty Jester colours though - mustard yellow, a dull brick red, a saddened teal...

Instructions.

Cast on 128 stitches and start working in garter stitch - knit 4 rows.

5th row: increase in first stitch, k62, increase in next stitch, increase in next stitch, K62, increase in last stitch.
6th row and every alternate row up to row 13: Knit
7th row: increase in first stitch, k64, increase in next stitch, increase in next stitch, K64, increase in last stitch.
9th row: increase in first stitch, k66, increase in next stitch, increase in next stitch, K66, increase in last stitch.
11th row: increase in first stitch, k68, increase in next stitch, increase in next stitch, K68, increase in last stitch.
13th row: increase in first stitch, k70, increase in next stitch, increase in next stitch, K66, increase in last stitch.

Knit another 13 rows on these 148 stitches.
Now proceed in stocking stitch and shape by working short rows as follows:
27th row: K72, k2togtbl, k2tog, k40, turn
28th row: P39, p2tog, p2togtbl, p39, turn
29th row: K38, k2togtbl, k2tog, k40, turn
30th row: P39, p2tog, p2togtbl, p39, turn

Repeat 29th and 30th rows 14 times, thus completing 58th row.

59th row: K38, k2togtbl, k2tog, k40.
60th row: P39, p2tog, p2togtbl, p39.
61st row: K38, k2togtbl, k2tog, k38.
62nd row: P37, p2tog, p2togtbl, p37.
63rd row: K36, k2togtbl, k2tog, k36.
64th row: P35, p2tog, p2togtbl, p35.
65th row: K34, k2togtbl, k2tog, k34.
66th row: P33, p2tog, p2togtbl, p33.
67th row: K32, k2togtbl, k2tog, k32.
68th row: P31, p2tog, p2togtbl, p31.

Make slots for ribbon on next row thus:
Slot row: K1, (k2tog, wfd, k2) to last 3 sts, k2tog, wfd, k1.
Next row: Purl.
Break off wool.
Now work the points as follows:
With right side of work facing you slip the first 11 sts onto a piece of thread; join wool to next stitch, then k1, (p1, k1) 10 times, turn, leaving the remaining sts. on a spare needle, continue only on these 21 sts, as follows:

2nd row (first point): P1, (k1, p1) 10 times.

Continue in rib but decrease 1 stitch at each ent of the next row and every alternate row until 3 sts. remain.
Knit 3 together and fasten off.

With right side of work facing you. join wool to inner end of sts on spare needle, then k1, (p1, k1) 10 times, turn, leaving the remaining 11 sts on the spare needle.
Now work as first point, starting with its 2nd row.

Join underfoot and back seam.

With right side of work facing you, join wool to inner end of sts on spare needle. (k1, p1) 5 times, then knit last stitch on spare needle together with first stitch on on the thread, after which (p1, k1) 5 times over remaining sts on thread.
Now work as first point, starting with its 2nd row.

Make another sock in the same way.

Run ribbon through slots at ankles.

Cuff Variation

You can see from the photo below that I added another layer of points to my sock.
I cast on 64 sts and worked 6 rows in rib. I then worked the points in moss stitch as given for the points on the main sock, but I decreased on every 3rd row instead of every alternate row to make the points longer. When I had finished I sewed the cuff to the inside of the sock matching the points on the second cuff to the gaps between the points on the sock. I attached the cuff just below the eyelet row.

JesterSocks3.jpg

Materials

2 x 50g balls 4ply
I used Cygnet 4ply colour 2041 (yellow)

A pair each of No
11 (3mm) needles.

A yard of narrow ribbon.
(I used a twisted cord of yarn).

Tension

32sts x 40 rows to 4 ins over stocking stitch.

Size matters

Foot length about 9 inches, length down back about 5 inches.

Abbreviations

Increase: increase by knitting into front and back of the next stitch.
k2tog: (decrease) knit 2 sts together.
tbl: through back loops (also known as ssk).
p2tog: (decrease) purl 2 sts together.
wfd: "wool forward": make a stitch by bringing the wool to the front of the work and then passing the yarn over the needle when you make the next stitch.
sl1: slip one stitch.
psso: pass the slipped stitch(es) over.

A word on the wool.

The original socks were knitted in "Wendy Family Wool 4ply". I chose to use Cygnet yarn not only because it is a good (75/25) blend for socks but also I wanted the lovely bright "Jester" yellow - and I was surprised that in the vast array of available yarns in my local John Lewis, I could not find any true yellows in any weight of wool - obviously not fashionable currently. The "brights" seem to be limited to cotton blends, which in my experience are not good for socks.

Disclaimer
(well...almost)

In transposing any pattern it is always a risk that errors will be introduced, in spite of dedicated proof reading.
If you have any problems with this pattern, please and I will try and assist.

January 2011

Life of Ease

LivingAran2.jpg

Well if you don't actually have the life of ease, this might help you attain it - firstly with the relaxation of knitting it, and then in the casual dress code it will encourage once completed.
This pattern is straight from the 1970s, but does seem to have that timeless quality* about it.
The Magpie Aran yarn is exactly the nutty brown tweed colour I always imagined for the cardigan, (yellow/cream Arans are not a good colour for me). However Magpie, though a very robust wool, soft it is not, and I think this design would be great in a lovely soft airy yarn; luckily there is plenty of choice these days in this kind of wool weight.

* I do admit that I hate that word "timeless"- it seems to be an unwritten rule that once said it will ensure the item to which it applies becomes dated and laughable even more quickly than other items of the same vintage. However, in this case I think it really does apply, and (if it's any comfort) I don't think it was high fashion even in the 1970s, which is probably why it took so long for me to be inspired to finally make it up.

Instructions.

Figures in brackets refer to larger sizes; where only one figure is given, this refers to all sizes.

The Back

With No 9 needles cast on 98 (104 : 110: 116 : 122) sts.
1st row: P2, (kb1, p2) to end.
2nd row: K2, (pbl, k2) to end.

Repeat the last 2 rows 3 times more, then 1st row once, increasing 1st at both ends of last row on lst, 3rd and 5th sizes.

Increase row: K8 (10 : 14: 16: 20), kfb *p7, (k2, pfb) 6 times, k2, p7 *; (k1, p1, then k1, p1 in next st) 4 times, k2; repeat from * to *, kfb, knit to end. [118 (122 : 130 : 134: 142) sts]

Change to No 7 needles and pattern as follows:

1st row: (kb1, p1) 5 (6 : 8 : 9 : 11) times; * k7, (p2, k2) 6 times, p2. k7 *; p18; repeat from * to *, (p1, kb1) to end.
2nd row: k10 (12 : 16 : 18 : 22); * p7, (k2, p2) 6 times, k2, p7 *; k1, (work k1, p1, k1 into next st, p3tog) 4 times, k1; repeat from * to *; knit to end.
3rd row: (kb1, p1) 5 (6 : 8 : 9 : 11) times; * cp7, (p2, k2) 6 times, p2, cp7 *; p18; repeat from * to *; (pl, kb1) to end.
4th row: k10 (12 : 16 : 18 : 22); repeat from * to * as 2nd row; k1, (p3tog, then into next st work k1, p1, k1) 4 times, k1; repeat from * to * as 2nd row; knit end.
5th row: (kb1, p1) 5 (6 : 8 : 9 : 11) times; * k7, p2, (c6L, p2) 3 times, k7 *; p18; repeat from * to *; (p1, kb1) to end.
6th row: As 2nd row.
7th row: As 3rd row.
8th row: As 4th row
9th row: As 1st row
10th row: As 2nd row
11th row: (kb1, p1) 5 (6 : 8 : 9 : 11) times, * cp7, p2, k2, p2, (c6R, p2) twice, k2, p2, cp7 *; p18; repeat from * to *, (p1, kb1) to end.
12th row: As 4th row

These 12 rows form the pattern.

Continue in straight until work measures 20 ins, ending with right side facing for next row.

Shape Armhole:
Cast off 4 (5 : 6 : 6 : 7) sts at the beginning of the next 2 rows; then cast off 4 (5: 6: 7: 8) sts at the beginning of the following 2 rows. [100 (100 : 104 : 106 : 110) sts]

Continue straight until armhole measures 7½ (7½ : 8: 8: 9) ins, ending after a wrong-side row.


Shape Shoulder and Neck:
Cast off 8 (8 : 10 : 11: 13) sts at the beginning of the next 2 rows. Next row: Cast off 8, pattern until there are 25sts on the right-hand needle, cast off 18, pattern to end.

Continue on the last set of stitches.

Next row: Cast off 8, pattern to end.
Next row: Cast off 5, pattern to end.

Repeat the last 2 rows once more.
Cast off the remaining sts.

Join yarn to neck edge of remaining sts and work to match lst side, reversing shapings.

Pocket linings (make 2)

[Editor's note: You may note from the photograph that I omitted pockets on my cardigan - actually I think it looks best with pockets, and I plan to add them in later, but if you don't want them, simply leave out these sections.]

With No 9 needles cast on 38sts.

1st row: K2, (p2, k2) to end.
2nd row: P2, (k2, p2) to end.

Repeat the last 2 rows for 5 inches, ending after 1st row.

Next row: P3, increase in the next stitch, rib to the last 4 sts, increase in the next stitch, p3.

Leave the stitches on a spare needle or stitch holder.

The Right Front

With No 9 needles cast on 58 (61 : 64 : 67 : 70) sts.

1st row: K1, (kb1, p2) to end.
2nd row: (k2, pbl) to last st, k1.

Repeat the last 2 rows once more.

Next row (buttonhole): Rib3, cast off 3, rib to end.
Next row: Work in rib, casting on 3sts over those cast off.

Work 3 more rows in rib, increasing 1st at the end of the last row on the 1st, 3rd and 5th sizes. [59 (61 : 65 : 67 : 71) sts]

Increase row: K8 (10 : 14: 16: 20), kfb; repeat from * to * as increase row on back; (k1, p1, then k1, p1 in next st) twice, k2; turn, leaving the remaining 8 sts on a safety-pin to work the buttonhole band later.

Change to No 7 needles and continue to work on 60 (62 : 66 : 68 : 72) sts as follows:

1st row: P10; repeat from * to * as 1st row of back, then (p1, kb1) to end.
2nd row: K10 (12 : 16 : 18 : 22); repeat from * to * as 2nd row of back; k1 (work k1, p1, k1 into next st., p3tog) twice, k1.

Keeping bramble stitch and cable pattern correct, decrease 1 stitch at the end of the following 21st row, then the following 12th row.
Work 1 row.

Next row (place pocket): P10, slip the next 40 stitches on to a stitch holder or spare needle;
work across the pocket lining stitches thus: k7, rib 26, k7;
then pattern across the remaining stitches.

Continue in pattern, decreasing 1 stitch at side edge on the following 10th row. Then continue straight on the remaining 57 (59 : 63 : 65 : 69) stitches until work measures 13 inches.
Increase 1 stitch at the side edge on the next row and following 18th row.
Then continue straight until work matches back to armhole, ending at side edge.

Shape Armhole:
Cast off 4 (5 : 6 : 6 : 7) sts at the beginning of the next row, and then 4 (5 : 6 : 7 : 8) stitches on the following alternate row. Continue straight until armhole measures 5 (5 : 5½ : 5½ : 6) inches, ending at the front edge.

Shape Neck:
Cast off 9 sts at the beginning of the next row; 3 stitches on the following alternate row; and 2 stitches on the following 4 alternate rows.
Continue straight until armhole matches back to shoulder, ending at the armhole edge.

Shape Shoulder:
Cast off 8 (8 : 10 : 11: 13) stitches at the beginning of the next row, and 8 stitches on the following 2 alternate rows.
Work 1 row.
Cast off remaining 7 stitches.

The Left Front

With No 9 needles cast on 58 (61 : 64 : 67 : 70) stitches.
1st row: (P2, kb1) to last stitch, k1.
2nd row: K1, (pbl, k2) to end.

Repeat the last 2 rows 3 times more, then 1st row once, increasing 1st at the beginning of the last row on the lst, 3rd, and 5th sizes.

Increase row: Rib 8 stitches, and leave these 8 stitches on a safety-pin to work the left front band later.
Continue the row: k2; (p1, k1, then p1, k1 in next st) twice; repeat from * to * as increase row on back; kfb; knit to end.
[60 (62 : 66 : 68 : 72) stitches]

Change to No 7 needles and pattern thus:

1st row: (Kb1, p1) 5 (6 : 8 : 9 : 11) times; repeat from * to * as 1st row of back, then p10.
2nd row: K1, (work k1, p1, k1 into next st., p3tog) twice, k1; repeat from * to * as 2nd row of back; knit to end.

Continue in pattern as now set, and complete to match right front, reversing shapings and the position of the pocket.

The Sleeves

With No 9 needles cast on 44 (44 : 50 : 50 : 50) sts.
Work 9 rows in rib as for the back welt, omitting the increases on the last row.

Increase row: ** (k2, kfb) once (once : twice : twice : twice),
k2 **; repeat from * to * as for the increase row on the back; then repeat from ** to **. [52 (52 : 60 : 60 : 60) sts]

Change to No 7 needles and pattern as follows:

1st row: (Kb1, p1) 3 (3 : 5 : 5 : 5) times; repeat from * to * as for the 1st row of the back; (p1, kb1) to end.
2nd row: K6 (6 : 10 : 10) ; repeat from * to * as for the 2nd row of the back; knit to end.

Continue in pattern as now set, increasing 1 stitch at both ends of following 5th row and every following 5th (5th : 6th : 6th : 5th) row until you have 80 (80 : 86 : 86 : 92) stitches, working the increased stitches into the pattern as end panels.

Continue straight until work measures 17 (17 : 18 : 18 : 18) inches. For 1st, 2nd, and 3rd sizes, end with wrong side facing, and for 4th and 5th sizes end with right side facing to begin the next row.

Mark the ends of the last row (with a piece of coloured thread or a stitch marker).

Shape Top:
Cast off 3 (4: 4: 5: 6) stitches at the beginning of the next 4 rows;
4 (4 : 5 : 4 : 4) stitches at the beginning of the next 2 rows;
and then 8 stitches at the beginning of the following 4 rows.
Cast off.

The Pocket Tops

With right side facing, slip the 40 stitches on the stitch holder for the left front pocket on to No 9 needles.

1st row: K1, (k2tog tbl, p2) twice; (kb1, p2) 8 times; k2tog tbl, p2, k2tog tbl, k1. [36 sts]

2nd row: K1, pb1, (k2, pb1) to last stitch, k1.
3rd row: K1 (kb1, p2) to last 2 stitches, kb1, k1.
Repeat last 2 rows once more.
Cast off in rib.

Repeat the process for the stitches on the stitch holder for the right front pocket.

The Front Bands

With wrong side facing, slip the 8 stitches of left front on the safety-pin back on to on to No 9 needles.

Work in rib as set, increasing 1 stitch at the end of the 1st row. [9 sts]. Continue in rib until band will fit front edge.

[Editor's note: I have found it difficult to judge the fit of front bands knitted in this way. My method now is that when I have knitted about the right length, I test the length against the main body by laying the work flat and totally relaxed with the front band laid in position up the front. When the front band is about ½ to 1 inch shorter than the main body it fits nicely into position very slightly stretched.]

Leave the stitches on a spare needle.
Mark the band with pins to indicate position of buttons; the first one should be 4 rows up from the beginning and then position 5 more evenly spaced between, allowing that top one will be in the neckband.

With wrong side facing, slip 8 stitches of right front on the safety-pin back on to on to No 9 needles.
Increase in 1st stitch, and rib to end. [9 sts]
Complete to match left front band, working buttonholes at pin positions thus:
1st row: Rib 3, cast off 3, rib to end.
2nd row: Rib 3, cast on 3, rib 3.

The Neck Band

Join shoulder seams.

With No 9 needles and right side facing, rib across the 9sts of the right band, pick up and knit 29 sts up right front neck, 37 sts round back neck, 29 sts down left front neck, and finally rib across 9sts of left front band.

Work 6 rows in rib matching in with the bands, making the last (top) buttonhole on the 4th and 5th rows.
Cast off in rib.

To Make Up

Join side seams.
Sew in sleeves, sewing the rows above the markers to the cast off groups at the armholes.
Join sleeve seams.
Sew down pocket linings, and sides of pocket tops.
Sew on front bands and buttons.

Materials

9 (10 : 10 : 11: 11)
100g skeins Rowan Magpie Aran.

A pair each of Nos
7 (4½mm) and 9 (3¾mm) needles, and
2 cable needles.

7 buttons.
(I used wonderful smooth shiny leather buttons that look like conkers).

Tension

20sts to 4 ins in double moss stitch.

Size matters

The pattern is given in 5 sizes to fit chest:
32 (34 : 36: 38: 40) ins; length: 27 (27 : 27½: 27½: 28½) ins;
and sleeve seam:
17 (17 : 18 : 18 : 18) ins.

Abbreviations

Increase: increase by knitting into front and back of the next stitch.
k2tog: (decrease) knit 2 sts together.
p2tog: (decrease) purl 2 sts together.
kfb or pfb: knit or purl into front and back of stitch.
kb or pb: knit or purl into back of stitch.
tbl: through back loop
sl: slip

c6L: cross 6 left thus:
slip next 2sts on to cable needle, leave at front, slip next 2sts on to cable needle and leave at back, k2, then p2 from cable needle at back, k2 from cable needle at front.

c6R: cross 6 right thus: slip next 4sts on to cable needle, leave at back, k2, then pass 2 purl sts back on to left-hand needle, purl these 2sts, then k2 from cable needle.

cp7: claw pattern 7 thus: slip next 2sts on to cable needle, leave at back, k1, then k2 from cable needle, knit next st, slip next st on to cable needle, leave at front, k2, then knit st from cable needle.

A word on the wool.

The original cardigan was knitted in a vintage Bainin yarn.

Disclaimer
(well...almost)

In transposing any pattern it is always a risk that errors will be introduced, in spite of dedicated proof reading.
If you have any problems with this pattern, please and I will try and assist.


LivingAran3.jpg

Afterthought Pockets

You can see two things from the photograph of my cardigan. One is - the sleeves look disproportionately short - what can I say? I have very short arms so knitted them shorter to fit me.

The second thing is that there are no visible pockets. The reason is that my yarn was restricted, so when I started the knitting, I always planned to add the pockets later if I had sufficient yarn left at the end.

It is very easy to add afterthought pockets, and sometimes - especially if making your own design - it allows you to judge their position a little better.

You decide where you want your pocket tops to begin, and mark the centre. Thread a lifeline (use a blunt needle and nylon or smooth mercerised cotton thread) through the stitches to either side of the marker as big as the pocket will be (in our case, 40 stitches).

[Editor's note: I know - this can be hard when you have a complicated cable pattern - all I can say is, try and choose one of the wrong side rows where you were not executing the cables - this is good advice from the point of view of the picking up of the stitches, as well as stylistically where you want the pocket to be positioned.]

On the row above the marker for the centre point (and above your lifeline) cut a stitch and unthread the sts to either side of the marker for 20 sts each side. You will have 2 loose ends that you darn in on the wrong side at the end.

Pick up the loose sts above the row you have undone - this will normally yield 41 or 39 sts. Transfer the sts to working needles and knit downwards to make the pocket lining which you then push to the inside and sew down.

Pick up the 40 live sts from your lifeline and knit up to make the pocket tops. (Pull out the lifeline).

If you are short of yarn, you can always make the pocket linings out of any other yarn you have as they do not show - though it's best to choose a toning colour, otherwise it looks very amateurish if the inside of your elegant grey cashmere cardigan is revealed to show red bri-nylon square patches.

© Christina Coutts 2007

Helpful Stuff

Pattern Archive

Categories

Yarn Links

Fabric etc

Stuff to do

  • Little rabbits
  • V&A 1940s Patterns
  • Monkey Socks
  • Necktie Bag
  • Posh Gloves
  • Criss-cross coasters