Brer Rabbit
More....
Please note:
Patterns are for
Personal Use Only
You may freely circulate patterns with the Copyright Statement Preserved.
See terms of use.
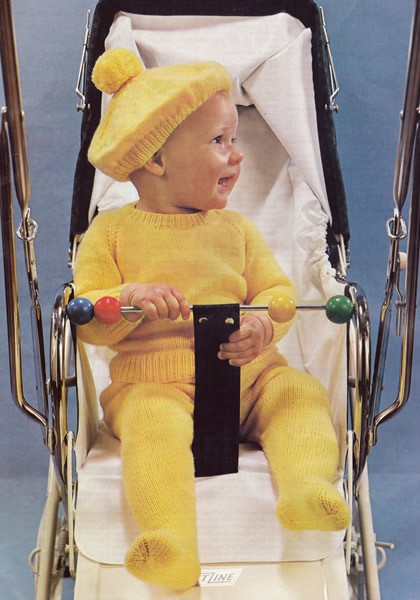
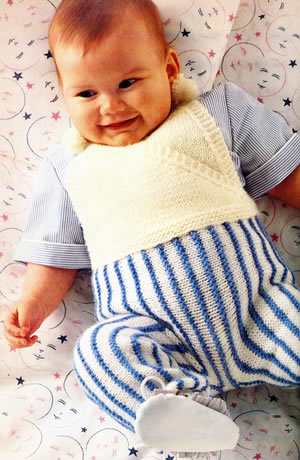
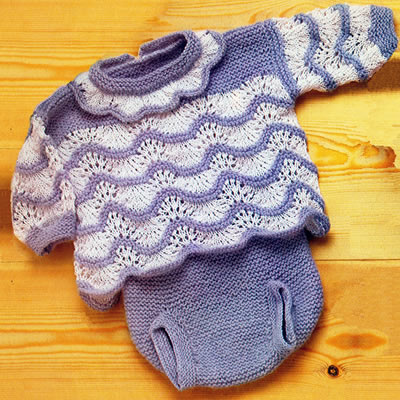
Another delightfully plain and practical pram set for a little one, including leggings, a jumper, and a jaunty beret!
InstructionsJumper Back★ Using size 12 (2¾mm) needles, cast on 72 (76, 80, 84) stitches, and work in k1/p1 rib for 1½ inches ending with a wrong side row. Change to size 10 (3¼mm) needles and stocking stitch (1 row knit,
1 row purl). Shape Raglan Armholes by casting off 3 stitches at the beginning
of the next 2 rows. Jumper FrontFollow instructions for Back from ★ to ★, until 42 (44, 44, 46) stitches remain, ending with a wrong side row. Next row: k2, p2tog , k10 stitches and turn, leaving remaining stitches on a spare needle. Still decreasing at the armhole edge as before, at the same time, decrease
1 stitch at the neck edge on every following alternate row until 5 stitches
remain. Work 1 row; k2tog, and fasten off. Slip the centre 14 (16, 16,
18) stitches onto a spare needle.
Jumper Sleeves Using size 12 needles, cast on 36 (38,
40, 42)
stitches and work in k1/ p1 rib for 1½ inches, ending with a wrong
side row. Shape Raglan Top by casting off 3 stitches at the beginning of
the next 2 rows. Jumper NeckbandUsing a flat stitch, join raglan seams, leaving left back raglan seam
open. With the right side of the work facing and using size 12 needles,
knit across the 6 (8, 8,
10) stitches on the top of the Left
Sleeve;
pick up and knit 12 stitches down the left side of the neck; knit across
the 14 (16, 16,
18) stitches at the centre; pick up
and knit 12 stitches up the right side of the neck; knit across the 6
(8, 8,
10) stitches on top of the Right Sleeve,
and the 26 (28, 28,
30) stitches on the back neck. Work in k1/p1 rib for ¾ inch. Leggings - right leg★ Using size 12 needles, cast on 72 (76,
80, 84)
stitches. Shape Back 1st row: knit 16 (18,
20, 22)
stitches and turn. ★★ Continue in stocking stitch, working across all stitches
for 28 (32, 32,
34) rows. Commence Leg Shaping by casting off 2 stitches at the beginning
of the next 2 rows. Continue on these stitches until work measures 16½ (17¼, 17¾, 18½) inches at the longest (back) edge, ending with a purl row. ★★ Shape Foot Next row: knit 31 (31,
34, 34)
stitches and turn. Work on the centre 13 (13, 14,
14) stitches for 1¾ (2,
2, 2¼)
inches, ending with a purl row. Break off yarn and join it to the inner
edge of the 18 (18, 20,
20) stitches already knitted, pick
up and knit 13 (15, 15,
17) stitches along the first side
of the instep; knit across the 13 (13,
14, 14)
toe stitches, and then knit 13 (15,
15, 17)
stitches along the other side of the instep; then knit the remaining 7
(7, 8,
8) stitches. Commencing with a purl row, work 7 rows in stocking stitch. 1st row: k3, sl1, k1, psso, k1 (1,
2, 2),
k2tog, k27 (29, 30,
32), sl1, k1, psso, k1 (1,
2, 2)
k2tog, k24 (26, 27,
29). Leggings - left legWork as for Right Leg from ★ to ★ . Shape Back 1st row: purl 16 (18,
20, 22)
stitches and turn. Commencing with a purl row, follow the instructions for the Right Leg from ★★ to ★★. Shape Foot Next row: knit 20 (20,
22, 22)
stitches and turn. Work on the centre 13 (13, 14,
14) stitches for 1¾ (2,
2, 2¼)
inches, ending with a purl row. Break off yarn and join it to the inner
edge of the 7 (7, 8,
8) stitches already knitted, pick
up and knit 13 (15, 15,
17) stitches along the first side
of the instep; knit across the 13 (13,
14, 14)
toe stitches, and then pick up and knit 13 (15,
15, 17)
stitches along the other side of the instep; then knit the remaining 18
(18, 20,
20) stitches. Commencing with a purl row, work 7 rows in stocking stitch. 1st row: k24 (26,
27, 29);
sl1, k1, psso, k1 (1, 2,
2), k2tog, k27 (29,
30, 32),
sl1, k1, psso, k1 (1, 2,
2) k2tog, k3. BeretUsing size 12 needles, cast on 132 (132, 136, 136) stitches and work 9 rows in k1/p1 rib. Next row (increase row): rib 7 (7,
9, 9).
* work twice into the next stitch,
rib 2; repeat from * to the last 8
(8, 10,
10) stitches; work twice into the
next stitch, rib 7 (7, 9,
9). Change to size 10 needles and stocking stitch. Shape Crown Break off yarn, thread through remaining stitches, draw up and fasten off securely. To Make UpJumper Leggings Beret |
Materials4 ply yarn 25g balls: Pair each of No 12 (2¾mm) and No 10 (3¼mm) needles. 4 inch zip fastener for jumper Tension30sts and 38 rows to 4 inches Size mattersFinished chest measurement: Abbreviations k: knit A word on the wool.Original yarn was a superwash wool. It appeared as 1 oz balls, then as per this pattern in 25g balls, and finally in 50g balls. Possible yardage based on the 50g ball information is 93 yards (85 metres) to 25g. Disclaimer
|
InstructionsSweater Back and Front alike:With No 10 (3¼mm) needles and MC, cast on 85 stitches. Work 10 rows stocking stitch, beginning with a knit row. *

Continue until 3 complete patterns have been worked (or until work measures
16 inches from hemline), ending with a purl row. Shoulder Shaping: Cast off 8 stitches at the beginning of the next 6 rows. Purl 1 row (hemline). Work 6 rows in stocking stitch, beginning with a purl row, increasing 1 stitch at the beginning of every row. Cast off. Sleeves:With No 10 needles and MC cast on 49 stitches. Trousers Right Leg:Beginning at the ankle, with No 10 needles, and MC cast on 76 stitches.
Work 7 rows in stocking stitch knit 1 row (hemline). Decrease 1 stitch at each end of the 5th and every following 6th row until 68 stitches remain. Continue until work measures 24½ inches from hemline *, ending with a knit row. ** Shape back by working short rows thus: Change to No 10 needles and work 1 inch in k1/p1 rib. Trousers Left Leg:Work as right leg to *, ending with
a purl row. Hat:With No 10 needles and MC cast on 97 stitches. Work 6 rows in stocking stitch, decreasing 1 stitch at the end of 1st row. [96 sts]. Shape top thus: Continue decreasing in this way on every alternate row until 24 stitches
remain. Purl 1 row. Mitts (make 2 alike):With No 10 needles and MC cast on 39 stitches. With right side facing and 32 stitches on right hand needle, rejoin
yarn at the base of the thumb; pick up and knit 2 stitches at the base
of thumb, knit the 6 stitches to the end of the row end. [40 sts]. To Make Up Press or block work. Sweater: Join shoulder and neck facing seams. Trousers: Join front and back seams. Hat: Join seam. Mitts: Join seam. |
MaterialsWorked in a standard double knitting yarn (swatch as per tension given). Sweater: Hat: Trousers: Mitts: Pair each of No 9 (3¾mm), and Waist length of elastic. Tension26sts to 4 inches over fair-isle, 24sts over stocking stitch on 3¾mm needles. Size mattersSweater: Trousers: Abbreviations k: knit MC = main colour Disclaimer
|
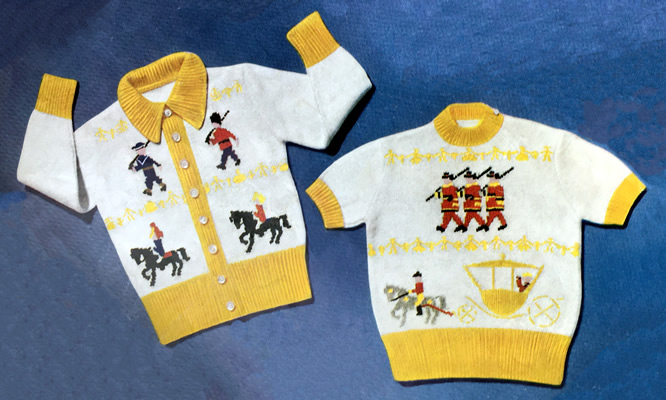
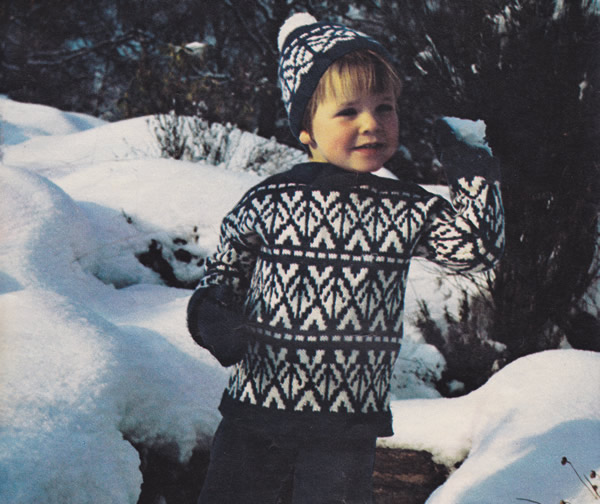
Just to mark the occasion, for a child (from 3-4 years apparently): a cute little twin set with royal processional motifs.
Even if you don't make this twinset for the event, it has some cute military motifs, which cleverly catch the essence of the servicemen depicted despite the simplicity of the design.
This pattern was created to mark the Queen's coronation in 1953 and depicts the historic Gold State Coach; the latter will also be used by King Charles - but only for the somewhat shorter procession back to the Palace after his Coronation on May 6th. For the outward journey, the more modern and altogether more comfortable Diamond Jubilee Coach will be used.
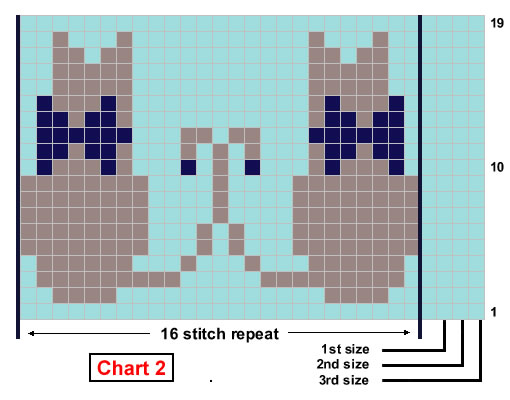
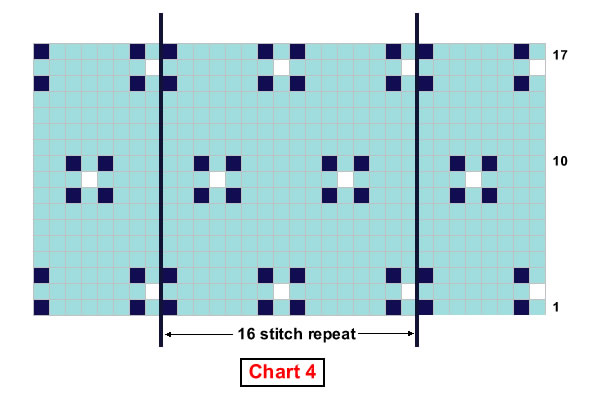
Instructions:Motifs may be worked in Fair Isle or embroidered when garment is completed. ChartsThe charts are included with the pattern instructions below, but for a full version of the charts you can right click on the icon below and choose "save link as" or "save target as" (browser dependent options) to download and save a pdf file. 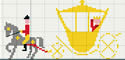 If you want to view chart images full size in the browser then right click on the image and choose "view image". THE JUMPERJumper Front Using No 13 needles and gold (L) wool cast on 106 stitches. Commence 1st panel: 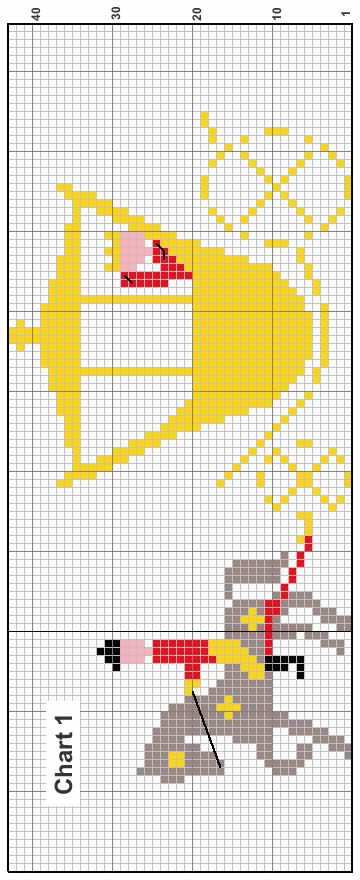
Work 1 row in white (W). Commence 2nd panel: 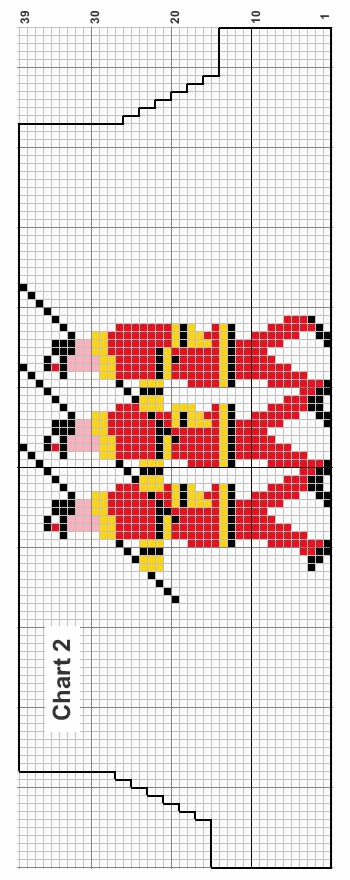 Shape the Armholes Continuing to work from chart, cast off 6 stitches at the beginning
of the next 2 rows. Join in L. Shape the Neck Now work on and finish each side separately: Shape the Shoulder: Rejoin the wool to the other side at the neck edge and complete to match the 1st side. Jumper Back Using No 13 needles and L wool cast on 106 stitches. Shape the Armholes: Shape the Shoulders: Jumper Sleeves (both alike)Using No 13 needles and L wool, cast on 60 stitches. Work until sleeve measures 2½ inches from cast on edge, ending with a purl row. Shape Top: Jumper Neck BandJoin the right shoulder seam. Making up the jumperPress or block each piece separately with a warm iron and a damp cloth,
omitting the ribbing. THE CARDIGANInstructions have been given for a boys' cardigan. Cardigan BackWork as for back of jumper. Cardigan Right FrontWith No 13 needles and L. wool cast on 62 stitches. Commence 1st panel:
Work 6 rows in W. Commence 2nd panel:
Shape the Armhole: Join in L and continue as follows: Shape the Neck: Shape the Shoulder: Cardigan Left FrontWith No 13 needles and L. wool cast on 62 stitches. Continue in rib, making one more buttonhole 1½ inches from the 1st
until work measures 3 inches from cast on edge ending at centre-front
edge. Commence 1st panel.
Join in L, and continue as follows : 7th row: *
3W, 3L, 9W, 3L, 6W; repeat from * once more.
Shape the Armhole: Work 7 rows in W ending with a knit row. Continue in W Cardigan Borders Left front border: [Editor's note: In case of tension variations, you may wish to make the plain border first - which will be the right border for a boy and the left border for a girl - so you can see how many rows you need to fit nicely up the front; you can then work out how best to place the buttonholes evenly up the other side.] The CollarUsing No 13 needles and L wool cast on 137 stitches. Cardigan Sleeves (both alike)Using No 13 needles and L wool cast on 50 stitches. Shape top as for jumper sleeve instructions. Making up the cardigan Press each piece separately with a warm iron and damp cloth, omitting
the ribbing. |
Materials3 ply yarn: Jumper: Cardigan: Pair each of No 12 (2¾mm) and No 13 (2¼mm) needles. Tension36sts and 48 rows to 4 inches. Size mattersInstructions for 3-4 years. A word on the woolSusan Crawford, who specialises in vintage knits, offers lovely Fenella wool which "knits up to that elusive vintage ‘3 ply’ tension". Jamiesons have an excellent range of colours in "2ply laceweight" which states: This yarn can be used in vintage patterns which call for "3ply yarns". John Arbon has some wonderful laceweight that looks suitable. Disclaimer
|
Delightfully plain and simple outfit for a new baby. Cardigans are (I am told) the most useful for small babies - trousers optional - and the bootees - well, they are always just impossibly cute aren't they? (even if they rarely stay attached to the baby!).
Instructions.The cardigan is worked as one piece, starting with the two front, pieces worked separately, then joining them to complete the lower back Cardigan left front:Using No 11 (3mm) needles, cast on 34 stitches and knit 2 rows. Shape front hem, by working short rows as given below, noting that after the first 8 rows in garter stitch (every row knitted), you start to work in stocking stitch (right-side rows knitted, wrong-side rows in purl) on the first 27 stitches, and keep the last 7 front edge stitches (the curved edge) in garter stitch to form the front band Next row: k26. Turn, knit back to
end. Continue straight, with the 7 front edge stitches in garter stitch and
the 27 side edge stitches in stocking stitch, until work measures 4¾
inches from the start of the stocking stitch, (about 46 rows), ending
with a wrong side row. Shape neck, by casting off stitches at the front edge as follows: Next row (wrong side facing): cast
off 7 stitches at the front edge, work to end of row. Continue straight, as set, keeping the sleeve cuff in garter stitch, until work
measures 7¾ inches (about 76 rows), ending with right side facing
for the next row. Cardigan right front:Work as for the left front, reversing all shapings, and placing 3 buttonholes
at the front edge on the 4th, 30th, and 56th row of the stocking stitch. When you have completed the 76 rows on the right front, join the two fronts together to knit the back: Cardigan backNext (joining) row (right side facing):
knit 54 stitches from the left front; cast on 22 stitches for the back
neck; knit 54 stitches from the right front. [130 sts]. Continue straight for 31 rows, keeping the 7 stitches at each end in garter stitch, for the two sleeve cuffs. Cast off 34 stitches at the beginning of the next 2 rows. [62 sts]. CollarUsing No 11 needles, cast on 11 stitches and knit 2 rows. Next row: k4. Turn, knit back to
end. Shape collar: Next row: k3. Turn, knit back to
end. Next row: k3. Turn, knit back to
end. Cast off. Making up the cardiganJoin side and sleeve seams. |
Materials4ply fingering yarn in 50g balls: Nos 11 (3mm) needles. Tension28sts x 32 rows to 4 inches over stocking stitch. Size mattersTo fit one size up to 3 months. Abbreviationsk2tog: decrease by knitting 2 stitches together. A word on the wool.Original yarn was a synthetic mix of acrylic and rayon (which gave it
a ply of a silky thread), and a small percentage of wool. Disclaimer
|

Trousers Front* Using No 11 (3mm) needles, cast
on 27 stitches, and work in garter stitch for 8 rows. Make a second leg by repeating these instructions from * to *. Then join the two legs by knitting across these 27 stitches from the
second leg, cast on 8 stitches, and knit across the 27 stitches from the
first leg. [62 sts] Work straight on these 62 stitches in stocking stitch for 5½ inches ending with wrong side facing for next row. Next row: knit. Starting with a knit row, work 8 rows in stocking stitch as before. Trousers BackWork as for Front from * to **.
Shape top by working as follows: Next row: Work to the last 3 stitches.
Turn. Work 3 rows across all 62 stitches, ending with wrong side facing for next row. Next row: knit. Making up the trousersJoin side and leg seams. 
BooteesUsing No 11 (3mm) needles, cast on 38 stitches, and work for 8 rows in
garter stitch. Next row: k2, *
k2tog, yon; repeat from * to last
2 stitches, k2. Next row: k24. Turn, and leave the
remaining stitches on a spare needle. Continue on these 10 stitches for a further 16 rows in stocking stitch,
ending with right side facing for next row. With right side facing, rejoin yarn and knit 14 stitches from spare needle; knit up 12 stitches along the side of the rows just worked; knit across 10 stitches from spare needle; knit 12 stitches down the other side of the rows just worked; knit across 14 stitches from spare needle. [62 sts] Work 8 rows in garter stitch, ending with right side facing for next
row. Shape Sole: Slip the first 26 stitches on to the right hand needle (or "working" needle if you are left handed), and rejoin yarn to work the centre 10 sole stitches; knit 9, k2tog, turn. Cast off. Finishing: Join back seam, and join sole at the back. Make a cord by cast on 100 stitches; knit one row, then cast off. Make a second bootee in the same way. |
|
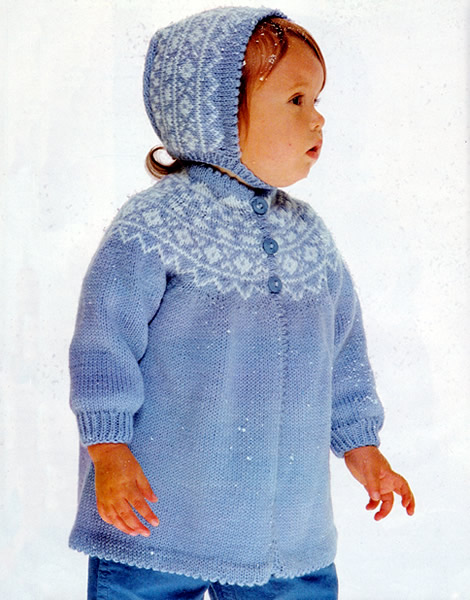
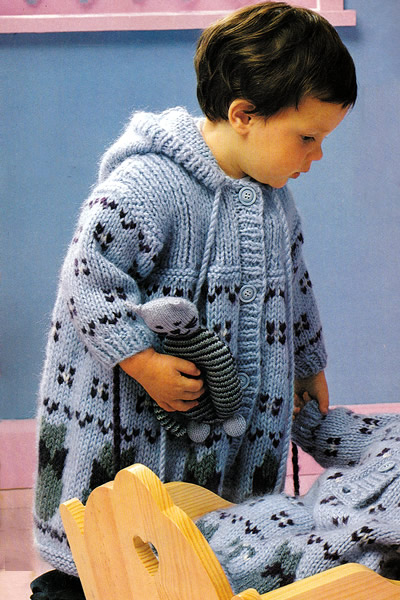
Adorable winter coatigan and bonnet set for a child.
Instructions.Instructions for 2 sizes, larger size in brackets. COATThe body of the coat is made in one piece beginning at the bottom edge. With larger size needles and white colour, cast on 186 (204)
stitches, and, using the blue colour, work in stocking stitch until the work measures
9 (13 ) inches. Coat BackContinue on the centre 94 (104)stitches for the Back only. Shape armholes by decreasing: for size 1: decrease 1 stitch at the beginning of the next 8 rows, (for size 2: decrease
1 stitch at each end of the next row once, then the following 4th row
once, then the following alternate row once, and finally the following
4th row once). Coat - Right Front:With right side facing, pick up 46 (50)
stitches for the on the right and shape the armhole. Leave all 42 (46) stitches remaining on a holder. Coat - Left Front:Work the left front the same as the right front, reversing all shapings. Sleeves (make 2):With smaller size needles and blue colour, cast on 38 stitches and work
1¼ inches in k1/p1 rib. Continue without shaping until work measures 6¾ (8¼)
inches. Yoke:With larger size needles in blue colour, pick up the 278 (300) stitches from the holders: 42 (46) stitches from the right front, 54 (56) stitches from the right sleeve, 86 (96) stitches from the back, 54 (56) stitches from the left sleeve, and finally, 42 (46) stitches from the left front. With right side facing, work 2 rows in stocking stitch decreasing 8 stitches
at the armholes on the first row as follows: The next row decreases a number of stitches evenly across each section of the yoke - work the two sizes as follows: SIZE 1 only Next row (decrease): (k1, k2tog,
k2tog, k1, k2tog) 5 times, k1; SIZE 2 only Next row (decrease): (k1,
k2tog) 15 times; Next row: purl.
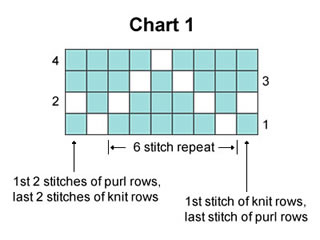
Both sizes: work row 1-4 rows from chart 1 starting with a knit row.
SIZE 1 only: SIZE 2 only: Next row 5 (decrease): Using
blue yarn: k8, *
k2tog, k6, repeat from *
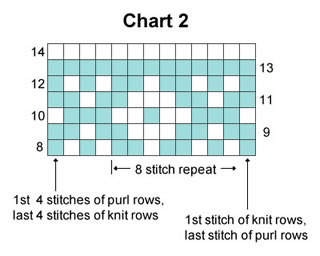
26 times, k3. [193 sts] Both sizes: work 7 rows from chart 2 starting with a purl row.
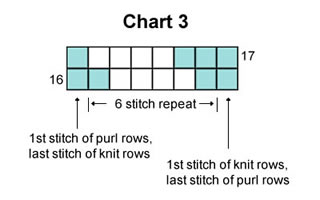
SIZE 1 only: SIZE 2 only: Next row 15 (decrease): Using blue yarn: k7, * k2tog, k4, repeat from * 27 times, k4. [146 sts] Both sizes: work 2 rows from chart 3 starting with a purl row.
SIZE 1 only: SIZE 2 only: Next row 18 (decrease): Using
blue yarn: p6, *
p2tog, p4, repeat from *
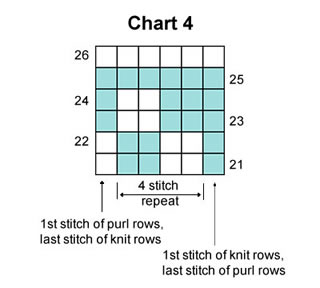
23 times, p2. [123 sts] Both sizes: work 6 rows from chart 4 starting with a knit row.
SIZE 1 only: SIZE 2 only: Next row 27 (decrease): Using blue yarn: k2, * k2tog, k2, repeat from * 25 times. [77 sts] Both sizes: work 4 rows from chart 5 starting with a purl row.
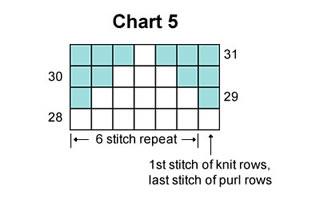
Both sizes: purl 1 row in blue, decreasing one stitch at the centre of the work. [60 (76) sts] Place the remaining stitches on a stitch holder. Coat border:Remove the strand of white at the bottom of the work, picking up the
stitches as you go. Work 4 rounds of stocking stitch (every round knitted) and on the 2nd
round on right front edge, make 3 buttonholes 2 stitches wide: cast off
2 stitches, then on the third round, cast on 2 stitches over the spaces. On the 5th round, work 1 round of eyelets: Work a further round, then make 3 buttonholes at same places as first 3 buttonholes. Work a further 2 rounds then cast off all stitches. Finishing the coat:Sew armhole and sleeve seams. |
MaterialsDouble Knitting yarn: Coat: 3 (4) x 50g balls in blue colour plus 1 ball in white. Bonnet: 1 ball in each colour. One pair each of 3mm and 3½mm (or 3¾mm) needles. 3½mm (or 3¾mm) circular needle. Tension23sts x 30 rows to 4 inches Size matters1 / 2 years Abbreviations:k2tog: decrease by knitting 2 stitches together A Word on the Wool.Original yarn was a double knitting with 50/50 wool/acrylic mix and approximately 125m to 50g. Disclaimer
|
BONNETWith larger size needles and blue colour, cast on 89 stitches. On the 5th row, work eyelets: Continue in stocking stitch, and when work measures 1¼ inches, begin the fair-isle pattern following the 35 rows on the chart given at the end.
Then shape the back of the hat by casting off 30 stitches at each
edge of next row. You now have 29 stitches.
Continue on the centre 29 stitches in blue colour, decreasing 1 stitch
at each end of every 4th row 6 times. Finishing the bonnet:Fold the border along the row of eyelets to form the picot edge, and
sew a hem. To make the chin strap, cast on 25 stitches (left side of work, right
side of bonnet), and work 4 rows in k1/p1 rib. On the 2nd make 1 buttonhole
2 stitches wide, as on the coat, placing it 4 stitches from the end of
the strap. Bonnet Chart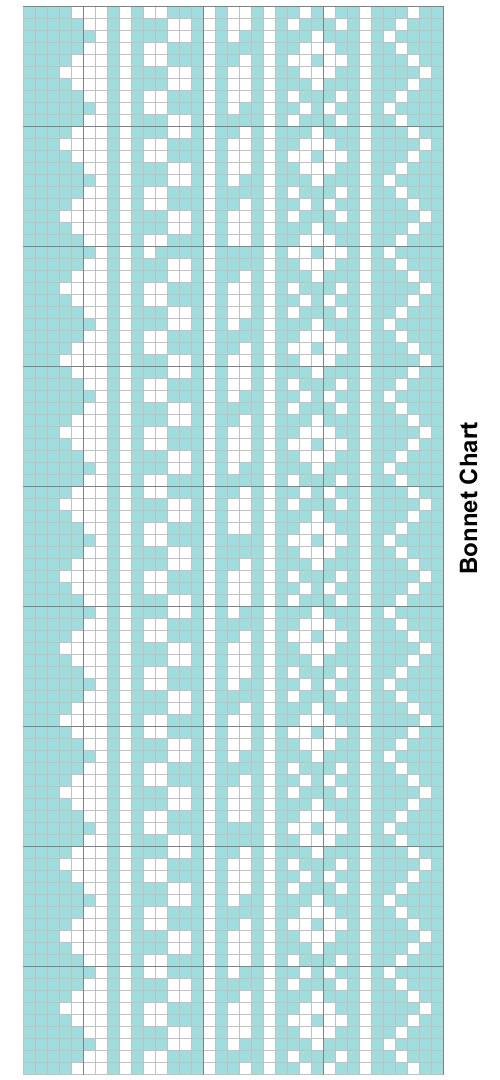 |
|
The cutest hooded gown made in a soft chunky yarn - perfect for bedtime, (or other occasions, as it is described as a "coat"). The lower section has a design of kittens - and there is a cute toy cat to match.
InstructionsThe pattern is given in 3 sizes: 12 (18
: 24) months. Where only one set
of instructions is given it applies to all sizes. SleevesWith 5mm needles and main colour (M), cast on 22 (24
: 26) stitches and work 3 (3
: 4) cm in k1/p1 rib, ending with
wrong side facing for next row. Now change to 6mm needles and stocking stitch following the Fair Isle colour pattern in the chart for the sleeve:
For the first size, begin with 1 stitch in black (B) then 1 in main shade
(M); for the second size, begin with 1M, 1B,
1M; for the third size, begin with 4M,
1B, 1M, 1B, 1M. Leave the stitches on a stitch holder or spare needle and work a second sleeve in the same way. Body (knitted as a single piece)Using size 5mm needles and main colour (M), cast on 113 (121 : 129) stitches and work 6 rows in garter stitch. Change to 6mm needles and work 2 (2 : 6) rows in stocking stitch. Continue stocking stitch and follow the Fair-Isle pattern working from the charts.

Work 2 rows as in Chart 1, commencing with 1M, 1B, then repeating the 8 stitch pattern across the row ending 1M, 1B, as indicated.
Now work the 19 rows of the cat pattern from Chart 2, 4 times across the row, placing 3 (5 : 7) stitches between each group, and working 2 (3 : 4) stitches in main shade before the first and after the last group.

Work 2 rows as in Chart 3, commencing with 2M, then repeating the 8 stitch pattern across the row ending 1B, 1M, as indicated. Work 4 rows in stocking stitch.
Work 4 rows in stocking stitch. Repeat the 2 rows as in Chart 3, as before, (commencing with 2M, then repeating the 8 stitch pattern across the row ending 1B, 1M, as indicated). Work 3 (2 : 2) rows in stocking stitch, and (wrong side facing) work 4 rows in garter stitch. At this point you have completed 58 (64 : 68) rows and your work should measure 32 (35 : 38) cm. Now you must divide the work and continue knitting the back and fronts separately. Change to 5mm needles and work in k1/p1 rib as follows, casting off some stitches for the armholes, as well as decreasing across the row. Next (right side facing, decrease) row:
k2, (p1, k1) 3 (3
: 3) times, p1, k2tog, (p1, k1) 2
(3 :
4) times, p1, k2tog, (p1, k1) 3 (3
: 3) times, k1; place these 23
(25, 27 ) stitches
on a spare needle or stitch holder...
Upper Left FrontNext row (wrong side facing): p2, * k1, p1, repeat from * to last stitch, p1. [23 (25 : 27) sts] With right side facing, continue in k1/p1 rib for a further 19 (21
: 23) rows, then shape the neck
as follows: cast off 3 (4
: 4) stitches on the next row, then
2 (2 :
2) on the following alternate row. Continue to decrease at the neck edge, and shape shoulders as
follows: Upper Right FrontRejoin yarn to the right front section at the front edge. Next row (right side facing): k2, * p1, k1, repeat from * to last stitch, p1. [23 (25 : 27) sts] With wrong side facing, continue in k1/p1 rib for a further 19 (21
: 23) rows, then shape the neck
as follows: cast off 3 (4
: 4) stitches on the next row, then
2 (2 :
2) on the following alternate row. Continue to decrease at the neck edge, and shape shoulders as
follows: Upper Back sectionWith wrong side facing, rejoin the yarn to the remaining stitches in
the centre. Work a further 26 (28 : 30) rows in k1/p1 rib. Now shape shoulders and back neck by casting off 5 (5 : 6) stitches at the beginning of the next row. Next row (wrong side facing): cast
off 5 (5 :
6) stitches, rib 15 (17
: 19) (including the stitch already
on the needle), cast off 7 stitches, and rib to end. This completes the right side of the Back neck. Rejoin the yarn to the remaining stitches at the neck edge and, right side facing, rib one row. Next row (wrong side facing): cast
off 5 (6 :
6) stitches, rib 10 (11
: 12) (including the stitch already
on the needle). This completes the left side of the Back neck. Button BandUsing 5mm needles, cast on 65 (71 : 77) stitches in main shade (B), and work in k1/p1 rib for 5 rows, keeping the 2 stitches at each end of the row in stocking stitch - like this: Next row: k2,
* p1, k1, repeat from *
to last stitch, k1. And so on for 5 rows in all. Purl one row, then knit 3 rows in stocking stitch using waste yarn of a different colour. Leave these stitches on a spare needle or holder. Make a second (right hand) band in the same way, adding 3 button holes on the 4th row: 4th row: k2,
p1, k1, cast off 2, rib 10 (12
: 13), cast off 2, rib 10 (12
: 13), cast off 2, rib to end. Complete with 3 rows of waste yarn as before. HoodUsing 5mm needles, cast on 69 (73 : 75) stitches in main shade (B), and work in k1/p1 rib for 8 rows. Change to 6mm needles and work 11 (13
: 15) rows in stocking stitch. Wrong side facing, continue in stocking stitch, increasing 1 stitch at
each end of every 4th row 3 times. [21 (23
: 25) sts] Right side facing, continue in stocking stitch, decreasing 1 stitch at
each end of every 6th (6th
: 5th) row 3 (3
: 4) times. [15 (17
: 17) sts] To Make UpSew shoulder and sleeve seams up to the coloured markers. Sew the button band, stitch by stitch, to the right side of the work using back stitch, (undo the rows of waste yarn). Sew up the sides of the hood. Fold the front edge in half inwards and
sew round like a hem to make a channel to thread the cord through. Finish the buttonholes with embroidery if desired, and sew on buttons. |
Materials
|
MittensThis is a pattern for a very simple little pair of mittens in matching colours. The mittens are attached to a cord which is threaded through the armholes of a coat so that they can hang free at the ends of the sleeves if removed (and thus don't get lost). With 5mm needles and dark contrast colour (B), cast on 18 (18
: 20) stitches and work 3 cm in k1/p1
rib. Next row: k1, sl1, k1, psso, k4 (4
: 5), k2tog, sl1, k1, psso, k4 (4
: 5), k2tog, k1.
|
|
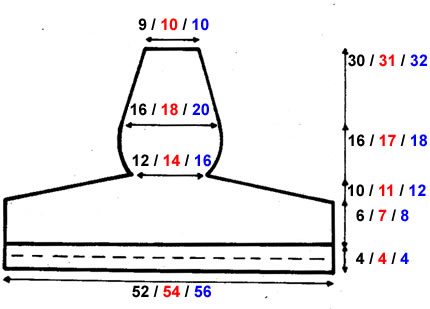
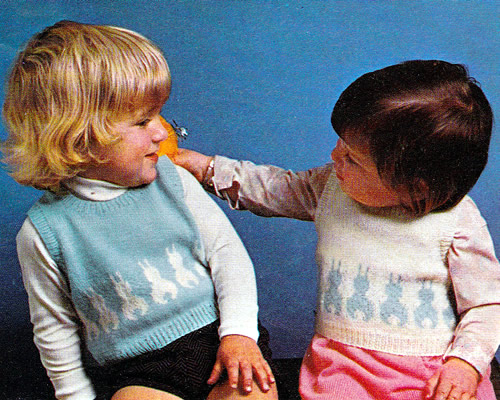
Sweet little sleeveless jumpers for toddlers with Easter bunny motifs.
Instructions.When working the colour pattern from the chart, strand yarn not in use
loosely across the wrong side of the work over not more than 3 stitches
at a time in order to keep the fabric elastic. If you want to view chart image full size in the browser then right click on the image below and choose "view image". Back** Next row: rib 3 [7,
10] (m1, rib 10) 7 times, m1, rib 3 [7,
10]: Change to No 11 needles and starting with a knit row, work straight in stocking-stitch until back measures 1½ [2, 2] inches, ending with right side facing. Change to No 10 needles and joining in contrast colour (C) as required, work rows 1-20 inclusive from chart A [B, A]
Work the first 0 [1, 1]
stitch on knit rows and last 0 [1,
1] stitch on purl rows as indicated, repeating
the 12 [13, 12]
pattern stitches 7 [7, 8]
times across - and the last 0 [0,
1] stitch on knit rows, and first 0 [0,
1] stitch on purl rows as indicated. Change to No 11 needles and continue in M and stocking stitch until back measures 4½ [5, 5½]inches, ending with right side facing. Shape armholes by casting off 6 stitches at the beginning of the next 2 rows, then decrease 1 stitch at each end of every row until 54 [58, 64] stitches remain. Work 1 row straight. Now decrease 1 stitch at each end of the next and every alternate row until 48 [52, 56] stitches remain. ** Continue straight until back measures 9 [10, 11] inches, ending with right side facing. Shape shoulders by casting off 5 stitches at the beginning of the next 2 rows, then 4 [5, 6] stitches at the beginning of the following 2 rows. Leave the remaining 30 [32, 34] stitches on a spare needle. FrontWork as for Back from ** to **
. Shape neck as follows: Knit 18 [19, 20],
turn, and leave remaining stitches on a spare needle. Work straight until front matches back at armhole edge, ending with right side facing. Shape shoulder by casting off 5 stitches at the beginning of the
next row. With right side facing, leave centre 12 [14, 16] stitches on a spare needle, rejoin yarn to the remaining stitches and knit to end. Finish to correspond with first side, reversing shapings. Making UpUsing a cool iron and a damp cloth for Baby Wool, press parts lightly
on the wrong side, omitting ribbing. Neckband: With right side facing, No 13 needles and M, start at
the top of the left shoulder and work as follows: Work 6 rows k1/p1 rib. Join left shoulder seam, then join neckband with a flat seam Armhole Borders: With right side facing, No 13 needles and M, pick up and knit 86 [94, 102] stitches round each armhole and work 6 rows k1/p1 rib. Cast off evenly in rib. |
MaterialsBaby 3 ply 25g balls: 2 in main colour and 1 contrast colour (all sizes). Pair each No 13 (2¼mm), No 11 (3mm), and No 10 (3¼mm) needles.
Tension32 stitches x 40 rows to 4 ins (10cm) in stocking stitch on No 11 (3mm) needles. Size mattersTo fit chest 20 [22, 24]
inches; Abbreviationsk2tog or p2tog: knit or purl 2 stitches together (decrease one stitch). m1: make 1 stitch by picking up horizontal sl1: slip one stitch by passing it between the needles without knitting it. A word on the woolThe original design was in Patons Baby 3ply - a version of which is still available today. Disclaimer
|
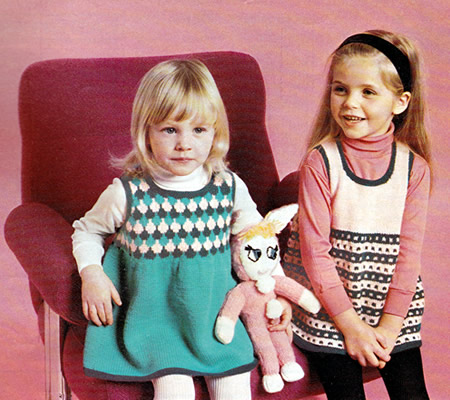
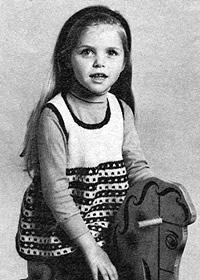
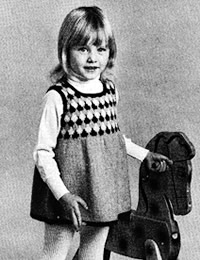
Pretty and easy to make knitted pinafores, providing a practical alternative to full knitted dresses which may be too warm for most centrally heated homes in this era.
Instructions.This is the plain bodice, striped skirt, design in two colours. Back** Next row (increase row): knit 7/9/8/10
stitches; (m1, k14/14/16/16)
5 times; m1, knit 7/9/8/10. Change to No 8 needles and join in main shade (L); work in pattern as follows: 1st row (right side facing): Knit
in L These 12 rows form the pattern. Next row: Using D: purl 13/2/0/5
stitches; (p2tog, p0/1/1/1)
31/29/33/31
times; p2tog, purl 13/3/1/6 Starting with a knit row, continue straight in stocking-stitch (one row knit, one row purl) until back measures 8/9½/11/12½ inches, ending with a purl row. Shape armholes by casting off 3 stitches at the beginning of the
next 2 rows, then decrease 1 stitch at each end of every row until 42/48/52/58
stitches remain. Now decrease 1 stitch at each end of the next and every alternate row
until 36/40/44/48
stitches remain. Work straight until back measures 12½/14½/16½/18½
inches ending with a purl row. Front Work as for back from ** to **
. Divide for neck as follows: Next row: knit 10/11/12/13;
k2tog, turn, and leave the remaining stitches on a spare needle. With right side facing, leave the centre 12/14/16/18 stitches on a spare needle, and rejoin yarn to the remaining stitches k2tog, knit to end. Finish to correspond with the first side, reversing shapings. To Make UpPress parts lightly under a damp cloth on wrong side, omitting garter Neckband: With right side facing, using No 10 needles and colour
D, starting at the left front shoulder, work as follows: Join left shoulder seam and neckband. Join side seams. |
MaterialsDouble Knitting yarn: Pair each of No 8 (4mm) and No 10 (3¼mm) needles. Spare needles or stitch holders. Tension22sts and 30 rows to four inches on 4mm needles over stocking stitch.
Size mattersTo fit chest: Abbreviations L: main shade (light) k: knit m1: make a stitch by picking up the horizontal loop lying before next stitch and working into the back of it. sl1: slip one stitch by passing it between the needles without
knitting it. A word on the wool.Original yarn was Patons Totem double crepe. Disclaimer
|
Instructions.This is the pinafore with the patterned bodice design in three colours. Note: When working colour pattern from the chart, strand yarns
loosely across the back of the work over not more than 3 stitches at a
time, to keep the fabric elastic. Back** Next row (increase row): knit 7/9/8/10
stitches; (m1, k14/14/16/16)
5 times; m1, knit 7/9/8/10. Break off colour D Change to No 8 needles and join in main shade (M), and starting with a knit row, work straight in stocking stitch until back measures 7/8½/9½/11 inches ending with a knit row. Next row: purl 4/10/10/7
stitches; (p2tog, p2/2/2/3)
20/18/20/18
times; p2tog, purl 4/10/10/7 Joining in and breaking off colours as required, work in pattern from chart until back measures 8/9½/11/12½ inches, ending with a purl row. Note: Repeat the 6 pattern stitches 11/12/13/14 times across and last 3 stitches on knit rows and first 3 stitches on purl rows as indicated.
Keeping continuity of pattern, shape armholes by casting off 4
stitches at the beginning of the next 2 rows, then decrease 1 stitch at
each end of every row until 47/53/59/65
stitches remain. Now decrease 1 stitch at each end of the next and every alternate row
until 43/47/51/55
stitches remain. Work straight in pattern until back measures 12½/14½/16½/18½ inches ending with a purl row. Shape shoulders by casting off 4/4/5/5
stitches at the beginning of the next 2 rows, then 4/5/5/6
stitches at the beginning of the following 2 rows. Front Work as for back from ** to **
. Divide for neck as follows: Next row: pattern 12/13/14/15;
k2tog, turn, and leave the remaining stitches on a spare needle. With right side facing, leave the centre 15/17/19/21 stitches on a spare needle, and rejoin appropriate colour yarn to the remaining stitches k2tog, pattern to end. Finish to correspond with the first side, reversing shapings. To Make UpPress parts lightly under a damp cloth on wrong side, omitting garter Neckband: With right side facing, using No 10 needles and colour
D, starting at the left front shoulder, work as follows: Join left shoulder seams and neckband. Join side seams. |
MaterialsDouble Knitting yarn: Pair each of No 8 (4mm) and No 10 (3¼mm) needles. Spare needles or stitch holders. Tension22sts and 30 rows to four inches on 4mm needles over stocking stitch.
Size mattersTo fit chest: Abbreviations M: main (aqua) k: knit m1: make a stitch by picking up the horizontal loop lying before next stitch and working into the back of it. sl1: slip one stitch by passing it between the needles without
knitting it. A word on the wool.Original yarn was Patons Totem double crepe. Disclaimer
|
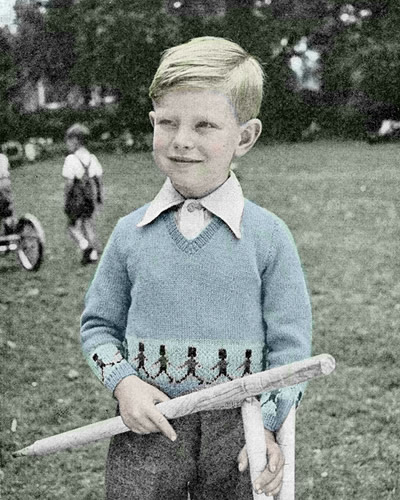
Suitable for all 5 year olds who aren't expecting an iphone, (and who like to play out of season cricket).
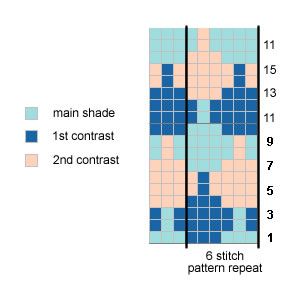
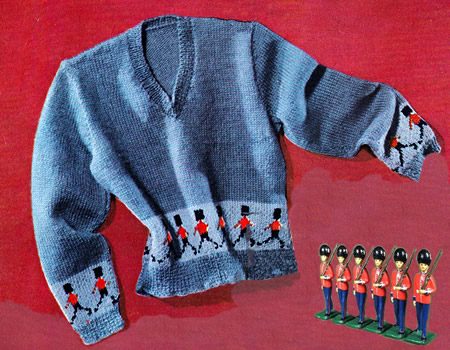
Instructions:The jersey is worked in one size - stated as a 5 year old but remembering that children now tend to be larger than they were in the early 1950s. BackUsing No 12 (2¾mm) needles and main shade (mid blue) cast on 84 stitches, and work 1½ inches in k1/p1 rib, increasing to 85 stitches on the last row. Change to No 10 (3¼mm) needles and stocking stitch, and changing from the main mid-blue wool to the pale blue as the background colour for the motifs, work the soldier pattern from chart, reading knit rows from right to left and purl rows from left to right.
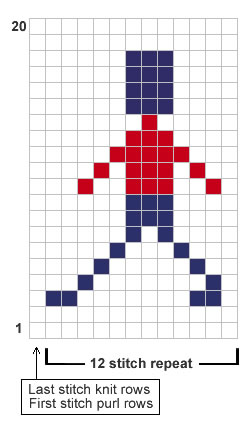
Work the 12 pattern stitches 7 times across with last stitch on knit
rows and first stitch on purl rows as indicated. When 20 rows have been completed, change back to the mid-blue main shade and work straight in stocking stitch until back measures 8 inches. Then, with right side facing, shape armholes by casting off 5 stitches
at the beginning of he next 2 rows. Then k2tog at each end of every knit
row until 65 stitches remain. With right side facing, shape shoulders by casting off 12 stitches
at the beginning of the next 4 rows. FrontWork exactly as for back until the first 2 rows of the armhole shaping have been done. [75 sts] Now divide for the neck: Continue on these 35 stitches for back, decreasing 1 stitch at the armhole edge on the next 4 rows, then keeping the armhole edge straight, and at the same time, decreasing at the neck edge on every following 3rd row until 24 stitches remain. Work straight until front matches back, then with right side facing, shape shoulders by casting off 12 stitches at the beginning of the next and following alternate row, armhole edge. Join the wool to the remaining stitches, at the neck edge; cast off 1,
then work to correspond with first half, reversing all shapings. SleevesUsing No 12 (2¾mm) needles and main shade (mid-blue) cast on 48 stitches and work 1 inch in k1/p1 rib, increasing to 49 stitches on the last row. Change to No 10 (3¼mm) needles and stocking stitch, and work the 20 rows from the chart as for the back. When these are done, change back to the main mid-blue wool and continue in stocking stitch, increasing 1 stitch at each end of the next and every following 6th row until there are 63 stitches. Work straight until sleeve measures 10½ inches. With right side facing, shape top by casting off 3 stitches at
the beginning of the next 2 rows, then k2tog at the beginning of every
row until 21 stitches remain. NeckbandJoin right shoulder seam. With right side facing, using No 12 (2¾mm) needles and mid-blue main shade, pick up and knit 48 stitches down left front, 1 stitch from centre, 48 stitches up right front, and 18 stitches across back of neck. Work ¾ inch k1/p1 rib; decreasing 1 stitch either side of centre
front stitch on alternate rows. Making UpOmitting ribbing, press each piece carefully on wrong side using a warm
iron and a damp cloth. |
Materials3 oz Fair Isle Fingering in main shade (mid blue) and 1 oz in paler blue. Small balls in red and navy for the soldier motifs. A pair each No 12 (2¾mm) and No 10 (3¼mm) needles. Tension30 sts and 38 rows to 4 inches over stocking stitch. Size mattersOne size - width all round chest 25 ins. Abbreviations:k1: knit 1. A word on the woolOriginal called for Patons Fair Isle Fingering about which there is some information available on Ravelry. This pattern is in ounces but it seems the yarn
stuck around for a while as some vintage stocks can be seen in 25g balls. Jamiesons are Kings (or Queens) of Fair Isle and Shetland knitting - their Spindrift yarn sounds a good substitute: equivalent to a traditional 4ply; ideal for Fair Isle knitting; extensive colour pallet of over 220 colours; supplied in 25g Balls (105m); tension: 30sts x 32 rows on 3¼mm needles. Disclaimer
|
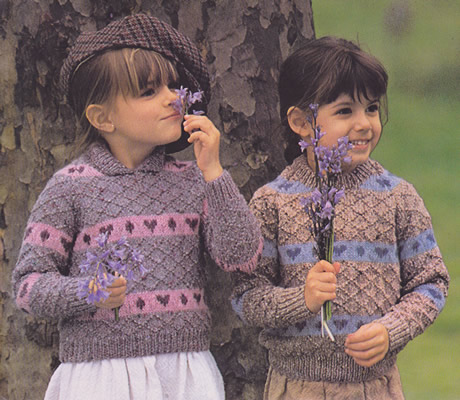
Hearts and flowers in the bluebell season.
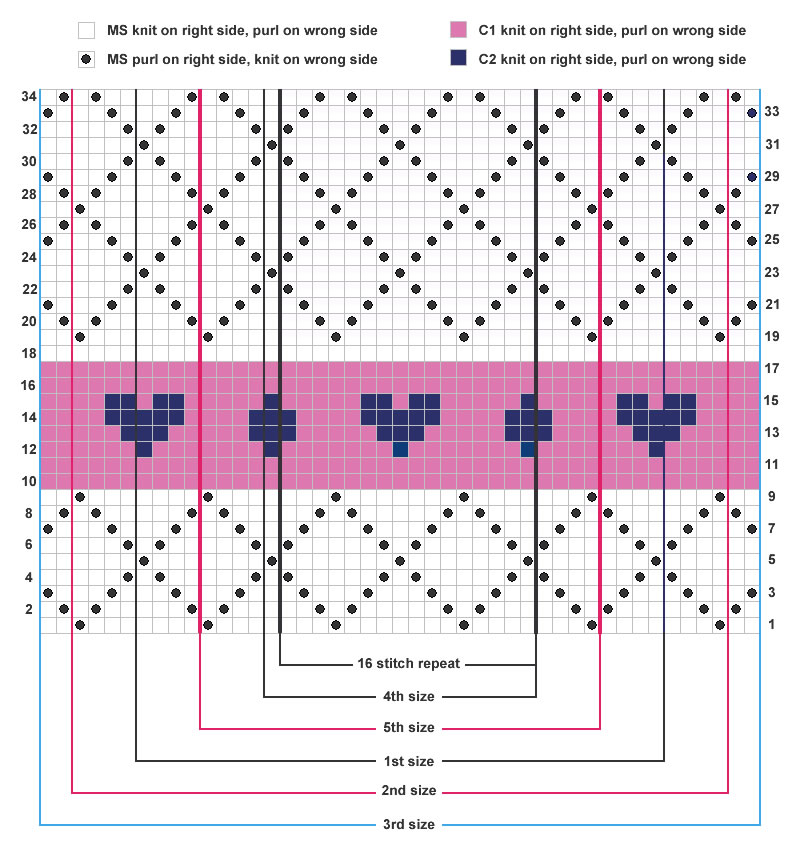
Instructions for Crew Neck Version.Instructions for 5 sizes - larger sizes are shown in brackets. ChartsWhen working the colour pattern from the chart, strand yarn not in use
loosely across the wrong side of the work over not more than 3 stitches
at a time in order to keep the fabric elastic. The chart is included with the pattern instructions below, but for a larger version of the chart you can right click >>here<< and choose "save link as" or "save target as" (browser dependent options) to download and save a pdf file. If you want to view chart image full size in the browser then right click on the image below and choose "view image". BackWith No 10 (3¼mm) needles and MS, cast on 61 [65, 71, 77, 81] stitches and work in rib as follows: 1st row (right side): k1, *
p1, k1; repeat from * to end. Repeat these 2 row for 5cm ending with a a first row (wrong side facing
Next row: Rib 8 [4, 8, 10, 5] m1; (rib 15 [8, 11, 19, 10], m1) 3 [7, 5, 3, 7] times, rib to end. (65 [73, 77, 81, 89] sts). Change to No 8 (4mm) needles and work 34 rows in pattern from the chart, working the first and last 8 [12, 14, 0, 4] stitches of each row as indicated for each size, and working the 16 stitch repeat pattern in between.
After completing the first 34 rows, work a further 6 [18, 26, 38, 40] rows in the pattern thus ending with a 6th [18th, 26th, 4th, 6th] pattern row. Keeping the continuity of the pattern, shape raglans by casting off 4 stitches at the beginning of the next 2 rows. 3rd, 4th and 5th
sizes: All sizes: Leave remaining stitches on a spare needle or stitch holder. FrontWork as for Back until 37 [43, 45, 47, 49] stitches remain in raglan shaping, ending with right side facing for next row. Keeping continuity of pattern, divide for neck as follows: Continue on these 12 [14, 15, 15, 16] stitches for the first side, decreasing 1 stitch at the neck edge on every row, and at the same time decreasing 1 stitch at the raglan edge on every alternate row until 6 [8, 8, 8, 7] stitches remain. Work 1 [1, 0,
0, 1] rows. With right side facing, slip centre 11 [13, 13, 15, 15] stitches on a length of yarn or stitch holder, rejoin yarn to remaining stitches, pattern to the last 2 stitches, k2tog. Work to match first side, reversing shapings. SleevesWith No 10 (3¼mm) needles and MS, cast on 31 [31, 39, 39, 39] stitches and work in rib as on back for 5 [5, 6, 6, 6] cm, ending with a 1st row and wrong side facing for next row. Next row: Rib 8 [8, 10, 10, 10] m1; rib 15 [15, 19, 19, 19], m1; rib to end. (33 [33, 41, 41, 41] sts). Change to No 8 (4mm) needles and joining in and breaking off colours as required, and starting with a 19th row, work in pattern as for 1st [1st, 2nd, 2nd, 2nd] size of the Back at the same time shaping sides by increasing 1 stitch at each end of the 3rd [7th, 3rd, 7th, 3rd] and every following 6th [7th, 12th, 14th, 12th] row until there are 49 [49, 53, 53, 57] stitches, taking the increase stitches into the pattern. |
Materials50g balls DK in 3 colours: main shade (MS) plus 2 contrasts: Pair each No 7 (4½mm), No 8 (4mm), and No 10 (3¼mm) needles. Tension23 stitches x 30 rows to 4 ins (10cm) in stocking stitch on No 8 (4mm) needles. Size mattersTo fit chest 22 [24, 26,
28, 30] inches, (56 [61,
66, 71,
76]cm) actual measurement allows 1-2 inches
of ease; Abbreviationsk2tog or p2tog: knit or purl 2 stitches together (decrease one stitch). stocking stitch: one row knit and one row purl, ("stockinette"). m1: make 1 stitch by picking up horizontal sl1: slip one stitch by passing it between the needles without knitting it. A word on the woolThe original yarn was Patons Moorland Tweed/Shetland double knitting. Moorland was 100% wool with a suggested yardage of 137 yds (125m) - although this was not printed on the ball bands at that time. A similar substitute might be Rowan Felted Tweed DK. "Always check your tension" [Good Advice]. Disclaimer
|
|
Continue in pattern until sleeve seam measures: 9½ [11, 12, 14, 15½] inches, (24 [28, 31, 35, 39] cm), ending with the same pattern row as on the Back at the start of the raglan shaping, thus ending with right side facing for next row. Keeping the continuity of the pattern, shape raglans by casting off 4 stitches at the beginning of the next 2 rows. 2nd, 3rd,
4th, and 5th
sizes: All sizes: Leave remaining stitches on a safety pin. Making Up and instructions for crew neckWith wrong side of work facing, block each piece by pinning out round
edges, and omitting ribbing, press parts lightly on wrong side following
instructions (if any) on the ball band. Make Neck Border: Starting with a 2nd row, work in rib as for the Back for 5 [5,
6, 6, 6] cm.
Join remaining raglan and Crew Neck seam. Making Up and instructions for collarWork as for Crew Neck Version but casting off stitches loosely at back of neck, front of neck, and top of sleeves. With wrong side of work facing, block each piece by pinning out round
edges, and omitting ribbing, press parts lightly on wrong side following
instructions (if any) on the ball band. Make collar: 1st row (right side): k2, *
p1, k1; repeat from * to last stitch,
k1. Repeat the last 2 rows once more then the 1st row again. Continue thus until the 2 rows "sl1, rib to last 16 stitches, turn"
have been worked. Continue in rib across all stitches until Collar measures 3cm at the side edge. Using a No 8 (4mm) needle, cast off evenly in rib. Press seams. |
|
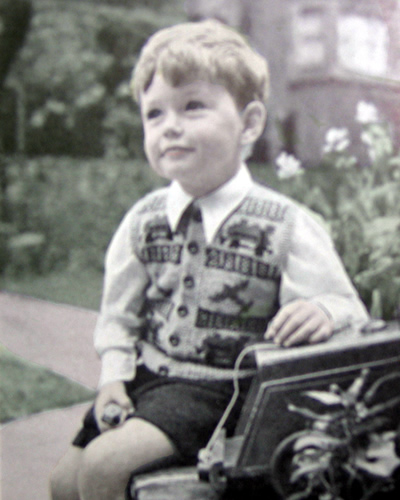
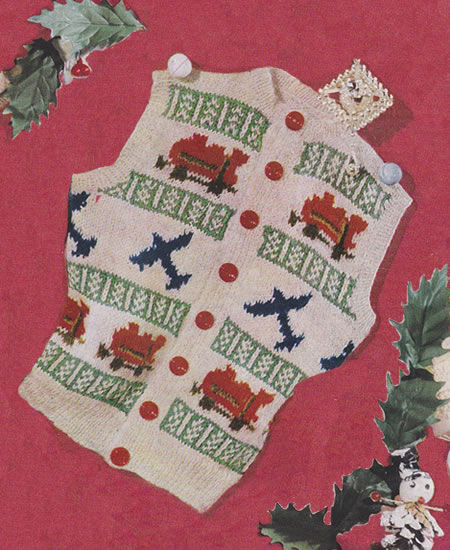
A jolly little waistcoat for the lucky 3 year old who is having a new toy engine or or aeroplane.
... what little boy wouldn't be thrilled to receive this attractive woolly on Christmas morning, teaming up with his new toys. Quickly knitted in tough Fair Isle Fingering, and you can use up your odds and ends for the various motifs.
How far away those days seem - or actually "are"! Even in my era - as attested by James May in Top Toys - boys (not girls of course!) were fixated by rockets and action men - though Airfix was as popular as ever.
Nonetheless - a "jolly little waistcoat" - for retro 3 years olds and their retro parents.
Instructions:The waistcoat is worked in one piece and in one size - stated as a 3 year old but remembering that children tend to be larger than they were in the early 1950s. As usual, you could probably increase the size successfully by using a heavier wool and larger needles. Back and Fronts in oneUsing No 12 (2¾mm) needles and main shade (MS) cast on 145 stitches, and work 1½ inches in k1/p1 rib - rows on the right side having k1 and each end. Change to No 10 (3¼mm) needles and stocking stitch, and work in pattern from chart, reading knit rows from right to left and purl rows from left to right.
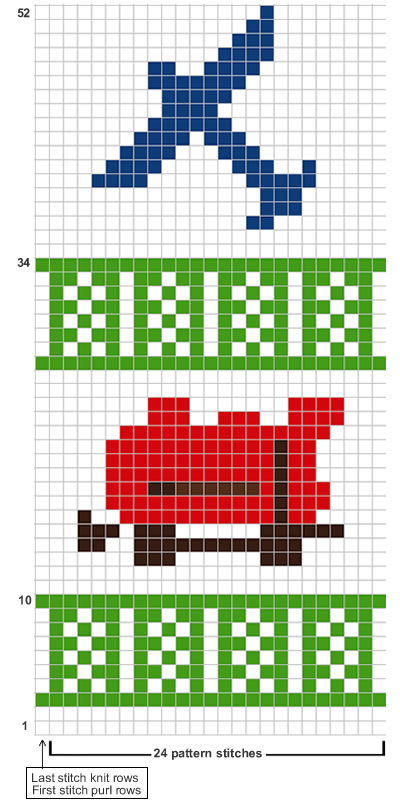
Work the 24 pattern stitches 6 times across with last stitch on knit rows
and first stitch on purl rows as indicated. Work the 52 rows once, then, continuing to work motifs from the chart, and with right side facing, divide for armholes thus: Next row: pattern 36, turn, and
leave remaining stitches on a spare needle or stitch holder. Continue in pattern on these 33 stitches for the right front, decreasing 1 stitch at the armhole edge on the next 6 rows. [27 sts] Work straight in pattern to the end of the 34th row of the chart. With right side facing, continue in MS only, shaping neck by casting
off 4 stitches at the beginning of the next row, then k2tog at the neck
edge on the next 5 rows. With wrong side facing, shape shoulder by casting off 9 stitches at the beginning of the next and following alternate row, (armhole edge). With right side facing, join wool to the remaining stitches. Continue on these 67 stitches for back, decreasing 1 stitch at each end of the next 6 rows. Work straight to end of the 34th row of the chart. Change to MS only and work 8 rows straight, then with right side facing, shape shoulders by casting off 9 stitches at the beginning of the next 4 rows; cast off remaining stitches loosely. With right side facing, join wool to last 36 stitches, armhole edge, and cast off 3, pattern to end, then work to correspond with right front. Ribbed Front BordersUsing No 12 (2¾mm) needles and main shade (MS) cast on 11 stitches
and working in k1/p1 rib, with rows on the right side having a k1 at each
end, make a strip to go up the right front when slightly stretched. Make a similar strip for left front with the addition of 7 buttonholes,
the first to come in the 3rd and 4th rows from the bottom edge, and the
7th about 1 inch from the top (allowing for 8th to be worked in the neckband
later), and the remaining 5 at equal intervals. To make a buttonhole: Neck BorderJoin shoulder seams. Using No 12 (2¾mm) needles and main shade (MS), rib the 11 stitches from the right front border, pick up and knit 43 stitches all round the neck, then rib the remaining 11 stitches from the left front border. [65 sts] Work ½ inch in k1/p1 rib making the 8th buttonhole after ¼ inch has been done. Cast off in rib. Armhole BordersWith right side facing, using No 12 (2¾mm) needles and main shade
(MS), pick up and knit 89 stitches round each armhole. Making UpOmitting ribbing, press each piece carefully on wrong side using a warm
iron and a damp cloth. |
Materials 2 oz Fair Isle Fingering in main shade and 1 oz each in emerald and
scarlet. A pair each No 12 (2¾mm) and No 10 (3¼mm) needles. Eight buttons. Tension32 sts to 4 inches on No 10 (3¼mm) needles over Fair Isle pattern. Size mattersOne size - width all round under arm 22 inches. Abbreviations:k1: knit 1. A word on the woolOriginal called for Patons Fair Isle Fingering about which there is some information available on Ravelry. This pattern is in ounces but it seems the yarn
stuck around for a while as some vintage stocks can be seen in 25g balls. Jamiesons are Kings (or Queens) of Fair Isle and Shetland knitting - their Spindrift yarn sounds a good substitute: equivalent to a traditional 4ply; ideal for Fair Isle knitting; extensive colour pallet of over 220 colours; supplied in 25g Balls (105m); tension: 30sts x 32 rows on 3¼mm needles. Disclaimer
|
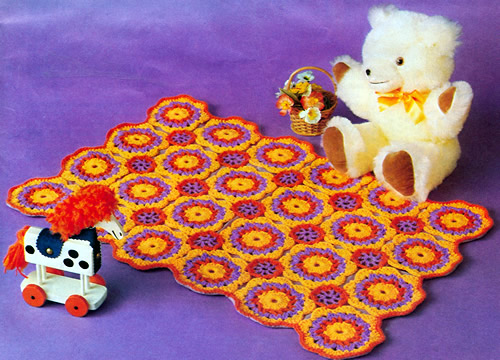
There maybe just enough time to crochet a simple cover if you can get over the lurid sixties colour schemes. [I'm sure you can choose your own combinations which would be less traumatic for a baby].
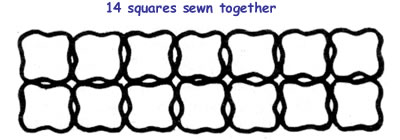
InstructionsThe crochet blanket is made up of a number of large motifs sewn together and then joined with smaller motifs which are integrated as you work. Large Motif (make 24)Using No 7 (4½mm) hook and DK in Light colour (L) make 6ch loosely and join in a ring using a slip stitch. 1st round: 3 chain, work 23tr into
the ring and join with a slip stitch to top of 3ch. [24 sts]. This completes the motif. To Make UpUsing L, join motifs by stitching centre stitches of each motif together,
and making 6 rows of 4 motifs. Work 15 small motifs to fill the spaces formed by the larger motifs and join together as follows: Small Motif (make 15 - joining as you work)The smaller motifs are worked in 4 ply. 1st round: 6 chain, work (1tr, 3ch)
7 times into the ring and join with a slip stitch to 3rd of 6 ch. This completes the motif - work the other 14 in the same way. FinishingWith right side facing, Using No 7 (4½mm) hook and M in DK, work
1 round of dc around scalloped edge of cover. Block the blanket by pinning it out and dampening; leave to dry. You can press very lightly with a damp cloth - just hold the iron above the cloth so it heats it but do not press down. You want to leave the texture of the stitches in place, so do not press heavily. Cut the lining material to fit around the scalloped edges. Turn in the edges and catch down all around the scallops inside the dc border. |
Materials
|
The original yarn was bri-nylon - famous for its hard wearing properties and luminous colour ranges. Although "bri-nylon" is not very marketable now, modern acrylic yarns are a worthy replacement being soft yet robust with a wide choice of colours.
Stylecraft have a good range of acrylics with equivalent colours available in DK and 4ply.
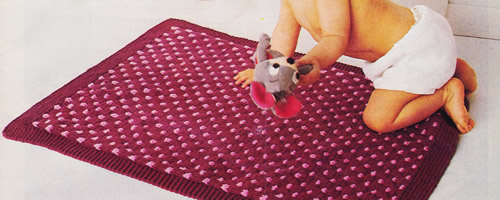
There maybe just enough time to knit a simple cover if you can get over the dramatic sixties colour scheme. [I'm sure you can choose your own combinations].
InstructionsThe pattern uses DK weight yarn with 2 strands held together. Motif (make 12)Using main shade (M) cast on 96 stitches and work 11 rows in garter stitch (every row knit but slip the first stitch of every row). Next row: Sl1, k7, slip these 8 stitches on to a thread; k4, increase in the next stitch, (k9, increase in next stitch) 7 times; k5; slip the next 8 stitches on to a thread (88 sts). Joining in contrast (C) as required and work in pattern as follows: 1st row: Sl1, k2C, *
k4M, k2C, repeat from * to last stitch,
k1M. These 8 rows form the pattern. Continue in pattern until main part measures approximately 26½ inches
ending with a 2nd pattern row. Borders and finishingWith wrong side facing, rejoin M to the 8 border stitches on left
side and work in garter stitch until Border measures 26 inches from cast-on
edge, ending with wrong side facing. Sew remaining Border in position. |
Materials
|
The original yarn was bri-nylon - famous for its hard wearing properties and luminous colour ranges. Although "bri-nylon" is not very marketable now, modern acrylic yarns are a worthy replacement being soft yet robust with a wide choice of colours.
You could also consider knitting a single strand in a heavier weight yarn - Aran, worsted, even chunky. However you would need to knit a tension square in the pattern stitches.
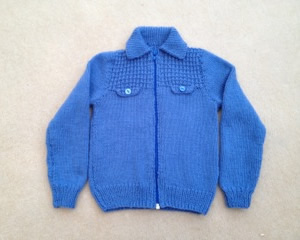
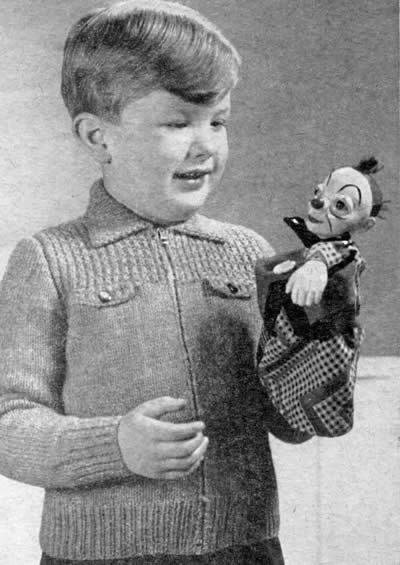
A delightful little child's jacket from the 1950s. Beryl knitted it for her grandson and it looks lovely on him - see pictures at the end. [She also gives useful feedback on the sizing].
Instructions:Two sizes are given - see notes on sizing with the photos at the end. Larger size is shown in brackets, and where only one number is shown it applies to both sizes. Pocket Flaps (make 2)Using No 8 (4mm) needles cast on 13 stitches. 1st row: Purl. Break off wool and leave stitches on a spare needle or stitch holder. Right FrontUsing No 10 (3¼mm) needles cast on 33[35] stitches. 1st row: K2, *
p1, k1; repeat from * to the last
stitch, k1. . Work these two rows 8[9] times more, increasing one stitch the beginning of the last row on the larger size only. {33[36] sts}. †† Shape armhole by casting off 3[3]
stitches the the beginning of the next row. Decrease 1 stitch the the
armhole edge on every row until 26[28]
stitches remain. Work 3[4] rows in stocking stitch thus finishing at the side edge. Place pocket flap: Proceed in yoke pattern as follows: 1st row (right side of work facing):
P8[8]; slip 13 pocket flap stitches
on to left-hand needle, purl across these stitches; purl to end. ††† Keeping yoke pattern correct, shape neck by casting off 5[6] stitches at the beginning of the next row. Decrease 1 stitch at the neck edge on every row until 17[18] stitches remain. Continue on these stitches until work measures 5[5½]inches from the beginning of the armhole shaping, finishing at the armhole edge. Shape shoulder: Left FrontUsing No 10 (3¼mm) needles cast on 33[35] stitches. Work rows 1 and 2 of rib as on Right Front 9[10] times, increasing one stitch the end of the last row on the larger size only. {33[36] sts} Work as for Right Front from †† to
††. Place pocket flap: Proceed in yoke pattern as follows: 1st row (right side of work facing):
P5[7]; slip 13 pocket flap stitches
on to left-hand needle, purl across these stitches; purl to end. Complete as for right Front working from ††† to end. Back:Using No 10 (3¼mm) needles cast on 65[71] stitches. Work rows 1 and 2 of rib as on Right Front 9[10] times. Change to No 8 (4mm) needles and proceed in stocking stitch until work measures same as fronts up to the armhole shaping, finishing at the end of a purl row. Shape armholes by casting off 3[3]
stitches at the beginning of the next 2 rows. Decrease 1 stitch at both
ends of every row until 51[55] stitches
remain. Proceed in yoke pattern as follows: 1st row (right side of work facing):
Purl. Continue in yoke pattern as on these 6 rows until work measures same as fronts up to shoulder shaping. Shape shoulder by casting off 8[9]
stitches at the beginning of the next 2 rows, 9[9]
stitches at the beginning of the following 2 rows. Sleeves (both alike):With No 10 (3¼mm) needles, cast on 32[34] stitches and Work 2¼[2½] inches in k1, p1 rib. Next row: Rib 1[2], (increase in next stitch, rib 3) 7 times; increase in next stitch, rib to end. {40[42] sts}. Change to No 8 (4mm) needles and proceed in stocking stitch, increasing 1 stitch at each end of the 7th and every following 10th[10th] row until there are 50[54] stitches. Continue on these stitches until work measures 10½[12] inches from the beginning. Shape top by casting off 3[3] stitches at the beginning of the next 2 rows. Decrease 1 stitch at each end of the next and every alternate row until 14[16] stitches remain. Cast off. Collar:Using No 10 (3¼mm) needles, cast on 85[89] stitches. 1st row: K2, *
p1, k1; repeat from * to the last
stitch, k1.. Work rows 2-5 inclusive 3 times more, then the 2nd row once. Cast off 9 stitches at the beginning of the next 6 rows. Pockets (make 2):Using No 8 (4mm) needles, cast on 13 stitches. Making UpOmitting the ribbing, with wrong side facing, block each piece by pinning
out round edges. Omitting ribbing, press each piece carefully using a
warm iron and a damp cloth. |
Materials7 [9] oz Double Knitting Yarn. A pair each No 8 (4mm) and No 10 (3¼mm) needles. 12[14] inch open ended zip. Tension22 sts and 30 rows to 4 inches on No 8 (4mm) needles in stocking stitch. Size mattersTo fit 23½[25½] inch chest. Abbreviations:yf: yarn forward; makes an extra stitch which forms a small pattern
hole when knitted on the next row. A word on the woolOriginal called for Patons Moorland, Double Quick, or Totem DK. Disclaimer
|
And here is a picture of the cardigan knitted by Beryl in a modern yarn: 2½ balls of Sirdar Snuggly Double Knitting:
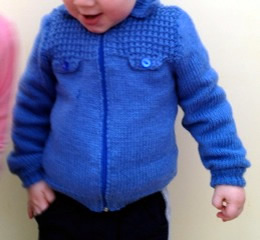
Beryl had some notes on the sizing. The original pattern was for 4-7 year olds; her grandson was only 20 months old and she left the length as it was written - she says: "he is a chunky littel chap" and previous feedback for the Little Raglan Reefer suggested the lengths of these old patterns works up a bit short for modern taste. The sleeves could have been shortened (for a 20 month old) as you can see the cuffs are turned back. Beryl found the zip a challenge and ended up using the sewing machine.
Her conclusion is that if the knitter does the length longer and leaves the sleeves as they are it would be more suitable for a 2-3 year old.
Beryl said: "I love the jacket on my grandson and I have recently found a picture of my brother wearing the same cardigan that my Mum made for him!"
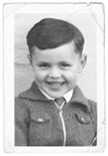
[And needless to say this one is my personal favourite - how is it that all our brothers from that era have such wonderful cheeky grins? All of them "Just William".]
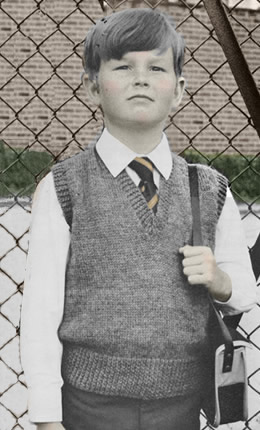
A classic sleeveless school pullover with instructions for 4ply fingering and double knitting.
[Illustrated on a rather serious classic school boy.]
Instructions:The instructions are give for a 28 inch chest with 3 larger sizes in
brackets. Casting onCast on using cable method. 4 ply Pullover BackUsing No 12 (2¾mm) needles cast on 98 [106;
112; 120]
stitches and work in K1/P1 rib for 2 inches Shape Armholes: Shape Shoulders: Cast off remaining stitches. 4 ply Pullover FrontWork as given for back until you reach the armhole shapings, ending with a wrong side row. Shape Armhole and Divide for Neck: Shape Shoulder: Continue to match the first side, reversing all shapings. 4 ply Pullover Neck BorderJoin right shoulder seam. Next row: Work in K1/P1 rib to within
2 stitches of the centre stitch; k2tog, p1, k2togtbl, rib to end. Repeat the last 2 rows 4 times more. 4 ply Pullover Arm BordersJoin left shoulder seam (including the neck border). For each armhole, with right side facing and using No 12 needles pick
up and knit 112 [120; 126;
132] stitches evenly round armhole.
Cast off ribwise. To Make UpPress, using a warm iron over a damp cloth. Double Knitting Pullover BackUsing No 11 (3mm) needles cast on 84 [90;
96; 102]
stitches and work in K1/P1 rib for 2 inches Shape Armholes: Shape Shoulders: Cast off remaining stitches. Double Knitting Pullover FrontWork as given for back until you reach the armhole shapings, ending with a wrong side row. Shape Armhole and Divide for Neck: Now decrease 1 stitch at the armhole edge on the following 5 rows, then
1 stitch on the following 4 alternate rows, and at the same time
decrease 1 stitch at the neck every following 3rd row from the last decrease
until 15 [17; 19;
21] stitches remain. Shape Shoulder: With right side facing rejoin yarn to the remaining stitches on the spare
needle and work to end. Continue with armhole and neck shapings to match the first side, reversing all shapings. Double Knitting Pullover Neck BorderJoin right shoulder seam. Next row: Work in K1/P1 rib to within
2 stitches of the centre stitch; k2tog, p1, k2togtbl, rib to end. Repeat the last 2 rows 3 times more. Double Knitting Pullover Arm BordersJoin left shoulder seam (including the neck border). For each armhole, with right side facing and using No 11 needles pick
up and knit 90 [96; 102;
108] stitches evenly round armhole.
Cast off ribwise. To Make UpPress, using a warm iron over a damp cloth. |
Materials 4 ply version: 5 [6; 7;
7] x 1 oz balls DK version: 7 [7; 8;
9] x 1 oz balls Tension4 ply version: DK version: Size mattersChest all round at underarm: on jumper, 26 [28;
30; 32]
inches. Abbreviationsk2tog/p2tog: decrease by knitting/purling 2 sts together. k2togtbl: decrease by knitting 2 sts together through back loops, sometimes called ssk (slip 1 knitwise, slip 1 knitwise, place 2 sts back on left needle and knit/purl 2 slipped sts together through back loops). p2togtbl: decrease by purling 2 sts together through back loops. A word on the woolThe yarn in ounces. When substituting yarn, ideally you need to calculate using the yardage
of the yarns - and with old patterns this is usually impossible, as the
yardage is not given. So you need to be aware that in some cases, where
the old yarn was synthetic or had a very good yardage, you may find that
you use as much as one 50g ball for every 1 oz ball. Disclaimer
|
This is an adorable romper; the stripes are created by knitting garter stitch ridges sideways using contrast yarn. Pom-pom ties are used as fasteners at the shoulders.
After last months picture of the Andy Pandy puppet, how could I resist making this outfit.
InstructionsThe romper is easy to knit, though - like exam questions - make sure you read the pattern and understand the pictures of the pieces clearly before you start. Pattern stitchesGarter Stitch: every row knitted. Trouser legsThis section is worked sideways in one piece up to the armhole. Dotted lines in picture show the centre sides and the ankle borders. 
Using 3mm needles and white yarn (A) , cast on 34 sts and knit 3 rows of striped pattern. Next row (wrong side) : Cast on 47 sts and purl across these and to end of row. [81 sts] Continue in striped pattern, shaping waist by decreasing 1 stitch at the beginning of the 9th and every following 10th row until 77 sts remain. Work straight until leg measures 23cm (9 inches) from the beginning,
ending with wrong side facing.
Next row (wrong side) : Cast off 47 sts and purl to end of row. [30 sts] Work straight on these 30 sts for 2 cm (¾ inch) ending with wrong
side facing.
Next row (wrong side) : Cast on 47 sts and purl across these and to end of row. [77 sts] Work straight until section measures 36 cms (14¼ inches) from the
beginning, ending with right side facing. Start shaping the waist again by increasing 1 stitch at the beginning
of the next and every following 10th row until there are 81 sts.
Work straight until section measures 47 cms (18½ inches) from the
beginning, ending with wrong side facing. Next row (wrong side) : Cast off 47 sts and purl to end of row. [34 sts] Work 2 rows stocking stitch in white (A). Ankle BordersWith 2½mm needles and white yarn A, knit up 70 sts along lower edge of leg. Next row: K1; (k2tog) 34 times; k1. [36 sts] Now work in garter stitch for 2 cm (¾ inch). Left FrontWith 3mm needles and white yarn A throughout, cast on 53 sts and work 1 cm (½ inch) in garter stitch. Next row (right side): Knit. Next row: K4, SL 1, k2tog, psso,
knit to the last 6 sts; k2tog, k4. Repeat these last 4 rows until 11 sts remain. Next row: K3, SL 1, k2tog, psso,
k3tog, k2. [7 sts] Cast off.  Right BackWork as for Left front. Right FrontWith 3mm needles and white yarn A throughout, cast on 53 sts and work 1 cm (½ inch) in garter stitch. Next row (right side): Knit. Next row: K4, SL 1, k1, psso, knit
to the last 7 sts; k3tog, k4. Rep these last 4 rows until 11 sts remain. Next row: K2, SL 1, k2tog, psso,
k3tog, k3. [7 sts] Cast off. Left BackWork as for Right front. Making UpJoin centre back seam and leg seams. Placing left front over right front and right back over left back, sew
bodice pieces to trousers. Make twisted cords and small pom-poms, and attach to shoulders for fastenings.
|
Materials
|
I think it is very awkward to put a small baby into trousers in the conventional way. Many of these vintage baby patterns from the 1980s have leg openings which I think are much more practical, so I adapted this pattern. I chose buttons but you can apply press studs if you think that is safer.
Instead of sewing the inside leg seams I picked up 111 stitches all around each side and knitted a few rows in 3 x 3 rib, working as follows:
Row 1: K3, *P3, K3; repeat from * to end of row.
Row 2: P3, *K3, P3; repeat from * to end of row.
Repeat these last 2 rows once and cast off in rib
For the other side I inserted a button hole row:
Work rows 1 and 2 in rib as before.
Next (buttonhole) row:
K3, (P1, yrn, P2tog), K3, P3; (K1, yfwd, K2tog);*
P3, K3, (P1, yrn, P2tog), K3, P3; (K1, yfwd, K2tog);
repeat from * once, (6 buttonholes worked), then,
P3, (K1, yfwd, K2tog), P3, (centre buttonhole worked), then,
(K1, yfwd, K2tog), P3, K3, (P1, yrn, P2tog), *
K3, P3, (K1, yfwd, K2tog), P3, K3, (P1, yrn, P2tog);
repeat from * once, K3.
Work row 2 again, then row one, and cast off in rib.
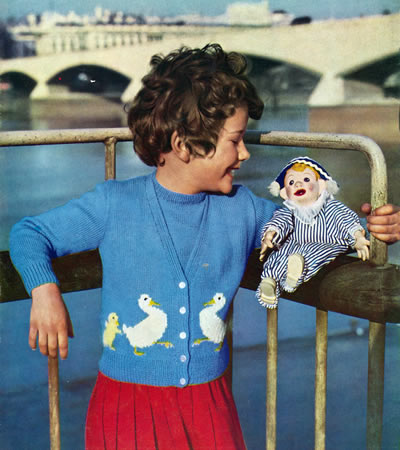
A twin set with a duck motif for Easter. However, the biggest charmer here is in the photo. Not only is the girl cute and looking like she having a lovely day out, but we have a real star in the shape of an original Andy Pandy himself. Even if the cardigan set does not appeal, these are cute little duckling motifs and the charts could be used for cushions or as cross stitch patterns.
Instructions:The individual ducklings are worked intarsia style, but main shade is
stranded loosely across back of work when not in use. ChartsThe charts are included with the pattern instructions below, but for a larger version of the charts you can right click on the icon below and choose "save link as" or "save target as" (browser dependent options) to download and save a pdf file.
If you want to view chart images full size in the browser then right click on the image and choose "view image". Cardigan BackBegin by winding 4 balls each of Lemon (L) and Gold (G) wool. Change to No 11 needles and stocking stitch and work 30 pattern rows
from chart B, reading odd rows knit from right to left and even rows purl
from left to right.
When the 30 rows are completed, continue straight in stocking stitch in main shade (M) only until back measures 9 inches. Then with right side facing, begin to shape armholes by casting off 5 sts at the beginning of the next 2 rows, then k2tog at each end of every knit row until 83 sts remain. Work straight until back measures 14½ inches. With right side facing, shape shoulders by casting off 8 sts at the beginning of the next 6 rows; cast off remaining stitches. Left FrontWith No 12 needles and main shade (M), cast on 50 sts and work 2 inches k1/p1 rib, increasing 1 stitch at the end of the last row. [51 sts] Change to No 11 needles and stocking stitch and work 42 pattern rows
from chart C, reading odd and even rows as on back and joining in a separate
ball of G for each bird.
When the 42 rows are completed, continue straight in stocking stitch in M only until front measures 7 inches. Here shape front edge: Work 3 rows straight. Continue thus, decreasing 1 stitch at front edge on the next and every
following 4th row. Meanwhile, when front matches back at side edge, with
right side facing, shape armhole by casting off 5 sts at the beginning
of the next row, then k2tog at this edge on the following 5 knit rows,
after which you keep the armhole edge straight. Work straight until front matches back. With right side facing, shape shoulder by casting off 8 stitches at the beginning of the next and following 2 alternate rows, armhole edge. Right Front:Work as for left front, reversing all shapings. Sleeves (both alike):With No 12 needles and B. wool, cast on 52 sts and work 2 inches in k1,
p1 rib. With right side facing, shape top by casting off 3 stitches at the beginning of the next 2 rows, then k2tog at the beginning of every row until 46 sts remain, and then at each end of every row until 20 sts remain. Cast off. Front Borders:Join shoulder seams. To make a buttonhole: right side facing, rib 4, cast off 2, rib to end. On the next row casting on 2 over those cast off. Jumper Front:** Change to No 11 needles and work 2 rows in stocking stitch, starting
with a knit row.
When the 26 rows are completed, continue straight in stocking stitch
in M until front measures 9 inches. Then, with right side facing, shape
armholes by casting off 4 sts at the beginning of the next 2 rows,
then k2tog at each end of the next and every following knit row until
80 sts Work straight until front measures 12½ inches. Then, with right side facing, shape neck as follows:- Next row (right side facing): K30, k2tog, turn, and leave remaining stitches on a spare needle. Continue on these 31 sts , decreasing 1 stitch at the neck edge on every
row until 27 sts remain. Then decrease on every alternate row Work a few rows straight until front measures 14 inches. With right side facing, shape shoulder by casting off 8 sts at
the beginning of the next and following 2 alternate rows, (armhole edge). Finish to correspond with first shoulder. Jumper Back Work as for front from ** to ** . [80 sts] Work straight over all stitches until back measures 11½ inches.
Next row (right side facing): K42,
turn, and leave remaining stitches on a spare needle. To make a buttonhole: with right side facing, knit to last 3 sts, wool forward, k2tog, k1. When back measures same as front, with right side facing, shape shoulder by casting off 8 sts at the beginning of the next and following 2 alternate rows, (armhole edge); leave remaining 18 sts on a spare needle. With right side facing, rejoin wool to last 38 sts, cast on 4 sts for underlap. Next row: Knit. Finish to correspond with right shoulder, omitting buttonholes. Jumper SleevesWith No 12 needles and M, cast on 63 sts, and work ¾ inch k1/p1 rib, rows on right side having a k1 at each end. Change to No 11 needles and stocking stitch, shaping sides by increasing 1 stitch at each end of the 3rd and every following 4th row until there are 71 sts. Work a few rows straight until sleeve measures 2¾ inches. With right side facing, shape top by casting off 3 sts at the
beginning of the next 2 rows, then k2tog at the beginning of every row
until 47 sts remain, and then decrease at each end of every row until
19 sts Cast off. Jumper NeckbandJoin shoulder seams. With right side facing, using No 12 needles and M, pick up and knit 87 sts all round neck, including those on spare needles at back and front. Work inch k1/p1 rib, making 4th buttonhole after inch has been done and remembering to keep 4 sts at each end in garter stitch as before. Cast off in rib. Making UpPress parts carefully on wrong side under a damp cloth. Cardigan: embroider eyes and beaks of ducklings as for jumper. |
Materials 3 ply yarn: A pair each No 11 (3mm) and No 12 (2¾mm) needles. Four small buttons for jersey and 5 larger ones for cardigan. Tension32 sts and 40 rows to 4 inches on No 11 (3mm) needles in stocking stitch. Size mattersChest all round at underarm: on jumper, 25 ins; on cardigan, 26 ins;
A word on the woolOriginal called for Patons Beehive Fingering 3-ply. You can find some
nice 3 plies available to meet the tension specified. Disclaimer
|
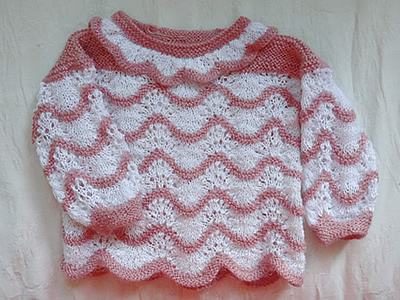
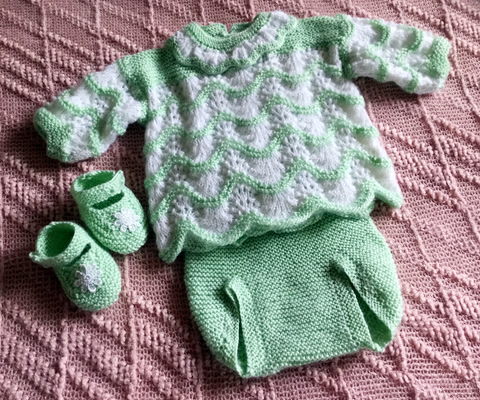
A really pretty top using the ubiquitous but nonetheless charming old shale (or old shell) stitch. Originally it was knitted in fine white cotton bands interspersed with a fine slightly fluffy yarn, giving it a summery feel. However - how charming it would be in red and white for a small person's party outfit at Christmas. I am not sure how I would arrange the colours for a winter version - I favour the dominant red colour for the plain garter stitch - but it might be interesting to have the white as the fluffy bands simulating fur trimming.
The pattern is for an entire outfit with pants, and some cute little cotton sandals (of dubious value...!).
Below we have simply lovely photo from Sandy in Shellharbour, Australia, showing the complete outfit. She has added a of a little pair of bootees of her own design rather than the "sandals" supplied in the pattern.
Such a pretty colour!
Instructions for Angel TopThe angel top is worked in a combination garter stitch (every row knitted) and a Wave pattern using "old shale" (or shell) stitch. When working the Wave pattern, carry the yarn not in use loosely up the side of the work. Angel Top - main sectionThis section is worked in one piece up to the armhole.
Using 3mm needles and pink yarn (A) , cast on 192 sts and knit one row. Continuing with yarn A begin Wave pattern as follows: 1st row (right side) : Knit. Join in white yarn (B), working 5th - 14th rows in white: 5th row: Sl 1; *
(k2tog) 3 times; (k1, yfwd) 6 times; k1; (k2tog) 3 times; repeat from
* to last stitch; k1. These 14 rows form the pattern, Repeat the pattern 3 (4) times more,
then work the 1st to 3rd rows again. Divide for armhole: Next row (wrong side): K57, increase in the next 2 sts, k74, increase in the next st, and leave these 137 sts on a stitch holder; increase in the next st, knit to end. Continue on these remaining 59 sts to make the Left Back. Work rows 5-14, break yarn B and continue in yarn A only. Next row: Knit Continue in garter stitch with yarn A until work measures 24 (27½) cm, or 9½ (10¾) inches, ending with a right side row. Cast off, placing a marker for the collar on the 26th stitch from the end. With right side facing, rejoin white yarn B to sts on stitch holder and pattern 78 (as 5th row of Wave pattern); turn and leave remaining sts on stitch holder. Continue in pattern on these 78 sts for Front and work rows 6-14. Next row: Knit Continue in garter stitch with yarn A until work measures 20 (23½) cm, or 7¾ (9¼) inches, ending with a right side row. Shape Neck: Next row (wrong side): K27 and leave on a stitch holder; cast off 6 sts; knit to end. Continue on remaining 27 sts for first side: 1st and every alternate row: Knit 2nd row (wrong side): cast off 3
sts, knit to end. Work a few rows on remaining 19 sts until Front matches Left Back to
shoulder.
With right side facing, rejoin white to 59 sts on stitch holder and pattern
59 (as 5th row of Wave pattern). Angel Top - sleevesWith 2½mm needles and yarn A, cast on 30 sts and work 10 rows in
garter stitch. Change to 3mm needles, join in white yarn B and beginning with 5th row of the Wave pattern, work in pattern until sleeve measures approximately 11 (14½) cm, or 4¼ (5¾) inches, ending with a 14th pattern row. Break off yarn B and continue in yarn A only.  Angel Top - collarWith 3mm needles and yarn A, cast on 120 sts and work 3 rows in garter
stitch. 1st row: Sl 1 , *
k1, yfwd, k4, k2tog, sl 1, k1, psso, K4, yfwd; repeat from *
to last 2 sts, k2. Rep these 2 rows twice more. 7th row: Sl 1 , *
k1, k2tog, k3, k2tog, k3, sl 1, k1, psso; rep from * to last 2 sts, k2.
[93 sts] Angel Top - neck bandWith 3mm needles and yarn A, cast on 60 sts and work 6 rows in garter
stitch. Making Up the Angel TopDo not press. |
Materials
|
Instructions for PantsThe pants are worked entirely in garter stitch (every row knitted) in one piece, starting at the front waist, working down to the crotch, and then up the back, ending at the back waist.  Begin at front and with 2½mm needles cast on 48(56)
sts and work 2cms, or ¾ inch, in k1/p1 rib. Divide for leg openings:Next row: Knit 13(17) and leave on a stitch holder; k22, turn, and leave remaining 13 (17) sts on a stitch holder. Continue on these centre 22 sts and work 9(10)
cms 3½(3¾) inches in garter
stitch,ending with a right side row. With wrong side facing, rejoin yarn to sts on first stitch holder and
knit to end. ** Begin shaping side by decreasing
1 st at the beginning of the next and following 6th(4th)
row. Decrease 1 st at the beginning of the next and following 4th row 2(1)
times. [8(13) sts] Decrease 1 st at the beginning of the next and following 1(2)
alternate rows. [6(10) sts] Cast off 2 sts at the beginning of the next and following 0(1)
alternate rows. [4(6) sts] With right side facing, rejoin yarn to sts on 2nd stitch holder and knit
to end. [13(17) sts] Shape Front SidesWorking right side of pants as left side from ** until 6(8) sts remain, ending at side edge. Continue shaping sides and join all 3 parts to close leg openings: Next row (wrong side): cast off 2
sts, k4(6) (including st left on needle
after cast-off), k22 from centre, then k4(6)
from left side. [30(34) sts] Next 2 rows: Cast off 2 sts, knit
to end. Shape Back2nd SIZE BOTH SIZES 1st SIZE BOTH SIZES Cast off in rib. Making Up the PantsLeg Borders: With right side facing and using set of 4 needles, knit up 46(51) sts round each leg opening and work in rounds. 1st round: Purl Join side seams. |
Materials
|
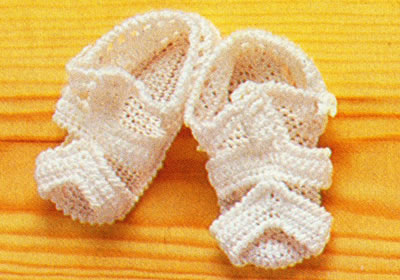
Instructions for SandalsWith 2mm hook make 20 chain foundation row. SOLE1st round: 1 dc in 2nd ch from hook, 1 dc in each of next 17ch, 3 dc in next ch, then back along other side of foundation: 1 ch: 1 dc in each of next 18 ch, 3 dc in next ch, sl st to join. Work 2 more rounds, working 3 dc in stitch at each end of sole as before. 4th round: 1 ch; (1 dc in each of next 19 sts, 3 dc in next st, 1 dc in each of 3 end sts, 3 dc in next st, 1 dc in next st) twice; sl st to join. 5th round: 1 ch; (1 dc in each of next 20 sts, 3 dc in next st, 1 dc in each of 5 end sts, 3 dc in next st, 1 dc in each of next 2 sts) twice; sl st to join. [66 sts] Work 1 round dc on these 66 sts to complete sole and fasten off. With right side facing, mark 33 sts round one end of sole and work back of sandal working back and forth in rows: 1st row: Rejoin yarn. 3 ch; miss
1 st; 1 tr in next st; (1 ch, miss 1 st, 1 tr in next st) 15 times, turn.
Fasten Off. Crab StitchCrab stitch is worked exactly as you do double crochet - but from right to left instead of left to right (assuming you are right handed and normally crochet from left to right). It seems very awkward but just force yourself to do it; push the hook through the stitch to the right of your needle, pull through a loop, then yoh and pull through both loops on hook. It creates a very attractive twisted ribbed edge. There a is you tube extract inserted at end of this item - or go search the web for "crab stitch" for a variety of explanations. TOEMake 18 ch. STRAPS for TOP of SANDALMake 26 ch and work Foundation Row as for Toe. [25 sts] 2nd and 3rd rows: 1 ch, 1 dc in each
stitch to end. Miss 11 sts and rejoin yarn to next stitch 1 ch, 1 dc in each of next 2 stitches. [3 sts] Work 3cms (1¼ inches) in dc on these 3 sts, then continue in crab
stitch round all edges, making a buttonhole at each side of 3 dc strip,
To Make a Buttonhole2 ch, miss 2 rows, 1 dc in next row. ANKLE STRAPMake 17 ch. TO MAKE UPSew Toe and Sandal Straps in place on sole, (see photo). |
Materials
|
* not used in this pattern.
Here is a You Tube item showing how to do crab stitch - a picture painting a thousand words and so on.
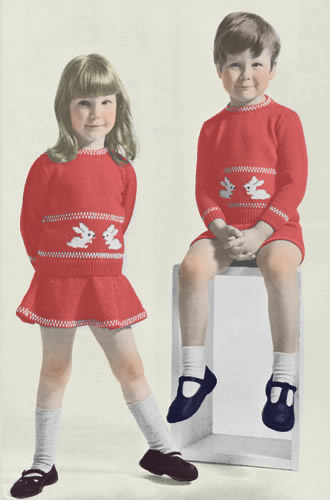
Cute little sweaters with rabbit motifs. Also supplies a pattern for a skirt and little shorts.
"Small girls and boys will love these Bunny Rabbit sets. Hers has a cute flared skirt, and his, neat little trousers. We knitted them in vivid red and white for tough wear."
Instructions.Instructions for one size given for jumper, cardigan, shorts, and skirt. JumperFront** [Editor's note: I used to work twisted rib a little differently to the one described here. I would knit into the back of the knit stitches on right side rows, and purl into the back of the purl stitches on wrong side rows. This leads to very rigidly defined columns of knit stitches on the right side. It looks very attractive but it is less elastic than normal ribbing. ] Change to No 10 (3¼mm). Next row: Knit. Change to No 9 (3¾mm) and, joining in contrast white (W), work the two clour pattern rows 1-4 as follows: 1st row (right side facing): Knit:
* 1R, 1W; repeat from *
to end. Change back to No 10 (3¼mm) needles and work 4 rows stocking-stitch
in R, starting with a knit row. [Editor's note: You might need a second bobbin of red here - if you read later on they suggest you work with 3 bobbins as above and two balls of red - it depends which you find easier..] Continue in stocking-stitch working from chart
over the centre 44 stitches, reading odd rows knit from right to left,
and even rows purl from left to right. 1st row (right side facing): Knit
21 R.; work centre 44 stitches from chart thus:
4 R, join in W bobbin, 10 W, join in R bobbin, 16 R, join in 2nd bobbin
W, 10W., join in a second ball R, 4 R; then knit remaining 21 R. With right side facing, continue in R over all stitches and work 4 rows stocking-stitch. Change to No 9 (3¾mm) needles, join in W and work the two-colour pattern rows 1-4 as before. Break W. Change back to No 10 (3¼mm) needles and continue in stocking-stitch in R, until front measures 8½ inches down centre. With right side facing, shape armholes by casting off 4 stitches at the begining of the next 2 rows, then decrease 1 stitch at each end of every row until 66 stitches remain. Work straight until front measures 11½ inches. With right side facing, shape neck: Next row: Knit 26; turn and leave
remaining stitches on a spare needle. Continue on first 26 stitches, decreasing 1 stitch at the neck edge on every row until 16 stitches remain. Work a few rows straight until front measures 13 ins. With right side facing, shape shoulder by casting off 6 stitches at the begining of the next row, then 5 stitches at the begining of the following 2 alternate rows. With right side facing, slip the centre 14 stitches on to a spare needle. BackWork as for front from **
to **
With right side facing, divide for back opening. Next row: Knit 33, turn and leave remaining stitches on a spare needle. Continue on first 33 stitches until back matches front at armhole edge.
With right side facing, rejoin wool to remaining stitches, and finish
to correspond with first side, reversing shapings. SleevesWith No 11 (3mm) needles and main wool (R) cast on 44 stitches and work 11 rows in k1/p1 rib, knitting into the back of each knit stitch on every row to form a twisted rib. Change to No 10 (3¼mm). Next row: Knit, increasing 1 stitch
at each end of the row. Change to No 9 (3¾mm) needles, join in W, and work two-colour pattern rows 1-4 inclusive again. Break W. Change back to No 10 (3¼mm) needles and continue in stocking- stitch
in R, shaping sides by increasing 1 stitch at each end of the next and
every following 6th row until there are 60 stitches. With right side facing, shape top by casting off 4 stitches at the beginning
of the next 2 rows, then decrease 1 stitch at each end of the next and
every alternate row until 32 stitches remain. Neck borderJoin shoulder seams. Working backwards and forwards (not in the round), continue as follows: Change to No 10 (3¼mm) needles and two-colour pattern. 1st row (wrong side facing): Purl:
* 1R, 1W; repeat from *
to end. Change back to No 11 (3mm) needles and work 7 rows stocking stitch in R, starting with a purl row. Cast off loosely using a bigger needle. To Make UpPress parts on wrong side under a damp cloth, avoiding ribbing. Buttonhole Band Join side and sleeve seams; insert sleeves. TrousersRight HalfWith No 11 (3mm) needles and main wool (R), cast on 82 stitches loosely and work 12 rows stocking-stitch, starting with knit row. Make a hem on the next row by folding the work in half, purl side inside,
and knitting 1 stitch from the needle together with 1 stitch from the
cast-on edge all along. With right side facing, shape back as follows using short row shaping: Next 2 rows: K10, turn and purl back.
Work straight until front seam (short edge) measures 8 ins. With right side facing, shape leg by decreasing 1 stitch at each
end of every row until 76 stitches remain. 1st row (right side facing): Knit:
* 1R, 1W; repeat from *
to end. Change to No 11 (3mm) needles and work 9 rows stocking-stitch. Cast off loosely using a bigger needle. Left HalfWork as for right half, reversing back shaping, i.e. having wrong instead
of right side facing. Your first two rows will read :- To Make UpPress parts lightly on wrong side under a damp cloth. SkirtBack and front alikeWith No 11 (3mm) needles and R wool, cast on 154 stitches loosely, and
work 6 rows stocking-stitch, starting with a knit row. Change to No 10 (3¼) needles and join in W. 1st row (right side facing): Knit:
* 1R, 1W; repeat from *
to end. Change back to No 11 (3mm) needles. Next row: Knit. Make a hem on next row by folding work in half, purl side inside, and knitting 1 stitch from needle together with 1 st. from cast-on edge all along. Next row: Purl, increasing 1 stitch at each end of the row. [155 sts] With right side facing, shape as follows: Next row (1st decrease row): K14,
(slip 1, k2tog, pass slipped stitch over, k28) 4 times, slip 1, k2tog,
pass slipped stitch over, k14. [145 sts] Next row (2nd decrease row): K13,
(slip 1, k2tog, pass slipped stitch over, k26) 4 times, slip 1, k2tog,
pass slipped stitch over, k13. [135 sts] Continue decreasing 10 stitches thus on next and every following 12th
row until 6th decrease row has been worked, and 95 stitches remain. Now shape skirt by decreasing 10 stitches as before but on on next and
following 6th row [75 sts]. Change to k1/p1 rib and work 1 inch, knitting into the back of each knit
stitch on every row to form a twisted rib. To Make UpPress work lightly on wrong side under a damp cloth, avoiding ribbing
at waistband. |
Materials
|
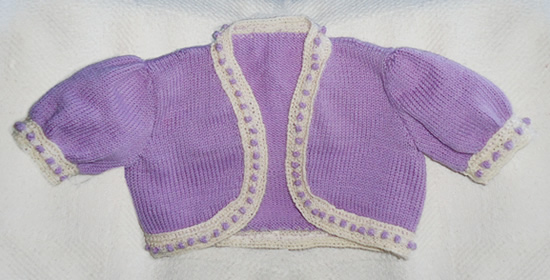
The bolero as such a popular wardrobe accessory for women in the 1950s - it went with all those off-the-shoulder/strapless little numbers (see footnote **) which was the only way to make them respectable day-wear.
This toddler adaptation with its cute puffy sleeves was clearly intended for a little girl.
InstructionsThe instructions are for two sizes - the larger size is given in bold
blue in curly brackets thus: "Intended to fit 1{2}
year old.". BackWith No.10 needles and main shade (M), cast on 70 {76} sts and work straight in stocking stitch, starting with a knit row, until back measures 2¼ {2¾} inches. With right side facing, shape armholes by decreasing 1 stitch at each end of next and every following alternate row until 58{64} sts remain. Work straight until back measures 5¾ {6¼} inches. With right side facing, shape shoulders by casting off 8 {9} sts. at beginning of next 4 rows. Cast off remaining 26 {28} sts. loosely. Left frontWith No 10 needles and M, cast on 18 {21} sts and work 2 rows in stocking stitch, starting with a knit row. Continue in stocking stitch, shaping the front edge by increasing 1 stitch
at the end of the next row, then at this edge on every following row until
there are 27 {30} sts. Right frontWork to correspond with left front, reversing all shapings. SleevesWith No 12 needles and M, cast on 43 {43}
sts and purl 1 row. Next row (right side facing): k2tog,
across entire row. BordersJoin shoulder seams. Main border: With No. 12 needles and contrast yarn C, cast on 7 sts and work in pattern as follows: 1st row (wrong side facing): Using
contrast C, * k1, p1; repeat from
* to last st, k1. These 6 rows form the pattern. Pin in position as you go along Sleeve Borders: In the same way work a strip in the pattern to
fit all round each sleeve edge. To Make UpPress parts gently on the wrong side under a damp cloth. |
MaterialsOriginal materials called for: 2 {2}
ozs Patons Beehive Fin- A pair each Nos 10 and 12 (3¼mm and 2¾mm) needles. Tension30sts and 38 rows to 4 ins over stocking stitch on No 10 needles. Size mattersWidth all round at underarm. 18 {20}
inches; length from top of shoulders, 6½ {7}
ins; sleeve seam, 2½ {2½}
ins. A word on the wool.I used some vintage 3 ply yarn which had no label (but I believe is wool) for the main shade, and some Patons pure wool 3ply in white for the contrast. Disclaimer
|
**Footnote: Have you seen Dana Wynter's outfit at the start of Invasion of the Body Snatchers (1956)?? Here - take a peek - it did have a bolero but she immediately removed it on entering the room.

All this for a visit to the dentist - ok,ok, he was her old boyfriend whom she was trying to impress....

Well - it's so much talked about I could not let it pass without a little commemoration could I?
Just make sure you make them for your own special baby - I am sure the Palace is exploding with little woolly items (and in one of the hottest month's on record...).
This crochet pattern is a staggered shell, which I found a little tricky to follow, so use the detail photo at the end for guidance as to what it should look like.
Instructions.Special pattern stitch: And a reminder of English crochet stitches: Double crochet: draw a loop through next stitch, draw a loop
through both loops on hook. [American single]. Bootees (make 2)Beginning at the sole: make 15(17;20;23)ch loosely. 1st round: Miss 3 ch, 3 tr in next
ch, 1 tr in each of next 1(1;2;2)
ch, 1 htr in next ch, 1 dc in each of next 2 ch, 1 htr in next ch, 1 tr
in each of next 2(3;3;4)
ch, 1 d tr in each of next 3(4;6;8)
ch, 9 dtr in last ch. 2nd round: 3 ch, "inc", 1 tr in next st, "inc", 1 tr in each of next 10(12;15;18) sts, ("inc", 1 tr in next st) 4 times, "inc", 1 tr in each of next 10(12;15;18) sts, ("inc", 1 tr in next st) twice, sl st in 3rd ch at beginning. You now have 46(50;56;62) tr, counting the initial 3 ch as 1 tr. 3rd round: Working into the back loops only (leaves a ridge to mark sole): 3 ch, 1 tr in each tr to end; sl st in 3rd ch at beginning. 4th round: 3 ch, 1 tr in each tr to end; sl st in 3rd ch at beg. Repeat the 4th round 0(0;1;1) time(s). Shape InstepYou are now going to work back and forth across the instep in rows. 1st row: 3 ch, 1 tr in each of next
28(30;33;36)
tr, miss next tr, sl st across next 2 tr. Turn. Repeat the 2nd row 4(4;4;6) times. Next row: Miss 2 sl st, 1 tr in each of next 10 tr, 1 tr in each tr to end; sl st in 3rd ch at beg of 1st row to rejoin the round. You now have 28(32;38;38) tr. Next round: 4 ch, miss 1(1;2;2) tr, 1 tr in next tr, * 1 ch, miss 1 tr, 1 tr in next tr, repeat from * to last 1(1;2;2) sts, miss last 1(1;2;2) sts, sl st in 3rd of 4 ch to join the round. You now have 14(16;18;18) holes. Next round: 1 ch, 1 dc in same place
as sl st, * 1 dc in next 1 ch sp,
1 dc in next tr, repeat from * to
last ch sp, 1 dc in 1 ch sp, 1 dc in same place as first dc, DO NOT
JOIN the round. Turn, and work in rows as follows: First size only: 1st row (wrong side): 1 ch, 2 dc in first dc, * 3 ch, miss 3 dc, (1 dc, 3 ch, 3 tr) in next dc, miss 2 dc, (1 dc, 1 ch, 1 dc) in next dc, repeat from * ending last repeat with 2 dc in last dc instead of (1 dc, 1 ch, 1 dc). 2nd, 3rd and 4th sizes: 1st row (wrong side): 1 ch, 2 dc in first dc, * 3 ch, miss 3 dc, (1 dc, 3 ch, 3 tr) in next dc, miss 2 dc, (1 dc, 1 ch, 1 dc) in next dc *; repeat from * to * (0;1;1) times; 3ch, miss (2;3;3) dc, (1 dc, 3 ch, 3 tr) in next dc, miss (2;3;3) dc, (1 dc, 1 ch, 1 dc) in next dc (3;1;1) times; repeat from * to * (1;2;2) times, ending last repeat with 2 dc in last dc instead of (1 dc, 1 ch, 1 dc). All sizes: You now have 4(5;5;5) patterns. 2nd row: (3 ch, 1 tr) in first dc, * 3 ch, (1 dc, 3 ch, 3 tr) in next 3 ch sp, miss next 3 ch sp, (1 tr, 1 ch, 1 tr) in next 1 ch sp, repeat from * ending last repeat with 2 tr in last dc instead of (1 tr, 1 ch, 1 tr). 3rd row: (3 ch, 1 tr) in first tr, * 3 ch, (1 dc, 3 ch, 3 tr) in next 3 ch sp, miss next 3 ch sp, (1 tr, 1 ch, 1 tr) in next 1 ch sp, repeat from * ending last repeat with 2 tr in top of turning ch instead of (1 tr, 1 ch, 1 tr). Repeat the 3rd row 1(1;3;3) times. Next row: (3 ch, 1 tr) in first tr, * 3 ch, 1 dc in next 3 ch sp, 3 ch, miss 1 sp, (1 tr, 1 ch, 1 tr) in next 1 ch sp, repeat from * ending last repeat with 2 tr in top of turning ch instead of (1 tr, 1 ch, 1 tr). Next row: (3 ch, 2 tr) in first tr, * miss 1 sp, (3 tr, "Picot", 3 tr) in next dc, miss 1 sp, (3 tr, "Picot", 3 tr) in next 1 ch sp, repeat from * to last pattern, miss 1 sp, (3 tr, "Picot", 3 tr) in next dc, miss 1 sp, 3 tr in top of turning ch, "Picot". Fasten off. Make UpUsing a flat seam, join back seam. |
Materials
|
Picture of pattern detail:
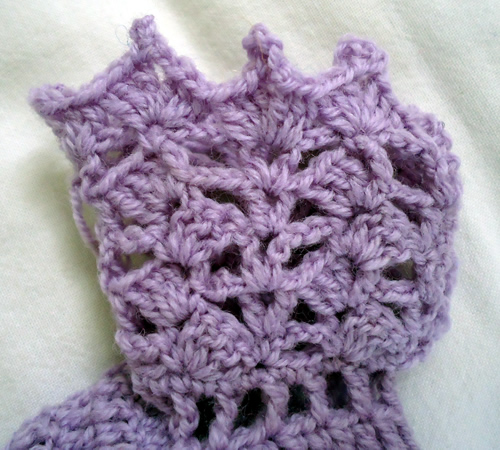
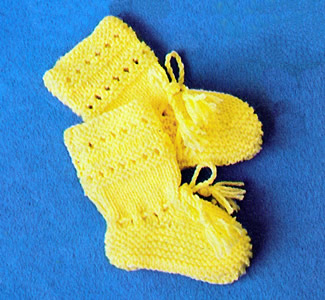
Well - it's so much talked about I could not let it pass without a little commemoration could I?
Just make sure you make them for your own special baby - I am sure the Palace is exploding with little woolly items (and in one of the hottest month's on record...).
This is the knitted set which is fairly plain with a discreet eyelet pattern, and should be quite simple to make.
Bootees (make 2)With No 10 needles, cast on 33 sts. and knit 1 row. 1st - 4th rows: Knit. Repeat the last 2 rows 4 times more. Next row: as 5th row. Work 14 rows in stocking stitch on these 13 sts. Rejoin yarn to inside edge of 10 sts, then knit up 10 sts along side
of foot; knit across 13 sts on needle, knit up 10 sts from other side
of foot, finally knit across remaining 10 sts. [53 sts] Shape toe: 1st row: (k1, k2tog, k21, k2tog)
twice; k1. Cast off. Make UpPress lightly on wrong side. Join seam. |
Materials
|
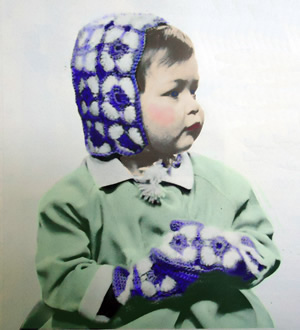
This looks like a little Victorian cherub, though the pattern is much later. It uses a combination of smooth and fluffy 4 ply yarns in a relatively simple crochet motif.
I think the bonnet is particularly cute.
Instructions:The items are made by piecing together a basic motif: Using blue colour (B), make 8 chain and join into a ring with a slip
stitch. Bonnet:Make 14 motifs the same and join together as shown in diagram.
Back of bonnet: 1st row: 1 dc into 2nd ch from hook,
1 dc into each of next 27 ch Continue in dc increasing 1 stitch at each end of every 4th row until
there are 36 dc. Making up the Bonnet: Pin one edge of front piece up sides and all round top edge of back piece.
With right side of work facing and B, crochet the 2 pieces together but
working 4 dc into edge of back piece only between motifs Fasten off. Mitts:Starting with the front of the mitts: Using B, make 21 ch Now work the back of the mitts: Work 2 motifs as given for bonnet and join together as before. With right side of motifs facing, start in corner and work along one
long edge as follows:- Turn and work 9th and 10th rows as given for front of mitt. Thumb: Using B, make 2 ch. Join thumb seam from top down as far as marker. Making up the mitts: Make another mitt in the same way but inserting thumb on opposite side
to first mitt when making up. |
Materials2 ozs 4 ply, in Powder Blue and One No 12 (2¾mm) crochet hook. TensionEach motif measures about 2 inches square. 6½ dc to an inch over
plain dc. Size mattersBonnet: All round front edge measures 15½ inches. Crochet abbreviations:ch: chain [Editor's note: Remember these are English crochet instructions where dc is equivalent to US single crochet - see "Terminology" in the side bar.] A word on the wool.Original yarn was Patons Beehive 4ply and Fuzzy Wuzzy angora. Disclaimer
|
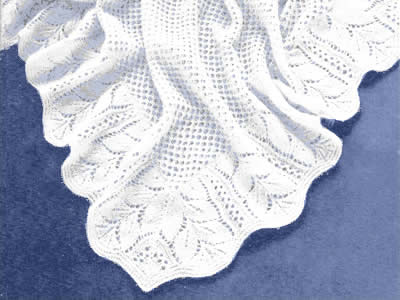
A lace baby shawl made in a 3 ply fingering weight, which makes it a bit more feasible to contemplate as a viable project than the traditional 2 ply, while yet remaining fine and lacey. Added to that, it is made up in sections, rather than a single piece which makes it easier to handle, with all the decreasing lace stitches.
Note added September 2018: since I first transposed this pattern I have had a number of queries so I have recently checked the pattern by knitting it myself from the instructions, and as a consequence corrected some scripting errors (random capital letters and typos), plus I have added the number of stitches after each alternate pattern row on the border pieces. I hope this will help, because despite the fact that the stitches overall are gradually decreasing, on some rows the stitch count increases.
I hope I have caught all the remaining issues, but, as ever, I always welcome anyone sharing any problems they may encounter while knitting it.
InstructionsThe shawl is made in 5 pieces: first a centre square, and then 4 mitred borders that are sewn on each side of the centre. Centre SquareWith No 8 needles, cast on 162 stitches. 1st row: knit. Repeat the last 4 rows until work measures 21 inches. Borders (make 4)With No 9 needles, cast on 206 stitches. 1st row: knit. Repeat 2nd and 3rd rows twice more [200 sts]. Change to pattern as follows:- 1st row: p2tog, p4, k2tog, wrn, p2,
* (k1, wfd) twice, k2, k2tog, p1,
sl1, k1, psso, k1, k2tog, p1, sl1, k1, psso, k1, k2tog, p1, sl1, k1, psso,
k2, (wfd, k1) twice, p2, k2tog, wrn, p2; repeat from *
5 times more, p2, p2tog. [186 sts] Cast off 162 stitches. Make 3 more pieces the same. To Make UpPin parts out and press very lightly under a damp cloth (so not to flatten the pattern stitches too much). |
Materials
|
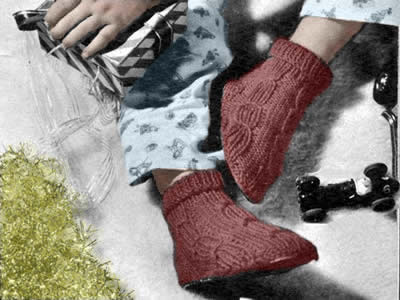
Toddler slippers for a quickly knitted Christmas gift. The top of each slipper is knitted, and is designed to be attached to a purchased leather sole. You could make your own out of leather (but be prepared to line it - perhaps with quilt batting and fabric, fleece fabric, or a shaped piece of knitting. If you design your own knitted sole you can make it non-slip by sewing on sole-shaped cut-outs from cushioned fabric ("slip-a-grip"); various brand options can be purchased on a roll from kitchen suppliers, or you can buy specialist sewing fabrics for this purpose.
Below I've added a great You Tube link for instructions on how to make your own non-slip soles.
InstructionsBoth slippers are worked alike. The following special abbreviation is used throughout the pattern, making a wide ribbed cable. Tie 5: Insert right-hand needle between 5th and 6th stitches from point of left-hand needle, draw loop through and place on point of left-hand needle, then k2tog, p1, k1, p1, k1.
Slipper (make 2)With No 11 needles, cast on 45 stitches and work 2½ inches in k1/p1
rib, rows on right side having a k1 at each end. Slip first and last 6 stitches on safety-pins for heel. With right side facing, rejoin wool to the centre 33 stitches and with No 9 needles continue in pattern for instep as follows:- 1st row: p4, (rib 5, p5) twice, rib
5, p4. Repeat the last 2 rows once more. 5th row: p4, tie 5, p5, rib 5, p5,
tie 5, p.4. Repeat 1st and 2nd rows twice more. 11th row: p4, rib 5, p5, tie 5, p5,
rib 5, p4. These 12 rows form pattern. Repeat, them once more, then rows 1-6 inclusive again. Continue in pattern decreasing 1 stitch at each end of next and following 2 alternate rows: 27 stitches remain. Now decrease 1 stitch at each end of every row until 15 stitches remain. Cast off. Join side edges of ribbing to form back seam. For the heel: Next row: p twice in 1st Stitch,
p to last stitch, p twice in last stitch. FinishingPin out patterned part and heel of each slipper and press on wrong side
under a damp cloth, avoiding ribbing. Pin tops to slipper soles and sew firmly in position. |
Materials
|
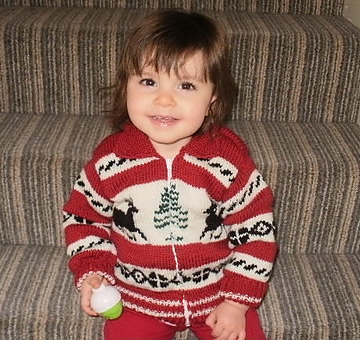
This looks so cute and would make a lovely Christmas cardigan for a toddler. The fair-isle design is not too challenging and hopefully you have plenty of time to knit for this year's festivities.
One size only I'm afraid, but you could increase it slightly by increasing the yarn weight and needle size.
This was beautifully knitted by Sara for her daughter, who also models it. The original (boy) model seen after the pattern instructions.
InstructionsBack and fronts are worked together and then divided and worked separately at the armholes. Note that all the charted patterns are worked in shades "dark" and "light". The medium shade is used for bands of colour. Back and Fronts:Using No 8 (4mm) needles and Medium shade, cast on 127 sts. Change to No 7 (4½mm) needles and work remainder of Back and Fronts
in stocking stitch, (knit on right side, purl on wrong side). Commencing with a knit row, work 4 rows Medium, then 3 rows Light. Starting with a purl row, work rows 1-7 inclusive. from Chart A, reading chart from left to right on purl rows and right to left on knit rows.  Starting with a knit row, work: Work rows 1-20 inclusive from Chart B, working from right-hand side to
the centre stitch; work the centre stitch; then work back to the right-
hand side on every row.  Divide for Back and Fronts:Next row (2lst row of Chart B): K26
in Light, cast off 11 sts in Light; (1st left on needle after cast-off),
k25sts in Light, k1 st in Dark, k26 sts in Light, cast off 11 sts in Light.
(1st left on needle after cast-off), knit remaining 25 sts in Light. Next row (22nd row of Chart B): P2
in Dark, p24 in Light. Using Light, work 2 rows. Work 3 rows in Light, decreasing 1 stitch at the neck edge on every row. [20 sts] Starting with a purl row, work rows 1-3 inclusive from Chart C.  Starting with a purl row, work 2 rows Light, 1 row Medium. Back:Slip the group of 53 sts back on to the working needles, and with wrong side facing rejoin Light proceeding for Back as follows: Next row (22nd row of Chart B): P24
in Light, p5 in dark, p24 in Light. Work 3 rows in Medium. Next row: Using Medium, k2tog; knit to the last 2 sts, k2tog. [49sts] Armhole shaping is now complete. Starting with a purl row, work rows 1-3 inclusive from Chart D.  Using Medium for the remainder of the Back, continue until the armhole
measures 5 ins, (that is 5 ins from the 11 cast-off sts), finishing at
end of a purl row.. Right Front:Slip remaining 26 sts back on to the working needles, rejoin Light, and with wrong side of work facing proceed for Right Front as for Left Front, reversing all shapings, and noting that the first 4 rows will read: Next row (22nd row of Chart B): Purl
24 in Light, 2 in Dark. Sleeves[Editor's note: The sleeves are knitted top down, making for easy length adjustments (or repairs).] Using No 7 needles and Medium, and commencing at the top of the Sleeve,
cast on 49 sts. Work rows 1-3 inclusive from Chart D. Work rows 1-7 inclusive from Chart E.  Work 3 rows in Light, 9 rows in Medium, and 3 rows in Light.
Next row: Using Medium, (p1, p2tog, p2, p2tog) 7 times. [35 sts] Change to No 8 needles, and commence the cuff, working stripes in rib
as for back and fronts welt as follows: Back CollarUsing No. 8 needles and Medium slip 13 sts. from Back neck on to the
working needles, and with right side of work facing proceed in rib as
on welts, increasing 1 st. at both ends of the 3rd and every following
alternate row until there are 33sts. Right part of CollarUsing No. 8 needles and Medium, cast on 2 sts. 1st row: Increase in the 1st stitch,
k1. Cast off. Left part of CollarUsing No. 8 needles and Medium, cast on 2 sts. 1st row: Increase in the 1st stitch,
k1. Cast off. To Make UpOmitting the ribbing, with wrong side of work facing block each piece by pinning out round edges. Omitting ribbing, press each piece using a warm iron and damp cloth. Using a back-stitch seam join shoulder and sleeve seams and stitch sleeves into position. Using a flat seam, stitch cast-off edge of Right Portion of Collar to
shaped edge of Back Collar noting that turnings should be placed nearest
to neck edged. Stitch side of Collar into position. Stitch zip into position. Press seams. |
Materials
|
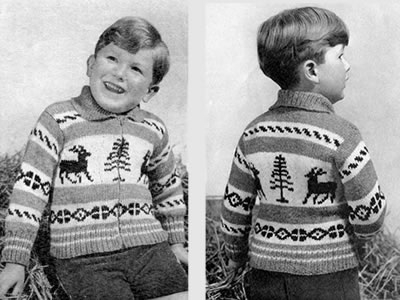
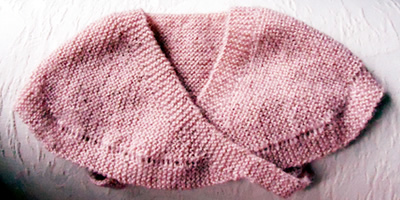
This is so very easy to knit and looks so cute over a (Liberty?) cotton baby frock. No idea how practical it is to keep in place, but it has secure back fastening straps and is perfect as a gift or for that special summer baby occasion.
InstructionsThe shawlette is worked in garter stitch (every row knitted) throughout. You start your knitting at the bottom of the back and work up towards the neck, where you divide and complete each front section separately. It is designed to cross over at the front, and button into place at the back. Using No 12 needles, cast on 50 sts and work in garter stitch for ½ inch (approximately 8-9 rows). Next row(make eyelets): K6; **
wrn, k2tog; repeat from ** to last
6 sts; k6. Start to shape the back as follows: 1st row: K6, wrn; knit to last 6 sts; wrn, k6. Repeat these two rows, (increasing 2 sts on each alternate row), until there are 115 sts. Your work then measures approximately 5¾ inches from the beginning. Now start to shape the right front, working each side of the neck separately. Next row: K6, wrn, k40, turn. Working only on these 47sts: 1st row: Knit. Repeat these two rows, (decreasing 1 stitch on each alternate row), until 15 sts remain. Next row: K6, wrn, k3tog, k6 Repeat the last 2 rows until 6 sts remain (your last decrease row will be "k2tog, k5"). Work strap, buy continuing to knit on these 6sts for 2¼ inches. Next row (make buttonhole): K2, cast
off 2, knit 2. Now pick up the sts left on the spare needle and join yarn to neck edge where you left off. Cast off 23 sts then, start to shape the left front, by knitting to the last 6sts, wrn, k6 [47 sts]. Working only on these 47sts: 1st row: Knit. Repeat these two rows, (decreasing 1 stitch on each alternate row), until 15 sts remain. Next row: K6, s2,k1,pass 2 slipped
sts over; wrn, k6 Repeat the last 2 rows until 6 sts remain (your last decrease row will be "k5, s1,k1,psso"). Work strap, buy continuing to knit on these 6sts for 2¼ inches, and finishing with a buttonhole as for the right front. To Make UpDo not block or press. |
Materials
|
Here's a view showing you the back.
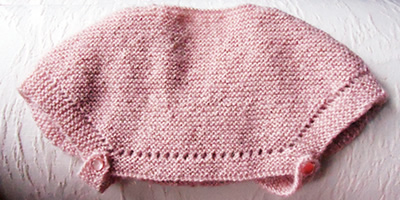
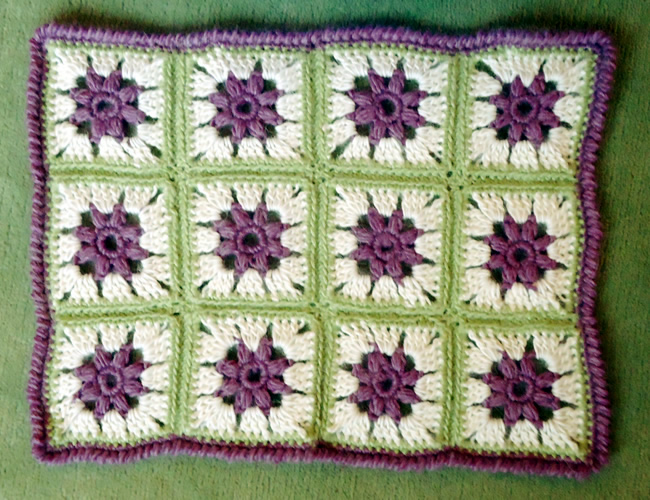
This is small blanket or cot cover made from 12 crochet squares in chunky yarn (so quick to make). It's based the usual granny-square principle, but a very pretty example of it incorporating the central flower motif.
InstructionsThere are a couple of new stitches used in this pattern, as well as basic chain, dc, and treble. There is a "cluster" used in making the central flower, and crab stitch for the edging. Make cluster: Working all into the same stitch, **yoh,
draw through loop **; repeat from
** to **
4 times (9 loops on hook); yoh, draw loop through all loops on hook; yoh,
draw loop through stitch on hook. Crab stitch is worked exactly as you do double crochet - but from right to left instead of left to right. It seems very awkward but just force yourself to do it; push the hook through the stitch to the right of your needle, pull through a loop, then yoh and pull through both loops on hook. It creates a very attractive twisted ribbed edge. There a is you tube extract inserted at end of this item - or go search the web for "crab stitch" for a variety of explanations. Motif (make 12)Starting at the centre of the square: using 7mm hook and first contrast, (plum), make 6ch and join in a ring using a slip stitch. 1st round: 8dc into the ring and
join with a slip stitch to top of first dc. Fasten off. This completes the motif. 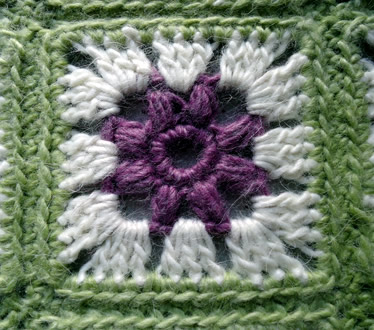 To Make UpMake 12 squares altogether. With 7mm hook and 3rd contrast (lime), join 2 squares together; hold
right sides together and slip stitch through the back loop of each dc,
leaving the front loops exposed as a decorative ridge on the right side
(see photos). Join 3 squares in a row, then join the 4 rows together. Finally, using first contrast (plum) and right side facing, work a row of dc all around the blanket, and work 2 or 3sts into the 4 corner sts, to make it curve properly. Then, keeping the right side facing you, change to a 6mm hook and go back the way you came, working one row of crab stitch right to left. Sew in all ends. Block the blanket by pinning it out and dampening; leave to dry. You can press very lightly with a damp cloth - just hold the iron above the cloth so it heats it but do not press down. You want to leave the texture of the stitches in place, so do not press heavily. |
Materials
|
Here is a You Tube item showing how to do crab stitch,
(a picture painting a thousand words and so on).
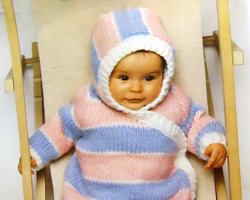
This is a vintage baby-bag pattern probably intended for babies up to 3 months in age. It's very simple to knit and fastened around the edge with easy poppers. It's tempting to knit this in beautiful, soft, lofty yarns - however, it does need to be washable, if not so very hard wearing.
OK - maybe not so many colours - but so cute!
InstructionsThe striped pattern is worked as follows: 1st row: Knit in main shade These 22 rows are repeated to form the striped pattern. BodyThe body is worked in one piece; you start off knitting short, shaped pieces for the back and front separately then join them both onto one needle. The pattern as written should work out that the stripes match up when you join them together - make sure they do - and you may want to use a circular needle for the 86 stitches in chunky yarn. Back: With No 4 (6mm) needles and second contrast (Pink), cast on 25 sts and
purl one row. 1st row(right side): Cast on 3, knit
to end. Change to white yarn for 1 row: Change to blue yarn for 9 rows: Change to white yarn for 1 row: Change to pink yarn and work in sts for 5 rows starting with a purl row. Front: With No 4 (6mm) needles and first contrast (Sky Blue), cast on 23 sts
and purl one row. 1st row(right side): Cast on 3, knit
to end. Change to white yarn for 1 row: Change to pink yarn: [Editor's note: You have ended with right side facing about to start your 6th row in pink yarn.] Right side facing, continuing in pink yarn, knit 41sts from front, and then 45 sts from back (stitches on holder). [86 sts] Continue straight until work measures 20 inches (51cm) - (measure the
back segment), ending with a wrong side row. Right side facing, tie coloured thread or place marker, between the 41st and 42nd sts and between the 84th and 85th sts. Next row (right side facing): Cast
off 4sts, work to end, and increase (cast on) 3 sts. [85sts] [Editor's note: You are now about to start the raglan shaping on the front, having completed 7 rows in colour blue with right side facing to begin 8th row in blue.] Next row(right side facing and keeping striped sequence correct): Cast off 3 sts, k 33 (34sts on needle). Turn, leaving remaining 48sts on a spare needle. 2nd row: Cast off 2 sts, purl to
end. [32sts] Change to white yarn for 1 row: Change to pink yarn for 10 rows: Change to white yarn for 1 row: Change to blue yarn for rest of front: The front should now measure 4¾ins (12cm) from beginning of raglan
shaping, and 2 sts remain. Back raglan shaping: With right side facing, take up 43sts of the back and leave the remaing
5 sts at the end of the row on a holder. Keeping striped sequence correct work as follows: cast off 2 sts at the
beginning of the next 6 rows, and one stitch at the beginning of the next
16 rows. With right side facing, take up the remaining 5 sts on the holder, and
keeping striped sequence correct work as follows: 1st row (right side facing): Cast
off 2 sts, knit to end. Change to white yarn for 1 row: Change to pink yarn for 10 rows: Change to blue yarn to complete: The work should now measure 4¾ins (12cm) from beginning of raglan
shaping, and 2 sts remain. Here's a photo of what it looks like (Figure 1):
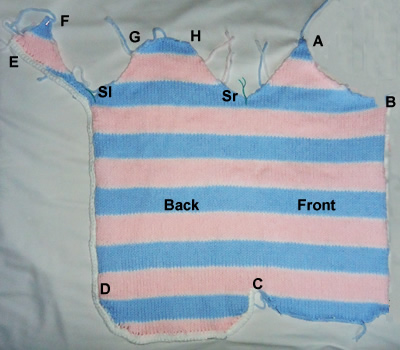
Sleeves:With No 6 (5mm) needles and main shade, cast on 26sts. and work 4 rows in k1/p1 rib, ending with a wrong side row. Change to No 4 (6mm) needles and striped stocking stitch starting with 1 row of main shade (White). Then work in blue as follows: 2nd - 10th row: Stocking stitch in
blue yarn 12th row: Purl one row in white. 13th - 20th row: Stocking stitch
in blue yarn 23rd row: Knit one row in white. Work 7 rows straight in blue. Work measures 7ins (18cm), ending with
right side facing to start raglan shaping. Shape raglan by casting off 3sts at the beginning of the next 2 rows, 1st at each end of every following 3rd row, twice, 6 sts remain. Cast off. HoodWith No 4 (6mm) needles and first contrast, cast on 17 sts and work in
striped pattern starting with 3 rows of the first contrast. Cast on 22sts at the beginning of the next right side row. [39 sts] Continue straight until work measures until work measures 11½ins (29cm), ending with wrong side row, and 2 rows of second contrast. Cast off 22sts at the beginning of the next right side row. [17 sts] Continue straight until work measures until work measures 18ins (46cm), ending with wrong side row, and 2 rows of first contrast. Cast off. Here's a photo showing how the hood looks (Figure 2):
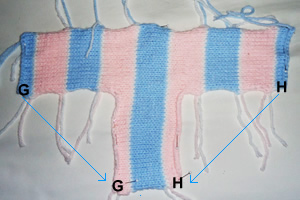
Front and Hood Band:With No 6 (5mm) needles and main shade, cast on 211sts and work 4 rows in k1/p1 rib, arranged as follows: 1st row: K2 *
p1, k1, repeat from * to last stitch;
k1. End with a wrong side row. Next row: Knit and leave sts on a holder. To Make UpSew up sleeve seams, and sew raglan seams together. Sew up hood seams, bringing together points G and H to make the hood
shape as shown in Figure 2 and then sew the back of
the hood to the back neck of the body between points G and H in Figure
1. With No 6 (5mm) hook and main shade work 2 rows dc along edge of sleeping
bag back from E to D and all around to C (refer back to Figure
1), working tightly across the bottom of the back section so that
it is slightly gathered and curls up to form the bottom of the bag. Here's a photo of the bottom section of the back of the bag (Figure 3):
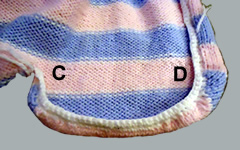
Sew on front and hood band stitch by stitch from C all around to A and then around edge of hood from A to E fitting the edge of the band into the corner by the edge of the hood, at point E. Sew on snap fasteners evenly from C to D to E on right side of work and from A to B to C on wrong side edge of front. Press all seams heartily. (That is: carefully with a damp cloth). Sew on decorative buttons if required. |
Materials
|
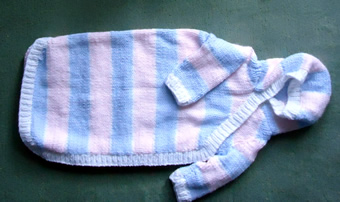
|
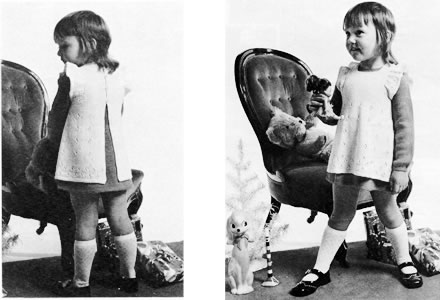
All dressed up in a charming pinafore, suitable for a spring or summer
celebration, perhaps, in a lighter cotton-blend 4ply. Alternatively, try an angora
or mohair blend for a more wintry festive feel.
The pattern for the dress underneath is also given, although, today, we seem to be fully equipped with central heating everywhere, so this combination may prove to be
too hot for most children.
InstructionsThe pinafore is worked in one piece up to the armhole shaping. Panel Pattern over 5 stitches: 1st row: k2, yfwd, k2tog tbl, k1 With No 12 (2¾mm) needles cast on cast on 223/239/255 sts. and work 5 rows garter-stitch, that is: every row knit. Change to No 10 (3¼mm) needles and pattern as follows : 1st row (right side facing): knit. Shape skirt and place panel pattern as follows: 1st decrease row: k5/13/5, (panel pattern 5 as 1st row, k5, k2tog, k4) 13/13/15 times, panel pattern 5 as 1 st row, k5/13/5. [210/226/240 sts] Keeping continuity of panel pattern, work 11/17/25 rows straight. 2nd decrease row: k5/13/5, (pattern 5, k4, k2tog, k4) 13/13/15 times, pattern 5, k5/13/5. [197/213/225 sts] Work 15/17/29 rows straight. 3rd decrease row: k5/13/5, (pattern 5, k4, k2tog, k3) 13/13/15 times, pattern 5, k5/13/5 [184/200/210 sts] Work 15/17/29 rows straight. 1st and 2nd sizes: Continue decreasing
13 sts thus on next and following 16th/18th
row [158/174 sts]. All sizes: Divide for front and backs: Continue straight on these 21/23/25 stitches for right back until work measures 14½/16½/18½ inches, ending with right side facing. Shape shoulder by casting off 3sts at the beginning of the next
and following alternate row. With wrong side facing, rejoin yarn to remaining stitches from holder; cast off 34/38/42, (for armhole), p43/47/51, turn and leave remaining stitches on a spare needle or stitch-holder. Continue straight on these 43/47/51 stitches for front until work measures 12/13½/15½ inches, ending with right side facing. Divide for neck: Work 1 row straight. Cast off remaining 2/3/4 sts. With right side facing, rejoin yarn to remainiing stitches, cast off centre 27/29/31, then finish to correspond with first side, reversing shapings. With wrong side facing, rejoin yarn to remaining stitches on holder, cast off 34/38/42, (for armhole) purl to end. Finish to correspond with right back, reversing shapings. Shoulder Frills:With No 12 needles, cast on 103/111/119
sts. and work 3 rows garter-stitch. To Make UpUsing a warm iron and a damp cloth. press parts lightly on wrong side. Join shoulder seams. Make borders: With right side facing and 3mm hook, work 2 rows
dc up left back, round neck and down right back. increasing and decreasing
at corners as required. Press seams. Sew on buttons. |
MaterialsOriginal materials called for: 3/3/4
50g balls 4 ply fingering. A pair each Nos 10 and 12 (3¼mm and 2¾mm) needles. 4 small buttons. Tension28 sts and 36 rows to 4 inches over stocking-stitch on No 10 needles. Size mattersThree sizes given for 22/24/26
inch chest; length from top of shoulders: 14½/16½/18½ inches. Abbreviationstbl: through back of loops ch: chain A word on the wool.The original colour combination is white for the apron with "Damask Rose" for the dress. Disclaimer
|
Eyelet pattern and sleeve frill detail:
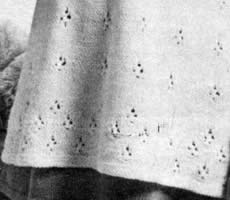
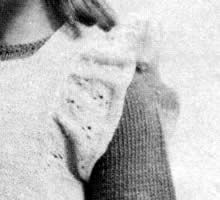
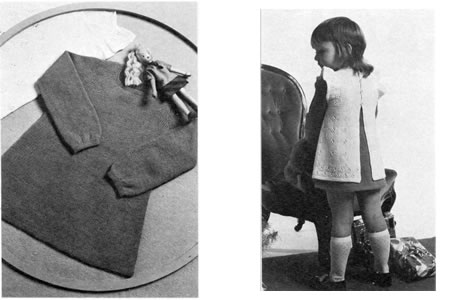
This is the plain and simple dress designed to go under Miss Muffet's pinafore.
InstructionsThis is an A-line dress, knitted completely plain, with a high round neck and long sleeves. Back** Change to No 10 needles and stocking-stitch, and, starting with a knit row, work 8 rows straight. 1st decrease row: k26/28/30, k2tog, k2tog tbl, k54/56/60, k2tog, k2tog tbl, k26/28/30. [110/116/124 sts] Work 11/13/15 rows straight. 2nd decrease row: k25/27/29, k2tog, k2tog tbl, k52/54/58, k2tog, k2tog tbl, k25/27/29. [106/112/120 sts] Work 11/13/15 rows straight. 3rd decrease row: k24/26/28, k2tog, k2tog tbl, k52/54/58, k2tog, k2tog tbl, k24/26/28. [102/108/116 sts] Work 11/13/15 rows straight. Continue decreasing 4 stitches thus on the next and every following 12th/14th/16th
row until 82/88/96
sts; remain. Work a few rows straight until back measures 12/13½/15 inches, ending with right side facing. Shape armholes by casting off 4 sts. at the beginning of the next
2 rows, then decrease 1 stitch at each end of every row until 62/68/72
stitches remain. Work a few rows straight until back measures 14/16/17½ inches, ending with right side facing. Divide for back opening: Continue straight on first set of stitches until back measures 16½/18½/20½ inches, ending with right side facing. Shape shoulder by casting off 4 stitches at the beginning of the
next and following 2 alternate rows, then 2/3/4
stitches at the beginning of the following alternate row. With right side facing, rejoin yarn to remaining stitches and finish to correspond with the first side, reversing shapings. FrontWork as for back from **
to **. Divide for neck: Shape shoulder by casting off 4 stitches at the beginning of the
next and following 2 alternate rows. With right side facing, leave centre 16/18/20
stitches on a stitch-holder, and rejoin yarn to remaining stitches and
finish to correspond with first side, reversing shapings. SleevesWith No 12 needles, cast on 40/44/46
sts. and work 7 rows garter-stitch. Shape top by casting off 4 stitches. at the beginning of the next
2 rows, then decrease 1 stitch at each end of the next and every alternate
row until 34 stitches remain. Cast off. To Make UpUsing a warm iron and a damp cloth. press parts lightly on wrong side. Join shoulder seams. Neckband: With right side facing and No 12 needles, start at top
of left back and work as follows:- Left Back Border: With 3mm hook, work 2 rows dc along left back
edge. Join side and sleeve seams; insert sleeves. |
MaterialsOriginal materials called for: 4/4/5
50g balls 4 ply fingering. A pair each Nos 10 and 12 (3¼mm and 2¾mm) needles. 3 small buttons. Shirring elastic for cuffs. Tension28 sts and 36 rows to 4 inches over stocking-stitch on No 10 needles. Size mattersThree sizes given for 22/24/26 inch chest; length from top of shoulders: 16½/18½/20½ inches; sleeve seam: 9½/10½/12 inches. Abbreviationstbl: through back of loops ch: chain A word on the wool.The original colour combination is white for the apron with "Damask Rose" for the dress. Disclaimer
|
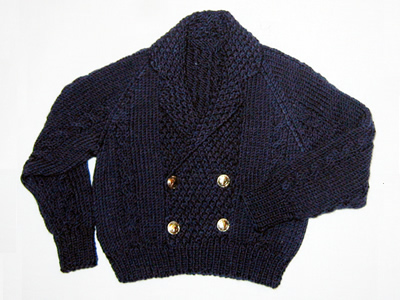
Here is a cute little knitted reefer for a small child (6-24months). It dates from pre 1960s where children's knitwear was not inspiring, but as soon as I saw this I wanted to make it - I am a sucker for any nautical theme, especially for kids (and dolls...)
Instructions.This pattern is given for 2 size options - the instructions for the larger
size are blue bold type in curly brackets. BackWith No 10 (3¼mm) needles cast on cast on cast on 55{61}
sts and work rib as follows: 12th rib row: Rib 3{6}, (increase in next st, rib 6) 7 times, increase in next st, rib to end. [63{69}sts] Change to No 8 (4mm) needles and proceed in cable pattern as follows: 1st row (right side facing): K9{10};
p1, k4, p1; k11{13}; (p1, k4, ) twice,
p1; k11{13}; p1, k4, p1; k9{10}. Continue in pattern until you have completed row 28{32}. Shape raglan: (keep continuity of pattern as you work these rows). [Editor's note: you should be about to begin Row 5 of the pattern sequence for the smaller size and Row 3 (a cable row) for the larger size.] Next row: Cast off 3sts, work to
end. Repeat last 2 rows 18{20} times,
[19{21}sts] FrontWith No 10 (3¼mm) needles cast on cast on cast on 55{61} sts and work rib for the first 11 rows as you did for the back. 12th rib row: Rib 3{6}, (increase in next st, rib 7) 6 times, increase in next st, rib to end. [62{68}sts] Change to No 8 (4mm) needles and proceed as follows: 1st row (right side facing): K9{10}; p1, k4, p1; k8{9}; (p1, k1, ) 8{9} times; k1. Turn and continue working on these 40{44}sts to make the left front (these instructions are intended for a boy - see editor's note below) and slip remaining 22{24} sts on to a stitch holder and leave to work later. [Editor's note: If you want to make this for a girl - maybe in white? - then you will perhaps want to reverse these instructions by working the first 22{24} sts, casting on 20sts and working on these 40{44} sts as written, omitting the button holes. Pick up the rest of the sts to work the right front - and don't forget to work the buttonholes on the right front!] 2nd row: (K1, p1) 9{10} times; purl to the last st, k1. [Editor's note: The centre panel on each of the front pieces is worked in double moss stitch, and I found it convenient to put a stitch marker after I had worked the first 18{20} sts of row 2, to show the limit of this section.] 3rd row: K9{10};
p1, C2B, p1; k7{8}; *
p1, k1; repeat from * to end. Keeping cable and moss stitch panel correct throughout, work 16{20} rows, working buttonholes as before on the 9th of these rows (row 21 for both sizes). Shape raglan: (keep continuity of pattern across the cables and
the centre moss stitch panel as you work these rows). Next row: Cast off 3sts, work to
end. Repeat last 2 rows 10{11} times,
[26{29}sts] ** Keeping continuity of the pattern,
continue to decrease at the armhole edge as before until 18{20}
sts remain of the moss stitch panel. Completing the other side to make the right front: Slip the sts from the stitch holder on to a No 10 needle, point facing
centre of work (right side facing you), and cast on 18{20}sts.
[40{44}sts]. 1st row (right side facing): K2;
(p1, k1) 8{9} times; k7{8};
p1, k4, p1; k9{10}. Shape raglan: (keep continuity of pattern across the cables and the centre moss stitch panel as you work these rows). Next row (wrong side facing): Cast
off 3sts, work to end. Repeat the last 2 rows 10{11} times, [26{29}sts] Next row: Cast off 5sts, work across
in pattern to the last 3 sts, k2tog, k1. Complete to match the left side of front, working from ** to end. Right sleeve:Using No 10 needles, cast on 32{34}sts. Work 13{15} rows in k1, p1 rib. Next row: Rib 3{4}; (increase in next st, rib 4) 5 times; increase in next st, rib to end. [38{40}sts] Change to No 8 needles and proceed in stocking stitch with cable panels set as follows: 1st row (right side facing): K3{3};
(p1, k4, p1, k7{8}) twice; p1, k4,
p1; k3{3}. Continue in pattern as on last 6 rows, increasing 1 st at both ends of
next and every following 6th row, until there are 50{54}sts;
work the extra sts in stocking stitch. Shape raglan by working rows as you did for the back: Next row: Cast off 3sts, work to
end. Repeat last 2 rows 18{20} times,
[6{6}sts] Right sleeve:Work as for the right sleeve, but working C2F instead of C2B. [Editor's note: The sleeves are identical apart from the way the cables twist, and obviously you can choose to sew them into the Reefer in whatever orientation you prefer.] To Make UpBlock each piece from the wrong side, pressing very lightly using a warm iron and a damp cloth, omitting the ribbing. Join side, raglan, and sleeve seams using a flat seam. Stitch down the 20 cast-on stitches at the waist on the inside. |
Materials
|
|
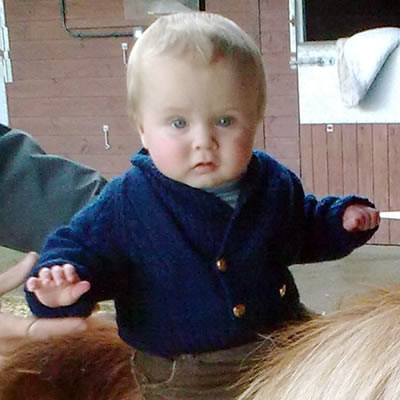
|
|
|
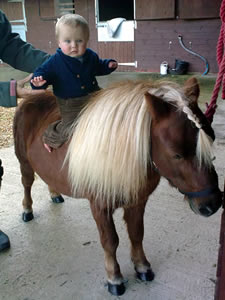
|
|
|
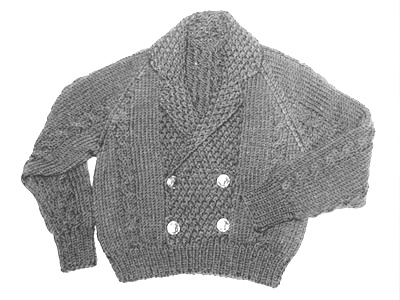
|
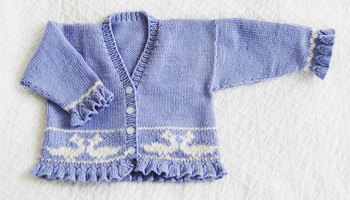
Cute cardigan for a little girl with folk pattern of birds. Acceptable enough for a baby boy using a "masculine" colour (blue?!) and adapting the welts from their frilly form to a conventional rib.
Instructions:The body of the cardigan is knitted in one piece. There are options for a plain welt as well as the frilled version - perhaps to better suit a boy. Frilled welt: 1st row: *
P2, k7; repeat from *to last 2 sts;
p2. Alternative plain ribbed welt: 9th row: K31, place marker; k62, place marker; k31. Duckling border: Starting with wrong side facing, set the 31 stitch pattern across the
row as follows: Row 1: *p1 in blue, p29 in white, p1 in blue*; p0; repeat from * to * twice; p0; repeat from * to *.
Row 15: as row 1. Next row: (right side facing) Knit
in main shade. Continue with main shade only stocking stitch until work measures 6 inches,
including the frill, ending with a purl row and right side facing for
next row. Divide for fronts and back: Next row: Purl. Repeat the last 4 rows, decreasing at front edge only until 21 sts remain.
Continue without shaping until armhole edge measures 5 inches, ending
with a purl row. Left front: Next row: Knit. Repeat the last 4 rows, decreasing at front edge only until 21 sts remain.
Complete to match the right front, ending with a knit row. Back: Work straight in stocking stitch until back matches fronts at armhole edge, ending with a purl row. Next row: K21, cast off 20, k21. Join shoulders. Sleeves (both alike): 1st row: *
P2, k7; repeat from *to last 2 sts;
p2. Alternative plain ribbed welt: Now join in contrast and work 3 rows as follows. Continuing in main shade only, increase one stitch at each end of the next and every following 4th row, until there are 61sts. Work straight until sleeve is 8 inches long (including the frill), or to required length. Cast off loosely, using one size larger needle. Work second sleeve the same. Button border: [Editor's note: My
method for picking up sts evenly is to pick up 2 sts for every 3 row ends.
I use a double pointed needle and slip it into all the alternate row ends
- the ones that tend to stick out more as little bumps. Then using my
working needle, I knit into 2 bumps from the dpn and then pick up an extra
stitch in between the bumps. Next row: Slip the first stitch;*
k1; p1; repeat from * to last st;
k1. Work one more row in rib, then cast off loosely in rib, using a larger size needle if required. Making up: Press lightly with a damp cloth. |
Materials 3 x 50g balls Debbie
Bliss Baby Cashmerino (125m per 50g ball), in main shade (colour shown
Lavender 605). One circular No 9 (3½mm) needle. Tension24sts and 32 rows to 4 inches on No 9 (3½mm) needles in stocking
stitch. Size mattersInstructions for 6-12 months size. A word on the woolDebbie Bliss Baby Cashmerino is a lovely yarn, (55% merino wool, 33%
microfibre, 12% cashmere). Disclaimer
|
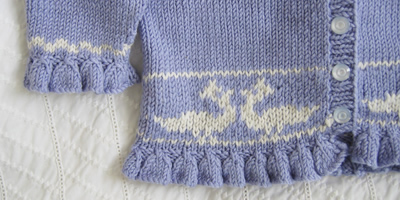
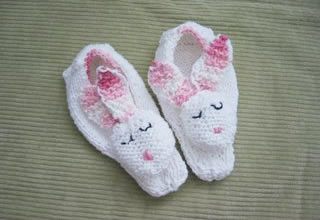
A charming pattern from Alison for a pair of child's slippers, first knitted for her niece, Nancy.
InstructionsWork two slippers the same as follows: Sole and foot - Cast on 28 sts in white At start of toes k1p1 rib for 2 inches Next row: p2 tog across entire row
(14 sts) Heel - Pick up 10 stitches from middle of cast on row, leaving 18sts (9 on each side of the 10 you have picked up). You will pick up and incorporate these 18 sts as you work the back of the heel. Work 15 rows on these 10 sts in stockinette as follows: Row 1: K9; pick up the next st of
the cast-on row and knit it together with the last st of the row. Turn. Continue in this way for 12 rows in all. Bind off remaining 6 stitches. In sewing the toe centre seam, and working the heel you have pulled up the sides to form the slipper shape. [Editor's note: If the 'cuff' of the slipper is loose you can work a row of single crochet around the edge of the slipper and pull in the shape a little. I used the pink for this.]. Head - knit 2 in white. Cast on 10 sts. Using spare yarn, embroider a pink nose, and crescent shapes for closed eyes, using the picture as a guide. Loosely stuff head and use long tail to sew around edge and pull in making
a small flat ball. Ears - knit 4 in white and 4 in pink Cast on 2 sts. Sew a white to a pink ear using blanket stitch. Finishing - Sew ears firmly to back of head at jaunty angle. Tail - (optional) make 2 small pompoms and attach to heels of slipper. |
MaterialsDishcloth cotton - white and pink (Lily Sugar n'Cream cotton.). 1 pair 5mm needles. . Tension20 sts and 26 rows to 4 inches measured over stocking stitch on 4½mm needles. Size mattersFits feet 7" long (age 4 or so). Disclaimer
|
© Christina Coutts 2007
![]()
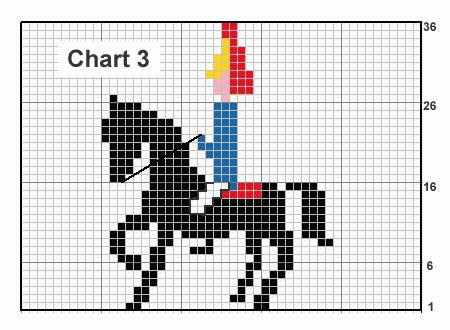
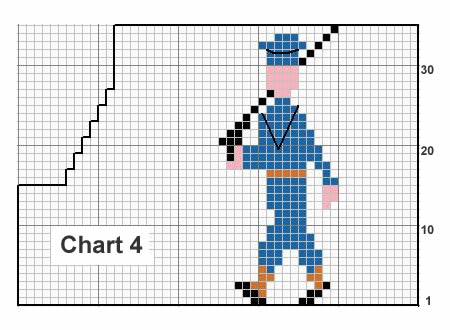
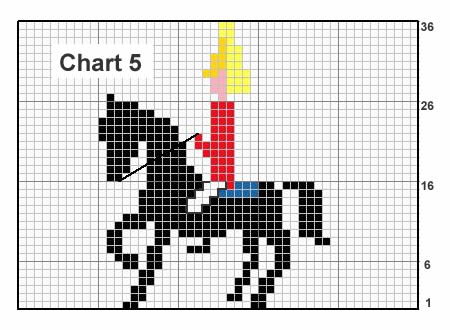

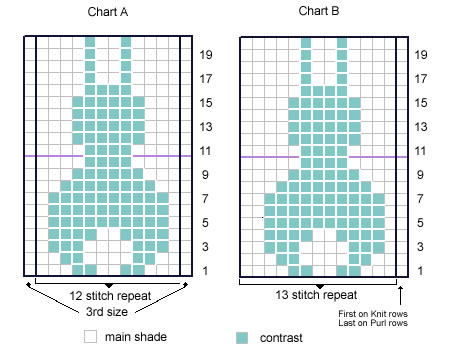 .
.