Valentine Beaded Mittens
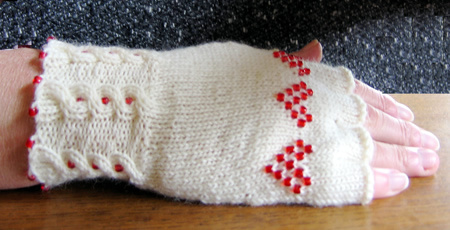
I was inspired to make these mitten patterns by brightly coloured offerings from 1975. This is the posh version, even cuter than the intarsia version I think.
They are a close fit on my hands, but though my hands are small, I tend to have short fingers only; the measurement around my hand is just over 7 inches.
Instructions:Begin working the RIGHT GLOVE: Thread 12 beads on to the yarn. Cast on 48 stitches, using "backward loop method" as follows: loop 2, slide a bead up next to the loops; loop 4, slide next bead into place; slide next bead into place; and so on to the last bead and then end with loop 2 [48 loops].
Knit one row. Begin fancy rib as follows: 1st round: *
P1, k2, p1, k2, p2; repeat from * to end
of round. 6th (cable) round: *
P1, CB5 (cable over 5 sts "back" by slipping the next 3 sts
on to a cable needle and leaving at the back of the work; k2, then (p1,
k2) from cable needle), p2; repeat from *
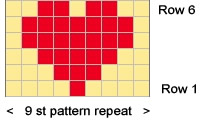
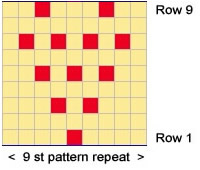
to end of round. Thumb gusset 1st round: K24, p1, k2, p1, k20. Now set aside the thumb stitches and continue with the main glove - at the same time work the first row of the pattern from the chart, setting the position of the beaded hearts as follows, repeating the 9 pattern sts 3 times: Row 1: K4; hook bead and slip this
beaded st, passing the yarn behind, and pulling it firmly as you go into
the next st; (k8, hook bead) twice; k5; slip the next 18 sts on to a safety
pin; cast on 2 sts, k24 to complete the round. [54 sts]
Continue straight, working from the chart for the 9 rows, and completing the three hearts. Row 10: K1, m1, k52, m1, k1. [56 sts] Work 4 rows straight. Divide for fingers Next round (forefinger): Knit
the first 20 sts of the round and place on a stitch holder; place the
last 20sts of the round on a second stitch holder; Knit 16; cast on 2
sts. [18 sts] Next round (middle finger):
Slip the last 7sts on the first stitch holder (the ones nearest to the
forefinger) onto a needle and knit them; pick up and knit 2 from the cast
on sts at the base of the forefinger; slip the first 7sts on the second
stitch holder (the ones nearest to the forefinger) onto a needle and knit
them; cast on 2 sts. [18 sts]. Next round (third finger): Work and complete as for middle finger. Next round (little finger):
Pick up 2 sts at the base third finger; slip the remaining 6 sts on the
second stitch holder onto a needle and knit them; slip the remaining 6
sts on the first stitch holder onto a needle and knit them. [14sts] Thumb: LEFT GLOVE: Thread 12 beads on to the yarn, cast on 48 stitches, and knit one row,
as for right glove. Begin fancy rib as follows: 1st round: *
P2, k2, p1, k2, p1; repeat from * to end
of round. 6th (cable) round: *
P2, CF5 (cable over 5 sts "forward" by slipping the next 2sts
on to a cable needle and leaving at the front of the work; k2, p1, then
k2 from cable needle), p1; repeat from *
to end of round. Thumb gusset You work the thumb gusset in the same way as you did for the right glove, but set the position of the thumb differently as follows: 1st round: K20, p1, k2, p1, k24. Continue in this way as for right glove, but following the stitch layout as set until you reach row 25. 25th and 26th rounds: K23, p1, k18, p1, k27. [70 sts] Now set aside the thumb stitches and continue with the main glove - at the same time work the first row of the pattern from the chart, setting the position of the beaded hearts as follows, repeating the 9 pattern sts 3 times: Row 1: K24; slip the next 18 sts
on to a safety pin; cast on 2 sts; k5; hook bead and slip this beaded
st, passing the yarn behind, and pulling it firmly as you go into the
next st; (k8, hook bead) twice; k4. [54 sts] Once you have set the position of the thumb and the bead hearts, you can work the rest of the left glove exactly as for the right glove. Making up: |
MaterialsExample shown is knitted in 1 x 50g ball Sunbeam St Ives 4 ply in cream 3103. One set of 4 No. 12 (2½ mm) needles. A tiny crochet hook for placing the beads. 66 beads size 6/0 TensionApprox. 32sts and 44 rows to 4 inches on No 12 needles. Size mattersWidth all round above thumb, 7 ins. To alter the size use larger or smaller
needles as required. A word on the woolThe wool I used was from my store room. BeadingFor those of you who think "Less is More" you might prefer to work a single bead heart, positioned on row 20, with the first bead on the 7th st from the edge. Disclaimer
|
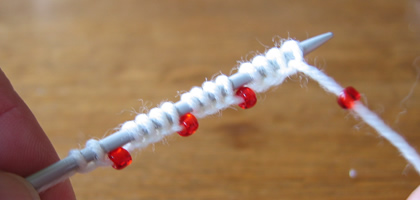
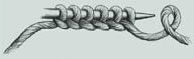
Cast on loop method |
|
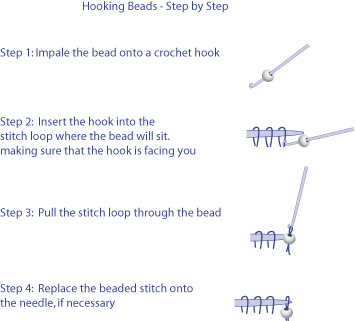
Hooking Beads.This method means you don't have to pre-string the beads on your yarn - I think it is good for placing a few beads amid a lot of knitting, when you don't want to carry just a few beads across miles of yarn before you use them, and you also don't want to break your thread. This information appeared in Knitty.com. (Spring 2006 edition) in an article by Sivia Harding.
|