Nautical top with buttoned vestee
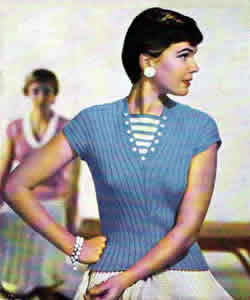
Mid-fifities fashion in fresh blue and white summer colours. The stripes and buttoning give the design a slightly off-kilter nautical look. My version used a stronger blue than the original.
If you are tantalised by the ghostly image of the other sweater in the background then look at these instructions - it is not actually that very knitted top (the one in the background of the photo above has beads - you'll have to trust me on that), but it is very similar, and also dates from the summer of 1956.
My own version is now complete so the pattern is "checked out", and I hope to add a photo soon.
InstructionsKnitted in 2 pieces with a V-neck, and detachable vestee. BackWith No 12 (2¾mm) needles cast on cast on 138sts and work as follows: 1st row (right side facing): k2;
(p2, k4) 22 times; p2, k2. Start centre shaping: Continue thus, keeping continuity of rib and increasing 1 stitch at each
side of centre 2 purl sts on next and every following 4th row until there
are 180 sts, remembering that when increasing for purl sts to purl
into back of loop and when increasing for knit sts to knit into
back of loop,that is: the next 2 sets of increasings will be purl and
the following 4 sets of increasings knit. With right side facing, change to garter stitch, (that is, every row
knit), Then, continuing in garter stitch, shape shoulders by casting off 4 sts
at beginning of next 10 rows, then 12 sts at beginning of following 4
rows. FrontWork exactly as for back until there are 172 sts. Work 3 rows straight, then start to introduce the garter stitch at the centre as follows: 1st row (right side facing): Rib
82, k3, m1k, k2, m1k, k3, rib 82. Divide for neck: Next row: K9, rib 80. Repeat the last 2 rows once more. Put a coloured marker at the end of the row to mark the start of the armhole. Continue in rib and garter stitch, shaping the armhole edge only by k2tog at the beginning of the next and every following 4th row, and at the same time make a buttonhole in the garter stitch border on the 2nd and every following 12th row until 5 in all are done, excluding first buttonhole at the centre front. To make a buttonhole:- With wrong side facing, k2, k2tog, wind wool twice round needle, k2tog, k3, rib to end. On the next row: knit and purl into the two twists as before. When the 5 buttonholes are done, continue in rib and garter stitch, still continue to decrease at the armhole edge on every 4th row until 15 sts have been decreased at this edge, and 75sts remain. Work 3 rows straight. Change to garter stitch over all sts, With right side facing, continue in garter stitch and shape the shoulder by casting off 4sts at the beginning of next and following 4 alternate rows, then 14sts at the beginning of following 3 alternate rows. Cast off remaining 13 stitches. With side facing, rejoin wool to remaining sts, and work, to correspond with first shoulder, reversing the shaping. VesteeWith white wool and No 11 needles, cast on 10 sts and knit 4 rows. 5th row: Knit, increasing 1 stitch
at each end. Work 3 rows straight in stocking stitch, keeping the 4sts at each end in garter-stitch throughout. Repeat last 4 rows once more. Join in blue. Next row (in blue, right side facing): K3, increase in next stitch, knit to last 4sts, increase in next stitch, k3. Work 3 rows straight in blue with border as before. Next row (in white): K4, p34, k4. This completes the 5th white stripe. Break white, join in blue and knit 5 rows. To Make UpPress work very lightly taking care not to spoil rib. Sleeve Edgings: With right side facing, No 11 needles and contrast
yarn, pick up and knit 92 sts between markers on back and front. Knit 8 rows; cast off. Join side seams. |
MaterialsOriginal materials called for: 7 ozs Patons Beehive Fingering 3-ply in main shade (powder blue) and a small ball (less than 1oz) in white. A pair each Nos 11 and 12 (3mm and 2¾mm) needles. 11 small white buttons. My version is knitted in 5 x 50g balls of Adriafil Avantgarde 3 ply using
Nos 13 and 12 needles. TensionRibbing is difficult to measure, but it is equivalent to a basic tension
of 8 sts and 10 rows to an inch over stocking-stitch on No 11 needles. Size mattersOriginal sized for bust 34-36 inches; See "adapting the size". Abbreviationsm1p: pick up loop lying before next stitch and purl into back of it. m1k: pick up loop lying before next stitch and knit into back of it. A word on the wool.I have so many words on the wool I am not sure where to begin. Jamiesons have an excellent range of colours in "2ply laceweight" which states: This yarn can be used in vintage patterns which call for "3ply yarns". I can suggest looking at Susan Crawford's new Excelana range from John Arbon textiles. I have great hopes of this venture solving my knitting issues in the future: 4 ply available now and hopefully 3 ply in the future. I have not yet experimented with either of these two latter yarns. Disclaimer
|
Adaptations:I made quite a few casual adaptations to "improve" the design for my figure - but as usual this had a knock-on effect in some other areas - so I describe what happened here. Adaptation 1: When changing to garter stitch the ribbing pulls at the garter stitch section and causes puckering. You can see this happening slightly in the original photo. To compensate for this, on the first knit row of the garter stitch (right side facing) I knitted across the 4 knit sts and and the k2tog for the 2 purl sts. This changed the number of sts for the casting off. So for the Front sections I worked k2tog 10 times on the p2 sections of the rib; I then shaped the shoulder by casting off 3sts at the beginning of next and following 4 alternate rows, then 13sts at the beginning of the following 2 alternate rows, then 12sts at the beginning the final 2 alternate rows. For the Back, I worked it slightly differently without decreasing
across the back of the neck. So I worked k2tog across the first 11 p2
sections of the rib, but incorporated the centre 7 p2 sections into the
garter stitch as k2, then k2tog across the last 11 p2 sections of the
rib. Adaptation 2: I lengthened the garter stitch sections by about 2 inches to make the V neck lower. This was to avoid "waist boobz" (please see Kate's blog, "needled" ** on the subject). Adding 2 inches at the shoulder, lengthens the whole sweater, so I knitted 2 inches less at the start of the sweater - as it is not overly short in the first place. Having done this, you may find the armhole markers are (up to 2 inches) too low, so check this before you do the sleeve edging and sewing up the side seams. In my case, I have chubby little arms so wanted the armhole slightly larger in any case. ** Unlike Kate I have a large bosom
with a low bust point, so need no assistance in producing waist boobz
- in fact I seek to reverse the effect. See Kate's lovely design "by-the-sea-shore" where she reverses the "waist boob" effect. It is also an off-kilter nautical design in a way so sits nicely with this entry. |
|
Adapting the size:The original pattern is for one size: 34-36 inch bust. The sweater is designed to fit snugly, but is ribbed which allows some leeway on the exact fit. It is designed to be knitted in 3 ply at about 30 sts to 4 inches. I have used a 4 ply at about 28 sts to 4 inches, and the size would have been acceptable for me - a UK size 12 or "medium". I think this may be suitable for using a thicker yarn with larger needles and getting a larger result. |
|
