Home

Weblog

Pattern of
the Month

On the Needles
(...and Off the Needles)

Knitalong

Stitchcraft

Vintage Patterns

About the
Idle Hands


Archive entry for June 2008

« May 2008 | Main | July 2008 »

June 2008

Trim crochet gloves

TrimGloves1.jpg

Chic summer gloves from 1955, worked in cotton crochet, though not lacy.
Elegant but not frilly - "these trim gloves are crisp and fresh". Definitely to be worn with pill-box hat and veil rather than Edwardian sunshade, (or in practice - neither - but you get the idea).
Original worked in white with black trim. Very Audrey Hepburn.
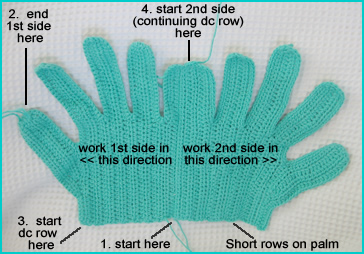
Instructions (both hands alike).

Beginning at the side edge with main colour, make 41 chain, turn.

Start with little finger
1st Row: Miss 1 ch., * 1 half treble in each ch.; repeat from * to end, turn with 2 ch.
2nd Row: * 1 h.tr. in each h.tr.; repeat from * to end; break cotton and rejoin at other end.

Begin third finger
3rd Row: 1 h.tr. in each of next 25 h.trs., 19 ch. for 3rd finger, 1 ch. to turn.

**
4th Row: Miss 1 ch., 1 h.tr. in each ch; 1 h.tr. in each of next 25 h.tr. to end, turn with 2 ch.
5th Row: * 1 h.tr. in next h.tr.; repeat from * to end, turn with 2 ch.
6th Row: Repeat last row once more.**

Begin middle finger
7th Row: 1 h.tr. in each of next 25 h.trs., 21 ch. for middle finger, 1 ch. to turn.
Repeat from ** to ** once.

Begin first finger
11th Row: 1 h.tr. in each of next 25 h.trs., 19 ch. for 1st finger, 1 ch. to turn.
Repeat from ** to ** once.

Begin thumb
15th Row: 1 h.tr. in each of next 19 h.trs., 14 ch. for thumb, 1 ch. to turn.
16th (short) Row: Miss 1 ch., 1 h.tr. in next 14 ch., 1 h.tr. in each of next 7 h.trs., 1slip st. in next stitch, turn;
17th Row: 1 h.tr. in each of next 21 h.trs., turn with 2 ch.
18th (short) Row: 1 h.tr. in each of next 24 h.trs., 1slip st. in next stitch, turn.
19th Row: * 1 h.tr. in each h.tr.; repeat from * to end. Fasten off.

[Editor's note: You end here at the top of the thumb. One half of the glove is complete - this half covers the back of the hand.]

Now keeping same side of glove piece facing you, rejoin to beginning of row, and work 1 long row dc. up side of thumb and all round fingers, ending at top of little finger.

TrimGloves5.jpg

Now work down side of little finger to wrist thus:
[Editor's note: You are working the other half of the glove now - the palm side.]

Little finger
1st Row: * 1 h.tr. in next h.tr.; repeat from * to end, turn with 2 ch. Repeat last row 4 times more, turning with 1ch on last row.

Third finger
††
6th Row: 1 dc in each of first 12 h.trs., 1 h.tr. in each of next 13 h.trs., 19 ch. for next finger; 1 ch. to turn.
7th Row: Miss 1 ch., 1 h.tr. in each of the 19 ch; 1 h.tr. in 13 h.tr. [that is 32 h.trs. in all], 1 dc in each 12 dc; turn with 2 ch.
8th Row: 1 h.trs.in each 12 dc, * 1 h.tr. in next h.tr.; repeat from * to end; turn with 2 ch.
9th Row: * 1 h.tr. in next h.tr.; repeat from * to end, turn with 1 ch. ††

Middle finger
10th Row: 1 dc in each of first 12 h.trs., 1 h.tr. in each of next 13 h.trs., 21 ch. for middle finger, 1 ch. to turn.
11th Row: Miss 1 ch., 1 h.tr. in each of the 21 ch; 1 h.tr. in 13 h.tr. [that is 34 h.trs. in all], 1 dc in each of 12 dc turn with 2 ch.
12th Row: 1 h.tr.in each of 12 dc, * 1 h.tr. in next h.tr.; repeat from * to end; turn with 2 ch.
13th Row: * 1 h.tr. in next h.tr.; repeat from * to end, turn with 1 ch.

First finger
Repeat from †† to †† once - as for third finger.

Thumb
18th Row: 1 dc in each of first 12 h.trs., 1 h.tr. in each of next 7 h.trs., 14 ch. for thumb, 1 ch. to turn.
19th (short) Row: Miss 1 ch., 1 h.tr. in next 14 ch., 1 h.tr. in each of next 7 h.trs., 1slip st. in next stitch, turn.
20th Row: 1 h.tr. in each of next 21 h.trs., turn with 2 ch.
21st (full) Row: 1 h.tr. in each of next 24 h.trs., * 1dc into next dc, repeat from * to end; turn with 2 ch.
22nd Row: 1 h.tr. into each stitch to top of thumb. Do not fasten off.

Continue with row, working a row of dc. down inner side of thumb and round all fingers, ending at top of little finger, where you finished your row of dc when working the other side; fasten off.

Make another glove in the same way.

To Make Up

Press parts very carefully on wrong side under a damp cloth.
Join sides and fingers by oversewing.
[Editor's note: The original gloves were made in white, so the instructions here say to use with white sewing cotton. So either use a toning sewing cotton or do as I did and use the main yarn to sew up]

Remember to turn second glove inside out for other hand.
[Editor's note: The original gloves are made identically, but have a specific side for the palms, so you need to fold and sew them up opposite ways in order to create right and left hands.
If this helps: after you have sewn up the first glove and then turned it right side out, sew up the second glove to look exactly the same orientation as the first - then when you turn it right side out, it will be the reverse of the first glove.].

Cuffs

With main colour yarn, make 45 ch., turn.
[Editor's note: This strip is eased to fit bottom of the glove, but it does have to fit around your wrist, plus allowing for a little overlap - I found that although the glove fitted me, 45 chain were not sufficient to create the strap - so I used 51 chain.]

1st Row: Miss 1 ch., * 1 dc in each ch.; repeat from * to 
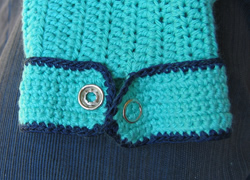
last ch., 2 dc in last ch.; turn with 1 ch.
2nd Row: 2 dc in first dc; * 1 dc in next dc, repeat from * to end; turn with 1 ch.
3rd Row: * 1 dc in next dc, repeat from * to last dc, 2 d.c. in last dc; turn with 1 ch.
4th Row: As 2nd row.
5th Row: * 1 dc in next dc, repeat from * to last dc, 1 slip st in last dc; turn with 1 ch.
6th Row: Miss 1 dc, * 1 dc in next dc, repeat from * to end; turn with 1 ch.
7th Row: * 1 dc in next dc, repeat from * to last dc, 1 slip st in last dc; turn with 1 ch.
8th Row: As 6th row. Fasten off.

With contrast yarn, work 1 row of dc all round cuff.
[Editor's note: As it's left to your own judgement, do not work too many dc across the short straight edge, or it will splay out and the curved edge will not cover it properly for the overlap.]

Sew cuff neatly round glove with contrast edging overlapping edge of main work and with opening in centre of back; rounded edge comes below 3rd finger and slightly overlaps straight short edge of cuff.
Sew press-studs to cuff to fasten invisibly.
[Editor's note: I used a non-sew fastener (9 or 10mm) - the kind you apply with pliers or a supplied tool. You need to apply this before you put on the decorative contrast circle.]

TrimGloves3.jpg

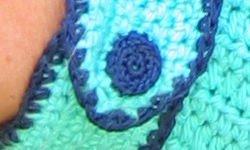
Work a small circle of dc in contrast and sew in position on top of cuff as shown in photograph.
[Editor's note: I used Coats No 20 crochet cotton worked double for my contrast navy - so for the circles I used the cotton singly with a much smaller hook. I made a ring and worked 7 dc into it; I then worked a second round of 2 dc into every dc. This wasn't quite big enough, so I work a round of slip sts to finish.]

TrimGloves4.jpg

Materials

1 x 50g ball Phildar Phil Crochet, shade 07 Veronese, (100% cotton, 201yards), with a small amount of navy blue for contrast.
One number 12 (2½mm) crochet hook.
Two press fasteners.

Crochet abbreviations:

ch = chain
h.tr = half treble
dc = double crochet

Remember these are English crochet instructions where dc is equivalent to US single crochet, and so on - see "Terminology" in the side bar.

Tension

6 half trebles to an inch.
Note:
these are UK crochet instructions - to work a half treble: wool over hook, insert hook in next stitch, draw loop through, wool over hook, and draw through all three loops.

Size matters

To fit "an average hand".

A word on the wool.

Original specified 2 x 1oz balls of Strutt's Milford Knitting Cotton No. 8 in white, with scraps of black 4-ply wool for edging.

The single 50g ball of Phil Crochet was only just enough at 201yds.

For winter gloves, they could be easily worked in wool instead of cotton for those who don't like to knit.

Disclaimer
(well...almost)

In transposing any pattern it is always a risk that errors will be introduced, in spite of dedicated proof reading.
If you have any problems with this pattern, please and I will try and assist.


Your finished gloves.
Editor's note: "So what's all this messing about with a bunch of flowers?" - I was trying to emulate the original photo shoot, and found it surprisingly hard. I had to get George to take the photo and he did not seem focussed enough on (a) yes I did want the flowers in the photo not just a load of stems, (b) but it is supposed to be a centred around the gloves and not a bunch of flowers, and (c) o I wish I had slim elegant fingers, and maybe 4 arms so I could take the photo myself...

TrimGloves2.jpg


© Christina Coutts 2007

Helpful Stuff

Pattern Archive

Categories

Yarn Links

Fabric etc

Stuff to do

  • Little rabbits
  • V&A 1940s Patterns
  • Monkey Socks
  • Necktie Bag
  • Posh Gloves
  • Criss-cross coasters