Roll up for a string shopper
More....
Please note:
Patterns are for
Personal Use Only
You may freely circulate patterns with the Copyright Statement Preserved.
See terms of use.
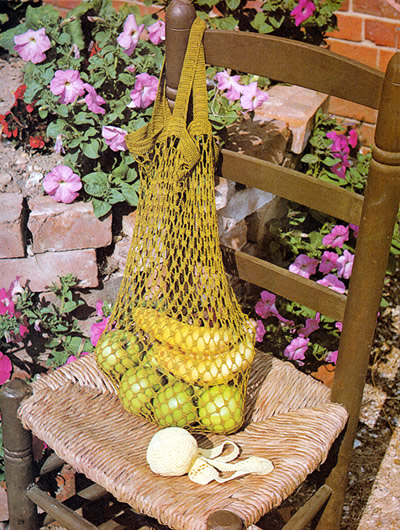
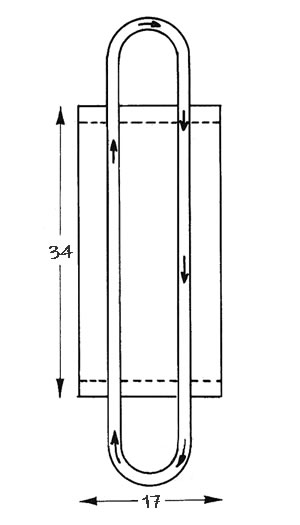
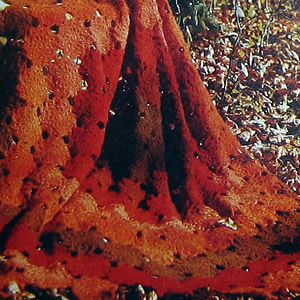
Fun to make, this was a common type of reusable shopping bag before the days of the ubiquitous little nylon fold-up bags. It easily rolls up to keep in a handbag or purse, and is more useful than ever now in eliminating single-use plastics.
Instructions.The bag can be made in either of 2 sizes. Both designs are worked from
the same instructions and the figures in brackets [ ] refer to the
smaller bag where applicable.
Base - first section:Using 1¾mm [1¼mm] hook make 5 chain and join with a ss to
the first ch to form ring. Base - second section:Using 1¾mm [1¼mm] hook, rejoin yarn through elastic band,
3ch to form first tr, work 48 tr over band. Main section 1st round: Place both sections together
and join by working through both sections at the same time, 1dc into sp
before next tr, * 1dc into each of
next 2 sps, 9ch, 1dc into each of next 4 sps, 9ch, 1dc into next sp; repeat
from * to end, omitting 9ch and 1dc at the end of the last repeat, 3ch,
1trtr into first dc. Top band 1st round: 4dc into loop just made,
* 4ch, 4dc into next loop, repeat
from * ending with 4ch, ss into first
dc. Handle (make 2) Using 1¾mm [1¼mm] hook, make 9ch. To make up Damp and pin out to size. |
MaterialsLarge bag: 4 x 20g balls No 10 crochet cotton. Small bag: 2 x 25g balls No 20 crochet cotton. Elastic band or shirring elastic in a circle. TensionLarge bag: 8sts and 4 rows to 1 inch over trebles worked on 1¾ mm crochet hook. Small bag: 11sts and 5 rows to 1 inch over trebles worked on 1¼ mm crochet hook. Size mattersLarge bag: will carry 15lb (7 kilo) Small bag: will carry 6½lb (3 kilo) Abbreviations:ch: chain Remember these are English crochet instructions where dc is equivalent to US single crochet - see "Terminology" in the side bar. A Word on the WoolNos 10 and 20 crochet cotton are fairly standard and easy to obtain. Disclaimer
|
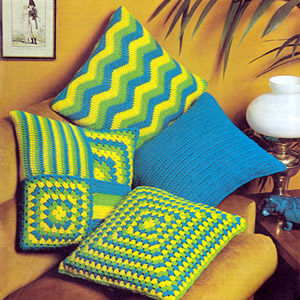
These crochet cushion covers are really easy (and quick) to make in double knitting yarn, and would be good for a beginner if you fancy them. They are so simple that an experienced crocheter could no doubt make them without a pattern. However, although simple, they are a good example of creating an effect purely through the use of colour - if you want them to really pop, use opposites on the colour wheel (turquoise/tangerine, purple/yellow] - or you can dial it right down and use natural sheep colours. As the size and therefore tension for cushion covers is pretty adaptable, it could provide a useful project for handspun, - or you could use up any bright knitting oddments for a colourful designer effect, (as controversially favoured by our current colourful prime minister).
Instructions.Basic instructions for 4 cushions as illustrated.
Chevron cushionUsing B, make 68 chain. Foundation row: using B, 1 tr in 4th ch from hook, 1 tr in each of next 6 ch, (decrease 2, 1 tr in each of next 6 ch, 3 tr in next ch, 1 tr in each of next 6 ch) 3 times, decrease 2, 1 tr in each of next 6 ch, 2 tr in last ch. [65 sts - 3 ch at start of row counts as 1 stitch] Joining in colours as required, work in pattern as follows: 1st row: using B, 3 ch, 1 tr in first
stitch, 1 tr in each of the next 6 stitches, (decrease 2, 1 tr in each
of the next 6 stitches, 3 tr in the next stitch, 1 tr in each of next
6 stitches) 3 times, decrease 2, 1 tr in each of the next 6 stitches,
2 tr in top of 3 ch These 6 rows form the pattern. Making up the chevron cushionJoin starting and finishing edges using a flat seam. Patchwork cushionMake 2 of each of the following squares: First Square (wide stripes):
Using B, make 33 chain. Continue repeating last row, working 1 row more in B, then 3 rows G,
3 rows Y, 3 rows B, 3 rows G, 3 rows Y: 18 rows in all. Second Square (mitred corner): Work 18 rows as for first square, but working 1 row B, 1 row G, 1 row Y. Third Square (wide stripes):
Using Y, make 4 chain. 1st row: Using Y, 3 ch, (3 tr, 1 ch 3 tr) all chain space, 1 tr in top of 3 starting chain. [3 ch counts as 1 stitch, 3 tr forms a group] 2nd row: Using G, 3 ch, 1 tr in space
between first stitch and next group, (1 group, 1 ch, 1 group) in chain
space, 2 tr in space between last group and 3 ch. 3rd row: Using G, 3 ch, 1 group in
space between half group and next group, (1 group, 1 ch, 1 group) in chain
space, 1 group in space between group and half group, 1 tr in top of 3
chain. 4th row: Using B, 3 ch, 1 tr in space
between first stitch and group, 1 group in next space between 2 groups,
(1 group, 1 ch, 1 group) in chain space, 1 group in next space between
2 groups, 2 tr in space between last group and 3 ch. 5th row: Using B, 3 ch, 1 group in
space between half group and group, 1 group in next space between 2 groups,
(1 group, 1 ch, 1 group) in chain space, 1 group in next space between
2 groups, 1 group in space between group and half group, 1 tr in top of
3 chain. 6th row: Using Y, 3 ch, 1 tr in space between first stitch and group, 1 group in each space between 2 groups, (1 group, 1 ch, 1 group) in chain space, 1 group in each space between 2 groups, 2 tr in space between last group and 3 ch. 7th row: Using Y, 3 ch, 1 group in space between half group and group, 1 group in each space between 2 groups, (1 group, 1 ch, 1 group) in chain space, 1 group in each space between 2 groups, 1 group in space between last group and half group, 1 tr in top of 3 chain. 8th and 9th rows: Using G, as 6th
and 7th rows. Fasten off. Fourth Square (squared circle):
** worked in rounds as follows: 1st round: Using Y, 4 ch, (3 tr, 1 ch) 3 times into the ring, join with a slip stitch in the 3rd of the 4 starting chain. 2nd round: Using G, slip stitch into
first ch space (formed by top of starting chain of previous round), then
4 ch, 3 tr into that same ch space, (3 tr, 1 ch, 3 tr in next ch space)
3 times, 2 tr in first chain space again, join with a slip stitch in the
3rd of the 4 starting chain. 3rd round: Using B, slip stitch into first ch space, then 4 ch, 1 group into that same ch space, (1 group in next space between 2 groups, 1 group, 1 ch , 1 group in next ch space) 3 times, 1 group in next space between 2 groups, 2 tr in first ch space, join with a slip stitch in the 3rd of the 4 starting chain. 4th round: Using Y, slip stitch into first ch space, then 4 ch, 1 group into that same ch space, * 1 group in each space between 2 groups,1 group, 1 ch, 1 group in ch space; repeat from * but ending with 2 tr in first ch space, join with a slip stitch in the 3rd of the 4 starting chain, as on previous rounds. 5th round: Using G, work as 4th round. Making up the patchwork cushionUsing a flat seam piece together the squares, to make two large squares
each made up of 4 smaller squares, for the front and back of the cushion
(see photograph). Block cushionThe fourth square of the patchwork cushion is a squared-off circle -
a form of the traditional "granny" square. The block cushion
is a giant version of this square. Make a second piece in the same way. Making up the block cushionJoin 3 sides, slip in pad, and join remaining side. Plain cushionUsing a single colour throughout, make 62 chain. Next row: 3 ch, miss first stitch, 1 tr in each remaining stitch. Repeat the last row until cushion measures 16 inches (or to make the
size you require). Make a second piece in the same way. Making up the plain cushionJoin 3 sides, slip in pad, and join remaining side. |
Materials
|
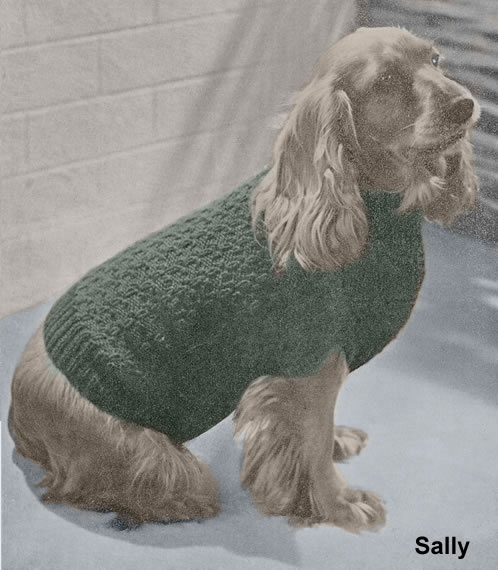
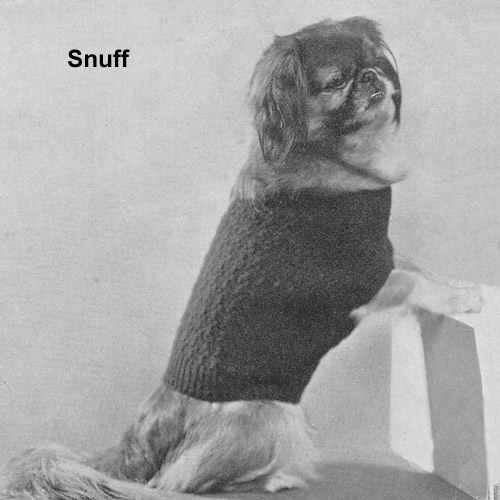
A dog coat which is basically for smaller dogs (which are more likely to need one in colder weather). The pattern is worked out to fit the dogs shown in the photos; Sally, pictured above is the larger size and the other three dogs are shown at the end. Here is the introduction for this 1930s pattern:
Here is a very easy way to keep your dog free from chills during the winter months. Most dogs feel the damp just as much as you do, especially when they are getting on in years, and a nice jumper like this to keep the tummy warm will help to prevent colds and rheumatism. The collar has been made to fit low down as a dog is apt to feel heat easily round the neck.
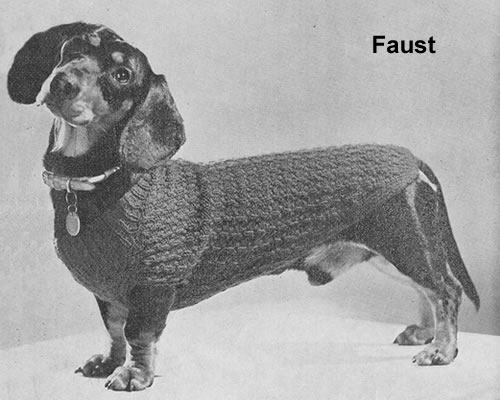
Instructions.Instructions are given for 3 sizes (large, medium, small) which are named
after the doggy models "Sally", "Snuff",
and "Faust" (see pictures) As far
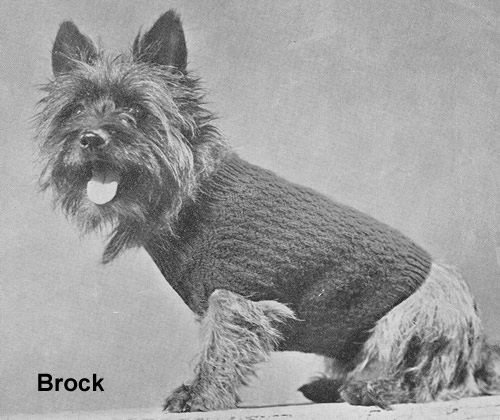
as I can tell they are a Spaniel, a Pekingese, and a Dachshund. The additional "Brock" seems to be some kind of terrier; his
coat is worked exactly as for Snuff, but you need to knit an extra inch
on the back, so continue until work measures 6 inches from the leg openings
before shaping the back, instead of 5 inches. Pattern rows1st row: *
p3, k1; repeat from * to end. Work up a small piece of pattern before starting to make sure you can follow it correctly when increasing - and perhaps use it to make a swatch to check your tension. Coat (or "Jumper")With No 7 (10) [10] needles, cast on 68 (96) [72] stitches, and work in k1/p1 rib, shaping for neck as follows: 1st row: Rib 18 (24)
[20], turn. Now repeat the all previous 12 rows 3 (2) [3]times. Change to No 6 (9) [9]
needles and pattern stitches as above, at the same time
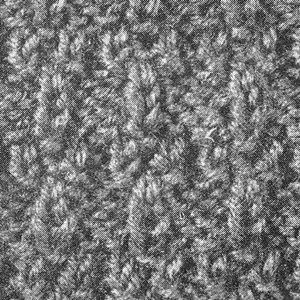
increasing as follows: Continue in pattern, increasing thus in every row, and taking the extra stitches into the pattern as set, until there are 124 (136) [120] stitches on the needle. (Be very careful to keep the pattern correct over the increasings, and refer to close-up photo.)
Divide for leg openings: Work 16 stitches in pattern, turn, leaving remaining stitches on a spare needle or stitch holder, and work 4 (3) [3] inches straight. Leave these stitches and work 4 (3) [3] inches straight on the next 92 (104) [88] stitches, and then work 4 (3) [3] inches straight on remaining 16 stitches. Continue in pattern, working across all the stitches again, decreasing
in every alternate row (every row)
[every 4th row] as follows: Continue thus until 100 (100) [116] stitches remain, and then work straight until work measures 7½ (5) [4½] inches from the leg openings. For Sally and Snuff only continue
as follows: Work 1½ (1) inches more in rib
working across all stitches. For Faust only, work as follows: Change to No. [10] needles. 1st row: (k1, p1) 8 times, pattern
the next 84 stitches, (k1, p1) 8 times. Rejoin wool to main work. Now work over all stitches in k1/p1 rib, decreasing at each end of every
row until 36 stitches remain. To Make UpPress main part lightly under a damp cloth, avoiding the ribbing. Join
the two edges together and, if desired, over sew neatly round leg openings. |
Materials5oz Double Knitting for the largest size "Sally", 2oz 4ply
for medium "Snuff" or "Brock", and A pair each of No 6 (9) [9] {5mm (3¾mm) [3¾mm]} and No 7 (10) [10] {4½mm (3¼mm) [3¼mm]} needles. Tension22 (32) [32] sts and 24 (32) [32] rows to 4 inches over pattern. Size mattersAround the neck: 13½ (12) [9] inches; width all round at foreleg: 24 (18) [16] inches; foreleg to back leg at underseam: 9 (6) [6] inches; width all round at back leg: 21 (13) [15] inches; width between forelegs: 6½ (4) [4] inches. A Word on the WoolOriginally these were knitted in Totem and Diana Non-Shrink Knitting Wool. Given the prevalence of wonderfully practical acrylics these days, they would seem to be a good alternative to wool, (and appear in almost any colour you would care to imagine). Disclaimer
|
|
Slide the jumper over your little doggy's head and gently push his little doggy legs through the openings. Say "what a good dog" a few times to avoid distress. I expect he'd like a biscuit too (what a good dog...).Here is some promotional advice from the 1930s: When it turns very cold indeed and these handsome coats aren't sufficient to ward off chills, their cautious owners give them a few extra Spratt's biscuits every day. These contain warming cod-liver oil and are most nourishing. |
|
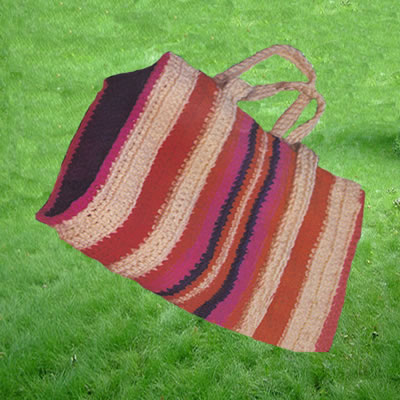
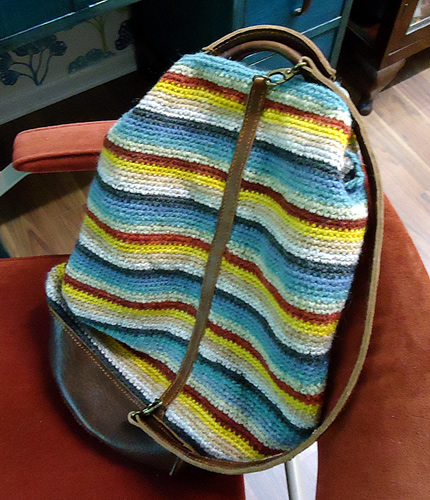
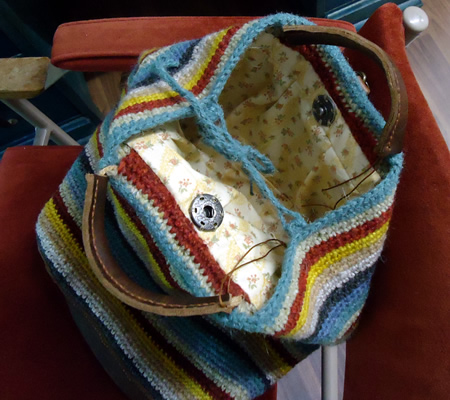
Soft-sided bags pack well into a car for touring or camping - or simply excursions to the beach. So these can make a good alternative as light weight overnight bags, or to contain all those little essentials for trips to the washrooms.
Instructions.Size could be modified by adding stitches or rows, or using a thicker yarn to change the tension - see "a Word on the Wool". Main sectionUsing tan beige colour (G) make 80 chain, plus one chain to turn. Work in dc inserting hook into the back of the loop only. Work in stripes as follows; 6 rows in B (tan) Now reverse the sequence: 1 row in C (red) Fasten off Side GussetsUsing dark blue or purple colour (D) make 30 chain, plus one chain to
turn. Work 8 rows in dc, inserting hook into the back loop only. Work a second gusset in the same way. HandleUsing tan beige colour (B) make 200 chain, plus one chain to turn. Work
4 rows in dc, inserting hook into the back loop only. To Make UpFold under a hem of 5 dc at each end of the bag. A Word on the WoolThe original yarn was a dense 100% acrylic carpet wool, with only 25m
to a 50g ball. It appears to be a chunky yarn designed for use with a
6mm hook - so this bag, using a 4mm hook, is designed to be made very
tight and firm to keep the shape of the bag. (Possibly hard work on the
fingers). I have seen Herdwick used to good effect for this type of bag. You may
have to buy it as an aran weight and use it double for this pattern; of
course you would be fairly limited in colour scheme. Finally, this could be a good way to use up remnants - always provided you can achieve the required tension, or make your own calculations to compensate. The bag is simply a mirror image of one set of stripes, so divide your remnants into 2 equal parts, either by weight or length before you begin - or alternatively - go wild and make an asymmetric pattern! |
Materials
|
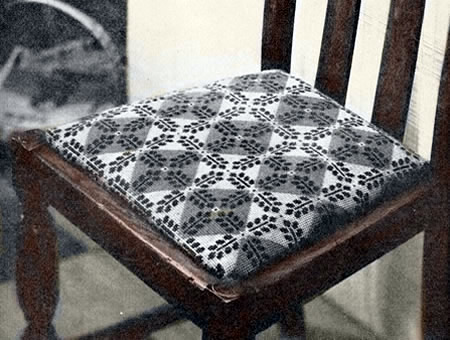
This is a needlepoint design with instructions below. However, needlepoint charts can be used for colourwork in knitting, so I also discuss the possibility of adapting it to use for a "modern" cushion cover.
This chair on which the cover is shown seems far from modern for the 1950s when this pattern was published, but this might have been a way to try an update it. They reassure us: "you can extend this design as required to fit any chair or stool top; with careful colour choosing the pattern would suit period pieces as well as modern furniture".
This particular chair seems very similar to my Mother's dining set purchased in 1938, where the seat is wider at the front that the back (so not quite square), but the chair's construction seems a bit more solid, so it is probably a little older.
Sadly, his type of brown furniture is even less popular today than it was when this was first published - but upcycling with chalk paint and a colourful fabric is always a possibility.
Needlepoint embroidery instructions.As I said in the introduction - these are the instructions for needlepoint, with notes on using the chart for a knitted cushion at the end. Make a paper pattern of seat, and draw round the outline, centring the
pattern, on the canvas. Mark the centre line in each direction and start
the diamond pattern on the centre point.
The main design is worked in tent-stitch (a slanting-stitch over one
Press, stretch and mount finished tapestry as required. Mounting TapestryBefore mounting your work, press it carefully on wrong side under a lightly
damped cloth. If, through not working in a frame, the tapestry has got
out of shape, pin out face downwards on a clean cloth, stretching it to
the correct shape; press the wrong side carefully under a damp cloth,
and leave pinned out for 24 hours. To mount, lay the tapestry flat, wrong side up, then place the seat pad
on top. Bring tapestry up sides of padded cushion part and fix temporarily
with lots of ordinary sewing pins, turning to the front again and again
to check the correct positioning of the design. When it is firmly held with pins all round, fold the surplus edges of
the canvas over the wooden frame of the pad, and nail firmly in position
with tacks and a hammer, or use a staple gun, mitreing the corners as
neatly as possible. Charted cushion adaptation.You can easily use an embroidery chart as a colourwork chart for knitting.
So here is the chart in some nice shades of yellow and grey.
Assuming you are familiar with the idea of working from charts, as usual, the charts show the right, or knitted, side of the work, reading knit rows from right to left; every alternate row worked in purl and read from left to right. The yarn not in use is carried loosely across the back of the fabric all the time, so it will be taken behind the stitches on a knitted row and in front of them on a purled row. Ideally you need to keep within a maximum of about five or six stitches
in each colour so that you don't have to carry the yarn not in use across
too many stitches at the back of the work. It is feasible to carry the
yarn across a greater number of stitches as long as you don't pull the
yarn so tightly that it puckers your work.
Finally - here's a roughly square cushion made up of 3 x 4 distorted motifs showing what it might actually look like:
Making upFor a cushion you need two identical pieces. You could make two knitted
pattern pieces, or make one of them in plain knitting, or back the cushion
with fabric, cut to the right size (don't forget to allow extra on the
fabric to turn in the raw edges). The size (and shape) of the resulting cushion cover will depend on the yarn you choose to work with. For a standard double knitting yarn, a 3 x 4 motif should work out to a size of about 22 inches wide and x 23 inches high. |
Materials
|
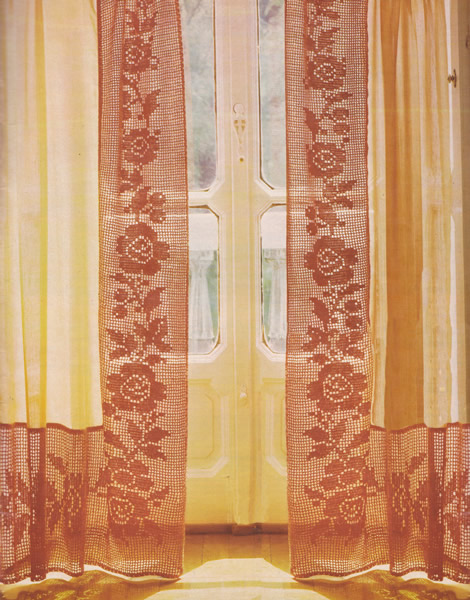
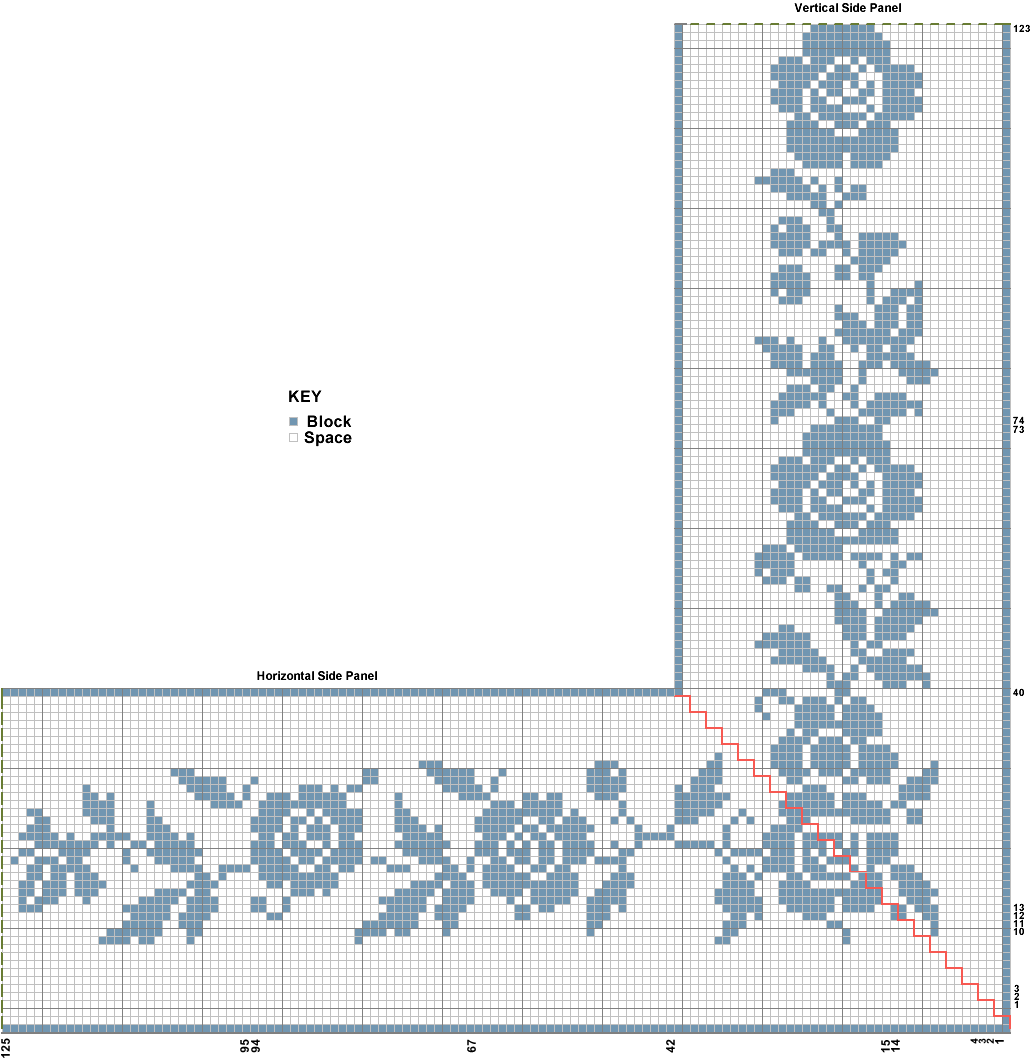
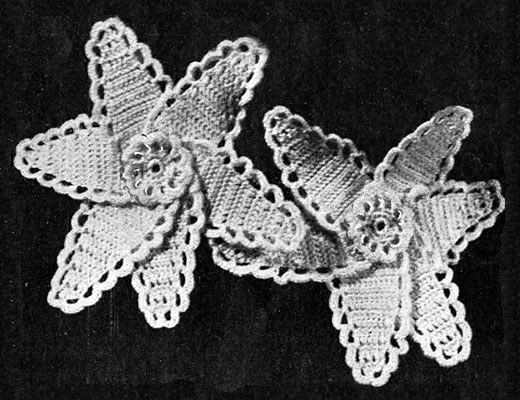
"A lovely idea for enhancing plain curtains is to make this floral pattern filet crochet border."
— again very true, but still quite a commitment if you are to make them looking as splendid as in the photo; as noted in the other posts this month, filet crochet is not technically difficult, but quite laborious.
This border is worked in No 20 cotton on a 2mm hook - still fairly fine but not quite so taxing as lace. Note that it could be adapted for an edging for a table cloth or table runner.
If you want to crochet a little something, and the mere thought of this gives you a headache, then try the little bonus pattern for a flower spray.
Filet CrochetThe crochet stitches used in filet crochet are very simple, consisting of "tall" stitches which in this patter are trebles, and chain stitches combined together to create a mesh of "spaces"; some of these spaces are filled in with "blocks" of the tall stitches, hence the pattern can be represented with a chart, that shows you how the spaces and blocks are arranged. You will see how this works as I explain below. In these examples the "tall" stitches are shown as trebles. Spaces (sp)Spaces are made by making 2 chain, missing 2 (or the same as the number
of chain) stitches, then "tall" stitch into the next stitch.
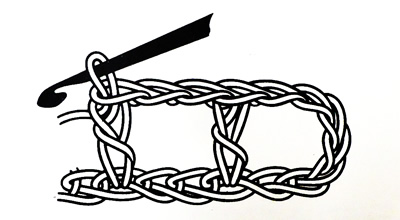
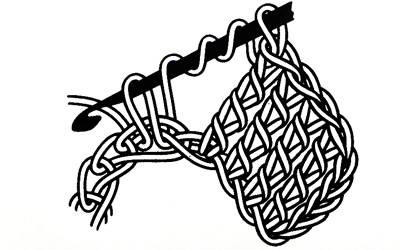
Blocks (blk)To make a block you fill in the space with tall stitches. The picture shows making 1 treble into each of the next 4 stitches (starting 3 chain counts as 1 treble), 2 chain, miss 2 stitches, 1 treble into the next stitch, 1 treble into the next 3 stitches (makes a block of 4).

As you continue in a pattern, you should ensure that your basic mesh
is preserved, so that the trebles that make the framework of the spaces
all sit evenly above one another, not offset like brickwork (unless of
course that is part of the pattern!). In general the pattern is created
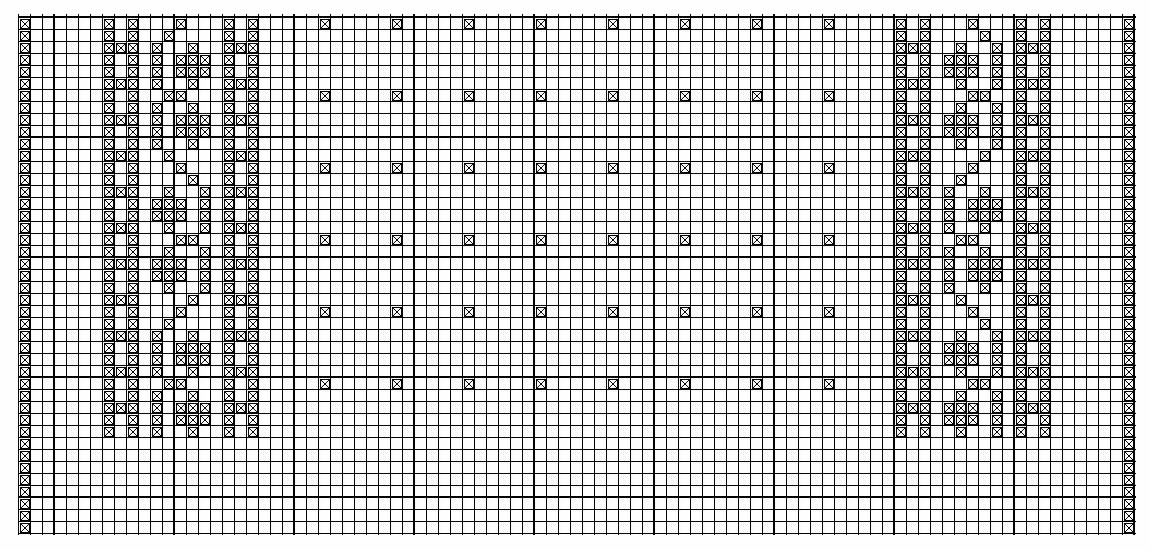
by the blocks, rather like giant pixels making an overall picture. InstructionsThe vertical (side) edging is worked first, from the bottom, starting with shaping the mitred corner as shown in the chart; then work on upwards to the required length, after which you fasten off. Next, you pick up at the mitred corner at the bottom of the side panel and work short rows across the mitre until al the stitches are incorporated, and you are working the horizontal (bottom) panel at 90 degrees to the side edging - also as shown in the chart. Work to the require width of your curtain, then fasten off. Vertical Side PanelBegin at lower outer corner, make 11 chain, work 1 tr in 8th chain from hook, 1 tr in 3 chain, turn. 1st row (right side): 3 chain, miss 1 tr, 1 tr in 3 tr, 2 chain, 1 tr in 3rd chain, turn. 2nd row: 10 chain, 1 tr in 8th chain from hook; (2 chain, 1 tr in next tr) twice, 1 tr in 2 tr, 1 tr in top of 3 chain. 3rd row: 3 chain, miss 1 tr, 1 tr in 3 tr; (2 chain, 1 tr in next tr), twice, 2 chain, 1 tr in 3rd chain. Working bracketed instructions twice more on every repeat, repeat 2nd and 3rd rows 3 times more. Begin filet pattern thus: 10th row: 10 chain, 1 tr in 8th chain from hook, 2 chain, 1 tr in next tr, 2 tr in chain space, 1 tr in next tr, (2 chain, 1 tr in next tr) 8 times, 1 tr in 2 tr, 1 tr in top of 3 chain. 11th row:—3 chain, miss 1 tr, 1 tr in 3 tr, (2 chain, 1 tr in next tr) 8 times, 1 tr in next 2 tr, (l tr in next tr, 2 chain) twice, 1 tr in 3rd chain. 12th row: 8 chain, 1 tr in 4th chain from hook, 1 tr in next 2 chain, (2 chain, 1 tr in next tr) twice, 2 tr in chain space, 1 tr in next 4 tr, (2 chain, 1 tr in next tr) 8 times, 1 tr in 2 tr, 1 tr in 3rd chain. Beginning with 13th row, continue working from chart (each square marked
in blue worked by 2 tr in 2-chain space or previous trs as given on 10th, 11th
and 12th rows) until 40th row is worked, and the mitre shaping is complete. Horizontal Lower PanelWith wrong side of vertical panel facing, join cotton to outer corner.
1st row (right side): 2 chain, miss
2 tr, 1 tr in 3 tr, 1 tr in top of 3 chain, turn. Working bracketed instructions twice more on every repeat, repeat 3rd and 4th rows 4 times, then repeat 3rd row again. 14th row: 3 chain, miss 1 tr, 1 tr in 3 tr, (2 chain, 1 tr in next tr) 12 times, 2 chain, 1 tr in top of slip stitch, 2 tr in chain space, 1 tr in same chain as tr, 2 tr around bar of tr, slip stitch in base of tr, turn. Turn chart sideways and continue working from chart, beginning with 15th row, still shaping corner as set until 41st row is completed. 42nd row: Pattern to 1 tr in top of slip stitch, 3 tr in end tr of 40th row of side panel, turn. Continue working from chart until 94th row is completed. Making Up: Pin out work a section at a time and block. |
|
MaterialsOne ball of Twilleys Twenty will make approximately 26½cm or 10½
inches of border. 2mm crochet hook. Ready-made curtains, or a length of voile or appropriate fabric to make your own. Tension8 holes (spaces) to 2 inches or 5cm. Size mattersLength as required. Crochet abbreviations:ch: chain Remember these are English crochet instructions where dc is equivalent to US single crochet; htr is equivalent to US double crochet - see "Terminology" in the side bar. Disclaimer (well...almost)In transposing any pattern it is always a risk that errors will be introduced, in spite of dedicated proof reading. If you have any problems with this pattern, please and I will try and assist. |
You can access a larger version of the chart - right click on the icon below and choose "save link as" or "save target as" (browser dependent options) to download and save a pdf file.

"These delightful curtains will give your home a brighter look."
— which is very true I'm sure, provided you have the skill and patience to make them.
If you are up to speed with crochet — and I'm guessing you won't attempt this unless you are — then it would be quite feasible to adapt to a slightly thicker crochet cotton and fewer repeats, in both width and length, using the chart as a guide.
If you want to crochet a little something, and the mere thought of this gives you a headache, then try the little bonus pattern for a flower spray.
Filet CrochetThis pattern as originally written does not appear to provide any explanation of the abbreviations, so unless you are competent in the method of filet crochet, it could be hard to understand. So I am providing some expanded notes on the method here. The crochet stitches used in filet crochet are very simple, consisting of "tall" stitches that could be trebles, (or double trebles or triple trebles), and chain stitches combined together to create a mesh of "spaces"; some of these spaces are filled in with "blocks" of the tall stitches, hence the pattern can be represented with a chart, that shows you how the spaces and blocks are arranged. You will see how this works as I explain below. In these examples the tall stitches are shown as trebles. Spaces (sp)Spaces are made by making 2 (or more) chain, missing 2 (or the same as
the number of chain) stitches, then "tall" stitch into the next
stitch.
Blocks (blk)To make a block you fill in the space with tall stitches. The picture shows making 1 treble into each of the next 4 stitches (starting 3 chain counts as 1 treble), 2 chain, miss 2 stitches, 1 treble into the next stitch, 1 treble into the next 3 stitches (makes a block of 4).
As you continue in a pattern, you should ensure that your basic mesh
is preserved, so that the trebles that make the framework of the spaces
all sit evenly above one another, not offset like brickwork (unless of
course that is part of the pattern!). In general the pattern is created
by the blocks, rather like giant pixels making an overall picture. Notes for this vintage pattern:There are several considerations here: firstly the finess of the thread they specify; secondly the size of the hook needed, thirdly the tall stitch they used; and finally the spaces and blocks. No 60 thread is very fine - like sewing cotton - I can only point out that a curtain is a movable feast, and provided you check the tension, you could adapt it. For your sanity you might want to try out with the rather more usual No 20 cotton (the lower the number the thicker the thread). The No 5½ crochet hook is not a specification in mm. You
can read about imperial hook sizes using the link in the side bar. This
is going to be the type of tiny steel hook used in lace making equivalent
to about ¾mm. The "tall" stitch here is abbreviated to "ltr"
which is "long treble" I believe, and I'm given to understand
that this is a triple treble.
However although the spaces in this pattern are worked with 3 chain rather than 2, the mesh in the picture looks square, and it implies to me that the "ltr" might be a double treble rather than triple. Again, I would try a sample swatch to see how it looks. And just to encourage you - swatching in crochet is much quicker than knitting. Here is picture of double trebles; made the same way as triple trebles, but start by passing the hook under the thread of the left hand twice instead of 3 times.
The spaces and blocks for this pattern are worked over 4 stitch
repeats rather that 3 as in the examples. A space is made by working 3
chain and missing 3 stitches before the next ltr. Instructions[Editor's note:These are the instructions as given in the original - however they make a lot of assumptions about one's knowledge of the method, hence I have provided more in the way of explanation above.] The curtain is commenced at the top. [Editor's note:I feel
I have to explain this row: Repeat this row 7 times more. Start pattern: 9th row (1st row of pattern): 1 blk, 6 sp, 1 blk, 1 sp, 1 blk, 1 sp, 1 blk, 2 sp, 1 blk, 2 sp, 1 blk, 1 sp, 1 blk, 53 sp, 1 blk, 1 sp, 1 blk, 2 sp, 1 blk, 2 sp, 1 blk, 1 sp, 1 blk, 1 sp, 1 blk, 6 sp, 1 blk. Now proceed from the 10th row of the chart, that is, the 2nd pattern row. |
|
MaterialsCoats Chain Mercer Crochet No 60: Milwards steel crochet hook No 5½. Tension5 spaces to 1 inch Size mattersLength as required. Crochet abbreviations:ch: chain Remember these are English crochet instructions where dc is equivalent to US single crochet; htr is equivalent to US double crochet - see "Terminology" in the side bar. Disclaimer
|
|
|
You can access a larger version of the chart - right click on the icon below and choose "save link as" or "save target as" (browser dependent options) to download and save a pdf file.
Repeat the pattern for the required length, making allowance for the
hem and finishing with a row of ltr. To Make UpTurn over the hem at the 6th row of the plain mesh and stitch to the
Press the curtains using a warm iron over a damp cloth. |
|
This is a little addendum to the next two crochet curtain patterns providing the theme for this month. If you want to see the other patterns then search for "curtains" using the box in the side bar.
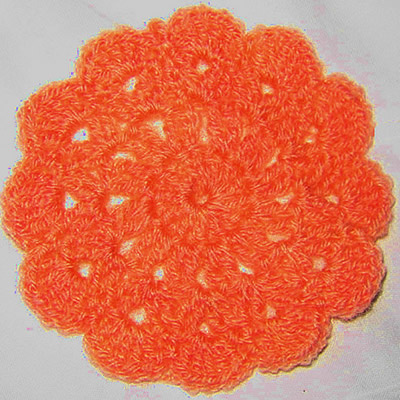
But — if you want to crochet a little something, and the mere thought of making a pair of curtains gives you a headache, then try this little bonus pattern for a flower spray. Again it asks for really tiny hook and lace cottons - but being a flower, you can freely adapt the materials and hook and make it come out any size you like.
Double Double CrochetDbl dc is not a stitch I had come across before, but here it is. I think it makes a rather pretty stitch. To work a dbl dc insert the hook into the stitch and pull thread through. Then thread over hook, and pull through one loop on hook; then thread over hook, and pull through remaining 2 loops. PetalCommence with 13 chain. 1st row: dbl dc into 3rd ch from
hook; 1 dbl dc into each of the remaining ch, 2 ch; turn. Repeat the 2nd row 6 times more. 9th row: Decrease 1 stitch at the
beginning and end of the row; 2 ch, turn. Fasten off. Edging 1st row: Join thread into the dbl
dc of 1st row-end, * 5 ch, miss 1
row-end, 1 dc into next row-end. Repeat from *
6 times more; 2nd row: 6 dc into each loop of 5
ch. Make 5 more petals. Centre.Commence with 6 ch, join with a slip stitch. 1st row: Into ring work 11 dc, join
with a ss. Fasten off. To Make Up.Sew petals together at base. Make another flower the same, and sew on to a piece of fine wire. |
MaterialsCoats Chain Mercer Crochet No 60 Milwards steel crochet hook No 5. Piece of fine wire. Tension12 rows to 1 inch Size mattersThe flower is about 3¼ inches from tip to tip. Crochet abbreviations:ch: chain Remember these are English crochet instructions where dc is equivalent to US single crochet; htr is equivalent to US double crochet - see "Terminology" in the side bar. Disclaimer
|
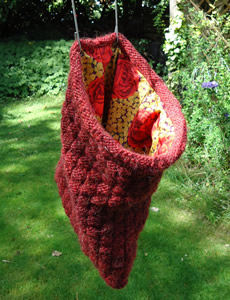
Kit bags are yet another thing I have a weakness for; I still have and use a floral one I bought from the Gap at its flagship store in Richmond in the 1980s. I think it stems from when I was a little girl finding my Father's military kit bag in the attic with "Delhi" and "Bombay" stenciled* on it - conjuring all kind of exotic ideas and possibilities. [All us kids also used this kit bag for camping with the Scouts and Guides in those days].
Kit bags are a bit impractical for any activity other than that for which they were designed, but smaller ones can be used more successfully as hand bags. This one seems to be of a more useful size, and you can really make it to any size you feel like. If you use "any thickness" of yarn as suggested then even the size of the base is really up to you. Designed towards the end of WW2, in an era of extreme shortages - where even the manufacture of yarn was restricted never mind the rationing - it is made from "oddments" or "pulled back" wool. The paper the pattern was printed on is flimsy in the extreme and there are sympathetic references everywhere to the inability to source the materials required.
* As well as the destinations, there was also my Father's name, army number, and unit stenciled on his kit bag, and I remember being amazed that he could just recite it without thinking - when in fact his army days were not so very far distant then and of course the only thing you were ever obliged to reveal were "name, rank, and number" - so not so surprising other than to a tiny child who suddenly had a glimmer of an idea that her Father had a life before she existed.
Instructions.The bag is really a free format design and quite simple to make. It's
the details that can make it rather splendid. Base:[Editor's note: Since you are working to a non-specified tension, you might want to do the crochet part first and make the base to fit accordingly.] Cut 2 circles of felt, one 8½ inches, the other 10 inches in diameter.
BorderCut a piece of felt 9 inches wide and 27 inches long; then a strip of
cardboard 26 inches long and 4 inches wide. Crochet topWith double wool, make 140 chain and close to form a ring. [Editor's note:
Or *not* with double wool - as you prefer and depending on the
thickness of the yarn you are using; in fact of you really are using scraps
of different thicknesses you might use some of them double and some not.
In the 1940s, sweaters were generally made in fingering (thin) yarn so
the assumption would have been that this is what you would have had to
work with. 1st round: Make 3 chain to form
first treble, then work 1 chain, 1 treble all round, and link up with
first treble. Repeat 2nd round for about 8 or 9 inches, changing colour as required. Now start decreasing by missing a tr 4 times evenly in round. Divide the work so that you have 36 trebles for back and front with 14
at each side. Work 12 rows of trebles on each of the 36 tr. Turn down each of these 2 (36 treble) top hems and slip a piece of cardboard into each to stiffen before finally stitching. HandlesWith double wool make 70 chain and join to form a circle. [Editor's note: You are essentially using the yarn as stuffing for the handles.] To Make UpStitch crochet top to edge of base on inside of it, making it very firm. Sew handles firmly to stiffened tops. Make a length of crochet chain with a small tassel at each end to thread through open sides at each side of handle. Adaptations
I was sufficiently smitten with this that I actually made one up for myself, with some adaptations of my own. Firstly I did stick with the idea of using oddments I already had, but I used mostly chunky yarns so I did not have to work with the yarn doubled - which can be a bit of a nuisance when doing crochet, even though many old and new patterns seem to suggest it. As I selected my yarns based on colour, some of them were used double to achieve the thickness I wanted. I also changed the stitch - I used a 4mm hook with my chunky yarn, and worked in double crochet (American single crochet) throughout instead of treble crochet in order to achieve a firmer fabric; trebles provide a moderately open fabric, which, even with a lining, was not the effect I wanted. If you want to do that yourself, bear in mind that working with dc is not as quick; however, I find crochet in general works up very quickly (as well as thicker) when compared with knitting. [Editor's note: Worth noting here that although I settled on using chunky yarn, in my opinion, the original fingering (or 4 ply) yarn is about equivalent to an Aran or worsted weight yarn when used double; I say "in my opinion" as opinions do differ on this.] For the base, I used a rather thick leather (about 2mm) which was tough to work but made up surprisingly well. I bought it from leather4craft's selection of offcuts on eBay - but it did prove fairly expensive for all that. You could use a thin leather, or PVC, or recycled leather (which I found very easy to work with in the past) in which case you can treat it much like the felt although easing it may not be quite so easy.

I made the base to be an oval shape to suit the offcut of leather I had. I just took a rectangle about 12 by 8½ inches and rounded the corners (using a dinner plate as a guide), then attached the border in that shape; about ½ inch was used all round for the overlapping seam which gave a circumference fairly close to the original 9 inch circular base. |
MaterialsOddments of wool, any shade or ply. A medium-sized crochet hook. Felt or leather
for the base. TensionDependent on the yarn and hook you use. Size mattersThe base of the bag is designed to be about 8½ inches. Crochet abbreviations:ch: chain Remember these are English crochet instructions where dc is equivalent to US single crochet - see "Terminology" in the side bar. A Word on the WoolI used some tough carpet wools in combination with any chunky yarns I could find in the right colours. I used a relatively smaller hook than usual for chunky in order to keep the fabric firm - and carpet-like. I have seen some crochet work for sale at Woolfest using Herdwick wool which I liked a lot. It was similarly firm, making self- supporting small boxes. [I was less keen to try that out myself as I felt it would be quite tough on the hands.] Disclaimer
|
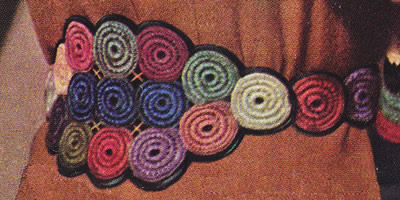
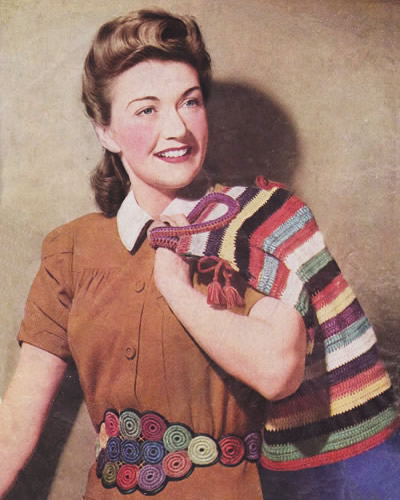
So by now I expect you are thinking "...but hey! - what about that extremely snazzy and attractive belt she is wearing? where can I buy that?".
Well - good news! it's not a purchased item at all - it's a one-of-a-kind hand-crafted item you can make yourself! Here's how:
Instructions. Again the materials are designed to be "make do and mend"
oddments of old pulled-back knitting wool in any ply and any shade, worked
with a medium-sized crochet hook. Each circle is made separately: Now make 6 chain and join into a circle closely. Break foundation and working wool and finish off neatly. [Editor's note: The intention here is to achieve a fairly solid roundel by working your stitches over a core of old yarn - as you might do in stumpwork embroidery or making a corded buttonhole. Obviously you can do as many rounds as you like to achieve the appropriate size.] Arrange the 15 circles for front of belt as shown in photograph, and stitch
to foundation material cut to shape. |
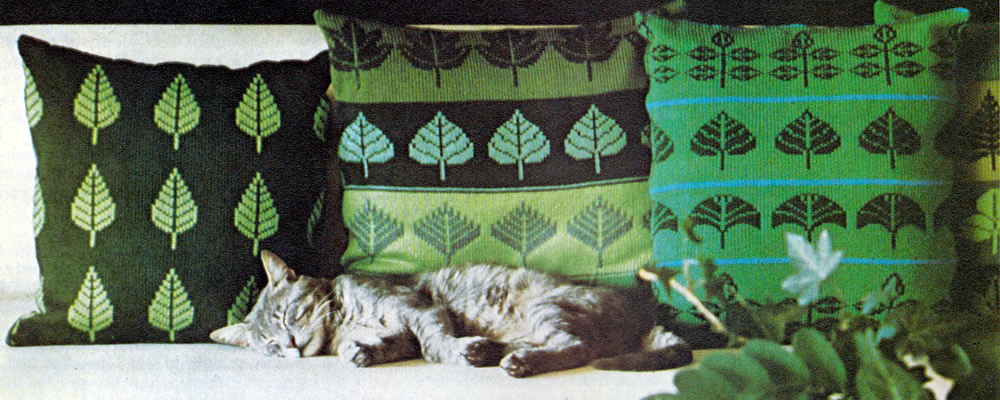
Simple yet effective cushions using stylised leaf motifs.
Cushions can be an opportunity to really give full rein to your creative side with little investment risk - in either time or materials. If (like me) you feel you lack a natural artistic streak of your own, you can find inspiration almost anywhere. Any small motifs from embroidery sources can be used for knitting - but make sure you check the tension you need to aim at as it will dictate the resulting size of the cushion.
Instructions.These cushions are created using a limited colour palette and an intarsia technique. Only two colours are used where the motifs are worked, which is a good idea to start with - both stylistically and technically. Assuming you are familiar with the idea of working from charts, as usual, the charts show the right, or knitted, side of the work, reading knit rows from right to left; every alternate row worked in purl and read from left to right. The yarn not in use is carried loosely across the back of the fabric all the time, so it will be taken behind the stitches on a knitted row and in front of them on a purled row. Ideally you need to keep within a maximum of about five or six stitches
in each colour so that you don't have to carry the yarn not in use across
too many stitches at the back of the work. It is feasible to carry the
yarn across a greater number of stitches as long as you don't pull the
yarn so tightly that it puckers your work. The completed size of a motif, (and the entire design), will depend on the tension at which you are working. For example: with a tension of 20 stitches and 28 rows to 4 inches (10 cm), a motif worked over 15 stitches and 21 rows will form a square measuring 3 inches (7.5cm) by 3 inches (7.5cm). So you can do some simple working out to adapt any motifs to a design measuring the size you want. If you are not so familiar with working from charts, this might be a good project to start out with. For consistency, the charts show each motif on a 23 stitch grid; the actual pattern repeat across the cushion is 24 stitches: each set of stitches on the chart is separated by one background stitch. The overall spacing or layout of the motifs is given by a written set-up row for each cushion, which is the first row on the charts.
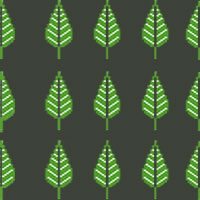 Cushion 1Worked in two colours with the same motif repeated evenly all over the cushion. Using No 9 (3¾mm) needles and main shade (A), cast on 99 stitches, and work in stocking stitch throughout. Work 4 rows in main shade (A). Next row: k1 stitch in A, k1 stitch in B, (k23 stitches in A, k1 stitch in B) 4 times finishing the row with k1 stitch in A. 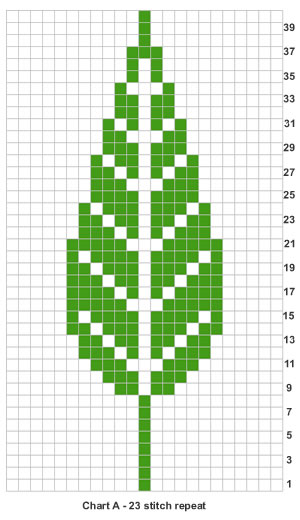 There is half a leaf at each end of the row, plus an extra stitch at each end of the work which will be used for seaming. So now continue in pattern from the chart, starting with the seam stitch followed by the centre stitch of the leaf. The overall pattern repeat is 24 stitches, 13 stitches for the leaf and 11 stitches between the leaves at the widest point. Work the 40 pattern rows, followed by 8 rows in A only, twice, then work
the 40 row pattern again followed by 4 rows in A.
 Cushion 2Worked in 8 colours with stripes of colour and repeated motifs in 8 colours (A-H). Using No 9 (3¾mm) needles and main shade (A), cast on 121 stitches, and work in stocking stitch throughout. Work 2 rows using A, 1 row using B and 4 rows using A. Motif stripe 1: Next row: p12 stitches in A, (p1 stitch in B, p23 stitches in A) 4 times finishing the row with p1 stitch in B, p12 stiches in A. 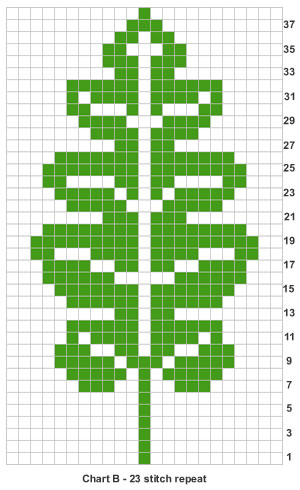 Continue working from the Chart B until 38 rows have been completed. Work plain stripes of 4 rows in A, 1 row in C, 1 row in D, and 4 rows in C. Motif stripe 2: Next row: p12 stitches in C, (p1 stitch in D, p23 stitches in C) 4 times finishing the row with p1 stitch in D, p12 stiches in C. 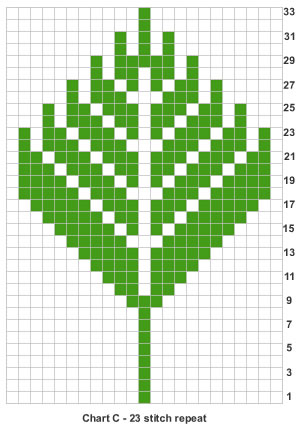 Continue working from Chart C until 33 rows have been completed. Work plain stripes of 4 rows in C, 1 row in E, 1 row in F, and 4 rows in E. Motif stripe 3: Next row: k12 stitches in E, (k1 stitch in F, k23 stitches in E) 4 times finishing the row with k1 stitch in F, k12 stiches in E. 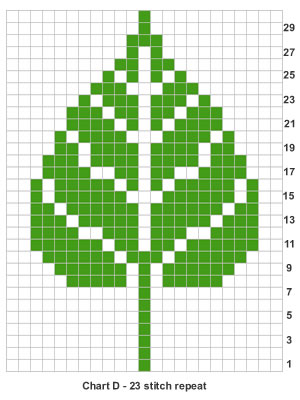 Continue working from Chart D until 30 rows have been completed. Work plain stripes of 4 rows in E, 1 row in H, 1 row in E, and 4 rows in G. Motif stripe 4: Next row: k12 stitches in G, (k1 stitch in H, k23 stitches in G) 4 times finishing the row with k1 stitch in H, k12 stiches in G. 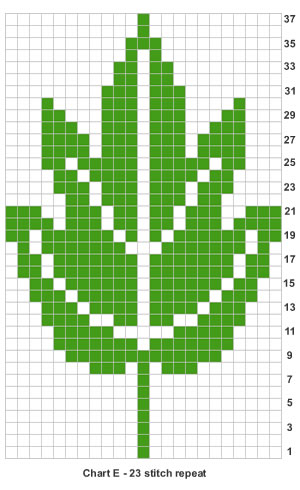 Continue working from Chart E until 37 rows have been completed. Finally, work plain stripes of 4 rows in G, 1 row in H, 2 rows G.
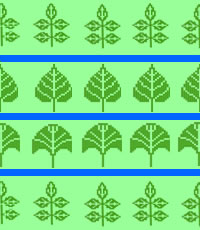 Cushion 3Worked in three colours (A-C) with different motifs repeated in bands across the cushion; the background and motif colours are constant, and the motif bands are separated by thin stripes of the third colour. Using No 9 (3¾mm) needles and contrast colour C, cast on 99 stitches, and work in stocking stitch throughout. Work 2 rows in contrast C, 4 rows in main shade A. Motif stripe 1: Next row: k2 stitches in B, (k23 stitches in A, k1 stitch in B) 4 times finishing the row with k1 stitch in B. 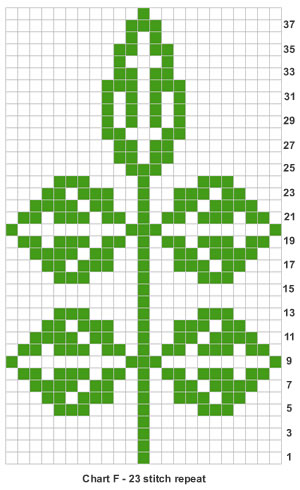 Here again there is half a leaf at each end of the cushion, so the pattern has been set to start with the centre stitch of a leaf, plus the seaming stitch at each end of the row. Continue working from the Chart F until 38 rows have been completed. Work plain stripes of 4 rows in A, 2 rows in C, and 4 rows in A. Motif stripe 2: Next row: k2 stitches in B, (k23 stitches in A, k1 stitch in B) 4 times finishing the row with k1 stitch in B. 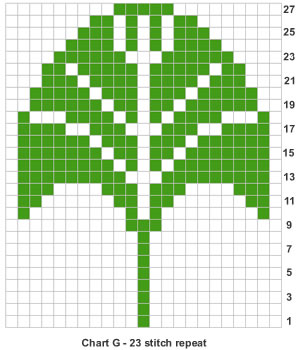 Again there is half a leaf at each end of the cushion, so the pattern has been set to start with the centre stitch of a leaf, plus the seaming stitch at each end of the row. Continue working from the Chart G until the 27 rows of the pattern have been completed. Work plain stripes of 4 rows in A, 2 rows in C, and 4 rows in A. Motif stripe 3: Next row: p2 stitches in B, (p23 stitches in A, p1 stitch in B) 4 times finishing the row with p1 stitch in B. Continue working from the Chart D until the 30 rows of the pattern have been completed. Work plain stripes of 4 rows in A, 2 rows in C, and 4 rows in A. Motif stripe 4: Next row: p2 stitches in B, (p23 stitches in A, p1 stitch in B) 4 times finishing the row with p1 stitch in B. Just as before, there is half a leaf at each end of the cushion, so the pattern has been set to start with the centre stitch of a leaf, plus the seaming stitch at each end of the row. Continue working from the Chart F until 38 rows have been completed. Work plain stripes of 4 rows in A, and 2 rows in C. Making upAll the cushions are made up of two identical pieces. |
Materials
|
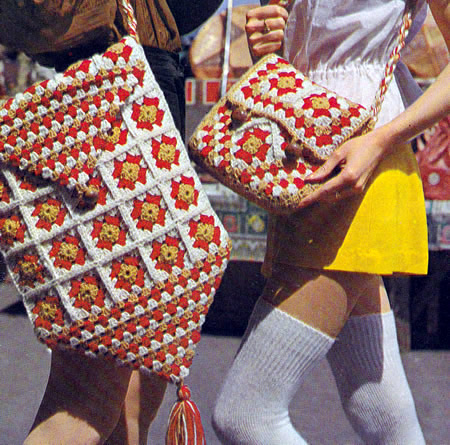
Summer season bags in crochet this time - for beach - or for festivals if you want the full seventies vibe. Easy to make using a single basic granny square motif.
Instructions.The bags are made up by joining a number of the same basic "granny square" motif. If you are feeling adventurous you could make up your own version of the squares to approximately the same size or you could use a variety of colours (in the "granny square" tradition) to use up wool oddments. MotifWith Gold (G) make 4 ch, join into ring with slip stitch (ss). 1st round: in G, 3 ch, 11 tr into
ring. [12 sts]
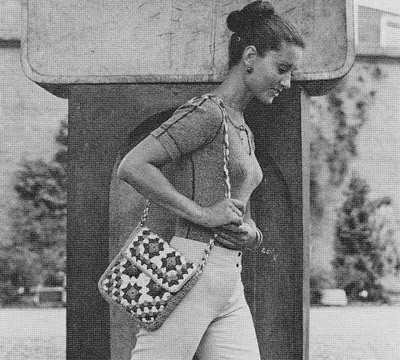 HandbagMake 10 motifs. Join remaining motifs in the same way, thus having 5 strips made of 2 motifs each Now make a square by joining 2 strips together using the slip stitch
technique as before. Make another square the same. Handbag - main part[Editor's note: In this section you make diagonal edgings for each side of the square sections of the bag. You end up with another square with the original 4 motifs set "on point" as you can see in the photo.] With right side facing and Gold (G), join yarn to corner ch sp of one
of the squares, and work along first side edge as follows : 2nd row: in Red (R), 3 ch, 2 tr in
1st sp between first 2 groups, 3 tr in 3rd row: in Cream (C), as 2nd row [5 groups]. Alternating colours as before, work 4 more rows, thus ending 3 ch 2 tr
in G worked in sp between 2 groups. [1 group]. Joining yarn to corner ch sp already used, work along 2nd and 3rd sides
of square in the same way, then work along 4th side starting Work the other main part in the same way on the second 4-motif square. Handbag - flap[Editor's note: At this point you might think "flap" is an instruction - but it isn't - it' just the description of the piece you are making next. The instruction is "just keep calm and carry on". Crochet is always more difficult to read from a pattern than it is to actually do it.] With right side facing and G, join yarn to corner ch sp at long side of remaining oblong strip and work as follows: 1st round: in G, 3 ch 2 tr in corner
ch sp, (3 tr in sp between next 2 groups) twice; 3 tr in centre of joining
row; (3 tr in sp between Handbag - gussetWith G, make 10 ch 1st row: 1 tr in 4th ch from hook,
1 tr in each following ch Repeat 2nd row until strip measures 24 inches (61 cm). Handbag - to make upUsing a warm iron and damp cloth, press parts lightly on wrong side.
Make twisted cord from 18 strands of remaining yarn, each strand 100 inches (254 cm) long (or however long you want the shoulder strap to be), and attach to top of gusset at each side of bag. Join lining and place inside bag with seams to inside, turn in raw edges at top and inside flap, and slip hem neatly in position. Sew on buttons.
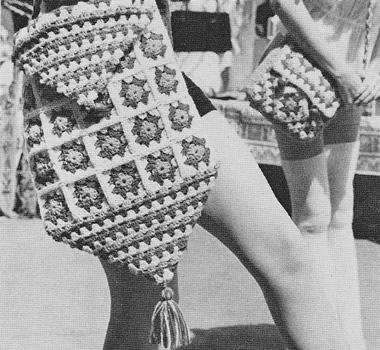 Beach bagMake 55 motifs. Beach bag - backJoin 6 strips together, thus having an oblong. 1st row: in G, 3 ch 2 tr in corner
ch sp, * (3 tr in sp between next
2 groups) twice, 3 tr in centre of joining row; repeat from *
ending 3 tr in corner ch sp [16 groups]. Alternating colours as before, work 13 more rows, thus ending 3 ch 2
tr in G, worked in sp between 2 groups. [1 group]. Beach bag - flapWorking along opposite edge of oblong, work as for point. Beach bag - frontJoin 5 strips together, thus making a square. Beach bag - to make upPress as for handbag. Cut lining as for front and back, allowing ½ inch (1 cm) extra for
turnings. Using a flat-stitch seam, join points by catching together tips of each group. Make twisted cord as for handbag and attach to sides. Using 18 strands of remaining yarn, each strand 12 inches (30 cm) long, make tassel and attach to point. Sew on button to match loop. |
Materials
|
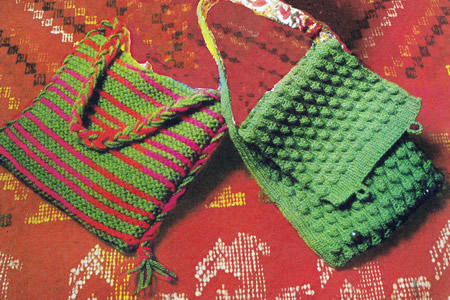
Festival season is well under way so I am posting this a little early - too late for Glastonbury but in time for WOMAD if you are a fast knitter (or knit while you are there..!).and Cropredy.
You can use any stitch for the bag that appeals, taking the pattern as a basic shape. You could try a multicoloured honeycomb pattern, or you could combine stripes of different pattern textures. The simplest shape (on the left) is the type I remember with the tasselled handle continuing all down the sides.
Instructions.Striped bag (left)Using No 3 needles and main colour A, cast on 36 stitches. To make up the striped bagIf you want to line the bag, cut the lining to the size of the bag, allowing
6mm (½ inch) turnings. Cut 6 strands each of A and B into 178cm (70 inch) lengths. Divide the strands into 3 groups and plait together to form a handle, making an overhand knot at each end and leaving the ends to form a tassel. Stitch the plait in position along the side seams of the bag, having a tassel at each lower edge and leaving the remainder to form the handle. Sew on one button or bead to the centre of each side of the top edge
of the bag. Shoulder bag (right)To make this bag you can experiment with any textured pattern. Cast on 62 stitches and start knitting in your chosen pattern.
Continue in pattern until the length is about 3 times the height you want the bag to be, allowing up to 2 inches additional for the bottom of the bag. The bag shown was knitted 76cm (30 inches) long. For the strap, cast on 11 stitches and work 106cm (42") in single rib. Finishing the shoulder bagSew together so that the strap makes a gusset at the sides of the bag. You can optionally line the bag and add a couple of buttons and loops as shown in the Picture. Textured Pattern stitches Bobble ribCast on a number of stitches divisible by 6 plus 2.  Cane basket stitchCast on a number of sts divisible by 6 plus 2. 1st row (right side): K2, *
P4, K2, repeat from * to end.  Tassel stitchCast on a number of sts divisible by 6 plus 2. You can find more textured stitches in these links: A different basket stitch and blackberry stitch.  Honeycomb stitch in two colours 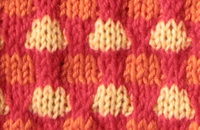 |
Materials
|
These types of bag were very popular in the 1970s - I used one instead of a school satchel. Probably the striped bag on the left above is the most stylistically similar to the ones I remember - I might choose different colours!
My own bag - now long lost - was woven in a mixture of dark red and blue. Below is a genuine "gap year" cloth bag from the 1970s which made its way backpacking to the far east and back. It is a mail bag style like the knitted version pictured on the right above.
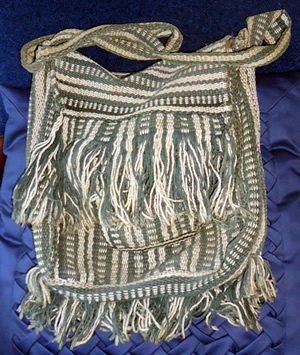
Below is a detail from the picture. The bag is woven of course but you could reproduce this pattern in knitting and easily add lots of tassels.
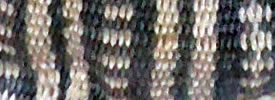
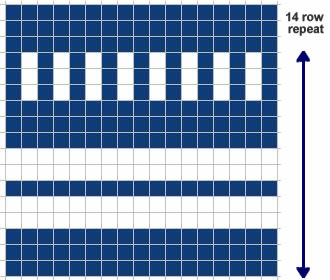
The main bag has the stripes running vertically, and the flap has them horizontal. If you want this effect, as it's not easy to knit vertical stripes while keeping the integrity of the fabric, you could use this chart as written for the flap, and then use it to knit the front and bag in one piece from side to side. If you were feeling really confident you could knit front and back (sideways rectangle) then pick up the stitches from the side of the knitting and knit the flap. So - to do this - before you start - work out your tension and then how large you want the bag to be. Lets say that it's 12 inches high and 10 inches wide. You need to cast on enough stitches to make 24 inches in the width of your knitting. Then knit stocking stitch in pattern for 10 inches and cast off. At the side of the knitting, pick up stitches for the flap. Usually this means picking up 2 stitches for every 3 rows to make a flat fabric without puckering. Then knit in the pattern for up to 12 inches to cover the front of the bag - if you are adding tassels you might want to knit as little as 4-6 inches.
Finally I'll leave you to extemporise on the handle and tassels. You might want to knit a plain handle about 2 inches wide and back it with some kind of webbing - then you would use it as the sides of the bag as you can see our original was made. Or you could just fold the bag without sides and apply a plaited cord handle as for the first bag on the left in these instructions.
You would probably need to use a 4 ply / DK / worsted on a smaller than usual needle to give a solid fabric, and it would be a good idea to line it with something firm.
I'm sure you could also make a simple bag from two woven panels (three for a mail bag) - perhaps made using a fairly crude home-made loom. I am planning to experiment with this in the near future. Watch this space (!).
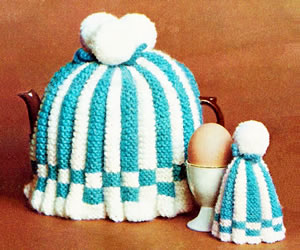
The archetypal cosy design (maybe with a few too many pom-poms for historical verisimilitude but who's counting?). And - no idea why the British are quite so obsessed with hats for their eggs, but it does seem that there is always a matching egg cosy* to complete the set.
*
I think with very fine wool and a bit of adaptation these could become knitted hats for the Big Knit - a campaign from Innocent Smoothies, who are again putting knitted hats on their bottles this year in aid of Age UK (helping older folk face the winter). The advertising says "knit a hat this November" however unfortunately the deadline for knitting is past as the campaign aims to have the hats in place during November - so maybe next year....
However, you can still join in by designing your own virtual hat and sharing on Facebook (10p donation from Innocent), or by buying a smoothie with a hat (25p donation by Innocent), or with a direct donation. Have a look on their website - there are free mini-hat patterns!
InstructionsThe pleats are formed by each colour being drawn up across the back of the colour just used and keeping all the strands to the wrong side of the work throughout. Tea Cosy (make 2 pieces)With No 8 needles and light colour (L), cast on 98sts and knit 5 rows. Join in Dark colour (D) and proceed in pattern as follows: 1st row: k1L, k6D; *
k7L, k7D; repeat from * to last 7
stitches, k6L, k1D. Repeat 1st and 2nd rows until work measures 6 inches from beginning finishing at the end of 2nd row. Shape top as follows: Break off wool, thread end of Light colour through the remaining stitches,
draw up and fasten off securely. Make another piece in same manner. To Make Up the Tea CosyStitch side and top seams leaving openings for handle and spout. Egg Cosy (make 1 piece)With No 10 needles and light colour (L) in 3 ply, cast on 72sts and knit 3 rows. Join in Dark colour (D) and proceed in pattern as follows: 1st row: k1L, k5D; *
k6L, k6D; repeat from * to last 6
stitches, k5L, k1D. Repeat 1st and 2nd rows until work measures 2¾ inches from beginning finishing at the end of 2nd row. Shape top as follows: Work from ‡ to ‡
as on Tea Cosy. To Make Up the Egg CosyStitch side seam. |
Materials
|
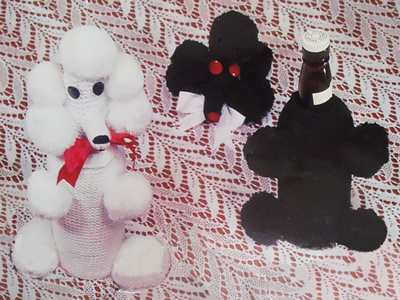
How very 1950s! How very French!.
How could I resist?
At first glance I assumed this was the more usual toilet roll cover (because nobody wants their spare toilet rolls exposed to the world do they?) - but no! It is a "bottle" cover. How much better to have a knitted poodle gracing the dining table rather than leaving your Castle Lafite Rothschild labels tastelessly speaking for themselves. [Actually I think it looks like it's designed for the sherry bottle - perhaps to hide the little nip you need to get through the housework.]
Alternatively you can wimp out and knit it as a toy - provided your child is also into retro 1950s toys, (did I mention that as a kid my favourite toy was a poodle ? ... he wasn't knitted though ..... Pom Pom .... ‹closes eyes in reminiscence›)
[Please note: This has not been knitted up to test the pattern but is provided as per the original. The shapes are very simple and the main effort is in the making up.]
Instructions.The poodle is knitted mainly in garter stitch with some eyelet rows to
carry elastic and drawstring. I think the two methods of assembly have
not been quite thought through in the original pattern, so you need to
use your common sense and refer to the picture when sewing it together. BodyWith No 8 needles cast on 49 stitches, and knit 2 rows. Next row: * k1, wf, k2tog; repeat from * to last stitch, k1. Continue in garter stitch (every row knit) until work measures 7½ inches from the beginning. Next row: *
k5, k2tog; repeat from * to end. [42 sts] Next row: *
k4, k2tog; repeat from * to end. [35 sts] Next row: *
k3, k2tog; repeat from * to end. [28 sts] Next row: *
k2, k2tog; repeat from * to end. [21 sts] Next row: K1; *
k2tog; repeat from * to end. [11 sts] Thread wool through remaining stitches, draw up and fasten off securely. [Editor's note: I think there is a bit of an implied error here - this is the neck, so only draw up to the degree that the neck of the bottle will fit...] HeadCast on 49 stitches, and knit 3 rows. Next row: *
k5, k2tog; repeat from * to end. [42 sts] Next row: * k1, wf, k2tog; repeat from * to last stitch, k1. Continue without any shaping for 3 inches. Next row: *
k2tog; repeat from * to end. [14 sts] Thread wool through remaining stitches, draw up and fasten off securely. NoseCast on 12 stitches, and work 1½ inches in garter stitch. Next row: *
k1, k2tog; repeat from * to end. [8 sts] Thread wool through remaining stitches, draw up and fasten off securely. Pom-PomsMake 8 pom-poms, 2½ inches in diameter. Cut 2 pieces of cardboard the diameter of the finished pom-pom; cut a ½ inch diameter hole in the centre. Wind wool over the rings until the centre hole is filled. With a sharp pair of scissors, cut through the wool at the outer edge. With double wool, bind round the centre of the pom-pom between the two pieces of cardboard; tie a knot and fasten off securely. Remove the cardboard. Fluff out and trim. To Make UpJoin back seam. Take 4 strands of light coloured wool and thread through holes at neck
and secure with a small knot. Tie in a bow. To Make Up the Poodle as a ToyFollow the instructions for the Bottle Cover. [Editor's note: After this there are a few inconsistencies which you need to work out as you go.] Assemble as the bottle cover. Insert a circle of cardboard 3 inches in diameter into the bottom of
the body. Make a roll of stuffing 13 inches long and insert this into
the base firmly, leaving excess sticking out for the head to fit over. Fluff out the stuffing slightly and fit head over it; pull down and stitch
over body. |
Materials
|
How to make pom-poms.
This is a different method which I ran across while looking for the simple tutorial above. It's less relevent for making our Poodle maybe but good if you want to make a load of these for a scarf or a necklace (ok - bit dated perhaps - think of your own project!)
|
|
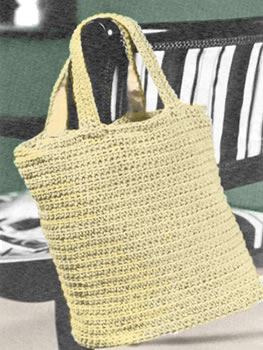
A crochet "holdall" or "tote" made in dishcloth cotton (subsequently re-branded craft cotton). This one is lined and the craft cotton is soft and flexible. You could make it from a coarser type of jute, (I would use a larger hook), and leave it unlined, to use as a vegetable or market bag. I have also seen some excellent bags and bowls made from Herdwick yarn; these are crocheted very tightly to create a rigid fabric so the bags will keep their shape unsupported.
InstructionsThe bag is made in one piece starting at the base, and the straps are then attached separately. Bag Start at the base and make 21 ch. 1st round: Work 3 dc into 2nd ch
from hook; 1 dc in each of next 18 ch; work 3 dc into last ch; then continue
along other side of ch by working 1 dc in next 18 ch; join with slip stitch
to first dc of round. [42 sts] Increase round: (inc1, 8 dc) 8 times. [80 sts] Work in ridge pattern as follows:- 1st round: Work 1 dc in each dc. Repeat last 2 rounds until work measures 11½ ins. from the the first
ridge worked at completion of base. Straps (Make 2)Make 49 ch and work in rows. 1st row: 1 dc in 2nd ch from hook,
1 dc in next 47 ch , I ch , turn. To Make Up:Cut piece of card to fit base. Cut lining, 18 x 24 inches (this lines the depth of bag and allows for gathered top as well). From remainder of material, cut two strips for lining handles, 15 x 2 inches, and for base, draw round the card shape on material and cut out about 1 in. away from pencil outline. Cover one side of card with lining, folding over and sticking surplus
material onto the other side. Join the 2 side edges of lining to make a tube. Top Finish: Fold over top edge of lining to wrong side to make
3½ inch hem, and stitch in position. ¼ inch down from top folded
edge. make 2 rows of stitching, ½ inch apart, for draw-string. Open
seam between the 2 rows and insert tape. Slip lining into bag and stitch into position by catching the 3½ inch hemline behind crochet (about ½ inch down from top of edge of crochet). Catch lining to base. Line handles and stitch on each side of bag. Draw up tape and tie. |
Materials2 x 4oz. hanks Dishcloth Cotton. Crochet abbreviations:ch: = chain Tension3 stitches to 1 inch in width. Size mattersDepth: 11½ inches; Oval base: 9½ x 4½ inches. A Word on the WoolThere are a number of brands sold as "dishcloth cotton" or "craft cotton" but it's a little pot luck with the thickness - you will have to experiment with the tension and how you want the bag to look. You are looking for an Aran weight yarn with a yardage of about 75m to 50g. Lion Brand Cotton is fairly common in the US and would be suitable if you can obtain it (and comes in exciting colours too...). You can literally use balls of string for this kind of bag but I've always found that works out surprisingly expensive. Disclaimer
|
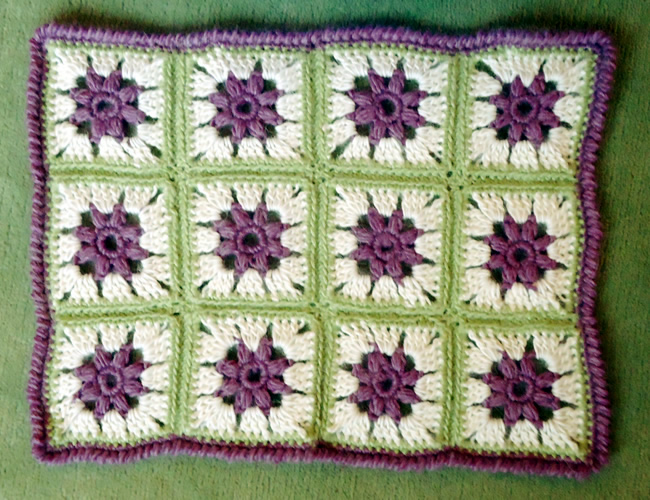
This is small blanket or cot cover made from 12 crochet squares in chunky yarn (so quick to make). It's based the usual granny-square principle, but a very pretty example of it incorporating the central flower motif.
InstructionsThere are a couple of new stitches used in this pattern, as well as basic chain, dc, and treble. There is a "cluster" used in making the central flower, and crab stitch for the edging. Make cluster: Working all into the same stitch, **yoh,
draw through loop **; repeat from
** to **
4 times (9 loops on hook); yoh, draw loop through all loops on hook; yoh,
draw loop through stitch on hook. Crab stitch is worked exactly as you do double crochet - but from right to left instead of left to right. It seems very awkward but just force yourself to do it; push the hook through the stitch to the right of your needle, pull through a loop, then yoh and pull through both loops on hook. It creates a very attractive twisted ribbed edge. There a is you tube extract inserted at end of this item - or go search the web for "crab stitch" for a variety of explanations. Motif (make 12)Starting at the centre of the square: using 7mm hook and first contrast, (plum), make 6ch and join in a ring using a slip stitch. 1st round: 8dc into the ring and
join with a slip stitch to top of first dc. Fasten off. This completes the motif. 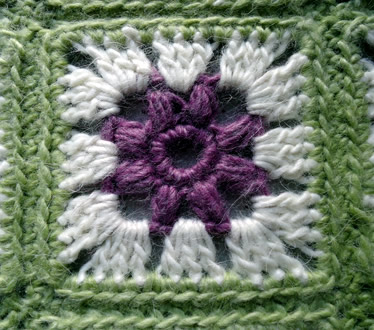 To Make UpMake 12 squares altogether. With 7mm hook and 3rd contrast (lime), join 2 squares together; hold
right sides together and slip stitch through the back loop of each dc,
leaving the front loops exposed as a decorative ridge on the right side
(see photos). Join 3 squares in a row, then join the 4 rows together. Finally, using first contrast (plum) and right side facing, work a row of dc all around the blanket, and work 2 or 3sts into the 4 corner sts, to make it curve properly. Then, keeping the right side facing you, change to a 6mm hook and go back the way you came, working one row of crab stitch right to left. Sew in all ends. Block the blanket by pinning it out and dampening; leave to dry. You can press very lightly with a damp cloth - just hold the iron above the cloth so it heats it but do not press down. You want to leave the texture of the stitches in place, so do not press heavily. |
Materials
|
Here is a You Tube item showing how to do crab stitch,
(a picture painting a thousand words and so on).
My peg bag finally wore out. It's such a good design that I had a fun time reconstructing the bag using knitting and fabric. You could easily just use a quilted fabric, and while looking on the web I found lots of lovely ideas to make other bag designs. Try this one, or this "clothes-pin bag" which has a tutorial and pattern here - I think it needs a carabiner instead of the loop! (see more below...)
InstructionsWith No 7 needles, cast on 107 stitches (more if felting), and work 4 rows in reverse stocking stitch starting with a purl row.With right side facing, commence pattern as follows: 1st row: (P3, K5) to end These six rows form the pattern; repeat for desired length of about 13-14 inches (more if felting). Cast off. Making upFold the bag in half lengthways and sew together the cast off edge (if you did not graft the edge) to form the bottom edge of the bag. Now prepare the support for the top edge which helps hold the neck of the bag open. Glue or overstitch the supporting paper rope to the length of cotton tape, centring it along the length of the tape. This does not need to be very firm, it just holds it in place while you insert it in the casing. Note that glue may help keep the rope stiffer without being too rigid. Before sewing the side seam, fold the top edge of reverse stocking stitch over to form a casing. This is to hold the supporting rope/tape that you just created. You may need to fold it over with your supporting stiff rope already inside - arrange so that the rope is in the centre of the casing and the tape emerges at each end. There should be about 2 inches at each end of the casing that is unsupported by the rope. Here is a picture showing the tape inside the casing. The lining is already
in place although I describe making the lining differently here, in a
separate step, below.
Sew up the side seam, and attach the tape ends together (tie them) so that the neck of the bag will not stretch too much when in use. Cut the ties neatly to about 1 inch - they will be hidden when you sew in the lining. Construct the lining: Cut the lining fabric in one or two pieces, and sew up into a bag with one of the shorter edges left open. The bag need to be about 11 inches by about 15 inches when finished so cut out your pieces allowing for the seams. Insert the lining into the knitted bag with wrong sides together; turn over the a hem at the top edge and sew into place around the knitted casing on the inside. Attach the lining to the knitting at the bottom corners, (a couple of invisible stitches using sewing cotton). Construct the hanger: Using the strong wire from a coat hanger, make the shape you need for the peg bag using rounded pliers. Make open hooks at each end. This photo shows the shape you are aiming at:
Insert metal eyelets into the top of the bag equally either side of the bag's side seam, matching the position of your constructed wire hanger hooks.
Put the hanger-hook ends through the eyelets and pinch together. Try out the bag. 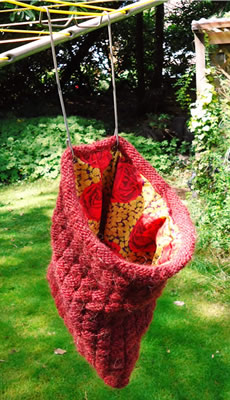 If you don't want to make a hanger: I was reconstructing an old bag, so I already had the hanger. If you don't feel up to messing about with heavy wire and pliers to make your own, you can make a tab on the back of the peg bag and attach an inexpensive carabiner (clip type not locking version) - large ones are fairly easily available on Amazon or eBay. Look at the Brabantia design for inspiration. If you use a carabiner then you should probably use paper rope (22inches)
through the entire length of the casing, not leaving any of the top of
the bag unsupported. |
|
Materials3 x 50g balls chunky yarn to required tension. One pair of number 7 (4½mm) needles. Wire or wire coat hanger to make peg- bag hanger (or carabiner). About 18 inches of paper rope for support. 1 metre or yard of cotton tape. Half a metre (or half a yard) of cotton fabric for lining. Tension20sts x 28 rows to 4 inches (10cm) on 4½mm needles over basket-weave pattern. Chunky yarn used is quoted as 14sts x 19 rows to 4 inches using 6mm needles. Size mattersBag is approximately 14inches by 11inches wide, when sewn into shape. A word on the wool.I used Sirdar Peru (now discontinued) for this project. I used a floral quilting fabric for the lining; I always think linings are fun in bright wild prints. Paper RopeThis is a very useful material used by prop makers as a stiffener or support. It is flexible but holds its shape. I had some difficulty finding it on the web in anything other than industrial quantities. Flints Theatrical Chandlers appear to sell it by the metre, and there seems to be some available at a site devoted to making toys for parrots... |
|
FeltingI used smaller needles to create as denser knitted fabric as I could without too much strain on my fingers. I would have preferred a stiffer felted fabric for the bag, but I tested Sirdar Peru previously and it does not felt well (too much synthetic content). If you do want to felt the bag then from the given tension and needles,
work out how many stitches to cast on with your chosen yarn to make a
width of 22 inches and work out how many rows to knit for 14 inches. Then
increase the stitches and rows according to the shrinkage factor of 85%
in width and 75% in length. Here is an example with a standard double knitting wool:Quoted tension is 22sts to 4 inches: -
Then increase by felting factor:- 121sts ÷ 85% × 100% = 142sts (discard decimal) To work the basket stitch as written, you need your stitches to be divisible by 8 plus 3. So calculate how many:-
8 × 17 + 3 = 139. So cast on 139 sts and knit for 14 inches finished length after shrinkage of 75%, which is:-
If you do make a felted bag and have some fabulous coloured wools - or
you decide to knit a "bag of many colours" with left over Noro
- or... anything that inspires you, then you may find you don't need the
patterning for texture and just want to go with stocking stitch. Just make sure your yarn will felt before you start. |
|
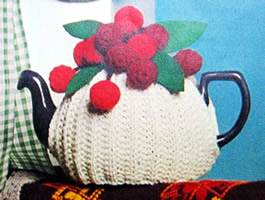
A jolly tea cosy to get you in the mood for the real cherry season.
I used brown for the main colour (more practical potential tea-stain colour for my partially sighted Aunt), and I used green for the stems and also crocheted the leaves. I did find making the little crochet bobbles slightly tedious and fiddly but they look so wonderful when you step back and admire the finished cosy.
InstructionsThis cosy is made as 2 flat pieces which are then sewn together to make
the hat-like shape. Although I prefer to avoid seaming wherever possible,
this is perfect for a cosy as you can tailor the openings to fit your
specific teapot. (I never realised this could be an issue until I made
a cosy which did not fit my 1930s pot as the spout was set very high).
The fancy rib fits snugly around most average pot sizes, making this an
excellent design. Main Cosy (make 2 pieces)‡ 1st row: k3, *
p2, k2; repeat from * to end. These 2 to rows form the pattern..
Work another piece from ‡ to ‡ Break yarn, leaving an end. Thread end through stitches on needle and
7sts from other piece left on holder; draw up tightly and fasten securely. Cherries (make 12 in all)With No. 8 crochet hook and red yarn (R), make 4 chain and join in a ring with a slip stitch. 1st round: 8dc into ring. Fasten off. StemsWith No. 8 crochet hook and brown yarn (B), make 24 chain. To Make UpJoin sides of cosy together leaving an opening at each side for handle
and spout. |
Materials
|
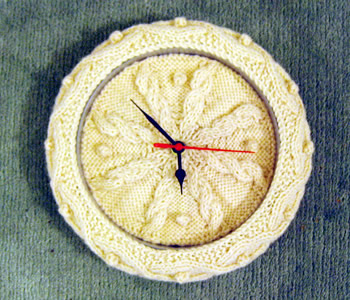
Here is my second autumn version of the quirky clock, which I have refurbished
in a similar way to that which I did in the spring. For the method used
to disassemble and reassemble the clock - please see the "Spring
Forward" entry for March 2010.
Read all those instructions first, then use the pattern here for the clock
face.
I love the rich autumn colours in this simple 1970s throw. Don't spurn the simple crochet motif; while not technically challenging, they do make an ideal handbag project for your holiday or your commute to work. You may think it's a bit early to think about autumn but there are just under 200 motifs make up the full size blanket... so maybe in time for Autumn 2011!
Crochet abbreviations:ss = slip stitch Remember the above are English crochet instructions where dc is equivalent to US single crochet - see "Terminology" in the side bar. Editor's note: While writing this I found a simply excellent free form crochet site from James Walters which reflects his own work alongside Sylvia Cosh and has - among other things - some great crochet information. As the author states - the information was originally intended as worksheets for their students - however I found they do offer useful guidance (available in both what I will call "English" as well as "US English"!) InstructionsMake 4 ch and join with a ss to make a ring. 1st round: 3ch; 11 tr into ring; ss to 3 ch. 2nd round: 3ch; 1 tr into same place as ss; * 2ch, 2tr into next tr, repeat from * to end, finishing with: 2ch, ss to 3rd of 3ch. 3rd round: 3ch; 2tr into first 2ch
space; * 2ch, 1tr into same space, work 2
tr tog (see abbreviations) with first leg in the same space and second
leg in the next space, 1tr into same space, repeat from *
to end, finishing with: 2ch 1tr into same space, ss to 3rd of 3ch. 4th round: * 1ch, 5tr in space, 1ch, 1dc into 2 tr tog, repeat from * to end, finishing with ss into ss of previous round. Fasten off. This completes your first motif. Make 7 for the centre and then 48, 44, 44, and 46 in the other colours. Here's a close-up picture of one of the motifs. Hopefully it will help you see how they should look.
Making upJoin 2 shells to each adjacent motif, using the following pattern as a guide to placement. It is a good idea to sew this together gradually as you go along - you can stop any time you feel it's big enough, leave the throw as a circular shape, or continue with the pattern to make a rectangle.
Sew in all ends. |
Materials4ply/Fingering yarn in 5 autumnal colours. You will need about 1 ball for the centre and about 8 balls for each of the other 4 colours. One number 11 (3mm) crochet hook. TensionOne motif measures about 4 inches in diameter. Size mattersApproximately 52 by 60 inches. Disclaimer
|

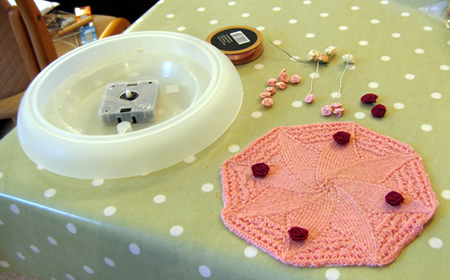
The clocks changed for British Summer Time last night - so here's a Spring clock!
Last summer our kitchen clock stopped working - not simply the battery this time. I took the cheap plastic mechanism to pieces - which was very interesting for me, and very irritating for George - but my only conclusion was that it was broken. I discovered I could get a relatively inexpensive replacement module from a local electronics chain store.
At some point along the way, I had the idea to make a knitted clock face - not sure where it came from - but here are my ideas in case you too want to create this somewhat over-the-top quirky original.
Making the clockIf you want to make the whole body of the clock yourself from scratch
then you can buy the mechanism
and hands
from Maplins (or elsewhere I suspect) either online or from one of their
shops for about £5. However, having done this to refurbish my old clock,
I found that IKEA sell the entire
clock (including mechanism and hands) for under £2. The clock face First of all - it is very important that the clock face that you knit
is not too thick - if it is then it will stop the hands going round. This
is because we are using a supplied module where the height of the hands
above the clock face is pre-defined. I have not thought of any clever
way of increasing the height, so - make sure your knitting is as fine
as possible. The hour hand is the one closest to the clock face, and it
is also the shortest - so you can cope better with increased texture towards
the rim of the clock, for example, to create the markers for the hours,
which could be, for example, buttons, knitted bobbles, or embellishments
such as rhinestones or silk roses. The clock face is knitted from the pattern for the smaller table mat (the pattern for the mats is given in its entirety below). I stopped after row 47 of the smaller mat and continued working each
section of the mat with short rows before casting off - this helped make
the face rounder, minimising the pointed edges: However, once I had finished, I found the whole thing was very slightly too big. So in the end I had to adapt it to make it even smaller, because I did not want to change to a finer yarn. Carefully take the clock to pieces. The following relates specifically to the clocks I used. The plastic front cover is secured to the outer rim by moulded plastic clips which should be released at the back - I managed to release them easily enough using my thumbnail. I then pushed the front face further upwards from the back using a small screwdriver or steel knitting needle - push at each clip in turn a few millimetres at a time until the front face comes free.
Add any non-knitted embellishments to mark the hours, and reassemble the clock.
Now you are ready to embellish the surrounding frame of your clock. Here is an opportunity for your own imagination - I knitted a fancy strip, which I tried to glue it (slightly stretched) around the rim edge with tacky glue, holding the surround in place with clothes pegs until the glue dried. However this did not work well and I ended by drilling tiny holes around the back edge of the plastic surround and securing the edge by sewing through them.
Knitted frame for the clock This is a simple knitted strip, using a technique I learned at a workshop
with Fi Morris. Cast on 12 sts and knit 2 rows, then begin the short row pattern: Row 1: K10; wrap the next stitch
by bringing the yarn to the front of the work, slip the next stitch on
to the right hand needle, take the yarn to the back of the work, slip
the stitch back on to the left hand needle; turn the work. Then knit across all 12 sts for 3 rows. Repeat these 23 rows until the strip is as long as you need. My clock was about 30 inches round and I did 40 repeats in 4ply yarn using 2½mm needles to fit around it. I cast on with waste yarn and grafted the sts together to make a ring before stretching it over the clock and glueing in place. |

|
|
InstructionsTo make the pink clock face I worked the smaller mat using a vintage 4ply synthetic yarn. These are the full instructions for the table mats here (in case you want to make table mats). Large place mat
|
Materials2 x 20g balls Coats Chain Mercer-Crochet No 20 in selected colour to
knit the table mats. To knit the clock: one 50g ball of fine yarn (3 or 4ply or finer) in your chosen colour. Set of 4 No 14 needles pointed both ends for the clock face or table mats. A pair of No 12 (2¾mm) needles to knit the clock face surround. Embellishments available from John Lewis branches or TensionOriginal cotton yarn knits 15 rows to one inch.** Size mattersLargeer place mat: 14in diameter; Abbreviationsyfwd/yrn/yon: "yarn forward"/"yarn round needle"
/"yarn over needle"; make a stitch by passing the yarn over
the needle. **A word on the wool.I used a vintage 4ply synthetic mix of "unknown origin" to knit the clock. The side mat worked up sligtly too large for my clock face, so I had to adpat the pattern (see instructions). The recommended Coats crochet yarn would be suitable, and help ensure the clock face was not too thick. Disclaimer
|
I did think that there would be nothing else like this - but as we know there is nothing new in this world. A while after I first discussed the project with Alison, she pointed me at this Clock Tam from Knitpicks.
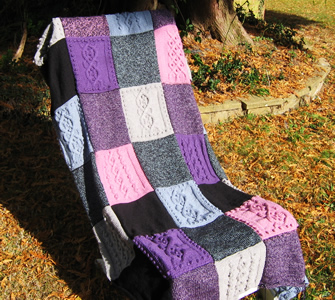
The Knitter magazine, supported by Rowan, have set up the Macmillan Comfort Blanket campaign. The idea is to knit blanket squares with your knitting group, and sew them all together at the fund-raising World's Biggest Coffee Morning* on September 25th. You can hand in your completed blankets either at a drop off point or at The Alexandra Palace show in October. Details all provided in the link.
*The coffee mornings are fund-raising events; you can register to hold one or join one. Again - details all provided in the link.
Blankets that are donated to Macmillan will be used to support and raise awareness of the charity's campaign to freeze out fuel poverty for cancer patients. I am an enthusiastic supporter of Macmillan and other cancer charities involved with care of cancer sufferers (like Maggie's). Cancer is (mainly) a disease of the old, and the unpalatable truth is that the longer we live, the more likely we all are to be affected. It is a great comfort to know that such professional and caring organisations exist to help us when we need them.
At the Macmillan
website you can see that Rowan have gained the support of top international
designers to create a square pattern for the campaign.
That is:- "top international designers" - and - the idle hands ....!
AbbreviationsMB: make bobble by knitting into the front, back, front, back,
front and back of next stitch, then pass 2nd, 3rd, 4th, 5th and 6th sts
over 1st stitch. m1: make a stitch by picking up the loop between the sts and knitting into the back of it. C4B: "cable 4 back"; slip the next 2sts onto a cable needle and leave at the back of the work, k2, then k2 from cable needle. C4F: "cable 4 front"; slip the next 2sts onto a cable needle and leave at the front of the work, k2, then k2 from cable needle. C6B: "cable 6 back"; slip the next 3sts onto a cable needle and leave at the back of the work, k3, then k3 from cable needle. T3B: "transpose 3 back"; slip the next (purl) st onto a cable needle and leave at the back of the work, k2, then p1 from cable needle. T3F: "transpose 3 front"; slip the next 2 (knit) sts onto a cable needle and leave at the front of the work, p1, then k2 from cable needle. T4B: "transpose 4 back"; slip the next 2 (purl) sts onto a cable needle and leave at the back of the work, k2, then p2 from cable needle. T4F: "transpose 4 front"; slip the next 2 (knit) sts onto a cable needle and leave at the front of the work, p2, then k2 from cable needle. T5B: "transpose 5 back"; slip the next 2 (purl) sts onto a cable needle and leave at the back of the work, k3, then p2 from cable needle. T5F: "transpose 5 front"; slip the next 3 (knit) sts onto a cable needle and leave at the front of the work, p2, then k3 from cable needle. k2tog = decrease a stitch by knitting 2 sts together. Chain and Vines Square |
MaterialsOne ball of double knitting yarn at about 100m or 108 yards in length makes about 2 squares. Rowan are supporting this initiative but you are not compelled to use their wools - you are encouraged to use wool from your stash. Size matters8 inch squares making up a 40x64 inch blanket. TensionGeneral DK tension: 22 stitches and 30 rows to 4 inches over stocking stitch. or gauge to make the 8 inch square. These bobble squares: 23 sts to 4 inches using 3¾mm needles. A Word
|
Pattern inspirations for the squares
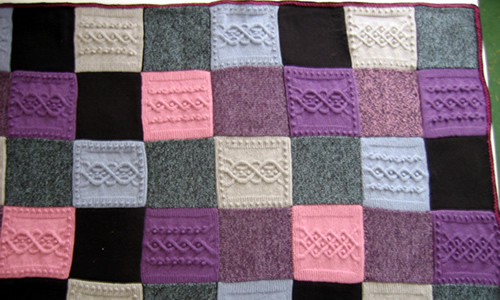
I used my squares in combination with the "Debbie Bliss Square" shown below.
|
Rather Pleasing EdgingThe method for the basic stitch pattern is as follows, assuming using a combination of DK and extra-thick chunky type wool, and working back and forth across the rows on two needles:
Row 1 (right side): Using DK and suitable needles (eg 4mm), knit. When edging the blanket, I picked up sts around the whole blanket, and I worked from the right side for all rows, so on row 4, I purled the chunky sts, and all all other rows were knitted. To achieve this with such a large number of sts round the whole blanket, I started every row with a new ball of yarn, and worked in sections, completing all rows and casting off for a section before picking up the next set of sts. I did not break the multiple yarn strands between sections. |
Cabling without a NeedleIt was while I was making the Estonian socks from the Interweave Knits Sock book that I first became aware that this was a bona fide knitting technique. Before that, I always thought it was just some dexterous manipulation that I was forced into when knitting on the train and found that I had forgotten to take my cable needle with me. Now it seems to be the technique of the moment, with a Beyond the Basics lesson on it in the 2009 autumn issue of Interweave Knits, plus a full explanation in Knitting Daily. It works like this:- for example, when cabling over 4 stitches as in C4B above, work to just before the stitches to be cabled. With the yarn at the back of the work, slip all four stitches purlwise to the right-hand needle. Bring the left-hand needle to the back of the work and insert it into the backs the two sts further from the left hand needle. Between the left thumb and forefinger, pinch the base of the four stitches firmly. Pull the right-hand needle completely free of all four stitches; half will be on the left-hand needle; half will be free for a moment. Maintaining the front/back positions as established, quickly reinsert the right-hand needle into the free stitches at the front of the work. Make sure all the stitches are seated correctly on the needle; if they are held firmly, the stitches won't have twisted or moved at all during the time that they were dropped. Finally slip the two stitches on the right-hand needle back to the left-hand
needle. The stitches are now crossed over. Knit all four sts as usual
to complete the C4B. This works well for cabling with smaller numbers of stitches (less than 6) and proved to be very useful for me while knitting these squares. |
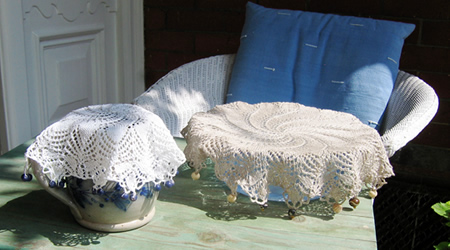
Knitted doilies from the early 1960s
These were frequently used when I was a child, as everyone had a milk jug to protect - and often as not, no refrigerator. I need to point our here, (just to be clear), that I did not come into the world during the era when milk was delivered daily straight from a churn into your own jug - ours did come in bottles.
Actually, I exaggerate our level of refinement "chez nous" - we did not have our milk in a jug as the norm. Mrs Blake did though, and I remember her lovely hand-made beaded doilies, to which I even now aspire - even though my milk is safe in a carton in the fridge.
I also remember camping with the Girl Guides, and protecting our dishes of jam with net cloths - only to find them later covered in wasps, munching away, having casually sliced their way through the netting with their sharp little mandibles! [Not members of the saw-fly family for nothing].
Larger doilyStart with 10ch, join with slip stitch to form a ring. Pass loops on to knitting needle thus: 1st Round: Knit. 3rd Round: Yfwd, k1. Rep 16th and 17th rounds until 41 st round is completed, having one knit stitch more before k2tog at end of each repeat. [220 sts] 42nd Round (and all even rounds unless otherwise stated): knit From now on one repeat of pattern stitches is given and is repeated 19 times more (20 times in all). 43rd Round: K10, yfwd, k1, yfwd. 61st Round: K1, (k2tog,yfwd) 3 times,
k1, k twice into next st, k1, (yfwd, slip 1, k1, psso) 3 times. 63rd Round: K8, k5 sts into next st, k7. 65th Round: Slip the last stitch
of each right needle on to left needle, slip 1, k2tog, psso, k2tog, yfwd,
k4, yfwd, k2tog, yfwd, k1, yfwd, slip1, k1, psso, yfwd, k4, yfwd, slip1,
k1, psso. 67th Round: Slip last stitch of each
right needle on left needle, slip 1, k2tog, psso, k5, yfwd, k2tog, yfwd,
k3, yfwd, slip 1, k1, psso, yfwd, k5. 71st Round: K2, yfwd, slip1, k2tog,
psso, yfwd, k2tog, yfwd, slip 1, k1, psso, k3, k2tog, yfwd, slip 1, k1,
psso, yfwd, slip 1, k2tog, psso, yfwd, k1. 74th Round: Knit. Crochet Edging75th Round: Slip last stitch of each
right needle on to left needle. Insert hook into place near stitch just
transferred and pull working thread through, *
(insert hook into next 3 sts as if to knit, thread over and pull through,
thread over and pull through 2 loops - dc made - slip the 3 worked sts
from needle, 3ch) twice; [Editor's note: This final crochet row does take a long time - it is fiddly and took me well over an hour and a half of fiddling. However, you can be encouraged by the fact that this is your very last step to finishing - once completed, it's all over.] Smaller doilyStart with 8ch, join with slip stitch to form a ring. Pass loop on to knitting needle and continue as for larger doily, noting that repeat is worked 7 times more (8 times in all) instead of 9. Divide the 8 sts, 3 on 2 needles and 2 on 1. Work as for larger doily until 29th round is completed. 30th Round: K14, k2tog. Continue as for larger doily starting from 57th round to end. Making upSew in all ends. Sew beads around edges - or make a set for your side table....
|
MaterialsCoats Mercer Crochet Cotton No 40 (20 gram), 2 balls in selected colour. 1.00 mm (or No 4) steel crochet hook. Set of four double pointed No 13 (2¼mm). Size matters13 inch diameter for larger and 9½ inch for smaller. Abbreviationsch: chain A Word
|
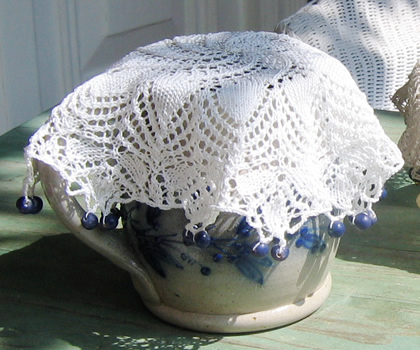
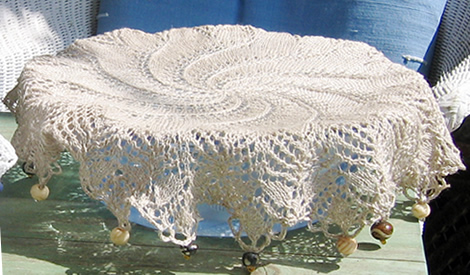
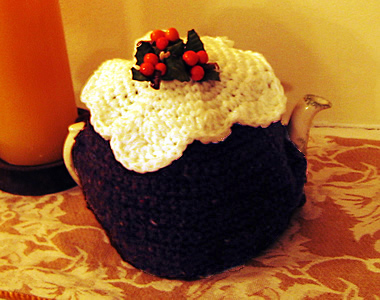
A last minute novelty gift from 1960.
It is crocheted with a double thickness of wool; this can be a nuisance but it is a good way to get that tweedy pudding-mix effect.
"Quick-as-lightening fillers for amusing family presents."
InstructionsThe pattern includes a tea-cosy in the shape of a Christmas Pudding, and a tea-pot stand in the shape of a plate. CosyUsing wool double, with No 7 hook and using the brown and tan wools together (to make a tweedy effect), make 4 chain and join into a ring with a slip stitch. Work 8dc into ring. 1st round: (2dc into each dc) 8 times
[16 dc] Start opening for handle by turning the work and working backwards and forwards in rows. 12th row: with wrong side facing
1dc in next dc all across to back to start of round [56 dc]. Turn with
1ch. Start opening for spout, working each side of cosy separately. †† [Editor's note: Here's a picture of the cosy with one side worked, showing the coloured thread marking the early rounds.]
Rejoin wool at spout end to work the other side of the cosy. With right side facing, repeat from †† to ††. Join spout opening with one slip stitch. 1ch; turn the work. With right side facing, return to working in rounds. Work 3 rounds of dc, joining handle opening in first round. Turn the work, and crochet one round of slip stitches. Fasten off.
IcingWith number 7 hook and white bouclé wool used single, work as for first 6 increase rounds of the plate, [56dc]. Next round: * 1dc in next dc; 4 tr in next dc; 1dc into each of the next 3dc; repeat from * 9 times. Fasten off. [Editor's note: I extemporised with the crochet here. You can form "realistic" icing/snow either with extra rows of long and short crochet stitches, or by adding embroidery when you stitch the icing in place on the cosy.] Making up:Stitch icing to top of cosy, and use white bouclé wool to embroider
irregular shapes round edge of icing. Using black wool embroider spots
on cosy to represent currants as required. Sew in all ends. Plate (not shown)Using wool double, with No 7 hook and white, make 4 chain and join into a ring with a slip stitch. 1st round: 1ch, 8dc into ring; 1
slip stitch into top of 1st dc. Continue increasing in this way, 8 sts in every round, until 8 rounds
have been worked from the start [64 dc]. Next round: *
2 dc in next dc; repeat from * to end of
round [128 dc]. Work 2 rounds without shaping. Join in red, and work 1 round. Fasten off red wool. Turn the work and with wrong side facing, using white wool double, work 1 round of slip stitches into last round of dc. Fasten off white wool. Press plate lightly. Thread a length of white wool through last round of base - that is before the start of the rim - and fasten off securely. This will retain the shape of the plate. |
|
Materials50g balls each in dark brown and tan double knitting wool, (used double throughout), and one ball of a white bouclé double knitting wool for the icing. Scraps of red and black for stripes on the plate. Holly sprig decorations in paper or plastic. One each Nos. 7 (4.5mm) and 10 (3¼mm) crochet hooks. Crochet abbreviations:ch = chain Remember these are English crochet instructions where dc is equivalent to US single crochet - see "Terminology" in the side bar. Tension4dc to an inch. Size mattersIntended to fit a 2 pint pot (that's UK pints which are each 20 fluid ounces not 16). Check out the diagram with the dimensions of my cosy. A word on the wool.I used a vintage tweed DK (used double) which was a perfect "pudding"
colour, being a rich brown and having flecks of different colours, so
I did not need to use two different colours to work together. Disclaimer
|
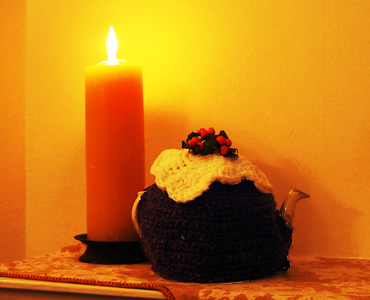
If you would prefer to make a knitted cosy for the main body rather than crochet then here are some instructions for a ribbed cosy. You can still make the white top and holly using crochet as before, and fasten it only in the centre on top of the cosy, which will allow the ribs to adapt nicely to the shape of the teapot.
The cosy is worked in double knitting wool used singly on No 8 (4mm) needles. [The crocheted cosy is worked with two different coloured DK wools worked together to give a tweedy "pudding" effect. I used a flecked wool for my cosy which would work well for this knitted pattern.].
Measurements: width all tround 16 inches, height 6 inches.
Tension: 12 sts and 17 rows to 2 inches measured over pattern.
Instructions:
**
Cast on 47 sts and work in pattern as follows:
1st row: K3, *
p2, k2; repeat from * to end
2nd row: K1, *
p2, k2; repeat from * to last 2 sts, p1,
k1.
These two rows form the pattern. Continue until work measures 5 inches,
ending with a second row.
Shape Top:
1st row: *
K2tog, k1, p1; repeat from * to last 3 sts,
k2tog, k1. [35 sts]
2nd row: K1, *
p1, k2; repeat from * to last stitch, k1.
3rd row: K2, *
p1,k2; repeat from * to end.
4th row: as second row.
5th row: *
K1, p2tog; repeat from * to last 2sts, k2.
[24 sts]
6th-8th rows: *
K1, p1; repeat from * to last 2sts, k2.
9th row: K1,*
k2tog; repeat from * to last stitch, k1.
[13 sts]
10th row: K1, purl to last stitch,
k1.
11th row: K2tog 6 times, k1. [7 sts]
**
Break yarn and leave sts on a safety pin.
Work a second piece from ** to **.
Break yarn and leaving an end. Thread through sts on needle and then through
the 7 sts on the safety pin. Draw up tightly and fasten off.
Sew up the sides, leaving an opening for handle and spout.
[Editor's note: This
design allows you to sew the front an back seams, and allow handle and
spout openings to exactly match your teapot.]
Decorate with the crochet icing and holly as desired, but leave edges of icing free.
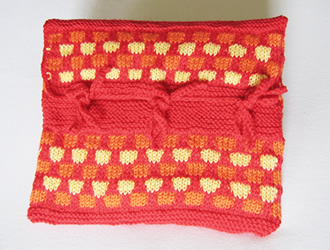
This is my modern version of a hot-water bottle cover. The cover is designed to fit a microwavable hot pad - link for this under "materials". The pads are conveniently small, and much safer (to lie on) than a hot-water bottle.
The pattern stitch from 1968 was used for a tea-cosy (colours Jade, Pink, and White), and a cushion cover (colours Brown, Amber, and White). I think the cushion cover, (style and colour scheme), is more authentically late 60s that the cosy. Although a tea cosy was de rigeur in our house, I think tea bags with and without the use of tea pots was becoming more prevalent by that time.
InstructionsWith No. 11 needles and main colour (red), cast on 58 stitches. **Change to number 10 needles and commence pattern as follows, using second colour (orange): Row 1: (right side) *K4, slip 2;
repeat from * to last 4 sts, K4. Rows 13-24: repeat rows 1-12. Change to number 11 needles and continue in garter stitch for 15 rows. Purl one row.** Repeat from ** to ** three times, then rows 1-30 again. Change to number 11 needles and work in garter stitch for 4 rows. Cast off.
Crochet edging - Using the main colour, (red), work a dc edge around the flap of the cover with ties as follows: With right side facing, starting at the side edge, work 6 dc up edge
of the garter st band, 15 dc up the honeycomb edge, 2dc up to corner,
3 dc into the corner st. Work 3 more ties by making 40 chain, then working 1 row of dc into each
chain. Sew the ties on to the cover to match the positions of the ties
on the flap. |
MaterialsOriginal pattern calls for three contrast colours, (red, orange and yellow). One pair each of number 10, an No 11 needles. One hot water bottle "replacement
core", (available to order on the web). TensionThe wool should knit to a basic tension over st st of 28st to 4 inches (10cm) on No 10 (3¼mm) needles. Size mattersOne size. A word on the wool.I used Phildar Lambswool (a 4 ply wool/acrylic mix) left over from another project. |
Here is a version adapted for a light worsted cotton yarn (Rowan Cotton Glace). For this version, cast on 52 sts.
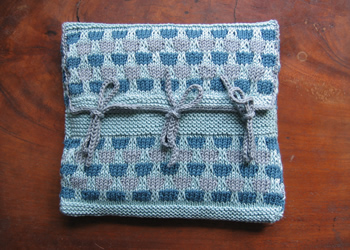
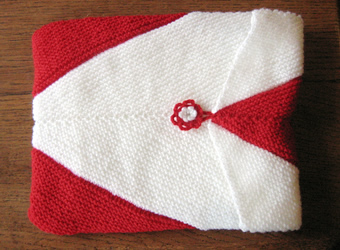
This is a pattern from 1956 "reversible bottle-cover" (sic) - though why the quotes, why the hyphen, and why the description reversible, I really am not sure. Originally a cover for a hot-water bottle, I have adapted it to fit a microwavable pad. The knitting turned out to be an interesting shape, and in consequence made for an interesting pattern, (probably not as intended). I used a bright red and white combination, which reminded me of a 1950s accessory set. The original recommended colours were "powder blue and white".
In the days when pattern illustrations were not in colour, the colour names were much more vivid and descriptive; modern names tend to try and evoke an emotion rather than a colour. I do love reading these old patterns with the colours - "lipstick red" "primrose yellow" "mimosa" "frosty lime" - you could just eat them - a feast for the mind's eye.
InstructionsFirst piece - with No. 11 needles and first colour, cast on 4 stitches. Row 1: Inc in every st (8 sts) With the right side facing for row 7 place a row marker on this side of the work, to mark it as the right side of the work.
Then continue working as before, increasing at both ends of the row, and in the middle, on odd (right side) rows; increase only in the middle on even (wrong side) rows. After a while, the stitches will become crowded and the shape hard to manage on just 2 needles. At this point, spread the sts evenly across two needles, discarding the centre st marker; continue to work back and forth across the needles using a third needle.
The work will take on a triangular, or arrow shape. Continue working until you have 105 sts on each side of the centre. Second piece - work a second triangle (or arrow) in the contrast colour. Lay the pieces out with the point of one arrow to the base corner of the other arrow, (see picture below).
Continue working with one of the available colours (I used the red). Cast off the two rows of knitting together, using a "three-needle cast off"(see picture below), fairly tightly.
[Editor's note: You put your working needle into the first st on the front needle and the first st on the second needle behind; you pull your loop through and knit both sts off the needles together. You have one st on your working (usually right hand) needle. You repeat so there are two sts on your working needle. You pass the first st you knitted over the second; continue casting off in this way.] This is how it looks half way through; ideally the work should lie flat at the cast off edge:
Next you put the other two edges together - again the point of one arrow is next to the base corner of the other arrow, (see picture below):
Cast off the two rows together. You are left with a sort of tube; turn it so that the cast off edges are inside. The next picture shows a hot water bottle placed in the tube. 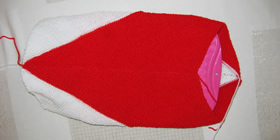 The arrow points are arranged centre front and back.
Crochet flower - begin by making a slip loop with your first colour as if you were starting a crochet chain, and crochet into this loop for your first round. Ensure that the loop "slips" (can be tightened) from the tail end of your work, not the working end. Round 1: using the first colour, crochet 8 dc into
your loop; adjust the slip loop until the stitches fit nicely. Make a second flower in the second colour. Round 1: using the second colour, crochet 8 dc into
your loop; adjust the slip loop until the sts fit nicely. Place second flower on top of first, and sew through both layers, onto the cover at the marked position for the button. |
MaterialsOriginal pattern calls for 2 oz each of two contrast colours in 3ply. One pair of number 11 needles, with a spare pair (or set or 4) to aid
in the construction. One hot water bottle "replacement
core", (available to order on the web). TensionGarter stitch is difficult to measure but the wool should knit to a basic tension over st st of 28st to 4 inches (10cm) on No 11 (3mm) needles. Size mattersOne size. A word on the wool.I used an acrylic 4ply; not ideal, but these covers can take some wear and tear. |
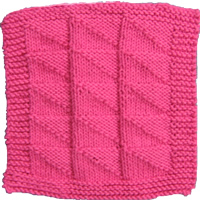
Dishcloth design based on traditional guernsey flag pattern, (colour: Hot Pink).
InstructionsWith No. 7 needles, cast on 49 stitches Commence pattern as follows: Row 1: K5, (K9, P1) 3 times, knit to end. These rows form one pattern. Repeat the 10-row pattern 5 times more (6 times in all). Work 6 rows in garter stitch, then cast off all 49 sts. Finishing - sew in all ends, and press lightly with a damp cloth. |
MaterialsOne (2 oz) ball of Lily Sugar n'Cream cotton. One pair No. 7 needles. Tension20 sts x 26 rows to 4 inches measured over stocking stitch on No 7 (4½mm) needles. Size mattersThe pattern as written should make a dishcloth about 10 inches square. My original in the picture is slightly smaller. |
Flag pattern detail:
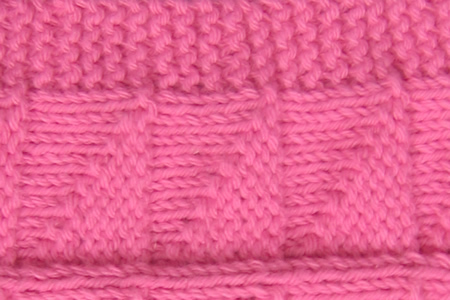
© Christina Coutts 2007
![]()
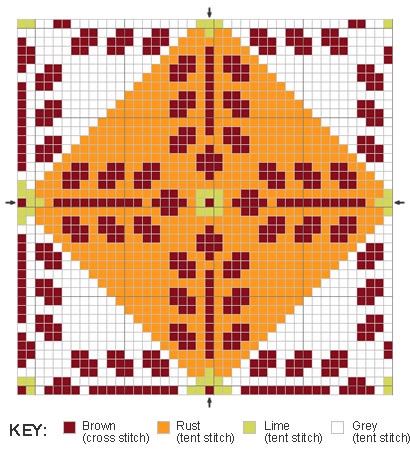
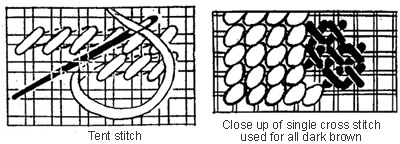
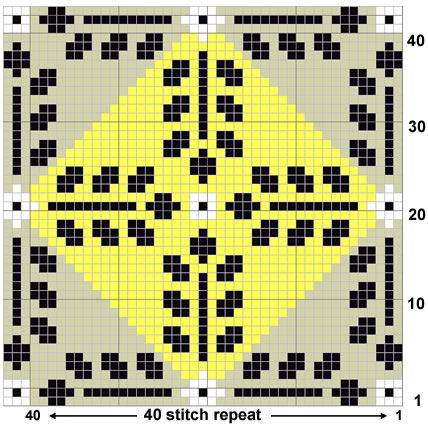
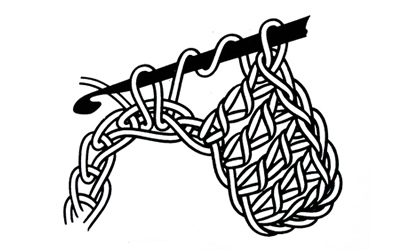
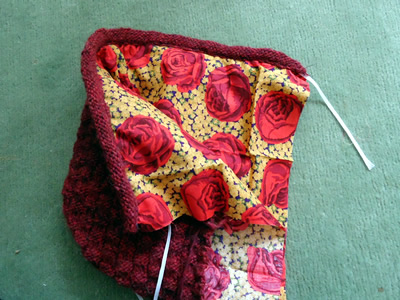
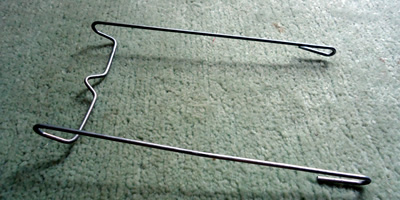
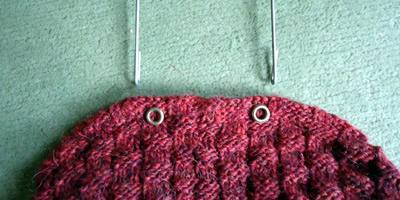
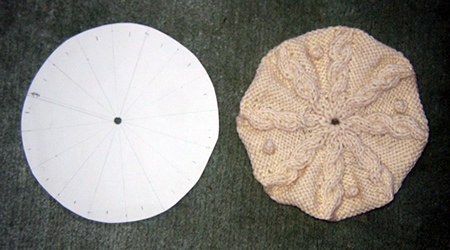
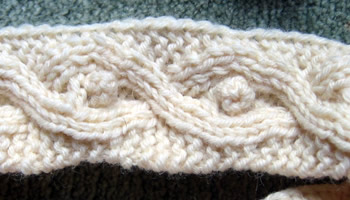
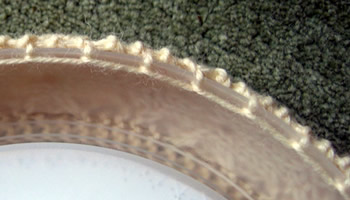
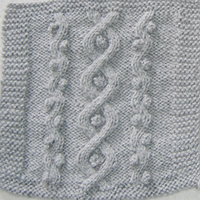
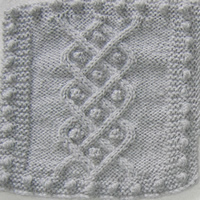
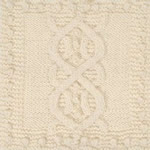
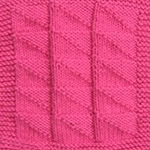
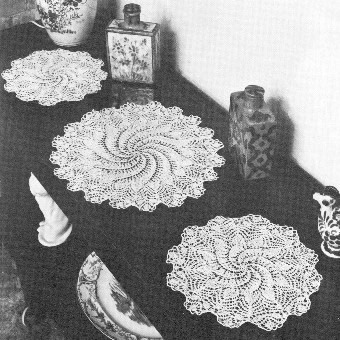
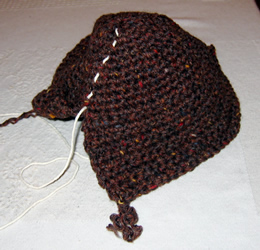
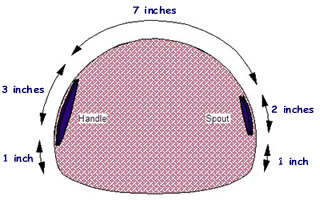
 Making up - Press the piece lightly on the wrong side under a
damp cloth with a hot iron.
Making up - Press the piece lightly on the wrong side under a
damp cloth with a hot iron.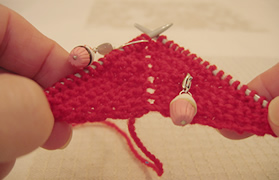
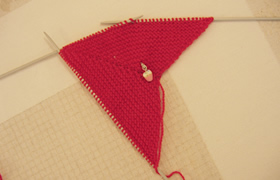

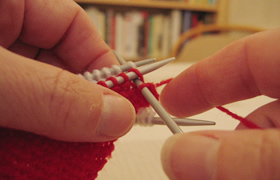
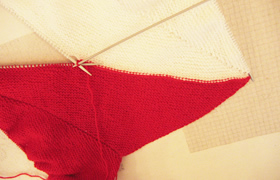
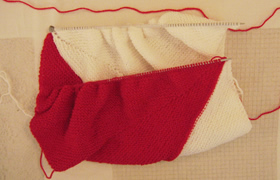
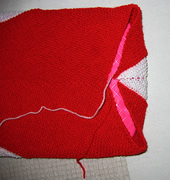 Fold up one of the ends and sew the diagonal seams in place from the wrong
side. (I sewed the tip of my white arrow for the closed end). At the other
end, make a chain using the crochet hook and sew in place as a loop for
the button at the (red) arrow tip.
Fold up one of the ends and sew the diagonal seams in place from the wrong
side. (I sewed the tip of my white arrow for the closed end). At the other
end, make a chain using the crochet hook and sew in place as a loop for
the button at the (red) arrow tip. 