Set Up for the Cold
More....
Please note:
Patterns are for
Personal Use Only
You may freely circulate patterns with the Copyright Statement Preserved.
See terms of use.
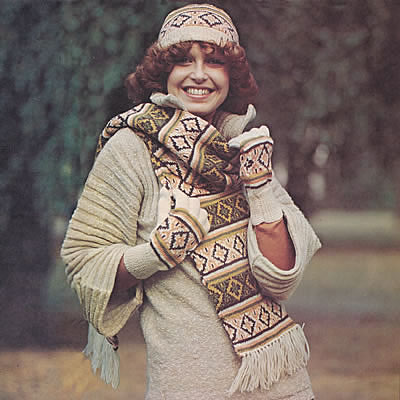
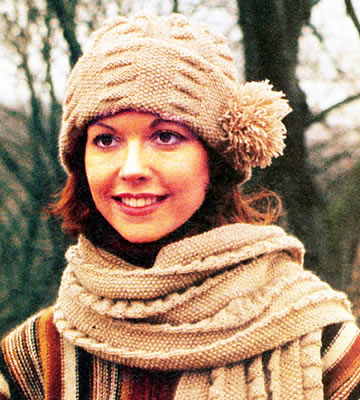
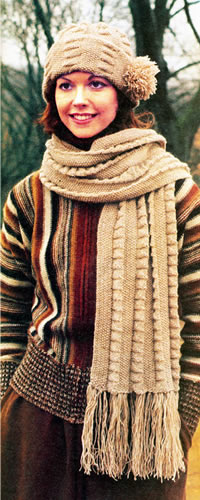
A "long, long" scarf worked in bands of stripes and jacquard pattern, with a matching pull-on hat and gloves to complete the set. These are all knitted in a lighter weight yarn, but the scarf is double thickness so will be very snug; it's also pretty long, so check that's what you want, as obviously you can make it to whatever length you like.
InstructionsThe scarf is worked on 4 needles in the round to make a tube, which is then flattened; the result is a flat scarf with two layers of knitted fabric, and means you don't have to worry about seeing the "wrong side" of the knitting. This is a standard way to make - especially commercial - scarves. Although often seen made in the round, both the hat and the gloves are worked flat on two needles, with a seam making them into the required round shape. It would be simple enough to adapt this pattern and make the hat in the round, especially as you have the method given for the scarf. If this is your first attempt at gloves, however, making them flat may be a good way to start. ScarfUsing the set of 4 No 10 (3¼mm) needles - or the circular needle
- cast on 112 sts in Main Shade (A). Pattern as follows: ** 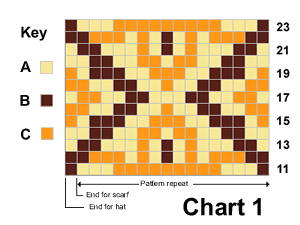 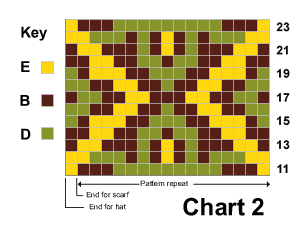 These 46 rounds form the pattern. Cast off using A. To make up the ScarfDarn in all ends on the wrong side. HatUsing No 12 (2¾mm) needles, and main shade A, cast on loosely 144
stitches. Work 20 rows K1/P1 rib, increasing 1 stitch at the end of the
last row. [145 sts] Continue in pattern until work measures 18cm (7 inches) from the beginning, ending with a purl row. Shape the crown Decrease for the crown, keeping the continuity of the striped pattern: To make up the HatPress as given for the scarf. GlovesNote: When working the gloves, use separate balls of yarn for the palm and thumb, twisting the yarns at the back of the work when changing colours. Right hand gloveUsing No 12 (2¾mm) needles and main shade A, cast on 56 stitches.
Start thumb shaping: 1st row: using first ball of B, k28;
using A, increase one stitch in each
of the next 2 stitches, k1; using a 2nd ball of B, k25. Continue in pattern as given for chart, increasing the thumb stitches
as before on the 3rd and then every foil 4th row until the 24th row has
been completed, decreasing one stitch at the end of the last row. 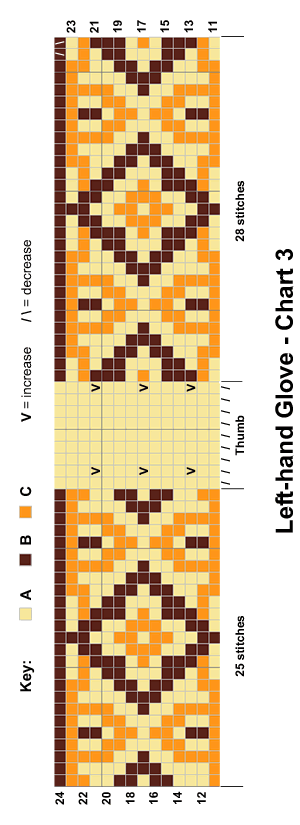 Thumb: Next row: using B, k28; using A,
k16 stitches; turn and cast on 2
stitches. [Editor's note: For this method you keep all the stitches on the needles as you work the thumb and each finger separately. At this point for the thumb, you keep 28 stitches unworked on the right hand needle, and 25 stitches unworked on the left hand needle, while you work on the centre 16 stitches (which you have increased to 20 by casting on 2 extra stitches on each side. You knit the thumb flat, back and forth up to the tip, then you fasten off and sew it up into the thumb shape.] Shape top: With right side of work facing and using B, knit up 4 stitches from the
base of the thumb, knit to end. [57 sts]
Divide for fingers: 1st finger Shape top: 2nd finger 3rd finger 4th finger Shape top Left hand gloveWork as given for right hand glove, reversing the pattern and the position of thumb as follows: 1st row: using 1st ball of B, k25;
using A, increase one stitch in each of Continue as given for right hand glove until 24th row of pattern has been completed. Thumb Next row: using B, k24; using A,
k16, turn and cast on 2 stitches. Complete as given for right hand glove working from *** to ***. To make upPress as given for scarf. |
Materials25g balls of 4 ply (fingering) yarn: Scarf: 4 balls in main shade A One set of 4 3¼mm (UK 10) double pointed needles (dpn), or a circular needle. Hat and gloves: One pair of 3mm (UK 11), and one pair of 2¾mm (UK 12) needles Tension28sts x 36 rows to 4 ins over stocking stitch on 3¼ mm needles. Size mattersScarf: 20½ cm (8 inches) wide, by 183cm (72 inches) long,
excluding the fringe Abbreviationsk2tog: knit 2 sts together. increase: by knitting into the front and back of the next stitch A word on the wool.The original yarn was standard 4 ply superwash wool; about 92 yards (84 m) per 25g ball. Disclaimer
|
This is the month for the Sailor's Society** "woolly hat week" (8th-14th February 2015). So I thought I would post this hat and scarf combination - easy to knit in 4 ply fingering weight knitting yarn - perhaps suitable for a sailor if you omit the pom-pom decoration!
You can find other patterns as well as where to send your hats on their website link above. Also see my previous POM from 2008 with other chunky hat patterns - including my all time favourite appropriately knitted in Fisherman's rib.
Here's what Hannah says: "Our international network of port chaplains and ship visitors give your amazing hats out to seafarers visiting port, while others are wrapped and included in the Christmas welfare parcels that are taken on board ship for the festive season. The need for more hats is ever-increasing! Drew, our Port Chaplain in Invergordon, has been known to give out 500 in a day on occasion!"
InstructionsPanels of moss stitch and flag stitch are used for this cosy scarf and pull on hat. The scarf is fringed and the hat trimmed with a large pom-pom. ScarfCast on 72 sts These 8 rows form the pattern. Continue in pattern until scarf measures 167½ cm (66 inches) from beginning, (or however long you want the scarf to be) ending with an 8th pattern row. Cast off. To make up the ScarfDo not press. HatCast on 144 stitches. Work in pattern as given for scarf, but without the moss stitch border on both sides. So set out your rows as follows: 1st row (right side): *
(k1, p1) 4 times, k1, p7; repeat from *
end. Continue until work measures 25½ cm (10 inches) from beginning, ending with an 8th pattern row. Shape crownNext row: * Moss st 8, k1, p2, ybk, sl 1, yfwd, p2tog, psso, p2; repeat from * to end of row. [126 sts] Next row: * k4, p2, moss st 8; repeat from * to end of row. Next row: * Moss st 8, k2, sl 1, p2tog, psso, p1; repeat from * to end of row. [108 sts] Next row: * k1, p3, moss st 8; repeat from * to end of row. Next row: * Moss st 8, k1, sl 1, k2tog, psso; repeat from * to end of row. [90 sts] Next row: Moss st to end of row. Next row: * Moss st 7, sl 1, k2tog, psso; repeat from * to end of row. [72 sts] Next row: Moss st to end of row. Next row: * Moss st 5, sl 1, k2tog, psso; repeat from * to end of row. [54 sts] Continue decreasing in this way on every alternate row until 18 sts remain.
Break off yarn, thread through sts, draw up and fasten off. To make up the HatDo not press. Trim with a large pom-pom. |
Materials
|
** Please note that the Sailors Society does seem to be a religious organisation, which I mention not through any disapproval on my part, but in case you would care to look at their website and ensure its aims do not go against anything you believe in.

Another scarf/hood combination from the 1940s that is the partner of last year's pattern. It has a firm headband to frame the face, and a pocket construction at the back (see photo below) to keep that forties hairdo in good shape. The scarf ties are double thickness.
The Back with elastic casing:Cast on 300 stitches Repeat the 3rd and 4th rows until 108sts remain. Repeat the 3rd row 4 times. 12th row: Slip 1, purl to the last
stitch k1. The Head Piece:Cast on 300 stitches Repeat the 3rd and 4th rows until 108sts remain. 1st row: K2tog, knit to the last
2sts k2tog. Repeat the 1st and 2nd rows until 68sts remain. The Border:Cast on 120sts. To Make Up the StormcheaterPress each piece separately on the wrong side under a damp cloth. 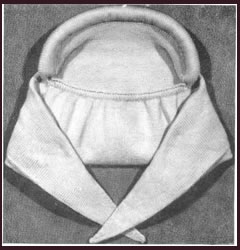 |
Materials4 ozs 3ply wool. One pair No 10 (3¼mm) knitting needles. 9½ inches elastic. TensionApprox. 32sts to 4 inches on No 10 needles. Size mattersTo fit an average sized head. Abbreviationsk2tog: (decrease) knit 2 sts together. A word on the woolOriginal knitted in Sirdar Majestic 3-ply Wool. Disclaimer
|
A lovely warm idea that has never lost its popularity: a scarf/hood combination. This has an interesting construction with the scarf being double sided, and the hood being more a like a pocket with the intention that it should form soft folds when worn. [I'm more used to a pixie hood type design with a centre back seam].
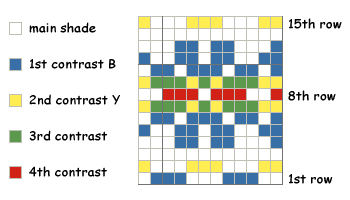
Hood Scarf:Using the main colour wool (MC) cast on 108 sts. 1st row: Slip 1, knit to end of row. ** Join in the first contrast (B) and working the 1st and 2nd rows as shown on the chart proceed as follows: 1st row: *
Knit 2MC, 3B, 3MC, 3B, 1MC, repeat from *
to end of row. Break off first contrast (B) and join in the second contrast
(Y).
Repeat from ** to ** twice. Continue in stocking stitch until the work measures 40 inches Work 18 rows in stocking stitch. Hood Border:Work a border along one 16 inch side of the hood opening as follows: Next row (right side): Slip 1, purl
to the last stitch k1. 1st row: *
Knit 2MC, 3B, 3MC, 3B, 1MC, repeat from *
to end of row. Break off first contrast (B) and join in the second contrast
(Y). Commencing with the 3rd row, proceed as shown on the chart, changing
the colours when necessary, until the 15th row has been worked. Proceed as follows: To Make Up the Scarf.Sew the ends of the scarf together on the wrong side. |
Materials5 ozs 3ply in main shade plus "medium-sized" balls in each of four contrast colours eg blue, yellow, green and pink. One pair No 9 (3¾ mm) knitting needles. TensionApprox. 30sts to 4 inches on No 9 needles. Size mattersWidth round face edge is 16 inches. A word on the woolOriginal knitted in Sirdar Majestic 3-ply Wool Disclaimer
|

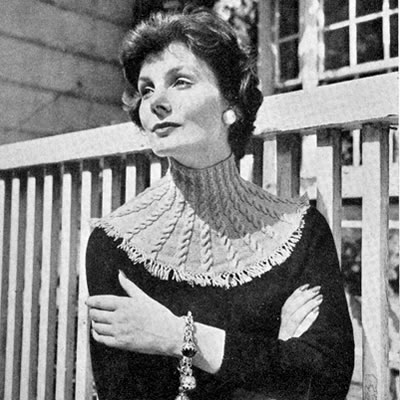
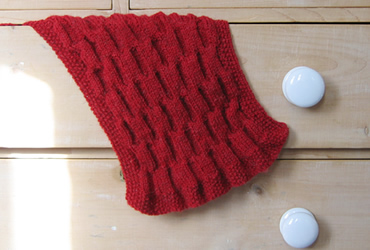
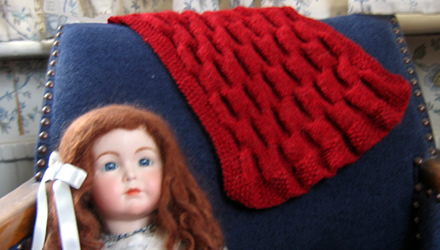
Knitted in a light weight yarn and originally designed in the 1950s to wear under or over a sweater with a lower neckline. The original is a "fringed cable yoke" (in case you want to show it off over the sweater) but I have omitted the fringing; I wear it as a convenient alternative to a scarf. The yarn I used is more a 4ply than a 3ply weight so my version is very slightly bulkier and longer than the original.
Instructions.Cables are worked as follows: Cable 8: Slip next 4sts. onto a cable
needle and leave at back of work; k4, then k4 from cable needle. Now begin the yoke, which is worked in one piece. Cast on 288 sts fairly loosely and work in cable pattern as follows: 1st row (right side facing): P4,
* k8, p8; repeat from *
to last 12 sts, k8, p4. Repeat the 1st and 2nd rows 3 times more. 9th row: P4, *
cable8, p8; repeat from * to last
12 sts, cable8, p4. Work 5 rows straight keeping the continuity of the cable rib pattern. 24th row (decrease row): K4, *
p7, k3, k2tog, k2; repeat from * to
last 11 sts, p7, k4. [236 sts] Work 4 rows straight keeping the continuity of the cable rib pattern. 30th row (decrease row): K4, * p3, k2tog, p2, k6; repeat from * to last 11 sts, p3, p2tog, p2, k4. [218 sts] Work 2 rows straight keeping the continuity of the cable rib pattern. 33rd row: P4, * cable6, p6; repeat from * to last 10 sts, cable6, p4. Work a further 2 rows straight keeping pattern as before. Continue thus, working a cable on every 8th row from previous cable, at the same time decreasing alternately in the knit and then in the purl panels, that is: decrease 1 stitch in each of the 15 knit panels on next row, then 1 stitch in each of the 17 purl panels on the following 6th row, omitting the 4 border stitches at each end. Repeat these 2 decrease rows with 5 rows straight between each and always keeping continuity of cable rib pattern until you have worked 10 decrease rows in all, when 113 sts remain and 3 sts remain in each of the knit and purl panels with the 4 border stitches at each end. Work a further 4 rows straight. Next row: P4, * cable3; repeat from * to last 7 sts., cable 3, p. 4. Work a further 5 rows straight in rib, then work another row cabling across the 3 knit stitches as before. Repeat last 6 rows until work measures 8 inches, then work a further 2 rows in rib. Cast off. To work the buttonholes: Optional fringing: To Make UpSew in all ends. |
MaterialsOriginal materials called for: 2 ozs. Patons Beehive Fingering 3-ply. ** A pair of No 12 (2¾mm) needles. TensionOriginal yarn knits 34sts x 42 rows to four inches over stocking stitch on No 12 needles. Substitute yarn knits 27sts x 38 rows to four inches on 2½mm needles. Size mattersOne size. Depth: 8 inches, excluding fringe. **A word on the wool.I used a vintage Phildar yarn called Anouchka (80% acrylic 16%, mohair, 4% wool), in a bright red. It knits to a tension of 27sts x 38 rows on 2½mm needles, and I used No 13 (2¼mm) regardless of tension. CrochetDouble crochet in the UK is equivalent to US single crochet - see "Terminology" in the side bar. Disclaimer
|
 |
|
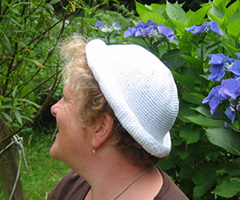
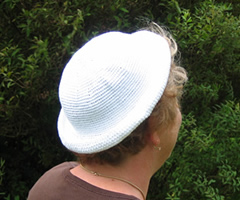
"Capped to catch the eye" in 1952.
This cap can be "worn with a purpose on windy days for cliff-top walks or out at sea,
or just for extra prettiness at any time".
"Leave it plain or dot with beads" - and - "for teenagers only - roll up the brim in jaunty sailor style".
Luvvly.
Instructions.Instructions are for 2 versions - one plain and one with striped brim. Crown 1st Round: *
2 dc in 1 dc; repeat from * to end. 5th Round: *
(1 dc in 1 dc) three times, 2 dc in 1 dc; repeat from *
to end. [40 dc] 7th Round: *
(1 dc in 1 dc) four times, 2 dc in 1 dc; repeat from *
to end. [60 dc] 12th Round: *
(1 dc in 1 dc) fourteen times, 2 dc in 1 dc; repeat from *
to last 10 dc; (1 dc in 1 dc) ten times. [106 dc] 19th-34th Round: As 18th round. This completes the crown. Striped BrimWith number 11 hook, and white yarn, make 23 chain, turn. Miss 1 ch 1 dc in each of 22 ch. †† Join in contrast. Continue repeating from †† to †† until strip fits all round the lower edge of the crown. Do not stretch this strip but allow it to fit comfortably. End with 2 rows of contrast colour. Fasten off. Finishing: Plain BrimThis is worked with the yarn doubled. Sew in ends and optionally embroider 5 rows of beads around the crown, as shown in
the photograph. |
MaterialsPlain: 2 x 50g ball Phildar
Phil Crochet, in white, (100% cotton, 201yards). Striped: 1 x 50g ball 3 balls (2 in white) made both hat versions. Nos. 11 (3mm) and 10 (3¼mm) crochet hooks. Crochet abbreviations:ch = chain Remember these are English crochet instructions where dc is equivalent
to US single crochet, and so on - see "Terminology" in the side
bar. Tension7 dc to an inch. Check the tension and your head measurement carefully; the original was made in angora which is more stretchy than pure cotton. Size mattersTo fit "an average head". However, the hat size can vary quite a lot according to your tension. A word on the wool.Original specified 2 x ½oz balls of Patons Fuzzy Wuzzy Angora. Disclaimer
|
Striped-brim version, and modelled original:


I was so taken with the another seaside idea on the same page as the hat that I felt compelled to share it with you here as well.
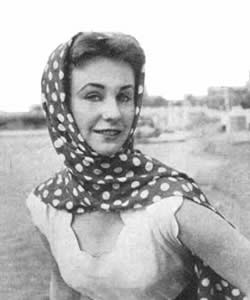
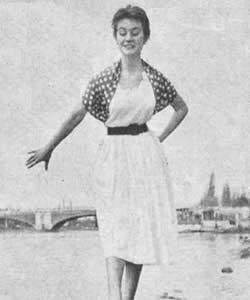
.....TIED AT THE BACK it makes a snug bolero....
As a change from the everlasting headsquare, buy a yard of rayon or silk -
ours was a yard of spotted rayon at 5/6d,
[Editor's note: For you
whipper snappers out there, that's 27½p or about 60 cents.]
but silk is best if you can afford it, as it's less slippery - cut it in half
lengthways, join the short ends neatly, slip hem the long raw edges, and you
have a manoueverable long stole, which can be worn in all sorts of ways and
is so much prettier and smarter than a triangle tied under your chin.
[Editor's note: I'm with
them on that one.]
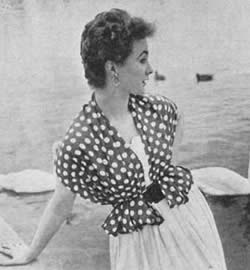
AS A CARDIGAN - round your shoulders, ends tucked up and over your belt in two comfortable pockets.
Carry it around on holiday and it will be a godsend for those chilly moments,
and less bother to carry than a cardigan. Tie it round tyour waist as a sash
when you don't want to carry it.
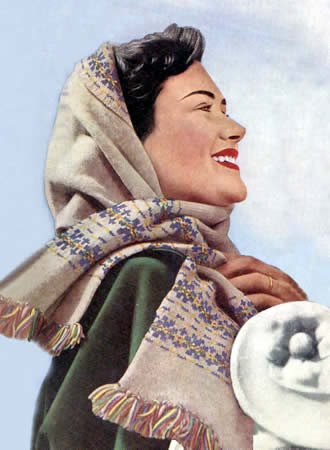
"Reversible scarf for the cold days ahead". This is a very pleasing pattern from October 1963, and is a suggestion for "pre-Christmas plans". The pattern is the same on both sides, so great for a scarf, and can be knitted in basically any wool weight; ensure you use needles a couple of sizes larger than normal for whichever weight you choose, and do a proportional calculation on the gauge, so your scarf is not too wide.
InstructionsCast on 73 stitches. First row: K1, * p1, k1; repeat from * to end. Repeat this row for the moss stitch border 8 times more. 10th (increase) row: Moss 8, (increase in the next st, moss 6) 8 times; increase in the next st, moss 8. [82 sts] Change to pattern rows as follows: 1st row: moss 5, p3, *k6,
p6; repeat from * to last 14sts; k6, p3,
moss 5. 11th row: moss 5; *slip
the next 3 sts on to a cable needle to the back of the work; k3, p3 from
cable needle; slip the next 3 sts on to a cable needle to the front of
the work; p3, then k3 from cable needle; repeat from *
to last 5sts; moss 5. 23rd row: moss 5; *slip
the next 3 sts on to a cable needle to the front of the work; p3, then
k3 from cable needle; slip the next 3 sts on to a cable needle to the
back of the work; k3, p3 from cable needle; repeat from *
to last 5sts; moss 5. These 24 rows form the pattern. Continue straight until the work measures 46 ins, ending with a 12th or 24th pattern row. Next (decrease) row: moss 8 *k2tog; (p1, k1) 3 times; p2tog, repeat from * 3 times more; k2tog; (p1, k1) 4 times. [73sts]. Work 9 rows moss stitch over all stitches. Finishing - Press work very lighty, taking care not to spoil th texture of the patttern. Cut the remainig wool into 7½ inch lengths; take 3 lengths of wool together each time, fold in half, and, with a crochet hook, knot through short ends to make a fringe. Trim fringe. Substituting the wool - I used a vintage wool,
Phildar Brisants. This is a fine double knitting, which is normally knitted
on no. 9 (3¾mm) needles. The cabling make for a tighter tension,
and the recommended needles (UK No 6) are 2 sizes larger than usual for
a DK. I went with no. 8 needles, instead of 9s, but should have gone larger
I think. If you want to use chunkier wool, then decrease the number of sts proportionally. The pattern is worked over 12sts. |
MaterialsOriginal call for 9oz of Patons Moorland Double Knitting Example shown is knitted in Phildar Brisants. One pair of No. 6 (5mm) needles. TensionEquivalent to 20st and 26rows to 4 inches (10cm) measured over stocking
stitch. Size mattersWidth: 12 inches A word on the wool.This pattern is for double knitting wool, and from memory Moorland DK
was slightly heavy-weight. Disclaimer
|
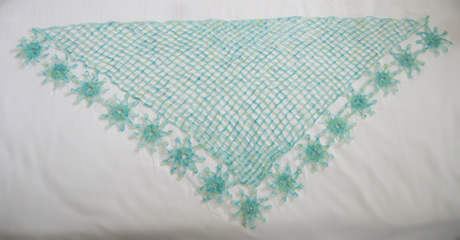
Pattern from 1955 described as a "lacy head scarf for evening wear". This is a charming fichu, for evening, or indeed day wear, depending on your choice of yarn type.
I don't know about you, but I try not to wear head scarves in the evening; in fact I try not to wear them ever. I took against them in the 1970s - something to do with the image of the Royal Family - o, and they make me look like an extra from an Edinburgh Fringe production of Mother Courage.
Hopefully, however, this one will make us all look like Grace Kelly.
InstructionsBegin at the widest part. With No. 11 (the larger) hook make 260 chain, very loosely. Row 1: Miss 1ch, * 1dc in next ch,
7ch, miss 5ch; repeat from * to last chain;
1dc in last ch; turn. Continue, repeating 2nd row, thus decreasing one trellis pattern
on every row, until only one trellis pattern remains to be worked in the centre.
First round: 3ch. (this counts as one dbl tr), work 26 dbl trs
through centre of ring, and join to top of he 3ch with a slip st. Make 14 more in the same way. Making up - Press lighty on the wrong side under a damp cloth. Make a long strip of flowers by joining (sewing) the tip of one petal of one flower to the adjoining tip of petal of another flower. Join this strip to sloping sides of main part - seven petals along each side, and one at the top of the triangle; catch the tips of two petals of each flower to the main work to secure the border. Give a final press, pinning out the flower points. [Editor's note: I experimented, adding a pearlised bead suspended in the centre of each of the flowers; it looks very pretty and follows the current fashion for applied beading - however the "nude" versions retain a certain delicacy without further adornment.] |
MaterialsOriginal pattern calls for a ½oz ball of "Fine Ply". Example in hand-painted cobweb lace wool (100m skeins about 9g) purchased from Alchemy Fibre Arts eBay shop. Numbers 11 (3mm) and 12 (2.5mm) crochet hooks. TensionOne trellis pattern measures ¾in on no. 11 hook. SizeApproximately 36 inches at the widest part. A word on the wool.There were quite a few patterns for very fine scarves and shawls in cobweb
wools, and as their name suggests they are very fine gauge. |
Now you have the taste for chic yet casual evening wear in adaptable crochet, I expect you'll want to embark on a larger project (such as the one below) to extend your skills. Let me know if you need the pattern.

© Christina Coutts 2007
![]()

 Flower border - With No. 12 (the smaller) hook make 12 chain,
and join in a ring with a slip st.
Flower border - With No. 12 (the smaller) hook make 12 chain,
and join in a ring with a slip st.