Set Up for the Cold
More....
Please note:
Patterns are for
Personal Use Only
You may freely circulate patterns with the Copyright Statement Preserved.
See terms of use.
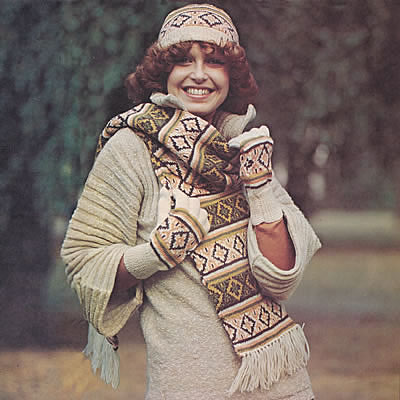
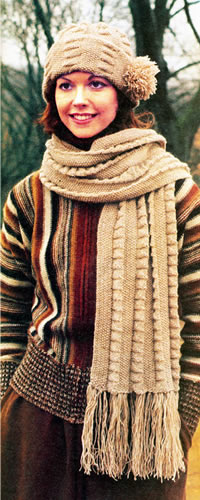
A "long, long" scarf worked in bands of stripes and jacquard pattern, with a matching pull-on hat and gloves to complete the set. These are all knitted in a lighter weight yarn, but the scarf is double thickness so will be very snug; it's also pretty long, so check that's what you want, as obviously you can make it to whatever length you like.
InstructionsThe scarf is worked on 4 needles in the round to make a tube, which is then flattened; the result is a flat scarf with two layers of knitted fabric, and means you don't have to worry about seeing the "wrong side" of the knitting. This is a standard way to make - especially commercial - scarves. Although often seen made in the round, both the hat and the gloves are worked flat on two needles, with a seam making them into the required round shape. It would be simple enough to adapt this pattern and make the hat in the round, especially as you have the method given for the scarf. If this is your first attempt at gloves, however, making them flat may be a good way to start. ScarfUsing the set of 4 No 10 (3¼mm) needles - or the circular needle
- cast on 112 sts in Main Shade (A). Pattern as follows: **   These 46 rounds form the pattern. Cast off using A. To make up the ScarfDarn in all ends on the wrong side. HatUsing No 12 (2¾mm) needles, and main shade A, cast on loosely 144
stitches. Work 20 rows K1/P1 rib, increasing 1 stitch at the end of the
last row. [145 sts] Continue in pattern until work measures 18cm (7 inches) from the beginning, ending with a purl row. Shape the crown Decrease for the crown, keeping the continuity of the striped pattern: To make up the HatPress as given for the scarf. GlovesNote: When working the gloves, use separate balls of yarn for the palm and thumb, twisting the yarns at the back of the work when changing colours. Right hand gloveUsing No 12 (2¾mm) needles and main shade A, cast on 56 stitches.
Start thumb shaping: 1st row: using first ball of B, k28;
using A, increase one stitch in each
of the next 2 stitches, k1; using a 2nd ball of B, k25. Continue in pattern as given for chart, increasing the thumb stitches
as before on the 3rd and then every foil 4th row until the 24th row has
been completed, decreasing one stitch at the end of the last row.  Thumb: Next row: using B, k28; using A,
k16 stitches; turn and cast on 2
stitches. [Editor's note: For this method you keep all the stitches on the needles as you work the thumb and each finger separately. At this point for the thumb, you keep 28 stitches unworked on the right hand needle, and 25 stitches unworked on the left hand needle, while you work on the centre 16 stitches (which you have increased to 20 by casting on 2 extra stitches on each side. You knit the thumb flat, back and forth up to the tip, then you fasten off and sew it up into the thumb shape.] Shape top: With right side of work facing and using B, knit up 4 stitches from the
base of the thumb, knit to end. [57 sts]
Divide for fingers: 1st finger Shape top: 2nd finger 3rd finger 4th finger Shape top Left hand gloveWork as given for right hand glove, reversing the pattern and the position of thumb as follows: 1st row: using 1st ball of B, k25;
using A, increase one stitch in each of Continue as given for right hand glove until 24th row of pattern has been completed. Thumb Next row: using B, k24; using A,
k16, turn and cast on 2 stitches. Complete as given for right hand glove working from *** to ***. To make upPress as given for scarf. |
Materials25g balls of 4 ply (fingering) yarn: Scarf: 4 balls in main shade A One set of 4 3¼mm (UK 10) double pointed needles (dpn), or a circular needle. Hat and gloves: One pair of 3mm (UK 11), and one pair of 2¾mm (UK 12) needles Tension28sts x 36 rows to 4 ins over stocking stitch on 3¼ mm needles. Size mattersScarf: 20½ cm (8 inches) wide, by 183cm (72 inches) long,
excluding the fringe Abbreviationsk2tog: knit 2 sts together. increase: by knitting into the front and back of the next stitch A word on the wool.The original yarn was standard 4 ply superwash wool; about 92 yards (84 m) per 25g ball. Disclaimer
|
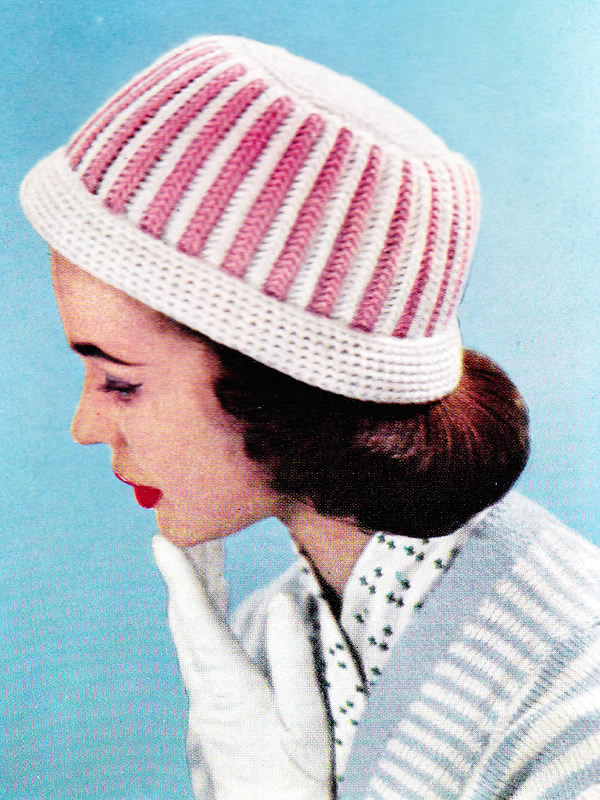
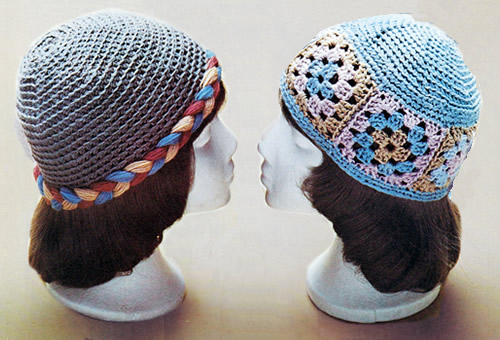
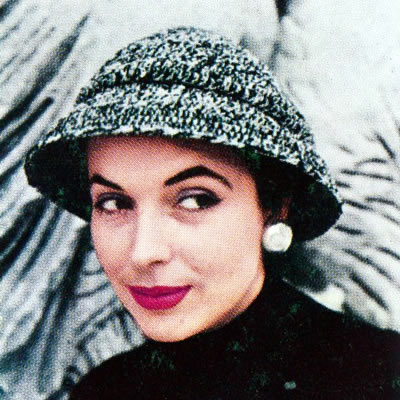
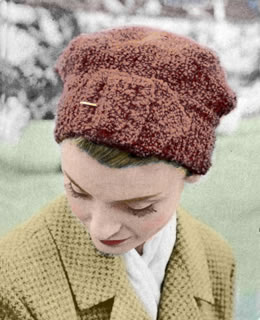
Knitting and crochet combine in this eye-catching candy floss striped hat which can be quickly put together in double knitting weight yarn.
This hat was designed for smart summer holidays (in the UK) in the 1950s, though it's hard to imagine wearing a woolly hat in the summer these days (even in the UK) - which is more a comment on fashion than global warming. However - easy to adapt the colour scheme for autumn and winter days.
Instructions.The main part of the hat is knitted in a fancy striped stitch (which is easier to do than to describe - see below); the top of the crown and brim are in simple double crochet. CrownBegin with the striped part: with pink wool, on No 10 needles, cast on 33 stitches and work in pattern thus: 1st row: k1, *
insert needle into next stitch and knit, winding wool twice round needle;
repeat from * to end. Next row: As 3rd in white. 3rd row forms pattern and this row is now repeated throughout, working
two rows in each shade, ie your next 2 rows will be in pink Continue thus until you have 26 pink stripes. Next 2 rows: in white. Cast off in white as follows: With No 8 hook and white wool, make 3 chain, join into a ring with a 1st round: *
2 dc in 1 dc; repeat from * to end.
[12 dc] Fasten off. Brim:With white wool and No 5 hook, make 101 chain fairly loosely. Join into
a ring with a slip stitch. Next round: *
1 dc in 1 dc but going through the back loop only of each dc; repeat from
* to end. To Make UpPress top of crown only. Don hat with best frock and cotton gloves, and go for a promenade on the sea front. |
Materials
|
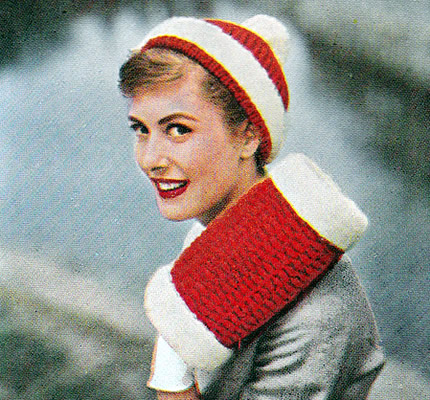
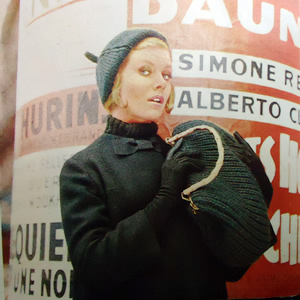
Charming offering from the mid-fifties - the era of the "set".
I'm not sure how much of a commonplace activity skating was or is. I guess the climate in the south of the UK and the constant dangers warned of in skating on lakes and ponds meant that in my youth at least it was not a general pursuit outside of ice rinks. I was very keen on roller skating - another 1950s and 60s popular sport - I even owned my own roller skates etc; however the only times I ever tried skating on ice, was at a rink with hired skates.
In the celluloid world, however, any wintry film would not have been complete without its skating scene, and this would have made the perfect accessory. Luckily you could also consider using it without the skating - though it does rather draw to mind US costume dramas.
InstructionsNote: Muff and all white borders are worked using yarn doubled. MuffPocket lining: Main Part: 1st row (right side facing): k1,
* k1tbl, p1; repeat from *
to last 2 stitches, k1tbl, k1. These 8 rows form the pattern. Next row: Pattern 9, cast off 31,
pattern to end. Continue straight in pattern until work measures 14 inches from start.
Borders: Making upPress work lightly on wrong side under a damp cloth. Join short sides of muff; insert pocket, joining top to 31 cast-off stitches,
then catch down pocket neatly all round. Turn muff inside out. Wrap 2 layers of wadding round muff and join ends.
Join short sides of lining material. Slip lining over wadding and hem
neatly to main work just inside ends of muff. I seem to remember from my youth that muffs generally had a string attached to hang them round your neck so that you could have both hands free if necessary. I'm not sure if this was just because I was a child and was the equivalent to having your gloves on a string (threaded through your coat sleeves!), but it certainly would make it more practical if you planned to use it for more than skating expeditions.] CapUsing single strand of red wool, cast on 108 stitches and work 4½ inches in k1/p1 rib. Change to twisted rib and shape crown as follows: 1st row: *
p1, k1 through back of loop; repeat from *
to end. Continue in twisted rib decreasing 6 stitches in the same way on every
Next row: purl. Break wool, draw through remaining stitches and fasten off. Border: Making upPress lightly on wrong side under a damp cloth. |
MaterialsDouble knitting yarn: 8 oz in Scarlet and 4 oz in white. One pair of No 7 (4½mm) needles. 6-inch zip fastener. White fabric to line muff, and 2 pieces of wadding for padding. TensionCap: 24 sts to 4 inches (10cm) over twisted rib pattern using
single strand of yarn. Size mattersCap to fit "an average head". Abbreviationsk2tog or p2tog: work 2 sts together to decrease. k1tbl/p1tbl: knit/purl 1 stitch through back loop. k2togtbl/p2togtbl: knit/purl 2 stitches together through back loops. stocking stitch: one row knit and one row purl, ("stockinette"). Disclaimer
|
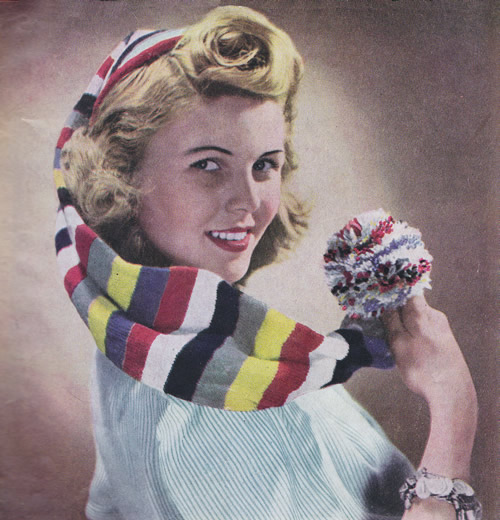
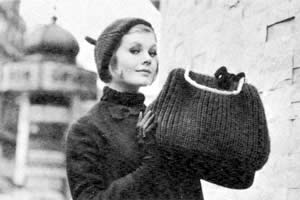
This knitting pattern is not at all challenging (except maybe the 4 needles).
No - it's really all about the delightful picture - such a charming fresh-faced model with those decorous come-hither eyes - all combined with lovely bright colours designed to be cheering for the home makers during WW2.
This kind of quirky Wee Willy Winkie hat did become popular for a while, a few years ago but I haven't seen many around lately. Big pom poms are still the thing though....!
Materials4 ozs mixed shades fingering, 2-ply. [Editor's note: the "2ply" is probably literally two plies but in yarn weight perhaps more like a 3 ply going by the stated tension,] A set of four No 11 (3mm ) needles. Instructions.Cast on 120 stitches, 40 on each of 3 needles. When 6 inches are done start to decrease very gradually. When cap is desired length k2tog all round, then draw wool through remaining
stitches and fasten off. Finish off the end with a multicoloured wool pom-pom, but don't make
You may need to run thread elastic round cast-on edge to keep cap firm on the head. |
Tension8 stitches to an inch. Size matters
Original cap is 30 inches long but you could make one 18 inches long that
is perhaps more suitable for every day wear. Disclaimer
|
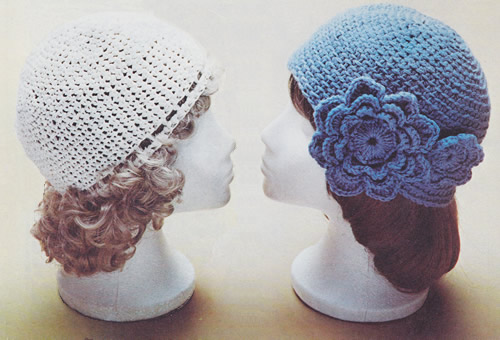
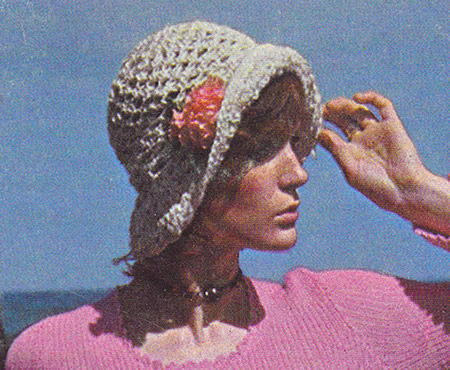
InstructionsNote: Yarn is used double throughout, and the hats are made using
a variation of double crochet: Basic HatMake 3 chain, join in a ring with slip stitch (ss) in 1st chain. Do not join after this round, but carry on working in continuous rounds,
making a spiral. This will be easy if you mark the begninning of the next
Continue in pattern, increasing 6 stitches in every round in this way
until there are 66 stitches. Continue working in rounds of double crochet without shaping for a further 3½ inches (9cm). For the basic hat - fasten off at this point. You can then decorate as required. DaisiesMake one small and one large daisy to sew on the basic hat. You should use a smaller crochet hook (2½ -3mm) and a single strand of the 4ply yarn. Small daisy: Fasten off. Large daisy: Make 11ch. [Editor's note: If you want to create a medium sized flower you can stop here and fasten off - otherwise continue with 2 more rounds.] 6th round: *
5ch, 1ss into back of st on 4th round between next 2 petals, repeat from
* 7 times more, joining last ss into
first of first 5ch. White hatThis hat was made using raffia, using thread single throughout with a
Granny squares hatUsing a No 6 (5mm) crochet hook and double yarn, work crown as given
for basic hat in double crochet pattern until there are 72 stitches. Fasten
off. Make 6 chain. Insert hook from front to back into first chain, yarn round hook and draw loop through chain and loop on hook in one movement. One slip stitch (ss) ss has been worked to join ch into a circle or ring. 1st round: 3ch to count as first
tr, 2tr into circle working under ch, 2ch, work (3tr into circle, 2ch)
3 times. Join with ss to third of first 3ch. 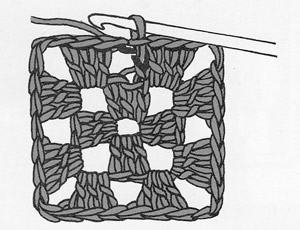
3rd round: 3ch, 2tr into first ch
space to the left of ss join of previous round, 1ch, *
work (3tr, 2ch, 3tr) into 2ch space, 1ch, 3tr into 1ch space, 1ch, repeat
from * twice more, (3tr, 2ch, 3tr)
into last 2ch space, 1ch. Join with ss to third of first 3ch. You can work the square in a single colour or in multiple different colours, fastening off one colour and starting another at the end of each round. Join the 6 squares into a circle. With main colour work 72 dc along To Make UpSew in ends and embellish as desired referring to the photos: - sew daisies to hat, or, |
Materials
|
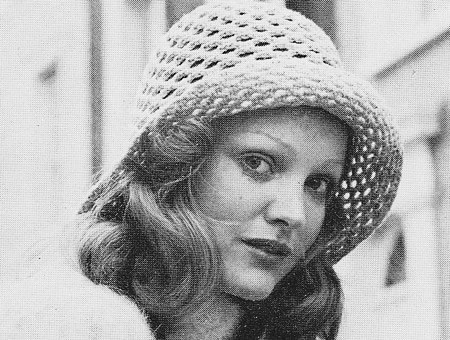
Instructions.Note: Yarn is used double throughout. Make 5 chain, join in a ring with slip stitch (ss) in 1st chain. Repeat the last round 13 times more. Make row of holes for cord as follows: Brim23rd round: ss in next st, 1 dc in
this st, * 2 ch, 1 dc in next ch sp,
2 ch, 1 dc in 2nd htr of previous round; repeat from *
ending last repeat, 2 ch, ss in 1st dc. To Make UpTo prevent heavy pressing and use of an iron, either
of which could be injurious to fabric, some yarns state that they should
not be pressed. Light pressing is suitable as follows:
|
Materials
|
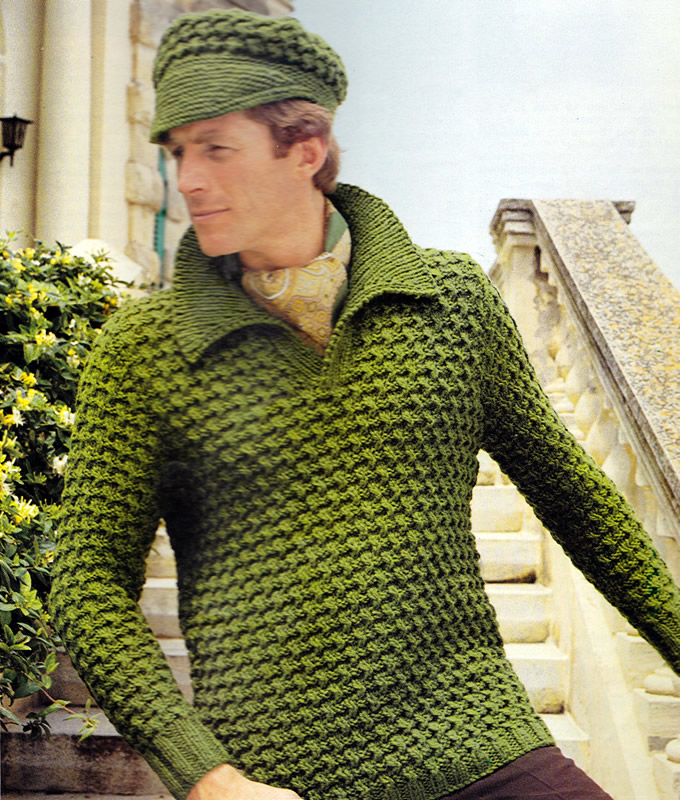
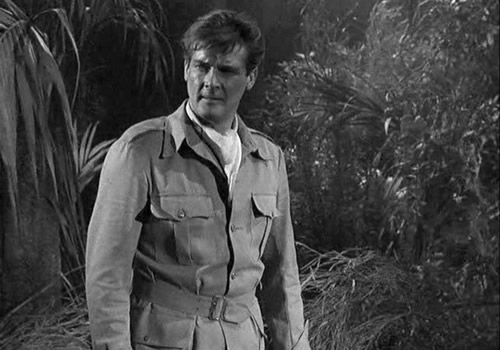
An expression of the era of safari suits and cravats* heralding a new "casual look" - where you could be smart without a lounge suit - like Brett Sinclair. [Having said that I can only find pictures of Brett with his safari jacket open necked or worn over a polo-neck, and his cravats worn conventionally with his suits; perhaps this was an expression of the character he was playing rather than fashion.]
If you overlook the styling - and maybe the colour - this is quite a nice sweater - and maybe cap if not all worn as an outfit. A shorter button-through neck would improve it for me.
* See gratuitous picture of Roger at the end of the instructions.
Sweater Instructions.Back** 1st row: p1, k2, *
p2, k2; repeat from * to last stitch,
p1. Change to No 4 needles and pattern as follows: 1st row (right side facing): *
Tw2R, k1 ; repeat from * to end. Shape sides by increasing 1 stitch at each end of the next and every following 24th row until there are 78/82/86/90 stitches, taking increased stitches into pattern. Work straight until back measures 17 inches, ending with right side facing. Keeping continuity of pattern, shape armholes by casting off 4
stitches at the beginning of the next 2 rows, then decrease 1 stitch at
each end of every row until 58/60/62/64
stitches remain. Work straight until back measures 26/26½/27/27½ inches, ending with right side facing. Shape shoulders by casting off 5/6/6/6 stitches at the beginning of the next 4 rows, then 6/5/5/6 stitches at the beginning of the following 2 rows. Leave the remaining 26/26/28/28 stitches on a spare needle. Front Work as for back from ** to **. Divide for front opening as follows: Next row: pattern 26/27/28/29.
Turn. Work straight in pattern on these 26/27/28/29 stitches for first side until front measures 23/23/23½/23½ inches, ending with right side facing. Shape neck by decreasing 1 stitch at the neck edge on the next 7 rows, then on every alternate row until 16/17/17/18 stitches remain. Work a few rows straight until front matches back at armhole edge, ending
with right side facing. With right side facing, leave centre 6 stitches on a safety-pin; rejoin yarn to remaining stitches and pattern to end. Finish to correspond with first side, reversing shapings. SleevesWith No 7 needles, cast on 32/32/36/36 stitches and work 3 inches in rib as on lower edge of back increasing 4 stitches evenly across last row: 36/36/40/40 stitches. Change to No 4 needles and pattern as on back, shaping sides by increasing
1 stitch at each end of the 9th and every following 6th row until there
are 48/44/52/50
stitches. Work straight until sleeve seam measures 18/18/18½/18½ inches, ending with right side facing. Keeping continuity of pattern, shape top by casting off 4 stitches at the beginning of the next 2 rows, then decrease 1 stitch at each end of the next and every alternate row until 38/38/42/42 38/38/42/42 stitches remain. Now decrease 1 stitch at each end of every row until 16 stitches remain.
Left Front BorderWith right side facing and No 7 needles, work across 6 centre stitches on front as follows: 1st row: k2, p1, m1, p1, k2 {7 sts} Repeat the last 2 rows until border, when slightly stretched, fits up
left side of front to start of neck shaping, ending with right side facing. Right Front BorderWith No 7 needles, cast on 7 stitches and work in rib as for left front until border fits up right side of front to start of neck shaping, ending with right side facing. Do not break yarn. Leave stitches on a safety pin. To Make UpOmitting ribbing, press lightly under a damp cloth or following the instructions
on the ball band. CollarWith right side facing and No 7 needles, rib 7 stitches from right front
border, pick up and knit 16/18/20/22
up right side of neck, knit 26/26/28/28
from back, increase 1 stitch at centre, pick and knit 16/18/20/22
down left side, then rib 7 border stitches. Shape collar as follows: 1st row: k1, *
p1, k1, repeat from * to end. Now repeat rows 2 - 5 until collar measures 4 inches at centre back,
ending with 2nd or 4th row. Use a tapestry needle and 12 inch lengths of yarn for making up, noting that yarn must be twisted from time to time during make up so that it does not break. Join side and sleeve seams; insert sleeves. |
Materials17/18/19/20 x 50g balls chunky wool. Pair each of No 4 (6mm) No 7 (4½mm) needles. Tension15st and 20 rows to four inches on No 4 needles over stocking stitch.
Size mattersTo fit chest: 17/18/19/20
inches; AbbreviationsTw2R: k2tog, but do not slip stitches off needle; then knit first
stitch again, A word on the wool.Original yarn was Patons Husky Chunky, which as I recall was a pure wool
chunky, and a fairly dense tough yarn as the name implies. Disclaimer
|
Cap Instructions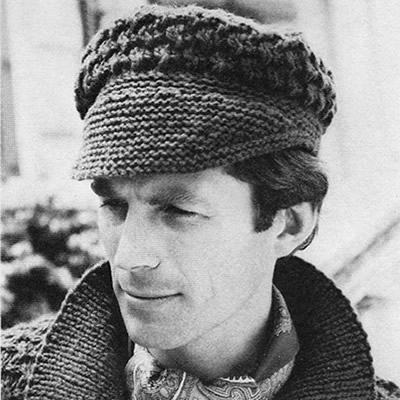 CrownWith No, 4 needles, cast on 14 stitches and purl 1 row. Shape as follows: Keeping continuity of pattern, increase 1 stitch as before at each end
of next and following 2 alternate rows: {34 sts} Now decrease 1 stitch at each end of every row until 14 stitches remain.
Work 1 row straight. BrimWith No 7 needles, cast on 84 stitches. 1st row: (p2, increase in next stitch) 3 times, * p1, increase in next stitch, p2, increase in next stitch; repeat from * to last 5 stitches, p2, increase in next stitch p2. {116 sts} Change to No 4 needles and work rows 1 - 8 of pattern as on back of sweater, then repeat rows 1 - 3 again. Cast off knitwise. PeakWith right side facing and No 7 needles, pick up and knit 76 stitches
along cast-on edge on the brim. Shape as follows: Continue working short rows in this manner, working 2 stitches fewer on every 2 rows until the rows "knit to last 33 stitches. Turn" have been worked. Next 2 rows: knit to last 36 stitches.
Turn. Making UpBlock crown to a 9 inch circle by pinning out round edges, and press
lightly under a damp cloth. Using a flat seam, join ends of brim. |
Materials3x 50g balls chunky wool. Pair each of No 4 (6mm) No 7 (4½mm) needles. Tension24st and 32 rows to four inches on No 9 needles. Size matters"Average hat size". A word on the wool.Original yarn was Patons Husky Chunky, which as I recall was a pure wool
chunky, and a fairly dense tough yarn as the name implies. Disclaimer
|
This is the month for the Sailor's Society** "woolly hat week" (8th-14th February 2015). So I thought I would post this hat and scarf combination - easy to knit in 4 ply fingering weight knitting yarn - perhaps suitable for a sailor if you omit the pom-pom decoration!
You can find other patterns as well as where to send your hats on their website link above. Also see my previous POM from 2008 with other chunky hat patterns - including my all time favourite appropriately knitted in Fisherman's rib.
Here's what Hannah says: "Our international network of port chaplains and ship visitors give your amazing hats out to seafarers visiting port, while others are wrapped and included in the Christmas welfare parcels that are taken on board ship for the festive season. The need for more hats is ever-increasing! Drew, our Port Chaplain in Invergordon, has been known to give out 500 in a day on occasion!"
InstructionsPanels of moss stitch and flag stitch are used for this cosy scarf and pull on hat. The scarf is fringed and the hat trimmed with a large pom-pom. ScarfCast on 72 sts These 8 rows form the pattern. Continue in pattern until scarf measures 167½ cm (66 inches) from beginning, (or however long you want the scarf to be) ending with an 8th pattern row. Cast off. To make up the ScarfDo not press. HatCast on 144 stitches. Work in pattern as given for scarf, but without the moss stitch border on both sides. So set out your rows as follows: 1st row (right side): *
(k1, p1) 4 times, k1, p7; repeat from *
end. Continue until work measures 25½ cm (10 inches) from beginning, ending with an 8th pattern row. Shape crownNext row: * Moss st 8, k1, p2, ybk, sl 1, yfwd, p2tog, psso, p2; repeat from * to end of row. [126 sts] Next row: * k4, p2, moss st 8; repeat from * to end of row. Next row: * Moss st 8, k2, sl 1, p2tog, psso, p1; repeat from * to end of row. [108 sts] Next row: * k1, p3, moss st 8; repeat from * to end of row. Next row: * Moss st 8, k1, sl 1, k2tog, psso; repeat from * to end of row. [90 sts] Next row: Moss st to end of row. Next row: * Moss st 7, sl 1, k2tog, psso; repeat from * to end of row. [72 sts] Next row: Moss st to end of row. Next row: * Moss st 5, sl 1, k2tog, psso; repeat from * to end of row. [54 sts] Continue decreasing in this way on every alternate row until 18 sts remain.
Break off yarn, thread through sts, draw up and fasten off. To make up the HatDo not press. Trim with a large pom-pom. |
Materials
|
** Please note that the Sailors Society does seem to be a religious organisation, which I mention not through any disapproval on my part, but in case you would care to look at their website and ensure its aims do not go against anything you believe in.
An amusing little tweed hat from the 1950s for you to crochet.
It uses the same yarn and technique as the tweed coat for January 2015.
Instructions.Note: The Bouclet is used double throughout with one ball of white together with one ball of black. Begin at the centre crown. Make 4 chain, join into a ring with a slip stitch 1st round: 9 dc through centre of
ring, join with a slip stitch 4th round: 3 ch; *
2 htr in 1 dc , 1 htr in l dc; repeat from *
9 times more. Fasten off. BrimMake 100 ch, join into a ring with a slip stitch. 1st round: 100 dc in 100 ch. 7th round: 3 ch, *
1 htr in 1 dc; repeat from * all round,
join with a slip stitch. Fasten off securely. To Make UpSew over bare ends of wire with wool. |
Materials
|
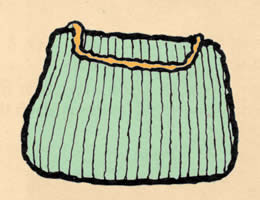
Elegantly modelled on location in the Boulevard des Capucines for Paris in Focus showing "hand knits from Paris: top fashion to knit in bulky wool"
InstructionsThe bag is knitted in a variation on fisherman's rib, or brioche stitch, while the beret is plain. BeretCast on 72 stitches and work 2½ ins. k1, p1 rib, working into the back of every stitch to give a twisted rib. Shape crown as follows: 1st row:
* k8, increase 1 by picking up horizontal
thread lying before next stitch and knitting into back of it; repeat from
* last 8 stitches, k8. [80 sts] 8th row:
(k1, p1, increase 1 by picking up horizontal thread lying before next
stitch and purling into back of it, p13, increase 1 as before, p1) 5 times:
90 stitches 15th row:
(k2togtbl, k13, k2tog, p1) 5 times. 20th row:
(k1, p15) 5 times. Continue decreasing 2 stitches thus in each stocking-stitch panel until
20 stitches remain. Break wool, thread through remaining stitches, draw up and fasten off. Stalk: Cast on 7 stitches and work 4 rows stocking-stitch; cast
off. Making up - beretPress beret lightly on wrong side under a damp cloth, avoiding ribbing.
Bag Sides (make two)Starting at base edge, cast on 60 stitches and work 1 row k1, p1 rib. Change to fancy rib pattern as follows:- Next Row: slip 1 knitwise, *
p1, knit into next stitch but through loop of row below at the same time
slipping stitch above off needle; repeat from *
to last stitch, p1. Repeat this row until piece measures 10 ins. Make another piece the same. Base:Cast on 14 stitches and work in rib pattern exactly as for main part
until piece measures 12 ins, slightly stretched. Making up - bagMake a hem across each piece of main part by folding over narrow piece
at top to wrong side. |
MaterialsBeret: 2 hanks Patons Big Ben Knitting. One pair of number 4 (6mm) needles. Lining material for bag approximately 21 inches square. Cardboard or stiffening for base 12x3½ inches; 9½
inch bag frame. TensionEquivalent to a basic tension of 15 stitches to 4 inches in stocking-stitch on No 4 needles. Size mattersBeret: average size. Abbreviationsk2tog: decrease by knitting 2 sts together. k2togtbl: decrease by knitting 2 sts together through back loops, sometimes called ssk (slip 1 knitwise, slip 1 knitwise, place 2 sts back on left needle and knit 2 slipped sts together through back loops). A Word on the WoolI don't know the size of the Big Ben hanks, but I am guessing they were at least 2oz (around 50g). My experience with chunky weight yarn bags leads me to guess that at least 6 50g balls might be required. Disclaimer
|
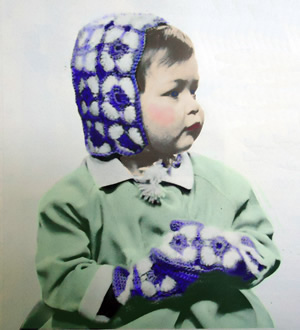
This looks like a little Victorian cherub, though the pattern is much later. It uses a combination of smooth and fluffy 4 ply yarns in a relatively simple crochet motif.
I think the bonnet is particularly cute.
Instructions:The items are made by piecing together a basic motif: Using blue colour (B), make 8 chain and join into a ring with a slip
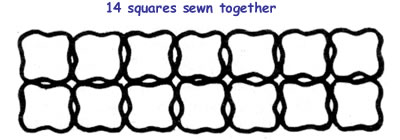
stitch. Bonnet:Make 14 motifs the same and join together as shown in diagram.
Back of bonnet: 1st row: 1 dc into 2nd ch from hook,
1 dc into each of next 27 ch Continue in dc increasing 1 stitch at each end of every 4th row until
there are 36 dc. Making up the Bonnet: Pin one edge of front piece up sides and all round top edge of back piece.
With right side of work facing and B, crochet the 2 pieces together but
working 4 dc into edge of back piece only between motifs Fasten off. Mitts:Starting with the front of the mitts: Using B, make 21 ch Now work the back of the mitts: Work 2 motifs as given for bonnet and join together as before. With right side of motifs facing, start in corner and work along one
long edge as follows:- Turn and work 9th and 10th rows as given for front of mitt. Thumb: Using B, make 2 ch. Join thumb seam from top down as far as marker. Making up the mitts: Make another mitt in the same way but inserting thumb on opposite side
to first mitt when making up. |
Materials2 ozs 4 ply, in Powder Blue and One No 12 (2¾mm) crochet hook. TensionEach motif measures about 2 inches square. 6½ dc to an inch over
plain dc. Size mattersBonnet: All round front edge measures 15½ inches. Crochet abbreviations:ch: chain [Editor's note: Remember these are English crochet instructions where dc is equivalent to US single crochet - see "Terminology" in the side bar.] A word on the wool.Original yarn was Patons Beehive 4ply and Fuzzy Wuzzy angora. Disclaimer
|
Charming retro hat with decorative band and buckle.
I learned from the Debbie Bliss Magazine Autumn/Winter 2012 that one of my favourite designers, Louisa Harding, has been facing up, with her husband, to his challenge of being treated for lymphoma. In appreciation for the help of Macmillan nurses, Louisa is taking part in Macmillan's Nepal Hiking Challenge and seems well on her way to raising her goal of £5000.
To help achieve the target She has put together a series of seven knitting patterns called 'Himalayan Hiking Hats'. She will have her photo taken wearing each one of the hats on the first 6 days of the trek. The seventh hat pattern in the series will be knitted 'en route' and photographed on the 7th (last) trekking day.
Download the hat patterns from her site and show your support by sending a donation.
Instructions.The main hat is knitted in reverse stocking stitch, with the band in garter stitch. The design is intended for a textured yarn. CrownUsing the 5 No 10 needles, cast on 8 stitches, placing 2 stitches on each of 4 needles. 1st (and every alternate) round:
purl 6th round: *
k2, knit twice in next stitch; repeat from *
all round. [32 sts] Continue increasing 8 stitches thus on every alternate round until there
are 36 stitches on each needle. [144 stitches] Next round: *
k16, k2tog; repeat from * all round.
[136 sts] Cast off. BandCast on 16 stitches, and work a strip in garter-stitch (every row knit)
22 inches long - or length required to fit round head with 3 inches to
spare. Now decrease 1 stitch at each end of the next and every alternate
row until 2 stitches remain; k2tog and fasten off. This forms a point. Stitch the cast-on edge of the band to the buckle, then slot the shaped end through the buckle pulling it through until the band fits round the head snugly. To Make UpPin band in position evenly all round crown noting that the purl side
of the crown is the right side. |
Materials
|
A word on the wool.Patons Rimple was a softly textured bouclé yarn, (97% wool, 3% nylon), which knitted to a double knitting tension. This hat is knitted on finer needles than usual so the knitted fabric will be denser and stiffer, giving the hat more body. There are a few double knitting bouclé yarns available though many tend to be chunky weight. Debbie Bliss seems to have discontinued the Cashmerino Astrakhan but you can still obtain it at some outlets on the internet (and often discounted). Rowan have recently brought out a British Sheep Breeds "fine" bouclé but this still seems to knit up to a chunkier tension. You can try and obtain the right tension with finer needles - and I think this would produce an excellent knitted fabric for the hat - but be warned that knitting bouclé tightly on small needles is very hard work. I cannot supply the yardage of Rimple, and can only guess that "Harlequin" was a multi-coloured tweed. | |
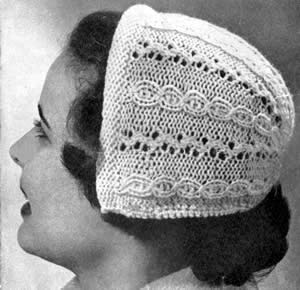
This type of bonnet was very popular in the 1950s - at least it was much favoured by Paton and Baldwin, using their Fuzzy Wuzzy angora**. I think, following the 1940s roll, it went with the more modern shorter hairstyles, and was possibly the half-way house to what was essentially the demise of the hat for everyday wear. Anyway - I am sure they explored every possible variation on this basic style.
**Perhaps not the best marketing brand for today's knitters.... However, angora wool is very light weight and was sold in half ounce balls; this gives you the clue that it was relatively expensive, so a tiny little cap - or perhaps bolero - was ideally affordable. (And did I mention fluffy? even I - never allergic to anything - am prone to fits of sneezing when wearing angora).
Note that there are two versions of the bonnet for different yarn weights.
Instructions for the double knitting bonnetPattern stitch is worked over 6 rows: 1st row (right side facing): *
p3, k3, p3; leave wool forward (wfd), k2tog; repeat from *
to last 9 sts; p3, k3, p3. [Editor's note: The above pattern repeat of 6 rows is as given in the original instructions. If you compare the photo below with my version, you will see the eyelet arrangement is slightly different between the two. I worked (k2tog, wrn) and then (wrn, k2tog) alternately on the right side rows; this does not fit with the 6 row repeat of the mock cables. I have not written out my resulting 12 row repeat for you, but if you want to do this it is quite simple to keep track of the two patterns as you knit, one having a 4 row repeat, and the other, a 6 row repeat. Knit to the correct number of rows overall, and make sure you keep it consistent when you get to the decrease rows. ]
To Make:Cast on cast on 64sts using the knit cast-on method to give a loose edge.
Work 9 rows in stocking stitch (one row knit, one row purl), ending with
a knit row. Now make the hem for the hair-band casing as follows: Hem row (purl side facing, which is the
right side of the work): Fold the hem so that the cast on edge
is aligned at the back of the needle containing your working sts; *
knit one stitch on the needle with one loop from the cast on edge; repeat
from * to end. Now commence the pattern - work the 6 pattern rows five times. Start the shaping: 31st row (first shaping row): p3,
k3, p3; * leave wfd, k2tog, p2tog,
p1, k3, p1, p2tog; repeat from * to
last 11sts; leave wfd, k2tog, p3, k3, p3. [56sts] 37th row (second shaping row): p3,
k3, p3; * leave wfd, k2tog, p2tog,
k3, p2tog; repeat from * to last 11sts;
leave wfd, k2tog, p3, k3, p3. [48sts] 43rd row (third shaping row): p3,
k3, p3; * leave wfd, k3tog, k2, sl1,
k1, psso; repeat from * to last 11sts;
leave wfd, k2tog, p3, k3, p3. [40sts] Next row: Cast off 9sts; knit to
the last 9sts; cast off 9 and fasten off. To CompletePin out and press the work lightly on the wrong side with a warm iron
over a damp cloth. With the right side of the bonnet facing you, join the wool to one side
edge, at the inner edge of the hem (ie do not crochet the ends of the
hem together, as you need to thread your plastic hair band into it), and
work one row of double crochet all around the neck edge, finishing atthe
same position on the opposite side of the front. Draw the edge in slightly
as you work. Slip the hair band through the front casing, and then seam the short ends to close it off. Sew in and neaten all ends. |
MaterialsOriginal materials called for: 2 ozs double knitting wool. One pair of No 7 (4½mm) needles. One No 11 (3mm) crochet hook. 1½ yards elastic thread. A plastic hair band. Tension21 sts and 29 rows to 4 inches. Size mattersTo fit "an average head". Abbreviationsinc: increase by working into the front and back of the next stitch. dc: double crochet. A word on the wool.Original yarn Sirdar Majestic. I used Phildar Partner 6 in a lovely red shade, (50% nylon, 25% wool,
25% acrylic).
Disclaimer
|
Here is the same bonnet in a finer yarn. Normally, I would say finer yarns make a better result, (I know: "it depends"...). However, I actually prefer the double knit version of this style which seems better proportioned.
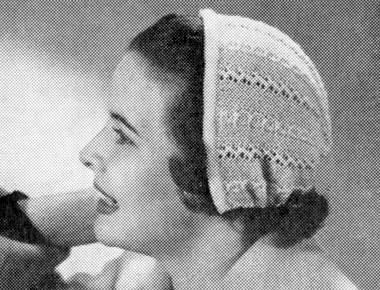
Instructions for the 3-ply bonnetPattern stitch is worked over 6 rows: 1st row (right side facing): *
p5, k3, p5; leave wool forward (wfd), k2tog; repeat from *
to last 13sts; p5, k3, p5. To Make:Cast on cast on 103sts using the knit cast-on method to give a loose
edge. Work 11 rows in stocking stitch (one row knit, one row purl), ending
with a knit row. Now make the hem for the hair-band casing as follows: Hem row (purl side facing, which is the
right side of the work): Fold the hem so that the cast on edge
is aligned at the back of the needle containing your working sts; *
knit one stitch on the needle with one loop from the cast on edge; repeat
from * to end. Now commence the pattern - work the 6 pattern rows eight times. Start the shaping: 49th row (first shaping row): p5,
k3, p5; * leave wfd, k2tog, p2tog,
p3, k3, p3, p2tog; repeat from * to
last 15sts; leave wfd, k2tog, p5, k3, p5. [93sts] 55th row (second shaping row): p5,
k3, p5; * leave wfd, k2tog, p2tog,
p2, k3, p2, p2tog; repeat from * to
last 15sts; leave wfd, k2tog, p5, k3, p5. [83sts] 61st row (third shaping row): p5,
k3, p5; * leave wfd, k2tog, p2tog,
p1, k3, p1, p2tog; repeat from * to
last 15sts; leave wfd, k2tog, p5, k3, p5. [73sts] 67th row (fourth shaping row): p5,
k3, p5; * leave wfd, k2tog, p2tog,
k3, p2tog; repeat from * to last 15sts;
leave wfd, k2tog, p5, k3, p5. [63sts] 73rd row (fifth shaping row): p5,
k3, p5; * leave wfd, k2tog, k1, k3tog,
k1; repeat from * to last 15sts; leave
wfd, k2tog, p5, k3, p5. [53sts] Next row: Cast off 13sts; knit to
the last 13sts; cast off 13 and fasten off. To CompletePress and complete as for the double knitting version of the bonnet. |
MaterialsOriginal materials called for: 1oz of 3-ply fingering wool. One pair of No 11 (3mm) needles. 1½ yards elastic thread. A plastic hair band. Tension30 sts and 44 rows to 4 inches. Size mattersTo fit "an average head". Abbreviationsinc: increase by working into the front and back of the next stitch. dc: double crochet. A word on the wool.Original yarn Sirdar Majestic. Disclaimer
|
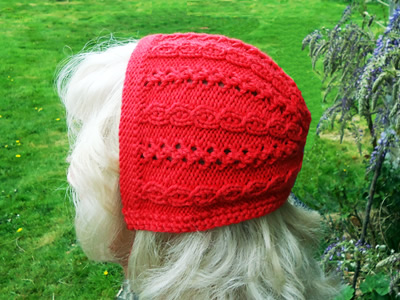
This is a very flattering hat - speaking as one who has difficulty with hats, which always leads to sartorial dilemmas in weather such as we have in the UK at the moment. However, not only flattering and warm, but amazingly speedy to knit, which can be very useful at this time of year. I completed it in one afternoon.
Instructions.The main part of the hat is a simple six-row pattern where you increase at the beginning and decrease at the end of every alternate row to create the diagonal effect. At the same time you alternate 3-row bands of stocking stitch and reverse sticking stitch. SideCast on 20sts. 1st row: Knit These 6 rows form the pattern. BrimWith right side facing, pick up and knit 72sts along one edge of the
side piece - that is 3 sts to each knit and purl stripe. Work 10 rows in k1/p1 rib, and then cast off in rib. Join side piece and brim neatly with a flat seam. Press seam lightly. CrownCast on 14sts, and work in stocking stitch, starting with a purl row (this is right side of work), and increasing at each end of the first and every alternate row until there are 28 sts. Knit one row. Then continue, decreasing at each end of next and every following alternate row until 14sts remain. Cast off. To Make UpPin crown in position to side of hat on wrong side, so that purl side
of crown is on the outside. Back stitch in position very neatly on wrong
side with a tailored seam Fold ribbed brim in half to wrong side and slip stitch in position round lower edge. Place on head. Wrap in Christmas paper. Put under tree. |
Materials
|
|
|
Handspun YarnI bought some Spelsau
fleece at Woolfest in 2009; there was a workshop on knitting direct from
the fleece but I intended to spin my sample. I made a 2 ply yarn which
was softer than I had expected, but kempy (as I had not attempted to remove
the coarser fibres). There was only a small amount - I did not measure
the yardage, but I started with 100g, the yarn was chunky weight, and
I knitted 2 strands of yarn together by combining it with an aran-weight
handspun merino/silk blend to achive the bulky weight required. As you
can see, the fleece was a lovely combination of natural grey tones. The description of the Spelsau fleece is as follows (taken from the reference above):
|
This wasn't my intended pattern for April, but I received a leaflet through the post telling me about the Sailors' Society [**please see footnote at the end], who are launching their woolly hat campaign for 2008. The campaign's aim is to provide seafarers arriving in the UK, (from foreign climates and thus ill-prepared for our weather), with hand-knitted hats to keep warm. Also worth noting is that these sailors often spend many months at sea in harsh conditions, sometimes not even speaking the same language as their colleagues, and these gifts can give a feeling of belonging and overcome feelings of isolation.
Last year's Woolly Hat Campaign saw over 15,000 hats distributed to seafarers throughout the UK and to Russia, Antwerp and South America, with over 6,000 given as part of Christmas packages.
If this inspires you, here are some patterns.
If you don't like any of these three hat patterns I have given for this month, the Yarn Harlot has an excellent free pattern for a "seriously quick hat".
** Please note that the Sailors Society does seem to be a religious organisation, which I mention not through any disapproval on my part, but in case you would care to look at their website and ensure its aims do not go against anything you believe in.
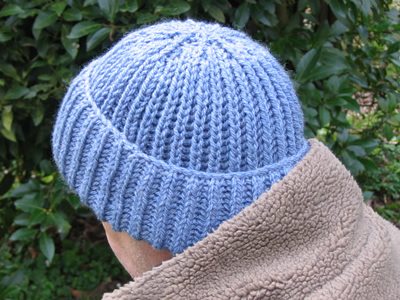
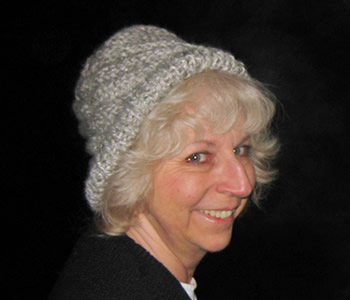
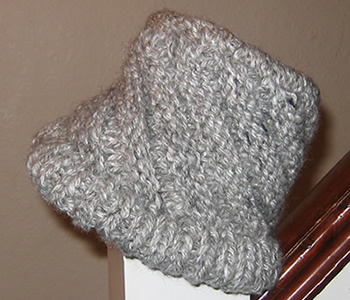
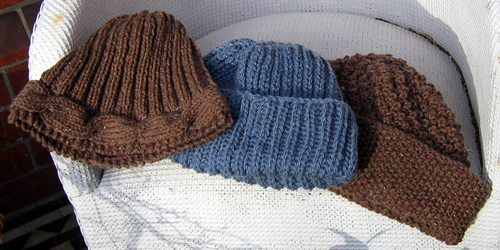
This is my favourite hat of the three this month. It's simple, warm, comfortable, and looks like a serious seafarer's hat! Even though I don't like knitting rib that much, and Fisherman's rib means you have to put in a lot more knitting to get the length you need.... it was nonetheless very satisfying.
InstructionsWith No. 6 (5mm) circular needle cast on 68 stitches, and join into a
round, and purl the first round. Place a stitch marker to mark the beginning
of the round. 1st round: *
K1B (knit one below, by knitting into the stitch below the next stitch,
and slipping both sts off the needle together); p1. Repeat from *
to end of round. These 2 rounds form the pattern. Continue in pattern until work measures 9inches from the beginning, ending with round 2. Shape Crown as follows, keeping continuity of the pattern: Next round: (K3tog; p1,k1,p1) 11
times; k2tog. [45 sts] Break yarn, thread through remaining sts; draw up and fasten off securely. Making up: Changing the hat size, or substituting the wool.You may want to alter the size (circumference) of your hat, or compensate for a different gauge. Simply work out how many sts you need to cast on according to your own
gauge eg divide the number of sts by 16 and multiply by the number of
sts you knit to 4 inches. A word on the wool.If you work in pure wool you may need more than my stated quantities of yarn. Fisherman's rib is a very yarn-hungry stitch which produces a satisfying elasticated bulky fabric, by effectively knitting the yarn double, (nice and warm!). Original pattern called for 3 x 50g balls Patons Husky Chunky, which
is a pure wool chunky; the blend I used, no doubt, has a better yardage. |
MaterialsExample shown is knitted in 3 x 40g balls of vintage Argyll Ferndale Shetland Chunky (an acrylic and wool blend). Size 6 (5mm) and circular needle - short length suitable for a hat. TensionApprox. 8st to 2 inches on No 6 (5mm) needles. Size mattersThere is a lot of give in the ribbed stitch, making the sizing very flexible. Disclaimer
|

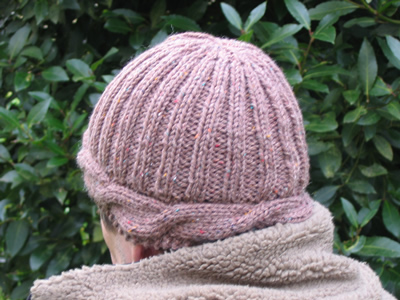
A 1970s hat using blackberry stitch, with a moss stitch brim. George did not think this was very "manly", but I leave that artistic decision to you, [George has also had experience of "life on the ocean wave" and says that as long as it's warm it will be welcome].
InstructionsWith No. 6 (5mm) circular needle cast on 89 stitches, and work in rounds of k1, p1, moss stitch for 3 inches. Increase 7sts evenly across the last row. [96 sts] Change to No. 4 (6mm) circular needle and work pattern as follows: [Editor's note: this pattern (blackberry stitch) is worked over groups of 4 sts, and the hat is knitted up from the wrong side throughout.] 1st round: (wrong side) Knit. These 4 rows form the pattern. Continue in pattern until work measures 8½ inches from the beginning, ending with round 4. Shape Top as follows, keeping continuity of the pattern: Next round: K1 *k2,
k2tog. Repeat from * to last st., k1. [72
sts] Next round: *K2tog,
k1. Repeat from * to end of round. [48 sts] Break yarn, thread through remaining sts; draw up and fasten off securely. Making up: Changing the hat size, or substituting the wool.You may want to alter the size (circumference) of your hat, or compensate for a different gauge. Simply work out how many sts you need to cast on according to your own
gauge eg divide the number of sts by 18 and multiply by the number of
sts you knit to 4 inches. Do the same calculation when increasing for the blackberry stitch, taking note that your number of sts needs to be divisible by 4. Example:
I have a gauge of 18 sts to 4 inches on no UK 6 (5mm) needles. Cast on 89 sts becomes 89/18*15 = 74, and you cast on 75, as it needs to be an odd number. Increase evenly to 96 sts becomes 96/18*15 = 80. |
MaterialsExample shown is knitted in 2x 50g balls of vintage Richard Poppleton Emmerdale Chunky Tweed (an acrylic and wool blend). Size 6 (5mm) and size 4 (6mm) circular needles - short length suitable
for a hat. TensionApprox. 9st to 2 inches on No 6 needles. Size mattersThis hat worked out to about 22 inches head circumference. My estimate
is that "to fit an average sized head" means 22/23 inches for
a man's size and 20-22 inches for a woman's size. A word on the wool.Original pattern called for Patons Husky Chunky, which was, I think a
pure wool chunky, somewhat bulkier than the one I used. Disclaimer
|
This 1970s style hat is constructed by knitting a cabled band and then picking up stitches to knit the rest of the hat - which in this example is ribbed. This version is is not intended to have a turned back brim; if you want one, then you must knit the rib section longer; you will not have to reverse any workings as the rib section is reversible, so could be worn either way out. The single layer construction is very economic on yarn; For my wool/acrylic blend, I used 58g.
InstructionsWith No. 5 (5½mm) needles cast on 11 stitches, and work in cable
pattern as follows: 1st row: (wrong side) K3, p6, k2. 9th - 14th rows: Repeat 1st and second rows 3 times. Repeat 1st - 14th rows 8 times more (9 patterns in all) ending with row 13. Graft the sts to the cast-on edge to form a circular band, [or cast off the 11 sts and sew the cast-on to the cast-off edge]. [Editor's note: If you want to alter the size (circumference) of your hat, now is the time to do it. Lengthen or shorten this band to the circumference you want to achieve. See "altering the size" below.] One edge of the band has a neat "finished" garter st edging
and the other has a reverse stocking stitch edge, which you will use to
continue knitting the hat in the round. Work in rounds of k2, p2 rib for 5 inches (about 28) rows. Shape Crown as follows: 1st round: *K2tog,
p2. Repeat from * to end of round. Repeat rounds 2 five times more. 8th round: *K1,
p2tog. Repeat from * to end of round. Break yarn, thread through remaining sts; draw up and fasten off securely. Making up: Changing the hat size, or substituting the wool.You may want to alter the size (circumference) of your hat, or compensate for a different gauge. This pattern relies on making an even number of cables around the hat, so to lengthen or shorten the band, you can either add in whole or partial pattern repeats, or, if you feel up to it, you could alter the number of rows in the pattern repeat of the cable. Test your gauge before you start and work out how many rows you need to make your chosen head circumference size. Start by dividing the number of rows you calculate by 14, and then try some other numbers, eg 12, 16, 13, or 15, until you are close to getting an exact number of patterns. [Note that if you choose to work to an uneven number of rows in the repeat, then you will end up doing your cable operations on purl rows, which is quite feasible, but approach with caution if your are a beginner in this field!] If the above all sounds hopeless to you, then just knit until the band is the length you require, and just sew the ends of the band together rather than trying to graft it. You could even work the hat on two needles instead of in the round, by picking up the stitches from the band before you sew it up, - and then, when you have finished, you sew a side seam into the hat, including the band. Finally if you are altering the size, or compensating for a different
gauge, you will probably need to pick up a different number of stitches
from the band. I usually pick up a number of stitches equal to three quarters
of the number of rows I have knitted. |
MaterialsExample shown is knitted in 2x 50g balls of vintage Richard Poppleton Emmerdale Chunky Tweed (an acrylic and wool blend). Two size 5 (5½mm) needles and a size 6 (5mm) circular needle - short
length suitable for a hat. TensionApprox. 9st to 2 inches on No 6 needles. Size mattersThis hat worked out to about 22 inches head circumference. My estimate
is that "to fit an average sized head" means 22/23 inches for
a man's size and 20-22 inches for a woman's size. A word on the wool.Original pattern called for Patons Double plus, which was a double knitting
wool, and the instructions were to knit the yarn double, producing a tension
of 7.5sts and 10 rows to 2 inches. Disclaimer
|
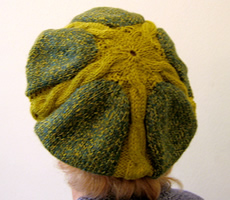
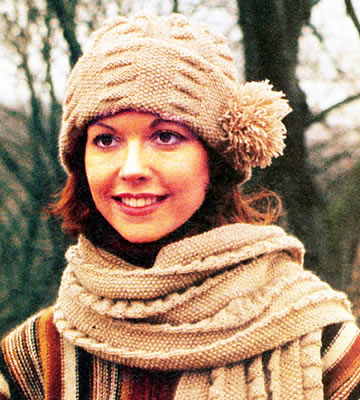
Hats are not my thing but I am fond of berets. Here is an irresistible 1970's two-tone design - the original in two glaring shades of gold and yellow. Consider also making it in orange with a strawberry or coffee contrast - I can vouch for this as a popular contemporary combination and you can view it as part of Southwest airlines hostess uniforms from the same period (although the colour of the uniforms is possibly not as striking as the hot pants and knee boots of the period...).
Alternatively just stick with more reserved single colour in traditional white Aran, understated and letting the pattern speak for itself.
Cable PatternRow 1: P3, k6, p3. These 10 rows form the pattern. Special note: Wind 5 small balls of yarn in each colour. Use a separate ball for each cable and panel, and twist the colours where they meet to avoid gaps in work ("intarsia method"). InstructionsUsing No. 10 needles and medium colour (M), cast on 106 stitches, and work 9 rows k1, p1 rib. [Editor's note: If you work the beret in 2 colours then work over 2 needles as described. If you work in a single colour, you could work this in the round, reversing knit and purl sts on wrong side rows.] Next row: (p1, p into front and back of next st) twice, * p2, p into front and back of next st, p1, p into front and back of next st; repeat from * to the last 7sts, (p1, p into front and back of next st) 3 times; p into front and back of last st. [150 sts]. Change to No 7 needles. Next row: (right side) *
k22 in M; join in light (L), k2, (k into front and back of next st) 4
time, k2; repeat from * to end. [170 sts]. Continue in stocking stitch and cable pattern, until work measures 5½ inches from beginning, finishing with right side facing for the next row. Shape crown as follows: Next row: *
(k2tog, k7, k2tog tbl) twice in M; pattern 12 L; repeat from *
to end. [150 sts]. Next row: K3, *
p6, k2, (p2tog) twice, k2; repeat from *
to last 11sts; p6, k2, p3tog. [60 sts]. Break off wool leaving end. Thread end through remaining sts and draw up tightly. Fasten off securely. Making up - Press lighty on the wrong side, using a warm iron and a damp cloth. Join seam, using a fine back stitch. Press seam. |
MaterialsOriginal pattern calls for 3oz of medium colour and 1oz light in an Aran
weight yarn. One pair each of numbers 10 and 7 needles. Tension20st and 25 rows to 4 inches (10cm) on No 7 (4½mm) needles. Size mattersInstructions to fit an "average" head (!). A word on the wool.I used Phildar yarns Oxygene (a DK) which knits 23st to 4 inches; and Frénésie (a heavy DK) which knits 19st to 4 inches. Disclaimer
|
Yet another object of my admiration is Southwest airlines. They don't really have any visibility outside the US, so I was suitably surprised on my first journey with them. (It was the night of October 31st flying to Tucson in 1994, and they sure had some fun with us passengers...). I have also been impressed at their impromptu organisation of party games to try and occupy a hot and fractious plane load of souls during an hours delay at LA. (See the wikipedia entry: "Southwest is known for colourful boarding announcements and crews that burst out in song. The singing is unusual, and is quite popular among customers, but has been noted by some travel critics as being offensive and intrusive." huh - what do they know?!)
They had their 25th anniversary in 1996, and had an exhibition that I must have caught somewhere (perhaps a magazine article) which showed their uniform designs over the years. Sadly I can't find any trace of this on the web now - just these photos:
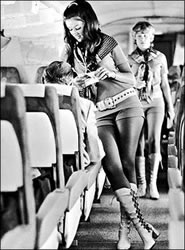
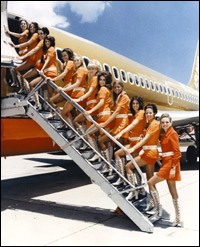
© Christina Coutts 2007
![]()
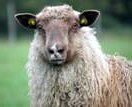 The Spaelsau is a direct ancestor to
the Old Norwegian Sheep.They were tough sheep supplying their masters
with meat, milk, wool, skin - even the sails that carried the ships over
the oceans were made of their wool. Today, a thousand years later, the
wool of the Spaelsau still consists of a rough cover to protect against
the wind and the rain, and under this a much softer layer close to the
skin as protection against the cold.
The Spaelsau is a direct ancestor to
the Old Norwegian Sheep.They were tough sheep supplying their masters
with meat, milk, wool, skin - even the sails that carried the ships over
the oceans were made of their wool. Today, a thousand years later, the
wool of the Spaelsau still consists of a rough cover to protect against
the wind and the rain, and under this a much softer layer close to the
skin as protection against the cold. 