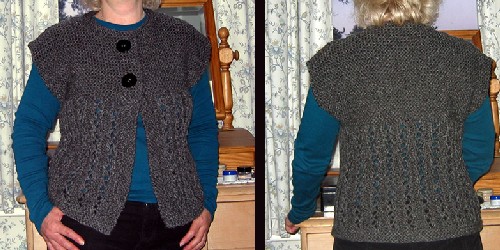
Winter Waistcoat
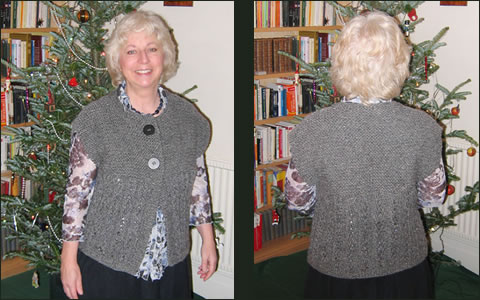
Speedy, speedy knitting from the 1970s. Flattering sleeveless top, warm and simple to knit.
Instructions.The pattern is worked back and forth on circular needles, in 5 stitch repeats over four basic rows: 1st Row: Wrong side facing, {p3,
k2}. Body:Note: The back and fronts are knitted as one piece up to the armholes. With smaller circular needles cast on {100/110}120 stitches and work 6 rows in garter stitch, noting that the first row is a wrong side row. Next Row: (Wrong side facing, 1st
pattern row), knit 4 and slip this 4 sts on to a safety pin or stitch
holder. Change to larger circular needles and commence pattern thus: k2,
*p3,k2; repeat from *
to the last 4 sts. Turn, slipping the last 4 sts onto a safety pin, without
knitting them. [{92/102}112 pattern sts] Next Row: (2nd pattern row), p2, *k1, yfwd, slip1, k1, psso, p2; repeat from * to end. Next Row: (3rd pattern row), as first pattern row. Next Row: (4th pattern row), p2, *k2tog, yfwd, k1, p2; repeat from * to end. Continue in pattern for 10 inches (or desired length), ending with a
4th row pattern, and wrong side facing to begin the next row. †† Leave the main work on the circular needles to one side now, still with wrong side facing - the row you have just knitted is not completed until after you make the front borders. Front Borders:At this point you need to go back to the 4sts you left on safety pins on each side of the work, to make the front borders. Using the pair of smaller needles, and working each set of 4sts separately, rejoin the wool and continue to knit the borders; it is important you join the wool and start knitting from the correct side of each border to continue in the right sequence for garter stitch. This means that, provided you have followed the instructions exactly
as above, for both borders, you need to join the wool at the edge which
will later be sewn to the main body. Work each border in garter stitch until, when very slightly stretched,
the border fits the length of the main body that you have just knitted,
finishing the left border on a wrong side row, and the right border on
a right side row. For both borders the yarn end will be at the edge next
to the main body. Break the yarn. Now return to your main work, on the circular needle. With wrong side facing, take up your last row of plain knitting (see the marker above ††) and complete the row by knitting the 4 sts of the right front border - make sure the border is not twisted. [{96/106}116sts]. Turn the work (right side facing) and knit across all {96/106}116 sts and then complete the row by knitting the 4 sts of the left front border - make sure the border is not twisted. [{100/110}120sts]. Now divide for front and back, with wrong side facing, knit the
first {25/29}32 sts (includes your extra
4 sts at front border) and place these sts on a stitch holder, to make
the left front, later. Continuing without turning, cast on 3 sts using the working yarn, knit
these 3 sts, knit {46/52}56 sts cast on 3
sts. Leave the remaining 32 sts on a stitch holder, to make the right
front, later. [{52/58}62 sts]. Back:With right side facing, work straight in garter stitch (every row plain)
for 8 inches (or the required length for the arm hole), ending with right
side facing. Shape shoulders by casting off {3/3}3 sts at the beginning of the next 4 rows, {3/4}4 sts at the beginning of the following 2 rows, {4/4}5 sts at the beginning of the following 2 rows, and {4/5}5 sts at the beginning of the following 2 rows, and leave the remaining {18/20}22 sts on a stitch holder. Left front:With right side facing return to the left front, slipping the {25/29}32 sts you left on the stitch holder back on to a left hand working needle. Rejoin the wool at the armhole edge to start your next row.
[Editor's note: it
is worth double checking here that:
If you have completed the steps as written, this should be how it works out.] Cast on 3 extra sts with the working wool; knit across these 3 sts followed
by the {25/29}32. [{28/32}35
sts]. Continue to work in garter stitch until 8 rows less than on back
have been worked to the start of the shoulder shaping, ending at the armhole
edge with right side facing to commence the next row. ** Shape shoulder by casting off {3/3}3
sts at the beginning of the next and following alternate row, {3/4}4
sts at the beginning of the following alternate row, {4/4}5
sts at the beginning of the following alternate row, then cast off the
remaining {4/5}5 sts. Right front:With wrong side facing return to the right front, slipping the {25/29}32 sts you left on the stitch holder back on to a left hand working needle. Rejoin the wool at the armhole edge to start your next row. [Editor's note:
it is worth double checking here that:
If you have completed the steps as written, this should be how it works out.] Cast on 3 extra sts with the working wool; knit across these 3 sts followed by the {25/29}32 sts, [{28/32}35 sts]. Commence working in garter stitch and make buttonholes on the following 6th and 28th (wrong side) rows as follows: Buttonhole row 1: (wrong side), knit
to the last 6 sts, cast off 2, knit to end. Continue to work in garter stitch until 8 rows less than on back have
been worked to the armhole edge, ending at the armhole edge with wrong
side facing to commence the next row. Work to complete the right front exactly as the left from ** to **. Neck Border:With right side facing and smaller needles, starting at the top of the
right front border, k{8/9}10 sts from stitch
holder, pick up and k9 sts up right side of neck, k{18/20}22
sts from back neck, pick up and k9 sts down left side of neck, then k{8/9}10
sts from stitch holder. [{52/56}60 sts].
To Make UpPress very lightly on wrong side under a damp cloth. Join shoulder seams,
using a flat seam, (or by grafting, working from the wrong side and making
a purl ridge on the right side). |
|
MaterialsAbout 7 x 100g balls of a chunky or "big" wool that knits to
the required tension on 7½mm needles. No 2 (7mm), and No 1 (7½mm) circular needles. Two 1½ inch buttons. Tension11sts x 16 rows to four inches measured over stocking stitch on 7½mm needles. Size mattersI made the main size shown in black text, which is a slightly large on me (UK size 12-14, maximum size 38 inches). The original pattern was multi-sized, so I have included {2 smaller size options}, in red ink with curly brackets, as shown. They are sized to fit {34/36}38 inches, and actual sizes more like {35/38}42 inches. Length from top of shoulder in my version is approximately 21 inches. See "adapting the size". A word on the wool.I used a pure wool Aran knitted double throughout, and this was about 450m as if knitted with a single strand of bulky wool. Original knitted in Patons Pablo. Abbreviations: yfwd: yarn forward - bring the yarn to the front of the work and when you knit the following stitch, you will have created an extra stitch, in a way that makes a decorative eyelet hole. "Yarn forward" or "yarn over needle" is often used in conjunction with knitting 2 sts together (so you avoid increasing the overall number of sts) in knitted lace patterns.
garter stitch: the simplest stitch pattern of all - every row is knittted, (when worked back and forth on two needles), and the back and the front of the work look the same. It makes a fabric that stretches vertically. Disclaimer
|
|
Adapting the size:Altering the size is fairly simple, as you are knitting a big rectangle, with the pattern being a 5 stitch repeat. Working to the required gauge, means that every addition of 5 sts gives you almost 2 inches extra room. Once you get to divide the work, you change to working garter stitch (no pattern), and can work it out so that half the sts go to make the back, leaving a quarter each for the two fronts. If you do not have stitches divisible exactly by four you can put the extra ones into the back, and incorporate them into the back neck. |
|