Home

Weblog

Pattern of
the Month

On the Needles
(...and Off the Needles)

Knitalong

Stitchcraft

Vintage Patterns

About the
Idle Hands


Archive entry for 2008

« 2007 | Main | 2009 »

December 2008

Plum Pudding Cosy

PuddingCosy3.jpg

A last minute novelty gift from 1960.
It is crocheted with a double thickness of wool; this can be a nuisance but it is a good way to get that tweedy pudding-mix effect.
"Quick-as-lightening fillers for amusing family presents."

Instructions

The pattern includes a tea-cosy in the shape of a Christmas Pudding, and a tea-pot stand in the shape of a plate.

Cosy

Using wool double, with No 7 hook and using the brown and tan wools together (to make a tweedy effect), make 4 chain and join into a ring with a slip stitch. Work 8dc into ring.

1st round: (2dc into each dc) 8 times [16 dc]
Mark the end of the round with a coloured thread.
[Editor's note: You just weave a piece of coloured thread between the last and first sts of each round such that you can just pull it out when you have finished.]
2nd round: (2dc in 1dc; 1dc in next dc) 8 times [24 dc]
3rd round: 1dc in next dc all round.
4th round: (2dc in 1dc; 1dc in next 2 dc) 8 times [32 dc]
5th round: (2dc in 1dc; 1dc in next 3dc) 8 times [40 dc]
6th round: (2dc in 1dc; 1dc in next 4dc) 8 times [48 dc]
7th and 8th rounds: 1dc in next dc all round.
9th round: (2dc in 1dc; 1dc in next 5dc) 8 times [56 dc]
10th and 11th rounds: 1dc in next dc all round.

Start opening for handle by turning the work and working backwards and forwards in rows.

12th row: with wrong side facing 1dc in next dc all across to back to start of round [56 dc]. Turn with 1ch.
13th row: (2dc in 1dc; 1dc in next 6dc) 8 times [64 dc]. Turn with 1ch.

Start opening for spout, working each side of cosy separately.
[Editor's note: I have altered the pattern here and started the spout opening 3 rows higher than intended in the original. Even with this alteration, the cosy fits only a conventional teapot, where the spout comes from the base of the pot. It does not fit my deco teapot design where the spout is high up the pot, on a level with the handle.]

††
14th row: with wrong side facing 1dc in next dc 32 times [32 dc]. Turn with 1ch.
15th row: with right side facing 1dc in next dc 32 times. Turn with 1ch.
16th row: with wrong side facing 1dc in next dc 32 times. Turn with 1ch.
17th row: with right side facing 1dc in next dc 32 times. Turn with 1ch.
18th row: with wrong side facing 1dc in next 15 dc; 2 dc into next dc; 1dc in next 16 dc [33 dc]. Turn with 1ch.
19th row: with right side facing 1dc in next dc 33 times. Turn with 1ch.
20th row: with wrong side facing 1dc in next 16 dc; 2 dc into next dc; 1dc in next 16 dc [34 dc]. Turn with 1ch.
21st row: with right side facing 1dc in next dc 34 times. Turn with 1ch.
22nd row: with wrong side facing 1dc in next 16 dc; 2 dc into next dc; 1dc in next 17 dc [35 dc]. Break wool.
††

[Editor's note: Here's a picture of the cosy with one side worked, showing the coloured thread marking the early rounds.]

Rejoin wool at spout end to work the other side of the cosy. With right side facing, repeat from †† to ††. Join spout opening with one slip stitch. 1ch; turn the work.

With right side facing, return to working in rounds. Work 3 rounds of dc, joining handle opening in first round.

Turn the work, and crochet one round of slip stitches. Fasten off.

Icing

With number 7 hook and white bouclé wool used single, work as for first 6 increase rounds of the plate, [56dc].

Next round: * 1dc in next dc; 4 tr in next dc; 1dc into each of the next 3dc; repeat from * 9 times. Fasten off.

[Editor's note: I extemporised with the crochet here. You can form "realistic" icing/snow either with extra rows of long and short crochet stitches, or by adding embroidery when you stitch the icing in place on the cosy.]

Making up:

Stitch icing to top of cosy, and use white bouclé wool to embroider irregular shapes round edge of icing. Using black wool embroider spots on cosy to represent currants as required.
Sew holly decoration to top of pudding.

Sew in all ends.

Plate (not shown)

Using wool double, with No 7 hook and white, make 4 chain and join into a ring with a slip stitch.

1st round: 1ch, 8dc into ring; 1 slip stitch into top of 1st dc.
[Editor's note: Mark the end of the rounds with a coloured thread, as before.]
2nd round: (2dc into each dc) 8 times [16 dc]
3rd round: (2dc in 1dc; 1dc in next dc) 8 times [24 dc]
4th round: (2dc in 1dc; 1dc in next 2 dc) 8 times [32 dc]

Continue increasing in this way, 8 sts in every round, until 8 rounds have been worked from the start [64 dc].
Work 5 rounds without shaping.
Change to number 10 hook and continue with single wool rim:-

Next round: * 2 dc in next dc; repeat from * to end of round [128 dc].
Next round: 1dc in next dc all round.
Next round: 1 dc in each of next 2 dc; * 2 dc in next dc; 1 dc into each of next 20 dc; repeat from * to end of round.

Work 2 rounds without shaping.

Join in red, and work 1 round. Fasten off red wool.

Turn the work and with wrong side facing, using white wool double, work 1 round of slip stitches into last round of dc. Fasten off white wool.

Press plate lightly. Thread a length of white wool through last round of base - that is before the start of the rim - and fasten off securely. This will retain the shape of the plate.

Materials

50g balls each in dark brown and tan double knitting wool, (used double throughout), and one ball of a white bouclé double knitting wool for the icing. Scraps of red and black for stripes on the plate.

Holly sprig decorations in paper or plastic.

One each Nos. 7 (4.5mm) and 10 (3¼mm) crochet hooks.

Crochet abbreviations:

ch = chain
tr = treble crochet
dc = double crochet

Remember these are English crochet instructions where dc is equivalent to US single crochet - see "Terminology" in the side bar.

Tension

4dc to an inch.
Note:
these are UK crochet instructions - to work a double crochet: insert hook in next stitch, draw loop through, wool over hook, and draw through both loops.

Size matters

Intended to fit a 2 pint pot (that's UK pints which are each 20 fluid ounces not 16). Check out the diagram with the dimensions of my cosy.

A word on the wool.

I used a vintage tweed DK (used double) which was a perfect "pudding" colour, being a rich brown and having flecks of different colours, so I did not need to use two different colours to work together.
I did not have any bouclé wool, so used a smooth wool; however Stylecraft seem to offer come resonably prices bouclé double knits (eg Carousel or Sirocco).

Disclaimer
(well...almost)

In transposing any patterns it is always a risk that errors will be introduced, in spite of dedicated proof reading.
If you have any problems with this pattern, please and I will try and assist.

PuddingCosy4.jpg


Pattern adaptations:

If you would prefer to make a knitted cosy for the main body rather than crochet then here are some instructions for a ribbed cosy. You can still make the white top and holly using crochet as before, and fasten it only in the centre on top of the cosy, which will allow the ribs to adapt nicely to the shape of the teapot.

The cosy is worked in double knitting wool used singly on No 8 (4mm) needles. [The crocheted cosy is worked with two different coloured DK wools worked together to give a tweedy "pudding" effect. I used a flecked wool for my cosy which would work well for this knitted pattern.].

Measurements: width all tround 16 inches, height 6 inches.
Tension: 12 sts and 17 rows to 2 inches measured over pattern.

Instructions:
**
Cast on 47 sts and work in pattern as follows:
1st row: K3, * p2, k2; repeat from * to end
2nd row: K1, * p2, k2; repeat from * to last 2 sts, p1, k1.
These two rows form the pattern. Continue until work measures 5 inches, ending with a second row.

Shape Top:
1st row: * K2tog, k1, p1; repeat from * to last 3 sts, k2tog, k1. [35 sts]
2nd row: K1, * p1, k2; repeat from * to last stitch, k1.
3rd row: K2, * p1,k2; repeat from * to end.
4th row: as second row.
5th row: * K1, p2tog; repeat from * to last 2sts, k2. [24 sts]
6th-8th rows: * K1, p1; repeat from * to last 2sts, k2.
9th row: K1,* k2tog; repeat from * to last stitch, k1. [13 sts]
10th row: K1, purl to last stitch, k1.
11th row: K2tog 6 times, k1. [7 sts]
**

Break yarn and leave sts on a safety pin.
Work a second piece from ** to **. Break yarn and leaving an end. Thread through sts on needle and then through the 7 sts on the safety pin. Draw up tightly and fasten off.
Sew up the sides, leaving an opening for handle and spout.
[Editor's note: This design allows you to sew the front an back seams, and allow handle and spout openings to exactly match your teapot.]

Decorate with the crochet icing and holly as desired, but leave edges of icing free.

November 2008

Gold Mesh Bag

GoldBag.jpg

From November 1940:
"This pretty gold mesh bag will rejoice the hearts of those can still enjoy a little social life. Personally we are at this moment sitting in an air-raid shelter!"
One wonders if that was literally true - but I am sure the editorial team spent a lot of their time in shelters in this period of history in the UK.

Instructions

Starting at the top make 37 chain.

1st row: Miss 2 ch; 35tr; turn with 2ch.
2nd row: 35tr, working into the front of each st; turn with 2ch.
3rd row: 35tr, working into the back of each st (right side facing); turn with 2ch.
4th row: as second, but make 5ch at the end of this row; pull through thread and fasten off. Cut the thread.
[Editor's note: This is the piece of work that fits into the metal frame. Your 35 treble need to be as wide as the handle frame and your 4 rows need to be as deep as the frame. My frame was roughly 5 x 2 inches; my width was OK but I needed to add in 2 rows to make the length, so I repeated rows 2 and 3 before moving on to row 4 as above, making 6 rows in all. Beware if you make a odd number of rows as there is a "right side" to this work - working into the front and back of the sts makes ribs on the right side.
I thought I would have to
add width as well (the frame size stated as 5¾ins and my work was barely 5); however, once I got the frame it was clear that my work fitted perfectly as the insertion width was about 5¼ins plus you do need the work to be very slightly stretched, not relaxed.
My advice is get the frame in your hot little hand first and make the bag to fit.

Be careful if you do add chain to make the bag wider, as you will need to be able to make the shell pattern fit later on. I varied my crochet hook size until I got a satisfactory tension to achieve the right width, rather than adding in sts.]

Now make a second piece exactly the same, and at the end of the final row, make 5ch, and then join the two pieces together by working across the first piece to end of 5ch in slipstitch, then slipstitch across 2nd piece, making a round.

Now change to pattern and work backwards and forwards in rows,
[Editor's note: This confused me at first - but you are "working backwards and forwards" and slip stitching at the end of each row to join the round.]
working into the back of each stitch as follows:

1st row: 1ch; 3dc into 3rd of 5 ch; 3dc into first space * miss 2 spaces; 3 dc into next space; repeat from * across all trebles; then 3dc into 3rd of 5 ch; work across the other side as for the first [27 groups]. Slipstitch into the middle of 3dc made on the 5ch. Turn.

2nd row: (1dc, 1tr, 1dc) into middle of each group of 3dc. Turn with a slipstitch to the next treble.

3rd row: 1dc into same treble as slipstitch, * (1dc, 3tr, 1dc) into next group, 1dc into centre of next group, * repeat from * to * once.
Work a group of (1dc, 3tr, 1dc) into each of the next 3 groups; repeat from * to * twice.
Work a group of (1dc, 3tr, 1dc) into each of the next 2 groups.
[Editor's note: This completes one "side"; it seems asymmetrical as you have one shell group designed to sit on the side of the bag.]
Work the other side of the bag to correspond.
There should now be 18 shell groups of (1dc, 3tr, 1dc) in all.
Turn with a slipstitch into second treble.

4th row: (1dc, 5tr, 1dc) into the middle of each group; turn with a slipstitch into second treble.
5th row: As 4th.

6th row: (1dc, 7tr, 1dc) into the middle of each group; turn with a slipstitch into second treble.
7th row-10th row: As 6th.

Now pinch the two sides of the bag together at the bottom edge and slipstitch across from one side to the other, taking two outside scallops together, to join. The scallops that were on the "side" of the bag are twisted slightly to accomplish this, joining 9 full scallops and avoiding a half-scallop at the sides of this edge.
Fasten off.

Making up:

Sew in all ends.
Sew bag to frame. You are intended to "draw up the work at the sides" so that it fits over the hinges, but as my work was lightly stretch over the frame - and I think due to the design of the frame - I could not make this work, and the hinges are exposed in the finished bag.
[Editor's note: Some frames have no holes in them for sewing and you are intended to glue the fabric in place; check carefully before you purchase.]
Make a fabric lining; I used a fine corded velvet (a remnant) in black.

If your frame has fasteners designed for a cord handle, make a cord or buy a fine chain to form the handle. I made a kumihimo cord, as this is a current interest of mine.

Materials

Example shown is made from 2 balls of Twilleys Goldfingering.

Bag handles from Bags of Handles
[see under 'frames'].
I used this one.

One No. 11 (3mm) crochet hook.

Fabric remnant for lining.

Crochet abbreviations:

ch = chain
tr = treble crochet
dc = double crochet

Remember these are English crochet instructions where dc is equivalent to US single crochet - see "Terminology" in the side bar.

Tension

No tension given - my 37 treble worked out to 5 inches when not eased out on frame.

Size matters

Fits 5¼ inch width handle.
My advice is get the frame first and make the bag to fit, by varying the hook size or adding stitches.

Disclaimer
(well...almost)

In transposing any patterns it is always a risk that errors will be introduced, in spite of dedicated proof reading.
If you have any problems with this pattern, please and I will try and assist.

October 2008

Hug-Me-Tight

HugMeTight1.jpg

Snug winter accessory from 1953.
"Something new in waistcoats. A modern version of the old-fashioned knitted comforter".
Proves to be very flattering for most shapes, and not just for those twig-like 1950s post-war figures.

Instructions.

The overall pattern is four basic rows:

1st Row: Right side facing, purl.
2nd Row: Knit.
3rd Row: Knit.
4th Row: Purl.

These 4 rows form the ridged pattern.

Back:

With larger needles cast on 117 sts. and work 52 rows in pattern as given above. With right side facing, shape sides by increasing one stitch at each end of next and every following 6th row until there are 153 sts.

Work straight until back measures 11 inches at centre.
With right side facing, shape arm-holes by casting off 6 sts at beginning of next 2 rows, then k2tog at each end of every row until 127 sts remain.

Work straight until back measures l8¾ inches, then with right side facing, shape shoulders by casting off 10 sts at beginning of next 8 rows.
Cast off remaining sts.

Right Front:

With larger needles cast on 82 sts and work in pattern as for back,
shaping cross-over flap by increasing one stitch at beginning of first and following 9 alternate rows [92 sts].

Work 12 rows straight in pattern.

With wrong side facing, decrease one stitch at end of next and following 9 alternate rows [82 sts].
Next Row: Right side facing, cast off 22, knit to end.
Next Row: In pattern.

With right side facing, continue in pattern, sloping front edge and shaping side edge as follows:
Next Row: p2tog, pattern to last stitch, increase in last stitch.

Continue in pattern, sloping front edge by decreasing one stitch at beginning of every following l0th row.
At the same time increase one stitch at side edge at end of every following 6th row, 17 times more; then, keep side edge straight until this edge matches back to armhole.

With wrong side facing, continue sloping front edge on every l0th row as before, and at the same time, shape armhole by casting off 6 sts at beginning of next row, then k2 tog at this edge on next 7 rows.

Now keep armhole edge straight and continue sloping front edge on every l0th row as before until 40 sts remain.
Work straight in pattern until front measures 18¾ inches.

With wrong side facing, shape shoulder by casting off 10 sts at beginning of next and following 3 alternate tows, armhole edge.

Left Front:

With larger needles cast on 60 sts. and work 52 rows in pattern.
Next Row: Increase in first stitch; pattern to last 2 sts; p2tog.
Finish to correspond with right front, reversing shapings.

Armhole borders:

Join shoulder seams.
With right side facing and smaller needles, pick up and knit 180 sts. round armhole.
Next Row: Knit.
Next Row: Purl.
Next Row: Knit.
Next Two Rows: k2, p2 rib.
Cast off in rib.

Front Borders:

With right side facing and smaller circular needle, pick up and knit 172 sts from top of flap to centre back of neck.
Continue and pick up and knit 212 sts round rest of neck and down left front to lower edge. [384 sts].

Work 5 border rows as for armhole borders.
Cast off loosely in rib.

To Make Up

Press parts lightly on wrong side under a damp cloth. Join side seams. Press seams. Fasten with pin or brooch as shown in photograph.

Materials

10 x 25g balls
Rowan Yorkshire Tweed 4 ply**,
100% pure wool. ; 110m/120 yards per ball.

1 pair each of No 11 (3mm) needles, and one long No 12 (2¾mm) circular needle.

Original knitted in a 3ply wool on numbers 14, and 13 (2mm and 2¼mm) needles.

Kilt pin to fasten.

Tension

Yarn knits 28sts x 40 rows to four inches on No 11 needles.

The original tension on thinner wool is 9 sts to the inch.

Note: Do not stretch pattern when
measuring length.

Size matters

Original sized for bust 33-34 inches; length from top of shoulders 19 inches.
This version in a slightly thicker yarn to fit 38-40 inch bust as shown in photo.

See "adapting the size".

**A word on the wool.

I used a Rowan Tweed 4ply, which is thicker than the original wool and made the item larger overall. The actual yarn I used is no longer available but you could choose Scottish Tweed 4ply instead.

Original: Paton's Beehive Fingering 3 ply in Lipstick Red.

Disclaimer
(well...almost)

In transposing any pattern it is always a risk that errors will be introduced, in spite of dedicated proof reading.
If you have any problems with this pattern, please and I will try and assist.

Adapting the size:

Knitting in 4-ply produces a bigger size than the original but I carefully checked my tension, experimented with needle sizes, and did the arithmetic. Changing from 9st per inch to 7st per inch makes a big change from a 34 inch bust to 42. However the wrap over style offers some flexibility, and it is easy to add or subtract a few sts throughout the pattern if you need to, or even alter the waist size that you start with, and do fewer increases up to the armhole, if you feel up to it.

This style is meant to be wrapped as tightly as you like to wear it, and seems to look flattering on a range of figure types.

I wanted to make the wrap for myself, I liked the style and tried on this one before sending it off to Alison. However, the 4ply tweed made up too big for me (even with my own ample bosom!). I purchased some 2 ply on-line - fine pure wool in a cone, intended for machine knitting - so one day when I feel like working with lots of tiny stitches, I might get round to it.... (It's a lovely red - "lipstick red" ...)

HugMeTight2.jpg


September 2008

Trekking Socks

LynsSocks1.jpg

My sister was going on a summer trekking holiday and wanted some suitable socks to wear in her riding boots. I have created these simple socks in soft wool/cotton double knitting to meet the needs for a thick summer sock. I can't say how well the wool/cotton will wear as a sock wool, but the double knitting weight means they take about 5 minutes to knit (OK maybe a bit longer...).
I made the largest size for my sister (UK shoe size 5 or 6) - the smaller sizes are intended for children. You can wear the tops extended if used under riding boots, or rolled down if, perhaps, wearing shorts with heavy hiking boots.

Instructions (work 2 alike).

Cast on 36 (40;44;48) stitches loosely; divide over 3 needles and join in a round.

Work 35 rounds in k2, p2 rib (or required length).

Next Round: K1, make 1 by picking up bar between sts and knitting into the back of it; knit to last st; make 1, k1. [38 (42;46;50) sts]

Knit 5 rounds straight.

Divide for heel

Next Round: K9 (10;11;12), and then slip the last 10 sts of the round onto the other end of the same needle - these 19 (21;23;25) sts are for the heel. Divide the remaining sts between two needles, and leave for the instep.

Commence Heel

1st Row: Slip 1 purlwise, purl to end.

2nd Row: Slip 1 knitwise. * K1, keeping yarn at back of work, slip 1 purlwise; repeat from * to last 2 sts; k2.

Repeat these 2 rows 8 (9;10;11) times more, then the first row again.

Turn Heel

1st Row: K13 (14;15;16) sts, slip 1, k1, psso (pass the slipped stitch over), turn.

2nd Row: Slip 1, p7, p2tog, turn.

3rd Row: Slip 1, k7, slip 1, k1, psso, turn.

Repeat the 2nd and 3rd rows 3 (4;5;6) times more, then the 2nd row once.

K5, thus completing the heel. 4 sts remain unworked on the left-hand needle.

Using spare needle, knit 4 heel sts, pick up and knit 10 (12;14;16) sts along side of heel. Slip all instep sts on to one needle, and using 2nd needle knit across instep sts. Using 3rd needle, pick up and knit 10 (12;14;16) sts along side of heel, then knit 5 heel sts. [48 (54;60;66) sts].

Shape instep:

1st round: Knit.

2nd round: 1st needle: knit to the last 3sts, k2tog, k1.
2nd needle: Knit. 3rd needle: K1, slip1, k1, psso knit to end.

Repeat these two rounds until 38 (42;46;50) sts remain.

Continue on these sts until work measures 4¼(5;5¾;6½) inches, or desired length, from where sts were knitted up at the heel.

Shape Toe:

1st round: 1st needle: knit to the last 3sts, k2tog, k1.
2nd needle: K1, slip1, k1, psso knit to the last 3sts, k2tog, k1.
3rd needle: K1, slip1, k1, psso knit to end.

2nd round: Knit.

Repeat these 2 rounds until 18 sts remain.

Making Up

Knit sts from 1st needle on to end of 3rd needle.
Graft sts together. Sew in ends. Press.

Materials

2 x 50g balls Rowan Wool Cotton , shade 930, "Riviera".

One set of 4 number 9 (3¾mm) needles.

Tension

24st and 32 rows to four inches on No 9 needles.

Size matters

Length of foot approximately 7½(8½;9½;10½) inches (adjustable).

A word on the wool.

Wool Cotton is possibly my favourite Rowan yarn; a 50/50 blend of soft Merino wool and cotton. I am not sure how well it will stand up to wear and tear in a sock, but the cotton should improve durability.
However, my sister reports that although they were fine (soft and lovely) while riding, they "felt like walking on a string bag" - which I have noticed myself with other handknit cotton socks and probably these are worse being larger gauge. So - either wear a thin cotton inner sock, or stick with conventional DK sock wool.

Disclaimer
(well...almost)

In transposing any pattern it is always a risk that errors will be introduced, in spite of dedicated proof reading.
If you have any problems with this pattern, please and I will try and assist.


LynsSocks2.jpg

Here's a picture of the socks "in use". Left to right - my sister at the rear on the grey, Susanna, Liz, and leading on the palamino, Tom, the guide.

LynTrekking2.jpg

Llanthony Riding and Trekking is based at Court Farm, next to Llanthony Priory; here's the full picture (from which the detail above is taken) showing the fabulous scenery and environment in Wales. Lyn strongly recommends the bed and breakfast accommodation that she enjoyed at Pen-y-dre Farm

LynTrekking3.jpg

August 2008

Seaside Caps

CapPlain1.jpg CapPlain2.jpg

"Capped to catch the eye" in 1952. This cap can be "worn with a purpose on windy days for cliff-top walks or out at sea, or just for extra prettiness at any time". "Leave it plain or dot with beads" - and - "for teenagers only - roll up the brim in jaunty sailor style".
Luvvly.

Instructions.

Instructions are for 2 versions - one plain and one with striped brim.
Both crowns are worked the same.

Crown
Begin at centre crown. With number 11 hook, make 4 chain, join in a ring with slip stitch. Work 6 dc through centre of ring.
In all following rounds, work through the back loop only of each dc to get a ridged effect, and mark the start of each round with coloured thread to check increasings.
[Editor's note: You just weave a piece of coloured thread between the last and first sts of each round such that you can just pull it out when you have finished.]

1st Round: * 2 dc in 1 dc; repeat from * to end.
2nd Round: * 1 dc in 1 dc, 2 dc in 1 dc; repeat from * to end. [18 dc]
3rd Round: * (1 dc in 1 dc) twice, 2 dc in 1 dc; repeat from * to end. [24 dc]
4th Round: As 3rd round. [32 dc]

5th Round: * (1 dc in 1 dc) three times, 2 dc in 1 dc; repeat from * to end. [40 dc]
6th Round: As 5th round. [50 dc]

7th Round: * (1 dc in 1 dc) four times, 2 dc in 1 dc; repeat from * to end. [60 dc]
8th Round: * (1 dc in 1 dc) five times, 2 dc in 1 dc; repeat from * to end. [70 dc]
9th Round: * (1 dc in 1 dc) six times, 2 dc in 1 dc; repeat from * to end. [80 dc]
10th Round: * (1 dc in 1 dc) seven times, 2 dc in 1 dc; repeat from * to end. [90 dc]
11th Round: * (1 dc in 1 dc) eight times, 2 dc in 1 dc; repeat from * to end. [100 dc]

12th Round: * (1 dc in 1 dc) fourteen times, 2 dc in 1 dc; repeat from * to last 10 dc; (1 dc in 1 dc) ten times. [106 dc]
13th Round: * (1 dc in 1 dc) fourteen times, 2 dc in 1 dc; repeat from * to last dc; 1 dc in 1 dc. [113 dc]
14th Round: * (1 dc in 1 dc) fifteen times, 2 dc in 1 dc; repeat from * to last dc; 1 dc in 1 dc. [120 dc]
15th Round: * (1 dc in 1 dc) nineteen times, 2 dc in 1 dc; repeat from * to end. [126 dc]
16th Round: * (1 dc in 1 dc) twenty times, 2 dc in 1 dc; repeat from * to end. [132 dc]
17th Round: * (1 dc in 1 dc) twenty times, 2 dc in 1 dc; repeat from * to last 6 dc; (1 dc in 1 dc) six times. [138 dc]
18th Round: * 1 dc in 1 dc; repeat from * to end.

19th-34th Round: As 18th round.

This completes the crown.

Striped Brim

With number 11 hook, and white yarn, make 23 chain, turn.

Miss 1 ch 1 dc in each of 22 ch.
Next Row: * 1 dc in 1 dc; repeat from * to end.

††

Join in contrast.
Next Row: Miss 1 dc, * 1 dc in 1 dc; repeat from * to last dc, 2 dc in last dc.
Next Row: * 1 dc in 1 dc; repeat from * to end.Join in white.
Next Row: Miss 1 dc, * 1 dc in 1 dc; repeat from * to last dc, 2 dc in last dc.
Next Row: * 1 dc in 1 dc; repeat from * to end.
††

Continue repeating from †† to †† until strip fits all round the lower edge of the crown. Do not stretch this strip but allow it to fit comfortably. End with 2 rows of contrast colour. Fasten off.

Finishing:
Fasten off the crown section.
Join short ends of striped brim. Pin in position round edge of crown, right side of brim to right side of crown. Oversew neatly with matching cotton; fold brim in half, and slip stitch to edge of crown on wrong side.
Sew in ends.

Plain Brim

This is worked with the yarn doubled.
Join a second strand of yarn in with the crown section, and using a number 10 hook, work 9 rounds of dc, but always working through both front and back loops of each dc in the row below.
Finish off with a row of slip stitches, but take care not to do this too tightly or the brim will be too small.

Sew in ends and optionally embroider 5 rows of beads around the crown, as shown in the photograph.
[Editor's note: I omitted the beads. You can use any free format style here that you like - for example a collection of small buttons.]

Materials

Plain: 2 x 50g ball Phildar Phil Crochet, in white, (100% cotton, 201yards).
Optional assortment of coloured glass beads.

Striped: 1 x 50g ball
in main shade, (07 Veronese), with 1 x 50g ball of contrast (white).

3 balls (2 in white) made both hat versions.

Nos. 11 (3mm) and 10 (3¼mm) crochet hooks.

Crochet abbreviations:

ch = chain
dc = double crochet

Remember these are English crochet instructions where dc is equivalent to US single crochet, and so on - see "Terminology" in the side bar.

Tension

7 dc to an inch. Check the tension and your head measurement carefully; the original was made in angora which is more stretchy than pure cotton.
Note: these are UK crochet instructions - to work a double crochet: insert hook in next stitch, draw loop through, wool over hook, and draw through both loops.

Size matters

To fit "an average head". However, the hat size can vary quite a lot according to your tension.

A word on the wool.

Original specified 2 x ½oz balls of Patons Fuzzy Wuzzy Angora.

Disclaimer
(well...almost)

In transposing any pattern it is always a risk that errors will be introduced, in spite of dedicated proof reading.
If you have any problems with this pattern, please and I will try and assist.


Striped-brim version, and modelled original:


I was so taken with the another seaside idea on the same page as the hat that I felt compelled to share it with you here as well.

Scarf on Holiday...


...to make a girl look prettier than ever


.....TIED AT THE BACK it makes a snug bolero....

As a change from the everlasting headsquare, buy a yard of rayon or silk - ours was a yard of spotted rayon at 5/6d,
[Editor's note: For you whipper snappers out there, that's 27½p or about 60 cents.]
but silk is best if you can afford it, as it's less slippery - cut it in half lengthways, join the short ends neatly, slip hem the long raw edges, and you have a manoueverable long stole, which can be worn in all sorts of ways and is so much prettier and smarter than a triangle tied under your chin.
[Editor's note: I'm with them on that one.]


AS A CARDIGAN - round your shoulders, ends tucked up and over your belt in two comfortable pockets.

Carry it around on holiday and it will be a godsend for those chilly moments, and less bother to carry than a cardigan. Tie it round tyour waist as a sash when you don't want to carry it.

July 2008

Engaging Bouclé Top

EngagingTop1.jpg

Cool summer top from 1935, knitted in bouclé cotton/linen mix, using an eyelet lace pattern for the body, and ribbing for the yoke. I have adapted the yoke slightly, and given a better fit to the sleeves.
"This engaging affair uses a fairly thick wool (quickly knitted!)".
Here I demonstrate its versatility - it could be worn as a smart top with a skirt - or in the garden with denim shorts!

Instructions.

The basic pattern for most of the top is two basic rows:

1st Round: * k2tog; k2; yarn forward; k1; yarn forward; k2; k2tog through back loops; repeat from *
2nd Round: Knit if right side facing; purl if wrong side facing.

[Editor's note: If you are knitting in the round, the alternate rounds are knitted; if you are knitting back and front on 2 needles, for example, when you divide at the armholes, then the second row is purl.]

Main body:

The back and front are knitted together in the round.

Using a No 11 (3mm) circular needle, cast on 198 stitches.
Place stitch markers to mark the beginning of the round and at the half way mark (99 sts).
Work 4 inches in k2, p2 rib.

Change to a No 10 (3¼mmm) needle, and work in pattern as given above, for an inch. Change to No 9 (3¾mm) needles and continue in pattern for another inch, then to No 8 (4mm) needles and carry on with these until work measures 13 inches from commencement, ending with a plain knit row (2nd round of pattern), but cast off the last 8 sts of the round
[Editor's note: This is about 33 eyelet rows after the rib.]

Shape armhole:

Divide front and back and work each side separately as follows:

Cast off the first 8 sts of the round, then, with one stitch on the right hand needle, commence the pattern row, and work 9 pattern repeats; k1.

Cast off the next 16 sts; then, with one stitch on the right hand needle, commence the pattern row, and work 9 pattern repeats; k1.

You should have 83 sts to work for the back and front.

Back:

Turn the work and purl back across 83sts.

Continue working back and forth across these 83 sts in pattern as set, starting and ending each row, with one plain knitted stitch. Work 2 inches (about 6 more eyelet rows), ending with a purl row.
[Editor's note: This is about 39 eyelet rows after the rib.]

Here shape the neck.

Next Row: k1, * k2tog, k2, wool forward, k1, wool forward, k2, k2tog * ; put the next 63 stitches on to a spare needle; join in a second ball of wool, repeat from * to * once, k1. Continue on the latter 10 stitches till work measures 19½ inches from commencement. Cast off 9 stitches from armhole end.
[Editor's note: Or you can finish on row 1 of the pattern and leave the sts on a holder so you can graft the shoulders together, with a plain grafting stitch.]

Finish off the opposite shoulder to match.

Front:

Rejoin the yarn to other set of 83sts, with wrong side facing, and purl back across 83sts.

Complete the front exactly as you did the back.

Yoke:

Join the shoulders either by stitching or grafting.

Using the No 10 needles with points at both ends, or a circular needle, and with the right side of the work facing, knit up 236 stitches, starting at a shoulder seam as follows:
28sts down the side of the neck, from the shoulder seam, 63 across the front (from the spare needle), 55 up the right side of the neck, 63 across the back of the neck (from the spare needle), 27 up the side of the neck.
If you are using double pointed needles, divide the stitches as follows: 79 on the first and third, and 78 on the second, or if you are using a circular needle, place a stitch marker at the beginning of the round.

1st Round: k2, (p2, k2) six times; p2tog; p1, (k2, p2) fourteen times; k2, p2tog, p1, (k2, p2) thirteen times, k2, p2tog, p1, (k2, p2); fourteen times, k2, p2tog, p1, (k2, p2) seven times.
2nd Round: k2, (p2, k2) six times, p2tog, (k2, p2) fourteen times, k2, p2tog, (k2, p2) thirteen times, k2, p2tog, (k2, p2) fourteen times, k2, p2tog, (k2, p2) seven times.
3rd Round: k2, (p2, k2) six times, k2tog, k1, p2, (k2, p2) thirteen times; k1, k2tog, k2, (p2, k2) thirteen times; k2tog, k1, (p2, k2) thirteen times; p2, k1, k2tog, (k2, p2) seven times.
4th Round: (k2, p2) six times; k2, k2tog, p2, (k2, p2) thirteen times; k2tog, k2; (p2, k2) twelve times; p2, k2, k2tog, (p2, k2) thirteen times; p2, k2tog; (k2, p2) seven times.
5th Round: (k2, p2) six times; k1, k2tog, p2; (k2, p2) thirteen times; k2tog, k1, p2; (k2, p2) 12 times, k1, k2tog, p2; (k2, p2) thirteen times; k2tog, k1, p2; (k2, p2) six times.
Continue decreasing in this manner until the yoke measures 3 inches from the commencement.

Cast off in pattern.

[Editor's note: It took me a while to work out the "continue decreasing in this manner" so at the end of the instructions I am including my explanation of the yoke decreasing. Rounds 2 through 5 are the four decreasing rows that are repeated.]

Sleeves:

With right side facing and using No 8 needles, pick up and knit 67 sts around the head of the sleeve, (leave the cast off armhole sts).

You will knit backwards and forwards in pattern across these sts, shaping the sleeve by knitting short rows.
Purl 1 row.

1st Row: K2, * k2tog; k2; yarn forward; k1; yarn forward; k2; k2tog through back loops; repeat from * to the last 2 sts, k2.
2nd Row: P2tog, purl to the last 2 sts, p2tog. [65sts].
3rd Row: K1 * k2tog; k2; yarn forward; k1; yarn forward; k2; k2tog through back loops; repeat from * 4 times more; wrap next stitch, by putting yarn forward, slipping the next st on the the right needle, putting the yarn back to the back of the work, and then slipping the slipped st back on to the left hand needle again; turn. [You turn with 19 sts left on the needle].
4th Row: P27, wrap next stitch; turn. [You turn with 19 sts left on the needle].
5th Row: K1, * k2tog; k2; yarn forward; k1; yarn forward; k2; k2tog through back loops; repeat from * once; wrap next stitch; turn, [You turn with 28 sts left on the needle].
6th Row: P9, wrap next stitch; turn.
7th Row: K1, * k2tog; k2; yarn forward; k1; yarn forward; k2; k2tog through back loops; repeat from * across all sts to last st, k1.
8th Row: Purl.
9th Row: K1, * k2tog; k2; yarn forward; k1; yarn forward; k2; k2tog through back loops; repeat from * 5 times more; wrap next stitch; turn. [You turn with 10 sts left on the needle].
10th Row: P45, wrap next stitch; turn. [You turn with 10 sts left on the needle].
11th Row: K1, * k2tog; k2; yarn forward; k1; yarn forward; k2; k2tog through back loops; repeat from * across all sts to last st, k1.
12th Row: Purl.
13th Row: K1, * k2tog; k2; yarn forward; k1; yarn forward; k2; k2tog through back loops; repeat from * to the last st, k1.
14th Row: Purl.

Knit the next 3 rows.
Cast off (from wrong side) knitwise.

Making Up

Sew up sleeve seams under the arms, and sew in all ends.

Sew four buttons up each of the two front corners of yoke.

Materials

5 x 50g balls Stylecraft Sirocco 80% cotton, 20% linen; 98yds/90m per ball.

Numbers 8, 9, 10, and 11 (4, 3¾, 3¼ and 3mm) circular needles.

8 decorative buttons.

Tension

Yarn knits to 20st and 28 rows to four inches on No 8 needles.

One pattern = 1½ in on No 8 needles.

Size matters

Original sized for bust 34 inches; length 18 inches.
This version in a slightly thicker yarn fits 36-38 inch bust as shown in photo, and instructions are for a 20 inch length.

A word on the wool.

I wanted to knit this in a bouclé or slub cotton and just could not find what I wanted - there is the fabulous Debbie Bliss Astrakhan, but that is too wintry and thick. Then, in a local haberdashers, I found this Stylecraft yarn which is absolutely what I was looking for and has the benefit of being natural fibre and very good value!

Original: Paton's Super Brindle, which comes (came) in white flecked with colours. This was probably finer than Sirocco - more a straight DK at 22 sts per 4 inches I am guessing.

Disclaimer
(well...almost)

In transposing any pattern it is always a risk that errors will be introduced, in spite of dedicated proof reading.
If you have any problems with this pattern, please and I will try and assist.

Additional Instructions for Yoke Decreasing:

These follow the foundation decreasing "Round 1". Instead of writing out every stitch, I have indicated the number of sts between the decreases; "rib" means k2 p2 rib, following the ribs as set out in the row below.

2nd Round: rib 26, p2tog, rib 58, p2tog, rib 54, p2tog, rib 58, p2tog, rib 28.
3rd Round: rib 26, k2tog, rib 56, k2tog, rib 54, k2tog, rib 56, k2tog, rib 28.
4th Round: rib 26, k2tog, rib 54, k2tog, rib 54, k2tog, rib 54, k2tog, rib 28.
5th Round: rib 25, k2tog, rib 54, k2tog, rib 52, k2tog, rib 54, k2tog, rib 27.

6th Round: rib 24, k2tog, rib 54, k2tog, rib 50, k2tog, rib 54, k2tog, rib 26.
7th Round: rib 24, p2tog, rib 52, p2tog, rib 50, p2tog, rib 52, p2tog, rib 26.
8th Round: rib 24, p2tog, rib 50, p2tog, rib 50, p2tog, rib 50, p2tog, rib 26.
9th Round: rib 23, p2tog, rib 50, p2tog, rib 48, p2tog, rib 50, p2tog, rib 25.

10th Round: rib 22, p2tog, rib 50, p2tog, rib 46, p2tog, rib 50, p2tog, rib 24.
11th Round: rib 22, k2tog, rib 48, k2tog, rib 46, k2tog, rib 48, k2tog, rib 24.
12th Round: rib 22, k2tog, rib 46, k2tog, rib 46, k2tog, rib 46, k2tog, rib 24.
13th Round: rib 21, k2tog, rib 46, k2tog, rib 44, k2tog, rib 46, k2tog, rib 23.

14th Round: rib 20, k2tog, rib 46, k2tog, rib 42, k2tog, rib 46, k2tog, rib 22.
15th Round: rib 20, p2tog, rib 44, p2tog, rib 42, p2tog, rib 44, p2tog, rib 22.
16th Round: rib 20, p2tog, rib 42, p2tog, rib 42, p2tog, rib 42, p2tog, rib 22.
17th Round: rib 19, p2tog, rib 42, p2tog, rib 40, p2tog, rib 42, p2tog, rib 21.

18th Round: rib 18, p2tog, rib 42, p2tog, rib 38, p2tog, rib 42, p2tog, rib 20.
19th Round: rib 18, k2tog, rib 40, k2tog, rib 38, k2tog, rib 40, k2tog, rib 20.
20th Round: rib 18, k2tog, rib 38, k2tog, rib 38, k2tog, rib 38, k2tog, rib 20.
21st Round: rib 17, k2tog, rib 38, k2tog, rib 36, k2tog, rib 38, k2tog, rib 19.

22nd Round: rib 16, k2tog, rib 38, k2tog, rib 34, k2tog, rib 38, k2tog, rib 18.
23rd Round: rib 16, p2tog, rib 36, p2tog, rib 34, p2tog, rib 36, p2tog, rib 18.
24th Round: rib 16, p2tog, rib 34, p2tog, rib 34, p2tog, rib 34, p2tog, rib 18.
25th Round: [Cast off in pattern as you go]; rib 15, p2tog, rib 34, p2tog, rib 32, p2tog, rib 34, p2tog, rib 17.

EngagingTop2.jpg EngagingTop3.jpg

June 2008

Trim crochet gloves

TrimGloves1.jpg

Chic summer gloves from 1955, worked in cotton crochet, though not lacy.
Elegant but not frilly - "these trim gloves are crisp and fresh". Definitely to be worn with pill-box hat and veil rather than Edwardian sunshade, (or in practice - neither - but you get the idea).
Original worked in white with black trim. Very Audrey Hepburn.

Instructions (both hands alike).

Beginning at the side edge with main colour, make 41 chain, turn.

Start with little finger
1st Row: Miss 1 ch., * 1 half treble in each ch.; repeat from * to end, turn with 2 ch.
2nd Row: * 1 h.tr. in each h.tr.; repeat from * to end; break cotton and rejoin at other end.

Begin third finger
3rd Row: 1 h.tr. in each of next 25 h.trs., 19 ch. for 3rd finger, 1 ch. to turn.

**
4th Row: Miss 1 ch., 1 h.tr. in each ch; 1 h.tr. in each of next 25 h.tr. to end, turn with 2 ch.
5th Row: * 1 h.tr. in next h.tr.; repeat from * to end, turn with 2 ch.
6th Row: Repeat last row once more.**

Begin middle finger
7th Row: 1 h.tr. in each of next 25 h.trs., 21 ch. for middle finger, 1 ch. to turn.
Repeat from ** to ** once.

Begin first finger
11th Row: 1 h.tr. in each of next 25 h.trs., 19 ch. for 1st finger, 1 ch. to turn.
Repeat from ** to ** once.

Begin thumb
15th Row: 1 h.tr. in each of next 19 h.trs., 14 ch. for thumb, 1 ch. to turn.
16th (short) Row: Miss 1 ch., 1 h.tr. in next 14 ch., 1 h.tr. in each of next 7 h.trs., 1slip st. in next stitch, turn;
17th Row: 1 h.tr. in each of next 21 h.trs., turn with 2 ch.
18th (short) Row: 1 h.tr. in each of next 24 h.trs., 1slip st. in next stitch, turn.
19th Row: * 1 h.tr. in each h.tr.; repeat from * to end. Fasten off.

[Editor's note: You end here at the top of the thumb. One half of the glove is complete - this half covers the back of the hand.]

Now keeping same side of glove piece facing you, rejoin to beginning of row, and work 1 long row dc. up side of thumb and all round fingers, ending at top of little finger.

TrimGloves5.jpg

Now work down side of little finger to wrist thus:
[Editor's note: You are working the other half of the glove now - the palm side.]

Little finger
1st Row: * 1 h.tr. in next h.tr.; repeat from * to end, turn with 2 ch. Repeat last row 4 times more, turning with 1ch on last row.

Third finger
††
6th Row: 1 dc in each of first 12 h.trs., 1 h.tr. in each of next 13 h.trs., 19 ch. for next finger; 1 ch. to turn.
7th Row: Miss 1 ch., 1 h.tr. in each of the 19 ch; 1 h.tr. in 13 h.tr. [that is 32 h.trs. in all], 1 dc in each 12 dc; turn with 2 ch.
8th Row: 1 h.trs.in each 12 dc, * 1 h.tr. in next h.tr.; repeat from * to end; turn with 2 ch.
9th Row: * 1 h.tr. in next h.tr.; repeat from * to end, turn with 1 ch. ††

Middle finger
10th Row: 1 dc in each of first 12 h.trs., 1 h.tr. in each of next 13 h.trs., 21 ch. for middle finger, 1 ch. to turn.
11th Row: Miss 1 ch., 1 h.tr. in each of the 21 ch; 1 h.tr. in 13 h.tr. [that is 34 h.trs. in all], 1 dc in each of 12 dc turn with 2 ch.
12th Row: 1 h.tr.in each of 12 dc, * 1 h.tr. in next h.tr.; repeat from * to end; turn with 2 ch.
13th Row: * 1 h.tr. in next h.tr.; repeat from * to end, turn with 1 ch.

First finger
Repeat from †† to †† once - as for third finger.

Thumb
18th Row: 1 dc in each of first 12 h.trs., 1 h.tr. in each of next 7 h.trs., 14 ch. for thumb, 1 ch. to turn.
19th (short) Row: Miss 1 ch., 1 h.tr. in next 14 ch., 1 h.tr. in each of next 7 h.trs., 1slip st. in next stitch, turn.
20th Row: 1 h.tr. in each of next 21 h.trs., turn with 2 ch.
21st (full) Row: 1 h.tr. in each of next 24 h.trs., * 1dc into next dc, repeat from * to end; turn with 2 ch.
22nd Row: 1 h.tr. into each stitch to top of thumb. Do not fasten off.

Continue with row, working a row of dc. down inner side of thumb and round all fingers, ending at top of little finger, where you finished your row of dc when working the other side; fasten off.

Make another glove in the same way.

To Make Up

Press parts very carefully on wrong side under a damp cloth.
Join sides and fingers by oversewing.
[Editor's note: The original gloves were made in white, so the instructions here say to use with white sewing cotton. So either use a toning sewing cotton or do as I did and use the main yarn to sew up]

Remember to turn second glove inside out for other hand.
[Editor's note: The original gloves are made identically, but have a specific side for the palms, so you need to fold and sew them up opposite ways in order to create right and left hands.
If this helps: after you have sewn up the first glove and then turned it right side out, sew up the second glove to look exactly the same orientation as the first - then when you turn it right side out, it will be the reverse of the first glove.].

Cuffs

With main colour yarn, make 45 ch., turn.
[Editor's note: This strip is eased to fit bottom of the glove, but it does have to fit around your wrist, plus allowing for a little overlap - I found that although the glove fitted me, 45 chain were not sufficient to create the strap - so I used 51 chain.]

1st Row: Miss 1 ch., * 1 dc in each ch.; repeat from * to last ch., 2 dc in last ch.; turn with 1 ch.
2nd Row: 2 dc in first dc; * 1 dc in next dc, repeat from * to end; turn with 1 ch.
3rd Row: * 1 dc in next dc, repeat from * to last dc, 2 d.c. in last dc; turn with 1 ch.
4th Row: As 2nd row.
5th Row: * 1 dc in next dc, repeat from * to last dc, 1 slip st in last dc; turn with 1 ch.
6th Row: Miss 1 dc, * 1 dc in next dc, repeat from * to end; turn with 1 ch.
7th Row: * 1 dc in next dc, repeat from * to last dc, 1 slip st in last dc; turn with 1 ch.
8th Row: As 6th row. Fasten off.

With contrast yarn, work 1 row of dc all round cuff.
[Editor's note: As it's left to your own judgement, do not work too many dc across the short straight edge, or it will splay out and the curved edge will not cover it properly for the overlap.]

Sew cuff neatly round glove with contrast edging overlapping edge of main work and with opening in centre of back; rounded edge comes below 3rd finger and slightly overlaps straight short edge of cuff.
Sew press-studs to cuff to fasten invisibly.
[Editor's note: I used a non-sew fastener (9 or 10mm) - the kind you apply with pliers or a supplied tool. You need to apply this before you put on the decorative contrast circle.]

TrimGloves3.jpg

Work a small circle of dc in contrast and sew in position on top of cuff as shown in photograph.
[Editor's note: I used Coats No 20 crochet cotton worked double for my contrast navy - so for the circles I used the cotton singly with a much smaller hook. I made a ring and worked 7 dc into it; I then worked a second round of 2 dc into every dc. This wasn't quite big enough, so I work a round of slip sts to finish.]

TrimGloves4.jpg

Materials

1 x 50g ball Phildar Phil Crochet, shade 07 Veronese, (100% cotton, 201yards), with a small amount of navy blue for contrast.
One number 12 (2½mm) crochet hook.
Two press fasteners.

Crochet abbreviations:

ch = chain
h.tr = half treble
dc = double crochet

Remember these are English crochet instructions where dc is equivalent to US single crochet, and so on - see "Terminology" in the side bar.

Tension

6 half trebles to an inch.
Note:
these are UK crochet instructions - to work a half treble: wool over hook, insert hook in next stitch, draw loop through, wool over hook, and draw through all three loops.

Size matters

To fit "an average hand".

A word on the wool.

Original specified 2 x 1oz balls of Strutt's Milford Knitting Cotton No. 8 in white, with scraps of black 4-ply wool for edging.

The single 50g ball of Phil Crochet was only just enough at 201yds.

For winter gloves, they could be easily worked in wool instead of cotton for those who don't like to knit.

Disclaimer
(well...almost)

In transposing any pattern it is always a risk that errors will be introduced, in spite of dedicated proof reading.
If you have any problems with this pattern, please and I will try and assist.


Your finished gloves.
Editor's note: "So what's all this messing about with a bunch of flowers?" - I was trying to emulate the original photo shoot, and found it surprisingly hard. I had to get George to take the photo and he did not seem focussed enough on (a) yes I did want the flowers in the photo not just a load of stems, (b) but it is supposed to be a centred around the gloves and not a bunch of flowers, and (c) o I wish I had slim elegant fingers, and maybe 4 arms so I could take the photo myself...

TrimGloves2.jpg


May 2008

Pretty Summer Woolley

PrettyWoolley1.jpg PrettyWoolley2.jpg PrettyWoolley3.jpg

Summer jacket from 1935 has an unusual design that is quite fun to work. It was given only in one nominal size, but has some flexibility for your own alterations. I simply love the way this has turned out; the bamboo yarn is so soft and comfortable. On finishing, I immediately wore it all the next day.

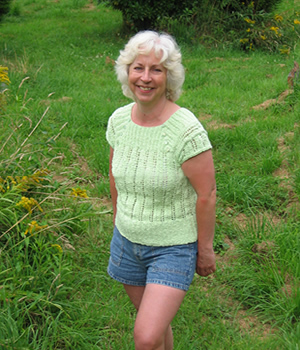
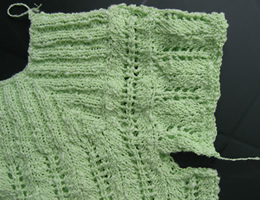
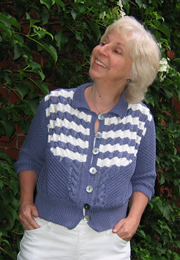
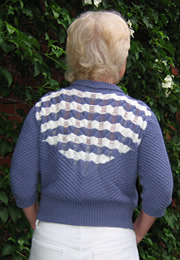
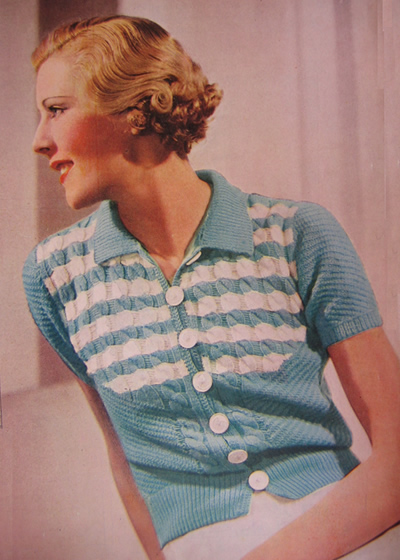
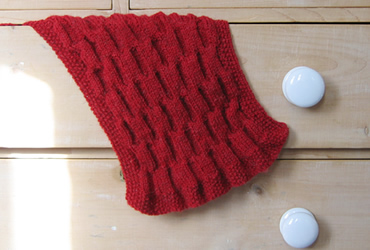
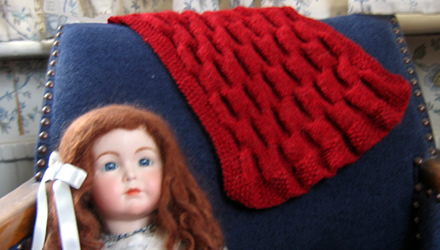
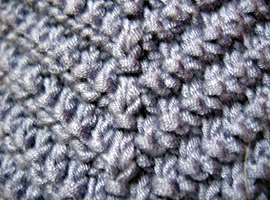
Diagonal Rib Pattern

Sleeves and lower part of jumper are knitted in a k2, p2 rib, with the rib carried one stitch sideways on each row.

The following 4 rows form the pattern, worked over an odd number of stitches.

Row 1: (k2, p2) repeated to centre stitch; knit centre stitch; (p2, k2) repeated to end of row.
Row 2: p1, (k2, p2) repeated to centre 5 sts; k2, p1, purl centre stitch, p1, k2; (p2, k2) repeated to last st, p1.
Row 3: (p2, k2) repeated to centre stitch; purl centre stitch; (k2, p2) repeated to end of row.
Row 4: k1, (p2, k2) repeated to centre 7 sts; p2, k1, purl centre stitch, k1, p2; (k2, p2) repeated to last st, k1.

DiagonalRib.jpg

Cable Pattern

The yoke of the jumper is knitted in cable ribbing, where the stitch between the cables is subsequently dropped to form "ladders".
To work the 8-stitch cables twisting to the right, (cable "back" abbreviated to C4B), slip 4 sts on to a cable needle, and leave at back of work, k4, then k4 from cable needle.
To work the 8-stitch cables twisting to the left, (cable "front" abbreviated to C4F), slip 4 sts on to a cable needle, and leave at front of work, k4, then k4 from cable needle.

When the sts are dropped, pull them back to where you started the cables, above the diagonal rib, and secure the stitch by running a thread through and stitching on the inside.
[Editor's note: Be extra careful with the bamboo yarn; it is very slippery, the ladders run very easily, and the yarn splits, making it the devil to pick up a stitch dropped accidentally.]

Back

Using No. 12 needles and main colour (blue), cast on 104 stitches, and work 3 inches in k1, p1 rib, (approximately 25 rows), increasing one stitch at the end of the last row.
Change to No. 9 needles and purl one row. [105 sts]

Work the 4-row pattern 10 times, then the first two rows again, (42 rows).

[Editor's note: The origonal instructions were to work the 4-row pattern 14 times as it was intended for a thinner yarn. For my version, in the bamboo yarn, I worked 16 rows fewer up to the start of the cables, as well as 16 rows fewer 
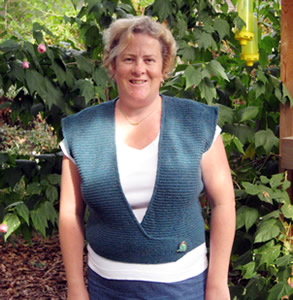
in the armhole section (see notes below) which brought the welt up to 
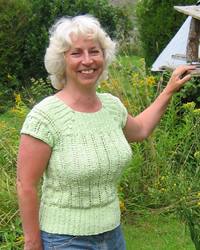
sit on my hips as shown in the photo.]

Row 43: (p2, k2) repeated to centre stitch; knit centre stitch; (k2, p2) repeated to end of row. (ie pattern row 3 with 5 sts knitted in the middle).
Row 44: k1, (p2, k2) repeated to centre 7 sts; p7 centre sts; (k2, p2) repeated to last st, k1. (ie pattern row 4 with 5 sts knitted in the middle).
Row 45: (k2, p2) repeated to centre 9 sts; k9 centre sts; (p2, k2) repeated to end of row.
Row 46: p1, k2, (p2, k2) repeated to centre 11 sts; p11 centre sts; (k2, p2) repeated to last 3 sts, k2, p1.
Row 47: p2, (k2, p2) repeated to centre 13 sts; k13 centre sts; (p2, k2) repeated to last 2 sts, k2.
Row 48: k1, (p2, k2) repeated to centre 15 sts; p15 centre sts; (k2, p2) repeated to last st, k1.
Row 49: (k2, p2) repeated to centre 17 sts; k17 centre sts; (p2, k2) repeated to end of row.
Row 50: p1, k2, (p2, k2) repeated to centre 19 sts; p19 centre sts; (k2, p2) repeated to last 3 sts, k2, p1.
Row 51: p2, (k2, p2) repeated to centre 21 sts; k21 centre sts; (p2, k2) repeated to last 2 sts, k2.
Row 52: k1, (p2, k2) repeated to centre 23 sts; p23 centre sts; (k2, p2) repeated to last st, k1.
Row 53: (k2, p2) repeated to centre 25 sts; k25 centre sts; (p2, k2) repeated to end of row.
Row 54: p1, k2, (p2, k2) repeated to centre 27 sts; p27 centre sts; (k2, p2) repeated to last 3 sts, k2, p1.

Now start the striped pattern:

Row 55: K38 sts in pattern as set in blue; join on white: k6, cable C4B, k1, cable C4F, k6; join on another ball of blue and finish row in pattern.
Row 56: Pattern 37 sts blue; purl 31 white; pattern k37 sts blue.
Row 57: Pattern 36 sts blue; knit 33 white; pattern 36 sts blue.

Continue as on last 2 rows. increasing number of white stitches for 5 more rows (i.e.. finally 31 blue; 43 white; 31 blue).

Row 63: Work in blue right across row: 30 sts in pattern; k5, (C4B, k1) twice, (C4F, k1) twice, k4; 30 sts in pattern.
Row 64: Pattern 29 sts; p47; pattern 29 sts.

Continue thus for 6 more rows in blue, still taking 2 more into stocking stitch in each row (23 pattern sts on each side).

Row 71: Pattern 22 sts blue; join on white: k4, (C4B, k1) 3 times, (C4F, k1) 3 times, k3; join on blue pattern 22 sts.
Row 72: Pattern 21 sts blue; purl 33 white; pattern 21 sts blue.

Continue thus for 6 more rows.

Row 79: Work in blue right across row: 14 sts in pattern; k3, (C4B, k1) 4 times, (C4F, k1) 4 times, k2; 14 sts in pattern.
Row 80: Pattern 13 sts; p79; pattern 13 sts.

Shape armhole:
Rows 81 & 82: Still taking one stitch more at each side of centre piece, cast off 3 sts at beginning of next 2 rows.
Rows 83: k2tog at beginning and end of row.
Row 84-86: Work 3 rows in pattern without decreasing.
**
Row 87: Change to white: k4, (C4B, k1) 5 times, (C4F, k1) 5 times, k3.
Continue in stocking stitch for 7 rows.

Repeat from ** with alternate colours 4 times, then repeat row 87 row in blue.
[Editor's note: The original pattern on thinner yarn repeated the pattern 6 times here. I worked a shorter arm hole here which worked out for my own measurements - see section on sizing. You can work the armhole to a suitable length according to your size and your yarn; however, if you do make alterations, remember to work the same length on the fronts, and prepare to do some compensation on the sleeve decreasing.]

Work 3 rows in stocking stitch.

Row 131: Cast off 2, drop 1 st, leave big loop (to cover dropped st), and cast off 1 more; knit to end.
Row 132: Cast off 2 purlwise, drop 1 st, leave big loop (to cover dropped st), and cast off 1 more; purl to end.
Row 133: Cast off 7, drop 1 st, cast off 1 more very loosely as before; knit to end.
Row 134: As 149th row but purl.
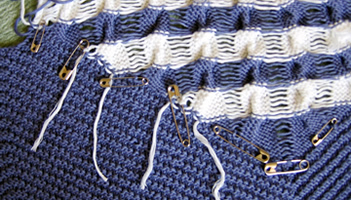
Now cast off remaining sts, dropping stitches between cables.
[Editor's note: You may want to catch the all the dropped sts with safety pins at this point in the construction, until you are ready to sew up and secure the sts in the right place.]

Ladders.jpg

Right Front

Using No. 12 needles and main colour (blue), cast on 66 stitches, and work 3 inches in k1, p1 rib, (approximately 30 rows), increasing one stitch at the end of the last row. [67 sts].
Change to No. 9 needles and purl one row.

Row 1: k15; (p2, k2) repeated to end of row.
Row 2: p1; (k2, p2) repeated to last 14 sts; k1, p13..
Row 3: k. 13, p2; (k2, p2) repeated to end of row.
Row 4: k1; (p2, k2) repeated to last 14 sts; p14.
Row 5: k4; cable C4F; k3; (p2, k2) repeated to end of row.
Row 6: p1; (k2, p2) repeated to last 14 sts; k1, p13.
Row 7: k. 13, p2; (k2, p2) repeated to end of row.
Row 8: k1; (p2, k2) repeated to last 14 sts; p14.

Repeat these 8 rows 4 times.
[Editor's note: The original pattern on thinner yarn repeated the pattern 6 times here. I worked a shorter length here to match the back]

Row 41: k15; (p2, k2) repeated to end of row.
Row 42: As 2nd but purl last 16 stitches.
Row 43: k17; p2, (k2, p2) repeated to end of row.
Row 44: As 4th but purl last 18 stitches.
Row 45: k4; cable C4F; k7; (p2, k2) repeated to end of row.
Row 46: As 2nd but purl last 20 stitches.
Row 47: k. 21; p2; (k2, p2) repeated to end of row.
Row 48: As 4th but purl last 22 stitches.
Row 49: k.23; (p2, k2) repeated to end of row.
Row 50: As 2nd but purl last 24 stitches.
Row 51: k25; p2; (k2, p2) repeated to end of row.
Row 52: As 4th but purl last 26 stitches.
Row 53: Join in white: k4; cable C4F; k1; cable C4F; k6. Join in blue: (p2, k2) repeated to end of row.
Row 54: As 2nd. ending k. 2. Purl last 28 stitches in white.
Continue for 6 rows in pattern, working 1 more stitch in white on each row.

Row 61: All blue. K4, (C4F, k1) twice, C4F, k5; (p2, k2) repeated to end of row.
Continue for 7 more rows as before, working 1 more stitch into stocking-stitch border in front on each row.

Row 69: Join in white: k4; (C4F, k1) 4 times, k3. Join in blue: (p2, k2) repeated to end of row.
Continue for 7 more rows as before.

Row 77: All blue. K4, (C4F, k1) 5 times, k2; (p2, k2) repeated to end of row.
Continue as before for 4 more rows.

Shape armhole:
Row 82: Cast off 5, k1, p2. k2, purl to end.
Row 83: Knit to within 5 from end, p2, k1, k2tog.
Row 84: K2tog, k1, purl to end.

Row 85: Join on white: k4; (C4F, k1) 5 times; k9, k2tog.
Row 86: P2 tog, purl to end. [58 sts]
Row 87: Knit to last 2 stitches, k2tog. [57 sts]
Row 88: P2 tog, purl to end. [56 sts]
Repeat the last 2 rows twice more.
Row 93: All blue. K4; (C4F, k1) 5 times; k3. [52 sts]
Work 7 rows stocking stitch.

Work 2 more cable stripes alternately in white and blue, working only 3 rows in stocking stitch after the cable row on the second blue stripe.
[Editor's note: The original pattern on thinner yarn repeated the stripes 4 times here, working 3 rows on the 4th stripe. I worked a shorter armhole here to compensate for the heavier yarn weight as on the back - see sections on wool and sizing.]

Row 113: Cast off 2, break wool and pull through last stitch; drop 1. Join on again.
[Editor's note: You have effectively cast off 3 and dropped one stitch - so you are 4 sts fewer on the needle].
Continue pattern. decreasing 1 stitch every row at neck-edge, not forgetting to drop stitches between cable, until 33 stitches are left.
[Editor's note: You don't count the dropped sts as decreases]
Work 3 straight rows (i.e. you have done 4 rows of the 2nd blue cable after armhole decreasings).
[Editor's note: With the original pattern on thinner yarn you would have worked the 4th blue cable after the armhole decreasings]
Cast off shoulder to match back:
Row 129: Work 1 row straight to the armhole edge.
Row 130: Cast off 2 purlwise, drop 1 st, leave big loop (to cover dropped st), and cast off 1 more; purl to end.
Row 131: Knit
Row 132: Cast off 7 purlwise, drop 1 st, cast off 1 more very loosely as before; purl to end.
Row 133: Cast off remaining sts, dropping stitches between cables.

Left Front

Cast on and work in ribbing as for right front; change to No. 9 needles and purl one row on 67 sts.

Row 1: k2; (p2, k2) repeated to last 13 sts, k13.
Row 2: p13, k1; (p2, k2) repeat to last st, p1.
Row 3: p2; (k2, p2) repeated to last 13 sts, k13.
Row 4: p13, p1; (k2, p2) repeated to last st, k1.
Row 5: k2; (p2, k2) repeated to last 13 sts, k1, cable C4B, k4.
Row 6: p13, k1; (p2, k2) repeat to last st, p1.
Row 7: p2; (k2, p2) repeated to last 13 sts, k13.
Row 8: p13, p1; (k2, p2) repeated to last st, k1.

Continue with these rows in pattern as set, reversing the shapings and making the two fronts correspond.

Sleeves (work 2 alike).

Cast on 62 stitches on No.12 needles.
Rib 10 rows, k1, p1, increasing once at end of last row.
Purl 1row on No.9 needles.[63 sts]
Work in pattern for 4 rows.

Next row: Increase once at each end of needle.
Work 7 rows pattern.
Keep continuity of pattern and repeat last 8 rows 7 times.
Next row: Increase once at each end of needle.
Work 2 more rows. [81 sts]

Cast off 3 sts at the beginning of the next 2 rows.
Decrease at each end of every row for 5 rows, then on every alternate row until 31 sts remain.
Decrease at each end of every row until 15 sts remain; cast off remaining 15 sts.

[Editor's note: The instructions above are as I worked the sleeve but are completely different fom the original. Below are the original instructions in case you are working in the fine fingering weight wool.]

Here are the original instructions for the 3 ply weight yarn:
Cast on 80 stitches on No.12 needles.
Rib 10 rows, k1, p1, increasing once at end of last row.
Purl 1 row on No. 9 needles.

Work 7 rows in pattern.
Next row: Increase once at each end of needle.
Keep continuity of pattern and repeat last 8 rows 4 times.
Work 4 more rows.
Decrease once at each end of every row until 21 stitches remain.
Cast off.

[My sleeve length is to the elbow. The original sleeve was made much shorter and a different shape.]

Collar

On No. 12 needles, pick up 104 stitches round neck: 33 sts from each front and side neck, and 38 sts across the back.
Work in k1, p1, ribbing for 10 rows, change to No. 9 needles and rib 10 more rows, (approximaterly 2½ inches).
Cast off loosely in rib, using a larger sized needle if necessary, (for example No. 8).
[Editor's note: Original instructions picked up 170 sts for the collar (50 each side, 70 across back).]

Making Up

Drop stitches between cables. Catch these stitches (and sew in) on the wrong side to prevent running into the diagonally ribbed pattern.
Press with damp cloth and hot iron.
Match cables at shoulder seams and darn ends across holes formed.
Join side seams and sew in sleeves.
Work 4 rows of double crochet down left front (work rather tightly and then stretch under iron, to prevent sagging in wear).
[Editor's note: I picked up two thirds of the row ends across the welt (approximately 20dc) and every alternate row end up the rest of the front (approximately 57dc) . I worked the crochet very loosely up the main body of the band, and more tightly when working the part across the side of the welt.
You have some flexibility here to increase the bust size slightly by working additional rows.]

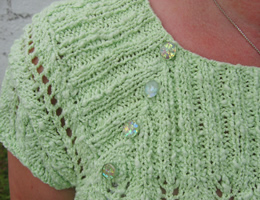
Sew on 7 white buttons down front.
Work 3 rows of double crochet down right front, then a 4th row with loops of 8 chain opposite buttons.
[Editor's note: My loops were 8 chain positioned on the 11th dc with 10 dc between them. To work the loops: (1dc into next dc; chain 8; 1 slip st into same dc; 10 dc into next 10 dc) repeat. However it's a good idea to sew on the buttons evenly first, and work the loops to match the positions.]

Materials

Original pattern calls for 6oz of main and 1oz white in "3 ply".
Example shown is knitted in 12 x 50g balls Rowan Bamboo Soft in main shade (colour: Cambria 109) and 2 x 50g balls in white.

One pair each of numbers 12 (2¾mm) and 9 (3¾mm) needles. One cable needle. One No 9 (3½mm) crochet hook.

Seven buttons, approximately 1 inch. The original shows rather larger buttons as part of the styling.

Tension

Original states 32st to an inch over diagonal rib on No 9 needles.

Size matters

No size given originally - knitted example measured 36-38 inches. My version is knitted with fewer rows than stated in the original pattern (my deviations noted in red); this is - as intended - to keep the cardigan waist length like the original, but with longer sleeves. The result is a good fit for me (a chubby UK size 12), shaped to be fitted around the bust, under the arms, and into the waist, but with a good degree of ease.

See the section on sizing.

A word on the wool.

Rowan Bamboo Soft, is a light weight DK which knits to a tension of 25sts and 30 rows to 4 inches; 102m/112yds to 50g.
This is a dense yarn, and thicker than the vintage yarn, so requires a lot more yarn than specified in the original pattern.

Disclaimer
(well...almost)

In transposing any pattern it is always a risk that errors will be introduced, in spite of dedicated proof reading.
If you have any problems with this pattern, please and I will try and assist.


Sizing and yarn choices

The original pattern seems to be intended as a neat fitting jacket in a fine yarn, knitted on larger needles.

I calculated the chest size (one size only given) as working out to only 28 inches, which even for the era seemed a bit small, so I felt confident in moving to a thicker yarn, based on the needle size. What I had failed to take into account, is that when you drop the stitches between the cable, the chest size expands a lot. Purely guessing I would say the original size using fine yarn was intended for a 33 to 35 inch bust.

The design of the cables and ladders, means that the cardigan is in fact self-shaping. In my version, the measurement for the back just above the welt is about 16 inches, and this increases to about 18 inches by the time you get to armholes. This gives you a nominal 36-38 inch bust size as the fronts are slightly larger and you can choose, within limits, to have fewer or more rows of crochet to form the front closure bands.

To increase the length of the cardigan, you can follow the areas marked in red where I have altered the rows. Preferably stick with adding or subtracting in chunks of 8 for simplicity.

To make tweaks to the bust size you can add in crochet rows at the front. To make a significant alteration is slightly more difficult; in order to keep the symmetry of the cables you really need to add in two cables on the back and one each on the front, which would make a difference of 36 sts, and in the yarn I used this would be about 5½ inches.
But please note: This cardigan fits me well, and still looks as shown in the pictures; however the bamboo yarn has eased considerably with wear - I now think I could easily have removed an even 4 cable patterns (5½ inches) and still have a nicely fitting cardigan.

Finally, you can of course make overall size changes by using substitute yarns of other weights. This design is pretty tolerant of such changes, as I discovered, but you risk ending up with a different look - anything from the tiny figure-hugging waist length jacket of the original to a longer altogether looser cardigan style. If you are up to it, you can of course check your tension and work it all out beforehand, but remember the effect of the ladders is to much increase the finished size above that implied by the tension.

Here is a popup of the original picture for comparison with my version:


April 2008

Woolly Hats for Sailors

ThreeHats.jpg

This wasn't my intended pattern for April, but I received a leaflet through the post telling me about the Sailors' Society [**please see footnote at the end], who are launching their woolly hat campaign for 2008. The campaign's aim is to provide seafarers arriving in the UK, (from foreign climates and thus ill-prepared for our weather), with hand-knitted hats to keep warm. Also worth noting is that these sailors often spend many months at sea in harsh conditions, sometimes not even speaking the same language as their colleagues, and these gifts can give a feeling of belonging and overcome feelings of isolation.

Last year's Woolly Hat Campaign saw over 15,000 hats distributed to seafarers throughout the UK and to Russia, Antwerp and South America, with over 6,000 given as part of Christmas packages.
If this inspires you, here are some patterns.

If you don't like any of these three hat patterns I have given for this month, the Yarn Harlot has an excellent free pattern for a "seriously quick hat".

** Please note that the Sailors Society does seem to be a religious organisation, which I mention not through any disapproval on my part, but in case you would care to look at their website and ensure its aims do not go against anything you believe in.

Fisherman’s Rib Hat

FishermanHat.jpg

This is my favourite hat of the three this month. It's simple, warm, comfortable, and looks like a serious seafarer's hat! Even though I don't like knitting rib that much, and Fisherman's rib means you have to put in a lot more knitting to get the length you need.... it was nonetheless very satisfying.

Instructions

With No. 6 (5mm) circular needle cast on 68 stitches, and join into a round, and purl the first round. Place a stitch marker to mark the beginning of the round.
Editor's note: Often when you cast on it tends to be tighter and have less give than the knitting, so with a hat band you need to make an effort to cast on loosely, especially if designed to fold back. Ravelry knitter kellyincville commented that it she would do the cast on and do the first row with a larger needle, which is excellent advice for this hat.
Now work in Fisherman's rib stitch as follows:

1st round: * K1B (knit one below, by knitting into the stitch below the next stitch, and slipping both sts off the needle together); p1. Repeat from * to end of round.
2nd round: * K1; P1B, (Purl one below). Repeat from * to end of round.

These 2 rounds form the pattern. Continue in pattern until work measures 9inches from the beginning, ending with round 2.

Shape Crown as follows, keeping continuity of the pattern:
Editor's note: Ravelry knitter kellyincville noted that when you get to the k1/p1 rib used for these decreases, the ribbing is noticeably tighter than the the fisherman's rib. I regarded this as part of the crown pattern, which is only just visible in the photo, but she points out that you could go up a size on the needles to compensate.

Next round: (K3tog; p1,k1,p1) 11 times; k2tog. [45 sts]
Next 3 rounds: K1, p1, rib to last st, k1. [45 sts]
Next round: (K3tog; p3tog) 7times; k3tog. [15 sts]
Next 3 rounds: K1, p1, rib to last st, k1. [15 sts]
Next round: (K3tog; p3tog) twice; k3tog. [5 sts]
Next round: K1, p1, k1, p1, k1. [5 sts]

Break yarn, thread through remaining sts; draw up and fasten off securely.

Making up:
Sew in all ends, and turn back brim as required.

Changing the hat size, or substituting the wool.

You may want to alter the size (circumference) of your hat, or compensate for a different gauge.

Simply work out how many sts you need to cast on according to your own gauge eg divide the number of sts by 16 and multiply by the number of sts you knit to 4 inches.
To work in Fisherman's rib, you need an even number of stitches.

A word on the wool.

If you work in pure wool you may need more than my stated quantities of yarn. Fisherman's rib is a very yarn-hungry stitch which produces a satisfying elasticated bulky fabric, by effectively knitting the yarn double, (nice and warm!).

Original pattern called for 3 x 50g balls Patons Husky Chunky, which is a pure wool chunky; the blend I used, no doubt, has a better yardage.
Patons Husky Chunky knitted to a tension of 7.5sts and 10 rows to 2 inches.

Materials

Example shown is knitted in 3 x 40g balls of vintage Argyll Ferndale Shetland Chunky (an acrylic and wool blend).

Size 6 (5mm) and circular needle - short length suitable for a hat.

Tension

Approx. 8st to 2 inches on No 6 (5mm) needles.

Size matters

There is a lot of give in the ribbed stitch, making the sizing very flexible.

Disclaimer
(well...almost)

In transposing any pattern it is always a risk that errors will be introduced, in spite of dedicated proof reading.
If you have any problems with this pattern, please and I will try and assist.

Moss and Blackberry Stitch Hat

MossHat.jpg

A 1970s hat using blackberry stitch, with a moss stitch brim. George did not think this was very "manly", but I leave that artistic decision to you, [George has also had experience of "life on the ocean wave" and says that as long as it's warm it will be welcome].

Instructions

With No. 6 (5mm) circular needle cast on 89 stitches, and work in rounds of k1, p1, moss stitch for 3 inches. Increase 7sts evenly across the last row. [96 sts]

Change to No. 4 (6mm) circular needle and work pattern as follows:

[Editor's note: this pattern (blackberry stitch) is worked over groups of 4 sts, and the hat is knitted up from the wrong side throughout.]

1st round: (wrong side) Knit.
2nd round: * P3tog; (k1,p1,k1) into the next st. Repeat from * to end of round.
3rd round: as first
4th round: * (k1,p1,k1) into the next st; p3tog. Repeat from * to end of round.

These 4 rows form the pattern. Continue in pattern until work measures 8½ inches from the beginning, ending with round 4.

Shape Top as follows, keeping continuity of the pattern:

Next round: K1 *k2, k2tog. Repeat from * to last st., k1. [72 sts]
Work 3 pattern rounds 2, 3 and 4.
[Editor's note: You can't keep the pattern bobbles in line with the previous work during the decreasings; just make the bobbles evenly across the rounds as before.]

Next round: *K2tog, k1. Repeat from * to end of round. [48 sts]
Work 3 pattern rounds.
Next round: *K2tog. Repeat from * to end of round. [24 sts]
Work 3 pattern rounds.
Next round: *K2tog. Repeat from * to end of round. [12 sts]
Work 1 round.

Break yarn, thread through remaining sts; draw up and fasten off securely.

Making up:
Sew in all ends.

Changing the hat size, or substituting the wool.

You may want to alter the size (circumference) of your hat, or compensate for a different gauge.

Simply work out how many sts you need to cast on according to your own gauge eg divide the number of sts by 18 and multiply by the number of sts you knit to 4 inches.
To work in moss stitch, you need to use an odd number of sts and work k1,p1 on every round.

Do the same calculation when increasing for the blackberry stitch, taking note that your number of sts needs to be divisible by 4.

Example: I have a gauge of 18 sts to 4 inches on no UK 6 (5mm) needles.
You have a gauge of, say, 15 sts to 4 inches (that is: your wool is thicker than mine).

Cast on 89 sts becomes 89/18*15 = 74, and you cast on 75, as it needs to be an odd number.

Increase evenly to 96 sts becomes 96/18*15 = 80.
For this hat, you need the number of stitches picked up to be divisible by 4, and 80 is exactly divisible by 4 so you are OK.
If not add or subtract a couple of sts until you get a number divisible by 4.

Materials

Example shown is knitted in 2x 50g balls of vintage Richard Poppleton Emmerdale Chunky Tweed (an acrylic and wool blend).

Size 6 (5mm) and size 4 (6mm) circular needles - short length suitable for a hat.

Tension

Approx. 9st to 2 inches on No 6 needles.

Size matters

This hat worked out to about 22 inches head circumference. My estimate is that "to fit an average sized head" means 22/23 inches for a man's size and 20-22 inches for a woman's size.
See "altering the size" below.

A word on the wool.

Original pattern called for Patons Husky Chunky, which was, I think a pure wool chunky, somewhat bulkier than the one I used.
It knitted to a tension of 7.5sts and 10 rows to 2 inches. However, the implied hat size was very large, so I have not altered the original pattern sts according to my gauge, but have allowed the hat to knit up slightly smaller than the original.

Disclaimer
(well...almost)

In transposing any pattern it is always a risk that errors will be introduced, in spite of dedicated proof reading.
If you have any problems with this pattern, please and I will try and assist.


Cable Band Hat

CableBandHat.jpg

This 1970s style hat is constructed by knitting a cabled band and then picking up stitches to knit the rest of the hat - which in this example is ribbed. This version is is not intended to have a turned back brim; if you want one, then you must knit the rib section longer; you will not have to reverse any workings as the rib section is reversible, so could be worn either way out. The single layer construction is very economic on yarn; For my wool/acrylic blend, I used 58g.

Instructions

With No. 5 (5½mm) needles cast on 11 stitches, and work in cable pattern as follows:
[Editor's note: I cast on with waste wool, so I could remove it later and graft the ends of the band together.]

1st row: (wrong side) K3, p6, k2.
2nd row: P2, k6, p1, k2.
Repeat 1st and second rows twice more, then the 1st row again.

8th row: (right side facing) P2, cable 6 (slip the first 3 sts onto a cable needle and leave at the front of the work; k3, then k3 from cable needle); p1, k2.

9th - 14th rows: Repeat 1st and second rows 3 times.

Repeat 1st - 14th rows 8 times more (9 patterns in all) ending with row 13. Graft the sts to the cast-on edge to form a circular band, [or cast off the 11 sts and sew the cast-on to the cast-off edge].

[Editor's note: If you want to alter the size (circumference) of your hat, now is the time to do it. Lengthen or shorten this band to the circumference you want to achieve. See "altering the size" below.]

One edge of the band has a neat "finished" garter st edging and the other has a reverse stocking stitch edge, which you will use to continue knitting the hat in the round.
Change to number 6 (5mm) circular needle and, with right side of work facing, pick up 92 sts evenly around the reverse stocking stitch edge.

Work in rounds of k2, p2 rib for 5 inches (about 28) rows.

Shape Crown as follows:

1st round: *K2tog, p2. Repeat from * to end of round.
2nd round: *K1, p2. Repeat from * to end of round.

Repeat rounds 2 five times more.

8th round: *K1, p2tog. Repeat from * to end of round.
9th round: *slip1, k2tog, pass the slipped st over; p1. Repeat from * to end of round.

Break yarn, thread through remaining sts; draw up and fasten off securely.

Making up:
Sew in all ends.

Changing the hat size, or substituting the wool.

You may want to alter the size (circumference) of your hat, or compensate for a different gauge.

This pattern relies on making an even number of cables around the hat, so to lengthen or shorten the band, you can either add in whole or partial pattern repeats, or, if you feel up to it, you could alter the number of rows in the pattern repeat of the cable.

Test your gauge before you start and work out how many rows you need to make your chosen head circumference size. Start by dividing the number of rows you calculate by 14, and then try some other numbers, eg 12, 16, 13, or 15, until you are close to getting an exact number of patterns. [Note that if you choose to work to an uneven number of rows in the repeat, then you will end up doing your cable operations on purl rows, which is quite feasible, but approach with caution if your are a beginner in this field!]

If the above all sounds hopeless to you, then just knit until the band is the length you require, and just sew the ends of the band together rather than trying to graft it. You could even work the hat on two needles instead of in the round, by picking up the stitches from the band before you sew it up, - and then, when you have finished, you sew a side seam into the hat, including the band.

Finally if you are altering the size, or compensating for a different gauge, you will probably need to pick up a different number of stitches from the band. I usually pick up a number of stitches equal to three quarters of the number of rows I have knitted.
Example: I knitted 9 pattern repeats of 14 rows which equals 126 rows in total. Then 126*3/4 = 94.5.
For this hat, you need the number of stitches picked up to be divisible by 4, and I chose to pick up 92sts. I could equally have chosen 96.

Materials

Example shown is knitted in 2x 50g balls of vintage Richard Poppleton Emmerdale Chunky Tweed (an acrylic and wool blend).

Two size 5 (5½mm) needles and a size 6 (5mm) circular needle - short length suitable for a hat.

Tension

Approx. 9st to 2 inches on No 6 needles.

Size matters

This hat worked out to about 22 inches head circumference. My estimate is that "to fit an average sized head" means 22/23 inches for a man's size and 20-22 inches for a woman's size.
See "altering the size" below.

A word on the wool.

Original pattern called for Patons Double plus, which was a double knitting wool, and the instructions were to knit the yarn double, producing a tension of 7.5sts and 10 rows to 2 inches.
The hat was "unisex" but shown modelled on a woman.
I have compensated for changing the wool, and made the hat slightly larger - my own version is printed here, not the original.
The original instructions were to knit 8 pattern repeats for the band, and to pick up 86 sts for the hat, which was not knitted in the round.

Disclaimer
(well...almost)

In transposing any pattern it is always a risk that errors will be introduced, in spite of dedicated proof reading.
If you have any problems with this pattern, please and I will try and assist.


March 2008

Easter Bunnies - slippers

BunnySlippers.jpg

A charming pattern from Alison for a pair of child's slippers, first knitted for her niece, Nancy.

©Alison Pate 2007

Instructions

Work two slippers the same as follows:

Sole and foot - Cast on 28 sts in white
Knit in stockinette for 4.5 inches ( this is the length of the foot from the back of the heel to start of toes)

At start of toes k1p1 rib for 2 inches

Next row: p2 tog across entire row (14 sts)
Next row: repeat: p2 tog across entire row (7 sts)

Draw thread through remaining stitches and secure, leaving a long thread. Sew up the edges of the ribbed section to form the toe. The seam is centred along the top of the foot and will be covered later by the head.

Heel - Pick up 10 stitches from middle of cast on row, leaving 18sts (9 on each side of the 10 you have picked up). You will pick up and incorporate these 18 sts as you work the back of the heel.

Work 15 rows on these 10 sts in stockinette as follows:

Row 1: K9; pick up the next st of the cast-on row and knit it together with the last st of the row. Turn.
Row 2: P9; pick up the next st of the cast-on row and purl it together with the last st of the row. Turn

Continue in this way for 12 rows in all.

Row 13: Pick up at a st at the beginning and end of the row, knitting the picked up sts with the first and last st of the row respectively.
Row 14: Pick up at a st at the beginning and end of the row, purling the picked up sts with the first and last st of the row respectively.
Row 15: Pick up at a st at the beginning and end of the row, and K2 tog repeated across the row.

Bind off remaining 6 stitches.

In sewing the toe centre seam, and working the heel you have pulled up the sides to form the slipper shape.

[Editor's note: If the 'cuff' of the slipper is loose you can work a row of single crochet around the edge of the slipper and pull in the shape a little. I used the pink for this.].

Head - knit 2 in white.

Cast on 10 sts.
Next row: Knit twice into every stitch [20 sts].
Work in garter stitch (knit every row) for 1.5 inches.
Next row: K2tog across the row [10 sts].
Bind off leaving long tail.

Using spare yarn, embroider a pink nose, and crescent shapes for closed eyes, using the picture as a guide.

Loosely stuff head and use long tail to sew around edge and pull in making a small flat ball.

Ears - knit 4 in white and 4 in pink

Cast on 2 sts.
Next row: Knit twice into every stitch [4 sts].
Work in garter stitch (knit every row) for 1 inch.
Next row: K2tog across the row [2 sts].
K2tog and bind off.

Sew a white to a pink ear using blanket stitch.

Finishing - Sew ears firmly to back of head at jaunty angle.
Sew head to slippers covering the seam on the toe section.

Tail - (optional) make 2 small pompoms and attach to heels of slipper.

Materials

Dishcloth cotton - white and pink (Lily Sugar n'Cream cotton.).
I used just over one ball of white and a scrap of pink.

1 pair 5mm needles. .

Tension

20 sts and 26 rows to 4 inches measured over stocking stitch on 4½mm needles.

Size matters

Fits feet 7" long (age 4 or so).
To adjust the length - knit the plain stockinette section for longer.
To adjust for width cast on more stitches, make sure you increase the heel pick up stitches in proportion.

Disclaimer
(well...almost)

In transposing any pattern it is always a risk that errors will be introduced, in spite of dedicated proof reading.
If you have any problems with this pattern, please and I will try and assist.


February 2008

Mittens for the Forces

Forces_mittens.jpg

These are double layered mittens which have suddenly become popular again (probably more the height of fashion a year or so ago - as well as half a century ago). This pattern is from February 1940. Here the thumb is left free; in some designs of this era, the thumb and forefinger are left free - your "trigger finger " I assume.
"The glove mitts are a sensible idea, ensuring both warmth and freedom of movement. Instructions are given for both men's and women's sizes".
The different sizes are achieved by using different wool weights and needles.

Instructions (both hands alike)

Using No. 14 (2mm) needles cast on 48 stitches, and work in k2, p2 rib in rounds for 2½ inches.

Next row: Knit twice into every stitch.

Now slip every alternate stitch (ie every "made" stitch) on to No 12(11) needles and leave the original 48 sts on the No14 needles on the outside of the work.

[Editor's note: The original instructions expect you to continue to knit on the larger needles, leaving the outer sts on the No 14 needles. I found this very awkward; I thought it would improve as I got further up the glove but it did not.
So I took the trouble, after I had slipped the sts as shown, to thread the outer sts onto waste yarn (slippery yarn, as the Tweed wool is felty), and then when I had finished the inner glove, rethread them back on to the 14 needles.]

Continue on the No 12(11) needles, on the "made" sts, in rounds of plain knitting, and work 2 rows straight.

3rd round: Knit twice into first st, knit to the last st, knit twice into it.
Knit 2 rounds.

6th round: Knit twice into first st, knit to the last 2sts, knit twice into next st, k1.
Knit 2 rounds.

9th round: Knit twice into first st, knit to the last 3sts, knit twice into next st, k2.
Knit 2 rounds.

Continue in this way, increasing on every 3rd row at either side of the thuumb, until there are 66 sts on the needles.

Divide for thumb
Next round: K8; leave next 50 sts a holder (or holders); cast on 4 sts in waste wool and knit them onto the working needle; knit remaining 8 sts of round. [20sts]

Continue on these 20 sts for 22 rounds.
Next round: K2tog all round.
Next round: Knit
Next round: K2tog all round.
Draw thread through remaining sts and fasten off.

Rejoin wool to continue with the main part of the mitten:
remove the waste wool and pick up 4 sts at the base of the thumb, then knit the 50 sts from the holder. [54sts]

Work 18 rounds straight on these 54 sts.

Divide for fingers
Next round (forefinger): K10; leave leave next 38 sts a holder (or holders); cast on 4 sts in waste wool and knit them onto the working needle; knit remaining 6sts of round. [20sts]

Work 3 rounds straight on these 20 sts, then work 4 rounds k1, p1 rib. Cast off loosely in rib.

Next round (middle finger): Remove the waste wool and pick up 4 sts at the base forefinger. Knit first 6 sts from holder; cast on 4 sts in waste wool and knit them onto the working needle; slip the last 6 sts on holder onto a needle and knit them. [20sts]

Complete as for forefinger.

Next round (third finger): Work and complete as for middle finger.

Next round (little finger): Remove the waste wool and pick up 4 sts at the base third finger, and knit the remaining 14 sts from holder. [18sts]

Work as before over these 18 sts.

Over-mitten
Now return to sts left on the No 14 needles at the wrist.
[Editor's note: Or - thread the sts on the spare wool back on to the No 14 needles.]
Join in the wool at the beginning of the round, (base of the thumb), and with No 11 (10) needles, work backwards and forwards in stocking stitch, (one row plain, one row purl), for 5 inches.

Next row (right side facing): K2tog; k21; k2tog; k21; k2tog.
Work 5 rows straight.
7th row: K2tog; knit to centre; k3tog; knit to the last 2 sts; k2tog.

Continue in stocking stitch, decreasing as for 7th row on every 6th row until 37 sts remain.
Work 3 rows straight.
Then decrease in the same way on every row until 9 sts remain.
Cast off.

Making up
Press stocking-stitch portions with a damp cloth. Darn in all ends. Insert zip down side of outer mitten, starting at top and ending with the pull just above the thumb; join the remainder of seam across top of fingers. The edges of the outer mitten should fit nicely round the thumb; finish these with a row of double crochet.

Mit_zips.jpg

Materials

Example shown is knitted in 3 x 25g balls Rowan 4ply Tweed.

Set of 4 each of numbers 14, 12 and 11 (UK size) needles for the smaller size, and 14, 11 and 10 for the larger size.
A number 12 crochet hook.

Two 4-inch zip fasteners.

Tension

Approx. 8st to 1 inch

Rowan 4ply tweed tension: 28st and 40rows to 4 inches (10cm) using No 11 (3mm) needles.

Size matters

To fit size 6¼-7, or 7½-8½ inch hand.

A word on the wool.

Original calls for 2oz 3 ply for girl's size [sic] and 3oz 4ply for man's size.
I have often read that older 3 or 4 ply wools were thicker than 3 or 4 plies of today; I have not really noticed that before in practice - however I think a large man's mitten could be knitted in guernsey 5ply or a light weight DK, like Debbie Bliss Baby Cashmerino.

Disclaimer
(well...almost)

In transposing any pattern it is always a risk that errors will be introduced, in spite of dedicated proof reading.
If you have any problems with this pattern, please and I will try and assist.


Balaclava.jpg
This 'good old Balaclava helmet' was included in the item "More Knitteds for the Forces".
I know - they are nice and warm - and they can be useful on the slopes - but I'm given to understand that beanies are more the thing currently, so I have spared you the details!
Let me know if, (your imagination no doubt fired by the hunk on the left), you want to knit it.

I'm afraid I also have to report that George says these are the silliest mittens he has ever had. Good thing he was not called upon to be in the Home Guard 50 or more years ago, eh?.

February 2008

Chunky Honeycomb Scarf

Honeycomb_scarf2.jpg

"Reversible scarf for the cold days ahead". This is a very pleasing pattern from October 1963, and is a suggestion for "pre-Christmas plans". The pattern is the same on both sides, so great for a scarf, and can be knitted in basically any wool weight; ensure you use needles a couple of sizes larger than normal for whichever weight you choose, and do a proportional calculation on the gauge, so your scarf is not too wide.

Instructions

Cast on 73 stitches.

First row: K1, * p1, k1; repeat from * to end.

Repeat this row for the moss stitch border 8 times more.

10th (increase) row: Moss 8, (increase in the next st, moss 6) 8 times; increase in the next st, moss 8. [82 sts]

Change to pattern rows as follows:

1st row: moss 5, p3, *k6, p6; repeat from * to last 14sts; k6, p3, moss 5.
2nd row: moss 5, k3, *p6, k6; repeat from * to last 14sts; p6, k3, moss 5.
Repeat the last 2 rows 4 times more.

11th row: moss 5; *slip the next 3 sts on to a cable needle to the back of the work; k3, p3 from cable needle; slip the next 3 sts on to a cable needle to the front of the work; p3, then k3 from cable needle; repeat from * to last 5sts; moss 5.
12th row: as first.
13th row: as second.
14th row: as first.
Repeat the 13th and 14th rows 4 times more.

23rd row: moss 5; *slip the next 3 sts on to a cable needle to the front of the work; p3, then k3 from cable needle; slip the next 3 sts on to a cable needle to the back of the work; k3, p3 from cable needle; repeat from * to last 5sts; moss 5.
24th row: as second.

These 24 rows form the pattern. Continue straight until the work measures 46 ins, ending with a 12th or 24th pattern row.

detail

Next (decrease) row: moss 8 *k2tog; (p1, k1) 3 times; p2tog, repeat from * 3 times more; k2tog; (p1, k1) 4 times. [73sts].

Work 9 rows moss stitch over all stitches.
Cast off.

Finishing - Press work very lighty, taking care not to spoil th texture of the patttern. Cut the remainig wool into 7½ inch lengths; take 3 lengths of wool together each time, fold in half, and, with a crochet hook, knot through short ends to make a fringe. Trim fringe.

Substituting the wool - I used a vintage wool, Phildar Brisants. This is a fine double knitting, which is normally knitted on no. 9 (3¾mm) needles. The cabling make for a tighter tension, and the recommended needles (UK No 6) are 2 sizes larger than usual for a DK. I went with no. 8 needles, instead of 9s, but should have gone larger I think.
My scarf measures less than the 12 inches wide of the original; I knitted to the length I wanted.

If you want to use chunkier wool, then decrease the number of sts proportionally. The pattern is worked over 12sts.

Materials

Original call for 9oz of Patons Moorland Double Knitting

Example shown is knitted in Phildar Brisants.

One pair of No. 6 (5mm) needles.

Tension

Equivalent to 20st and 26rows to 4 inches (10cm) measured over stocking stitch.

Size matters

Width: 12 inches
Length: 46 inches

A word on the wool.

This pattern is for double knitting wool, and from memory Moorland DK was slightly heavy-weight.
You can knit a scarf in anything you want - obviously - see "Substituting the wool".

Disclaimer
(well...almost)

In transposing any pattern it is always a risk that errors will be introduced, in spite of dedicated proof reading.
If you have any problems with this pattern, please and I will try and assist.


Honeycomb_scarf.jpg

January 2008

Sleeping socks are so cosy

SleepSocks2.jpg

Three offerings this month: this first pattern from 1968 is very similar in design (and the principle of the stretchy fit) to the second offering, Boudoir Boots; however these socks are knitted in a different (more conventional) orientation. They particularly appeal to me, being very jolly, knitted in stripes, (although, as a general rule, I prefer my socks wide awake...).

Instructions

Make two socks alike.

Main body - With main shade (M) cast on 56 stitches, and arrange across 3 needles (19 on each). Work as follows:

Rib round: k5, * p1, k1; repeat from * to last stitch, p1.

Repeat this round 10 times more.

**
Round 12: purl to end.
Round 13: k5, purl to end.
Round 14: purl to end.
Round 15: k5; join in contrast colour (C) and knit to the end of the round: turn. [Editor's note: in other words, knit a short round].
Round 16: continuing with C, purl to the last 5sts; turn.
Do not break C, but pick up M.
Row 17: using M knit the C sts of the previous round to end.
**

Repeat from ** to ** 13 times more, and then work the 12th, 13th and 14th pattern rows again

Break C.

Work the toe - Continuing in M only, re-arrange the sts over the 3 double pointed needles as follows:
Toe foundation round - needle one: k1, k2tog, k14. [16 sts]
Toe foundation round - needle two: k the last 2 sts from the first needle, then k19 from the second needle, then k7 from the third needle. [28sts]
Toe foundation round - needle three: k the last 12sts from the third needle [12sts].

You now have 56 sts in the round.
Knit 3 rounds. Begin decreasing for the toe:

Next round: knit to the last 3 sts on the first needle, sl1, k1, psso, k1. Beginning the second needle, k1, k2tog, knit to the last 3 sts on the second needle, sl1, k1, psso, k1. Beginning the third needle, k1, k2tog, knit to end of round, [52 sts].
Next round: knit.

Continue to decrease on every alternate round in this way until 24 sts remain. [8 on the first needle, 12 on the second needle, 4 on the third needle].
Knit the first 8sts from the first needle so that the wool is at the decrease edge of the toe. Do not cast off, but break off wool leaving a tail long enough for grafting (sewing up).

Making up - slip the last 4sts of the round on to the first needle and graft the two sets of 12 sts together to make the toe.
Darn in the ends.

SleepSocks1.jpg

Materials

Original pattern calls for a total of 2 (1oz) balls of 4ply - 1 ball in each colour.

One set of 4 double pointed No 11 needles.

Tension

30st and 38 rows to 4 inches (10cm).

Size matters

One size fits all.

A word on the wool.

Original knitted in Patons 101 Courtelle Crepe in "Venus blue" and "Starlight white".

Example knitted in Phildar Lambswool (51% wool, 49% acrylic), colours rouge and melon.

Tutorial on grafting or Kitchener Stitch.

Boudoir Bedroom Boots

Boudoir_boots.jpg

Second pattern this month from an "Oddments" leaflet for "using up old Scraps of Wool", dating anywhere between the 1930s and the 1950s. Described originally as Lady's Bedsocks*, I hope they will prove to be the perfect partner for Boudoir Bedjacket.

*One of the other patterns was called "Bedroom Boots" and I couldn't resist the alliteration; however, this pattern described here makes footwear that is much more elegant than either "bedsocks" or "boots" implies. They look at their best when on the feet, (as opposed to just after you have knitted them, when they look like a pair of unattractive caterpillars). It is hard for me to date the design, as many patterns were reproduced out of their true era; possibly an expert on publishing could be more accurate.

Instructions

Each sock is worked in one piece. Make two alike.

Commence at the front edge. Using No. 12 needles, cast on 64 stitches, and work 6 rows in k1, p1 rib.
Change to No. 6 needles.

**
Row 1: (right side) Knit twice into every stitch. [128 sts].
Row 2: Sl.1, purl to the last st, k1.
Work 4 rows in stocking stitch (k 1 row, p 1 row).
Row 7: *K2tog; repeat from * to end of row. [64 sts].
Work 5 rows in k1, p1 rib. **
This completes a 12 row pattern.
Repeat from ** to ** twice and then from ** until you have completed the 7th pattern row.

Change to No. 12 needles. Work 6 rows in k1, p1 rib.
Cast off loosely in rib.

Making up - Press each piece lightly on the wrong side under a damp cloth with a hot iron.
Join the cast on and cast off edges together, then continue the seam, stitching up one end for the toe.

Crochet edging - Using the main colour, work a picot edge all around the top of each of the socks, as follows:

One slip st to secure the yarn to the top front edge.
*3ch, 1dc into the first of these chain, miss 1 st, 1 slip st into the next st. Repeat from * around each top.

Embroidery
Using the contrasting wool, work pairs of chain stitches, (or a kind of "lazy daisy" stitch) in a "V" shape down each front seam.
[Editor's note: The link above is to Sharon Boggon's lovely site "In a minute Ago". She is an artist who is interested in the connections between textiles and digital technology, and has created a wonderful site, full of interesting information (and a blog!)]

Materials

Original pattern calls for 2oz of 4ply, and a small quantity of contrast for embroidery.
Example shown is knitted in 2 x 50g balls of Debbie Bliss Baby Cashmerino, in colour 007.

One pair each of number 12, an No 6 needles.

Tension

20st to 4 inches (10cm) on No 6 (5mm) needles.

Size matters

One size fits all.

A word on the wool.

Baby Cashmerino is heavier than a 4ply, knitting to a tension of 25st and 34 rows to 4 inches. Thus I used more yarn than the original pattern. Each 50g is 125m, and I used 90g.

Boudoir_boots2.jpg

As a variation (or to "use up old scraps of wool") you might choose to make the picot edging in the contrast colour to match the embroidery - I believe this would work better if the contrast were darker than the main colour.
Alternatively, if you are not confident in your embroidery skills (I found it harder than I had imagined) you could stick with a single colour and embroider in the main yarn; this provides a more sophisticated look - if indeed a bedsock can be said in any way to contribute to a sophisticated look!

Feather-light Boudoir Slippers - from only one ounce of wool

Third and final pattern is totally untested, from a magazine dated November 1968 [ "Ideas for Gifts"]. They really are called "boudoir slippers" which, apart from any other consideration, makes me feel that the pattern dates from longer ago than 1968. As a teenager, I would have found these indescribably awful; however, luckily, I did not have relatives who were handy with the old needles.
Likely to remain untested as a girl can have only so many bedsocks.
[Should any readers admit to making this pattern, please submit a photo of the result for me to display here!]

Instructions

Each sock is worked in one piece. Make two alike.

Cast on 76 stitches, and work as follows:

Row 1: k3, * p2, k2; repeat from * to last stitch, k1.
Row 2: k1, * p2, k2; repeat from * to last 3 stitches, p2, k1.

Repeat these rows for 6½ inches.
Cast off loosely in rib.

Change to No. 12 needles. Work 6 rows in k1, p1 rib.
Cast off loosely in rib.

Making up - Fold cast-on edge to cast-off edge and join side seams. (Seams form heel and toe).

Crochet edging - Starting at the heel, crochet eyelets all around the edge as follows: - 3ch, * 1dc in next stitch, 1ch, miss next st; repeat from * all round. Join with slip stitch to 3ch at the beginning.

Then work a row of picots thus: - * 3ch, 1 slip st into the first of these chain, 1 slip st into the 1ch space of the previous round; repeat from * all round. Fasten off

With wool double, crochet a chain cord for each sock and thread through holes; make and sew a small tassel to each end.

Materials

Original pattern calls for 1 (1oz) ball of Patons Beehive Baby Wool in 3ply.

One pair of number 11 needles.
Crochet hook

Tension

32st and 40 rows to 4 inches (10cm).

Size matters

One size fits all.

A word on the wool.

It is fairly easy to acquire 3ply Baby wool to knit up to this tension.

© Christina Coutts 2007

Helpful Stuff

Pattern Archive

Categories

Yarn Links

Fabric etc

Stuff to do

  • Little rabbits
  • V&A 1940s Patterns
  • Monkey Socks
  • Necktie Bag
  • Posh Gloves
  • Criss-cross coasters